
|
Register or Log In To remove these advertisements. |
|
|
|
|||||||
 |
|
|
Thread Tools | Display Modes |
 05-07-2010, 05:39 PM
|
#1 |
|
Senior Enthusiast
Join Date: Feb 2007
Location: Spokane Valley, WA
Posts: 8,356
|
60-63 Spotlight Installation
For those with an interest in adding a Unity spotlight to a 60-63 series truck, following is what I recently learned going through the process.
The first task was accurately producing the template from the image that is currently circulating. On my computer, printing in landscape mode at 83% of full size produced a template that perfectly aligned the mounting screw holes in the template to the special 141 LH outside bracket. This resulted in a template measuring exactly 7 3/8” inches long from tip to tip. In mocking up the location of the outside bracket, it immediately became apparent the template and the 988090 instruction sheet conflict on placement. As shown below, the instruction sheet places the bracket almost dead center between the rear edge of the fender extension and the rear edge of the hinge pillar.  The template moves the bracket forward about ½” from the centered location.     In addition to the visual difference, the bracket didn’t fit well in the template location and rocked back and forth diagonally. Moving it ½” to the rear and down just a tad, it perfectly matched the contours of the body. It just didn’t seem prudent to tighten down a very rare pot metal casting on an uneven surface. Over a period of several days I kept coming back and mocking up the bracket in various locations, and calculating the angle where the shaft would enter the interior of the truck. Each time the centered location fit best and matched the instruction sheet location on the outside, and also where the shaft entered the interior of the cab. After a proper amount of anguish I decided to follow my instincts and the instruction drawings rather than the template. Per the instructions, using the bracket I marked and center punched the body for the mounting screws. I then drilled the holes starting with a 1/16” bit and finished up with a new 1/8” single flute bit. A gasket was cut to fit from solid rubber stock and the bracket screwed in place. I didn’t have the Unity ½” drill bushing and was not very enthusiastic about trying to cram a ½” drill bit through an angled piece of sheet metal held in position by a precious piece of pot metal. As an alternate plan my son machined up three drill bushings from Oilite bronze. Each bushing has an outside diameter of .690 with inside diameters of ¼”, 3/8”, and ½”. With the ¼” bushing held in place with the bracket set screw, I used a ¼” transfer punch to mark the body.  I then drilled the body with an 8”long ¼” bit.  This was followed by the 3/8” and ½” bits. When I got to the 3/8” bit, I realized why the template moved the bracket forward. There is an errant piece of sheet metal between the outer body and the inner skin, about 3/4” into the body cavity. It’s a non functional flap of metal with about a 45 degree downhill angle from the upper rear to the lower front. It barely interferes, just enough to catch the edge of the bit making it a pita to drill through to the inner body using the spotlight bracket to hold the alignment. To avoid damaging the bracket, it was removed and the interfering lip was ground away using a rotary file. Once that was out of the way final drilling was completed without further incident. The edges of the holes were cleaned up and painted and the spotlight installed. Here it is in the upright and parked positions.   I'm going to speculate the bracket itself was originally designed to go where I installed it. The instruction drawings show it being mounted there, and it best fits the body profile in this location. In the instruction line drawing, the template appears shorter, even considering the perspective angle. Perhaps an earlier version of the template was shorter, and subsequent installation complaints resulted in a revised template moving the bracket forward to clear the inner obstruction. Moving it forward ½” will indeed clear the obstruction. If I knew about the internal obstruction ahead of time, I might have gone with the template layout. It would have been less work, but I never could get past the concern of distorting or breaking the bracket because it didn’t fit correctly. As soon as I can obtain a new old stock or mint original right hand outside bracket the passenger side will get a matching light (any leads appreciated). I’ll go through the grief again with the inner panel and put it in the same spot so both sides match. I didn’t have the special 8205 LH inner bracket, and don’t really want one. On a restored truck it would be a rare and desirable feature. With all the other changes in my interior it seemed to me the truck bracket would look a bit too industrial, so I opted for the standard rubber angle spacer and locking collar. I wanted to improve on the appearance of the factory clamp, so my son fabricated a new one from polished aluminum. Comparing this photo to the installation instructions shows the location where it enters the cab appears identical. Here’s a shot of the interior mounting. It's hard to get a decent photo because the handle is so shiny:  The spotlight I obtained still retained the factory wiring and electrical terminal in excellent condition. As seen in the photo above, per the instruction sheet, I drilled a 5/16" hole 3/4" down from the bottom of the handle hole. After several failed attempts to thread the wire under the dash, inspection with a mirror revealed the only path through is a gap at the very top of the dash. I stripped the piano wire out of an old choke cable, bent a very small 90 degree end on it, and crimped on a male electrical terminal that fit the female spotlight terminal. I joined the connectors, and after about 5 minutes managed to feed the piano wire through the gap. After pulling all the slack, the original wire ended up about 6-8 inches from the fuse panel. Terminal 26 on the Ron Francis fuse panel was empty, to be used for an electric clock. A quick jumper connected everything, and I switched out the fuse from 10 amps to 15 amps. That’s about it. The figuring took a lot longer than the actual installation. For anyone considering this, just take your time and don’t put undue stress on the external bracket during the drilling process. It would also be helpful to tape a paper towel over the door seam under the bracket, along with covering the upper front portion of the door. The drilling generates a lot of filings. I used a shop vacuum held above the surface to remove them, but it would have been nicer to not have filings resting on the paint in the first place. **************************************************** Edit - and here are the vehicle code links for California and Washington state, pertaining to owning and using vehicle mounted spotlights: California: http://www.dmv.ca.gov/pubs/vctop/d12/vc24404.htm Washington: http://apps.leg.wa.gov/RCW/default.aspx?cite=46.37.180 **************************************************** Edit 6/24/2010 - here is a thread for those interested in how to repair a Unity spotlight: http://67-72chevytrucks.com/vboard/s...d.php?t=403869 **************************************************** Edit 6/24/2010 – Passenger side bracket and inside bracket information. Here is a bit of confirming information for anyone looking to install both left and right hand spotlights on their 60-63 Chevy or GMC truck. Although the inner and outer brackets are shown in the early installation diagrams, no part numbers are specified. The left hand outside bracket is confirmed as part # 141. Inside the casting displays the markings 141 and Autolite, long associated with Ford. Unfortunately I failed to photograph the back of the bracket. The passenger/right side bracket is part #141R, and the back of the casting is marked 141-R and TEACO. I have been unable to find anything about Teaco or their association with Unity. Here are views of the front and back of the passenger side bracket. It does have a few cosmetic nicks and scratches after kicking around the Unity factory for 4 or 5 decades:   And here is the bracket installed:  Oddly, the Unity records list the 141R bracket as being designed for the 1966 Ford Bronco. Assuming the bracket truly was designed by Ford, prior to GM using it in 1960, I assume it must have been for some 1940’s - 50’s Ford product. Research to discover the true origin of the bracket has so far proven unsuccessful. Unity lists no application other than the Bronco. Here is a photo reduction of the 1966 Bronco template they sent.   The inside brackets are 8205 (driver side) and 8206RH (passenger side). After a lengthy delay in shipping I was in such a hurry to get them installed, I again forgot to photograph the backside for markings. I didn’t notice any, but don’t remember specifically looking either. Unity part numbers noted are as listed on the invoice. Here is what they look like installed, providing a very strong installation along with a clean custom appearance. There is a set screw directly underneath each bracket to lock the outer tube in place.   Unity no longer has stock of the 141R bracket, and will not produce any more. Kanter Auto Products also does not have this bracket, although Accessoryland does have one or two at the time this is written, and perhaps another set of inside brackets. http://www.dandrfoods.com/accessorylandparts/unity.htm
__________________
My Build Thread: http://67-72chevytrucks.com/vboard/s...d.php?t=444502 Last edited by markeb01; 01-06-2013 at 11:55 PM. |

|

|
|
05-07-2010, 06:49 PM
|
#2 |
|
Registered User
Join Date: Aug 2009
Location: Unionville Mo.
Posts: 217
|
Re: 60-63 Spotlight Installation
Great write up!
Also good to see transfer punches used- they can make life easy. David |
|
|
|
|
05-07-2010, 07:31 PM
|
#3 |
|
Check The Champ, Demonstrator
 Join Date: Jun 2009
Location: Montreal,Quebec
Posts: 6,625
|
Re: 60-63 Spotlight Installation
Thank you markeb01.
The bracket in his picture is the GM outer bracket #141L cast by Autolite. This is a picture of the GM inner bracket #8205L cast by Autolite. Thank's to member ( creep ) for the picture. Take note of the stubbier interior control handle for GM Factory/Dealer installed spotlights as compared to the standard handle from Unity.  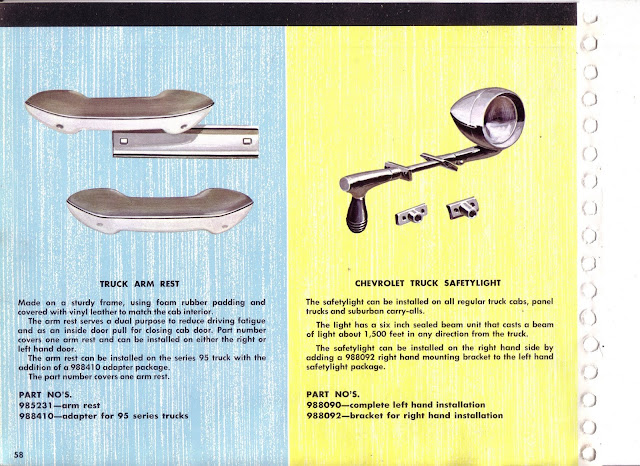 Full instructions from "1963 Chevrolet Custom Accessories Installation Manual" The spotlight is model CH for Chevrolet. Has ribs cast into the head. The spotlight for GMC is the S-6 225 smooth head.   
__________________
1963 Chevrolet Truck Literature LINK: https://picasaweb.google.com/113840717762774560215 YouTube Channel with 20+ Original Chevrolet Truck Salesmen, Mechanics & Service Department Training Slideshows. https://www.youtube.com/results?sear...otruk63&page=1 Last edited by aerotruk63; 05-07-2010 at 07:57 PM. |
|
|
|
|
05-07-2010, 07:44 PM
|
#4 |
|
Check The Champ, Demonstrator
Join Date: Jun 2009
Location: Montreal,Quebec
Posts: 6,625
|
Re: 60-63 Spotlight Installation
Unity offered their own, non GM factory, bracket. Kit #31.
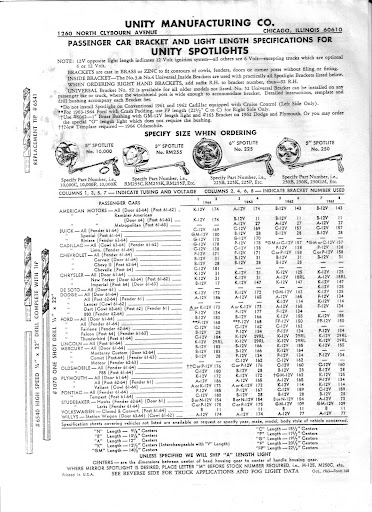 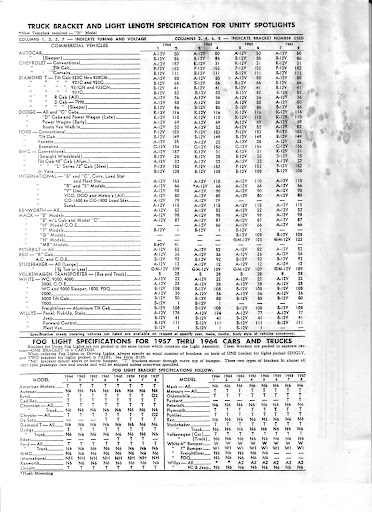   Instructions by Unity 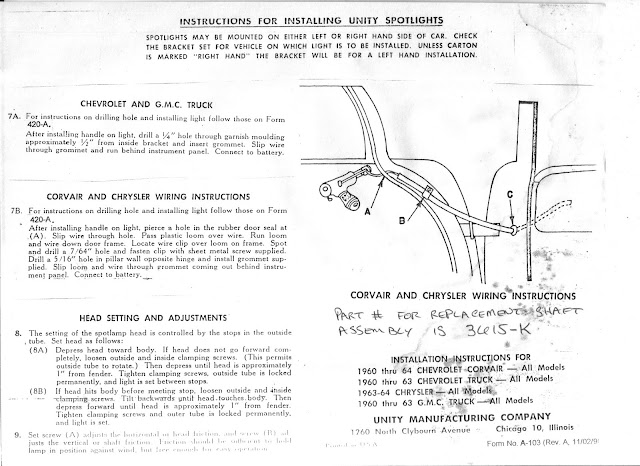 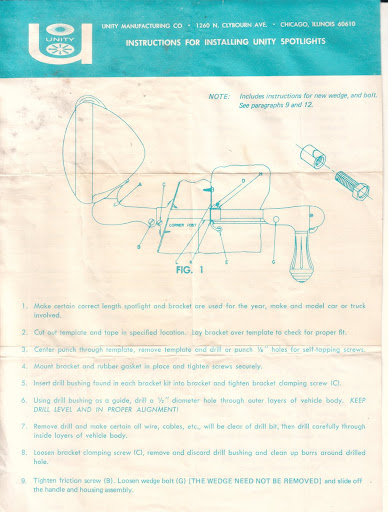 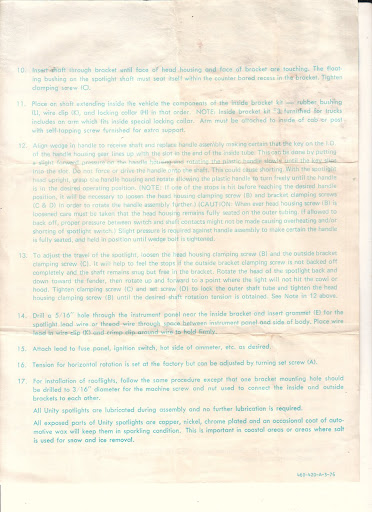 Notice the difference in the templates. First the Unity template. Second, the GM dealer template 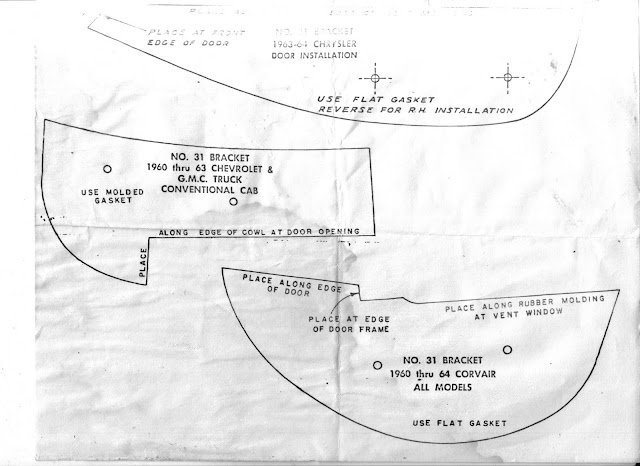     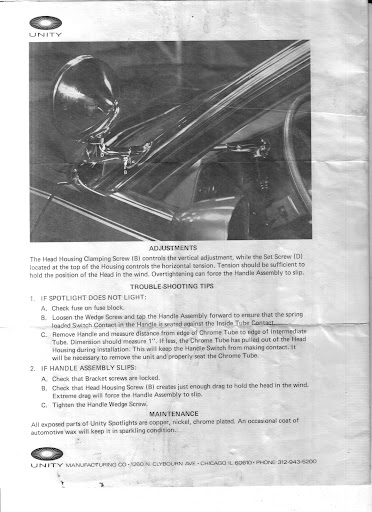
__________________
1963 Chevrolet Truck Literature LINK: https://picasaweb.google.com/113840717762774560215 YouTube Channel with 20+ Original Chevrolet Truck Salesmen, Mechanics & Service Department Training Slideshows. https://www.youtube.com/results?sear...otruk63&page=1 Last edited by aerotruk63; 05-07-2010 at 07:59 PM. |
|
|
|
|
05-07-2010, 07:47 PM
|
#5 |
|
Check The Champ, Demonstrator
Join Date: Jun 2009
Location: Montreal,Quebec
Posts: 6,625
|
Re: 60-63 Spotlight Installation
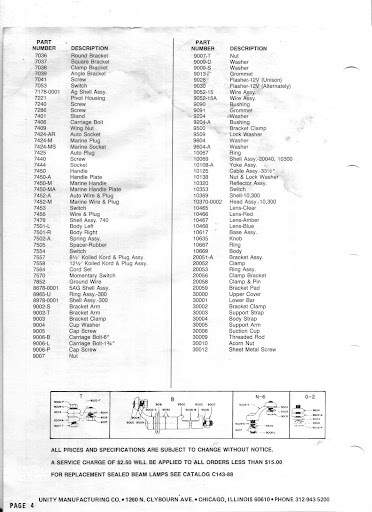
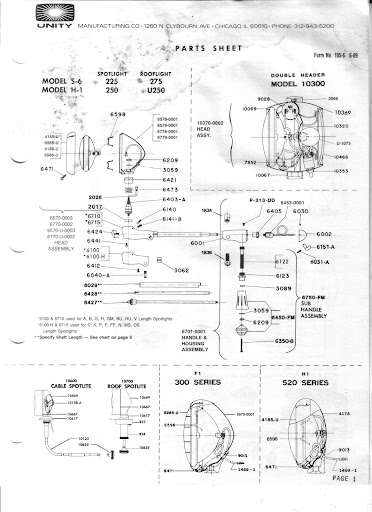
Parts exploded view.
__________________
1963 Chevrolet Truck Literature LINK: https://picasaweb.google.com/113840717762774560215 YouTube Channel with 20+ Original Chevrolet Truck Salesmen, Mechanics & Service Department Training Slideshows. https://www.youtube.com/results?sear...otruk63&page=1 Last edited by aerotruk63; 05-07-2010 at 07:58 PM. |
|
|
|
|
05-07-2010, 07:56 PM
|
#6 |
|
Senior Enthusiast
Join Date: Feb 2007
Location: Spokane Valley, WA
Posts: 8,356
|
Re: 60-63 Spotlight Installation
Thanks Aerotruk, you are definitely the man when it comes to spotlight information.
__________________
My Build Thread: http://67-72chevytrucks.com/vboard/s...d.php?t=444502 |
|
|
|
|
05-07-2010, 08:16 PM
|
#7 |
|
Check The Champ, Demonstrator
Join Date: Jun 2009
Location: Montreal,Quebec
Posts: 6,625
|
Re: 60-63 Spotlight Installation
What I like about this site is all the contributors to so many subjects. I learn off this site every time I come on. I especially like contributors like you who realize that we visualize better than we sometimes are able to read or explain. Someday soon, I'll be drilling my two trucks and have gained by this thread, the confidence to so. Thank's again. Norm
__________________
1963 Chevrolet Truck Literature LINK: https://picasaweb.google.com/113840717762774560215 YouTube Channel with 20+ Original Chevrolet Truck Salesmen, Mechanics & Service Department Training Slideshows. https://www.youtube.com/results?sear...otruk63&page=1 |
|
|
|
|
05-07-2010, 08:28 PM
|
#8 |
|
Nothing to see here.....
Join Date: Jun 2007
Location: Shawnee, KS
Posts: 4,625
|
Re: 60-63 Spotlight Installation
Unity still has any spare or repair part you'll ever need and everything is still made in the States as well. I rebuilt several over the years.
great info!
__________________
Doug  THANK YOU to our American Soldiers & Veterans - POW MIA "You will NEVER be forgotten". THANK YOU to our American Soldiers & Veterans - POW MIA "You will NEVER be forgotten". The democracy will cease to exist when you take away from those who are willing to work and give to those who would not. Thomas Jefferson |
|
|
|
|
07-01-2010, 03:06 PM
|
#9 |
|
Check The Champ, Demonstrator
Join Date: Jun 2009
Location: Montreal,Quebec
Posts: 6,625
|
Re: 60-63 Spotlight Installation
Unity bracket #31R and #31L pictured below, bottom matching pair. Correct for 60-63 Chevrolet/ GMC from Unity, not factory/dealer. Dealer could have purchased the kit from Unity outside of GM & installed. Bob from Accessoryland said these were a universal bracket, so they must of had several applications. My 64 GMC firetruck had them mounted above the roof drip rail, inline with the windshield pillar.
The triangular bracket center in photo below is 187R. 64-66 application. It mounts at the base of the windshield pillar crease, almost at the cowl. 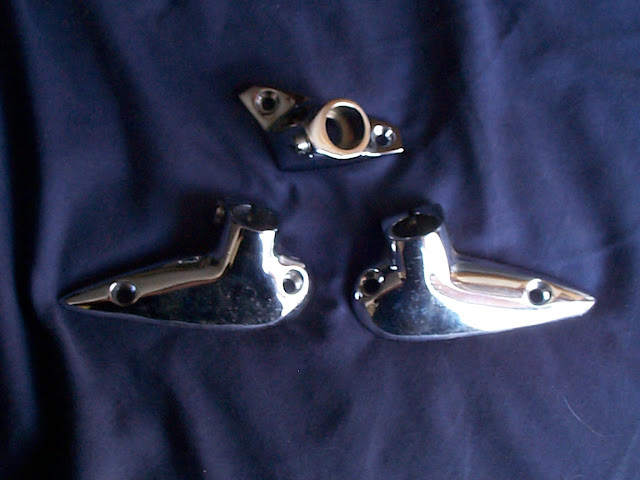 
__________________
1963 Chevrolet Truck Literature LINK: https://picasaweb.google.com/113840717762774560215 YouTube Channel with 20+ Original Chevrolet Truck Salesmen, Mechanics & Service Department Training Slideshows. https://www.youtube.com/results?sear...otruk63&page=1 Last edited by aerotruk63; 07-01-2010 at 05:04 PM. |
|
|
|
|
07-31-2010, 09:21 PM
|
#10 |
|
Check The Champ, Demonstrator
Join Date: Jun 2009
Location: Montreal,Quebec
Posts: 6,625
|
Re: 60-63 Spotlight Installation
Update: If you find bracket#31, make sure there's a thick tapered rubber gasket in the box. It is necessary for the installation on 60-63 cabs. Unity no longer lists #31 for the truck application as they do not make the tapered gasket anymore.
__________________
1963 Chevrolet Truck Literature LINK: https://picasaweb.google.com/113840717762774560215 YouTube Channel with 20+ Original Chevrolet Truck Salesmen, Mechanics & Service Department Training Slideshows. https://www.youtube.com/results?sear...otruk63&page=1 |
|
|
|
|
08-01-2010, 04:26 PM
|
#11 |
|
Senior Enthusiast
Join Date: Feb 2007
Location: Spokane Valley, WA
Posts: 8,356
|
Re: 60-63 Spotlight Installation
Interestingly, the #31 & 31RH looked exactly like the brackets on my 54 Chevy sedan back in the 70's, so I checked and they are the same part number. On the sedan they went through the doors however, which is not a great arrangement. Slamming the doors has a tendency to jar the spotlight head, which damages the parking nub in the handle over time.
Knowing what else this part was used on might prove helpful in finding additional number 31 brackets. This would have been used from 1949-1954, and probably on Pontiacs as well. Here's how they looked on the sedan:  
|
|
|
|
|
08-01-2010, 04:33 PM
|
#12 |
|
Check The Champ, Demonstrator
Join Date: Jun 2009
Location: Montreal,Quebec
Posts: 6,625
|
Re: 60-63 Spotlight Installation
Unity Bracket Kit #31 fits....
Buick 1953 50-70 series post ----- ----- 225gm-u-i 250gm-u-i ----- 31 31rh buick 1953 estate wagon door ----- ----- 125a-4535-u-i 50a-4515-u-i ----- 31 31rh buick 1954 50-70 series post ----- ----- 225gm-u-i 250gm-u-i ----- 31 31rh cadillac 1953 all models post ----- ----- 225gm-u-i 250gm-u-i ----- 31 31rh chevrolet 1949 regular & hard top convertible door ----- ----- 125a-4535-u-i 50a-4515-u-i ----- 31 31rh chevrolet 1950 regular & hard top convertible door ----- ----- 125a-4535-u-i 50a-4515-u-i ----- 31 31rh chevrolet 1951 regular & hard top convertible door ----- ----- 125a-4535-u-i 50a-4515-u-i ----- 31 31rh chevrolet 1952 regular & hard top convertible door ----- ----- 125a-4535-u-i 50a-4515-u-i ----- 31 31rh chevrolet 1953 all models except station wagon door ----- ----- 125a-4535-u-i 50a-4515-u-i ----- 31 31rh chevrolet 1953 all models except station wagon door ----- ----- 125a-4535-u-i 50a-4515-u-i ----- 31 31rh chevrolet 1954 all models except station wagon door ----- ----- 125a-4535-u-i 50a-4515-u-i ----- 31 31rh chevrolet 1960 all models cowl ----- ----- 225k-u-i 250k-u-i ----- 31 31rh chevrolet 1960 corvair car door ----- ----- 225b-u-i 250b-u-i ----- 31 31rh chevrolet 1961 corvair car door ----- ----- 225b-u-i 250b-u-i ----- 31 31rh chevrolet 1962 corvair car door ----- ----- 225b-u-i 250b-u-i ----- 31 31rh chevrolet 1963 corvair car door ----- ----- 225b-u-i 250b-u-i ----- 31 31rh chevrolet 1964 corvair car door ----- ----- 225b-u-i 250b-u-i ----- 31 31rh chrysler 1953 all models except estate wagon door ----- ----- 125a-4535-u-i 50a-4515-u-i ----- 31 31rh chrysler 1953 c60-2/ c56-1-2 cv cpe/ sp cl cpe door ----- ----- 125a-4535-u-i 50a-4515-u-i ----- 31 31rh chrysler 1954 all models except estate wagon door ----- ----- 125a-4535-u-i 50a-4515-u-i ----- 31 31rh chrysler 1963 all models door ----- ----- 225k-u-i 250k-u-i ----- 31 31rh chrysler 1964 all models door ----- ----- 225k-u-i 250k-u-i ----- 31 31rh de soto 1953 all models except estate wagon door ----- ----- 125a-4535-u-i 50a-4515-u-i ----- 31 31rh de soto 1953 de soto door ----- ----- 125a-4535-u-i 50a-4515-u-i ----- 31 31rh de soto 1953 s16/ s18 door ----- ----- 125a-4535-u-i 50a-4515-u-i ----- 31 31rh de soto 1954 all models except estate wagon door ----- ----- 125a-4535-u-i 50a-4515-u-i ----- 31 31rh de soto 1954 closed cars door ----- ----- 125a-4535-u-i 50a-4515-u-i ----- 31 31rh de soto 1954 convertible & hard top door ----- ----- 125a-4535-u-i 50a-4515-u-i ----- 31 31rh hudson 1952 all except jet door ----- ----- 125v-4535-u-i 50v-4515-u-i ----- 31 31rh hudson 1953 all except jet door ----- ----- 125v-4535-u-i 50v-4515-u-i ----- 31 31rh hudson 1954 all except jet door ----- ----- 125v-4535-u-i 50v-4515-u-i ----- 31 31rh oldsmobile 1949 small reg. & hardtop convertible door ----- ----- 125a-4535-u-i 50a-4515-u-i ----- 31 31rh oldsmobile 1950 small reg. & hardtop convertible door ----- ----- 125a-4535-u-i 50a-4515-u-i ----- 31 31rh oldsmobile 1951 small reg. & hardtop convertible door ----- ----- 125a-4535-u-i 50a-4515-u-i ----- 31 31rh oldsmobile 1953 90, 98 all post ----- ----- 225a-u-i 250a-u-i ----- 31 31rh pontiac 1949 regular & hardtop convertibles door ----- ----- 125a-4535-u-i 50a-4515-u-i ----- 31 31rh pontiac 1950 regular & hardtop convertibles door ----- ----- 125a-4535-u-i 50a-4515-u-i ----- 31 31rh pontiac 1951 regular & hardtop convertibles door ----- ----- 125a-4535-u-i 50a-4515-u-i ----- 31 31rh pontiac 1952 regular & hardtop convertibles door ----- ----- 125a-4535-u-i 50a-4515-u-i ----- 31 31rh pontiac 1953 all models except station wagin door ----- ----- 125a-4535-u-i 50a-4515-u-i ----- 31 31rh pontiac 1953 all models except station wagon door ----- ----- 125a-4535-u-i 50a-4515-u-i ----- 31 31rh pontiac 1954 all models except station wagon door ----- ----- 125a-4535-u-i 50a-4515-u-i ----- 31 31rh
__________________
1963 Chevrolet Truck Literature LINK: https://picasaweb.google.com/113840717762774560215 YouTube Channel with 20+ Original Chevrolet Truck Salesmen, Mechanics & Service Department Training Slideshows. https://www.youtube.com/results?sear...otruk63&page=1 Last edited by aerotruk63; 08-01-2010 at 04:35 PM. |
|
|
|
|
08-23-2011, 04:50 PM
|
#13 | |
|
Registered User
Join Date: Nov 2006
Location: Music City, U.S.A.
Posts: 638
|
Re: 60-63 Spotlight Installation
Quote:
Anyway, I'll throw a couple of pictures of them on here for posterity.    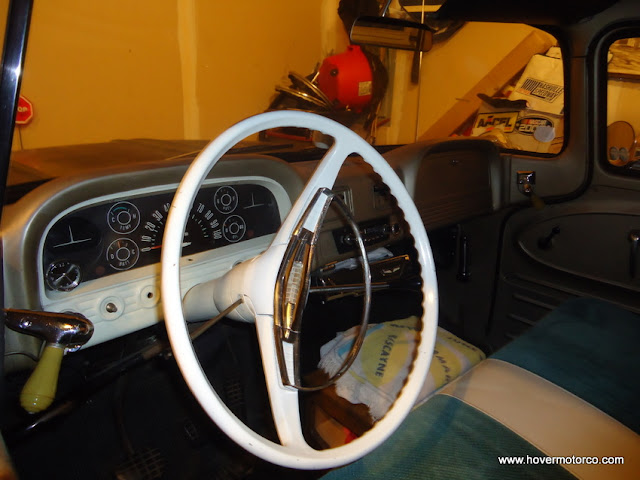
|
|
|
|
|
|
08-23-2011, 07:47 PM
|
#14 |
|
Check The Champ, Demonstrator
Join Date: Jun 2009
Location: Montreal,Quebec
Posts: 6,625
|
Re: 60-63 Spotlight Installation
That looks great, and the towel hanger bracket, ingenuous. Is that a flashlight mouted by the cowl vent?
__________________
1963 Chevrolet Truck Literature LINK: https://picasaweb.google.com/113840717762774560215 YouTube Channel with 20+ Original Chevrolet Truck Salesmen, Mechanics & Service Department Training Slideshows. https://www.youtube.com/results?sear...otruk63&page=1 |
|
|
|
|
08-23-2011, 09:31 PM
|
#15 |
|
Registered User
Join Date: Apr 2004
Location: arkieland
Posts: 1,070
|
Re: 60-63 Spotlight Installation
I have a nice Unity I bought for my 64, but cannot drill that hole. What about the light rubbing the paint off when not used, or will it stay just off the cowl surface? I don't think I have ever seen one that was properly installed (like Mark did it) around here...they always seem to rub off the paint.
|
|
|
|
|
08-23-2011, 09:36 PM
|
#16 | |
|
Registered User
Join Date: Nov 2006
Location: Music City, U.S.A.
Posts: 638
|
Re: 60-63 Spotlight Installation
Quote:
|
|
|
|
|
|
08-23-2011, 09:40 PM
|
#17 | |
|
Registered User
Join Date: Nov 2006
Location: Music City, U.S.A.
Posts: 638
|
Re: 60-63 Spotlight Installation
Quote:
I think I would have been less nervous drilling a '64. I don't think you have to go through the dashboard and worry about all those radical angles like you do on these curved windshield dudes. |
|
|
|
|
|
08-23-2011, 09:51 PM
|
#18 | |
|
Senior Enthusiast
Join Date: Feb 2007
Location: Spokane Valley, WA
Posts: 8,356
|
Re: 60-63 Spotlight Installation
Quote:
The problem is, over time rough handling will chew the stop out of the handle allowing the head to settle onto the body. If the outer tube and handle are in good shape and not abused, the parking feature will last for decades. Here are photos of an outer tube and handle that have been damaged:  
|
|
|
|
|
|
08-23-2011, 10:08 PM
|
#19 |
|
Grandpa in the rustmobile...
Join Date: Nov 2008
Location: Spokane WA/Viola TN
Posts: 11,422
|
Re: 60-63 Spotlight Installation
mark you wouldnt happen to have a tepmlate for 67-72 spotlight would you?
__________________
John Goose-1968 C10 355,9.32-1CR, Vortec Heads ,262 voodoo, 3.73:1 3OTT (HS ride/beater/farm truck) http://67-72chevytrucks.com/vboard/s...d.php?t=317684 Grams 53-1953 Chevrolet Belair http://67-72chevytrucks.com/vboard/s...=1#post4327784 1969 Chevy C10 Shortbed 4.5/6?" Frame off resto http://67-72chevytrucks.com/vboard/s...d.php?t=548136 1999 Toyota Tacoma 4x4 |
|
|
|
|
08-23-2011, 10:47 PM
|
#20 | |
|
Senior Enthusiast
Join Date: Feb 2007
Location: Spokane Valley, WA
Posts: 8,356
|
Re: 60-63 Spotlight Installation
Quote:
http://67-72chevytrucks.com/vboard/s...=401853&page=2 |
|
|
|
|
|
08-24-2011, 10:04 AM
|
#21 |
|
Registered User
Join Date: Apr 2004
Location: arkieland
Posts: 1,070
|
Re: 60-63 Spotlight Installation
thanks, maybe I can drill that hole...
|
|
|
|
|
08-24-2011, 10:39 AM
|
#22 |
|
Registered User
Join Date: Nov 2006
Location: Music City, U.S.A.
Posts: 638
|
Re: 60-63 Spotlight Installation
Incidentally, I'm missing the little ivory-colored end cap on the right handle. If anyone happens to run across one of those and wants to sell it, hit me up!

|
|
|
|
|
08-24-2011, 12:48 PM
|
#23 |
|
Senior Enthusiast
Join Date: Feb 2007
Location: Spokane Valley, WA
Posts: 8,356
|
Re: 60-63 Spotlight Installation
You might try Bob at Accessoryland. He has all the bits and pieces and access to the Unity factory inventory. His website is no longer working, but he may still be in business. It's just him and his wife. If he's still around he's a great resource for vintage parts.
(563) 556-5482 10793 Highway 61 S Dubuque, IA 52003 |
|
|
|
|
03-04-2012, 09:22 PM
|
#24 |
|
Registered User
Join Date: May 2008
Location: Neche, North Dakota/Winnipeg, Manitoba
Posts: 605
|
Re: 60-63 Spotlight Installation
Hey I got spotlight mounting templates and instruction sheets for 55-59 60-63 64-66 and 67-72 trucks. If any of you need a template and instruction sheet just pm me and i can send you a copy to exact scale!
|
|
|
|
|
05-21-2012, 10:39 AM
|
#25 |
|
Registered User
Join Date: Nov 2011
Location: fayetteville nc
Posts: 10,338
|
Re: 60-63 Spotlight Installation
Got the light installed this weekend
__________________
1963 Short bed step side SBW 427 big block and borg warner T-16 HD 3 speed manual http://67-72chevytrucks.com/vboard/s...d.php?t=519869 1963 Short bed fleetside BBW 348 1st gen big block w/Powerglide http://67-72chevytrucks.com/vboard/s...d.php?t=619024 1964 Short bed trailer |
|
|
|
|
| Bookmarks |
| Thread Tools | |
| Display Modes | |
|
|


 Linear Mode

