
|
Register or Log In To remove these advertisements. |
|
|
|
|||||||
 |
|
|
Thread Tools | Display Modes |
|
|
 09-19-2012, 03:12 AM
|
#1 |
|
Hollister, CA.
 Join Date: Sep 2006
Location: Hollister, Ca.
Posts: 6,147
|
HOW TO: Crossmember sectioning ...
As most of you know, Ive been working on my 62 GMC Suburban.
I picked up a '78 Crossmember with PS and steering linkage off CL for cheap. I decided for now I wanted to set up my suspension for a loooow Static drop, as I'm not concerned with Air-ride at the moment. (I'll save that for my customers  ) )I cant afford one of PorterBuilts AWESOME creations, so I knew I was on my own. To accomplish this, I knew the crossmember had to be raised. But how much ?? So, before making any cuts, I took some measurements. I did this by first leveling the Burban to the ground, checking both the chassis and the body. Measurements could of been done with a complete vehicle, but in this case, it is on stands: -  -  - For future reference, temporarily installed the stock front suspension, and marked the spindle location to my garage floor: -  - Measurements were, First ground to crossmember, then ground to chassis: -  -  - As you can see, the difference was 2. Sectioning the crossmember this amount would raise it level with the remainder of chassis. I viewed CapKaos great method and decided this is the way to go. As many of you know, I love providing pics so more detailed pics were used here. I could of done all this in my shop with my nice big welding tables, plasma cutter, etc. But this was done at my home garage .basically to illustrate anyone can do it. In fact, all cuts were made using a cheap $14 HarborFreight grinder, and lots of wheels. NOTE: I did not like the HF cut off wheels. They vibrate a lot, and do not like a little side load. What I mean, is I use a cutoff wheel on its side to clean surfaces, which caused it to come apart quickly and violently . The grinding wheels suck too Instead, I chose the DeWalt cutoffs from Lowes, as they were priced just over a dollar. If you have access to a Plasma BY ALL MEANS USE IT !! It will cut your time down considerably !! Regardless of what method you choose, your still going to need a welder. Another thing I should mention .As you can see I started with a loose crossmember. In the past I have removed them with engine in place. (By supporting engine across the inner fenders). But, unfortunately, this is not shown here. If your doing this on a running truck, SAFELY remove crossmember !! So .here we go ! Since they were right there like two arms, I used the frame rails of the Burban as a table , and leveled the crossmember. -  - Once leveled, I scribed vertical alignment marks on the crossmember. These are used to align the upper section down to the lower once the side material is removed. All my fancy squares are outta town, so here is my creation . -  - Hard to see scribe marks here but later used a Silver Sharpie If you look closely you can see FOUR spotwelds just above the Ubolt bolt holes -  - 
__________________
John What the Heck is that ?? CURRENT BUILDS: 62 BurbMaster  Other Builds: My '63 C-10,LWB,CC,BBW '06 HD StrAight Axle Swap Father/Son '67 C-20, LQ9,4L80,Bagged,8-Lugger !!Good Friend Richard's Build AMERICAN CUSTOMS & CLASSICS (831) 630-1965 www.ACCHOLLISTER.com ACC on FACEBOOK "Rest in Peace, Mom & Dad ... I will see you again someday!" |

|

|
|
09-19-2012, 03:12 AM
|
#2 |
|
Hollister, CA.
Join Date: Sep 2006
Location: Hollister, Ca.
Posts: 6,147
|
Re: HOW TO: Crossmember sectioning ...
Back side as well. Scribes were made where crossmembers shape start to change anlges upwards, if you will.
-  -  - Next I made this little device to help me scribe the line. It measures ½ and 1. I measured down from the top ½, then connect the vertical lines . -  -  - From the top line, I measured down the required amount in this case 2 -  - A quick trip to Staples scored me the cool Silver Sharpies . -  -  -
__________________
John What the Heck is that ?? CURRENT BUILDS: 62 BurbMaster Other Builds: My '63 C-10,LWB,CC,BBW '06 HD StrAight Axle Swap Father/Son '67 C-20, LQ9,4L80,Bagged,8-Lugger !!Good Friend Richard's Build AMERICAN CUSTOMS & CLASSICS (831) 630-1965 www.ACCHOLLISTER.com ACC on FACEBOOK "Rest in Peace, Mom & Dad ... I will see you again someday!" |
|
|
|
|
09-19-2012, 03:13 AM
|
#3 |
|
Hollister, CA.
Join Date: Sep 2006
Location: Hollister, Ca.
Posts: 6,147
|
Re: HOW TO: Crossmember sectioning ...
 -  -  -  -  - Now that we are all marked up, the crossmember needs to be braced before we make major cuts. Since I need to fit a grinder, I made the top slices before adding the brace. -  - Rather than weld a brace to the towers, I uses an old junkyard steering arm and some angle. Now I have another tool . for future chops -  -  - 
__________________
John What the Heck is that ?? CURRENT BUILDS: 62 BurbMaster Other Builds: My '63 C-10,LWB,CC,BBW '06 HD StrAight Axle Swap Father/Son '67 C-20, LQ9,4L80,Bagged,8-Lugger !!Good Friend Richard's Build AMERICAN CUSTOMS & CLASSICS (831) 630-1965 www.ACCHOLLISTER.com ACC on FACEBOOK "Rest in Peace, Mom & Dad ... I will see you again someday!" |
|
|
|
|
09-19-2012, 03:13 AM
|
#4 |
|
Hollister, CA.
Join Date: Sep 2006
Location: Hollister, Ca.
Posts: 6,147
|
Re: HOW TO: Crossmember sectioning ...
For lack of a welding table, I relocated to my red cart, which typically holds my Plasma. Leveled cart, then tacked the crossmember to cart
-  -  -  - Then carefully begin cutting. If you notice, I did not weld a brace across the top plate because I am using cutoff wheels which do not generate much heat. Otherwise I would have. However, that piece of angle was tacked to top, before welding  -  - And, just like some oysters on the grill we crack this thing open . -  -  -  -  - 
__________________
John What the Heck is that ?? CURRENT BUILDS: 62 BurbMaster Other Builds: My '63 C-10,LWB,CC,BBW '06 HD StrAight Axle Swap Father/Son '67 C-20, LQ9,4L80,Bagged,8-Lugger !!Good Friend Richard's Build AMERICAN CUSTOMS & CLASSICS (831) 630-1965 www.ACCHOLLISTER.com ACC on FACEBOOK "Rest in Peace, Mom & Dad ... I will see you again someday!" |
|
|
|
|
09-19-2012, 03:14 AM
|
#5 |
|
Hollister, CA.
Join Date: Sep 2006
Location: Hollister, Ca.
Posts: 6,147
|
Re: HOW TO: Crossmember sectioning ...
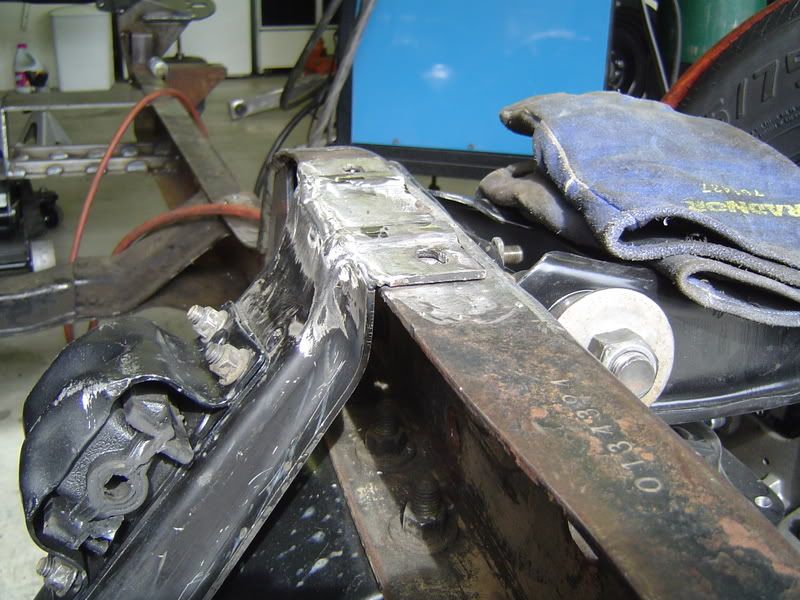
These tabs are part of the formed bottom plate of the crossmember. They are on all four corners, and are held in place by the four large spot welds mentioned earlier.
-  Next, you remove the amount of your section . In my case 2 . -  -  -  - After removing the two inches, the top of tab was been removed, along with the upper two spot welds. I cleaned this area, and fully welded it on both sides. -  -  -  -  -  -
__________________
John What the Heck is that ?? CURRENT BUILDS: 62 BurbMaster Other Builds: My '63 C-10,LWB,CC,BBW '06 HD StrAight Axle Swap Father/Son '67 C-20, LQ9,4L80,Bagged,8-Lugger !!Good Friend Richard's Build AMERICAN CUSTOMS & CLASSICS (831) 630-1965 www.ACCHOLLISTER.com ACC on FACEBOOK "Rest in Peace, Mom & Dad ... I will see you again someday!" |
|
|
|
|
09-19-2012, 03:14 AM
|
#6 |
|
Hollister, CA.
Join Date: Sep 2006
Location: Hollister, Ca.
Posts: 6,147
|
Re: HOW TO: Crossmember sectioning ...
Now is a good time to clean whatever grime is on the inside of the crossmember
especially the bottom
-  -  -  -  - Here you see where I welded the tabs: -  -  - Not needed, but what the heck: -  - You can see the importance of good, square measurments: -  -
__________________
John What the Heck is that ?? CURRENT BUILDS: 62 BurbMaster Other Builds: My '63 C-10,LWB,CC,BBW '06 HD StrAight Axle Swap Father/Son '67 C-20, LQ9,4L80,Bagged,8-Lugger !!Good Friend Richard's Build AMERICAN CUSTOMS & CLASSICS (831) 630-1965 www.ACCHOLLISTER.com ACC on FACEBOOK "Rest in Peace, Mom & Dad ... I will see you again someday!" |
|
|
|
|
09-19-2012, 07:20 AM
|
#7 |
|
Registered User
Join Date: May 2010
Location: nw SanAntonio, TX
Posts: 69
|
Re: HOW TO: Crossmember sectioning ...
Beautiful work. Please post your mailing address in order that I can get my cross member in the mail to you.
|
|
|
|
|
09-19-2012, 07:31 AM
|
#8 |
|
Registered User
Join Date: Oct 2010
Location: Independence,KS
Posts: 1,477
|
Re: HOW TO: Crossmember sectioning ...
very well documented! Thanks for sharing!
|
|
|
|
|
09-19-2012, 09:03 AM
|
#9 |
|
Registered User
Join Date: Jul 2010
Location: memphis
Posts: 2,537
|
Re: HOW TO: Crossmember sectioning ...
nice write up
__________________
1981 C-10 (Pop's) 1978 Camaro 2006 Lacrosse |
|
|
|
|
09-19-2012, 10:01 AM
|
#10 | |||
|
Hollister, CA.
Join Date: Sep 2006
Location: Hollister, Ca.
Posts: 6,147
|
Re: HOW TO: Crossmember sectioning ...
Quote:
Sure, send it down !! (or up, rather )Quote:
Quote:
__________________
John What the Heck is that ?? CURRENT BUILDS: 62 BurbMaster Other Builds: My '63 C-10,LWB,CC,BBW '06 HD StrAight Axle Swap Father/Son '67 C-20, LQ9,4L80,Bagged,8-Lugger !!Good Friend Richard's Build AMERICAN CUSTOMS & CLASSICS (831) 630-1965 www.ACCHOLLISTER.com ACC on FACEBOOK "Rest in Peace, Mom & Dad ... I will see you again someday!" |
|||
|
|
|
|
09-19-2012, 11:40 AM
|
#11 |
|
Registered User
Join Date: May 2010
Location: Visalia, CA
Posts: 376
|
Re: HOW TO: Crossmember sectioning ...
Very helpful how-to. Nice work.
|
|
|
|
|
09-19-2012, 11:34 AM
|
#12 |
|
UCA63
Join Date: Aug 2005
Location: Lloydminster AB Can.
Posts: 1,637
|
Re: HOW TO: Crossmember sectioning ...
Nice work Chief
T
__________________
member#7816 "63 sb ss bbw 350\350 12 bolt rear Pwr Fr Disc PS tilt '61 GMC in progress '63 GMC to use for parts '90 Chevy Ext cab sbfs 5.7l (current d d) |
|
|
|
|
09-19-2012, 12:33 PM
|
#13 |
|
Registered User
Join Date: May 2010
Location: Hillsboro, Oregon 97123
Posts: 1,300
|
Re: HOW TO: Crossmember sectioning ...
I"m keeping an eye on the post. I want to see what you do for your steering. Seem to me the crossmember is the easy part. Getting your steering geometry right in order to clear might be an issue.
Im guessing you will notch your frame or Rack ?? Very nice write up...I was lead to beleive 1 1/2" was all you could step..
__________________
Measure with a yard stick Mark with Chalk Cut with a torch  Built it yourself, don't count on others to to do it for you or with you. It will never get done |
|
|
|
|
09-19-2012, 07:08 PM
|
#14 |
|
Who Me?
Join Date: Sep 2010
Location: Royal Palm Beach, FL
Posts: 4,065
|
Re: HOW TO: Crossmember sectioning ...
Very nice write up!
__________________
 Steve Steve1997 Tahoe LT 4D 2WD (DD) 1961 Apache 10 (sold) 1965 C10 Stepper (sold) |
|
|
|
|
09-19-2012, 09:22 PM
|
#15 |
|
Registered User
Join Date: Nov 2010
Location: Littlerock, Ca
Posts: 72
|
Re: HOW TO: Crossmember sectioning ...
Very cool , I am going to be watching this close. Since I dont have the welding skills though I might have to send mine your way too.
__________________
Betty : '63 Fleetside Longbed 350 w/ 4 speed CPP 3/5 drop with front sway bar. |
|
|
|
|
09-19-2012, 10:05 PM
|
#16 |
|
Torn between 66 and 78
Join Date: May 2008
Location: So. Cal.
Posts: 253
|
Re: HOW TO: Crossmember sectioning ...
Hey Chief,
This thread has been needed for a long time!! Thanks!!! |
|
|
|
|
09-20-2012, 12:06 AM
|
#17 | ||||||
|
Hollister, CA.
Join Date: Sep 2006
Location: Hollister, Ca.
Posts: 6,147
|
Re: HOW TO: Crossmember sectioning ...
Quote:
Quote:
Quote:
 ) ) The crossmember was simple, but to some it might be more challenging ... thus this write up I believe the 1 1/2" was to ease the steering issue. By notching a FULL 2", one could easily taylor by adding a 1/2" block in between frame and xmember. Quote:
Quote:
Quote:
Feel free to come by, I'll hook you up !!
__________________
John What the Heck is that ?? CURRENT BUILDS: 62 BurbMaster Other Builds: My '63 C-10,LWB,CC,BBW '06 HD StrAight Axle Swap Father/Son '67 C-20, LQ9,4L80,Bagged,8-Lugger !!Good Friend Richard's Build AMERICAN CUSTOMS & CLASSICS (831) 630-1965 www.ACCHOLLISTER.com ACC on FACEBOOK "Rest in Peace, Mom & Dad ... I will see you again someday!" |
||||||
|
|
|
|
09-20-2012, 12:42 AM
|
#18 |
|
Registered User
Join Date: Nov 2011
Location: Chaparral NM
Posts: 688
|
Re: HOW TO: Crossmember sectioning ...
Nice work Chief...how many hrs did it take you to finish that bad boy?
__________________
CURRENT & PAST CHEVY TRUCKS 60 C-10 Apache short step side 62 C-10 short step side 66 GMC Long bed fleet side 305 V-6 77 C-20 Custom Deluxe (Blue Goose) |
|
|
|
|
09-21-2012, 12:05 AM
|
#19 |
|
Registered User
Join Date: Feb 2007
Location: SAN JO
Posts: 11
|
Re: HOW TO: Crossmember sectioning ...
This thread is robo appprove chief!
 Posted via Mobile Device Posted via Mobile Device Keep up the good work brotha ...lol Last edited by D-CHEESE; 09-21-2012 at 12:06 AM. Reason: None your biz |
|
|
|
|
09-21-2012, 12:09 AM
|
#20 |
|
Hollister, CA.
Join Date: Sep 2006
Location: Hollister, Ca.
Posts: 6,147
|
Re: HOW TO: Crossmember sectioning ...
Thanks.....
Who the heck is that dude ? Posted via Mobile Device
__________________
John What the Heck is that ?? CURRENT BUILDS: 62 BurbMaster Other Builds: My '63 C-10,LWB,CC,BBW '06 HD StrAight Axle Swap Father/Son '67 C-20, LQ9,4L80,Bagged,8-Lugger !!Good Friend Richard's Build AMERICAN CUSTOMS & CLASSICS (831) 630-1965 www.ACCHOLLISTER.com ACC on FACEBOOK "Rest in Peace, Mom & Dad ... I will see you again someday!" |
|
|
|
|
09-20-2012, 01:48 AM
|
#21 |
|
GM Addicted
Join Date: Jan 2009
Location: Visalia, Ca
Posts: 2,291
|
Re: HOW TO: Crossmember sectioning ...
Staying on for this write up! Clean work man
__________________
 ..Macs Garage.. ..Macs Garage..73 GMC, 54 Caddy, 2010 Silverado, 68 C10 RIP DAd My 73 GMC Truck Build Pic 2010 Silverado 4/6 on 24s IG:MacsGarage |
|
|
|
|
09-20-2012, 01:59 AM
|
#22 |
|
Redneck Hillbilly
Join Date: Jan 2010
Location: Backwoods
Posts: 1,307
|
Re: HOW TO: Crossmember sectioning ...
I was considering this same thing for my build, since I am in the "Too poor for Porterbuilt" parts club as well. Very nice to have this how-to guide, thanks a ton for the time you took, and are still taking, for the write-up.

|
|
|
|
|
09-20-2012, 10:14 AM
|
#23 |
|
Hollister, CA.
Join Date: Sep 2006
Location: Hollister, Ca.
Posts: 6,147
|
Re: HOW TO: Crossmember sectioning ...
__________________
John What the Heck is that ?? CURRENT BUILDS: 62 BurbMaster Other Builds: My '63 C-10,LWB,CC,BBW '06 HD StrAight Axle Swap Father/Son '67 C-20, LQ9,4L80,Bagged,8-Lugger !!Good Friend Richard's Build AMERICAN CUSTOMS & CLASSICS (831) 630-1965 www.ACCHOLLISTER.com ACC on FACEBOOK "Rest in Peace, Mom & Dad ... I will see you again someday!" |
|
|
|
|
09-20-2012, 10:35 AM
|
#24 |
|
Registered User
Join Date: Jan 2006
Location: LA, CA
Posts: 296
|
Re: HOW TO: Crossmember sectioning ...
John, excellent write up. I used the same motor mount perches on my '63 frame. I just cut them down to fit the frame rail.
|
|
|
|
|
09-20-2012, 11:36 PM
|
#25 |
|
Registered User
Join Date: Jan 2011
Location: Orlando Florida
Posts: 315
|
Re: HOW TO: Crossmember sectioning ...
Nice work!!! But I think I would still be affraid to do it myself..
__________________
My build thread: 1966 stepside http://67-72chevytrucks.com/vboard/s...d.php?t=486223 1965 GMC fleet http://67-72chevytrucks.com/vboard/s...d.php?t=651726 |
|
|
|
|
| Bookmarks |
|
|


 Hybrid Mode
