
|
 02-04-2012, 10:13 PM
|
#126 |
|
Registered User
Join Date: Mar 2008
Location: Powhatan, Va.
Posts: 376
|
Re: Project '64 Cheapskate
I love your build, I am doing a similar build with my 69 C10. Using up stuff that has accumulated and hitting the bone yards. Your right half the fun is the scavenger hunt for parts!!
__________________
Sean "If your gonna be dumb, you gotta be tough" 1960 Chevy Impala Sedan - my 25 year search is over!! 1969 C-10 longbed - Nice day DD  1970 Chevy Nova - Street and Strip Project 2002 Acura MDX my DD 2007 Honda Odssey - My Wife's "Mommy Van" |

|

|
|
02-19-2012, 11:51 PM
|
#127 |
|
Registered User
 Join Date: Mar 2005
Location: apple valley, ca
Posts: 2,670
|
Re: Project '64 Cheapskate
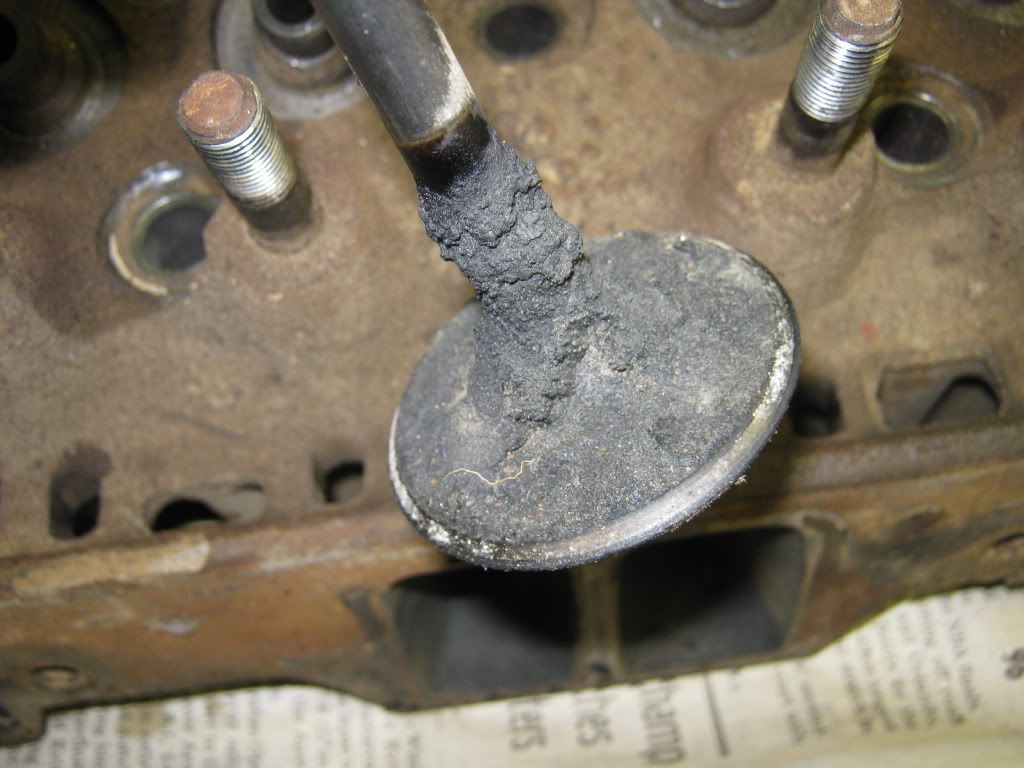
Been swamped at work, and the weather has been pretty crappy, so I haven't got a whole lot done on the truck. I started on the engine rebuild using the 350 long block that Brad gave me. After the teardown, everything inside looked pretty good with the exception of the crank. It'll need to be turned .020, as it was already a .010/.010 crank. I had a pair of 041 heads that I've had in my parts stash for the last 25 years, and I tore them down to do a freshening. The valves were so gunked up from carbon that they looked like they had been in the bottom of a BBQ grill. Check this out:
 here's a comparison of before and after some cleanup with the wire wheel: 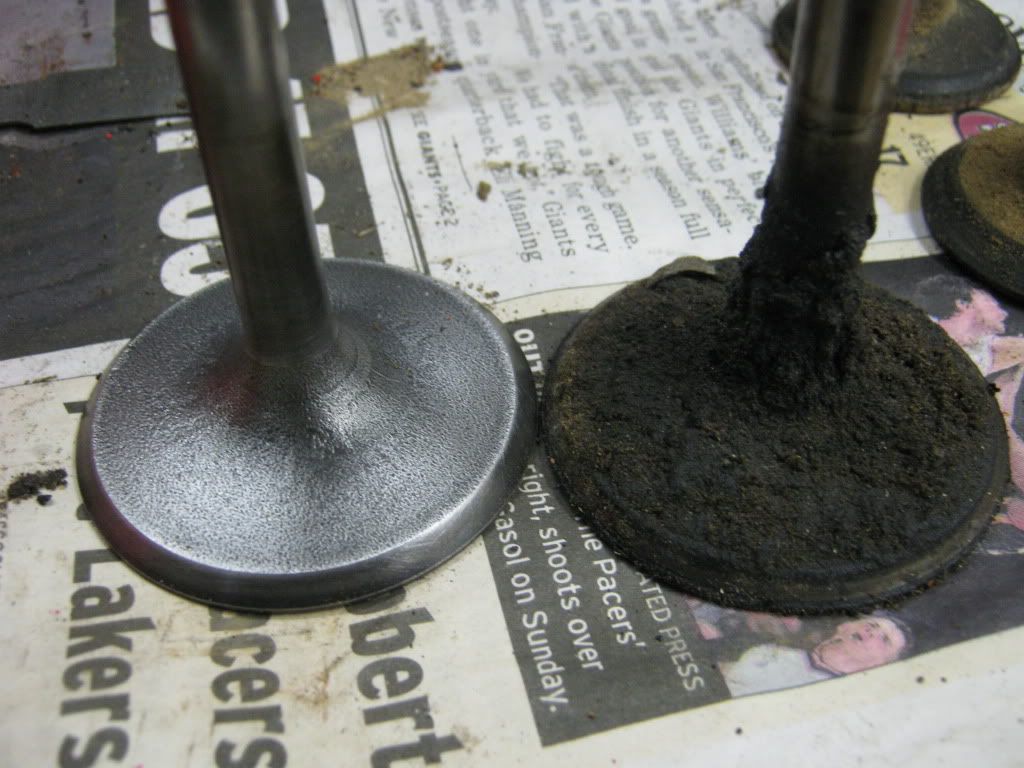 I am waiting for my valve guide cutter to show up, and then I'll cut the height and reduce the diameter for better valve seals, lap and check the valves, and reinstall everything. If you've seen my posts in the Wanted section for a tailgate, you'll know that I am been searching high and low for the "right" tailgate. If you recall, I already had a nice tailgate, but it was primered. I plan on keeping the natural patina of my paint, so a primered tailgate won't suffice. Even if I faked it, there's no way I could get it to look original. I had been looking on Craigslist as far away as St.Louis, and had even thought I had found one in Merced, only to have it sold before I could get the deal worked out. I even had a member, LostMy65, check on one in Oregon City, Oregon, but it was too beat up. On Thursday night, I was checking on Craigslist in the L.A. section, and there was an ad that said "60-66 tailgate" with no pictures. I shot the guy a text, and got nothing. On Friday, he texted me back with a picture, and I about had a cow. Yep, it was THE ONE. So, on Saturday, Brad and I headed out to East L.A. and got it. I paid a little more than what I wanted to pay, but after seeing the condition, I had to have it. The paint is original, the patina is perfect, the black lettering is original, and it is perfectly straight. Here it is: 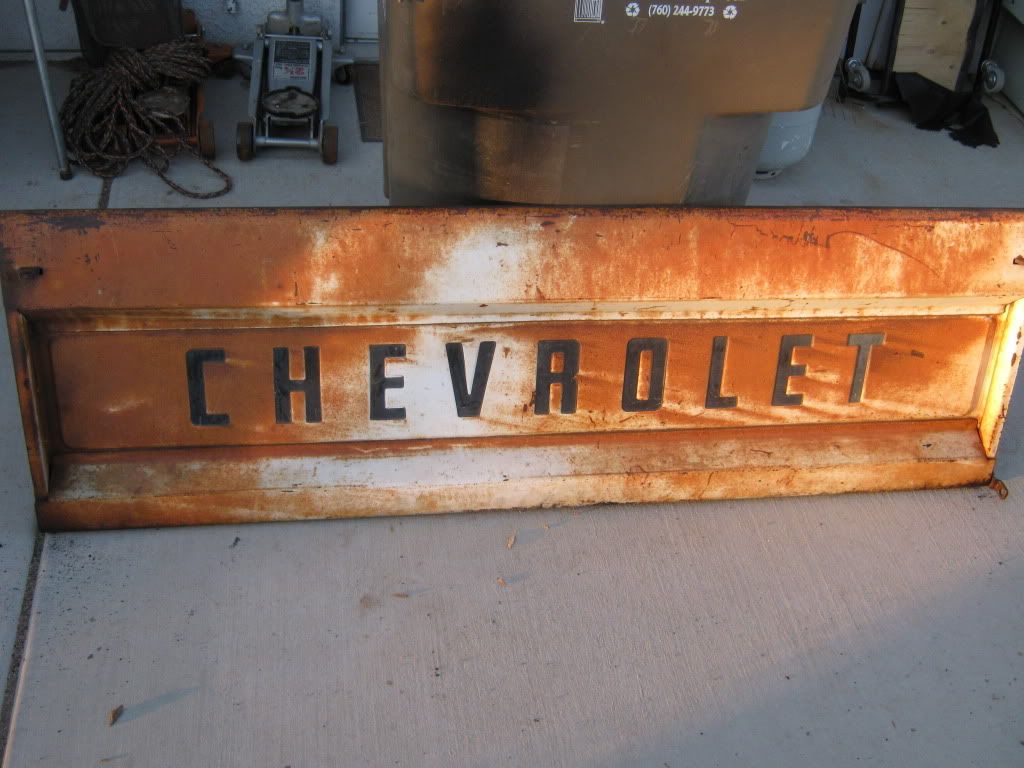 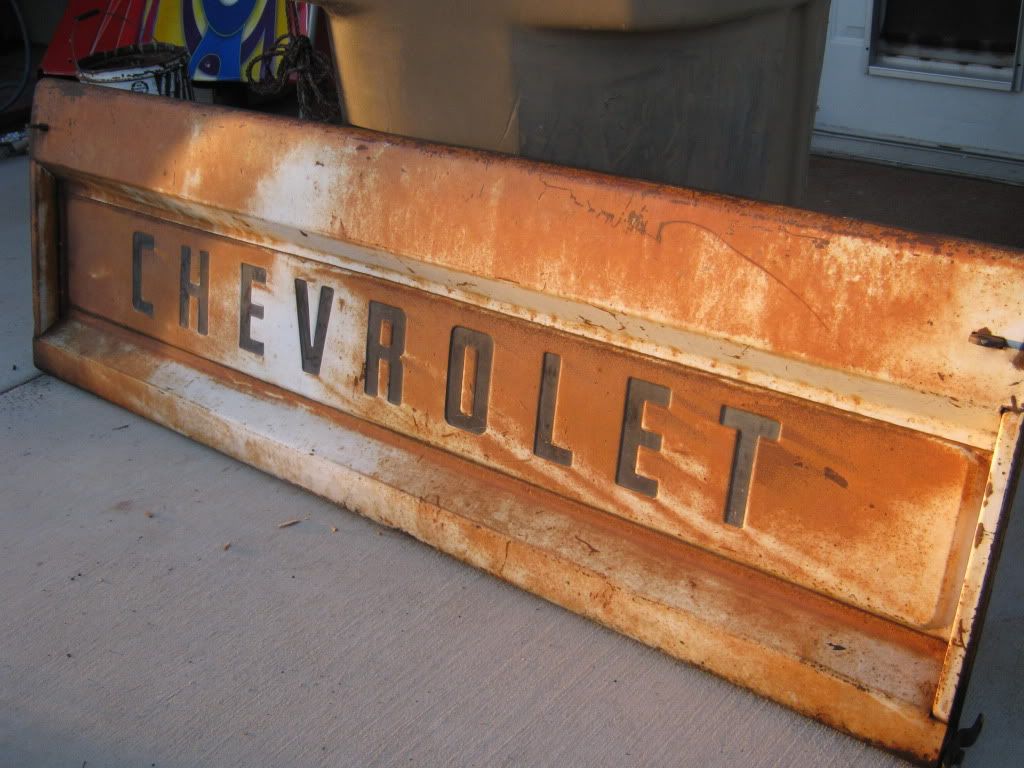 The only issue is that the tailgate trunions are seized up in the tailgate, but I have been soaking them with penetrating oil. With a little CLR, the tailgate will match the rest of the truck perfectly. It took awhile, but I was patient and waited for the right one to show up. I almost bought a few of the ones I looked at, but something told me to wait. I'm glad I did.
__________________
Check out my latest endeavor: https://roundsixpod.com My build threads: '55 Chevy: http://67-72chevytrucks.com/vboard/s...d.php?t=247512 '64 C-20: http://67-72chevytrucks.com/vboard/s...d.php?t=446527 |
|
|
|
|
02-19-2012, 11:58 PM
|
#128 | |
|
But Found Her 25yrs Later!
Join Date: Oct 2010
Location: Oregon City, Oregon
Posts: 10,468
|
Re: Project '64 Cheapskate
Quote:
Glad you found one.
__________________
I lost my 65 - Found it 25 years later: http://67-72chevytrucks.com/vboard/s...d.php?t=426650 66 C20 Service Truck: http://67-72chevytrucks.com/vboard/s...d.php?t=428035 |
|
|
|
|
|
02-20-2012, 12:43 AM
|
#129 |
|
Registered User
Join Date: Jun 2010
Location: Vancouver Island BC
Posts: 652
|
Re: Project '64 Cheapskate
Great karma pays off, that gate will be perfect. Great find.
__________________

|
|
|
|
|
02-20-2012, 10:25 AM
|
#130 |
|
Registered User
Join Date: Sep 2011
Location: Indianapolis, Indiana
Posts: 261
|
Re: Project '64 Cheapskate
Be patience grasshopper! Lol
Posted via Mobile Device |
|
|
|
|
02-27-2012, 12:30 AM
|
#131 |
|
Registered User
Join Date: Mar 2005
Location: apple valley, ca
Posts: 2,670
|
Re: Project '64 Cheapskate
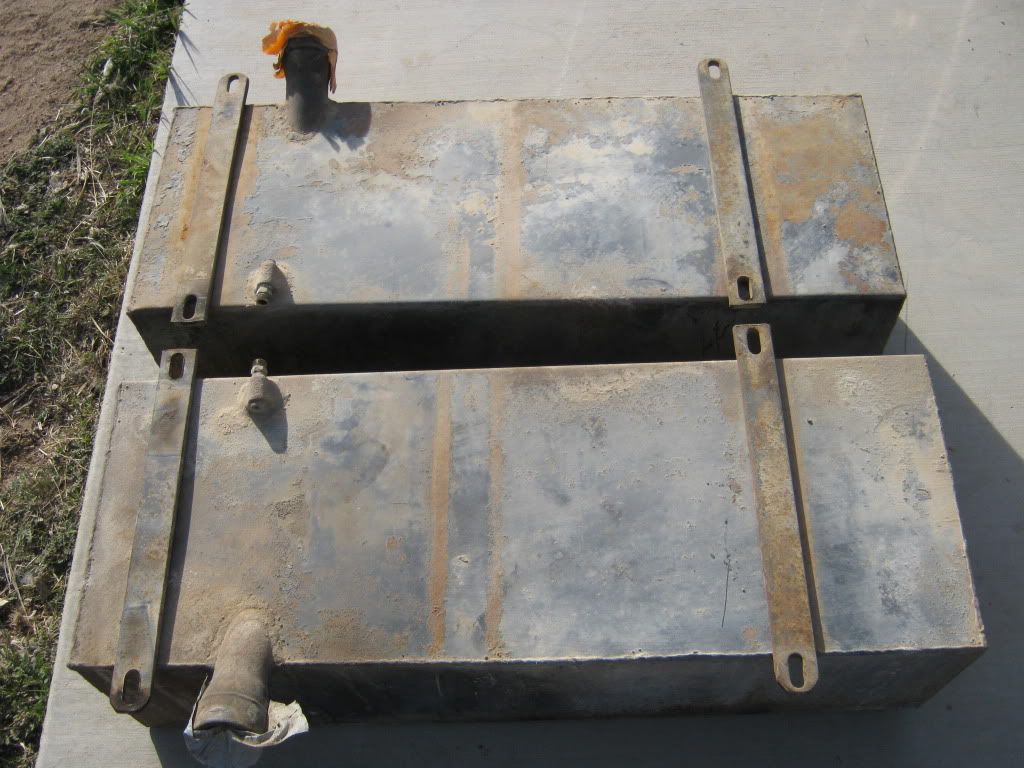
Didn't get too much done this weekend due to work and family commitments, but I was able to knock out a few things that had been bugging me. First of all, I wasn't planning on using my saddle tanks, so I pulled them, with all of the fuel lines. The fuel lines looked as if they had been bent over somebody's knee, and one of them was actually twisted so bad that it was 100% blocked.
 Next was the factory step bumper. The truck had gotten smacked on the passenger side of the rear bumper, and initially, I was going to break out the torch and hammer and dolly and get it back straight again. Once I pulled the bumper, I came to the conclusion that I am going to try and find a factory chrome rear bumper to match the front. 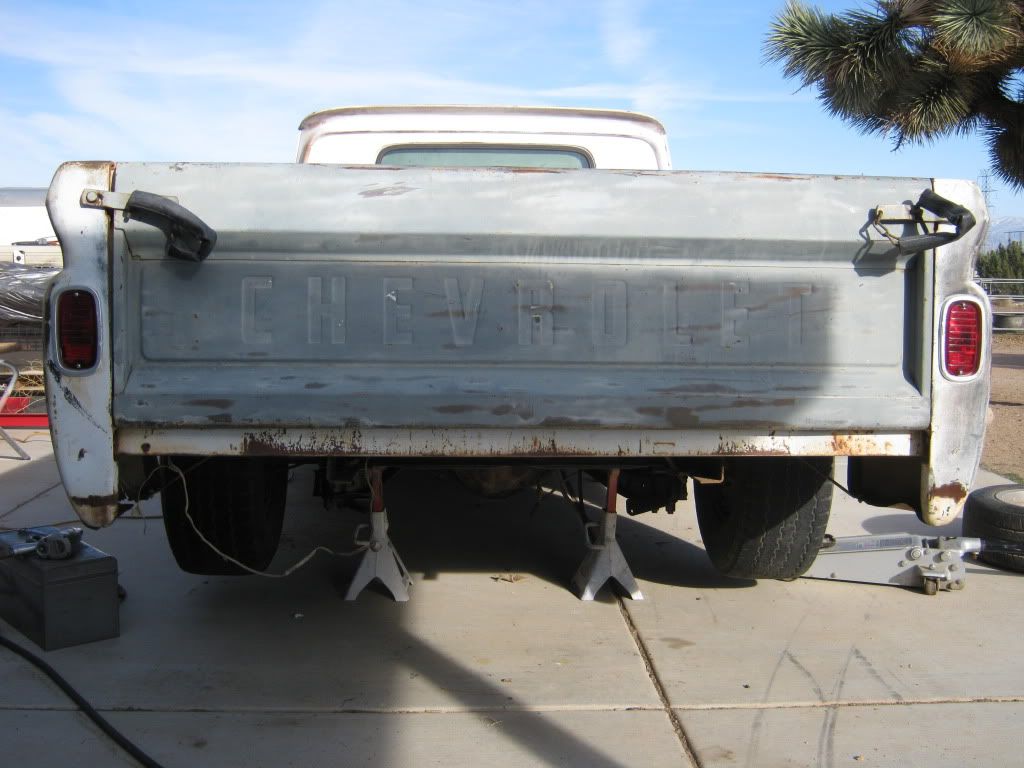 So, in about 2 hours of time, I put the truck on a diet and shed about 200 pounds!
__________________
Check out my latest endeavor: https://roundsixpod.com My build threads: '55 Chevy: http://67-72chevytrucks.com/vboard/s...d.php?t=247512 '64 C-20: http://67-72chevytrucks.com/vboard/s...d.php?t=446527 |
|
|
|
|
03-03-2012, 06:10 PM
|
#132 |
|
Registered User
Join Date: Aug 2010
Location: louisville, ky
Posts: 13
|
Re: Project '64 Cheapskate
Your project is really strating to look good. What kind of gas tank are you going to use?
Nate
__________________
In the process of looking for a 60 or newer short bed fleet side. |
|
|
|
|
03-04-2012, 12:50 PM
|
#133 |
|
Registered User
Join Date: Mar 2005
Location: apple valley, ca
Posts: 2,670
|
Re: Project '64 Cheapskate
I'm using the original tank, which is in the cab. I thought about moving the tank to behind the rear axle, but I want to use the original spare tire holder. I don't want to have the spare laying in the bed. I've done that too many times.
I've been busy on the weekends lately, so I haven't gotten much done. Lynn has had weekends off lately, and that means lots of trips to the mall and grocery store. Exciting........ Brad is going to get an 700r4 case this week, so I'll be able to get the motor mounts dialed in, the trans mount fabricated, the tailpipes installed, and the pinion angle set. After that, I have collected the pieces to replace the crappy C-20 rear cab mounts that are both broken. It's a design issue, and I have an idea in mind that will permanently fix that for less than $5.
__________________
Check out my latest endeavor: https://roundsixpod.com My build threads: '55 Chevy: http://67-72chevytrucks.com/vboard/s...d.php?t=247512 '64 C-20: http://67-72chevytrucks.com/vboard/s...d.php?t=446527 |
|
|
|
|
03-09-2012, 01:54 AM
|
#134 |
|
Registered User
Join Date: Jan 2012
Location: Austin, TX
Posts: 543
|
Re: Project '64 Cheapskate
subscribed.
|
|
|
|
|
03-13-2012, 11:59 AM
|
#135 |
|
Registered User
Join Date: Mar 2005
Location: apple valley, ca
Posts: 2,670
|
Re: Project '64 Cheapskate
I had a little time this weekend to work on the truck, and I got a few more things done. First, I bought a cab mount kit from Energy Suspension, and got the front cab mounts swapped out. I am working on a simple fix for all of us guys with the C-20 rear cab mounts that are always broken. I am still in the planning stage, and I have the material I need, so when I finalize it, I'll post up pictures. The fix will be cheap
Because my truck originally came with a 4-speed, and I am going to go with a 700r4, the original crossmember was not going to work. I didn't have a factory one to install, so I looked through my parts pile and found an old '70 Camaro TH350 trans crossmember. The width of the crossmember was workable, and the design is such that it lays flat to the bottom of the framerail. I had some old angle iron and welded it to the edges of the Camaro crossmember so it fit snugly into the frame and also gave me the provision to drill more holes to secure it. I could have just drilled 4 holes into the bottom of the frame rail and it would have been sufficient, but I decided that I wanted the crossmember to be a rigid part of the truck's chassis, so I decided to add material where it could be fastened to the vertical portion of the truck's chassis as well. In order to get that accomplished, I had to mock up a motor and trans to determine where the crossmember needed to be. Luckily, Brad had an aluminum Donovan block and another buddy who owns a trans shop let me borrow an empty 700r4 case. We bolted them up, and had it set in place in about 5 minutes with no cherry picker! Once they were in place, we bolted on an old set of heads and plopped the intake on to see what angle the engine needed to be at. Once that was determined, the trans crossmember was slid into place, and I drilled the attach holes, and it was done. 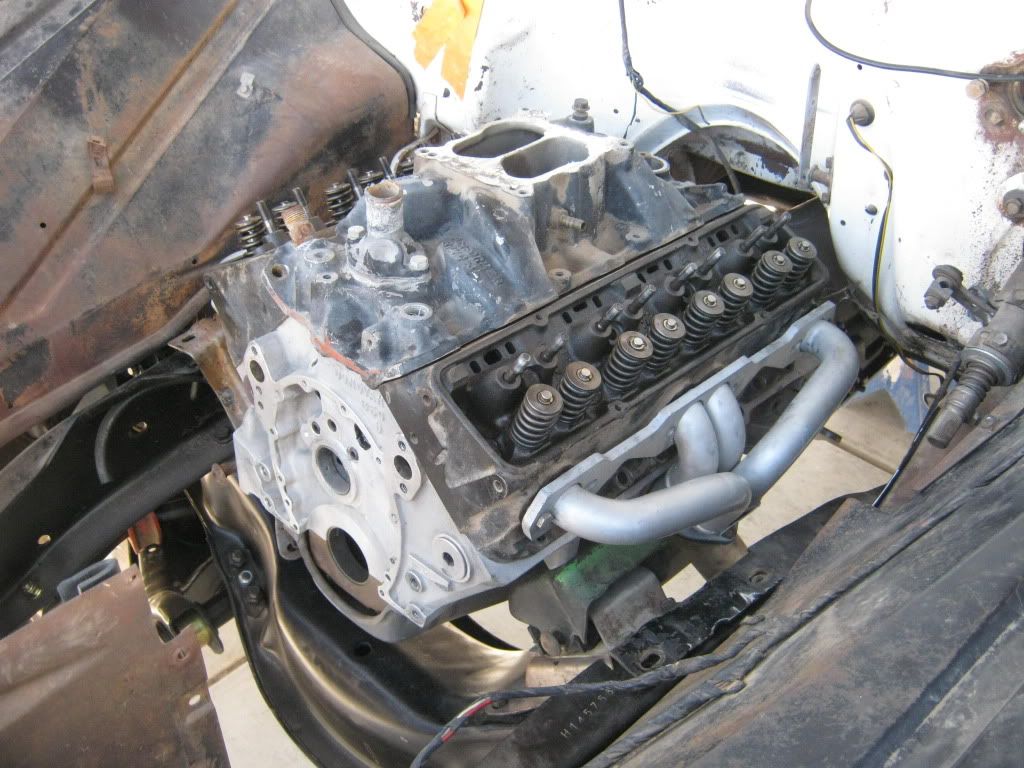 A while back, a friend of mine decided that his '65 needed to be restored so he tore it down. He decided to go with a big block, so I bought his entire exhaust from him. He had just recently had it done, and it's 2.5" with Magnaflow mufflers and Sanderson blockhugger headers. I would have gone with a full-length header, but other than that, it's exactly what I would have gone with anyway, so it worked out perfect. The exhaust was cut in 4 places total to get it out of his '65, and now, I have to get it all back in place. Not as simple as it sounds. Instead of trying to weld it back together, I might just buy 4 v-band set-ups and make it where I can remove it in sections if I ever need to again. Next step is to finish the cab mounts, the exhaust, build spacers for the motor mount stands (I used the stands and mounts from a '79 Suburban), and finalize the pinion angle.
__________________
Check out my latest endeavor: https://roundsixpod.com My build threads: '55 Chevy: http://67-72chevytrucks.com/vboard/s...d.php?t=247512 '64 C-20: http://67-72chevytrucks.com/vboard/s...d.php?t=446527 |
|
|
|
|
03-13-2012, 04:52 PM
|
#136 |
|
Registered User
Join Date: Dec 2011
Location: Alaska
Posts: 405
|
Re: Project '64 Cheapskate
Looks like it will fit well in there and you are making progress. Keep it up!
__________________
C@rnut001 (Owen) Alaskan Members Check In http://67-72chevytrucks.com/vboard/s...22#post5094422 http://67-72chevytrucks.com/vboard/s...18#post6778618 |
|
|
|
|
03-13-2012, 07:38 PM
|
#137 |
|
Registered User
Join Date: May 2007
Location: Deale Md
Posts: 4,663
|
Re: Project '64 Cheapskate
What none of your friends had a tunnel ram laying around to use J/K

__________________
James 63 GMC V6 4speed carryall 65 chevy swb bbw V8 auto 68 K20 327/4 speed, buddy buckets 2002 GMC CC Dually Duramax 64 GMC lwb 3/4 V6 4speed SOLD 66 GMC swb bbw buddy buckets SOLD IG duallyjams The only thing that stays the same is constant change! |
|
|
|
|
03-13-2012, 09:19 PM
|
#138 |
|
Registered User
Join Date: Mar 2005
Location: apple valley, ca
Posts: 2,670
|
Re: Project '64 Cheapskate
^^^Now that's funny! I just sold a tunnel ram a few months ago. It would have fit perfectly.
This one will be a driver, though. I don't feel like tuning those Holley 660s anymore, especially with the price of fuel nowadays.
__________________
Check out my latest endeavor: https://roundsixpod.com My build threads: '55 Chevy: http://67-72chevytrucks.com/vboard/s...d.php?t=247512 '64 C-20: http://67-72chevytrucks.com/vboard/s...d.php?t=446527 |
|
|
|
|
03-14-2012, 10:53 PM
|
#139 |
|
Registered User
Join Date: Mar 2005
Location: apple valley, ca
Posts: 2,670
|
Re: Project '64 Cheapskate
Had a little time today, so I decided to finish the cab mounts. My C-20, like most, had broken rear cab mounts. I'm usually 100% supportive of anything GM did back in the day, but whoever designed the rear cab mounts on the C-20 and heavier trucks really missed the mark. It's like they are designed to fail. I looked around and found out that you can send your mounts out to Steele Rubber and have then re-vulcanized, but like I said before, I'm not a fan of the design. Tony Smith makes a really nice retrofit kit that utilizes 1/2 ton-style mounts, but I didn't want to spend hardly any money. Brad came up with an idea that fit my plan perfectly. A modification that can be done at home for next to nothing.
As you can see, my mounts were shot:  The first thing to do was to separate the rubber from the mount. A hacksaw or a Sawzall (preferred) works great. Make sure you support the cab before you do this: 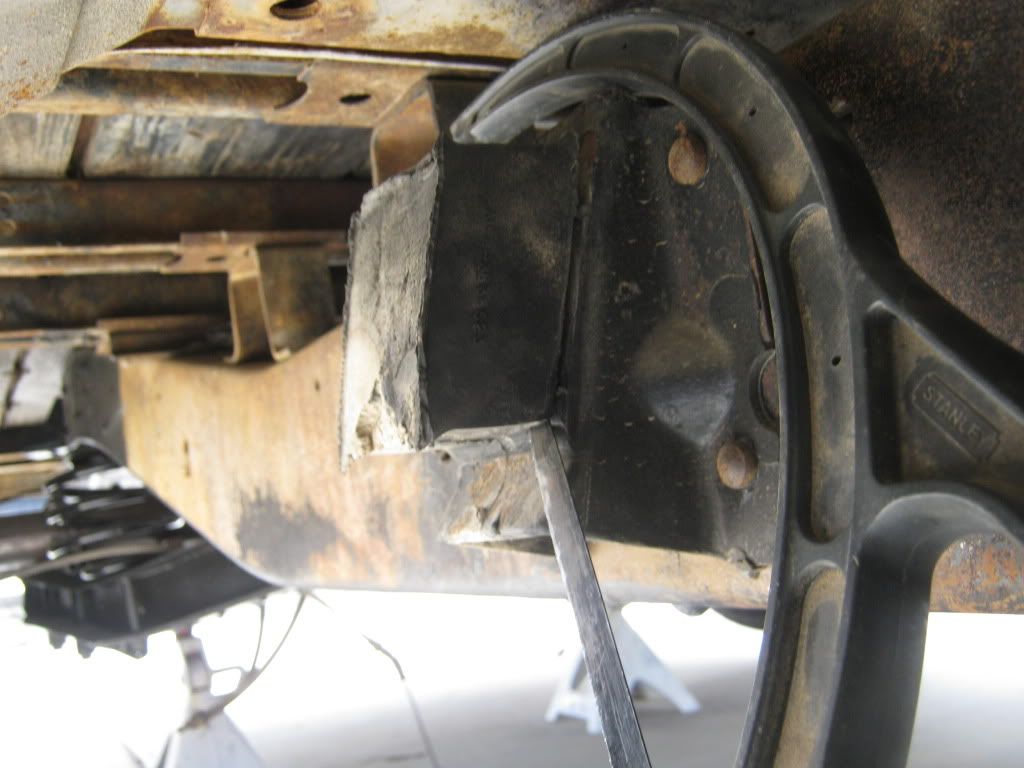 Once you get the pieces separated, you have to do the lovely task of getting the rest of the rubber off. The only way to do this is to get your torch and burn it off. Yeah, it's a nasty job, but it's really the only way you can do it. Continue to heat the rubber until it can be scraped off. The remaining rubber can be wisked off with a large wire brush. Get the rubber hot, and then hit it with the brush while it's still molten. The mount has to be clean in order to weld on it, which will come later. After the "arm" of the mount is removed and cleaned, I placed it back into position and made a measurement of the gap where the rubber block used to reside. It winds up being around 1.5". I determined that the best way to secure the arm and the riveted mount on the frame was to replace the rubber with steel. I wound up going to my local steel yard and bought some scrap steel, 3" wide by 1.5" tall U-channel, .250 thick. I got them for $4 total. I welded the U-channel (flat side out) to the cleaned mount section that's riveted to the frame. You're probably wondering how I plan to cushion this mount. It's real easy, I bought an Energy Suspension Cab Mount Kit (part# 34137, around $50) for a HALF TON. The bushings that normally attach to the mounts on a half ton will now go into the modified C-20 mount. I took the front mounts and swapped them out (they are the same between the half ton and the three quarter ton). I took the bushings for the aft mount and placed it and the flat washer on top of the mount arm and determined where the arm needed to be located. It's going to sit lower than it was originally, due to the thickness of the bushing. Once I liked where it was positioned, I welded the "arm" to the u-channel. I order to bolt this all together, you have to do a few things. First, the 1/2" x 5" long bolt in the Energy Suspension kit will not work. The nutplate in the cab floor on the C-20s is a 7/16", so you have to go to the bolt shop and get a 7/16" coarse x 5" bolt. Get a Grade 8, it's good insurance. Secondly, the Energy Suspension kit has a steel sleeve that has to insert into the upper and lower bushing. Unfortunately, the attach hole in the C-20 mount is slotted and needs to be enlarged to fit the sleeve. A die grinder works great for this. Once it was all welded and the hole was enlarged, I trimmed off the extra steel for the arm (the curly-Q section) to make it look a little more aesthetic. Here it is all finished (please note that the bolt is not ran down tight in this picture): 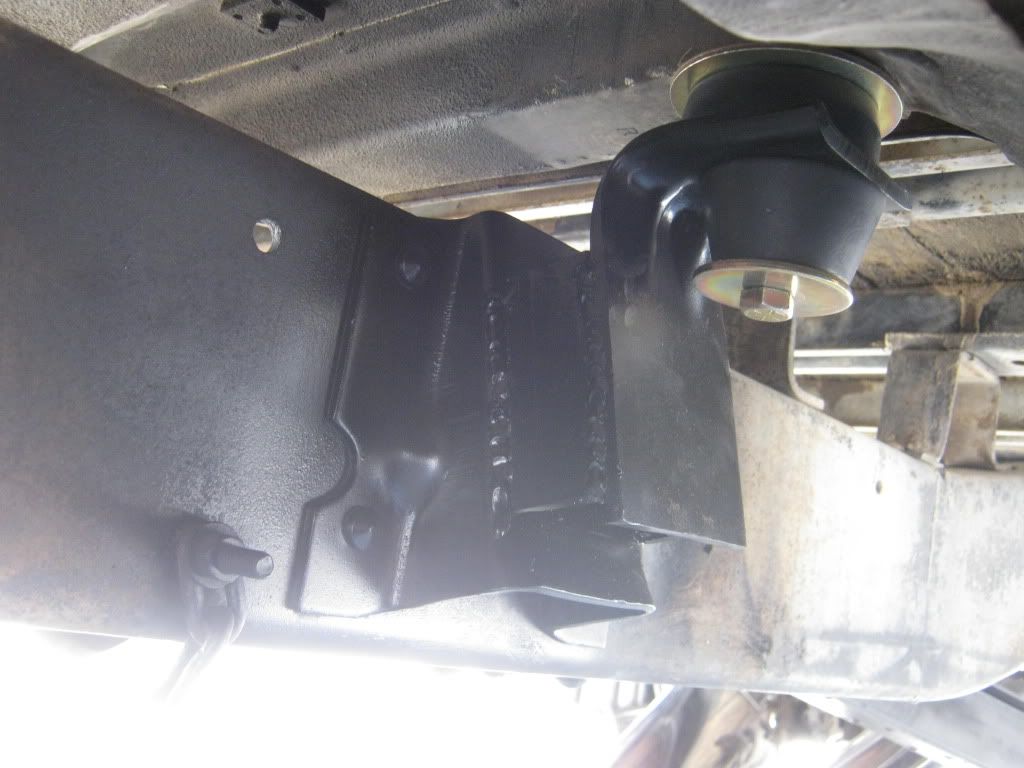 No more sagging!!!! 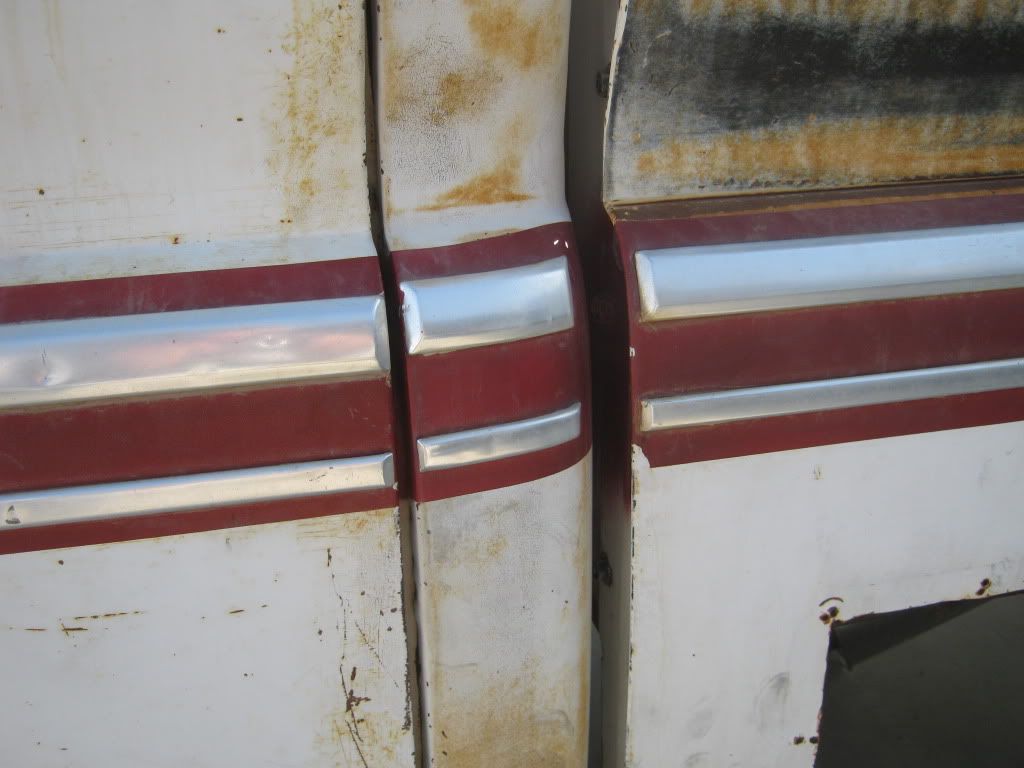 So, all total, I re-bushed all the cab mounts and fixed the problematic aft mounts for $58 (bushing kit, steel, and new 7/16" bolts).
__________________
Check out my latest endeavor: https://roundsixpod.com My build threads: '55 Chevy: http://67-72chevytrucks.com/vboard/s...d.php?t=247512 '64 C-20: http://67-72chevytrucks.com/vboard/s...d.php?t=446527 Last edited by chevyrestoguy; 03-15-2012 at 12:11 PM. |
|
|
|
|
03-15-2012, 11:54 AM
|
#140 | |
|
Registered User
Join Date: Aug 2011
Location: Patterson California
Posts: 1,133
|
Re: Project '64 Cheapskate
Quote:
__________________
MY 65 C20 BUILD http://67-72chevytrucks.com/vboard/s...d.php?t=483346 ......................_____ .........________//__{\_____ ,,,,,,,/__(O)___//___/__(O)_/ |
|
|
|
|
|
04-08-2012, 06:52 PM
|
#141 |
|
Gear Jammer
Join Date: May 2007
Location: Myrtle creek OR
Posts: 221
|
Re: Project '64 Cheapskate
Truck looks good!! Hopefully we run across each other somewhere up here soon.
|
|
|
|
|
06-17-2012, 10:54 AM
|
#142 |
|
Registered User
Join Date: Apr 2003
Location: Indep, MO
Posts: 5,893
|
Re: Project '64 Cheapskate
Great build!
Posted via Mobile Device
__________________
Boppa's Old Yeller Truck Build, Old Yeller's New Heart! Project Buzz Bomb Flyin' Low! |
|
|
|
|
06-17-2012, 03:21 PM
|
#143 |
|
Registered User
Join Date: Mar 2005
Location: apple valley, ca
Posts: 2,670
|
Re: Project '64 Cheapskate
Thank You, Sir. I have a been doing a ton of stuff on the truck lately, but I'm about 75% done on all of the many "little" jobs. As soon as I finish them 100%, I'll start posting up more photos. I don't want to post up a bunch of pictures of half-finished stuff. My work schedule has been hectic lately, and I can't put in as much "truck-time" as I would like.
__________________
Check out my latest endeavor: https://roundsixpod.com My build threads: '55 Chevy: http://67-72chevytrucks.com/vboard/s...d.php?t=247512 '64 C-20: http://67-72chevytrucks.com/vboard/s...d.php?t=446527 |
|
|
|
|
07-07-2012, 12:20 PM
|
#144 |
|
Registered User
Join Date: Mar 2005
Location: apple valley, ca
Posts: 2,670
|
Re: Project '64 Cheapskate
It's been awhile since I've posted anything on the '64, but that doesn't mean that there isn't anything going on with it. Actually, quite the opposite. I have a bunch of stuff going on, but I have been hesitant to post anything that's half-done with no expected completion date. I've been working some long hours, but in my spare time, I have been able to complete a portion of the build that was pretty important. The wheels!!
Because I converted the suspension to 1/2 ton, I now had the good fortune of being able to use a 5-lug wheel, which I prefer. The truck is being built with a mid-60s vibe, so naturally, a 5-spoke Torq-Thrust style wheel was what I had in mind. Finding an old Torq-Thrust style wheel in 5x5 was much more difficult than I expected. I did not want the later D-Spoke style wheels because I don't care for the curved spoke. They HAD to be the old straight-spoke style from the '60s. I found a pair of 15x8.5 ET Supers on the H.A.M.B., and I had a pair of 15x6 ETs in my parts stash, so the next step was to restore them to a '60s look. One of the rear wheels turned out to be cracked, so that meant it had to be fixed. The best way was to stop-drill the crack, then grind a "trench" and TIG weld it closed: 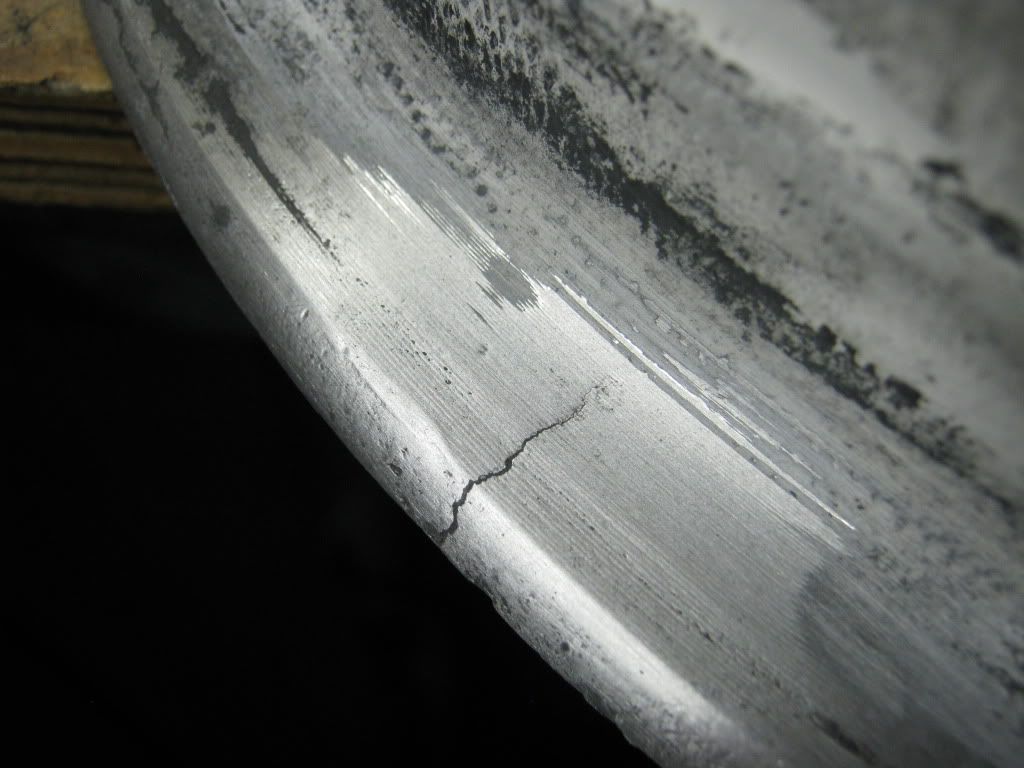 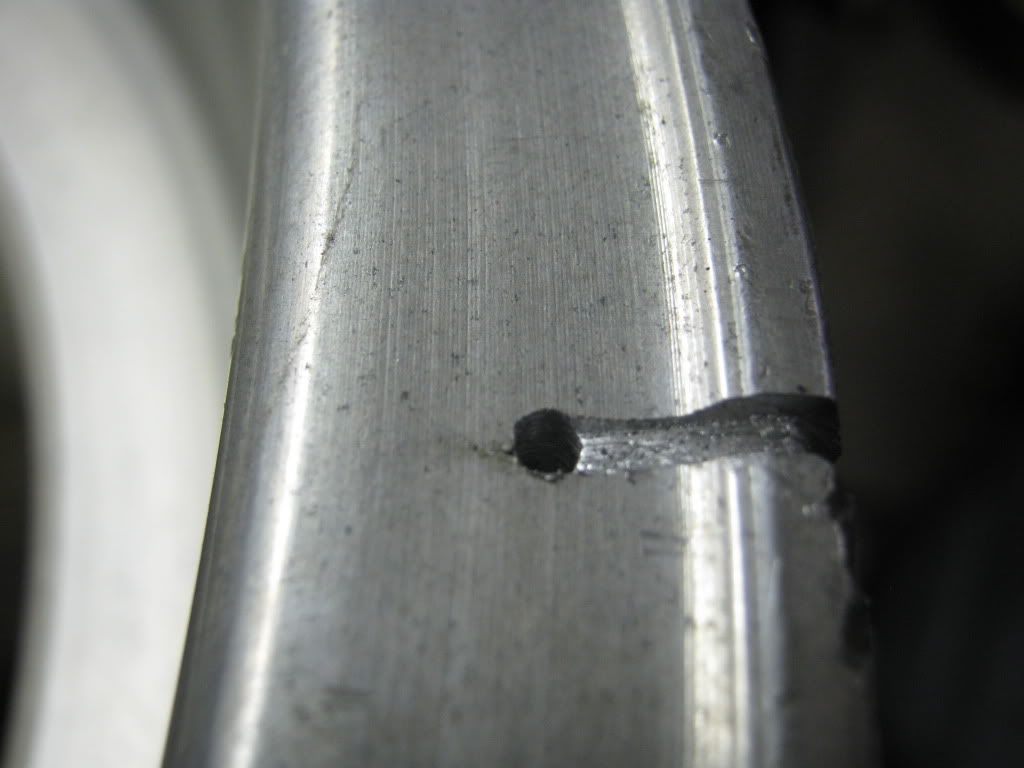 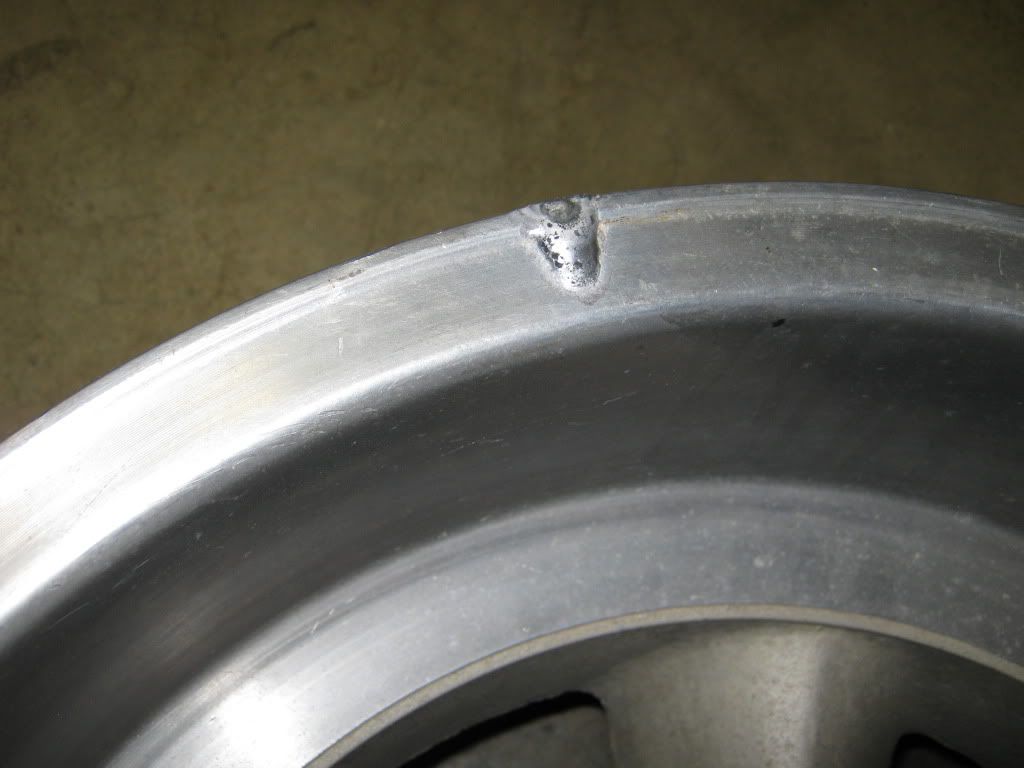 Because the wheel lips had some damage, it was a perfect opportunity to chuck them up in the lathe and true the lips and dress down the TIG weld at the same time. Next, the wheels were taped off and the centers were bead-blasted in preparation for paint. The fronts were already fully polished, so the blasting went really quick: 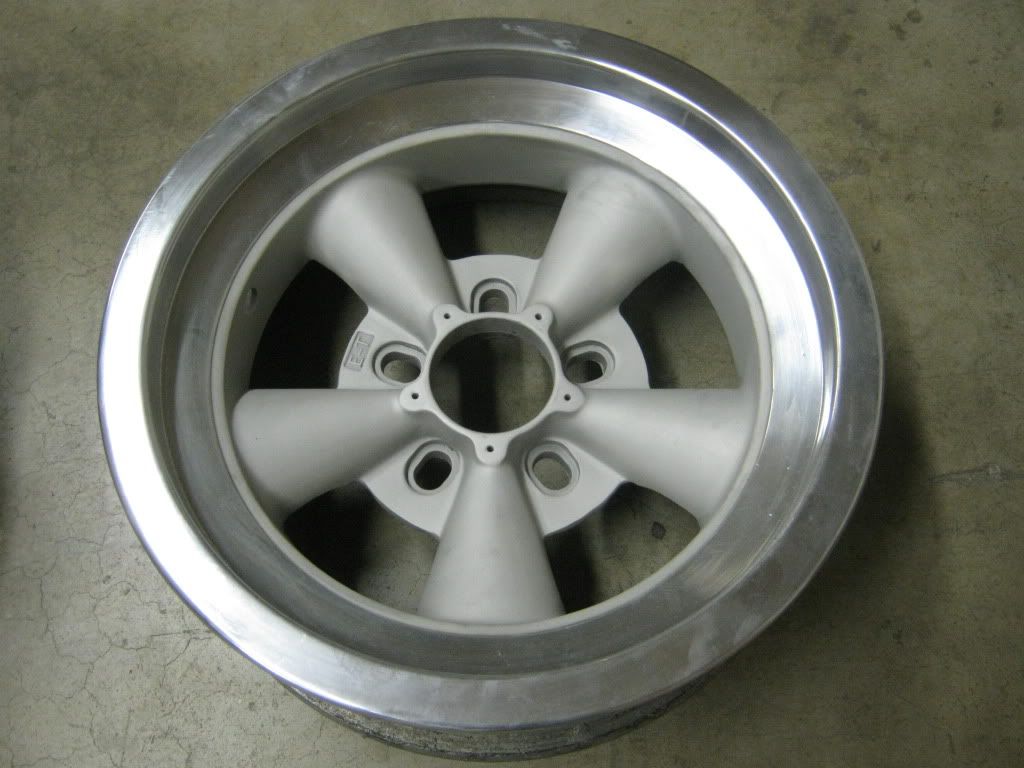 When it came time to paint the centers, Brad (hotrod49) had some extra paint left over from some previous custom jobs he had done, so we took some charcoal metallic base color paint and kept dropping in some silver base to get the shade just right. We waited until we had a calm morning and shot the wheels before the winds kicked up: 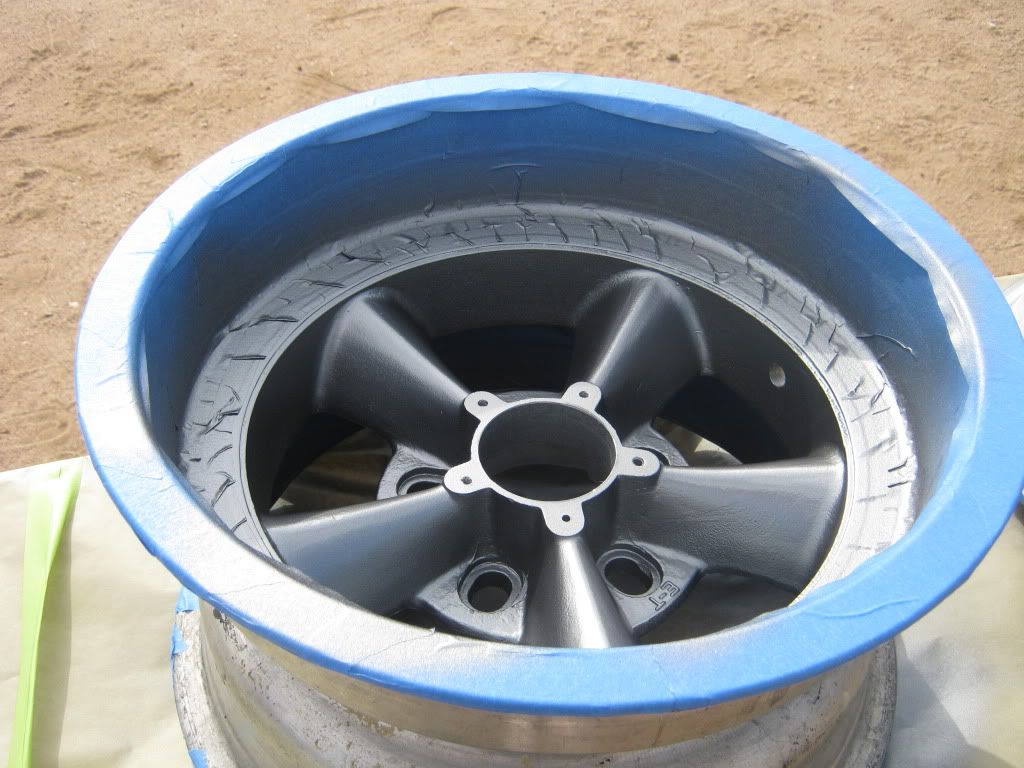 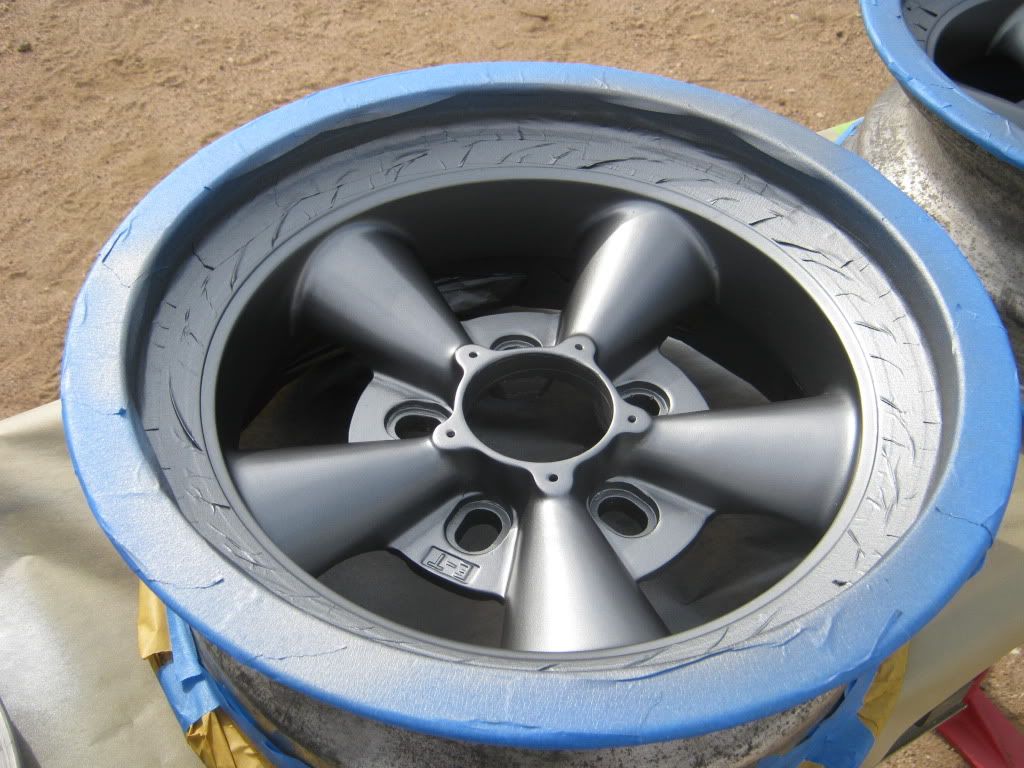 The ET wheels had a really funky oval center cap back in the '60s, and I thought that they would be perfect for the wheels to enhance the '60s vibe. I had been looking for months, and found a guy on a VW site called the Samba who had a set of N.O.S. ET caps so I grabbed them. 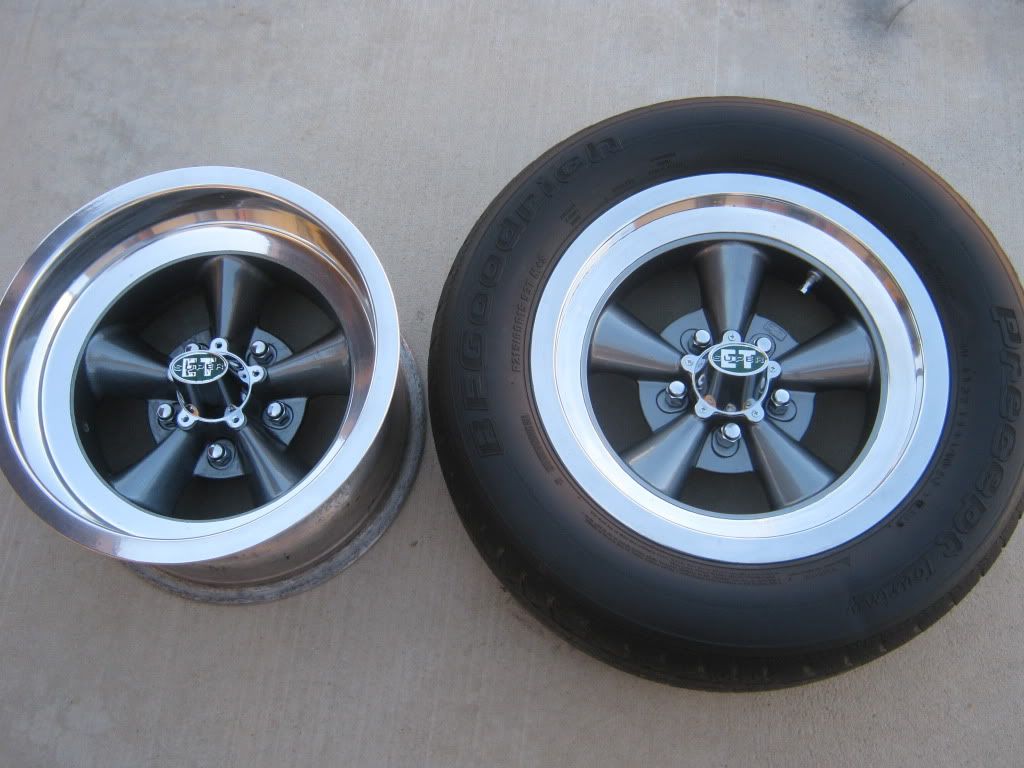 I haven't got the rear tires yet, but I hope to have them in the next few weeks. I have to get them first before I hammer out just how much I have to narrow the 12-bolt rear to get the wheels/tires to fit. I already have the Moser housing ends and a buddy who builds race cars owes me a favor and is going to do the narrowing as a payback. A BIG thanks to Brad for all of the help on painting the wheels, and the use of his awesome blast cabinet!! I've got lots of other stuff going on as well, and I'll post up the progress as I finish them.
__________________
Check out my latest endeavor: https://roundsixpod.com My build threads: '55 Chevy: http://67-72chevytrucks.com/vboard/s...d.php?t=247512 '64 C-20: http://67-72chevytrucks.com/vboard/s...d.php?t=446527 |
|
|
|
|
07-07-2012, 12:39 PM
|
#145 |
|
Registered User
Join Date: Jun 2010
Location: Vancouver Island BC
Posts: 652
|
Re: Project '64 Cheapskate
Wow Resto with updates like this their worth the wait!!! Beautiful job on the ET's nice choice by the way...those caps rock and the wheels look NOS. A post of this caliber is very appreciated, thanks for taking the time to shows us.
__________________
|
|
|
|
|
07-07-2012, 01:17 PM
|
#146 |
|
Registered User
Join Date: May 2007
Location: Deale Md
Posts: 4,663
|
Re: Project '64 Cheapskate
wheels look great can't wait to see them on the truck
__________________
James 63 GMC V6 4speed carryall 65 chevy swb bbw V8 auto 68 K20 327/4 speed, buddy buckets 2002 GMC CC Dually Duramax 64 GMC lwb 3/4 V6 4speed SOLD 66 GMC swb bbw buddy buckets SOLD IG duallyjams The only thing that stays the same is constant change! |
|
|
|
|
07-08-2012, 09:00 AM
|
#147 |
|
Registered User
Join Date: Aug 2010
Location: louisville, ky
Posts: 13
|
Re: Project '64 Cheapskate
Wow! Those wheels will look awesome on there.
Nate
__________________
In the process of looking for a 60 or newer short bed fleet side. |
|
|
|
|
08-04-2012, 10:14 PM
|
#148 |
|
Registered User
Join Date: Mar 2005
Location: apple valley, ca
Posts: 2,670
|
Re: Project '64 Cheapskate
I was able to get a lot of stuff done on the truck this weekend. The 12-bolt was torn down and sent over to a buddy's shop (RJ Fabrication, on the web as www.rjfabrication.com) to have the housing narrowed 1.5" on each side. Rob and I trade work between each other, and he owed me for a bunch of wiring work I did for him a while back.
So, while the rear end is being worked on, I spent the time doing a lot of cleaning, sandblasting, and painting. The driveshafts have been rebuilt with new yokes and u-joints. They have been blasted and painted with black primer, and I'll hit them with chassis black right before I install them for the last time. I had to build shims for the front motor mount stands because I used the ones from the '79 Suburban. I whipped them out of 3/8" aluminum plate. Also, because I wanted to get the engine perfectly level, I had to build shims for the trans crossmember. I wound up using a trans crossmember from a '70 Camaro because I had on laying around. I am a stickler for having the right pinion angle, so I even made a 3/8" shim for the carrier bearing to get all the angles right. While the rear end was out, I had to put the new wheel and tire in the opening to see how it was going to look. I am VERY happy with the results: 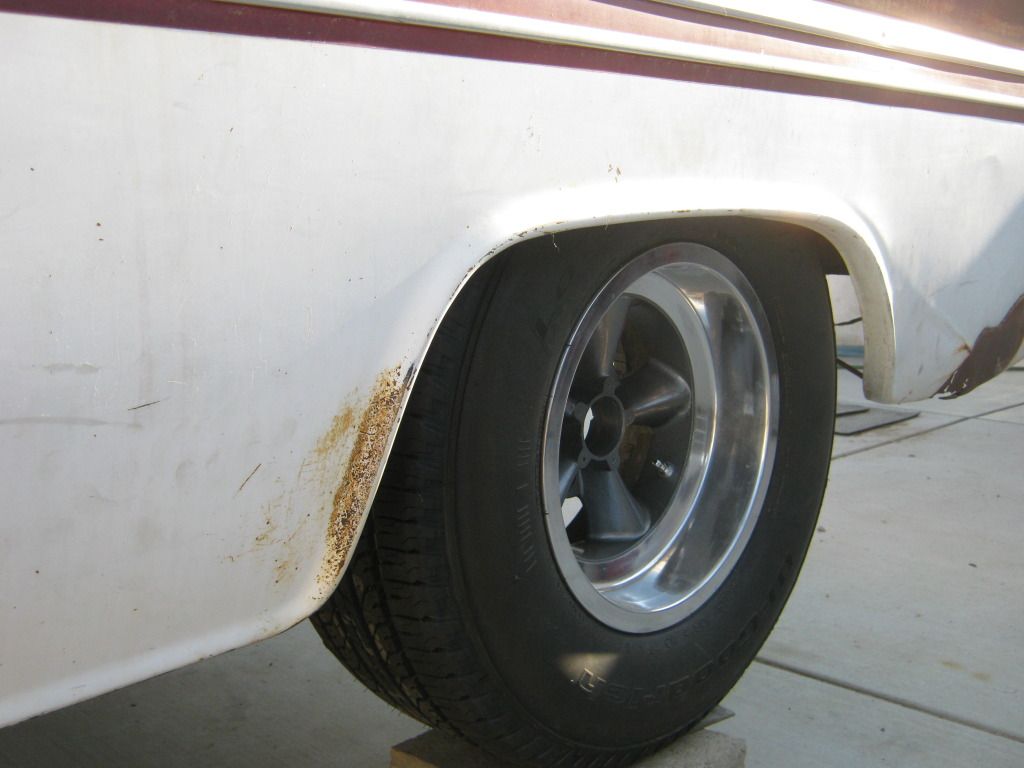 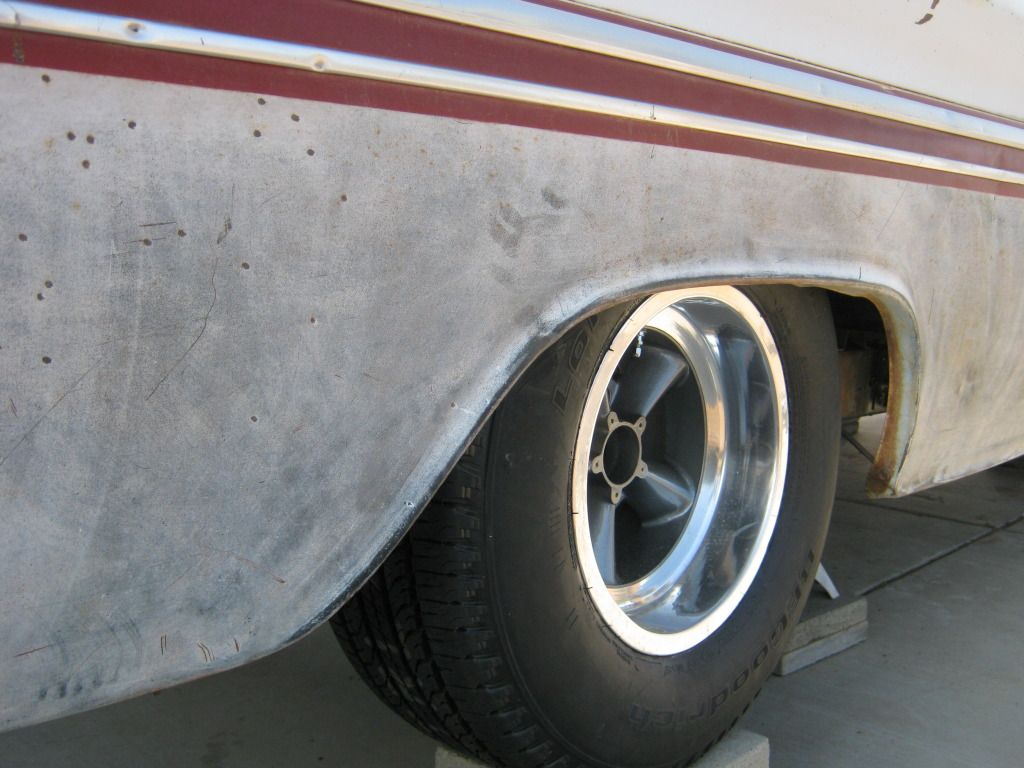 For those keeping score at home, the wheel is an ET II ('60s vintage) in 15x8.5 with a 3.0" backspace, and the tire is a BFG Long Trail Touring in 265/70-15. Fifteen inch tires are becoming increasingly more difficult to find in the larger sizes, and I had a heck of a time finding one that would give me the height and width I needed and still be an easily accessible tire to find if I needed to replace it. The next step is to get the exhaust up and situated while the rear end is out, paint the center of the frame, mock-up the master cylinder/booster and build brake lines, finish mounting the column and build the intermediate shaft, rebuild the steering linkage, replace the rear coil spring cups, paint the rear axle housing, and install the rear suspension for the last time. I want to get the suspension finished because I'm dying to get started on the motor and the exterior. You're going to flip when you see what we've got planned for the exterior.
__________________
Check out my latest endeavor: https://roundsixpod.com My build threads: '55 Chevy: http://67-72chevytrucks.com/vboard/s...d.php?t=247512 '64 C-20: http://67-72chevytrucks.com/vboard/s...d.php?t=446527 Last edited by chevyrestoguy; 08-04-2012 at 10:21 PM. |
|
|
|
|
08-04-2012, 11:48 PM
|
#149 |
|
Registered User
Join Date: Feb 2011
Location: muskogee, ok
Posts: 1,091
|
Re: Project '64 Cheapskate
ya those wheels were a good choice!!!!!
__________________
 bagged 66 longbed build http://67-72chevytrucks.com/vboard/s...d.php?t=449548 my favorite colors.. black, rust, and shiny!!!! instagram: @coulter918 |
|
|
|
|
08-05-2012, 01:02 AM
|
#150 |
|
Registered User
Join Date: Dec 2011
Location: Alaska
Posts: 405
|
Re: Project '64 Cheapskate
Your wheels really bring your project to life! Keep up the work and the updates, as we love seeing how it is going. I am looking forward to what you are planning for the exterior....
__________________
C@rnut001 (Owen) Alaskan Members Check In http://67-72chevytrucks.com/vboard/s...22#post5094422 http://67-72chevytrucks.com/vboard/s...18#post6778618 |
|
|
|
 |
| Bookmarks |
|
|


 Linear Mode

