
|
 05-24-2013, 02:37 PM
|
#1 |
|
Senior Member
Join Date: Jun 2007
Location: Pine Ridge Florida
Posts: 4,126
|
seat belt tutorial
I sold someone some seat belts parts today and wanted to post a tutorial on how to take apart and reassemble our seat belt components. I know many of you know how to do this but some may not. If someone has any corrections or additions feel free to add to this thread when I am done. I also have a thread where I kind of cleaned/restored a set
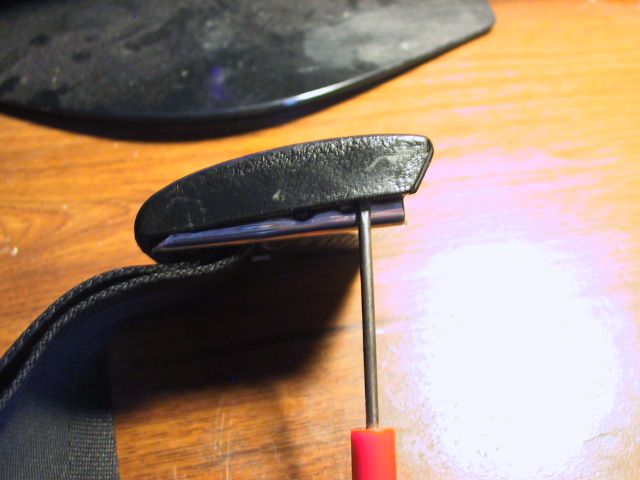
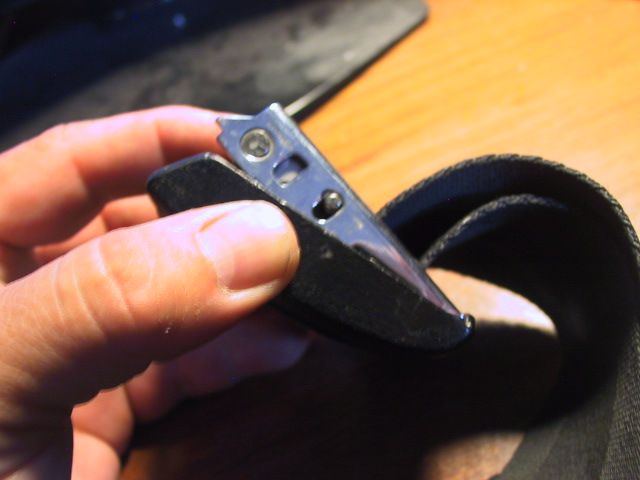
Seat belt restoration In this first picture I am pointing out what holds the plastic onto the metal mechanism. Be carefull trying to get them off you can tear the plastic easily. I hold the plastic body in one hand and try to pull straight out on the metal mechanism. 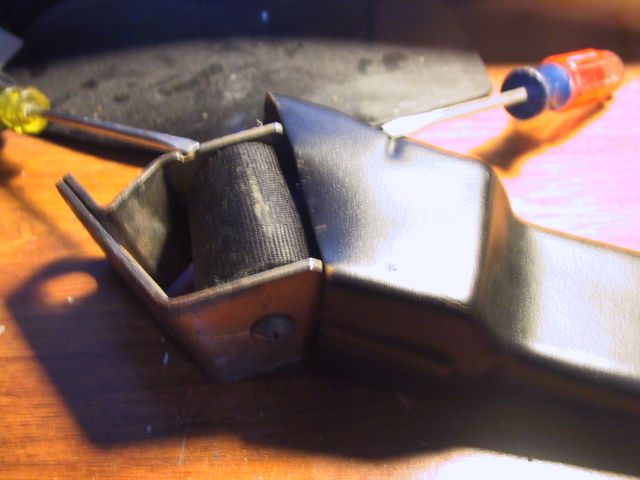 In the next picture I have the belt pulled all the way out showing the clip that holds the belt to the recoil part. I did not remove the clip as they can be tough to get off and on. I usually just get a screwdriver behind it and pry it off. Putting it back on can be frustrating and I don't have any tips for you. 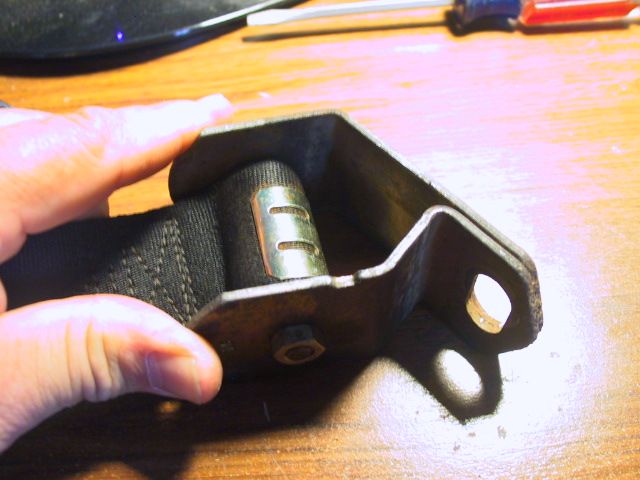 This shows the direction of the screw/bolt 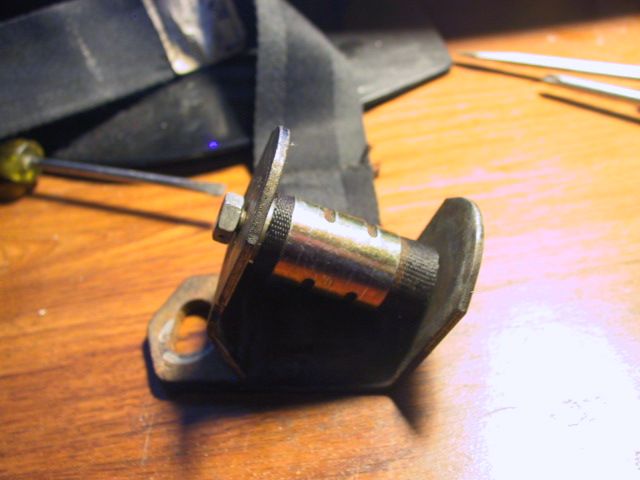 This shows the cut out of the screw 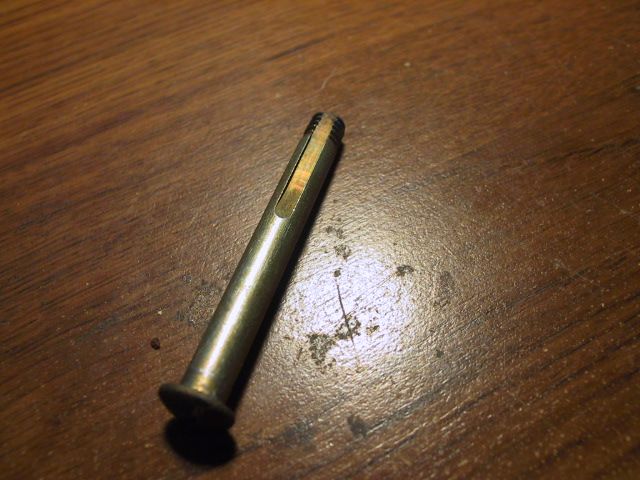 Here is the bolt with the sleeve it goes through 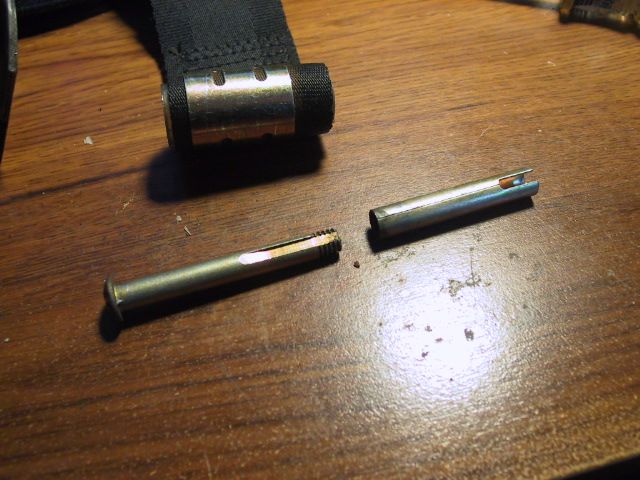 This is the notch in the recoil mechanism that the bolt and sleeve fit into. 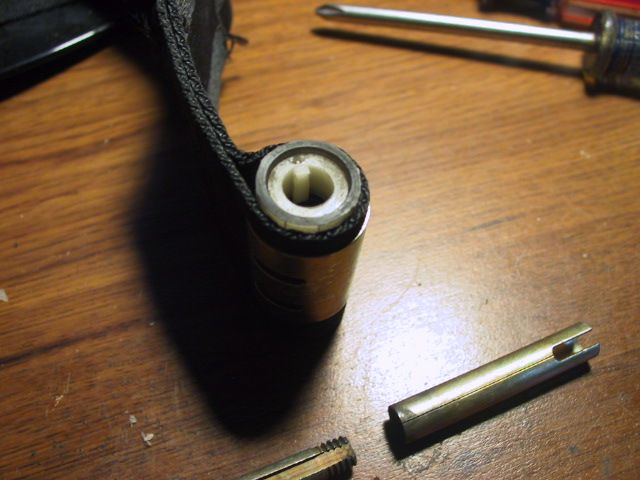
__________________
Click on my Not really a build thread, yet NOT SO RUST FREE RUST FREE BLAZER LS ENGINE SWAP INFORMATION THREAD BOLT RESTORATIONS 4l60 to an NP205 Last edited by Thealien; 05-24-2013 at 02:54 PM. |

|

|
|
05-24-2013, 02:38 PM
|
#2 |
|
Senior Member
Join Date: Jun 2007
Location: Pine Ridge Florida
Posts: 4,126
|
Re: seat belt tutorial
Here is the bolt and sleve in the mechanism. This is just to show how it goes. You have to have the belt clipped to the recoil mechanism. You then have to slide the recoil mechanism with the sleeve in facing the correct way back into the metal housing. When it is aligned with the hole you slide the screw through spinning it until the slot matches the recoil mechanism and you can push it the rest of the way through.
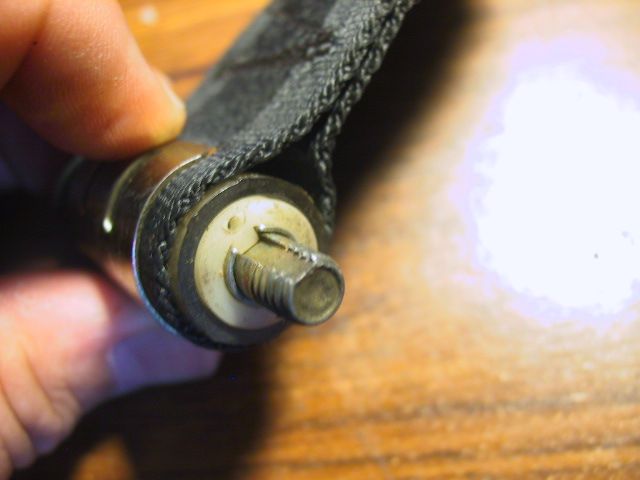 This is just to show how the spring fits into the plastic ends of the recoil mechanism. The other side is similar, Just remember upon installation the notched part has to go on the nut side (same side as the mounting tab) 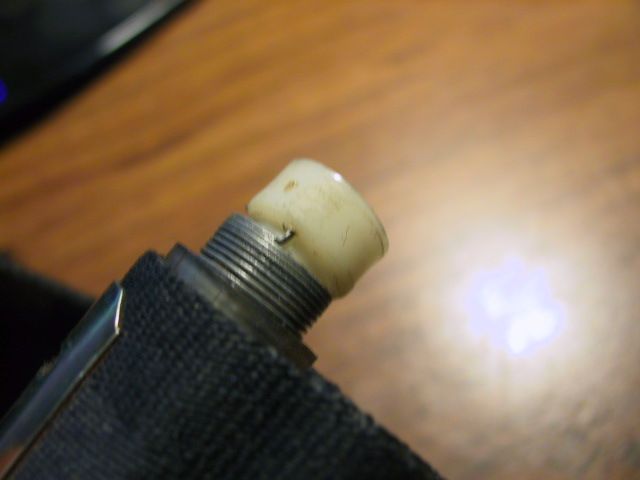 I mark the head of the philips screw. When everything is back together you will have to preload the recoil spring. 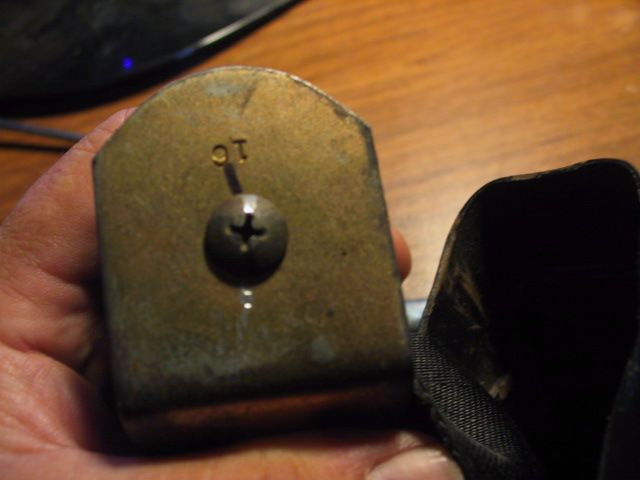 I pull the belt out and hold it. With a philips screwdriver in the screw and a 1/2 inch wrench or socket on the other I loosen the nut while holding the screw. I then count how many turns the screw takes to unload (mine was about 6). Before snapping the plastic cover back on test the spring tension. You should be able to pull the belt all the way out until you see that clip. The belt should also recoil back all the way. There is a fine line between too much and not enough. You will get it after a few tries. When you are happy snug the nut a little more (while adjusting you will have to hold the screw with a screwdriver and loosen and then tighten that nut snugly each time for each adjustment). You won't have to crank on that nut, just snug until you are happy and when happy tighten a little more. Snap the cover on and you are done with that part. 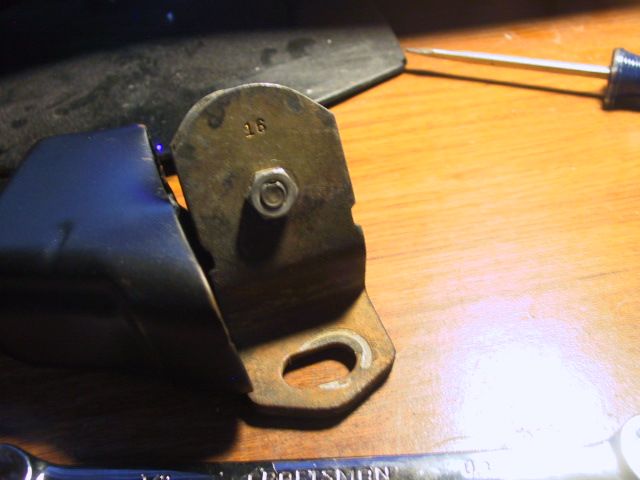
__________________
Click on my Not really a build thread, yet NOT SO RUST FREE RUST FREE BLAZER LS ENGINE SWAP INFORMATION THREAD BOLT RESTORATIONS 4l60 to an NP205 Last edited by Thealien; 05-24-2013 at 03:11 PM. |
|
|
|
|
05-24-2013, 02:38 PM
|
#3 |
|
Senior Member
Join Date: Jun 2007
Location: Pine Ridge Florida
Posts: 4,126
|
Re: seat belt tutorial
Here is how you take the buckle apart I am pointing to where you have to pry. Carefull they crack/break easy!
 This is the notch in the back of the cover 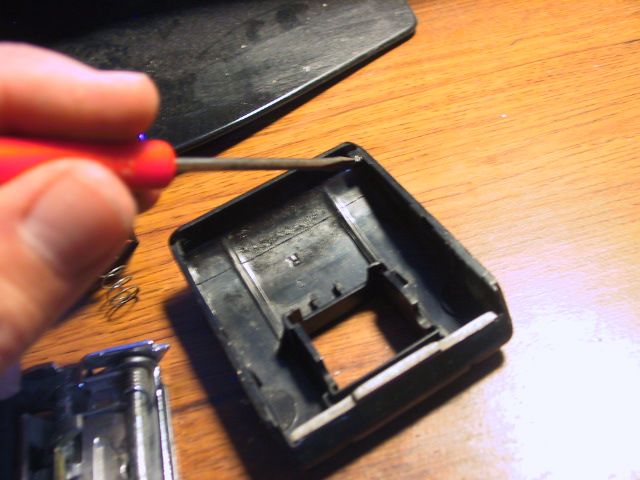 And the matching notch on the buckle 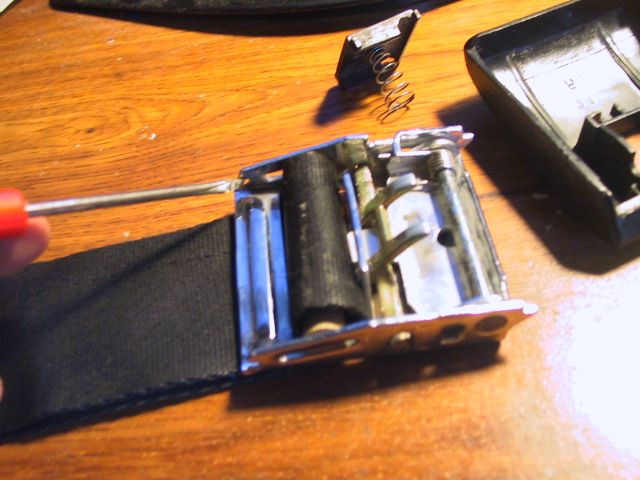 Here is the notch on the side that you are prying it apart for 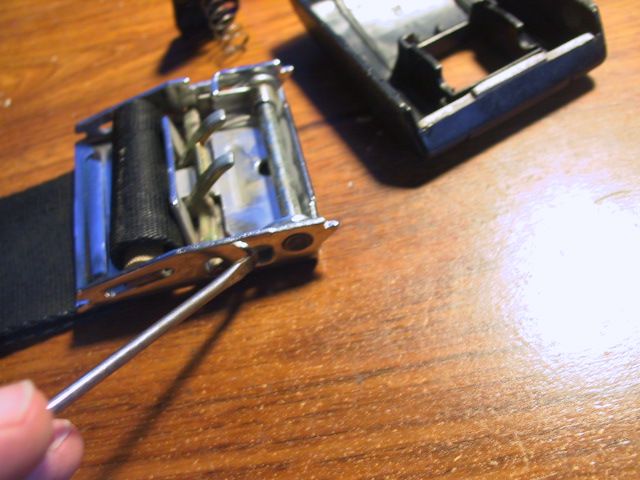 And the matching notch in the plastic cover 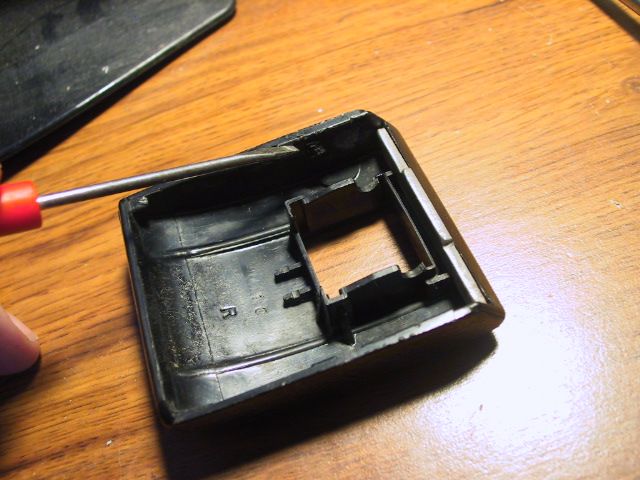 Here is the button in the cover. Note the metal part in the front. It is in wrong 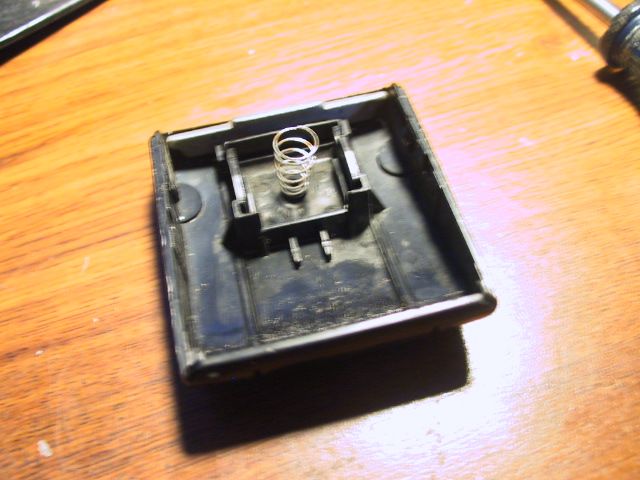 Here is how the metal piece is supposed to go. 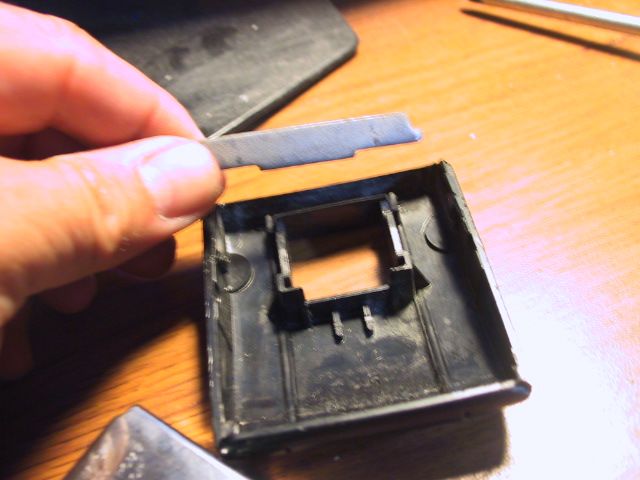
__________________
Click on my Not really a build thread, yet NOT SO RUST FREE RUST FREE BLAZER LS ENGINE SWAP INFORMATION THREAD BOLT RESTORATIONS 4l60 to an NP205 Last edited by Thealien; 05-24-2013 at 03:19 PM. |
|
|
|
|
05-24-2013, 02:39 PM
|
#4 |
|
Senior Member
Join Date: Jun 2007
Location: Pine Ridge Florida
Posts: 4,126
|
Re: seat belt tutorial
Here is how the buckle looks with the webbing removed. Make sure the friction part moves freely and the release part moves freely.
 Here is how you start feeding the webbing back through the buckle. 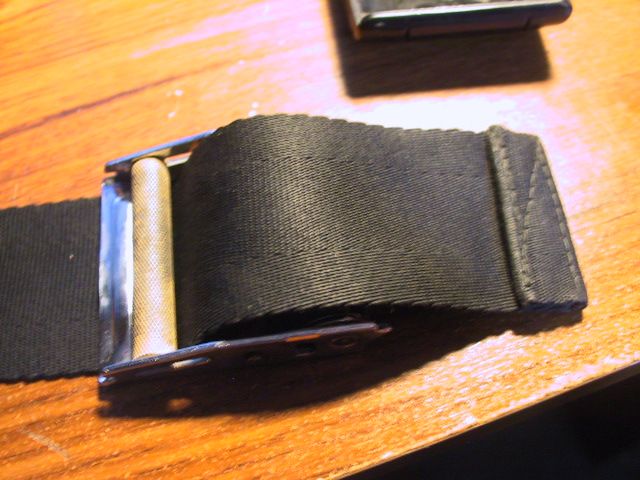 And then feed it back through. 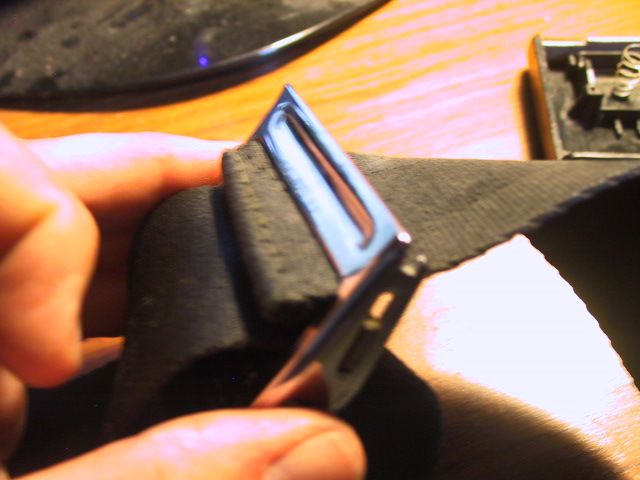 Here is how it should look when it is back through. While feeding it you can leave a big loop in the buckle and pull it tight when the folded part is back through. 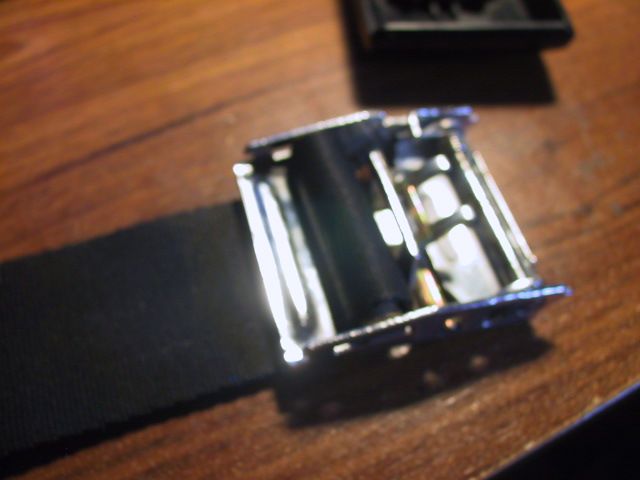
__________________
Click on my Not really a build thread, yet NOT SO RUST FREE RUST FREE BLAZER LS ENGINE SWAP INFORMATION THREAD BOLT RESTORATIONS 4l60 to an NP205 Last edited by Thealien; 05-24-2013 at 03:25 PM. |
|
|
|
|
05-24-2013, 02:39 PM
|
#5 |
|
Senior Member
Join Date: Jun 2007
Location: Pine Ridge Florida
Posts: 4,126
|
Re: seat belt tutorial
When snapping the plastic cover on you have to start at the back. Remember the notches?
 Make sure you have the button in place and facing the right way.  Then I just hold it like this and snap it back together. If its not all lined up in the back and that metal piece I showed upside down isn't in correctly it wont go back together. 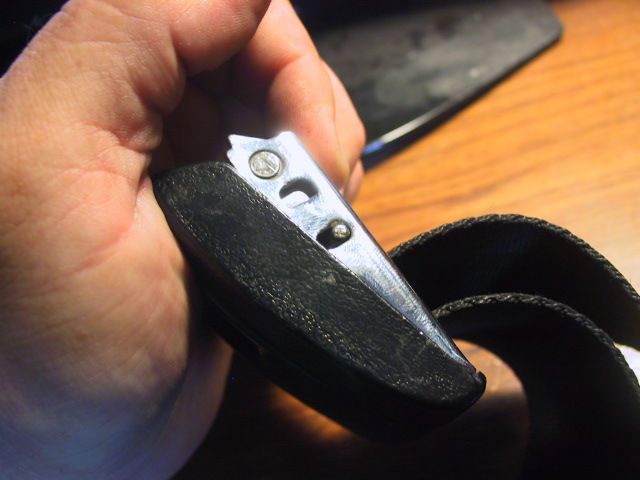 If it is all correct the sides of the plastic will be flush with the metal buckle part. 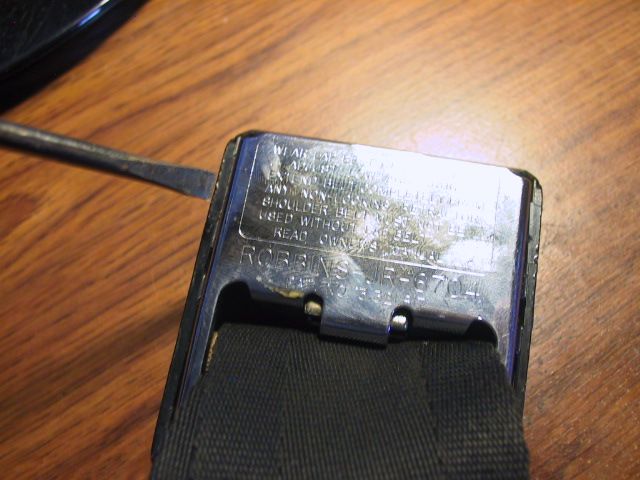 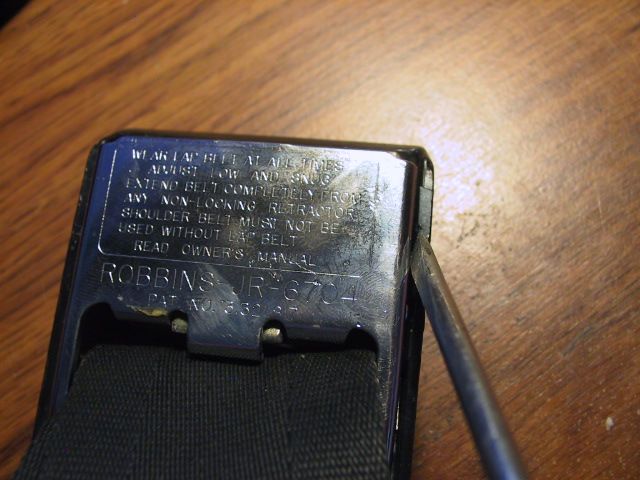 I hope this helps somebody.
__________________
Click on my Not really a build thread, yet NOT SO RUST FREE RUST FREE BLAZER LS ENGINE SWAP INFORMATION THREAD BOLT RESTORATIONS 4l60 to an NP205 Last edited by Thealien; 05-24-2013 at 03:31 PM. |
|
|
|
|
05-24-2013, 04:39 PM
|
#6 |
|
Registered User
Join Date: Apr 2011
Location: Klein Texas
Posts: 3,852
|
Re: seat belt tutorial
It helps me. The webbing refuses to move in the buckles of my '67 Corvette. They look very similar.
__________________
My Classics: '72 K20 Suburban + '65 Dodge Town Wagon '72 Corvette Roadster +'67 Corvette Roadster '73 Z-28 Camaro '63 Ford SWB Uni Pickup '50 Ford Coupe |
|
|
|
|
05-24-2013, 04:54 PM
|
#7 |
|
Senior Member
 Join Date: Oct 2009
Location: Godley, TX
Posts: 17,931
|
Re: seat belt tutorial
Very helpful, thx!
Posted via Mobile Device |
|
|
|
|
05-24-2013, 05:43 PM
|
#8 | |
|
Senior Member
Join Date: Jun 2007
Location: Pine Ridge Florida
Posts: 4,126
|
Re: seat belt tutorial
Quote:
__________________
Click on my Not really a build thread, yet NOT SO RUST FREE RUST FREE BLAZER LS ENGINE SWAP INFORMATION THREAD BOLT RESTORATIONS 4l60 to an NP205 |
|
|
|
|
|
05-24-2013, 10:13 PM
|
#9 | |
|
Special Order
  Join Date: Nov 2004
Location: Mt Airy, MD
Posts: 85,862
|
Re: seat belt tutorial
Quote:
__________________
"BUILDING A BETTER WAY TO SERVE THE USA"......67/72......"The New Breed" GMC '67 C1500 Wideside Super Custom SWB: 327/M22/3.42 posi.........."The '67" (project) GMC '72 K2500 Wideside Sierra Custom Camper: 350/TH350/4.10 Power-Lok..."The '72" (rolling) Tim "Don't call me a redneck. I'm a rough cut country gentleman" R.I.P. ~ East Side Low Life ~ El Jay ~ 72BLUZ ~ Fasteddie69 ~ Ron586 ~ 67ChevyRedneck ~ Grumpy Old Man ~ Last edited by special-K; 05-26-2013 at 09:46 AM. |
|
|
|
|
|
05-24-2013, 10:40 PM
|
#10 |
|
Account Suspended
Join Date: Aug 2005
Location: Southern UT
Posts: 905
|
Re: seat belt tutorial
Great post! I was searching the forums for this info yesterday. This needs to be in the FAQ section.
|
|
|
|
|
05-24-2013, 11:33 PM
|
#11 |
|
Senior Member
Join Date: Aug 2008
Location: Cedar Park, Texas
Posts: 7,494
|
Re: seat belt tutorial
Great thread! Thanks! I have taken the buckle covers and lower boots off but never attempted the retractors. Btw, i have found that a table knife is great for getting the buckle covers off. Shhh...dont tell my wife!
Posted via Mobile Device |
|
|
|
|
05-25-2013, 12:00 AM
|
#12 |
|
70+ ( Old Skool Club )
Join Date: Nov 2003
Location: Saskatoon, Saskatchewan ,Canada
Posts: 9,073
|
Re: seat belt tutorial
Thank you for sharing, this great info.
Posted via Mobile Device
__________________
1972 C10 Custom/Deluxe 613 Highlander 406/700R4 1999 White Tahoe LS 4x2 with Z56 Police Package 1992 K1500 GMC Suburban Members I have personally met: MusicMan70 - HeavyD - ChewyChevy67 - StingRay -71SWB4x4 - 67 Burb - DeadheadNM - too much stuff - bc65 - das601 " Circumsatances Do Not Change Responsibility " " The Sky is not the Limit, Your Mind is." Marilyn Monroe .. RIP Charlie Watts 1941 - 2021 |
|
|
|
|
05-25-2013, 06:28 AM
|
#13 |
|
Senior Member
Join Date: Jun 2007
Location: Pine Ridge Florida
Posts: 4,126
|
Re: seat belt tutorial
Reading these posts makes it worth taking the time to do threads like this for the members here. I have learned a lot from others here and like to help when I can. Thanks
__________________
Click on my Not really a build thread, yet NOT SO RUST FREE RUST FREE BLAZER LS ENGINE SWAP INFORMATION THREAD BOLT RESTORATIONS 4l60 to an NP205 |
|
|
|
|
06-02-2013, 10:11 AM
|
#14 |
|
Senior Member
Join Date: Jun 2007
Location: Pine Ridge Florida
Posts: 4,126
|
Re: seat belt tutorial
Bumping this up as search only brings up 100 posts.
__________________
Click on my Not really a build thread, yet NOT SO RUST FREE RUST FREE BLAZER LS ENGINE SWAP INFORMATION THREAD BOLT RESTORATIONS 4l60 to an NP205 |
|
|
|
|
06-23-2013, 11:17 AM
|
#15 |
|
Senior Member
Join Date: Jun 2007
Location: Pine Ridge Florida
Posts: 4,126
|
Re: seat belt tutorial
bump
__________________
Click on my Not really a build thread, yet NOT SO RUST FREE RUST FREE BLAZER LS ENGINE SWAP INFORMATION THREAD BOLT RESTORATIONS 4l60 to an NP205 |
|
|
|
|
06-26-2013, 07:06 AM
|
#16 |
|
It's alsways something.....
Join Date: Nov 2008
Location: Douglasville GA
Posts: 1,171
|
Re: seat belt tutorial
Great info, thanks for sharing
__________________
1968 RS Camaro 'Vert Matching number 327 and M21 Muncie 1968 C10 Black with red interior and orig paint. 5.3 / 4l60e,3:73 POSI 17" Torq Thrusts 1968 CST 514 Red with black interior. Buddy Buckets, Factory A/C, PS, PB- 20" AR custom shop TT, 5.3 and 4l60e |
|
|
|
|
10-17-2013, 08:24 AM
|
#17 |
|
Senior Member
Join Date: Jun 2007
Location: Pine Ridge Florida
Posts: 4,126
|
Re: seat belt tutorial
bump for some new views
__________________
Click on my Not really a build thread, yet NOT SO RUST FREE RUST FREE BLAZER LS ENGINE SWAP INFORMATION THREAD BOLT RESTORATIONS 4l60 to an NP205 |
|
|
|
|
02-24-2014, 06:16 PM
|
#18 |
|
Senior Member
Join Date: Jun 2007
Location: Pine Ridge Florida
Posts: 4,126
|
Re: seat belt tutorial
bump for some new reads
__________________
Click on my Not really a build thread, yet NOT SO RUST FREE RUST FREE BLAZER LS ENGINE SWAP INFORMATION THREAD BOLT RESTORATIONS 4l60 to an NP205 |
|
|
|
|
06-04-2014, 01:07 PM
|
#19 |
|
Junior Member
Join Date: Aug 2013
Location: San Antonio, Texas
Posts: 33
|
Re: seat belt tutorial
I bought some replacement lap belts out of LMC because my K5 has universal latch belts from the PO and they don't adjust too well. I'm trying to install them but they have no instructions and I'm quite baffled as to where the original mounting locations were? Any knowledge you guys can drop on me would be much appreciated.
|
|
|
|
|
06-04-2014, 01:38 PM
|
#20 |
|
Senior Member
Join Date: Oct 2009
Location: Godley, TX
Posts: 17,931
|
Re: seat belt tutorial
4 points of attachment - 1st pic is close up of the outside belt attach point on the driv side. Same on pax side. 2nd pic shows the other 3 locations. The center 2 attach points have 2 belts attached as depicted. Hope this helps. Pardon my fancy rusted "bucket" seat...
EDIT: oh, and one more thing, since I kinda stuck the arrow over the belts by accident - the driver's side inner attach point should have two female belts and the passenger side inner attach point should have one female and one male belt attached. This way, when seated in the middle, the rider would stretch a male belt across his lap from right to left to hook into the female coupling on his left. If that makes sense. As you look at the bench seat with nobody in it, going from driver's side to passenger side it should go in this order: - Driver's side male (retractable with boot) mounted to the floor - Driver's side female (mounted to driver's side inner mounting point) - Middle passenger female (mounted to same driver's side inner mounting point) - Middle passenger male (mounted to passenger side inner mounting point) - Passenger side female (mounted to same passenger side inner mounting point) - Passenger side male (retractable with boot) mounted to the floor Last edited by jocko; 06-04-2014 at 01:46 PM. |
|
|
|
|
07-08-2014, 10:42 PM
|
#21 |
|
70+ ( Old Skool Club )
Join Date: Nov 2003
Location: Saskatoon, Saskatchewan ,Canada
Posts: 9,073
|
Re: seat belt tutorial
So I guess to change the plastic seatbelt cover I would have to remove the clip that you didn't want to take off like in your picture??
__________________
1972 C10 Custom/Deluxe 613 Highlander 406/700R4 1999 White Tahoe LS 4x2 with Z56 Police Package 1992 K1500 GMC Suburban Members I have personally met: MusicMan70 - HeavyD - ChewyChevy67 - StingRay -71SWB4x4 - 67 Burb - DeadheadNM - too much stuff - bc65 - das601 " Circumsatances Do Not Change Responsibility " " The Sky is not the Limit, Your Mind is." Marilyn Monroe .. RIP Charlie Watts 1941 - 2021 |
|
|
|
|
07-27-2020, 03:23 PM
|
#22 |
|
Senior Member
Join Date: Jun 2007
Location: Pine Ridge Florida
Posts: 4,126
|
Re: seat belt tutorial
Bumping this thread as someone was looking for this information.
__________________
Click on my Not really a build thread, yet NOT SO RUST FREE RUST FREE BLAZER LS ENGINE SWAP INFORMATION THREAD BOLT RESTORATIONS 4l60 to an NP205 |
|
|
|
|
01-01-2022, 01:09 PM
|
#23 |
|
Senior Member
Join Date: Aug 2014
Location: cooperstown. ny
Posts: 1,573
|
Re: seat belt tutorial
Thank you for this. Just read it today, I need to find some aqua covers that need to be replaced.And this explains how to replace them.
__________________
1972 Chevy Custom Deluxe Highlander, owned 34 years. 1970 GMC Sierra Grande 2500, unrestored, original. 1970 Chevy K10 Short Wide-bed, working on restoration.. 1967 Chevy K10 Short Stepside, unrestored original. 1969 GMC CST (Longhorn) 396, buckets, unrestored. 1995 GMC K2500, 65,000 miles, 454. |
|
|
|
|
01-01-2022, 01:47 PM
|
#24 |
|
Senior Member
Join Date: Jun 2007
Location: Pine Ridge Florida
Posts: 4,126
|
Re: seat belt tutorial
You are welcome sir. I’m glad someone could use the information.
__________________
Click on my Not really a build thread, yet NOT SO RUST FREE RUST FREE BLAZER LS ENGINE SWAP INFORMATION THREAD BOLT RESTORATIONS 4l60 to an NP205 |
|
|
|
|
03-10-2023, 11:13 AM
|
#25 |
|
Senior Member
Join Date: Nov 2022
Location: So central coast, CA
Posts: 426
|
Re: seat belt tutorial
Excellent thread. A great step by step.
Thanks for the time you put in on this one. I have tried to document different restoration projects but find I just don't have the patience as it REALLY slows down the job at hand. Well done and appreciated. |
|
|
|
 |
| Bookmarks |
|
|


 Linear Mode

