
|
Register or Log In To remove these advertisements. |
|
|
|
|||||||
 |
|
|
Thread Tools | Display Modes |
 10-08-2015, 03:52 PM
|
#1 |
|
Registered User
Join Date: Jul 2013
Location: Canton, TX
Posts: 245
|
Project: TH350C Rebuild
I didn't know whether or not to keep this as part of my build thread or break it out, but I figured that somebody might be interested in this too and I didn't want them to have to wade through the banter on my build thread to get the info. So, here goes.
This thread will be a stock rebuild of my TH350C transmission using components that anyone can get from their local green, blue or orange auto supply houses. I do realize that you get one rebuilt by professional, get a lot of experience going into that "new" transmission by the skilled hands that build it, but I figure if I get it right, I will have learned something new and hopefully helped someone else with a similar problem. I'm going to go ahead and get this out in the open. I am NOT a transmission guy. I have been in and around a garage my whole life, nearly everyone in my family is a mechanic or a machinist, but I decided on a career in IT/Information Security. I am going to make mistakes, and once these mistakes are documented I don't think I can edit them, so read the entire thread from beginning to end. I just may have an update in a later post that answers the question or corrects the mistake I made. I AM, however, a person who is not afraid to try something that I know nothing about, because I know there are vast resources on the interwebs that can help, this forum and the brilliant people who contribute to it is a great example of only one of theses resources. If you have advice for me, feel free to give it. If you want advice on how I did what I have posted, ask, and I will do my best to answer any questions, but remember, I'm NOT a transmission guy. I'm just a guy who's trying to save a buck. I'm not trying write a definitive manual on transmissions rebuilds, I'm just documenting the rebuild of mine. A typical rebuilt kit costs ~$50-$150 depending on what you need to replace, and a rebuilt transmission is around $450. I am a guy that likes to do things myself to save money; I call it being conservative, and my wife calls that being a "cheapskate". My transmission has 1st gear completely gone. Reverse still worked, and I'm sure the higher "gears" are fine. We are about to find out. First things first. 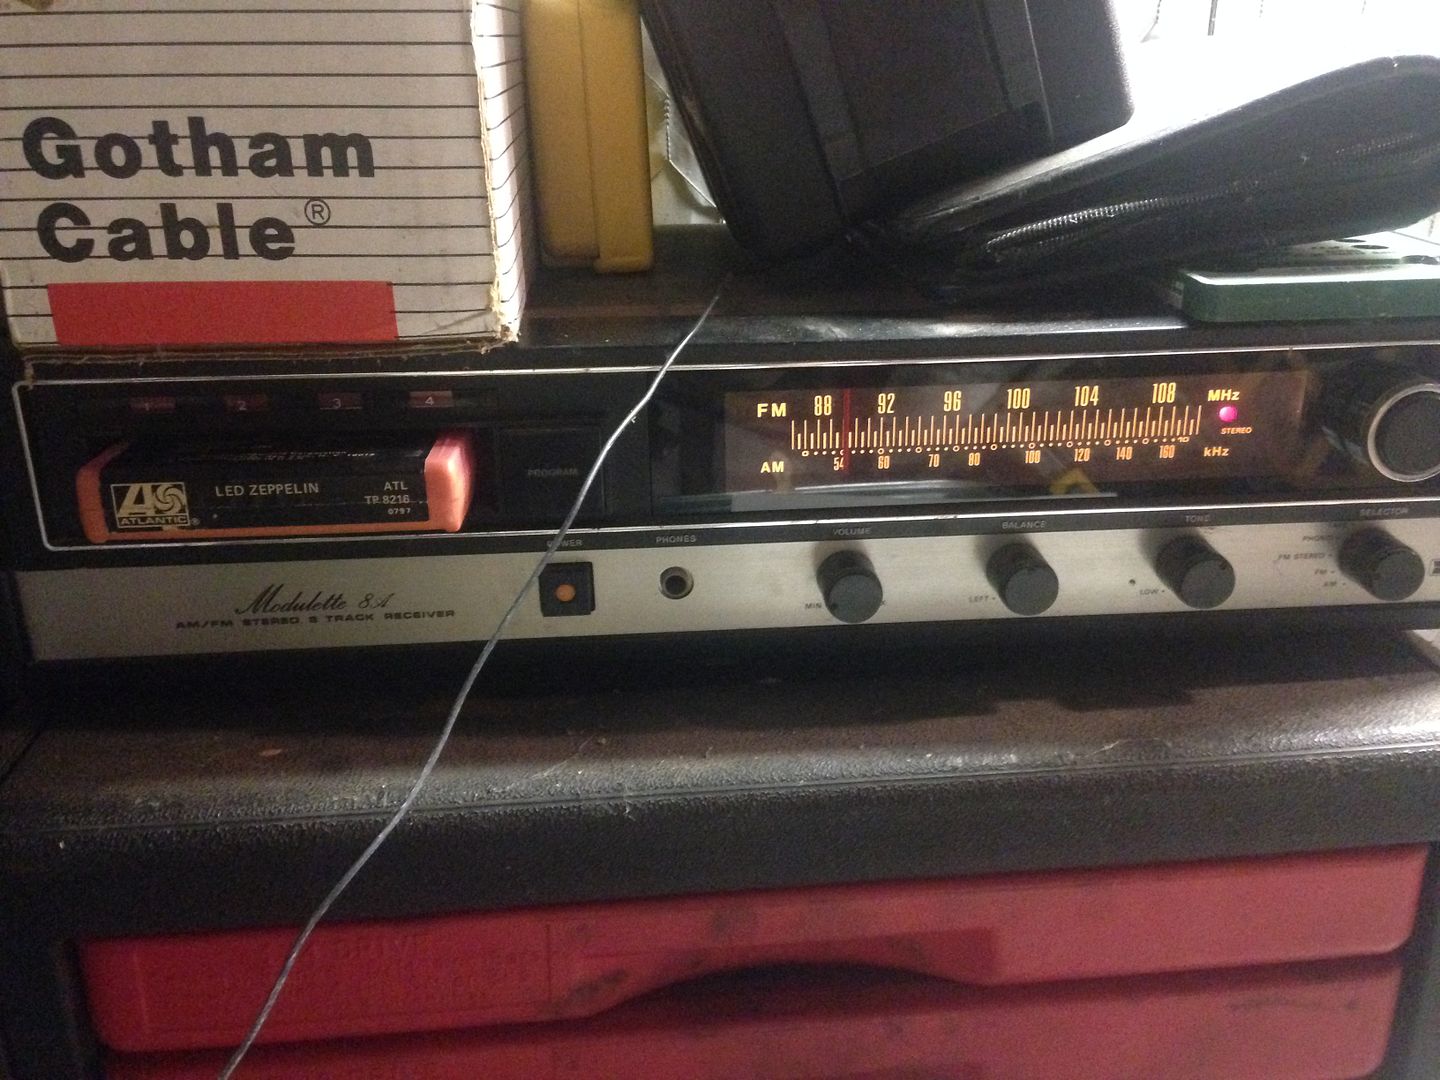 Now that I have music to work by, I needed to fabricate a bracket so that I could manipulate the transmission, as there is no way that I was about to try this on a table. So, using some metal I had laying around in the shop, and a welder borrowed from a friend, I welded up a bracket that I could attach to my motor stand. With the bracket made, I attached it to the tranny, drained the fluid, then mounted it on the stand. Now I can rotate the tranny however I want. 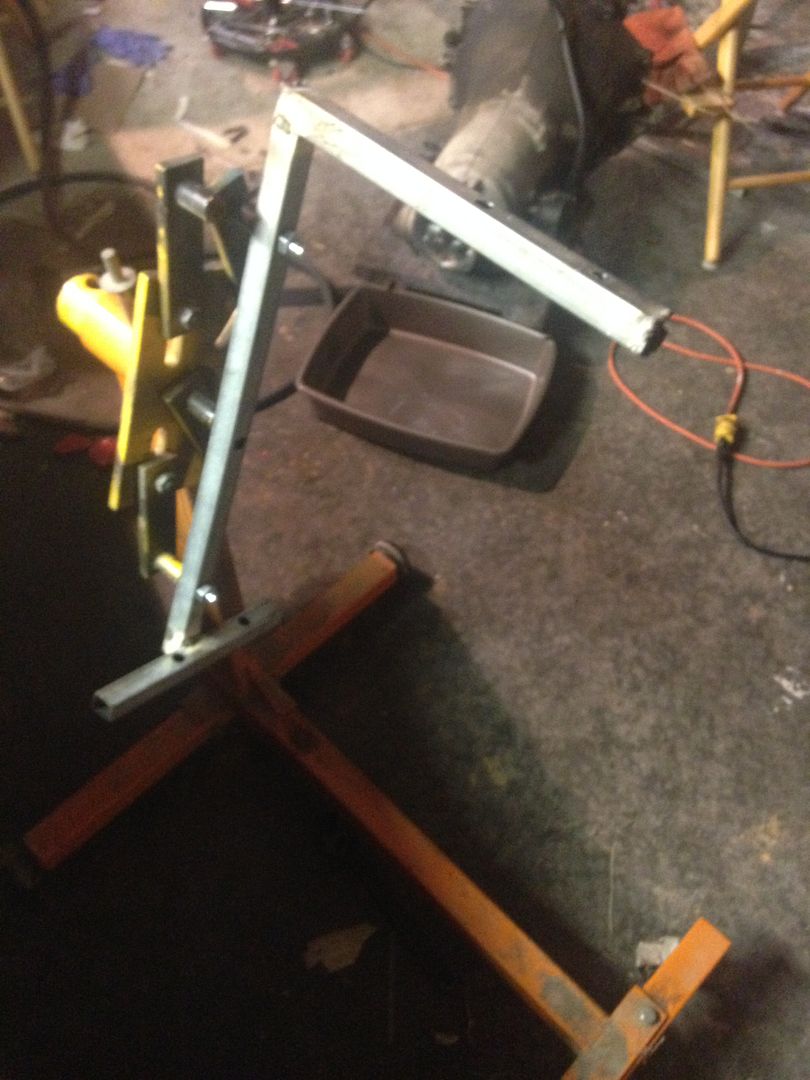  I knew I would have to fabricate some tools to compress the springs in the clutch packs, so I got some cheap tools that were similar to what I would need, and could be easily modified to suit my purpose. The muffin pans are used to collect and separate the different nuts/bolts/parts/etc. 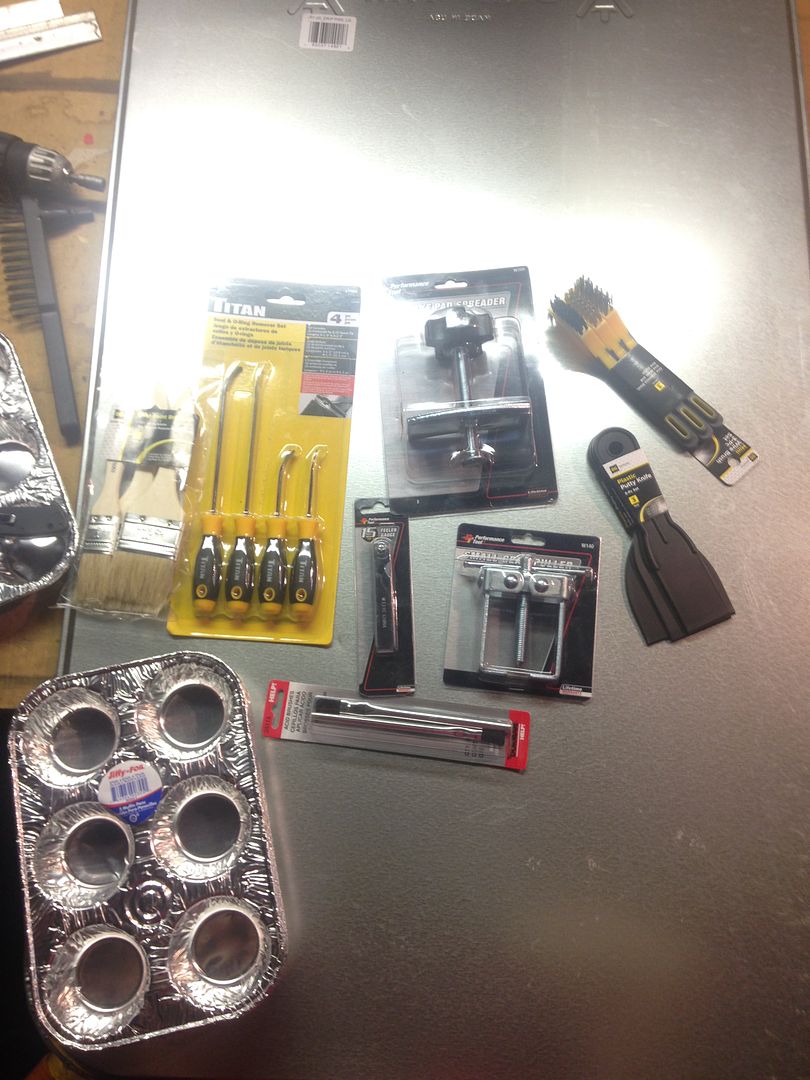 I am using manuals (Haynes, GM Documentation, etc) and a guide from BM Racing, These are very clear and concise step by step instruction manuals so I am not going to rewrite what is already written in them. Removed accumulator, governor, and vacuum modulator and oil pan and pan gasket. If you need a picture of the pan, please discontinue use of this site and contact an professional immediately..... 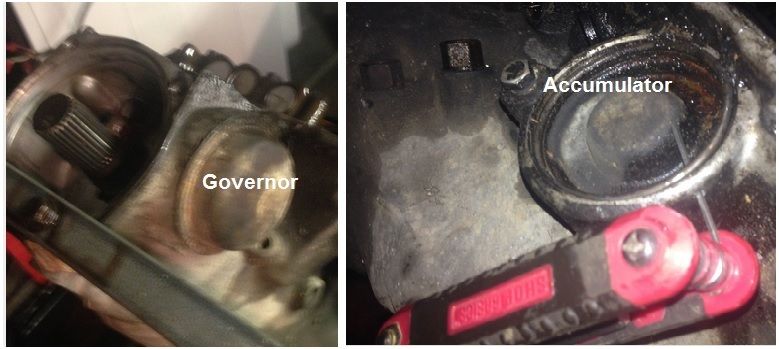 Removed filter, filter gasket, disconnected solenoid. Disconnected detent pin, mount and wire from valve. Unbolted valve body, park lock and solenoid. Removed solenoid, removed park log, removed valve body, disconnected shifter linkage.  All parts are separated in my muffin pan. 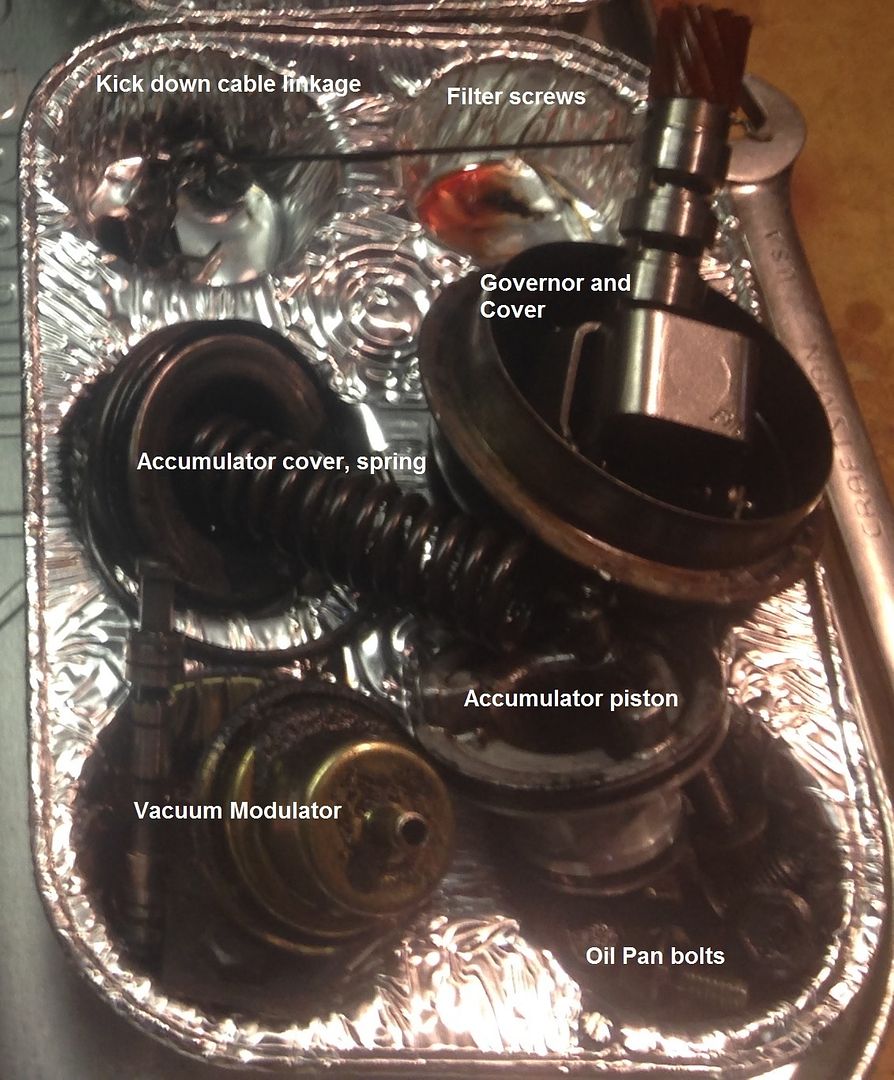
__________________
1980 Chevy K10 Silverado --> Build Page My wife told me I spent too much time on Facebook. So I bought an old truck. Now she wishes I was on Facebook, it was cheaper. 
|

|

|
|
10-08-2015, 04:46 PM
|
#2 |
|
Registered User
Join Date: Apr 2015
Location: Shenandoah Valley, Virginia
Posts: 332
|
Re: Project: TH350C Rebuild
Good luck looks to be an experiment for sure! I'm liking the muffin pan, you big muffin man lmao jk..
__________________
85' GMC Sierra Classic Built 350; Weiand intake, Holley 600, Thumpr Cam Built 350 turbo with shift kit & 2500 Stall Thumpin' away |
|
|
|
|
10-08-2015, 05:24 PM
|
#3 |
|
Registered User
Join Date: Jul 2013
Location: Canton, TX
Posts: 245
|
Re: Project: TH350C Rebuild
I knew I'd make a mistake. In the first post no less! Forgot to mention that this is a 4wd transmission. Also, In the second to last picture of post #1, I mislabeled the "Detent Spring and Roller" as the "Park Lock".
  By the way, keep a pan under the stand where your tranny is. As you rotate it on the stand, oil will continue to drain from the now open orifices. Also, take TONS of pictures. It will help when you have that question later when you are putting it back together about how deep that bushing was originally installed.... By the way, keep a pan under the stand where your tranny is. As you rotate it on the stand, oil will continue to drain from the now open orifices. Also, take TONS of pictures. It will help when you have that question later when you are putting it back together about how deep that bushing was originally installed....Removed the gasket and plate from underneath valve body. 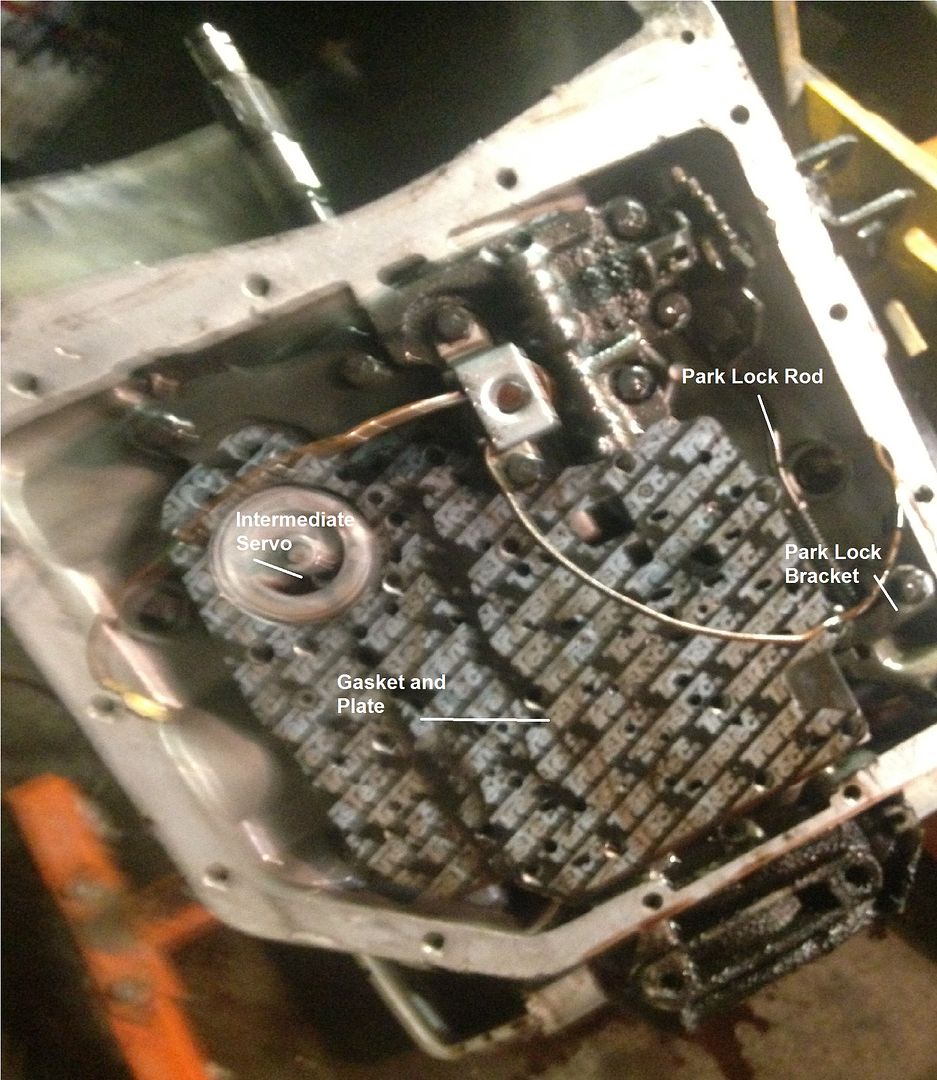 Removed the servo and spring. Removed the checkballs with a magnet. One of my check balls was plastic (note dark colored checkball in the top middle circle). Removed the park lock rod and bracket. 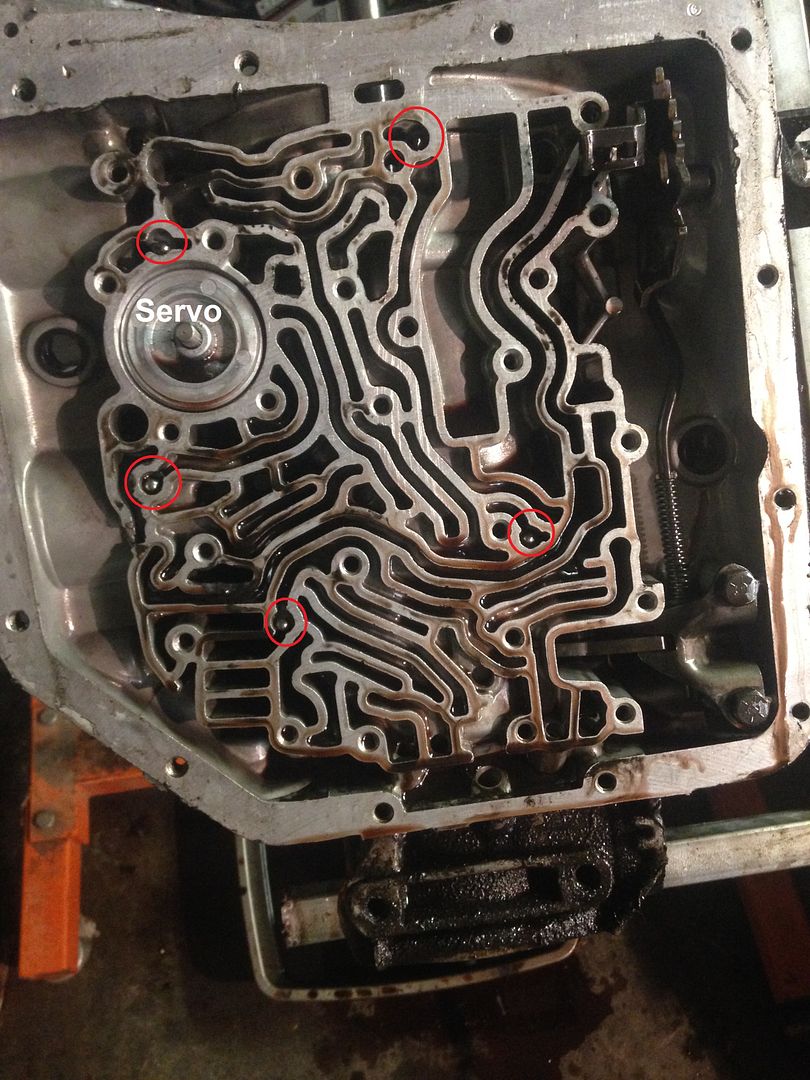 Remove pump bolts. Pull pump with a pump puller, or use an adequate similar tool to do the job. I used a gear puller with a 2' length of chain. There are two bolt holes that are threaded for a 3/8 16 bolt at the 11 and 4 o'clock positions for that purpose. I ended up using another piece of chain to the housing so that the puller would stay correctly upright. Carefully pull the pump. 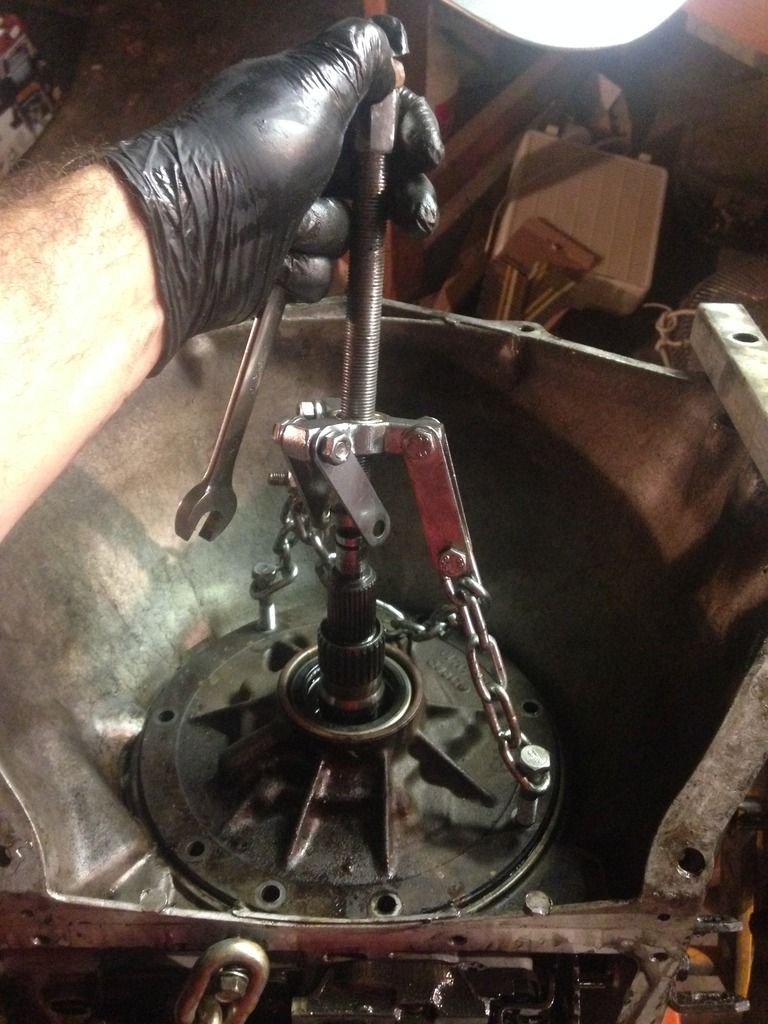 From this point on, you MUST pay particular attention to the order in which things are removed. I'm sure there may be other slightly different ways in which to accomplish the same thing. Underneath the pump is a set of clutches. Pull and set aside taking note of the order in which they will be reinstalled. ***********NOTE**************** The pictures of items on my workbench are pictures are of those items flipped. In other words when I pull them from the unit, I flip the entire set over so that the one on top goes first when I re-install. 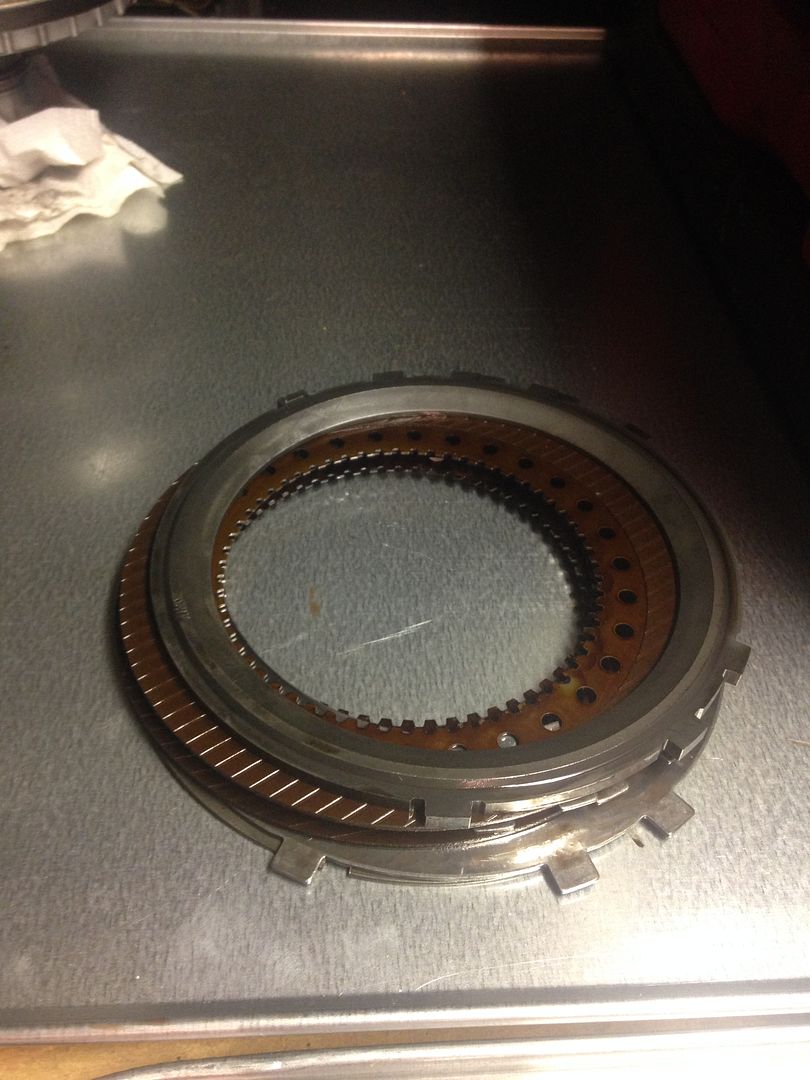 Pull the band and remove. 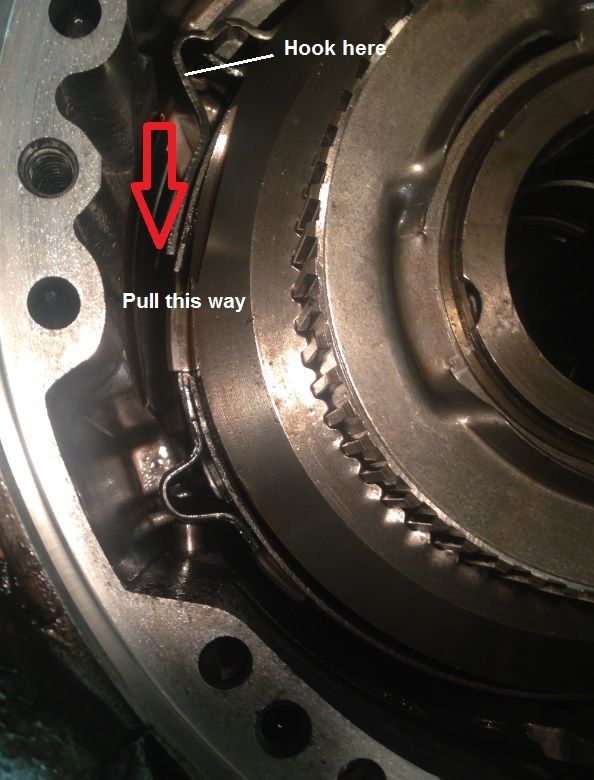 ****************NOTE***************** When you pull things out of the transmission, don't be the Hulk and start slinging stuff around. There are going to be parts that are held to each other by the cohesion of the transmission fluid, i.e bearings, bushings, thrust washers, etc. Did you read that note? Go back and read it again. :-) Once that is complete you can pull the input shaft with the attached set of clutches from the transmission, paying close attention to any little part that might just fall down out of the clutch pack assembly you just pulled. HINT HINT. 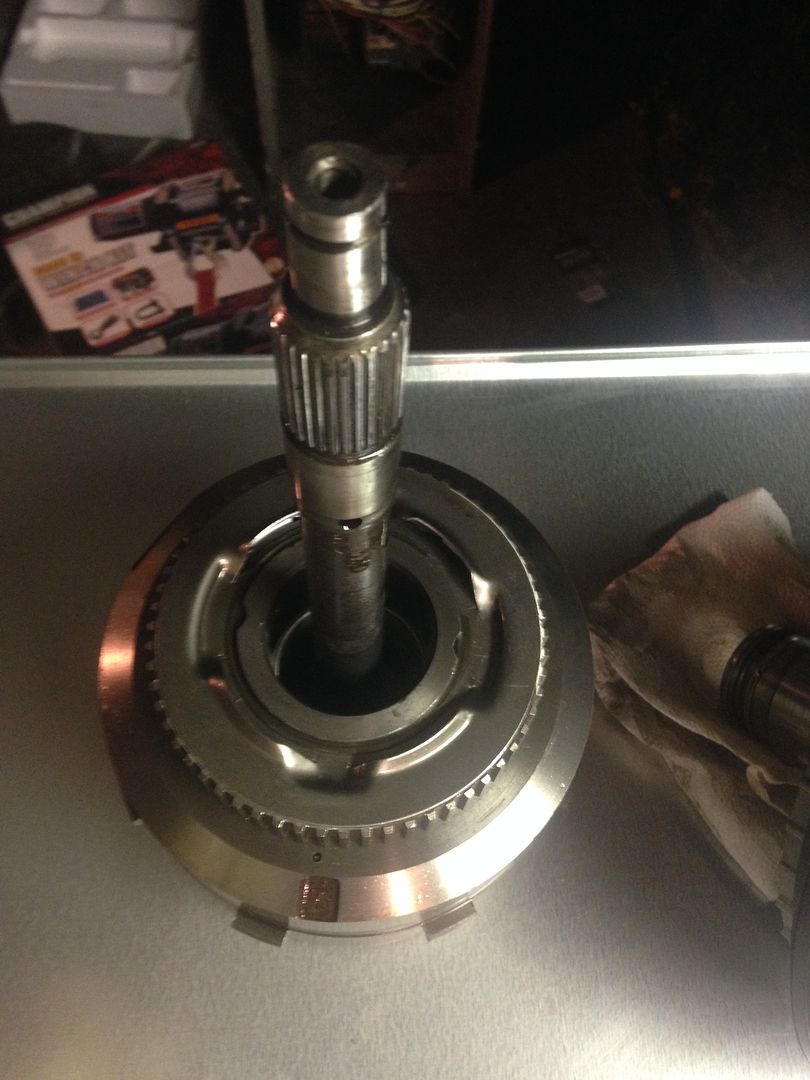
__________________
1980 Chevy K10 Silverado --> Build Page My wife told me I spent too much time on Facebook. So I bought an old truck. Now she wishes I was on Facebook, it was cheaper.
|
|
|
|
|
10-08-2015, 06:40 PM
|
#4 |
|
Registered User
Join Date: Jul 2013
Location: Canton, TX
Posts: 245
|
Re: Project: TH350C Rebuild
I'm stating to regret this thread.....I'm an IT guy, we hate writing documentation.......and this is a lot of documentation!
At this point, I went ahead and started disassembling these clutch packs, so I'm documenting it the way that I did it. My timestamped dated pictures are that way and it will help me reconstruct this crazy escapade I'm on should I get confused about what went where. I removed the top direct clutch pack from the input shaft. A bearing had adhered itself to the to the bottom by the laws of physics and fell down after I had almost cleared the input shaft. Remember that little note in the previous post about being the Hulk? Yeah, that one. I had to tell myself to slow down and take my time, it wasn't going to run away. I disassembled the top side, (snap ring, retainer, race and overrun clutch). Then pulled the roller cage (not shown in this picture). 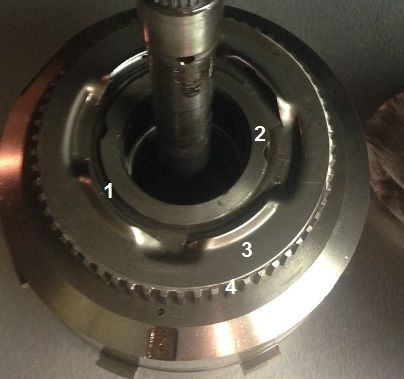 Then I flipped it over and disassembled the direct clutch pack itself. (retainer ring, pressure plate, clutches and steels, etc). Then had to remove the piston. There are tools specifically for this like a press, but I used C clamps to compress the spring, with some wood strips on the back as not to mar any surfaces with metal to metal contact. Compress spring, remove snap ring, pull components: spring pack, clutches and steels, and piston. 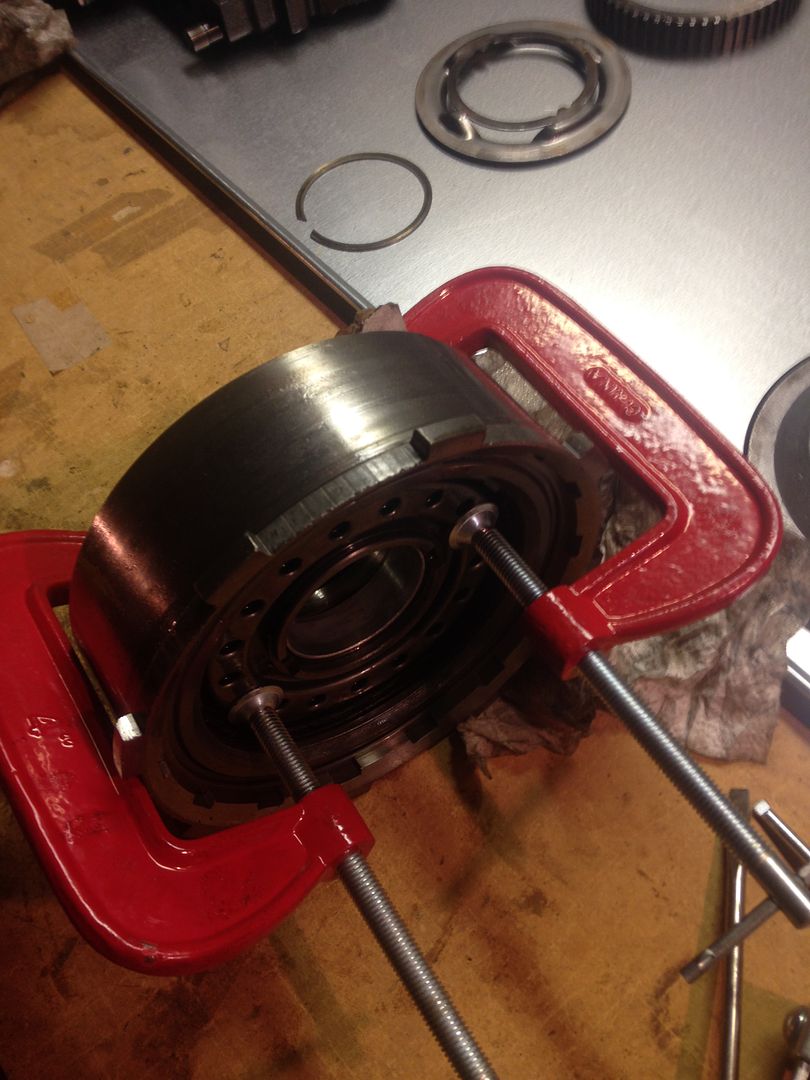 Components of this drum, but not necessarily installed in this order. 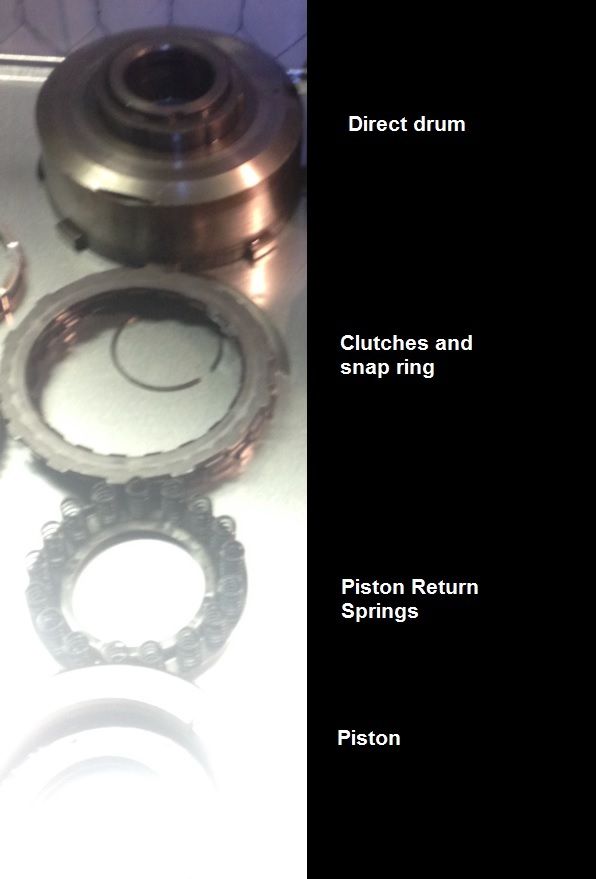
__________________
1980 Chevy K10 Silverado --> Build Page My wife told me I spent too much time on Facebook. So I bought an old truck. Now she wishes I was on Facebook, it was cheaper.
Last edited by 8lugnutz; 10-08-2015 at 06:51 PM. Reason: Missed a step! |
|
|
|
|
10-08-2015, 07:00 PM
|
#5 |
|
Registered User
Join Date: Jul 2013
Location: Canton, TX
Posts: 245
|
Re: Project: TH350C Rebuild
Next is the forward drum, it has the input shaft still attached. Oh, and that bearing, don't forget that, it can be removed and put aside for now..
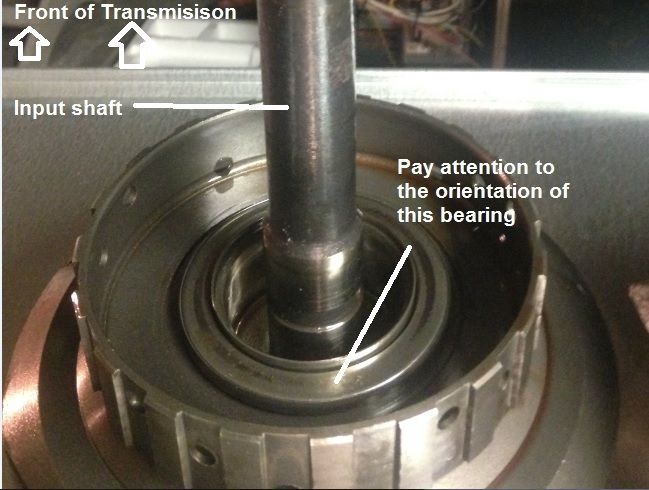 Since this one has the input shaft attached, you will have to account for that. I mounted a piece of cut off drive shaft to my workbench leg, and then placed the input shaft down through that so that I could get to the forward clutch (From my 700R4 swap.....see build thread for the gory details). Now you can remove the retainer, the pressure plate, clutches and steels, etc. Next, following a similar procedure with the C clamps as with the previous post on the direct clutch, compress the piston return springs and remove the snap ring. Slowly and equally unscrew the C clamps releasing pressure until the springs are free. Remove the springs, and the piston. 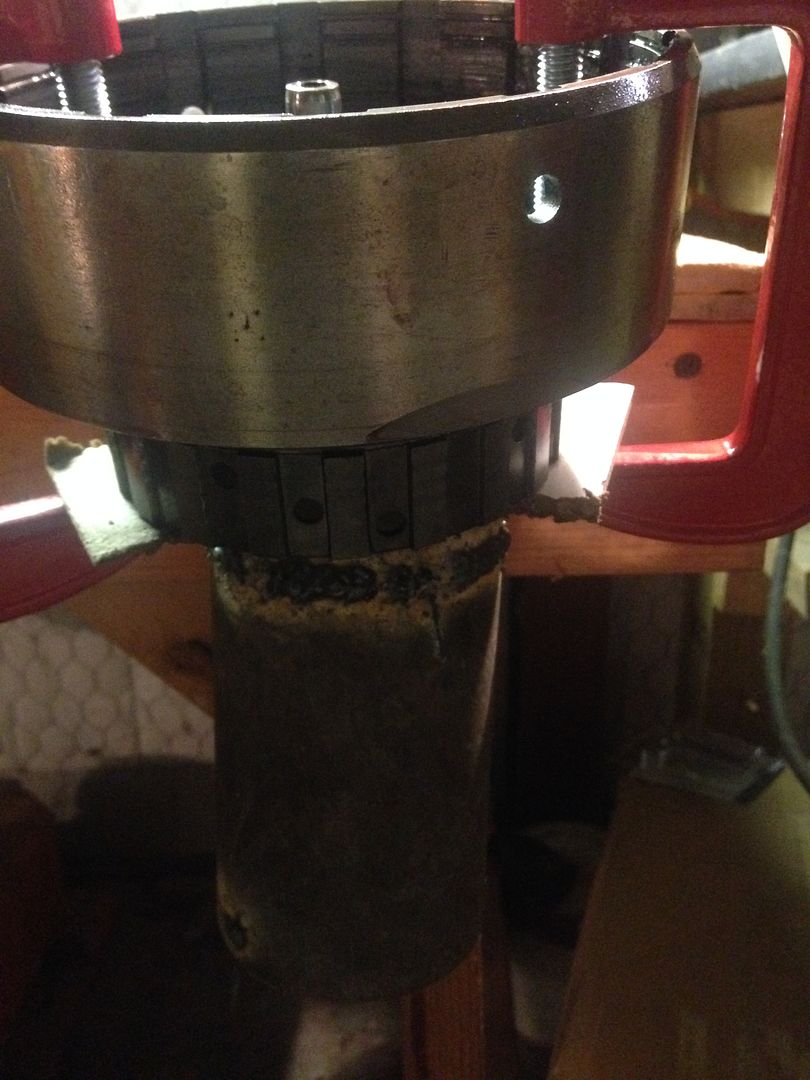 No comments on the crude welding job! I am an IT guy! 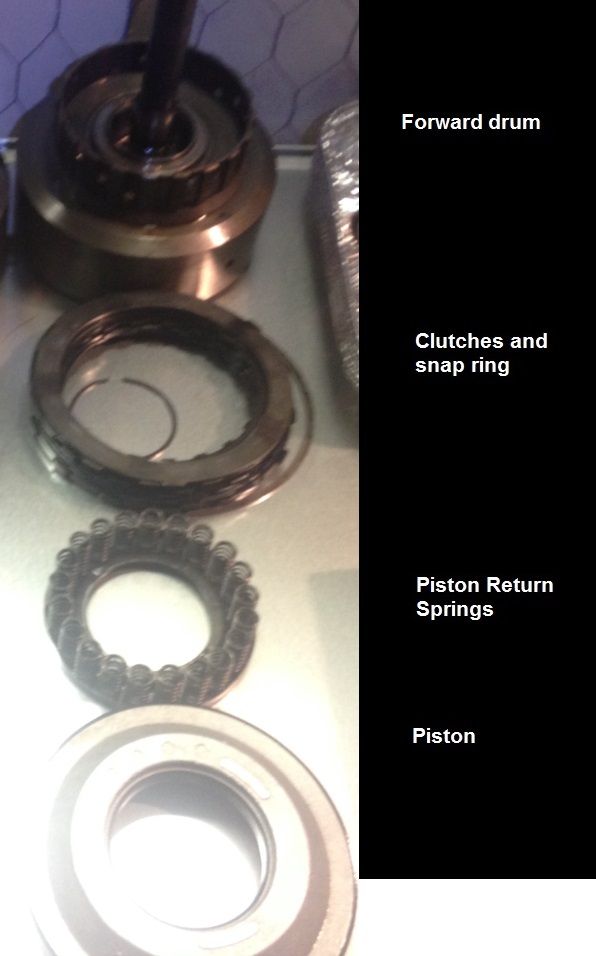
__________________
1980 Chevy K10 Silverado --> Build Page My wife told me I spent too much time on Facebook. So I bought an old truck. Now she wishes I was on Facebook, it was cheaper.
|
|
|
|
|
10-08-2015, 07:26 PM
|
#6 |
|
Registered User
Join Date: Jul 2013
Location: Canton, TX
Posts: 245
|
Re: Project: TH350C Rebuild
Next we need to remove the gear train (sun, planetary gears, etc.).
Pull the input ring straight out. There is a three tab metal thrust washer on it, and that pesky cohesion thing just might cause a 4 pronged thrust washer to attached to the inside, between it and the planetary carrier below. This photo is looking down at the three tab thrust washer and the input ring gear. 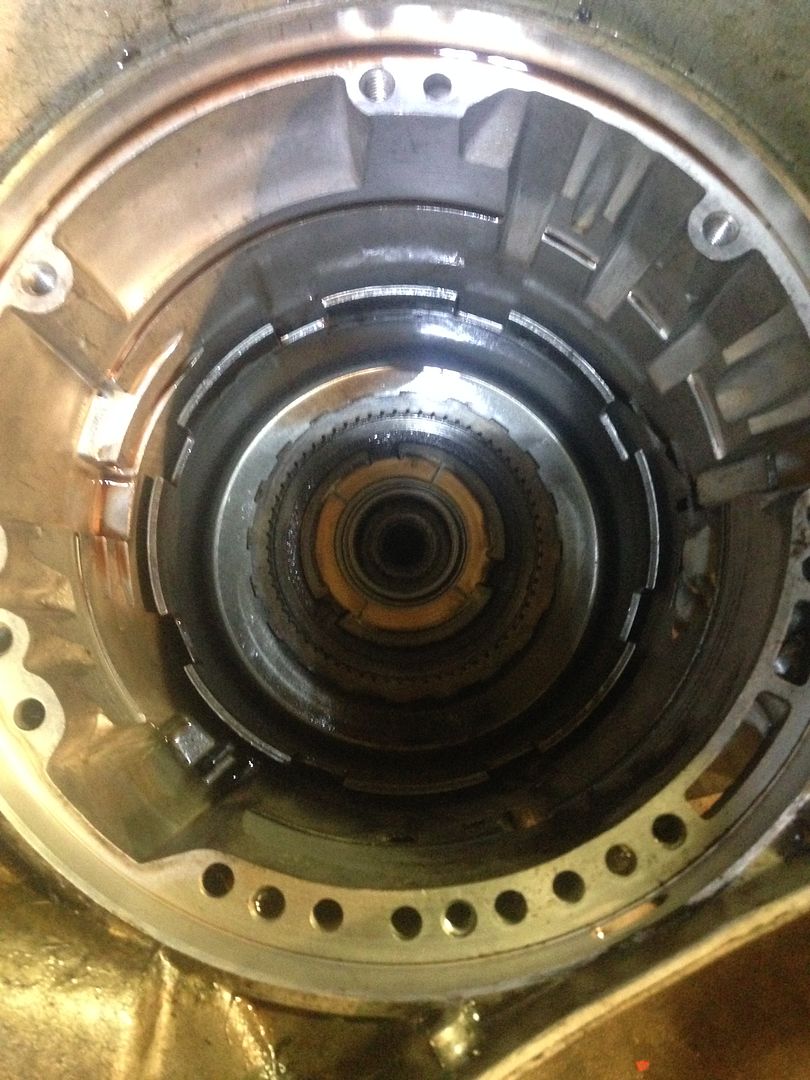 Now the snap ring for the planet carrier is visible, so remove that. Then pull up on the carrier and remove. It took a couple pulls and jiggles to get it to come out for me. Once that is done, you can remove the sun gear as well. Watch for another 4 tab thrust washer,it may be stuck to the back of it. Here are the parts in this group: 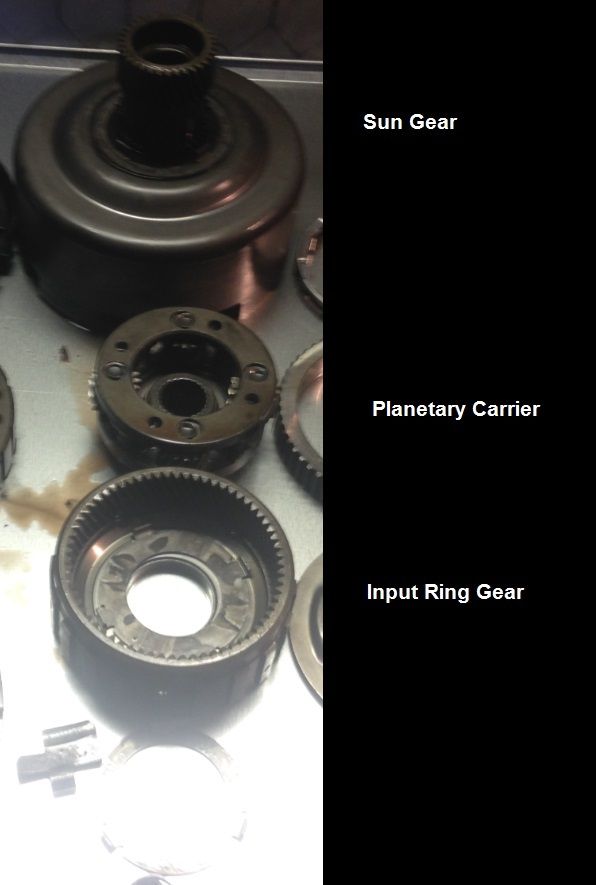
__________________
1980 Chevy K10 Silverado --> Build Page My wife told me I spent too much time on Facebook. So I bought an old truck. Now she wishes I was on Facebook, it was cheaper.
|
|
|
|
|
10-09-2015, 04:37 PM
|
#7 |
|
Registered User
Join Date: Apr 2015
Location: Shenandoah Valley, Virginia
Posts: 332
|
Re: Project: TH350C Rebuild
8lugnutz, could you take a look at my thread and possibly shed some light on what you think it could be? http://67-72chevytrucks.com/vboard/s...d.php?t=683173
I know this is your first build, but maybe you know something I don't. Thank you
__________________
85' GMC Sierra Classic Built 350; Weiand intake, Holley 600, Thumpr Cam Built 350 turbo with shift kit & 2500 Stall Thumpin' away |
|
|
|
|
10-09-2015, 06:21 PM
|
#8 |
|
Registered User
Join Date: Feb 2012
Location: Beautiful BC, Canada, eh?!
Posts: 2,176
|
Re: Project: TH350C Rebuild
"Jake Shoe" did a writeup (here on nastyz28.com) on rebuilding a TH350. I followed his advice in adding an additional direct clutch and steel, as well as dual-feeding the direct piston, and doing a shift kit without the shift kit. Make sure you replace all the bushings (and double up the sun gear bushings), as these transmissions eat bushings.
__________________
1961 Apache: "Grabber Orange" Shortboxed, pancake, step-notch, air-ride, boosted-LS 1977 Silverado: Shortboxed & dropped, potato-potato V8 Pontiac Firefly (Chevy Sprint): The ultimate engine swap: 5.7L in a 1.0L bag Lotus Super 7 Replica: Scratch-built street-legal rollerskate |
|
|
|
|
10-12-2015, 11:05 AM
|
#9 | ||
|
Registered User
Join Date: Jul 2013
Location: Canton, TX
Posts: 245
|
Re: Project: TH350C Rebuild
Quote:
I don't have access to a brake lathe, did you take it to a local shop to get that piston cut down? Quote:
__________________
1980 Chevy K10 Silverado --> Build Page My wife told me I spent too much time on Facebook. So I bought an old truck. Now she wishes I was on Facebook, it was cheaper.
Last edited by 8lugnutz; 10-12-2015 at 11:16 AM. Reason: Edit |
||
|
|
|
|
10-12-2015, 12:14 PM
|
#10 |
|
Registered User
Join Date: Feb 2012
Location: Beautiful BC, Canada, eh?!
Posts: 2,176
|
Re: Project: TH350C Rebuild
I have access to a machine lathe, so that's the way I went. Any local brake shop or machine shop could probably do it for you for beer.
__________________
1961 Apache: "Grabber Orange" Shortboxed, pancake, step-notch, air-ride, boosted-LS 1977 Silverado: Shortboxed & dropped, potato-potato V8 Pontiac Firefly (Chevy Sprint): The ultimate engine swap: 5.7L in a 1.0L bag Lotus Super 7 Replica: Scratch-built street-legal rollerskate |
|
|
|
|
10-12-2015, 12:46 PM
|
#11 |
|
Registered User
Join Date: Jul 2013
Location: Canton, TX
Posts: 245
|
Re: Project: TH350C Rebuild
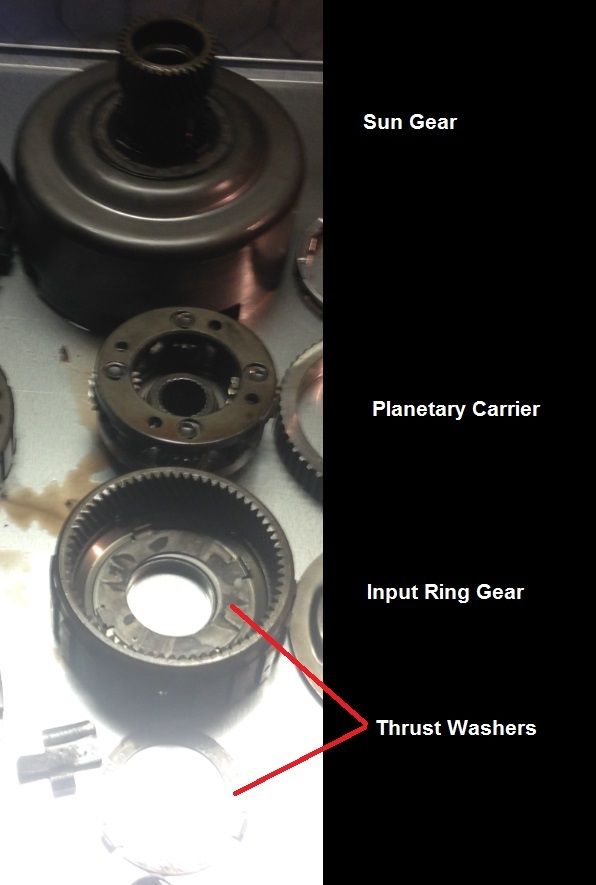
In the previous post detailing the parts for teardown, I neglected to notate the three pronged thrust washer in the bottom of the picture, and also didn't notate the 4 prong thrust washer that was stuck to the input ring gear. I have corrected that here.
 Next to remove is the low reverse roller clutch. If you see the thrust washer, in the tranny housing, pull it out. Pay attention to the orientation. The thrust washer was attached to the sun gear in my teardown. There will be a retaining ring that is on the housing side of this race. You should be seeing something like this: 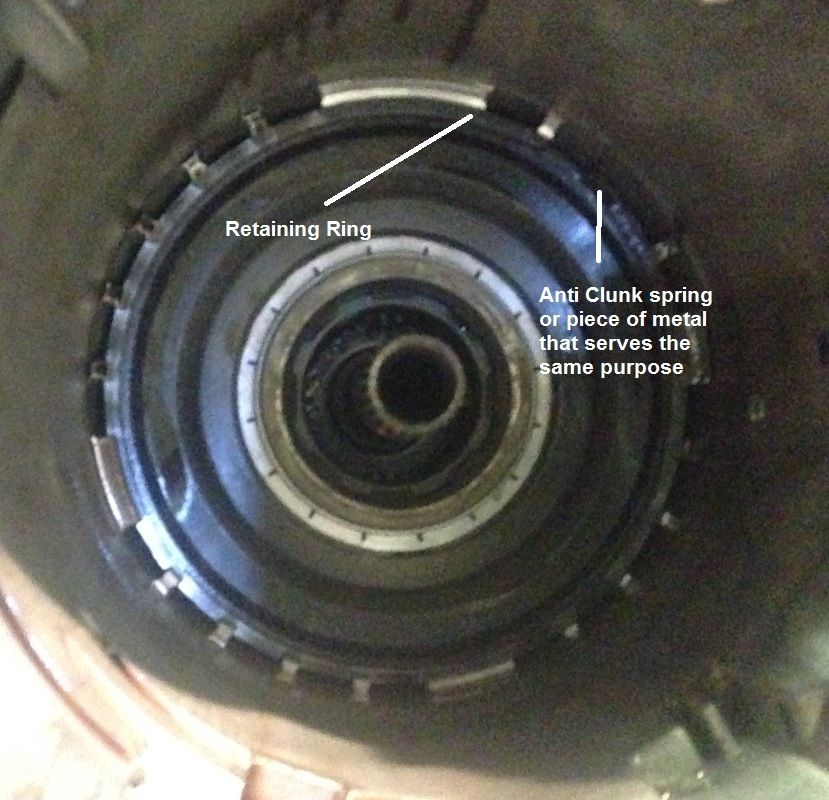 Pull the retaining ring, and either the clutch retaining clip, case saver or anti-clunk device (all three names have been used on all the docs I have seen, I think it depends on the year). A picture of mine is in the bottom left of the first picture in this update. Remove the low and reverse roller clutch assembly, then the planet carrier, and the clutches/steels. Pay attention to any bearings or thrust washers, and their placement and orientation in this collection of components. My thrust washer was stuck to the back side of the carrier. Remove the clutches and steels. 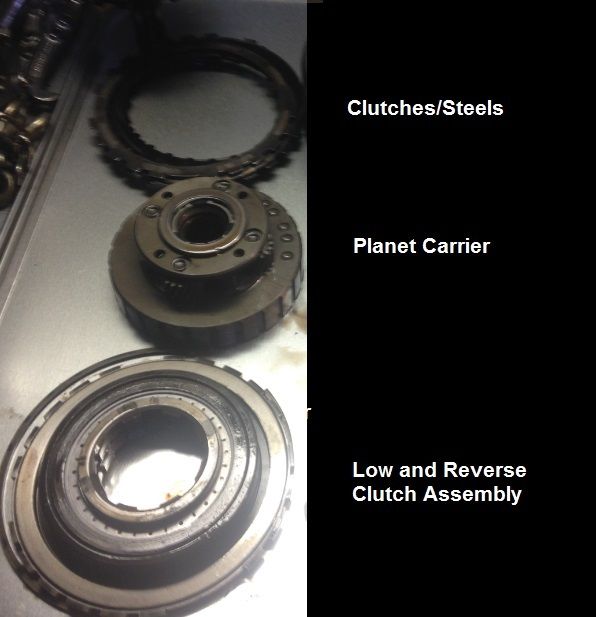 Remove the output shaft/ring gear and the bearing, noting the orientation. For the next step, you will need to buy or fabricate a tool to compress the spring retainer. They can be found on e-bay, or you can make one with some spare junk laying around. Here's mine. 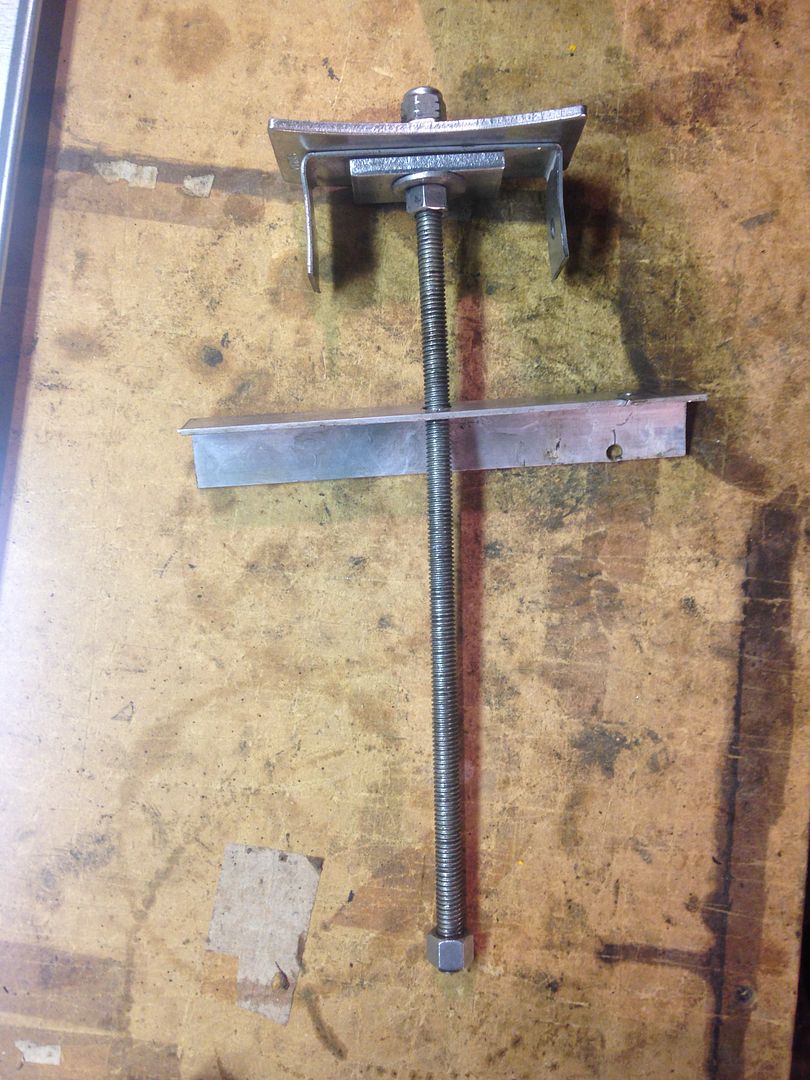 Compress the spring retainer and remove the snap ring, then remove the tool and spring retainer. It might get caught up on the snap ring groove, just use a screwdriver top pop it out of that groove, the springs will do the rest. 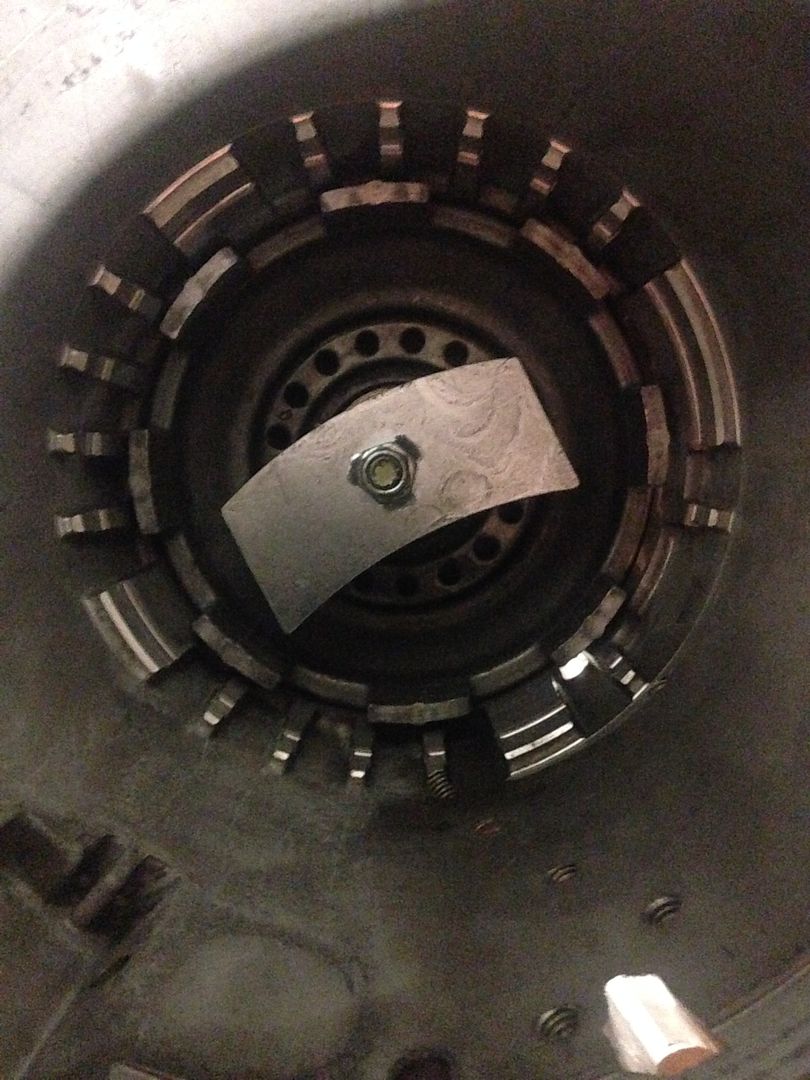 Then you can remove the piston from the case. You may have to use compressed air through the case to pop the piston out. If so, use it here, and it won't take much pressure to do it. 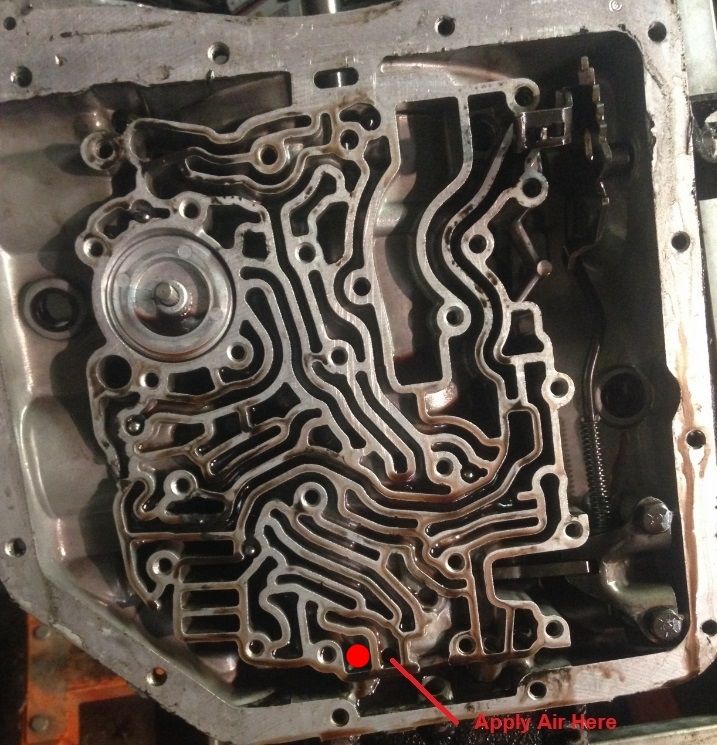 Once that is out, the case should have no remaining parts left inside. You should have a table full of parts: 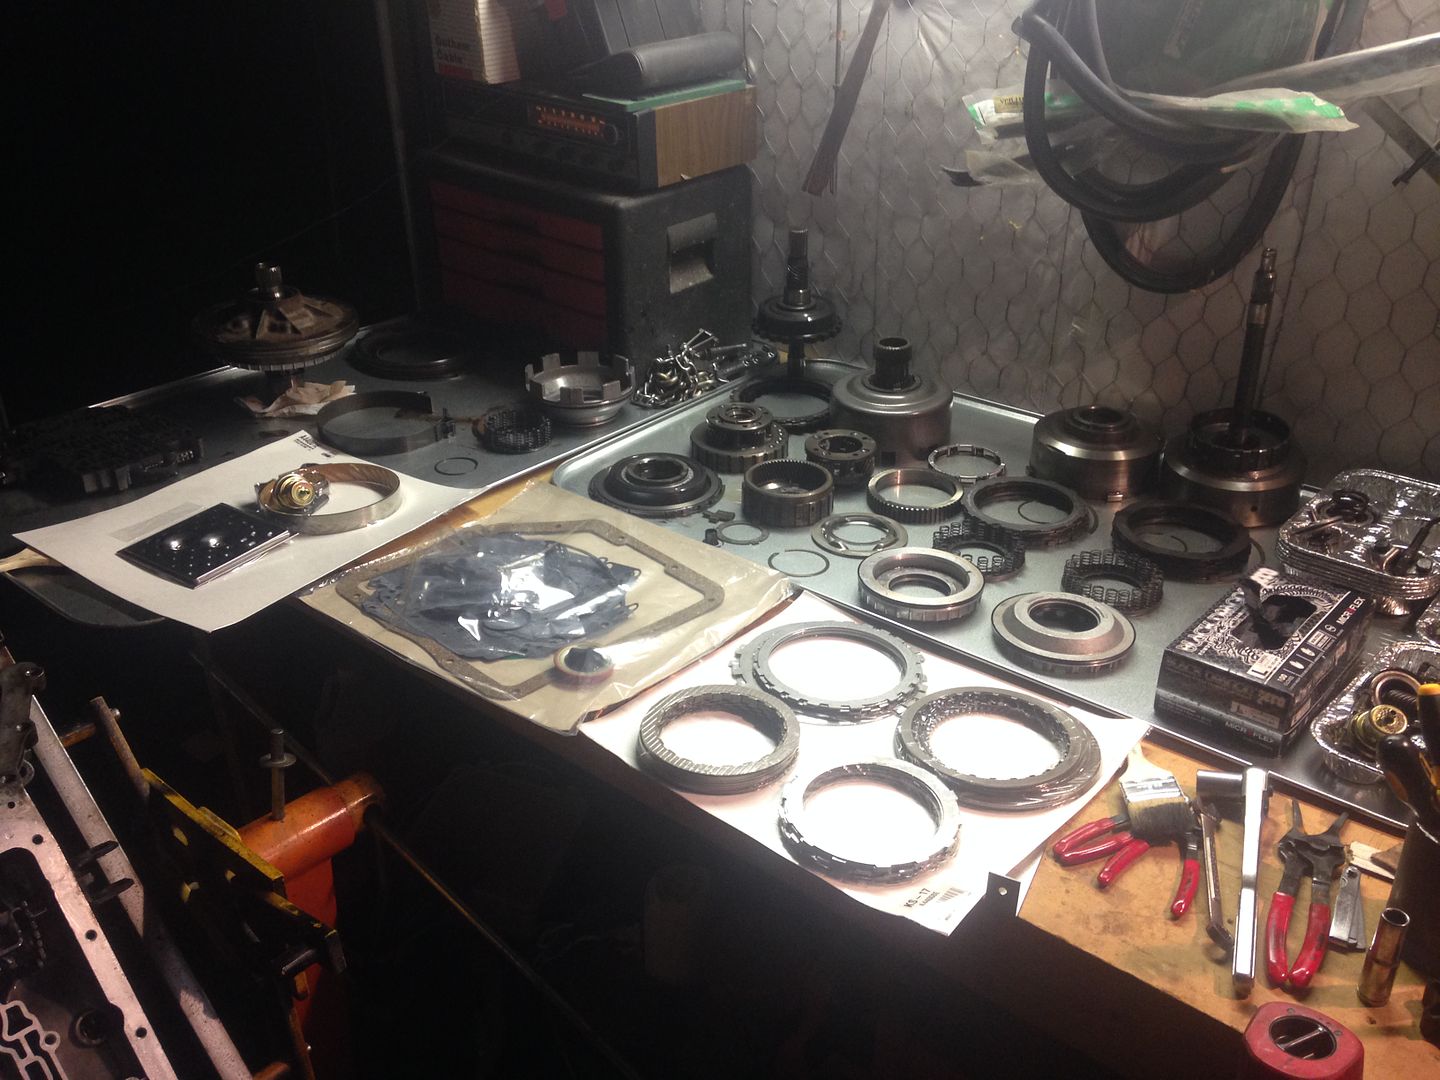 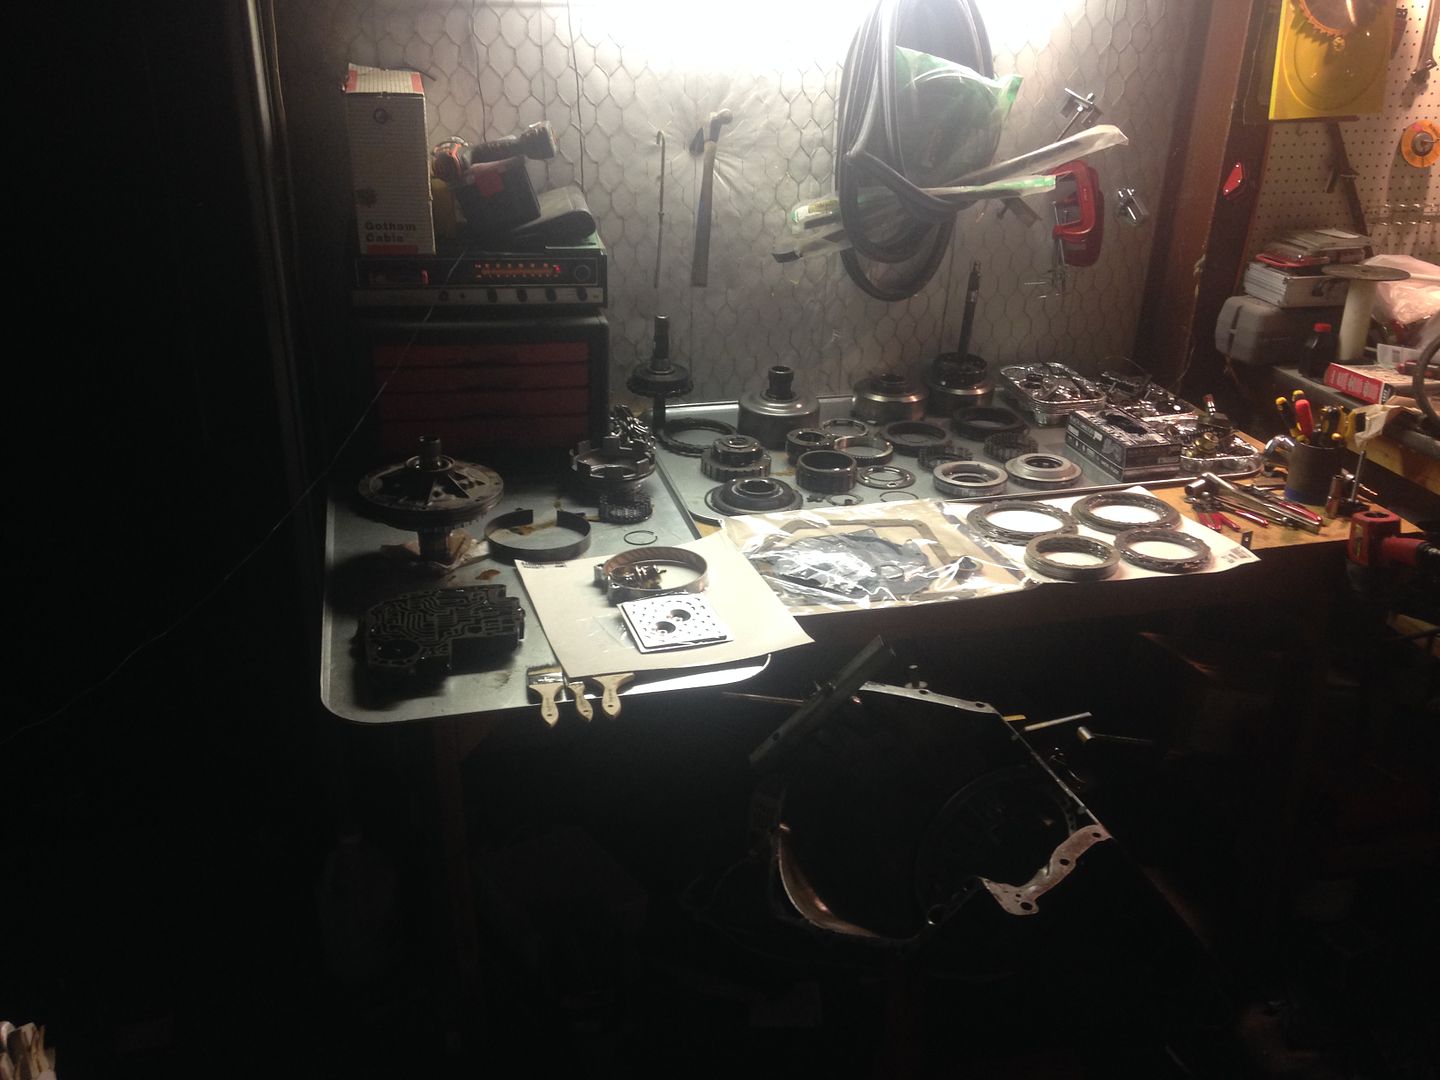 Time to change the 8-track. 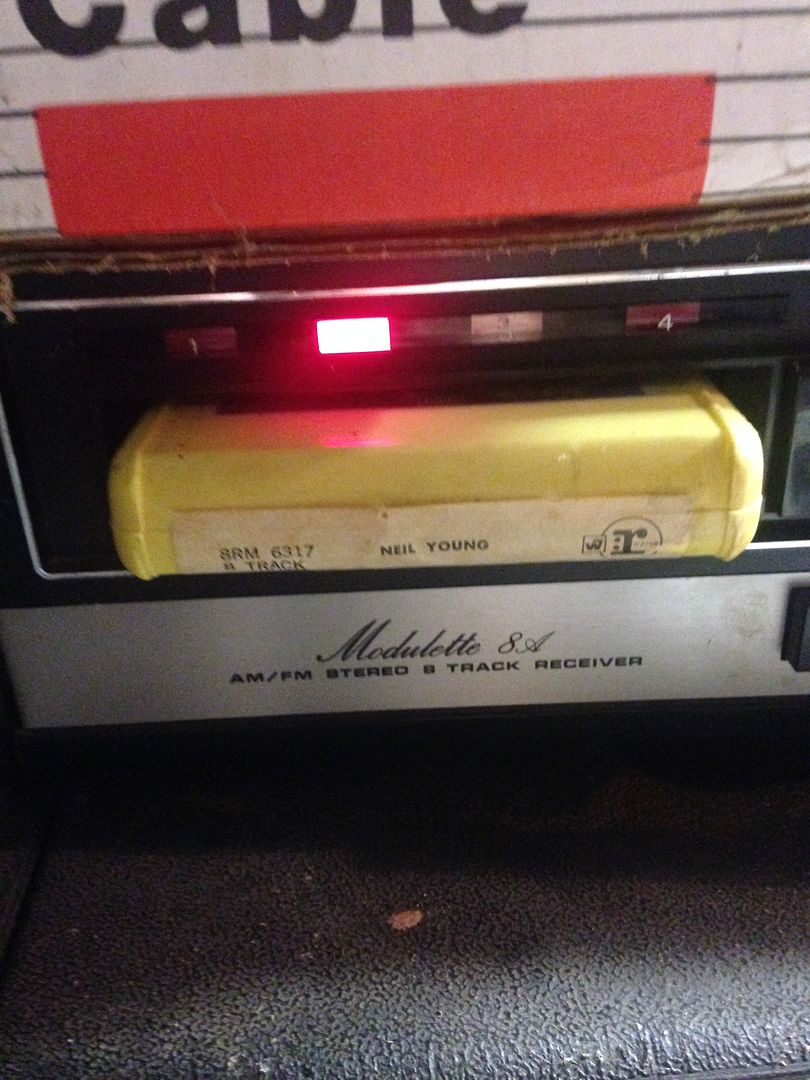
__________________
1980 Chevy K10 Silverado --> Build Page My wife told me I spent too much time on Facebook. So I bought an old truck. Now she wishes I was on Facebook, it was cheaper.
|
|
|
|
|
10-12-2015, 02:17 PM
|
#12 | |
|
Registered User
Join Date: Jul 2013
Location: Canton, TX
Posts: 245
|
Re: Project: TH350C Rebuild
Quote:
__________________
1980 Chevy K10 Silverado --> Build Page My wife told me I spent too much time on Facebook. So I bought an old truck. Now she wishes I was on Facebook, it was cheaper.
|
|
|
|
|
|
10-12-2015, 04:26 PM
|
#13 |
|
Registered User
Join Date: Jul 2013
Location: Canton, TX
Posts: 245
|
Re: Project: TH350C Rebuild
I really need to write this stuff down....Oh wait, that's what I'm doing...
To pop the piston, I incorrectly specified the port. Below is the correct port.  Ok, now next steps after all is removed from the case. Change the case bushing. After that, I cleaned inside the case completely with brake cleaner. Wear a mask. Do this outside. Don't breathe the fumes. Yuck. I also cleaned all of the internal components, drums, shafts, etc. and used my compressor to blow them dry. You are ready to begin rebuild. There is no need to document what's already been documented. I used the B & M Racing instructions .pdf that I printed out so that I could take it with me (no internet at the shop, and my phone is too small for the detailed pictures). Also as mentioned by SkinnyG, Jake Shoe has a great write up HERE. Both of these are public information, and I have referenced both to this thread. This covers the rebuild and some mods to do (if you want). You can use either the B&M PDF or Jake's write up as a *GUIDE* to rebuild the components in the transmission. I say *GUIDE* because there are steps in both that deal with mods, so if you are rebuilding a STOCK transmission like mine, then I would stick with a normal manual (Haynes, Chilton, etc.). Jake has a great write up, but I did not do any of mods that he mentions. I think will tackle a couple of his mods on a new build, but I need to find a K case core first. Jake's write up has clear pictures too. Speaking of pictures, during my teardown I took a LOT of them so that I would be able to identify the parts in the order in which they were removed, and to correctly identify the seals and their orientation so that there was no confusion when re-installing. Here are some pictures of the clutches that were removed from my tranny. No wonder it wouldn't move. 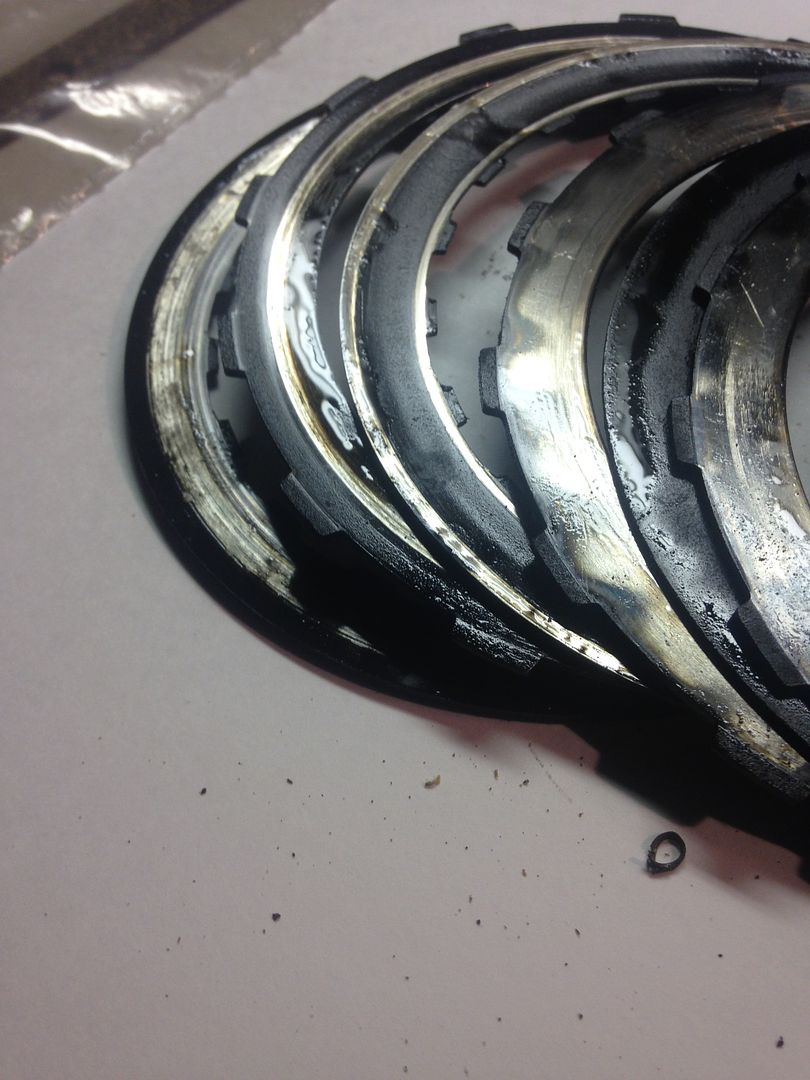 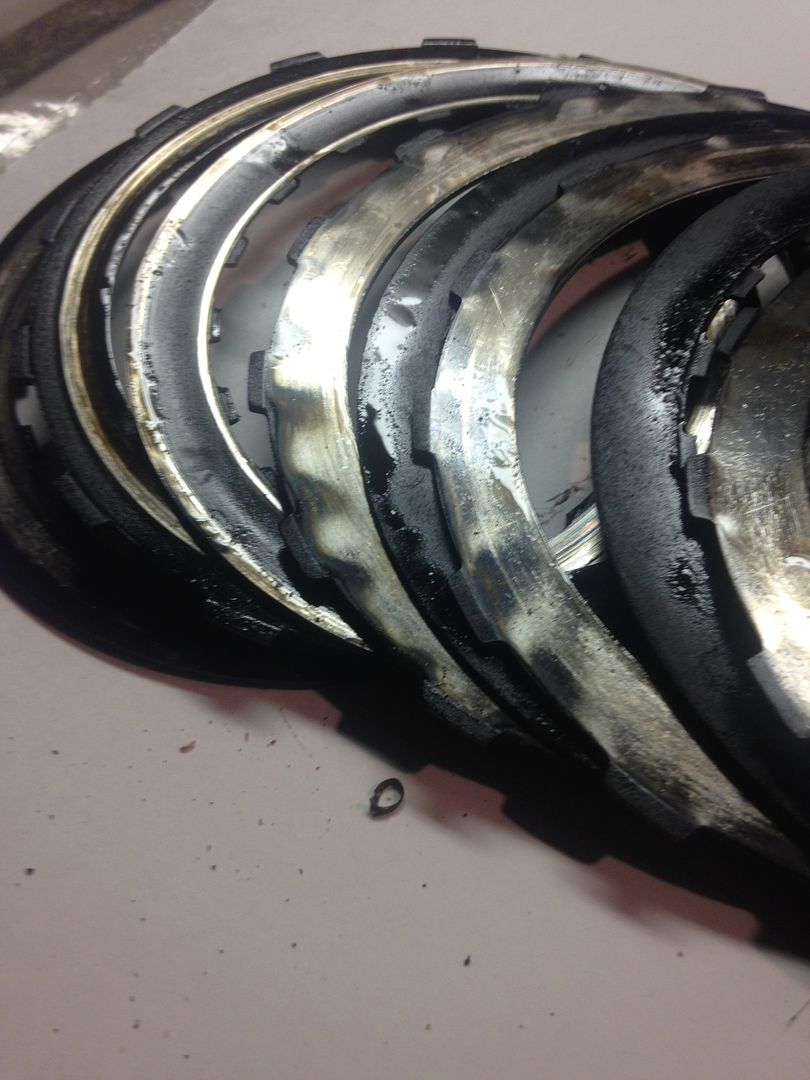 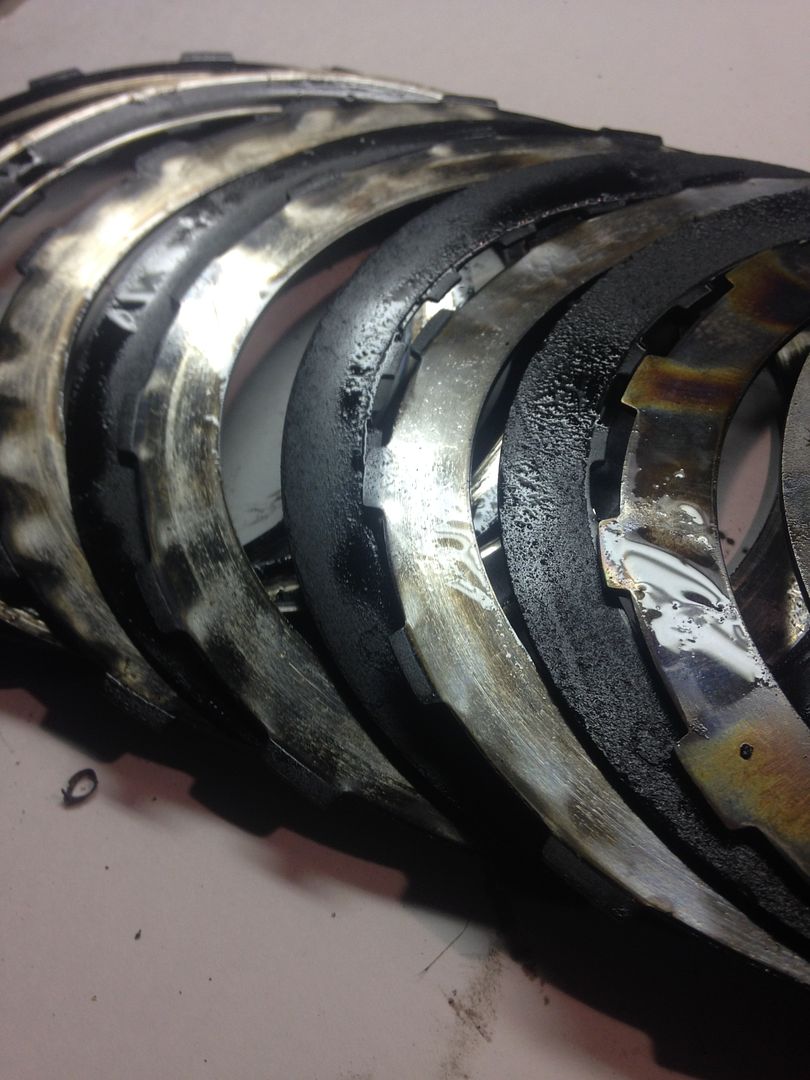 My rebuild kit came with new steels as well as clutches, so these will be tossed in the metal pile.
__________________
1980 Chevy K10 Silverado --> Build Page My wife told me I spent too much time on Facebook. So I bought an old truck. Now she wishes I was on Facebook, it was cheaper.
|
|
|
|
|
10-12-2015, 05:07 PM
|
#14 |
|
Registered User
Join Date: Jul 2013
Location: Canton, TX
Posts: 245
|
Re: Project: TH350C Rebuild
Here are some (not all) of the pictures from the rebuild, in installation order from case bushing to pump.
Reinstalling the piston springs, with tool in place to compress springs: After installing snapring:  +Output shaft/output ring gear: 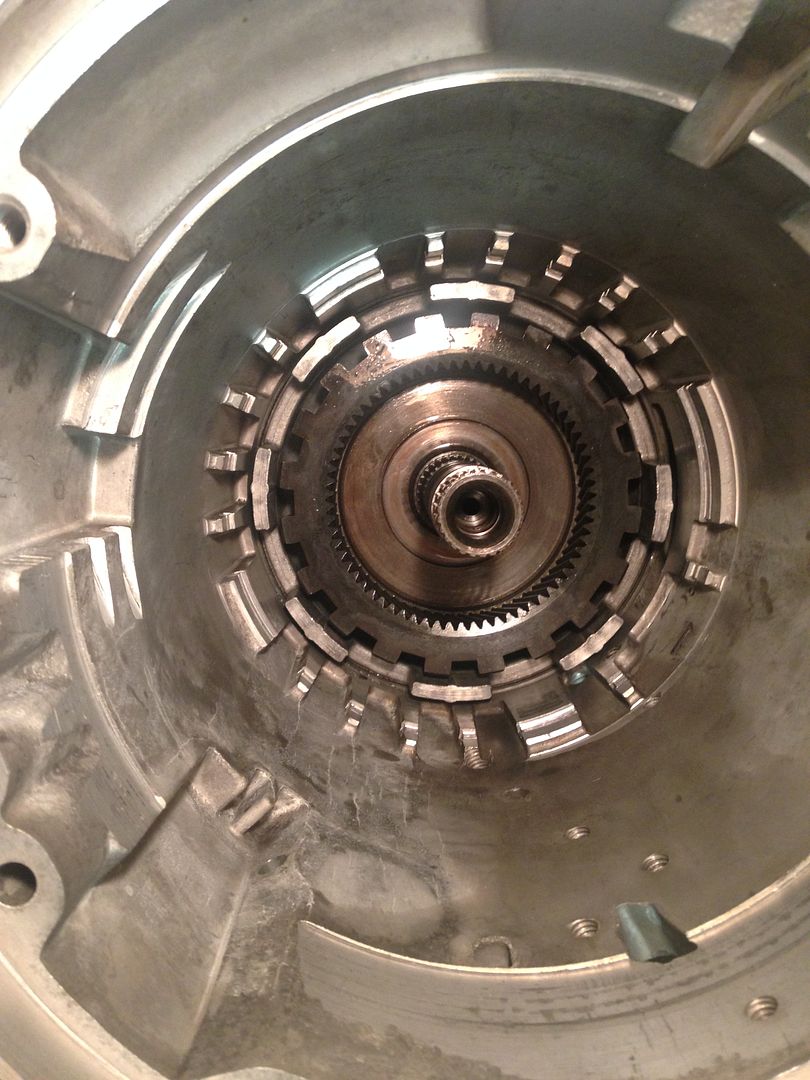 +Planetary Carrier 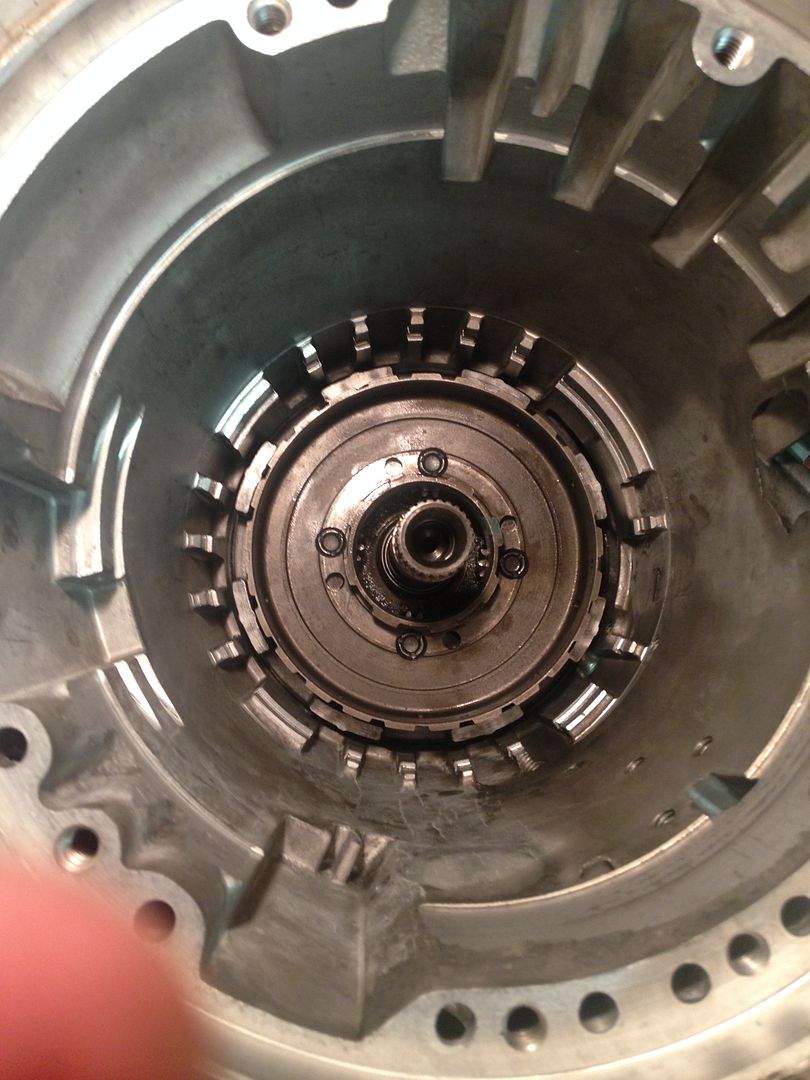 +Steels and clutches 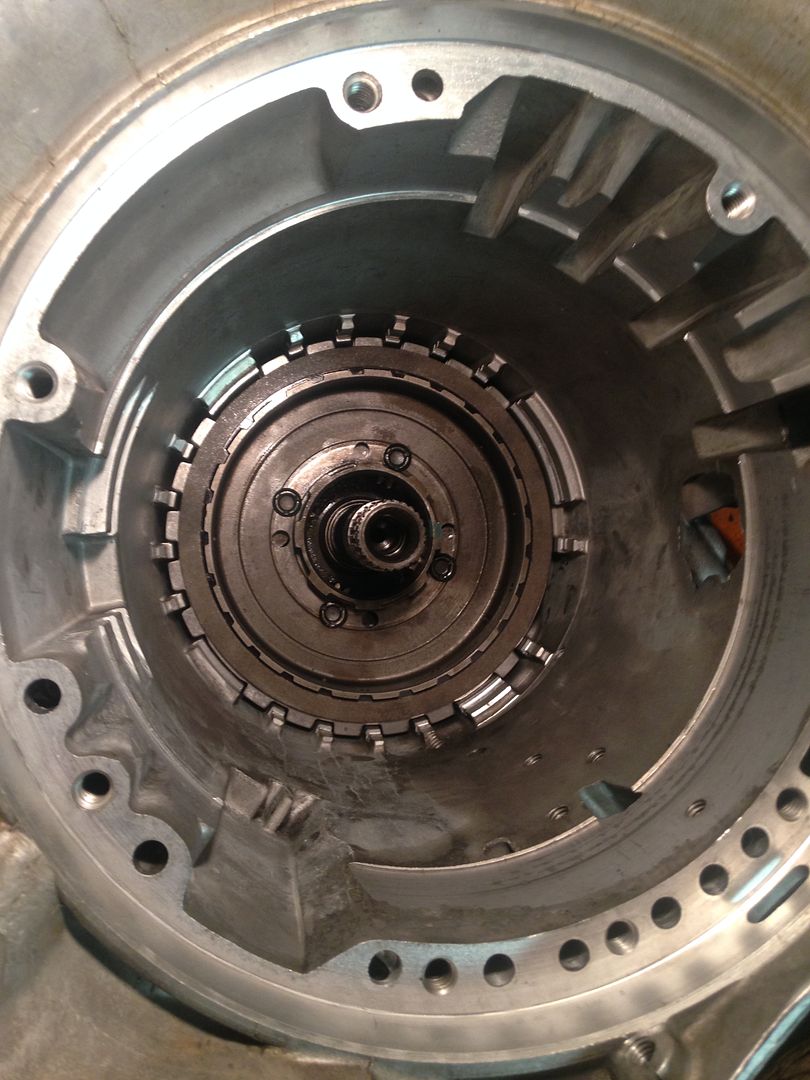 +Roller Clutch Assembly 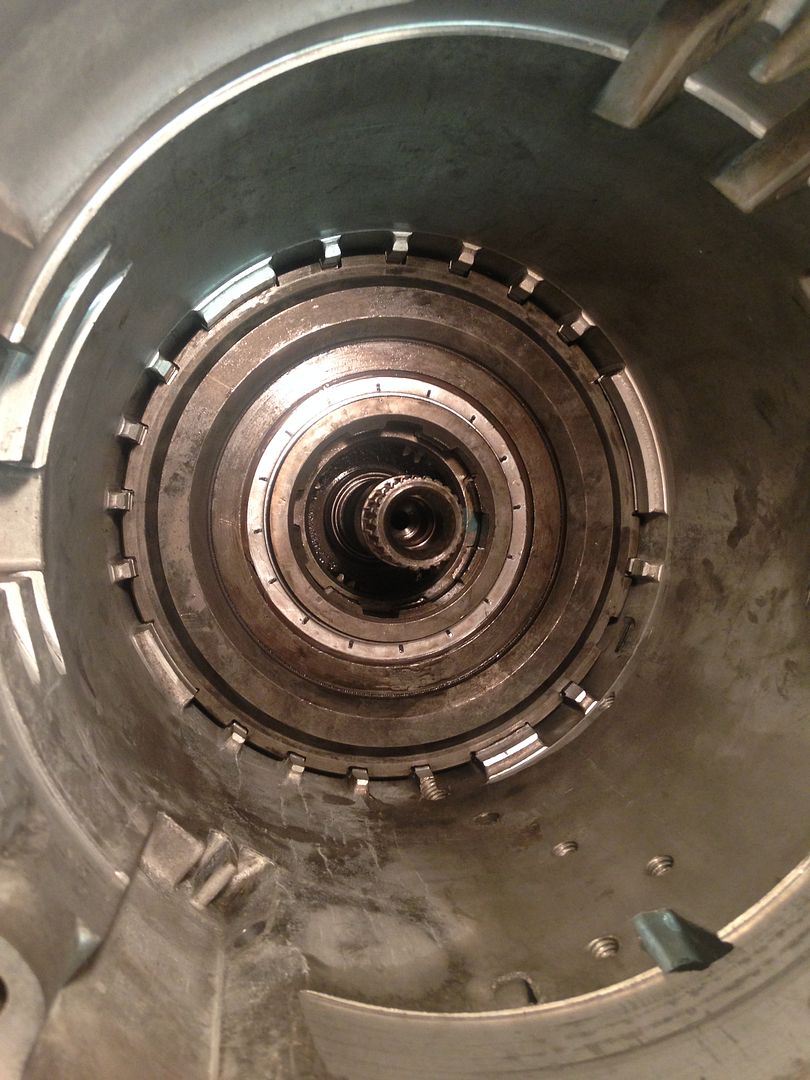 +"Case Saver" 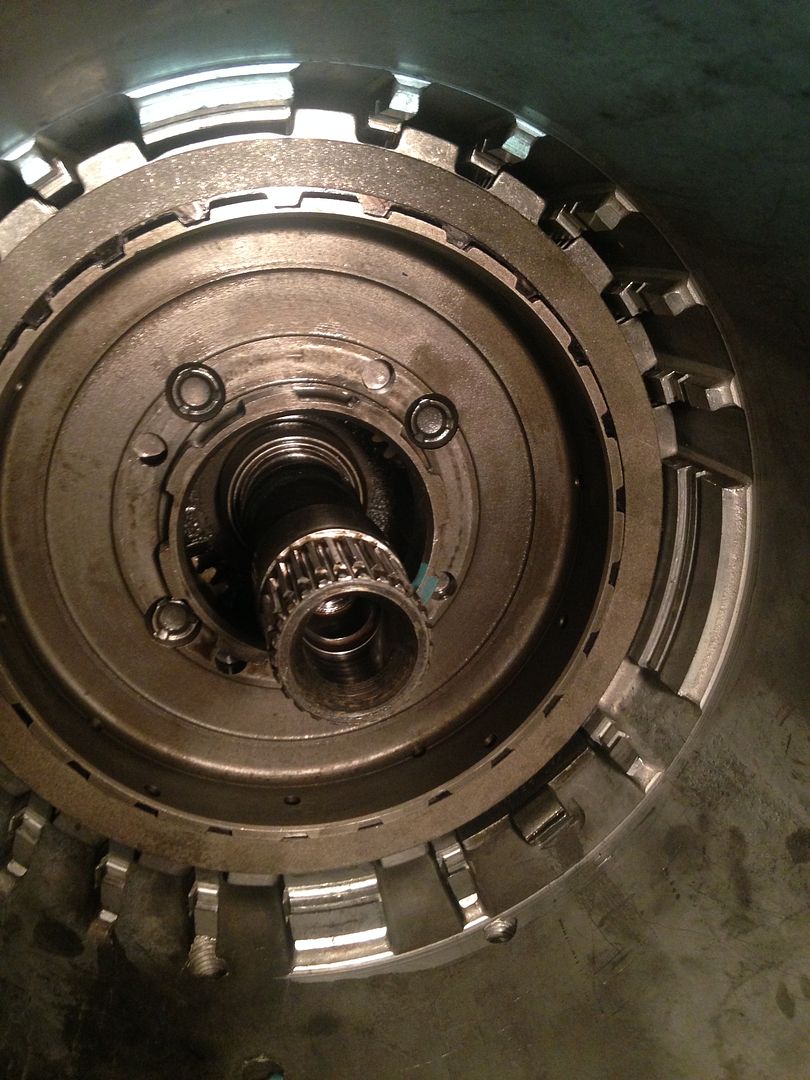 +Retaining Ring 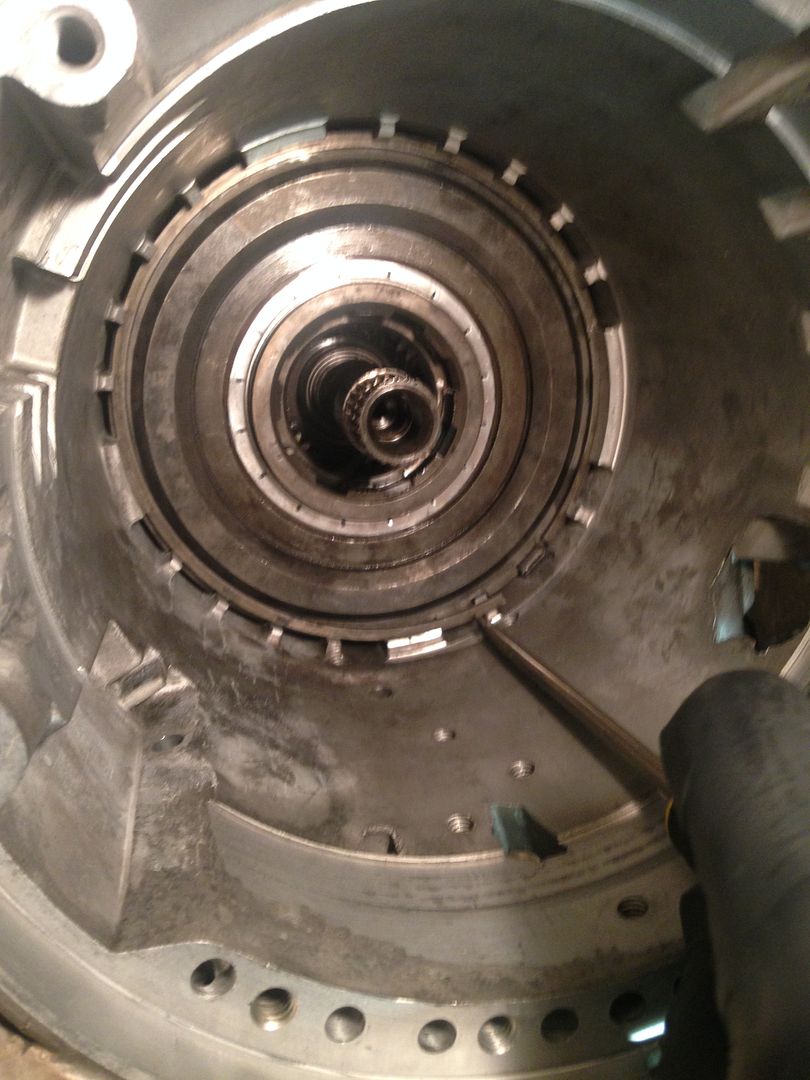 +Sun Shell 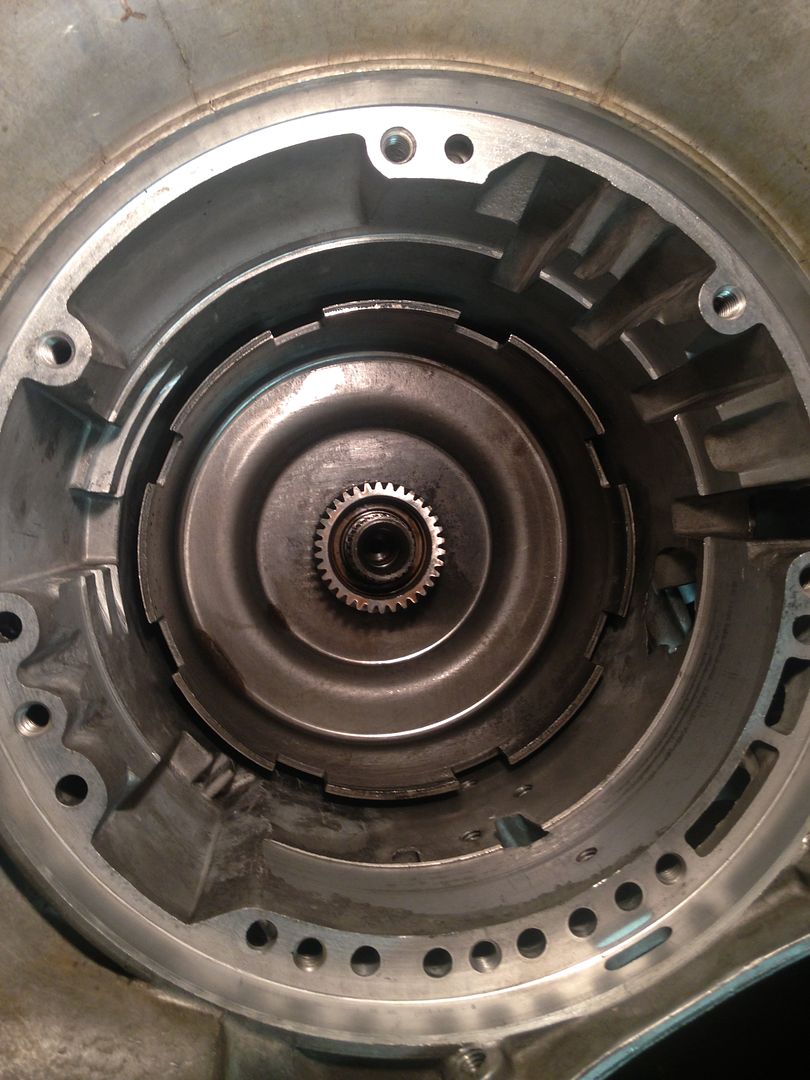 +Planetary Carrier 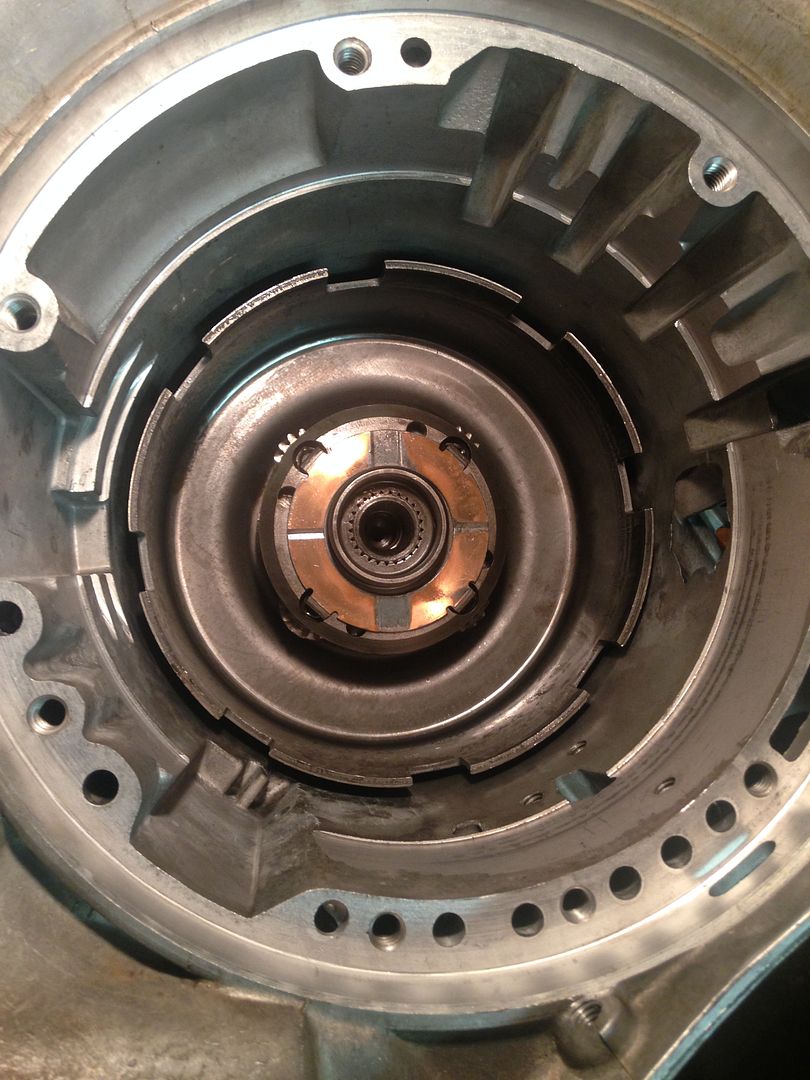 +Ring Gear, Bushing, and yellow bushing (not sure what the name is) 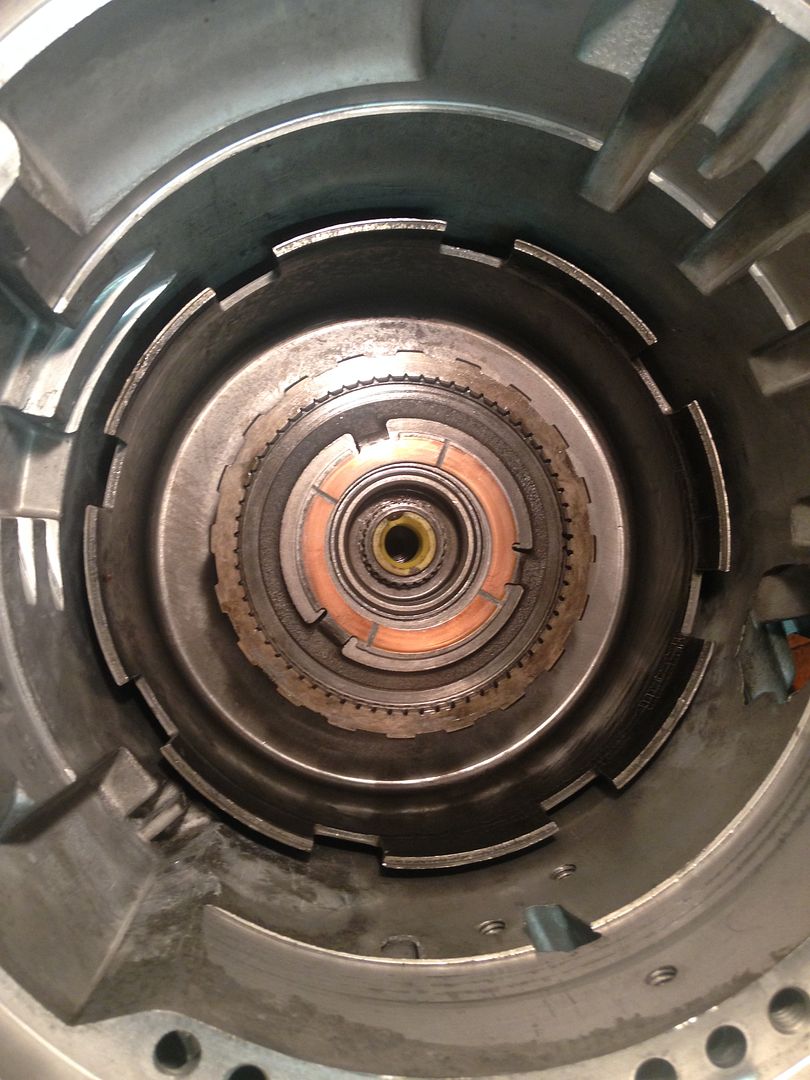 +Direct Clutch Drum and new seal in the below picture- WHICH I just noticed while posting this IS ON BACKWARDS!!!! I will have to take it back out of the truck tonight and reverse this seal. Pay ATTENTION to the detail. The lip goes towards the piston side of the drum. This in effect, nullifies the seal. Grrrr..... Edit: After this was posted, it was verified that this is the correct orientation of the lip seal. This is the only lip seal that faces the opposite direction of the pistons. It is not on backwards as originally posted above. 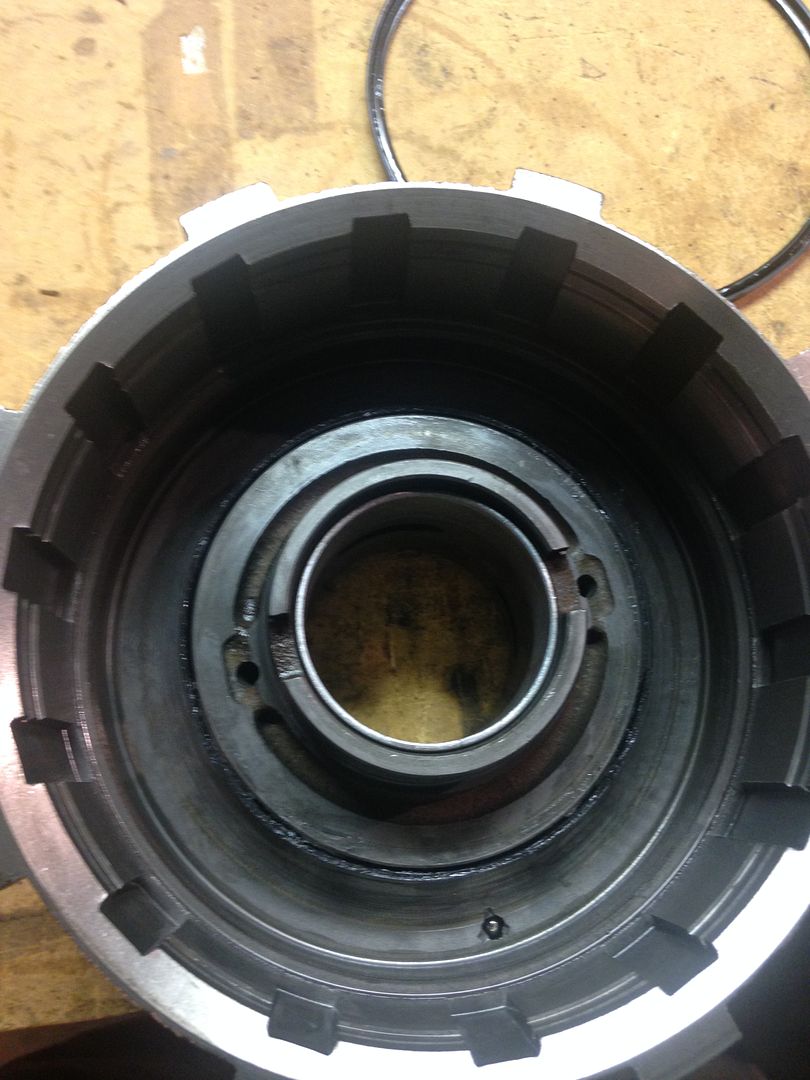 +Direct Clutch Piston w/ new lip seals 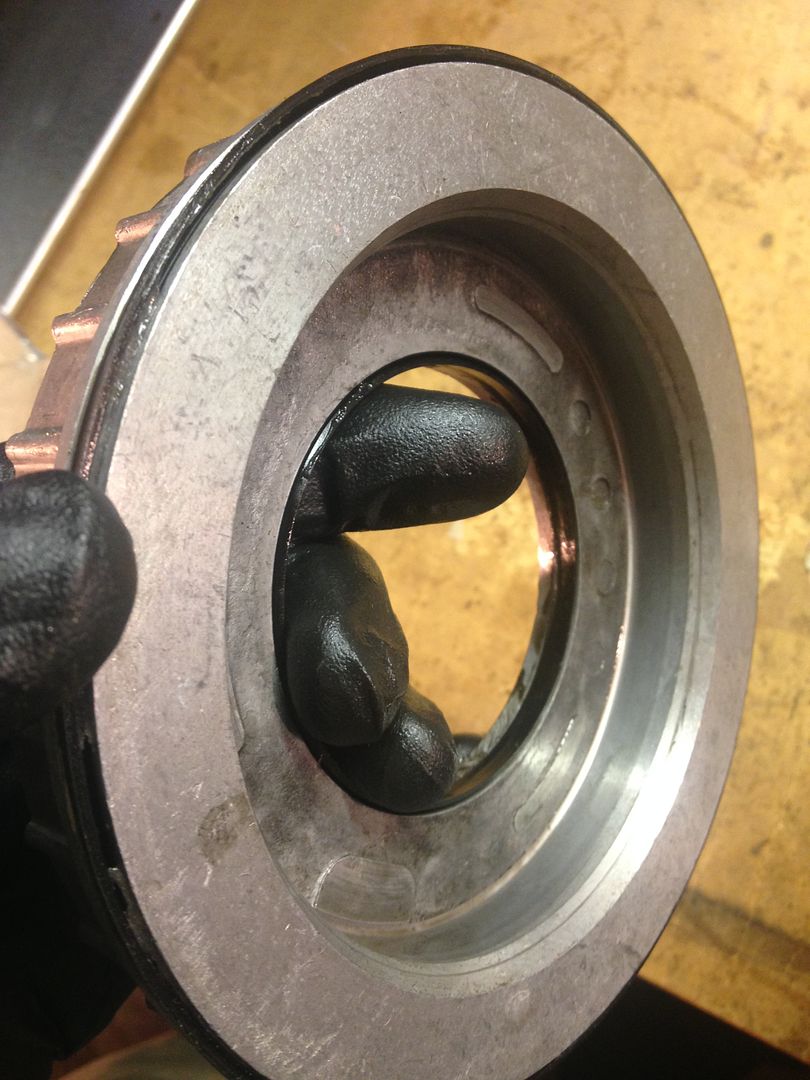 +Direct Clutch Piston Installed 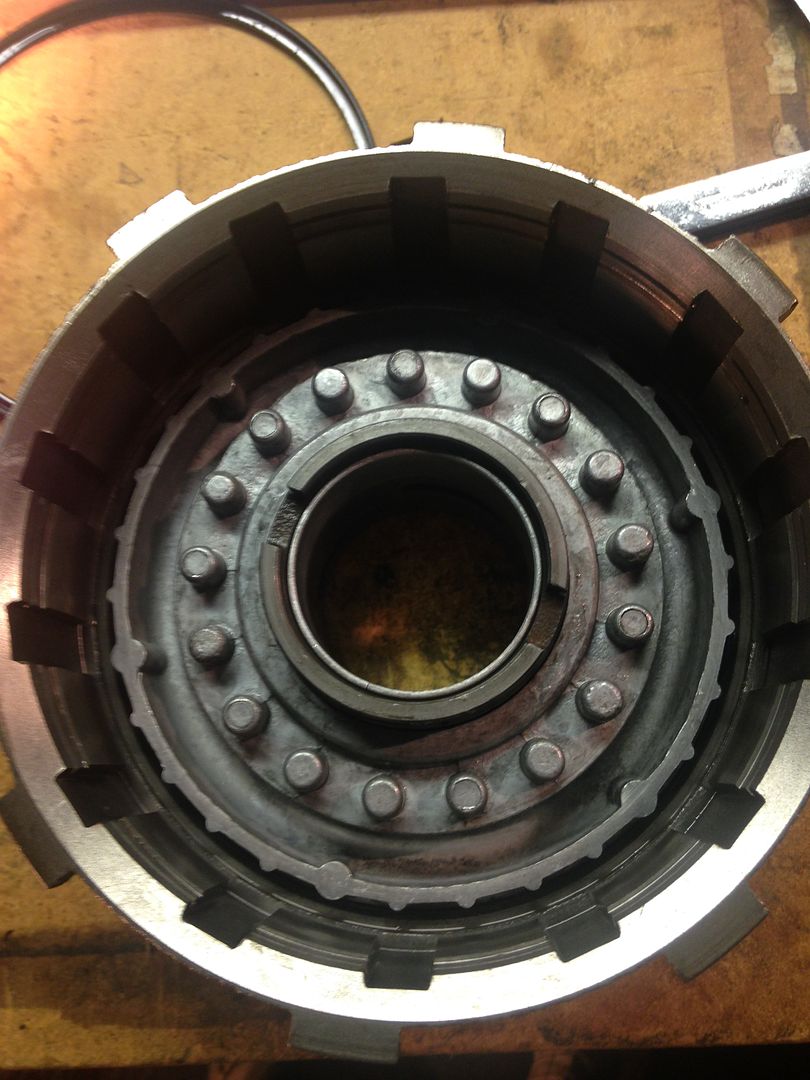 +Compressing piston springs 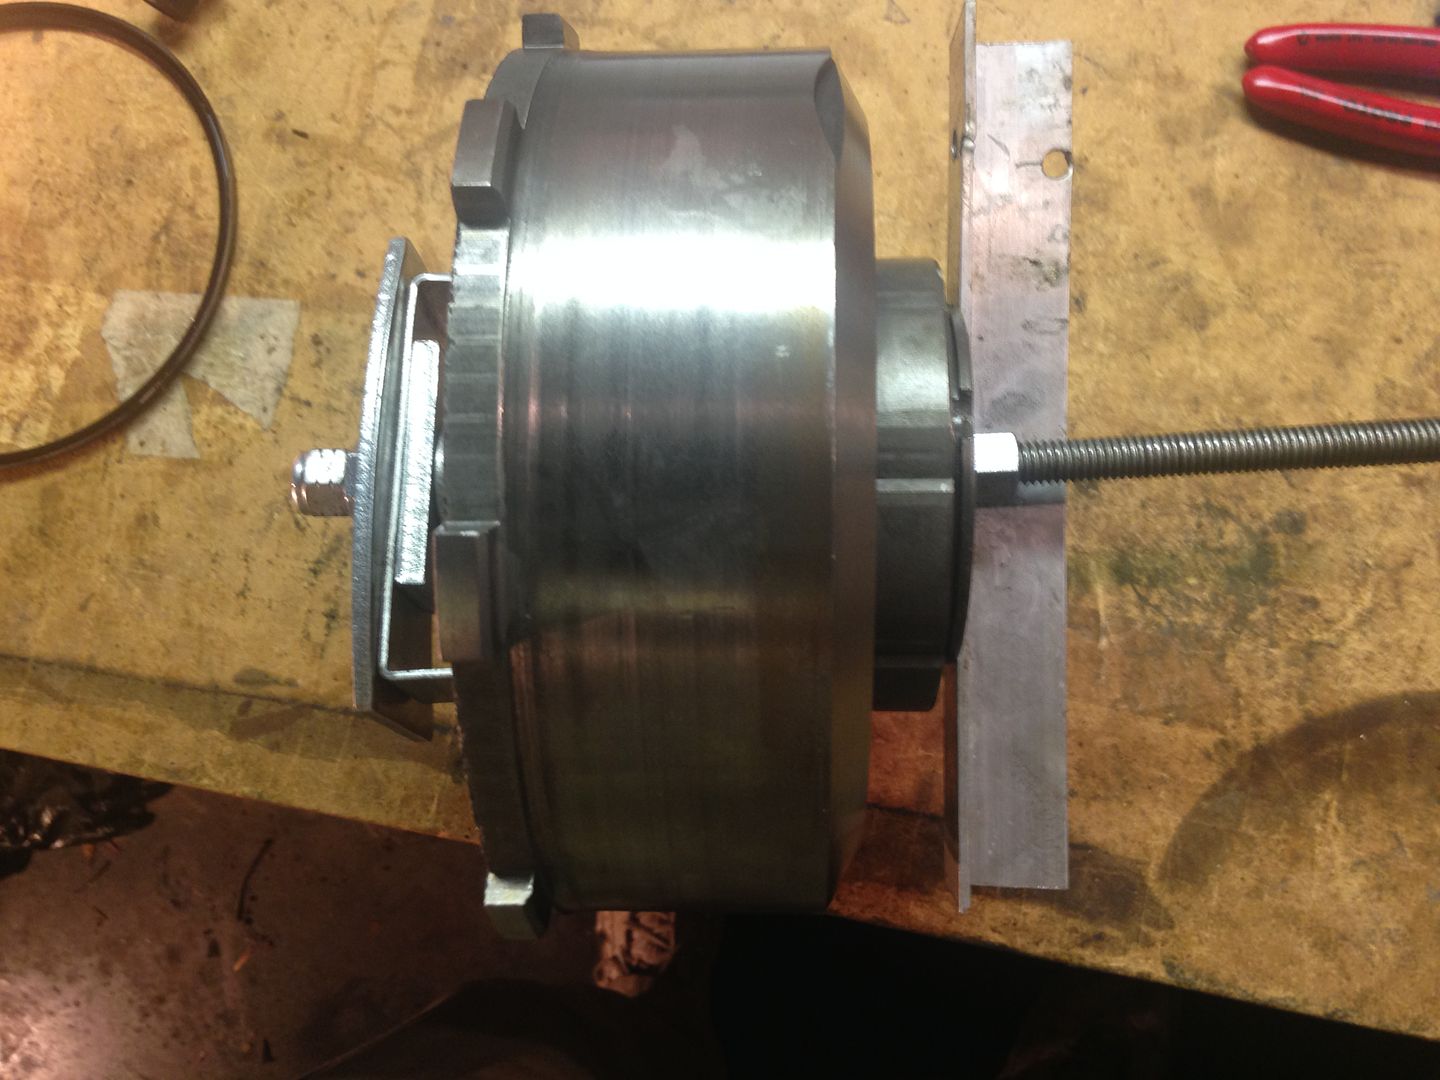 + Snap ring, clutches and steels, retaining ring 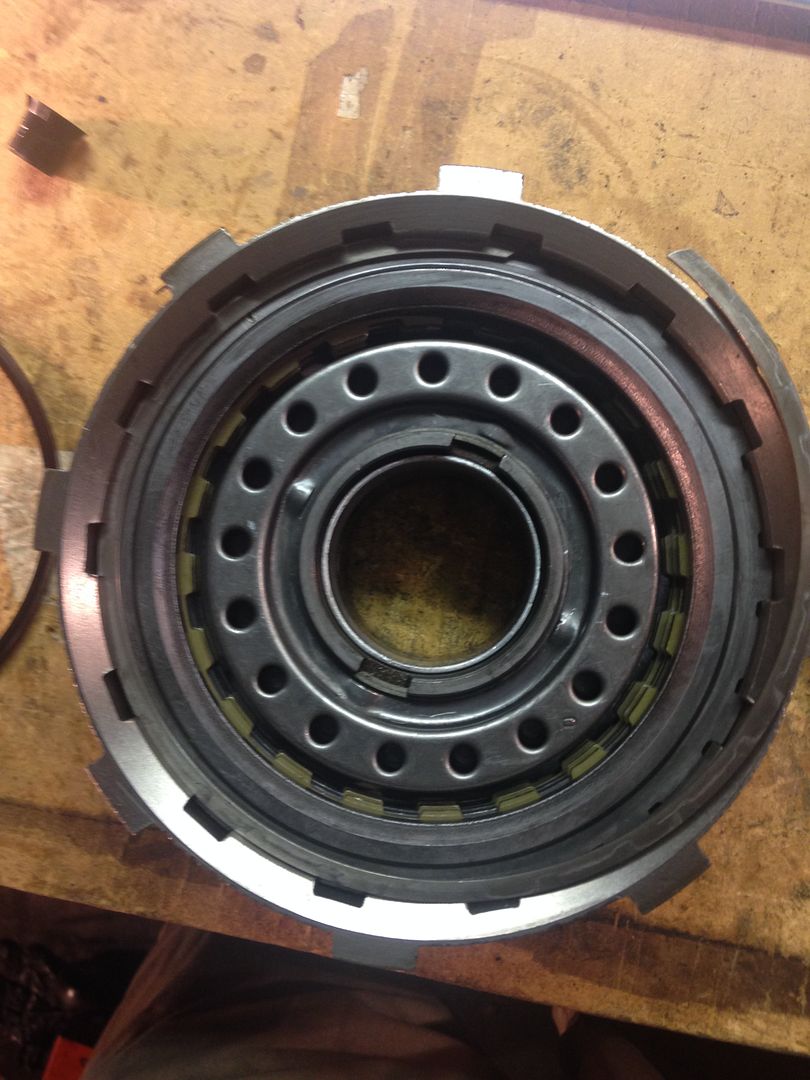 +Overrun clutch, roller cage, retainer and snap ring (front side of Direct Clutch Drum 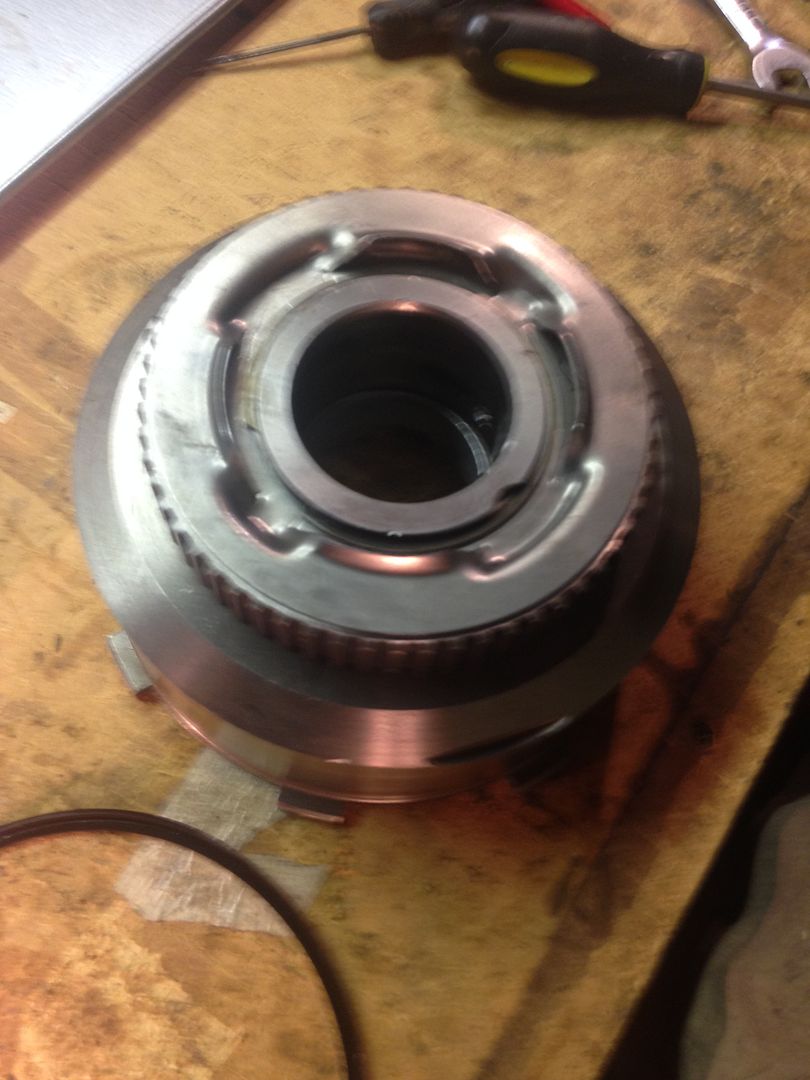 +Forward Clutch (piston already installed) 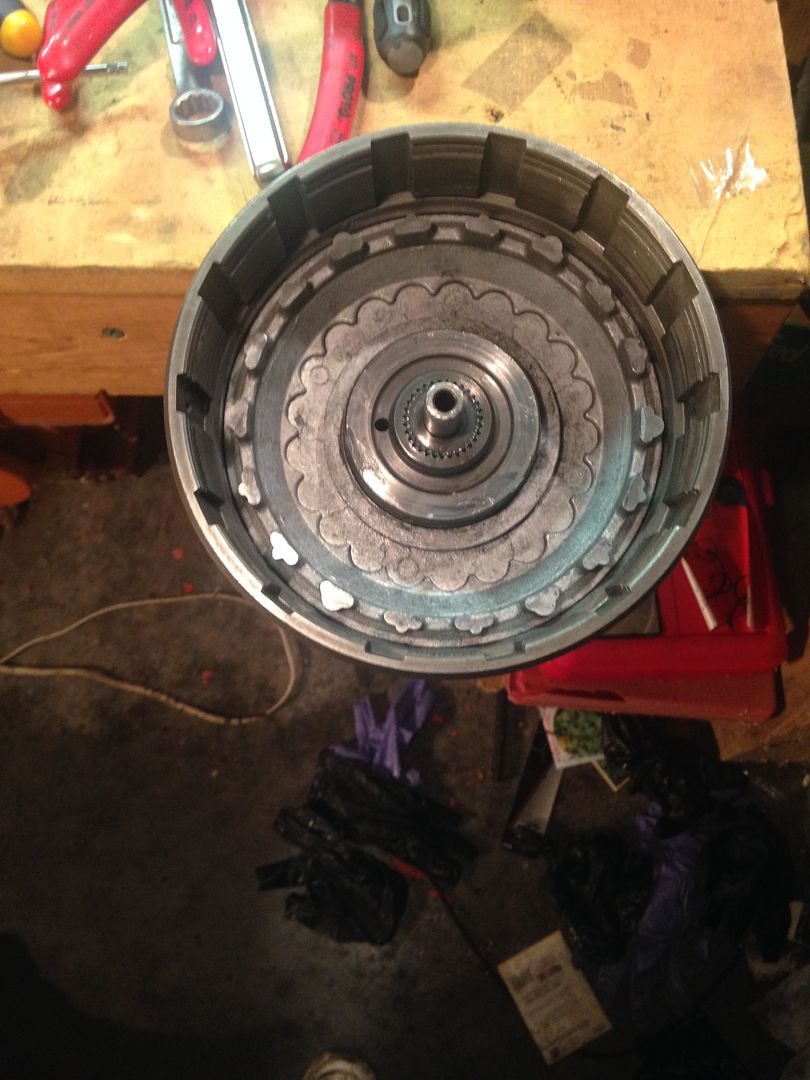 +Compressing piston return springs, snap ring (not shown: clutches and steels, retaining ring) 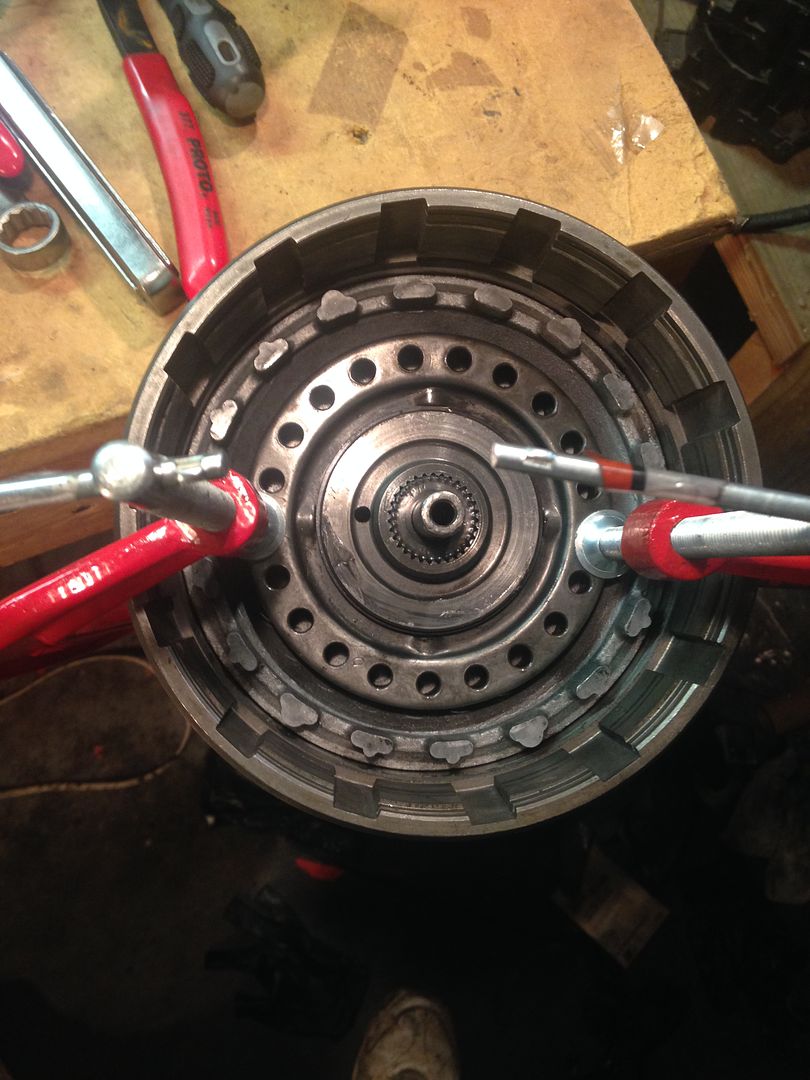 +Direct clutch assembly installed in sun Shell. Note how the clutch assembly is fully inserted into Sun shell, and it sits just below the top of the sun shell. This was a great big pain in the butt. Wiggle. Check. Wiggle. Check. Wiggle. Check. Wiggle Wiggle Wiggle Wiggle Wiggle Wiggle Wiggle. Check. Finally seated? Rejoice. 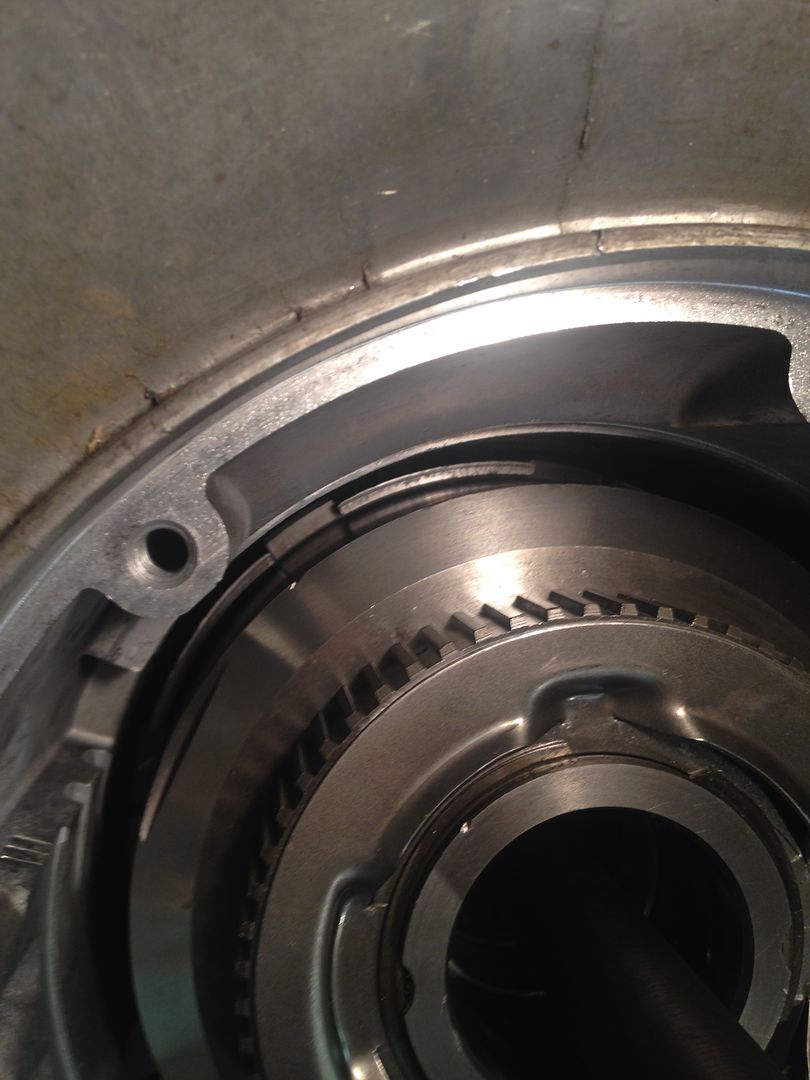 +Brake Band 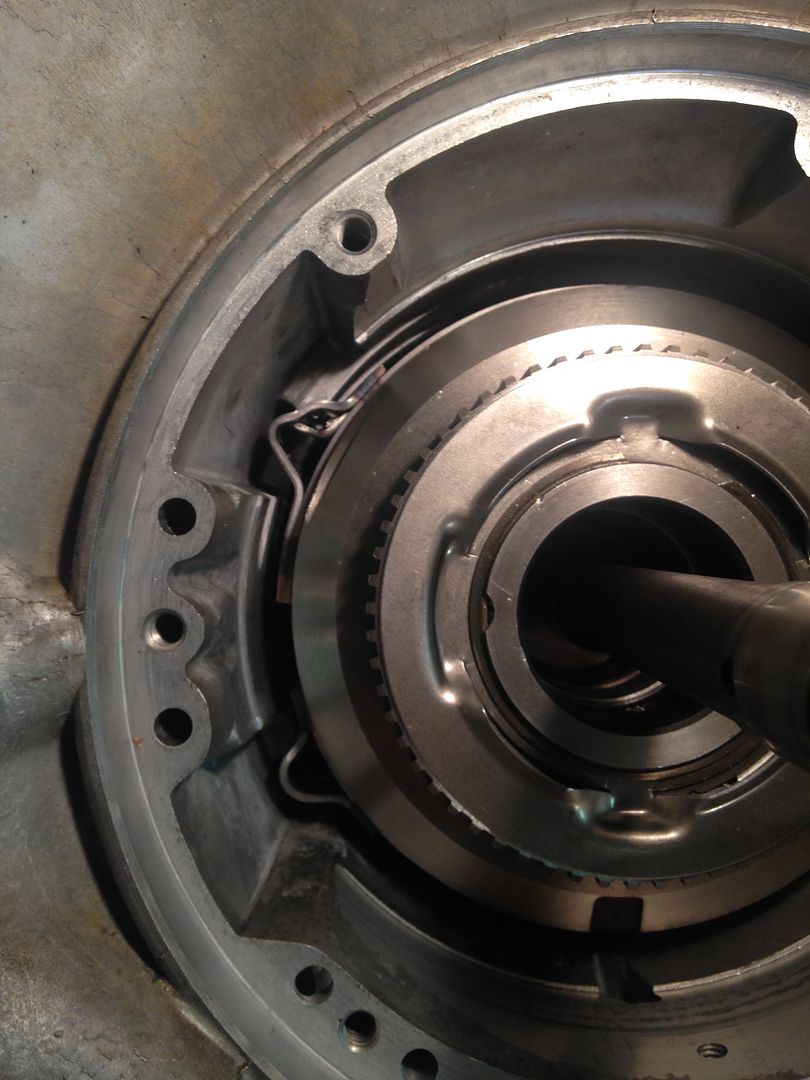 +Direct clutch, Clutches and Steels  SO, that brings me to where I am now today. I have the tranny in the truck and was getting ready to mate the transfer case up to it, until I realized I had put a seal in it backwards. So, I am going to have to drop the tranny again, and reverse that seal tonight if I want to keep it stock, or do the mod since I will have it out anyway. Decisions, decisions.
__________________
1980 Chevy K10 Silverado --> Build Page My wife told me I spent too much time on Facebook. So I bought an old truck. Now she wishes I was on Facebook, it was cheaper.
|
|
|
|
|
10-12-2015, 05:25 PM
|
#15 |
|
Registered User
Join Date: Feb 2012
Location: Beautiful BC, Canada, eh?!
Posts: 2,176
|
Re: Project: TH350C Rebuild
Depending how far in you have to go: Mod it! Mod it! This isn't even a question!
SIGNIFICANTLY more grip in 3rd, faster shifts (makes the clutches last longer), for minimal/zero cost. A student of mine and I went through his TH350 (I teach highschool auto shop), and we took the thickest clutch and steel that came out of his trans and added it to the direct clutch pack after machining the piston down. I had rebuilt a TH350 for myself just a month before, and ordered an extra clutch and steel and bushings from makco transmission.
__________________
1961 Apache: "Grabber Orange" Shortboxed, pancake, step-notch, air-ride, boosted-LS 1977 Silverado: Shortboxed & dropped, potato-potato V8 Pontiac Firefly (Chevy Sprint): The ultimate engine swap: 5.7L in a 1.0L bag Lotus Super 7 Replica: Scratch-built street-legal rollerskate |
|
|
|
|
10-13-2015, 01:10 PM
|
#16 |
|
Registered User
Join Date: Jul 2013
Location: Canton, TX
Posts: 245
|
Re: Project: TH350C Rebuild
Well, as it turns out I didn't have a choice....... I HAD to do the mod. Dropped the tranny and opened it up, then pulled that seal that was backwards. Flipped it over and absolutely could not get the piston to seat in the drum with it facing that direction. I tried and tried to get it to seat, but it just wouldn't budge. I pulled the seal again, and compared it to the old seal. Same circumference, same style, same EVERYTHING. Just wouldn't allow the piston to seat correctly though. Tried getting it to seat using a myriad of things, even applying a LOT pressure to almost force it to seat in the drum, even at the risk of ruining the seal. It just wouldn't budge! I even swapped it out and tried it with the old seal, but nothing I could do made it work. After almost three hours of trying, I finally decided to go ahead and leave it out. It was almost like it was begging for the mod.....
Pulled the seal on the pump stator to make it a dual feed, plugged the feed hole in the case, and then drilled the plate on the valve body as outlined in Jake's Post #5. By the way, if you just happen to drop the "s" link in that little hole that's underneath it while you are attaching it to the rooster comb, it will be certain to find it's way into the depths of the unit ......where NO magnetic retrieval device can reach. Yeah, read into that what you will.... Buttoned it back up and got the transmission put back in the truck (exactly where I left it the night before......), but this time it was nearly 4AM. 26 hours, and I'm no further than I was last night!  So, tonight's episode will be re-attaching the transfer case and the driveline, then a test drive. Years from now someone will comment on this and tell me it was correct and you can't install it backwards because the seal is designed to be idiot proof........
__________________
1980 Chevy K10 Silverado --> Build Page My wife told me I spent too much time on Facebook. So I bought an old truck. Now she wishes I was on Facebook, it was cheaper.
|
|
|
|
|
10-13-2015, 01:54 PM
|
#17 |
|
Registered User
Join Date: Jul 2013
Location: Canton, TX
Posts: 245
|
Re: Project: TH350C Rebuild
I was right. It is idiot proof.......
"Year 1969-1986 This is the seal that installs on the inside journal of the direct drum. When installed correctly the "lip" faces the open end of the drum." I had it installed correctly.... Grrrrr....
__________________
1980 Chevy K10 Silverado --> Build Page My wife told me I spent too much time on Facebook. So I bought an old truck. Now she wishes I was on Facebook, it was cheaper.
|
|
|
|
|
10-14-2015, 06:01 PM
|
#18 |
|
Registered User
Join Date: Jul 2013
Location: Canton, TX
Posts: 245
|
Re: Project: TH350C Rebuild
I got the remainder of the drive train in last night. Went over all the connections, bolts and such another round just to make sure I hadn't forgotten anything, and all was good. Dropped the truck of the jack stands and added about 6 qts of fluid. Checked underneath, and all was well, no leaks. That's good!
Added almost another quart and it started puking fluid from the top of the tranny. I figured it was because there was air in the system, so I started it up, let her idle for a less than a minute, shut it down and then added more fluid. Stopped adding when it was just below the "full" mark. Started it up and checked for function, backed up it out of the shop, to verify that reverse worked, then pulled it back in and let it idle for a bit. Low and reverse works, that's also good. Other than the fluid that puked from the top when putting the oil in, no leaks. Checked to verify that I had enough transmission fluid in it, naturally it was low, so added more to the full line. Gave it a couple of quick tromps on the gas pedal, no leaks. Off we go on the test drive! Down the driveway, no issues, to the road, no issues, shifted to 2nd nicely. Started to see smoke, and smell burnt fluid. I know that some got on the exhaust pipe when it puked, but I needed to verify that, so I turn around. Brought it back to the shop to find the leak. Pulled it in the shop, park, applied e-brake, and then looked underneath while it was still running. Holy leaking tranny Batman. Checked pan bolts, looked like it might be a pan issue. New pan and cork gasket, and the bolts checked out, they were solid. Checked everything out, and couldn't find it. I think it is leaking from the shift shaft seal. Don't know if I did something wrong or poked a hole it, contact with brake cleaner or what, but it only seems to only leak when it is under throttle or at RPMS higher than idle. I'll be pulling that tomorrow and replacing it to see if that is it.
__________________
1980 Chevy K10 Silverado --> Build Page My wife told me I spent too much time on Facebook. So I bought an old truck. Now she wishes I was on Facebook, it was cheaper.
|
|
|
|
|
10-15-2015, 02:50 PM
|
#19 |
|
Registered User
Join Date: Jul 2013
Location: Canton, TX
Posts: 245
|
Re: Project: TH350C Rebuild
Well, the tool that I ordered from the parts house to pull the shift shaft seal didn't come in. It was on the manifest and was supposed to be on the truck, but they couldn't find it. Will have to wait until tomorrow :-( Was looking forward to getting this done.
__________________
1980 Chevy K10 Silverado --> Build Page My wife told me I spent too much time on Facebook. So I bought an old truck. Now she wishes I was on Facebook, it was cheaper.
|
|
|
|
|
10-19-2015, 05:30 PM
|
#20 |
|
Registered User
Join Date: Jul 2013
Location: Canton, TX
Posts: 245
|
Re: Project: TH350C Rebuild
Friday night I put the new shift shaft seal in, but it didn't fix the leak. Thanks to the technological advances of iPhones and Gorilla tape, I found that the truck was leaking from the vent when under throttle. Double checked everything before I put it back in, so I'm kind of lost as to what the issue is, other than the mod. Will be pulling it again this week to check.
__________________
1980 Chevy K10 Silverado --> Build Page My wife told me I spent too much time on Facebook. So I bought an old truck. Now she wishes I was on Facebook, it was cheaper.
|
|
|
|
|
11-09-2015, 07:37 PM
|
#21 |
|
Registered User
Join Date: Jul 2013
Location: Canton, TX
Posts: 245
|
Re: Project: TH350C Rebuild
I finally figured out my problem. I am such a dork. I got distracted when I was putting it all back together and actually put the pump gasket in between the pump halves when I rebuilt it. I had troubleshot the problem down to thinking it might be the pump itself, and so I pulled a pump from another TH350 I had, and only then did I realize the gasket was in the wrong place. Talk about a "DUH!" moment......
I don't have a clue why I put it between the pump halves in the first place! The short story is that it didn't get put back in between the case and the pump where it's supposed to go. Now that it has been corrected, everything is working as it should, although I do have a little bit of slippage in first gear. I talked to a couple of guys at a local transmission shop and they have advised that I will probably need to add a thicker steel or two (.095 vs .080) to the forward drum to tighten it up, depending on what the clearance is. With all of the self induced problems I neglected to check the clearance in the forward drum, which is causing the slip in first. So, another round of pulling the tranny and popping the case open to add a steel or two. This has really been a cool learning opportunity for me. I definitely have a greater respect for my transmission and the beating it takes.
__________________
1980 Chevy K10 Silverado --> Build Page My wife told me I spent too much time on Facebook. So I bought an old truck. Now she wishes I was on Facebook, it was cheaper.
|
|
|
|
|
11-09-2015, 07:41 PM
|
#22 |
|
Registered User
Join Date: Jul 2013
Location: Canton, TX
Posts: 245
|
Re: Project: TH350C Rebuild
Forgot to add the link to this diagram which aided in my troubleshooting.
__________________
1980 Chevy K10 Silverado --> Build Page My wife told me I spent too much time on Facebook. So I bought an old truck. Now she wishes I was on Facebook, it was cheaper.
|
|
|
|
|
11-25-2015, 01:21 AM
|
#23 |
|
Registered User
Join Date: Jul 2013
Location: Canton, TX
Posts: 245
|
Re: Project: TH350C Rebuild
It's been a couple of weeks, and I had developed a small leak where the throttle cable enters the transmission, but $15 later, that was fixed. The issue with slippage in first mentioned above was because fluid was low, and leaking from the throttle cable. Now have a leak between the Tranny and transfer case that I am chasing down. Other than that, it's pretty good. No longer slipping in first when the fluid is at the proper level. I'm ready to build another one!
__________________
1980 Chevy K10 Silverado --> Build Page My wife told me I spent too much time on Facebook. So I bought an old truck. Now she wishes I was on Facebook, it was cheaper.
|
|
|
|
|
| Bookmarks |
|
|


 Linear Mode

