
|
Register or Log In To remove these advertisements. |
|
|
|
|||||||
 |
|
|
Thread Tools | Display Modes |
 07-18-2011, 10:40 AM
|
#26 |
|
Happy to be here
 Join Date: Mar 2000
Location: Cypress, TX
Posts: 39,023
|
Re: Retro-Tech- 77 Cheyenne gets retrogrades
Between waiting on parts, or parts to be painted this project came to a standstill for a while. Combine that with my Summer schedule that included hosting a 4th of July backyard bash, and a lot of time has slipped by.With most of my parts ready to go, I spent some time working on the headlight update. The round headlights in the 73-80 trucks create a dilemma. Many of us find the round eye look to be very attractive and an integral part of the classic styling. Unfortunately they do not offer the after dark visibility that we have come to expect from contemporary automotive lighting. You can improve that in several ways, but I chose a complete replacement bulb. I sourced these conversion headlights from Capt Kaos who is a Vendor here. He is the site owner at 73-87chevytrucks.com as well. 
__________________
Follow me on Facebook and Instagram @N2trux.com Articles- "Jake" the 84 to 74 crewcab "Elwood" the77_Remix 85 GMC Sierra "Scarlett" "Refining Sierra" Last edited by N2TRUX; 07-18-2011 at 06:18 PM. |

|
|
07-18-2011, 10:46 AM
|
#27 |
|
Happy to be here
Join Date: Mar 2000
Location: Cypress, TX
Posts: 39,023
|
Re: Retro-Tech- 77 Cheyenne gets retrogrades
Chris told me that the "direct fit" application the manufacturer claims isn't completely accurate. I "might" need to trim the headlamp buckets as well. He was correct. Once the box was opened and the lights were unpacked it was apparent that the rubber boot used to keep moisture from creeping inside the light housing was too large for the headlamp bucket.
I also noted that the original headlight socket might need to be replaced. It was designed to give a more secure connection than the earlier small sockets, but the physical configuration did not look compatible with the new light.  
__________________
Follow me on Facebook and Instagram @N2trux.com Articles- "Jake" the 84 to 74 crewcab "Elwood" the77_Remix 85 GMC Sierra "Scarlett" "Refining Sierra" |
|
|
|
07-18-2011, 11:16 AM
|
#28 |
|
Happy to be here
Join Date: Mar 2000
Location: Cypress, TX
Posts: 39,023
|
Re: Retro-Tech- 77 Cheyenne gets retrogrades
I removed the headlight bucket from the core support to determine how much material would need to be removed. It wouldn't take much, but I wanted the cuts to be clean. I pulled out my air powered jigsaw and marked the bucket.
The boot is too soft to use as a template, so I searched for something that was the correct size. Fortunately I found an item to use as a guide in my tape drawer. This was much quicker than creating a template.   
__________________
Follow me on Facebook and Instagram @N2trux.com Articles- "Jake" the 84 to 74 crewcab "Elwood" the77_Remix 85 GMC Sierra "Scarlett" "Refining Sierra" |
|
|
|
07-18-2011, 11:31 AM
|
#29 |
|
Happy to be here
Join Date: Mar 2000
Location: Cypress, TX
Posts: 39,023
|
Re: Retro-Tech- 77 Cheyenne gets retrogrades
Once the hole was enlarged in the bucket, the edges were filed and a coat of satin black made it looks fresh again. This was put aside to dry while I worked in the socket.
As you can see the original socket was too large to correctly fit the new headlight. I located a replacement socket at the local autoparts store. I wasn't really impressed with the quality of the pins or the gauge of wire used. To remedy this, the pins were removed from the socket. I had planned to source better quality pins for the new socket, but realized I could use the original pins in the new socket. I carefully removed the pins from the old socket and inserted the wires in the new smaller socket. This would allow me to make the install with out cutting the factory wiring.  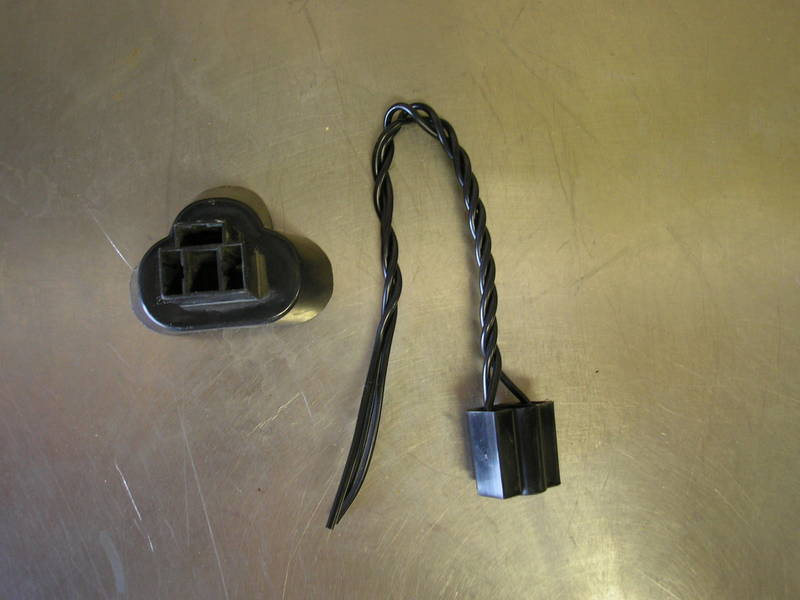 
__________________
Follow me on Facebook and Instagram @N2trux.com Articles- "Jake" the 84 to 74 crewcab "Elwood" the77_Remix 85 GMC Sierra "Scarlett" "Refining Sierra" |
|
|
|
07-18-2011, 12:17 PM
|
#30 |
|
Happy to be here
Join Date: Mar 2000
Location: Cypress, TX
Posts: 39,023
|
Re: Retro-Tech- 77 Cheyenne gets retrogrades
While everything was apart, I cleaned it thoroughly. That was followed by a coat of satin black to give it a fresh look. Once the paint was allowed to dry, I reassembled everything for a final test of fitment.
I was very pleased with the fit, and the resulting change in appearance that the contemporary styled light offered. The light is a perfect match to the driving lights in the bumper. I feel the similarity between the two will make it look like an integral package once completed.  
__________________
Follow me on Facebook and Instagram @N2trux.com Articles- "Jake" the 84 to 74 crewcab "Elwood" the77_Remix 85 GMC Sierra "Scarlett" "Refining Sierra" |
|
|
|
07-18-2011, 06:40 PM
|
#31 |
|
Happy to be here
Join Date: Mar 2000
Location: Cypress, TX
Posts: 39,023
|
Re: Retro-Tech- 77 Cheyenne gets retrogrades
It really doesn't matter how cool the conversion lights look if they don't do what they were designed to do. To show you what improvements were made with this upgrade, I took a few before and after pictures.
Keep in mind that I had to completely remove the light buckets to do the install. This means that the alignment was no longer near correct. I made some basic adjustments to get the lights with in range, with plans to have them professionally adjusted later. In the pictures below the truck is about 20" from the door. This gives you a quick look at the light output and the pattern produced. What the pictures fail to show is the color of the lighting. After these shots were taken I drove out on the street for a better look at the results. There was a significant difference in light output. Combine that with a light color that was much whiter and the increase in actual visibility was impressive. Stock sealed beam (Low)
 Conversion lights (Low)  Stock sealed beam (High)  Conversion lights (High) 
__________________
Follow me on Facebook and Instagram @N2trux.com Articles- "Jake" the 84 to 74 crewcab "Elwood" the77_Remix 85 GMC Sierra "Scarlett" "Refining Sierra" |
|
|
|
| Bookmarks |
|
|


 Linear Mode

