
|
 10-31-2011, 09:12 PM
|
#176 |
|
Registered User
Join Date: Jul 2011
Location: Des Moines, Iowa
Posts: 3,016
|
Re: Project "My Happy Mess"
Thanks
 , the fuel line routing was the work of "The Fixer". We shaved the exhaust manifold (driver's side only) and the alternator. , the fuel line routing was the work of "The Fixer". We shaved the exhaust manifold (driver's side only) and the alternator. Both fitting now, looking good for a custom/modified install. Last I saw, "The Fixer" was creating an oil pump primer tool with an old distributer. He was going to adjust the rocker arms, etc... also. I got hit with a cold this weekend so nothing else new. What's written above is what we did this morning. Pics from this morning I'll try and get posted late tonight.
__________________
project: "my happy mess" |

|

|
|
10-31-2011, 09:16 PM
|
#177 |
|
VA72C10
 Join Date: Mar 2008
Location: Midlothian, VA
Posts: 25,269
|
Re: Project "My Happy Mess"
Nice work. I like the way it looks..... I hope i'm wrong but I worry about vapor lock issues in the summer with that fuel line....I can only imagine it gets pretty hot in between the intake there....
__________________
Looking for a 67-72 swb or blazer project in or around VA. 
|
|
|
|
|
10-31-2011, 09:33 PM
|
#178 |
|
Registered User
Join Date: Jul 2011
Location: Des Moines, Iowa
Posts: 3,016
|
Re: Project "My Happy Mess"
ty I did question it, but since it's opened and air will be flowin, "The Fixer" thinks it'd be ok.
__________________
project: "my happy mess" |
|
|
|
|
11-01-2011, 08:42 AM
|
#179 |
|
GEARHEAD
Join Date: Aug 2003
Location: MN
Posts: 6,111
|
Re: Project "My Happy Mess"
I have tall valve covers on mine also and I added a couple inchs to the bottom end of my alt bracket to get it past the cover, then used a longer belt. BTW, I think the belt you have is too wide. If you go to a napa or other part store that has all the belts hanging there to see, just ask to pull some down and look. The length and width are usually printed on the cover and you should be able to find a belt with similar length but narrower that will fit in the pulleys better. Probably use the same length and it will actually seem longer because it'll fit deeper in the grooves and allow the alternator to move out a bit more.
No offense to "The Fixer", but I think he's wrong about the fuel line being ok through the manifold. It's going to be hot there and not flow much air. Besides, heating the fuel is bad for power. At the very least it should be wrapped in some insulation. One more thing on the fuel line, with the filter in that position it will dump gas on the front of the engine everytime you need to change it. Consider moving it to the line before the fuel pump in the frame rail, even back by the tranny crossmember.
__________________
If no one knows what you're doing, they can't tell you you're doing it wrong HG's Dream Car Build - Shelby Cobra Kit Build your own adjustable track bar 71  Long Fleet C/10 Long Fleet C/10 72  Jimmy 4x4 (Junkyard Jimmy) Jimmy 4x4 (Junkyard Jimmy)HG's Plow Truck '78  K35 Dually K35 DuallyBigass Farm Truck HG's thread of miscellaneous stuff |
|
|
|
|
11-01-2011, 10:20 AM
|
#180 |
|
Registered User
Join Date: Jul 2011
Location: Des Moines, Iowa
Posts: 3,016
|
Re: Project "My Happy Mess"
No offense taken and I appreciate your honest explanation/suggestions, as with everybody else here within the forum. He's my Brother and I coined the nickname "The Fixer" out of respect to him, but also as comic relief within the thread. I assume you've known or have first hand experience with air-gap intakes?
Funny you mention the width of the belt being too wide. Just yesterday I noticed how full it filled the pulleys. Napa (in my area) was one of the more dumber experiences for me when in search of the v-belt. I asked for a 54 1/2 inch belt, the kid came back with a 52" and was twice as thick as the one I have now. In all honesty, I hate auto stores. It stems from growing up having to deal with them - it is one of the reasons I moved on from wrenching on cars to just buying new instead. But as for the thickness, I do not know, or I will find out soon enough. I figured it being a "Gator" belt it had characteristics that produced better gripping, thus filled the pulleys better. I'm not certain they make (or sell locally to residential) a wide variety of v-belts for automotive/alternators. If when I go and change out the bottom bracket with the aluminum Corvette bracket (which I'm afraid will break under prolong stress), I will need to get a longer belt to compensate the difference. At least in my current situation I am able to start, tune and store the truck until a later date (next summer). I've read having two fuel filters is ideal. Before and after the pump. But as you've mentioned, relocation has merit.
__________________
project: "my happy mess" Last edited by litew8; 11-01-2011 at 10:34 AM. |
|
|
|
|
11-01-2011, 11:07 AM
|
#181 |
|
Registered User
Join Date: Jul 2011
Location: Des Moines, Iowa
Posts: 3,016
|
Re: Project "My Happy Mess"
Tuesday Update -
Monday, shaved the driver's side exhaust manifold for valve cover clearance. Shaved the alternator for the same reason.   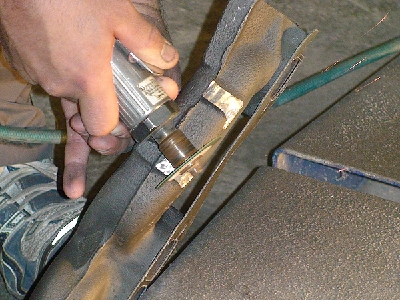 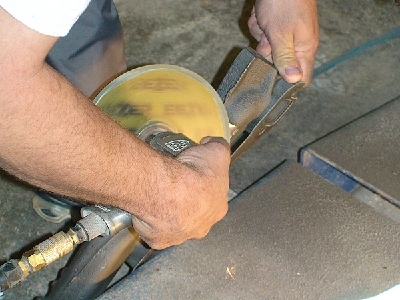 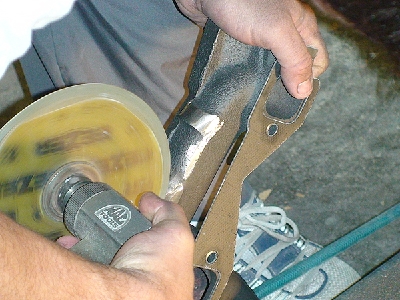 Exhaust manifold painted while still hot, baked on - 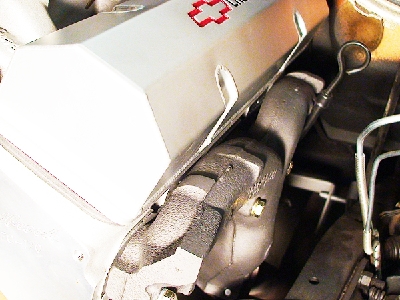 Warranty? We don't need no stinkin warranty!  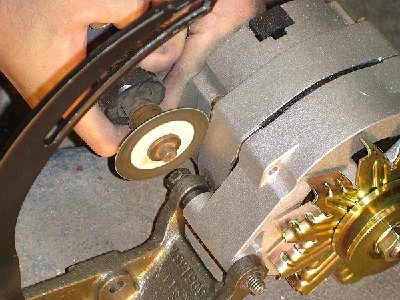 Cleaned up better than this, just didn't take a pic - 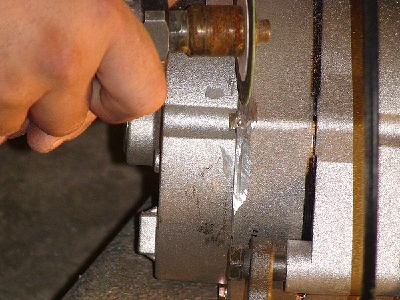 The "new" clearance 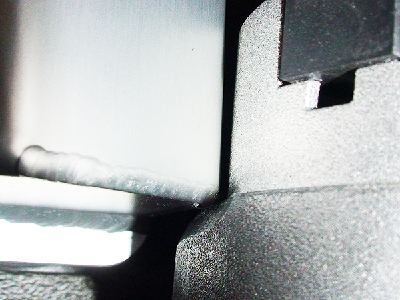
__________________
project: "my happy mess" |
|
|
|
|
11-02-2011, 08:03 PM
|
#182 |
|
Registered User
Join Date: Jul 2011
Location: Des Moines, Iowa
Posts: 3,016
|
Re: Project "My Happy Mess"
Haven't had much time to do a whole lot lately. Waiting on a couple of parts to arrive (soon). Primmed the oil pump and adjusted rocker arms the other day. Cleaned up the
 HEI Mallory Distributor today and dropped er in. Got the right spark plug wire loom kit on order and in route for a nice stock install. My air cleaner was on backorder, expected to ship on 11-15-11, but I called them up and muscled ( HEI Mallory Distributor today and dropped er in. Got the right spark plug wire loom kit on order and in route for a nice stock install. My air cleaner was on backorder, expected to ship on 11-15-11, but I called them up and muscled ( ) them into pulling some strings. It's also in route to my front door as I type. I've got a few pics I'll try and get posted asap. Thanks for looking. ) them into pulling some strings. It's also in route to my front door as I type. I've got a few pics I'll try and get posted asap. Thanks for looking.
__________________
project: "my happy mess" |
|
|
|
|
11-02-2011, 08:05 PM
|
#183 |
|
Registered User
Join Date: Jul 2011
Location: Des Moines, Iowa
Posts: 3,016
|
Re: Project "My Happy Mess"
Question: Who here wants to see an HD video of the first fire?
__________________
project: "my happy mess" |
|
|
|
|
11-02-2011, 08:18 PM
|
#184 |
|
6>8 Plugless........
 Join Date: Sep 2007
Location: Prairie City, Ia
Posts: 17,139
|
Re: Project "My Happy Mess"
I don't care if it's HD, but a video will be cool.
__________________
Ryan 1972 Chevy Longhorn K30 Cheyenne Super, 359 Inline 6 cylinder, Auto Trans, Tilt, Diesel Tach/Vach, Buckets, Rare Rear 4-link and air ride option Build Thread 1972 GMC Sierra Grande Longhorn 4x4 1972 Chevy Cheyenne Super K20 Long Step side tilt, tach, tow hooks, AC, 350 4 speed 1972 C10 Suburban Custom Deluxe 1969 Chevy milk truck 1971 Camaro RS 5.3 BTR STG3 Cam Super T10 1940 Ford 354 Hemi 46RH Ford 9" on air ride huge project Tired of spark plugs? Check this out. |
|
|
|
|
11-02-2011, 08:50 PM
|
#185 |
|
Registered User
Join Date: Jul 2011
Location: Des Moines, Iowa
Posts: 3,016
|
Re: Project "My Happy Mess"
I ask it like that because it will be a lot of work for me to transfer the video from my camcorder into a format for the web. I haven't ever had time to experiment in transfering video from it (HD camcorder), but I know it's going to be a bear. It prob. won't be true 1080 quality after all is said and done. The other option, I could take the video using my 11 year old floppy disk Sony Mavica camera and post tiny videos. That might actually be the way to go.
__________________
project: "my happy mess" |
|
|
|
|
11-04-2011, 02:53 AM
|
#186 |
|
Registered User
Join Date: Jul 2011
Location: Des Moines, Iowa
Posts: 3,016
|
Re: Project "My Happy Mess"
__________________
project: "my happy mess" |
|
|
|
|
11-04-2011, 06:29 PM
|
#187 |
|
Registered User
Join Date: Nov 2010
Location: Carlsbad, CA
Posts: 1,584
|
Re: Project "My Happy Mess"
Just letting you know I enjoy reading your thread and I'm following along. I love the happy mess title haha.
__________________
- Jim - My Daily Driver is a 1969 Chevrolet Custom/20 Fleetside 350/TH400/Eaton H052 4.10 and its Project thread is here http://67-72chevytrucks.com/vboard/s...d.php?t=456911 |
|
|
|
|
11-05-2011, 08:48 PM
|
#188 |
|
Registered User
Join Date: Jul 2011
Location: Des Moines, Iowa
Posts: 3,016
|
Re: Project "My Happy Mess"
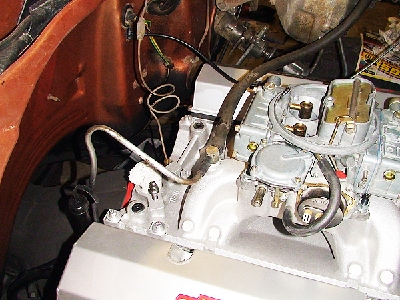
Thank you Jim. Complements coming from a retired engineer, that means a lot to me. We got the distributor dropped. Got the stock spark plug wire heat sheilds in and I began installing them this afternoon. Well, my dumb luck - the first one I installed (driver's side, rear) didn't seem to provide enough clearance for the 90 degree boot on the Taylor spark plug wire. The boot was touching the sheild, no matter which way I turned it. Also, removal of the spark plugs themselves would have been a real pain with the sheilds installed due to clearance provided. I decided we'd probably be better off not installing the heat sheilds. $18 bucks worth of metal. The other peices I will use. They are looms that originally were on Corvette installations (or older years). Two brackets for the back bellhousing to hold the wires coming off of the distributor and then two small brackets that mount on the block (front, where the front heat sheilds would have been installed). There are 4 small threaded holes on a 350 block for this purpose. The aftermarket (Taylor) spark plug wires are from a 1976 length Corvette installation. The wires will run from behind (distributor) and under exhaust manifolds. No wires draping over valve covers.
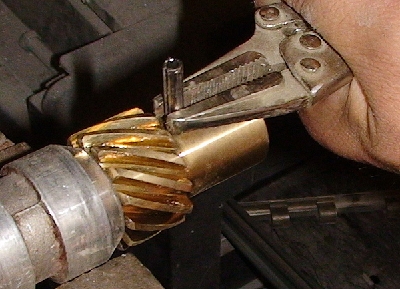
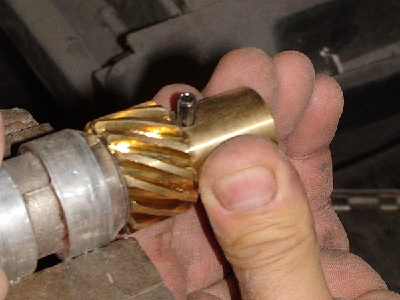
I went to take the heat sheild off and the damn bolt busted off inside of the block.  Oh well. Oh well.  Maybe we can tap it out and modify the sheilds for better clearance. I'm thinking the difference between stock heads and the E-tec's are such that it messes with things in the smallest irritating ways. "The Fixer" is drilling a 1 3/8" hole in each aluminum valve cover tonight for breather and pvc installation. Air cleaner is scheduled to arrive on Monday.
__________________
project: "my happy mess" Last edited by litew8; 11-05-2011 at 09:05 PM. |
|
|
|
|
11-05-2011, 10:36 PM
|
#189 |
|
Registered User
Join Date: Aug 2010
Location: Des Moines, IA
Posts: 1,241
|
Re: Project "My Happy Mess"
Hello from another Des Moines resident. I Spent some time going through the thread. Keep up the good work.
__________________
Bud |
|
|
|
|
11-06-2011, 02:37 AM
|
#190 | |
|
Registered User
Join Date: Jul 2011
Location: Des Moines, Iowa
Posts: 3,016
|
Re: Project "My Happy Mess"
Quote:
__________________
project: "my happy mess" |
|
|
|
|
|
11-06-2011, 02:39 AM
|
#191 | |
|
Registered User
Join Date: Jul 2011
Location: Des Moines, Iowa
Posts: 3,016
|
Re: Project "My Happy Mess"
Quote:
__________________
project: "my happy mess" |
|
|
|
|
|
11-06-2011, 10:43 AM
|
#192 |
|
Grandpa in the rustmobile...
Join Date: Nov 2008
Location: Spokane WA/Viola TN
Posts: 11,422
|
Re: Project "My Happy Mess"
pix????
__________________
John Goose-1968 C10 355,9.32-1CR, Vortec Heads ,262 voodoo, 3.73:1 3OTT (HS ride/beater/farm truck) http://67-72chevytrucks.com/vboard/s...d.php?t=317684 Grams 53-1953 Chevrolet Belair http://67-72chevytrucks.com/vboard/s...=1#post4327784 1969 Chevy C10 Shortbed 4.5/6?" Frame off resto http://67-72chevytrucks.com/vboard/s...d.php?t=548136 1999 Toyota Tacoma 4x4 |
|
|
|
|
11-06-2011, 12:01 PM
|
#193 |
|
Registered User
Join Date: Jul 2011
Location: Des Moines, Iowa
Posts: 3,016
|
Re: Project "My Happy Mess"
Going over to work on it now. Will get pics posted this afternoon if I have time.
__________________
project: "my happy mess" |
|
|
|
|
11-06-2011, 02:43 PM
|
#194 | |
|
Registered User
Join Date: Feb 2011
Location: Pittsfield, Ma
Posts: 497
|
Re: Project "My Happy Mess"
Quote:
__________________
Cam 1972 Chevy C/10 "Custom Cruiser Project" Build Thread 1961 Olds Super 88 (Daily) 1966 Chevy Corvair 500, "Marigold" SOLD 2005 Subaru Outback Wagon DEAD 2008 Pontiac G8, New Winter/Daily |
|
|
|
|
|
11-06-2011, 05:32 PM
|
#195 |
|
Registered User
Join Date: Jul 2011
Location: Des Moines, Iowa
Posts: 3,016
|
Re: Project "My Happy Mess"
Sunday Update -
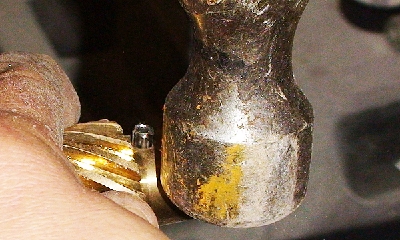
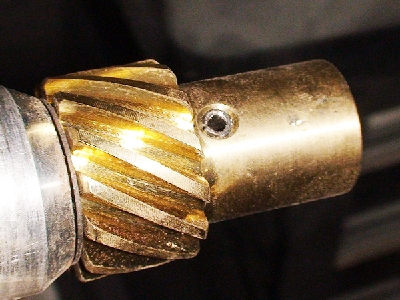
Inspiration. On the way to work on the truck, I see a Chevy I've seen before driving my streets. Took a couple pics for everyone to see what it looks like when our trucks drive my neighborhood. 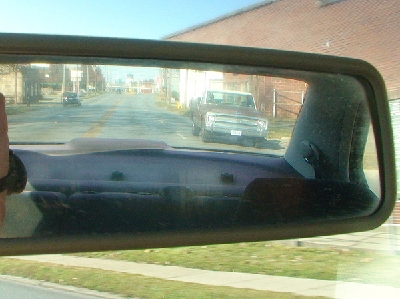 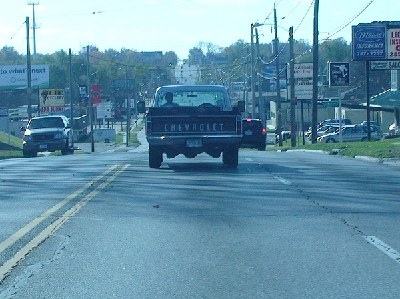 Got the wires run. 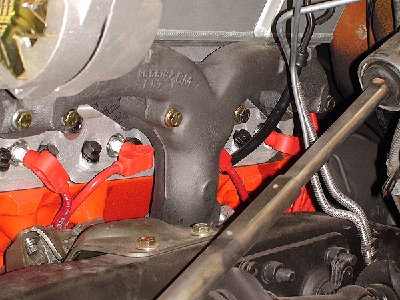 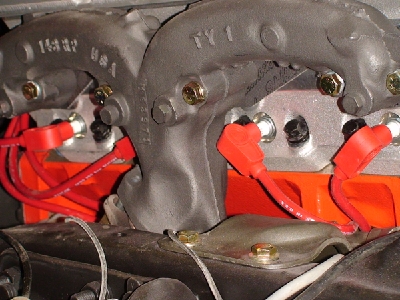 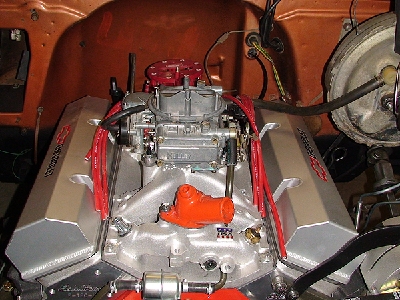 The hole the heat sheild bolt busted off into (back, driver's side) - 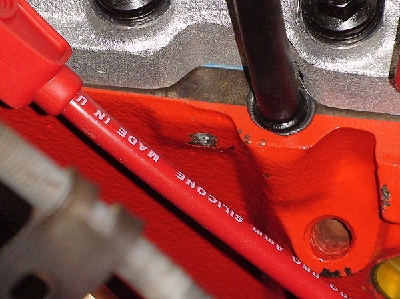 One retaining clip installed on both sides of oil pan (total of 2) 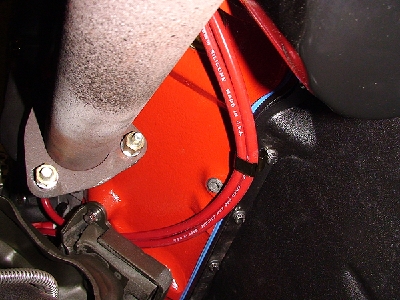 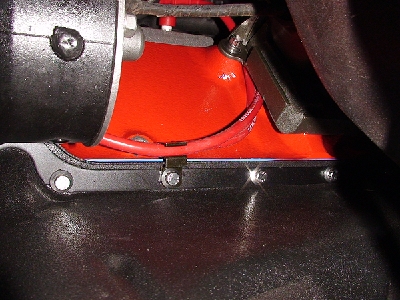 Looms installed on transmission bell housing, where guard should be - 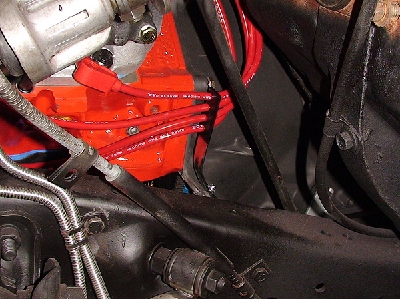 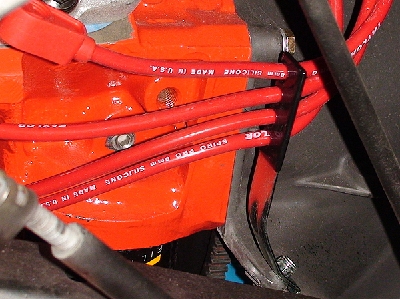 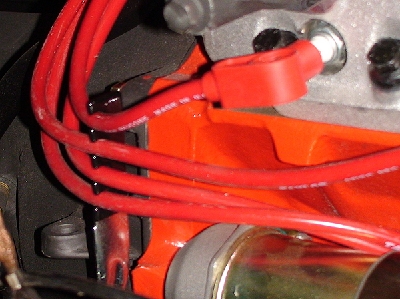 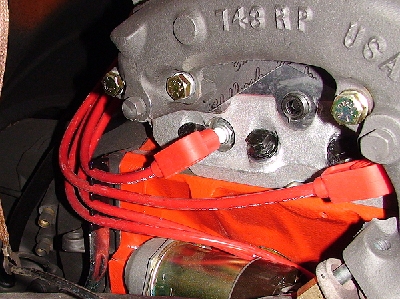 I'll get the other two smaller front clips installed tomorrow. "The Fixer" didn't drill the holes last night, but will find some time tonight. Here's the tool - 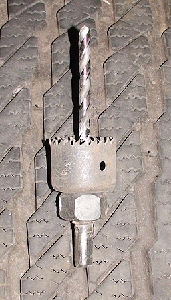
__________________
project: "my happy mess" |
|
|
|
|
11-06-2011, 06:13 PM
|
#196 |
|
VA72C10
Join Date: Mar 2008
Location: Midlothian, VA
Posts: 25,269
|
Re: Project "My Happy Mess"
Looking good!
__________________
Looking for a 67-72 swb or blazer project in or around VA.
|
|
|
|
|
11-06-2011, 08:02 PM
|
#197 |
|
Registered User
 Join Date: Dec 2009
Location: Durham,NC
Posts: 636
|
Re: Project "My Happy Mess"
From reading couple pages could you use the corvette upper braket and not have had to mod alt and gave your more clearance? Or would you have had to buy more then just upper bracket? Thanks Brandon
|
|
|
|
|
11-06-2011, 08:11 PM
|
#198 |
|
Senior Member
Join Date: Mar 2011
Location: West Plains, Missouri
Posts: 7,553
|
Re: Project "My Happy Mess"
Engine stuff looking real good....Jim
__________________
my build thread: http://67-72chevytrucks.com/vboard/s...d.php?t=459839 Jimbo's long bed step build:http://67-72chevytrucks.com/vboard/s...t=464626<br /> |
|
|
|
|
11-06-2011, 08:24 PM
|
#199 | |||
|
Registered User
Join Date: Jul 2011
Location: Des Moines, Iowa
Posts: 3,016
|
Re: Project "My Happy Mess"
Quote:
Quote:
Hope that helps answer your question in a roundabout way. A more direct reply - Both upper and lower Corvette brackets should be used for best clearnace. The upper bracket should be a longer arc, and the lower bracket should kick out to the right more. As it sits, I probably will end up having 1/8" clearance from alternator (after shaving the back edge and 1/2 of the bolt head) to valve cover. As long as the alternator doesn't vibrate loose and move, it should remain fine. I've asked that some of the posts up thread be removed so that they wouldn't cause confusion. va  Quote:
__________________
project: "my happy mess" Last edited by litew8; 11-06-2011 at 08:50 PM. |
|||
|
|
|
|
11-06-2011, 09:15 PM
|
#200 |
|
Registered User
Join Date: Jul 2011
Location: Des Moines, Iowa
Posts: 3,016
|
Re: Project "My Happy Mess"
Brandon, also keep in mind that I'm using E-Tec 170 heads and tall fabricated valve covers. Together, I think they exagerrate clearnce issues. The E-Tec heads seem to stand taller than stock heads. So it might be that stock heads and tall valve covers wouldn't create as much of a hassle I've encountered, but from what I've read, tall valve covers do create some issue on their own.
__________________
project: "my happy mess" |
|
|
|
 |
| Bookmarks |
|
|


 Linear Mode

