
|
|
|
 10-27-2016, 06:26 PM
|
#1 |
|
Registered User
Join Date: Aug 2014
Location: Vacaville, CA
Posts: 133
|
Re: S10 Swap how to
Happy to see you back! I'm one of many who truly appreciate you efforts with this swap thread. It's been an enormous help for my project!!
What blows my mind is how effortlessly you seem to make the motor fit. It took me quite a few attempts and a few different mount revisions to get my motor and transmission (and headers DOH!) to fit with out hacking up the cab. It looks like a rainy few days so I'll finally update my build thread. |

|

|
|
11-03-2016, 02:01 PM
|
#2 |
|
Registered User
Join Date: May 2016
Location: Tomball, Texas
Posts: 4
|
Re: S10 Swap how to
We are in the process of following your build steps on swapping onto S10 frame. Everything has been great but we are stumped on your motor mounts. We are using the 4.3 with the standard trans. What mounts are you using on the motor side when you built the engine mounts? If we use the same brackets that are already on the motor with your engine mount design it will be a solid mount with no rubber isolation.
|
|
|
|
|
11-14-2016, 07:36 PM
|
#3 | |
|
Registered User
 Join Date: Apr 2010
Location: Warrensburg, MO
Posts: 2,690
|
Re: S10 Swap how to
Quote:
__________________
www.olesargecustoms.com email: chris@olesargecustoms.com '48 build: http://67-72chevytrucks.com/vboard/s...d.php?t=541904 '33 build: http://67-72chevytrucks.com/vboard/s...=1#post6232888 '49 build: http://67-72chevytrucks.com/vboard/s...=1#post6364475 |
|
|
|
|
|
11-03-2016, 03:07 PM
|
#4 |
|
Senior Member
 Join Date: May 2007
Location: Doodah Kansas
Posts: 7,748
|
Re: S10 Swap how to
I am not skymangs but I used speedway universal mount stands and chevelle 350 mounts. I could not figure how to use the stock s10 4.3 clamshell mounts without using the stock frame side mount. we did it that way on the 47 (moved the stock frame side mount back)
 but I used the speedway universal weld in mounts and 350 70s chevelle motor mounts (4.99 any parts store) on the 49 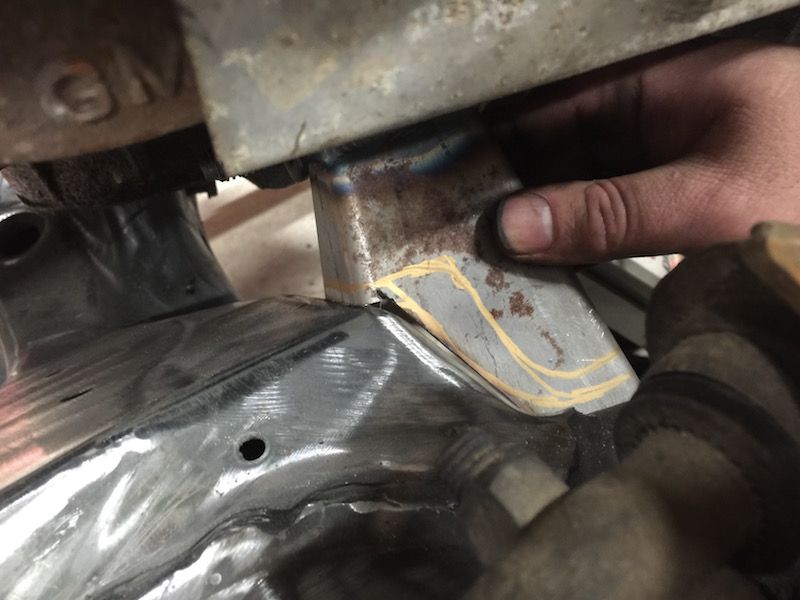 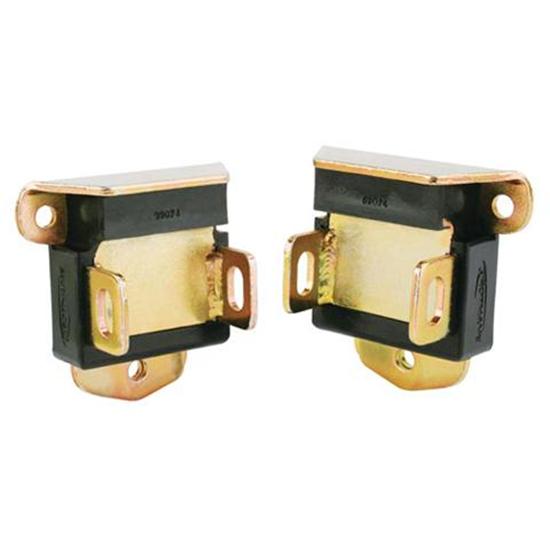 I moved the motor 6" on the 47 and had to use an electric fan. I moved the motor 7.5 inches on the 49 to leave room for the clutch fan.
__________________
the mass of men live lives of quiet desperation if there is a problem, I can have it. new project WAYNE http://67-72chevytrucks.com/vboard/s...d.php?t=844393 |
|
|
|
|
11-03-2016, 07:02 PM
|
#5 | |
|
Registered User
Join Date: May 2016
Location: Tomball, Texas
Posts: 4
|
Re: S10 Swap how to
Quote:
|
|
|
|
|
|
11-03-2016, 04:32 PM
|
#6 |
|
Registered User
Join Date: May 2013
Location: Kansas City
Posts: 572
|
Re: S10 Swap how to
Nor am I Skymangs...but this is how I did mine.
S10 conversion mounts bolted to the chassis. The passenger side will bolt on directly. The drivers side chassis will require re-drilling the two lower holes to bolt the mount on. You can use a 1990 S10 2.8L motor mount as a guide, you'll see what I mean when you have the parts in front of you. 1990 S10 2.8L Motor Mounts bolted to the engine, Anchor brand 2436. You can also use a 1990 Corvette Motor Mount, Achor brand 2713    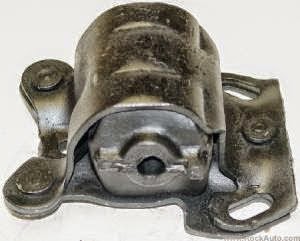 Anchor 2436, 1990 S10 2.8L |
|
|
|
|
11-13-2016, 12:03 PM
|
#7 | |
|
Registered User
Join Date: Apr 2010
Location: Warrensburg, MO
Posts: 2,690
|
Re: S10 Swap how to
Quote:
__________________
www.olesargecustoms.com email: chris@olesargecustoms.com '48 build: http://67-72chevytrucks.com/vboard/s...d.php?t=541904 '33 build: http://67-72chevytrucks.com/vboard/s...=1#post6232888 '49 build: http://67-72chevytrucks.com/vboard/s...=1#post6364475 |
|
|
|
|
|
11-03-2016, 06:34 PM
|
#8 |
|
Senior Member
Join Date: May 2007
Location: Doodah Kansas
Posts: 7,748
|
Re: S10 Swap how to
hey hussey that works great for a v8 because the v8 needs to move forward on the s10 chassis when used in an s10 bodied truck so its a net 7 or 8 inch rear move with them reversed, but with a 4.3 its only 4.5" rear move and that isnt enough for the fan clutch. thats why we made our own plates for the 47, we made them just like the swap plates, for a net 6 inch rearward move, which still wasnt enough for the clutch fan.
works great for a v8 though.
__________________
the mass of men live lives of quiet desperation if there is a problem, I can have it. new project WAYNE http://67-72chevytrucks.com/vboard/s...d.php?t=844393 |
|
|
|
|
11-03-2016, 09:56 PM
|
#9 | |
|
Registered User
Join Date: May 2013
Location: Kansas City
Posts: 572
|
Re: S10 Swap how to
Quote:
But, in my defense of missing the 4.3 part, who would in their right mind put a V6 in their hot rod, I could see a straight-6 but a V6??? 
|
|
|
|
|
|
11-03-2016, 10:48 PM
|
#10 | |
|
Senior Member
Join Date: May 2007
Location: Doodah Kansas
Posts: 7,748
|
Re: S10 Swap how to
Quote:
both of mine have been 4.3 vortec. the LU3 is 195 HP and 260 tq. a tbi 350 is 200 HP and 300 tq. these trucks are so light, just about anything makes it a tire melter. even the 2.8 V6 and I must not be a compensater, I had a 65 fullsize with a 2.2 
__________________
the mass of men live lives of quiet desperation if there is a problem, I can have it. new project WAYNE http://67-72chevytrucks.com/vboard/s...d.php?t=844393 |
|
|
|
|
|
11-03-2016, 11:11 PM
|
#11 | |
|
Registered User
Join Date: May 2013
Location: Kansas City
Posts: 572
|
Re: S10 Swap how to
Quote:
|
|
|
|
|
|
11-03-2016, 11:34 PM
|
#12 | |
|
Senior Member
Join Date: May 2007
Location: Doodah Kansas
Posts: 7,748
|
Re: S10 Swap how to
Quote:
yep, it was originally spelled s10 ride without a "w" and no one got it. "essten ride? whatinthehells that?" so I changed it from the play on words to the phonetic pronunciation, adding the w and changing the 10 to an LO. people were polarized by it, loved it or hated it. some of the coolest guys just asked questions and let me ask questions about their trucks. some guys were less impressed, and most of their trucks were still at home with big plans. I didnt care though, I didnt even put in a radio, just cruised it around for hours at a time. one more for the books.
__________________
the mass of men live lives of quiet desperation if there is a problem, I can have it. new project WAYNE http://67-72chevytrucks.com/vboard/s...d.php?t=844393 |
|
|
|
|
|
11-04-2016, 05:34 PM
|
#13 | |
|
Registered User
Join Date: Apr 2010
Location: Warrensburg, MO
Posts: 2,690
|
Re: S10 Swap how to
Quote:
__________________
www.olesargecustoms.com email: chris@olesargecustoms.com '48 build: http://67-72chevytrucks.com/vboard/s...d.php?t=541904 '33 build: http://67-72chevytrucks.com/vboard/s...=1#post6232888 '49 build: http://67-72chevytrucks.com/vboard/s...=1#post6364475 |
|
|
|
|
|
11-07-2016, 06:49 PM
|
#14 |
|
Registered User
Join Date: Jan 2014
Location: Grants New Mexico
Posts: 613
|
Re: S10 Swap how to
Chris;;
Very glad to hear n see you up n around. Just take is slow n easy; Hope this years Holidays are better for you. Glad to hear your getting a shop going again. Happy Holidays; T-P Auto  Tim |
|
|
|
|
11-03-2016, 06:59 PM
|
#15 |
|
Registered User
Join Date: Aug 2014
Location: Vacaville, CA
Posts: 133
|
Re: S10 Swap how to
I made the same basic mounts as Skymangs. Some 3/8 plate and some black pipe.
I pulled the 327 out of my Camaro and used it as is. The mount pads are just like the ones Joedoh posted.... although 51 years older. |
|
|
|
|
11-13-2016, 12:17 PM
|
#16 |
|
Registered User
Join Date: Apr 2010
Location: Warrensburg, MO
Posts: 2,690
|
Re: S10 Swap how to
Yeah, I'm up and answering any questions anyone may have. If they would just follow my build instructions exactly they would be fine. I even included pictures to make it easier.
__________________
www.olesargecustoms.com email: chris@olesargecustoms.com '48 build: http://67-72chevytrucks.com/vboard/s...d.php?t=541904 '33 build: http://67-72chevytrucks.com/vboard/s...=1#post6232888 '49 build: http://67-72chevytrucks.com/vboard/s...=1#post6364475 |
|
|
|
|
12-01-2016, 07:07 AM
|
#17 |
|
Registered User
Join Date: Feb 2016
Location: Norwell MA
Posts: 40
|
Re: S10 Swap how to
Great thread, it has helped a lot on my project. Now, my problem: driveshaft / pinion angle. I shortened an extended cab frame 7" to correct wheelbase. I have a 6" static drop, with an Explorer rear end, and went to a 1 piece driveshaft. I have a serious drive train vibration, and am on my second custom made driveshaft.
With all the builds you do, to you have a go-to solution? Thank you |
|
|
|
|
12-03-2016, 12:10 AM
|
#18 | |
|
Registered User
Join Date: May 2013
Location: Kansas City
Posts: 572
|
Re: S10 Swap how to
Quote:
http://www.rockler.com/wixey-digital...Ap4RoC7-Dw_wcB Harbor Freight sells one similar but is actually more expensive: http://www.harborfreight.com/digital...not%20provided I've heard guys say just adding a few washers to their transmission mount to correct the angle took away their drive line vibration. Last edited by HUSSEY; 12-03-2016 at 10:18 AM. |
|
|
|
|
|
12-03-2016, 12:58 AM
|
#19 |
|
Registered User
Join Date: Jul 2014
Location: Dallas, TX
Posts: 155
|
Re: S10 Swap how to
If you have an iPhone download the Tremec Toolbox. It has a very accurate angle finder and will walk you through the three angles that matter- tranny, driveshaft and pinion. It will compare the three and let you know which one(s) needs correcting.
|
|
|
|
|
12-03-2016, 07:22 AM
|
#20 |
|
Registered User
Join Date: Feb 2016
Location: Norwell MA
Posts: 40
|
Re: S10 Swap how to
Thank you both. I've learned a lot about driveline angles in the last couple days. I have it pretty much corrected. Because of the drop, the rear end pinion was above the trans tailshaft. Raised the trans 1", shimmed the pinion down
|
|
|
|
|
12-03-2016, 07:36 PM
|
#21 |
|
Registered User
Join Date: Apr 2010
Location: Warrensburg, MO
Posts: 2,690
|
Re: S10 Swap how to
[QUOTE=mxer666;7785317]Thank you both. I've learned a lot about driveline angles in the last couple days. I have it pretty much corrected. Because of the drop, the rear end pinion was above the trans tailshaft. Raised the trans 1", shimmed the pinion down[/QUOTE
glad that you figured it out. I always just put the rear end back on the springs, guess I just have a knack for setting up the driveline. LOL up
__________________
www.olesargecustoms.com email: chris@olesargecustoms.com '48 build: http://67-72chevytrucks.com/vboard/s...d.php?t=541904 '33 build: http://67-72chevytrucks.com/vboard/s...=1#post6232888 '49 build: http://67-72chevytrucks.com/vboard/s...=1#post6364475 |
|
|
|
|
12-03-2016, 07:59 PM
|
#22 |
|
Registered User
Join Date: Apr 2010
Location: Warrensburg, MO
Posts: 2,690
|
Re: S10 Swap how to
Here is some pics of my engine pedistals.
__________________
www.olesargecustoms.com email: chris@olesargecustoms.com '48 build: http://67-72chevytrucks.com/vboard/s...d.php?t=541904 '33 build: http://67-72chevytrucks.com/vboard/s...=1#post6232888 '49 build: http://67-72chevytrucks.com/vboard/s...=1#post6364475 |
|
|
|
|
12-04-2016, 02:52 PM
|
#23 |
|
Registered User
Join Date: Apr 2010
Location: Warrensburg, MO
Posts: 2,690
|
Re: S10 Swap how to
The Sorry, this is the pic I meant to post.
__________________
www.olesargecustoms.com email: chris@olesargecustoms.com '48 build: http://67-72chevytrucks.com/vboard/s...d.php?t=541904 '33 build: http://67-72chevytrucks.com/vboard/s...=1#post6232888 '49 build: http://67-72chevytrucks.com/vboard/s...=1#post6364475 |
|
|
|
|
12-04-2016, 11:35 PM
|
#24 |
|
Registered User
Join Date: Dec 2015
Location: Anderson, SC
Posts: 66
|
Re: S10 Swap how to
sort of off topic to the current conversation in this thread, but google search and the search button here has been insufficient for what I need. I'm using a stock 95 s10 brack booster/pedal setup on my 49 gmc. a 6.0lqr with 4l80e and need to wire up the pressure switch or tcc correctly. the brake booster has 4 or 5 wires going into a plug.. does anyone know what each of these wires go to?
|
|
|
|
|
12-05-2016, 12:12 AM
|
#25 | |
|
Registered User
Join Date: May 2013
Location: Kansas City
Posts: 572
|
Re: S10 Swap how to
Quote:
This is how I went about mine and how my switch hooked up. The front pair is for the brake light switch. When the plunger is opened (pedal depressed) the switch is closed and brake lights light up. The rear pair terminals are for the TCC and Cruise Control. They are normally closed. When the pedal is depressed these circuits open cutting the power to the TCC and Cruise control. I relocated my switch so it couldn't be seen below the dash. See Post 177 here: http://67-72chevytrucks.com/vboard/s...=664837&page=8  Referenced from: http://www.maliburacing.com/forum/vi...p?f=34&t=72495 |
|
|
|
|
 |
| Bookmarks |
|
|


 Hybrid Mode
