
|
Register or Log In To remove these advertisements. |
|
|
|
|||||||
 |
|
|
Thread Tools | Display Modes |
 04-23-2012, 09:09 PM
|
#1 |
|
Registered User
Join Date: Mar 2012
Location: Red Lake, ON
Posts: 106
|
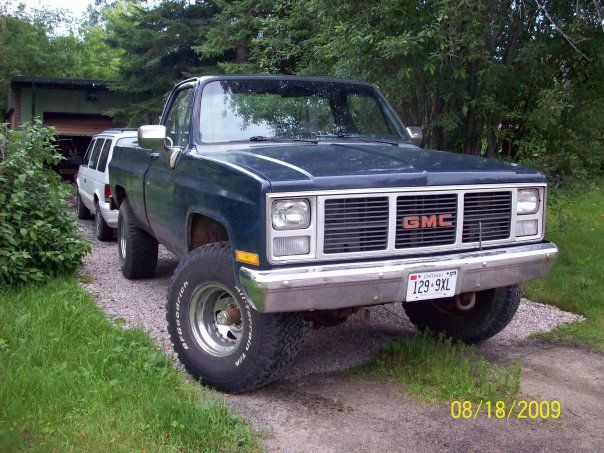
'87 GMC Blue Rhino Project
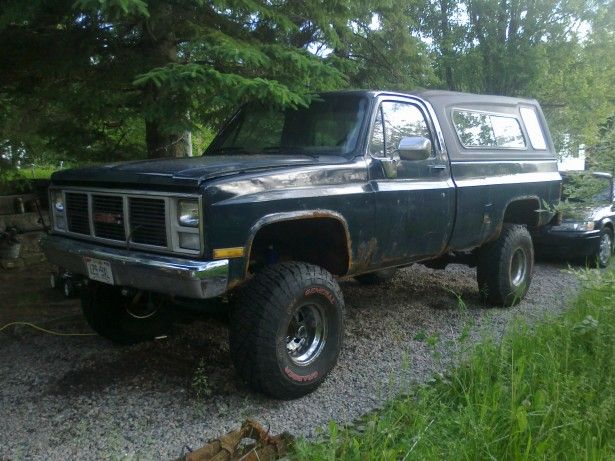
Hey everyone, finally got some time and warm dry weather to start putting some life into my Gmc, (a co-worker dubbed it the Rhino). I'm afraid this wip won't be as elaborate and jaw dropping as some of the ones I've used for inspiration and knowledge on here so please bear with me. I don't have a garage and I have to use this truck to get to my job so I will do the work in stages to avoid taking it off the road for any great length of time. I want to concentrate more on a clean straight body and a reliable drivetrain. I won't be doing anything to the 305 for now.
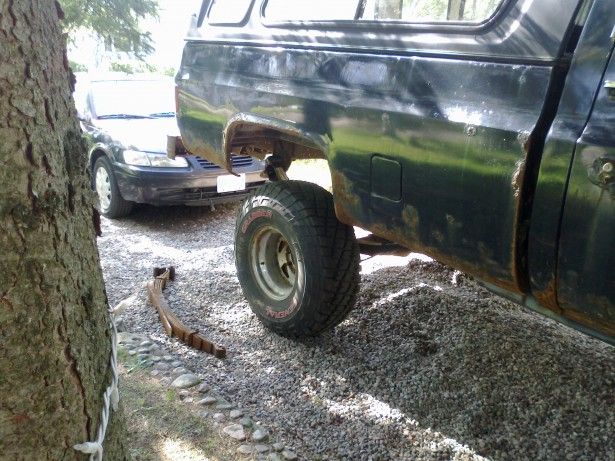
  The body is in very rough shape, hard to see in the pics but you can pick out all the individual patch panels stuck on over the years. The long winters here and salt they use on the roads just kills anything metal. 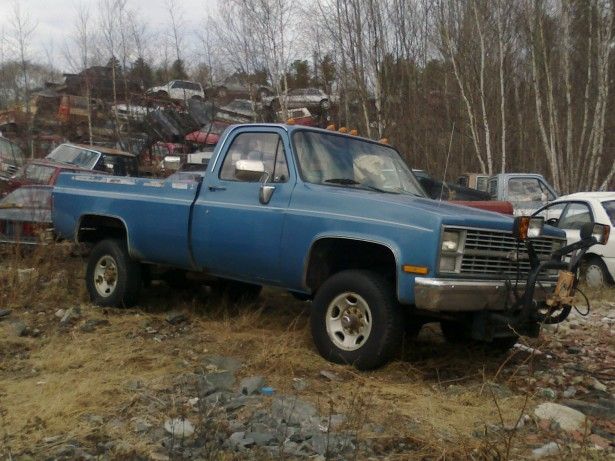 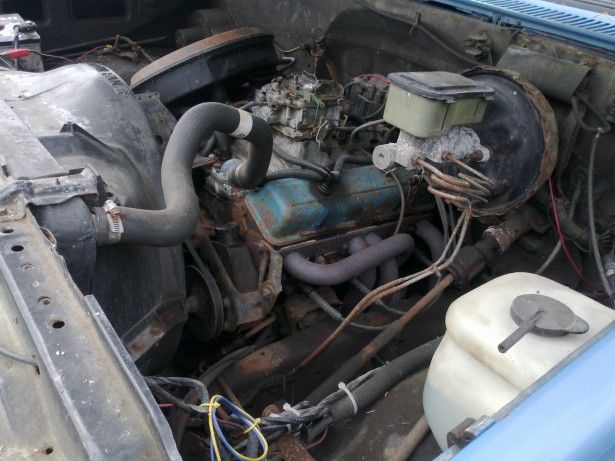 This is my parts truck. I spent 8 months debating on stripping it down or saving it and putting it back on the road. I just couldn't bear taking it apart. While it looks good, turns out underneath is a nitemare. Just too many issues and problems and I can't afford to fix up two trucks, plus I don't have the room. It did come with a plow but my driveway is done by hand, (me) so I sold it but does have a lot of stuff that will come in very handy. 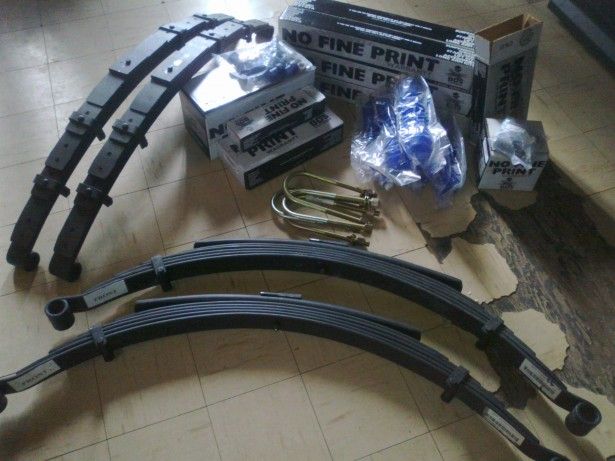 Lift kit finally came in, it's a BDS 6". One thing I couldn't stand was how the previous owner had hacked off bits of the fender for 35's to fit and I haul alot of stuff with this truck but clearly the springs were at the end of their lives. Not sure but I think the previous owner re-arched the springs with a torch and I just couldn't trust them anymore miles from home getting firewood. It made the decision of getting the lift kit pretty easy. I will install this on the weekend, just waiting on a few more minor parts now. The donor truck will provide the axles and as soon as I recondition and paint them, they will go on too. Thanks for looking everyone, cheers. |

|

|
|
05-27-2012, 07:35 PM
|
#2 |
|
Registered User
Join Date: Apr 2012
Location: Virginia Beach, Virginia
Posts: 219
|
Re: '87 GMC Blue Rhino Project
I got a 4in BDS lift and trust me it is great. Im really proud of how the truck sits and it doesnt look uneven like some other lifted trucks ive seen. You definitely made a good choice going with BDS
__________________
1986 GMC K15 4.3V6/SM465/NP205 will be converting to 5.3LS E-ROD/AA adapter/SM465/NP205 10 Bolt Axle Rebuild Tutorial: http://67-72chevytrucks.com/vboard/s...d.php?t=536415 |
|
|
|
|
05-28-2012, 09:47 PM
|
#3 |
|
Registered User
Join Date: Mar 2012
Location: Red Lake, ON
Posts: 106
|
Re: '87 GMC Blue Rhino Project
Thanks, React. I'm very happy with it so far and if you like stickers, you will like BDS. I found the kit included alot of things that weren't even shown in the pics when I ordered it. But the kit shackle bushings didn't work with my shackles, (not the ones that came on my truck anyway), so I lost a lot of time modifying and ordering new bits and pieces here and there. Finally made some progress and got the rear springs on after hours of fighting with rusted out nuts and bolts. A torch would have come in very handy here.
  My 35" tire sure looks small now and you can really see how rusted everything is. 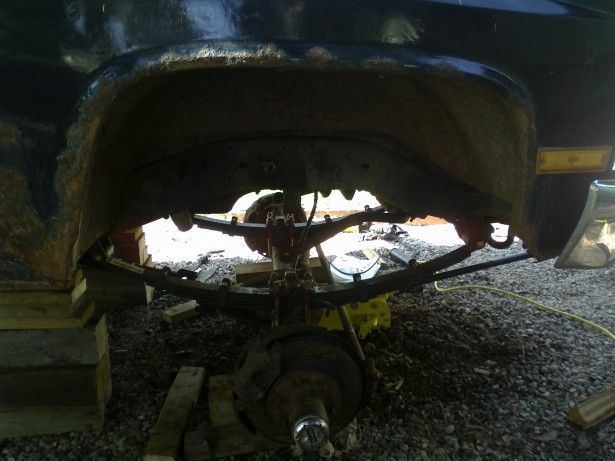 Last weekend I got the front springs on. Went alot slower then I was hoping for. Most days I would sit inside while it rained. On May 25 we got wet snow, way too sloppy to be working in the driveway. My exhaust pipe is holding up the front driveshaft now and is not connected to the diff. Luckily this wasn't a surprise because BDS lets you know about the exhaust modification on their site. 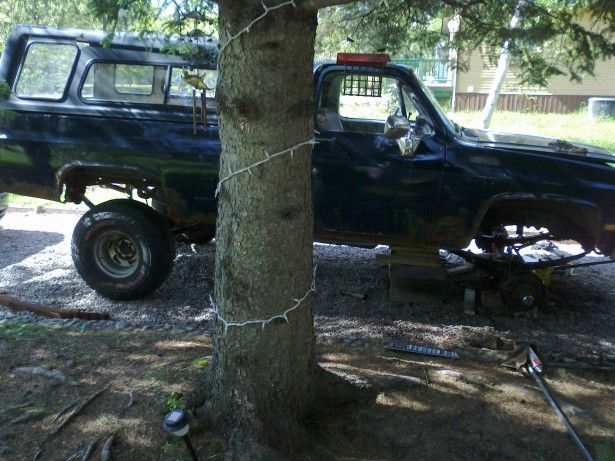 This is pretty much where I stand now, a very rare day where the sun came out. I had to disconnect all the brake lines because of the extra lift and most broke in the process. So for awhile I have been working underneath on little things that aren't very noticeable but take me a long time to accomplish, like bending brake lines. Also have to fabricate new hangers to attach the lines and brake hoses to before I put the front wheels back on. Cheers. |
|
|
|
|
05-31-2012, 01:35 PM
|
#4 |
|
Resident of Here
Join Date: May 2008
Location: Wesley Chapel, FL, USA
Posts: 7,716
|
Re: '87 GMC Blue Rhino Project
Looking good! What size red letter's you running?
__________________
~Bradley~ 2004 Black GTO LS2/T56 too much to list  Miss having a truck 
|
|
|
|
|
06-02-2012, 08:44 PM
|
#5 |
|
Registered User
Join Date: Mar 2012
Location: Red Lake, ON
Posts: 106
|
Re: '87 GMC Blue Rhino Project
Thanks Thirdstreet, For now the tires are 35x12.50 on 15's. This is temporary as my replacement axles are 8 bolts and will take 16 inch rims. Pretty depressing reading other wip's and seeing beautifully prepped and painted frames which is what I wish I would be doing but for now I will get the truck rolling and hopefully this summer get going on a garage project....So, for now sorry about the SS Rustoleum project.
Not much to see, but 15' of brake line installed, now to tackle the front lines. Got some goodies that I will be needing on the front. 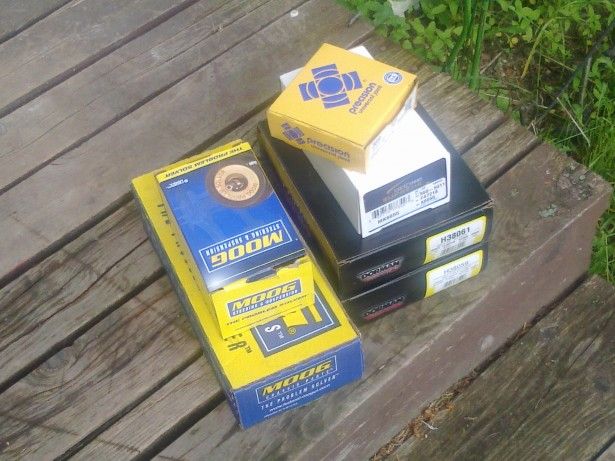 The main problem with the front brake lines is that althou the lift kit provides a drop bracket to lower the brake hose mounting point, you still have to extend the brake lines to meet up at the new location. The instructions say do not bend or kink the existing brake line. So, unless someone else changed my lines previously, there is no way that's going to happen without adding more line. And off course undoing the old corroded fittings mean that that old lines twist and break. I will change all of them with new lines. The kit's instructions make no sence to me as to the way they would have you locate the new drop bracket so I made another bracket from scrap to attach the drop hangers to. I also had to file notches in them to accept the new brake hose. You can just see it in the foreground piece. 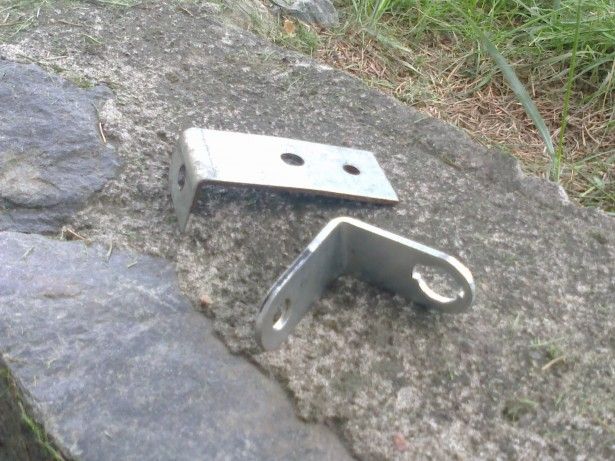 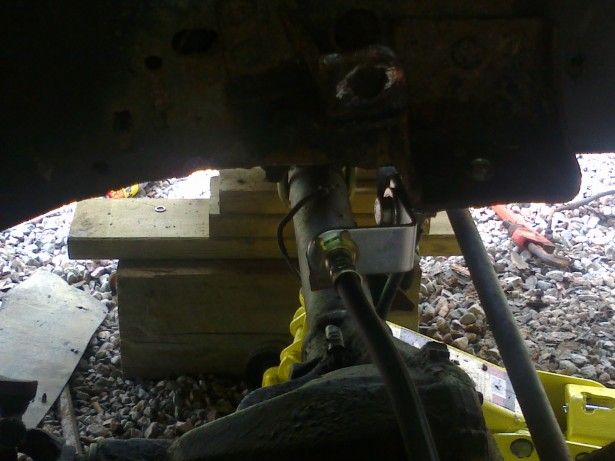 Here it is installed on the bumpstop(?) perch. I will leave the original bracket in place just in case I can find longer brake hoses because I don't really like how this looks. Cheers everyone, Les |
|
|
|
|
06-19-2012, 10:34 PM
|
#6 |
|
Registered User
Join Date: Mar 2012
Location: Red Lake, ON
Posts: 106
|
Re: '87 GMC Blue Rhino Project
After a week of straight rain, I finally squeezed in some time to finish the brake lines and install the new parts for the steering linkage. Finally its sitting on tires again.
 But I still have to change the exhaust and re-connect my front driveshaft. I took it off completely so I could examine it better and install the front u-joint. I noticed right away the center u-joint is finished and falling apart. I got my parts truck driveshaft and thinking it's the exact same piece I found it a bit shorter on full extension. 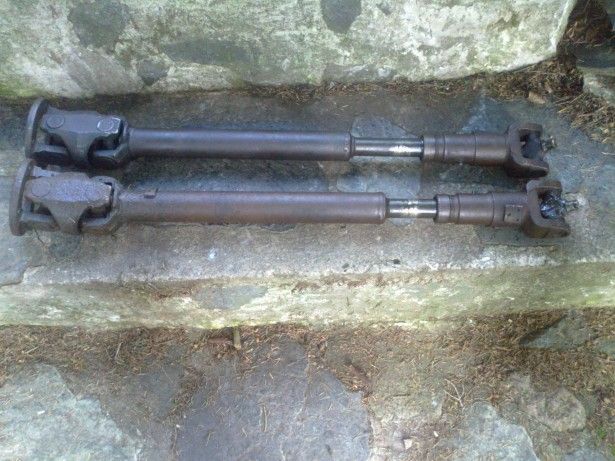 I thought maybe it was was just seized or packed full of mud or rust but when I took the yoke off, the lower shaft, (my 87 gmc) have the splines further down the shaft then the top one, (83 chev 3/4 ton). The two shafts are the exact same length with the yokes off but the lower one gives me 1/2 inch extra travel and both bottom out at the same distance. I'm thinking I will go with the bottom shaft althou the top one gives me more spline contact through-out its sliding travel. Might have to think about this. So, now instead of installing the driveshaft, gotta wait till tomorrow to get the u-joints. I'm thinking with it removed I may as well change them all and have that extra reliability. Cheers everyone. |
|
|
|
|
06-21-2012, 11:22 PM
|
#7 |
|
Registered User
Join Date: Dec 2009
Location: Fairbanks, AK
Posts: 1,830
|
Re: '87 GMC Blue Rhino Project
Cool truck, looks tough with the new lift on it. Keep plugging away...
__________________
-Marcus 1991 V3500 L29 454 4L80E NP205 D60/14 Bolt 4.56's 1984 K30 292 TH400 NP205 D60/14 Bolt 4.56's flat bed 7'6" Meyer Plow 2022 Silverado 3500 L8T Project Daily Driver Project Heavy Hauler Project Plow Truck |
|
|
|
|
07-02-2012, 03:18 AM
|
#8 |
|
Registered User
Join Date: Mar 2012
Location: Red Lake, ON
Posts: 106
|
Re: '87 GMC Blue Rhino Project
Thanks MT, I'm trying-summers are too short here.
I had a major interference problem with the front driveshaft and exhaust. I found a piece of exhaust which just about had the right bend in it at work and I lowered my pipe and cleared the driveshaft for the time being. I will weld it in properly at the shop I work at, at least I can drive it now without being pulled over by the police. 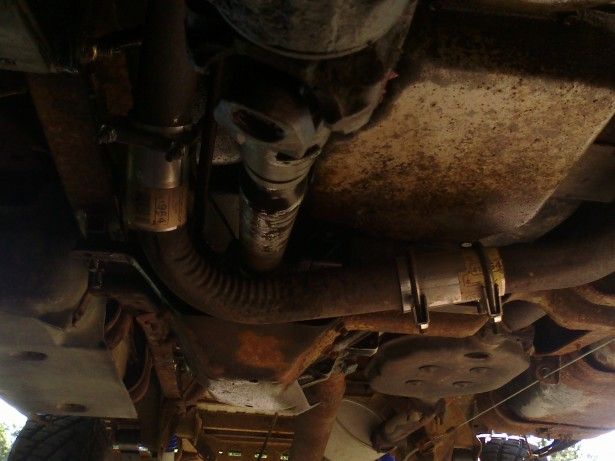 While I was lowering the transfer case using the kit supplied pieces, I noticed 2 holes in this mount which didnt look right. Turned out the transfer case wasn't anchored down and I had been driving it like this for a long time. Laying on my back and lifting it up I was surprised how easy it was to move around. Can't believe I didn't have any problems with this. Got 2 new bolts and secured it down. That banging coming from the box which I thought was my loose jack and tools is gone now.  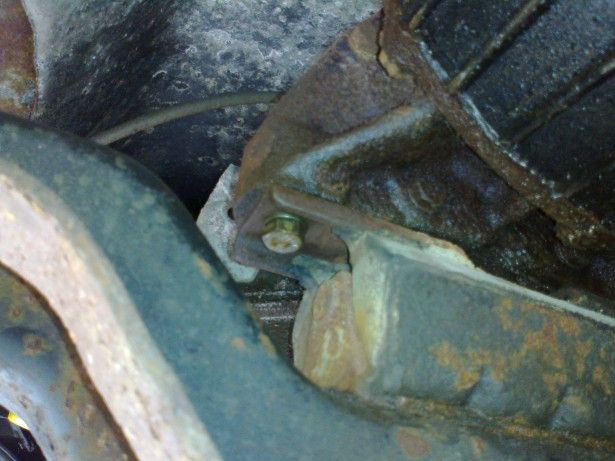 Just wanted to share my new purchase, a 1999 Landrover. 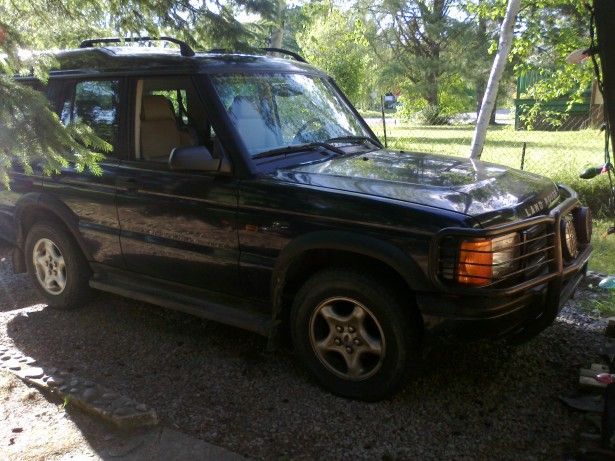 It's not a Chevy but at least it's a 4x4. This will really take the pressure off working on my truck and now I can take my time on the painting and other modifications. Plus I don't have to ask people for rides anymore. Cheers, Les |
|
|
|
|
07-12-2012, 12:28 AM
|
#9 |
|
Registered User
Join Date: Dec 2011
Location: Elkhart, IN
Posts: 1,308
|
Re: '87 GMC Blue Rhino Project
Nice truck, any updates?
__________________
1985 Chevrolet K10 Custom Deluxe---SOLD 1997 Ram 2500 5.9 Cummins 1985 Chevrolet Camaro Z28 1987 Chevrolet K10 Silverado "The Beast" build 1987 Silverado http://67-72chevytrucks.com/vboard/s...=1#post6150257 |
|
|
|
|
07-12-2012, 07:54 PM
|
#10 |
|
Registered User
Join Date: Mar 2012
Location: Red Lake, ON
Posts: 106
|
Re: '87 GMC Blue Rhino Project
Thank you, Car'N'Guitar. No real progress really. I have my replacement fenders and doors in my basement but still waiting on the new compressor I ordered. I wasn't planning on any body work and painting until it comes in, but it looks like I will have to dust off my old compressor. Served me well for over 25 years, I guess one more paintjob won't hurt. The replacement axles are still on my parts truck at work, just a matter of a couple of weekends to get them off and home.
|
|
|
|
|
07-30-2012, 07:24 PM
|
#11 |
|
Registered User
Join Date: Mar 2012
Location: Red Lake, ON
Posts: 106
|
Re: '87 GMC Blue Rhino Project
Well it finally came in.
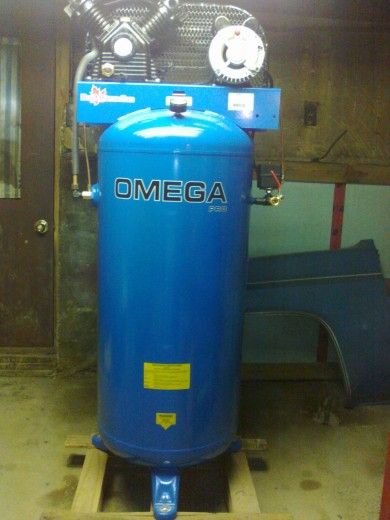 I still have to hook it up and I'm going to replace all my old hoses, gauges and regulator and moisture trap with new. They are all going to join my old compressor in their new loving caring home. 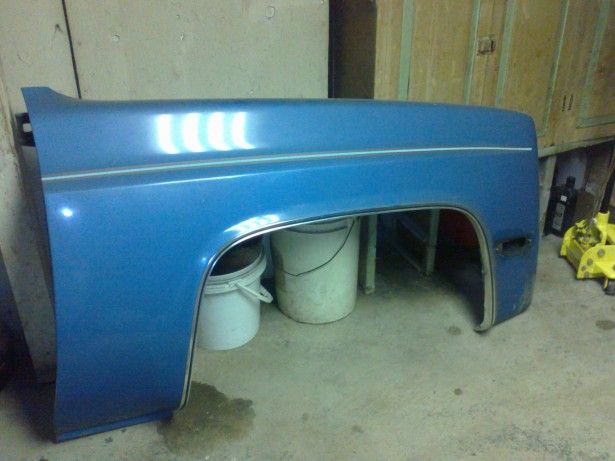 The fender off my part's truck, it's actually in really good shape. Just waiting on some primer and a few other paint supplies and it's time to get this show on the road. Cheers. |
|
|
|
|
09-23-2012, 12:23 AM
|
#12 |
|
Registered User
Join Date: Mar 2012
Location: Red Lake, ON
Posts: 106
|
Re: '87 GMC Blue Rhino Project
It's been a long time, very little progress on the truck thou. But I have been busy getting my shop together and tearing down the parts truck, bringing home what I think will come in handy down the road.
 I finally got it home, looking forward to taking it apart and prepping it for paint. The rear axle didn't make it as far. My friend and I got only this far before calling it quits-need more help. At least it's off the truck thou. 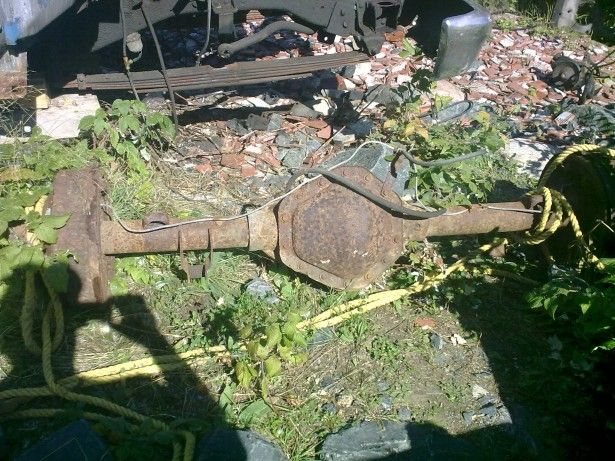 One thing I had to take care of was changing the heater core with winter just around the corner. Winters are too long and too cold here for the tiny bit of heat my truck produces. Got a new 195 degree thermostat also and will put a winter front on the grill. Hopefully that all helps. 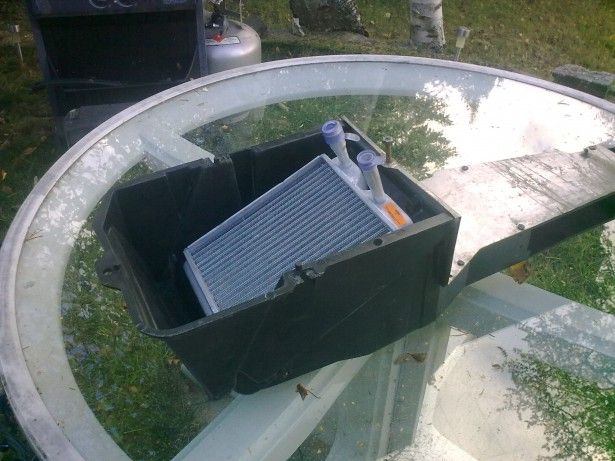 A new guy started at work where I am, just couldn't resist adding a pic of his rig. It's really a good looking truck.  Thanks for looking everyone. |
|
|
|
|
09-29-2012, 11:29 PM
|
#13 |
|
Registered User
Join Date: Mar 2012
Location: Red Lake, ON
Posts: 106
|
Re: '87 GMC Blue Rhino Project
Finally got the front axle in, my wife and I carried it in from the driveway. Not a job for wearing slippers. I started cleaning the pounds of crud and oily sand off and removed what I could. Looks like I need more tools too, didn't have a wrench or socket big enough for the top balljoint nut for starters. The driver's side nut was loose for some reason already.
 Pulled out the axle shafts, if I can get new ones easily enough, I think I will.  I was curious about the condition and ratio of the gears. This used to be a plow truck that had a hard life and I expected a mess. But everything looked pretty good, (to me anyway) and there no was no sign of metal bits or filings. The ratio is 3:73, the ones on the truck now are 3:08. I want to get 4:10's and was hoping I would find a mess here to justify getting a new gear set to better suit the tire size I plan on getting. Might do some more calculations before I decide on a final choice. 
|
|
|
|
|
09-30-2012, 03:27 PM
|
#14 |
|
Registered User
Join Date: Dec 2009
Location: Fairbanks, AK
Posts: 1,830
|
Re: '87 GMC Blue Rhino Project
Good progress. Are the front and rear axles from the same truck? What are you going to do for wheels and tires once you slide the 8-lug axles under the truck? I bet you would really like 4.10's with those 35's...
Posted via Mobile Device
__________________
-Marcus 1991 V3500 L29 454 4L80E NP205 D60/14 Bolt 4.56's 1984 K30 292 TH400 NP205 D60/14 Bolt 4.56's flat bed 7'6" Meyer Plow 2022 Silverado 3500 L8T Project Daily Driver Project Heavy Hauler Project Plow Truck |
|
|
|
|
09-30-2012, 03:43 PM
|
#15 |
|
Registered User
Join Date: Mar 2012
Location: Red Lake, ON
Posts: 106
|
Re: '87 GMC Blue Rhino Project
Thanks MTCK. My parts truck, ('83 Chevy) is supplying both axles. You're right, I would like those 4:10's for sure. I'm still looking around for new rims, (16") and hope to end up with 38's. There is a set of 37's at work that a customer didn't pick up and I might consider those too.
|
|
|
|
|
10-06-2012, 09:16 PM
|
#16 |
|
Registered User
Join Date: Mar 2012
Location: Red Lake, ON
Posts: 106
|
Re: '87 GMC Blue Rhino Project
Sometimes you just need the right tool to get the job done, and in this case it was the shop's towtruck. Amazing what some beer can get you.
 Well, getting it home was the easy part. My wife and I manhandled this brute out of the truck and onto the driveway and after about 9 feet called it quits. Will call a buddy to help get it inside. But then we get a winter storm watch and now I have a small snowbank in the driveway. I was hoping to drain the oil and take as many parts off, (mainly the drums) before taking it any further. Hard to believe the wife was hunting the day before in a t-shirt. 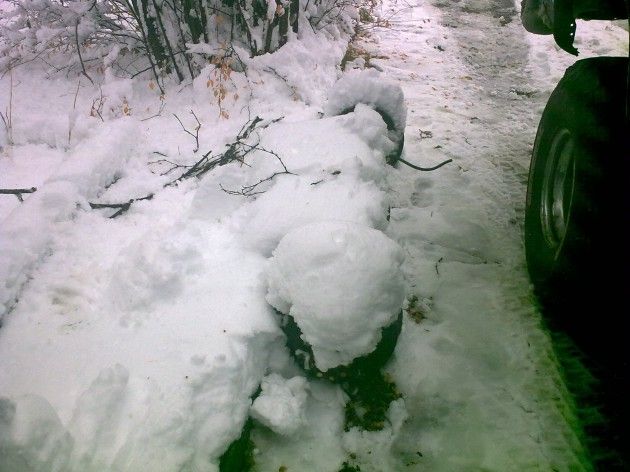
|
|
|
|
|
10-13-2012, 09:10 PM
|
#17 |
|
Registered User
Join Date: Mar 2012
Location: Red Lake, ON
Posts: 106
|
Re: '87 GMC Blue Rhino Project
Had a few days of really nice weather and out of my snowbank a 14 bolt appeared. I needed to take parts off because everyone I had asked to help me move it says it's too heavy. I knew those drums had to come off for sure.
The axles coming out. 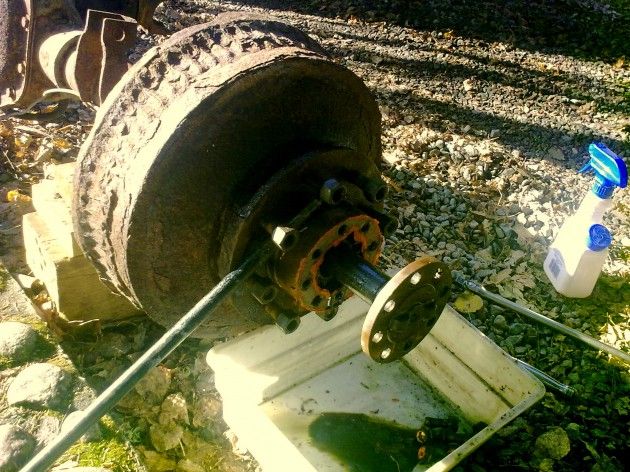 Snap ring out, 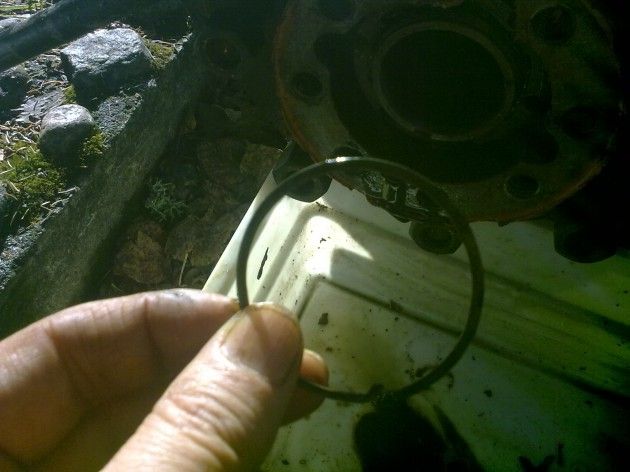 then the key  and finally got to try out my brand new spindle nut tool, the nut wasn't tight, just came right out. 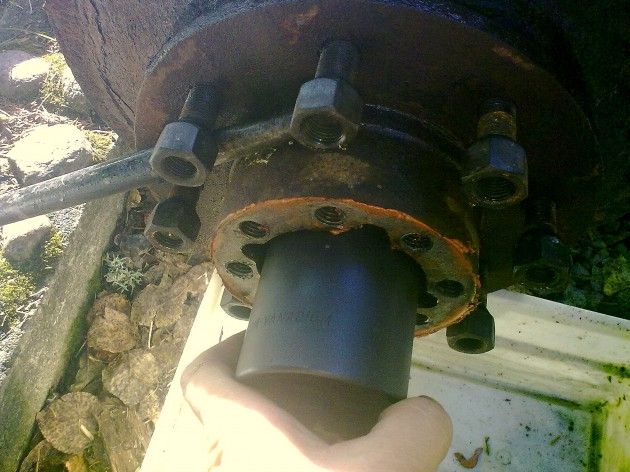 The drums came off easily, no banging with a hammer or anything. I was expecting a big fight. I have read alot about how heavy these things are, some places said 80 pounds,(must be the pair of them?) but these arent even close. Were alot lighter then I expected. 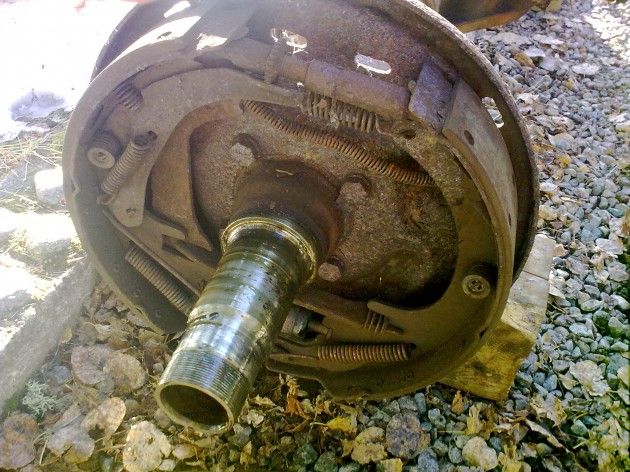 The drivers side reveiled a broken e-brake cable, but since I have already cut it when I removed the axle from the truck, its no worries.  Whole backing plate came off in one neat bundle, I won't be using any of this but I will keep them, just in case. 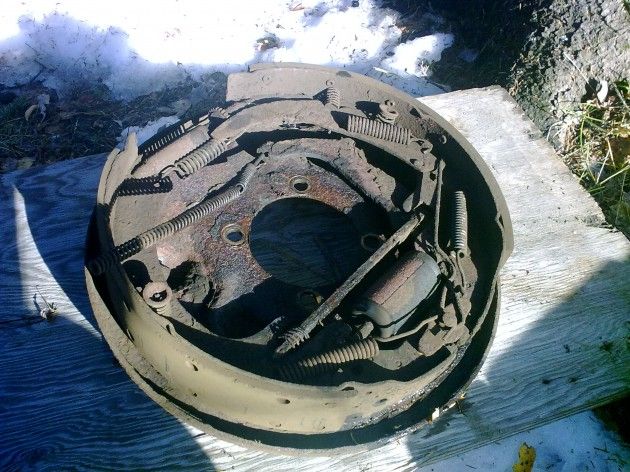 I did a lot of reading on how to take these drums off and I was expecting more parts, like in this picture (not my photo) 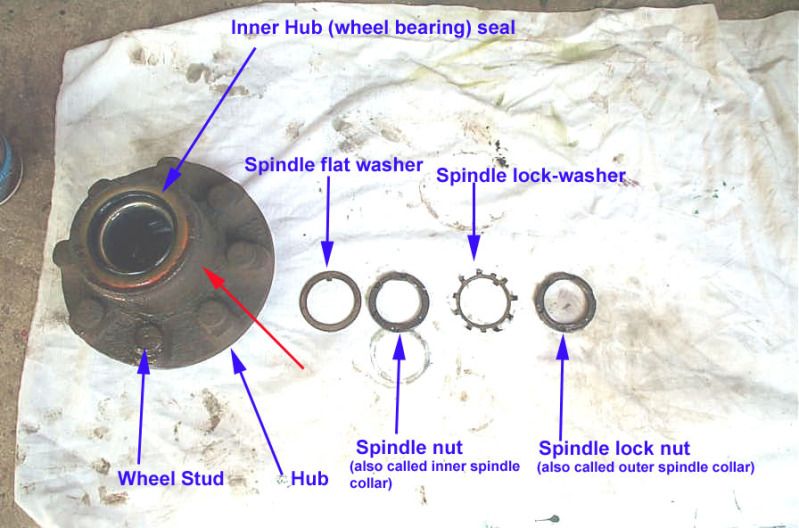 But in my setup the parts break down is more like in this diagram. 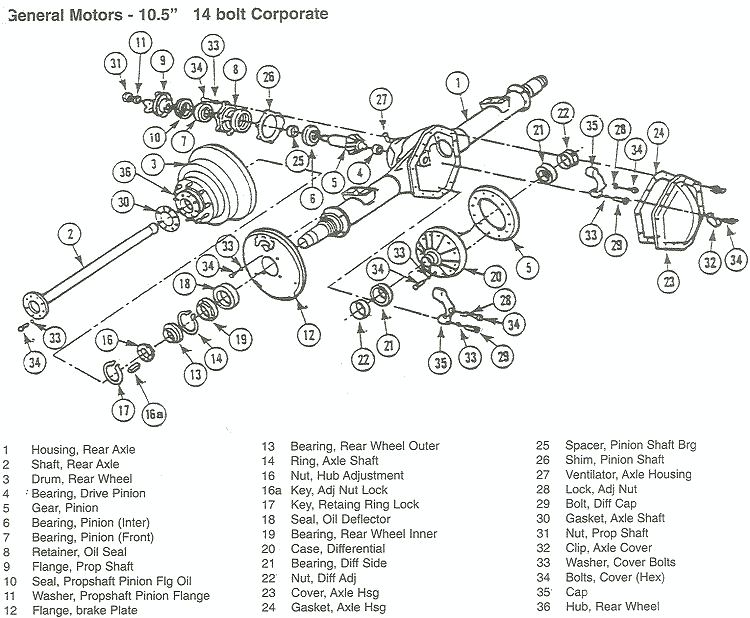 This was a fun little job, no fighting or struggling at all, Im sure I can carry it now all by myself to the basement,  Have to say that this is the first time I'm doing anything like this and just about everything I have learned came from other treads on this forum. Have to say that this is the first time I'm doing anything like this and just about everything I have learned came from other treads on this forum.Cheers, Les Last edited by quadzero; 10-13-2012 at 09:25 PM. |
|
|
|
|
10-21-2012, 08:01 PM
|
#18 |
|
Registered User
Join Date: Mar 2012
Location: Red Lake, ON
Posts: 106
|
Re: '87 GMC Blue Rhino Project
I knew I wanted rear disc brakes from the start and I wondered about how much weight I would lose by doing that conversion. So I bought a cheap suitcase scale and using highly scientific methods I decided to weigh all the parts out of curiousity.
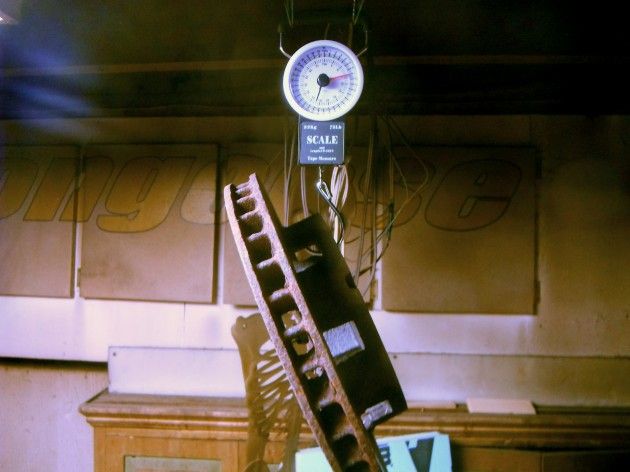 Here is what I found: Brake drums 37lbs Backing plate/brake assy 18lbs Rotor, (one I will likely use)15lbs Caliper with pads 10lbs Caliper bracket, (guessing) 5lbs So, by my primitive guessimate I will lose 25lbs per side, making a total of 50lbs less unsprung weight. It really doesn't matter thou. I just want disc's in the back. Decided to get going on the knuckles today. I bought this ball joint kit in spring and all ready its proved its worth with the lift kit and all the u-joints I have changed so far. 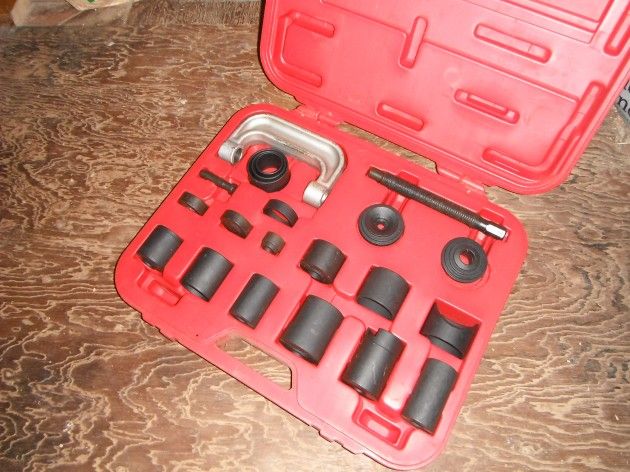 It's pouring rain outside and I have barely enough room in the basement anymore so I decided to work in the dining room, which I'm renovating and tearing apart anyway. That way I could keep watching the Hollywood Casino 400 and not miss anything, (Paul Menard was in the lead at the time). TheWhiteElephant's thread in this forum provided tons of information in this area and I highly recommend everyone checking out his wip. He removed his balljoints with no vise, only muscles and he made it look easy. Turns out the balljoints came out much faster then I had expected, didn't even have to hammer on them. Like he said it was just matter of finding the right angles to hold the knuckle down with one hand. 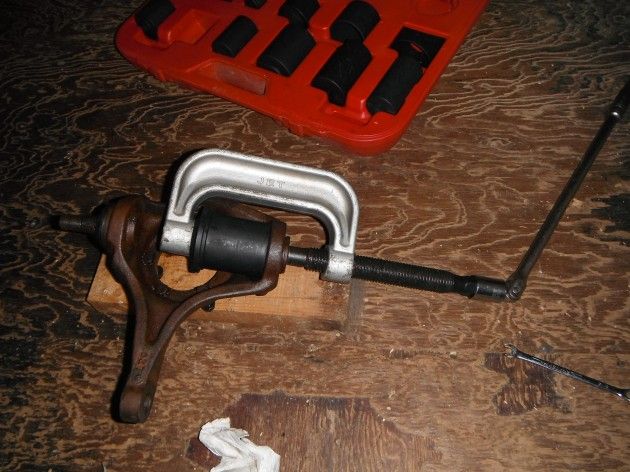 Lower ball joint out, both joints get pushed upwards to remove, easy peasy. 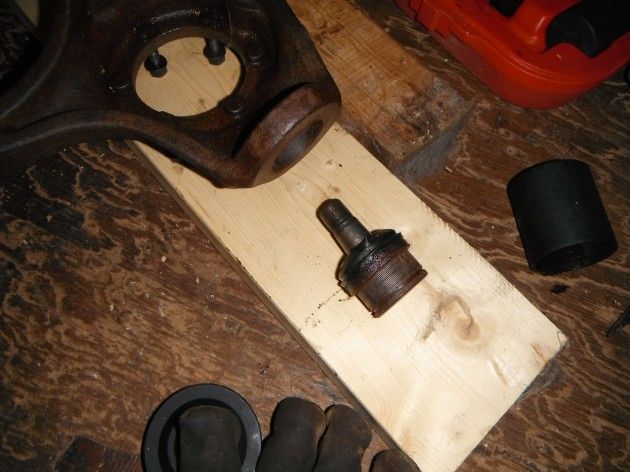 Hear is the knuckle ready to be cleaned and prepped for paint. 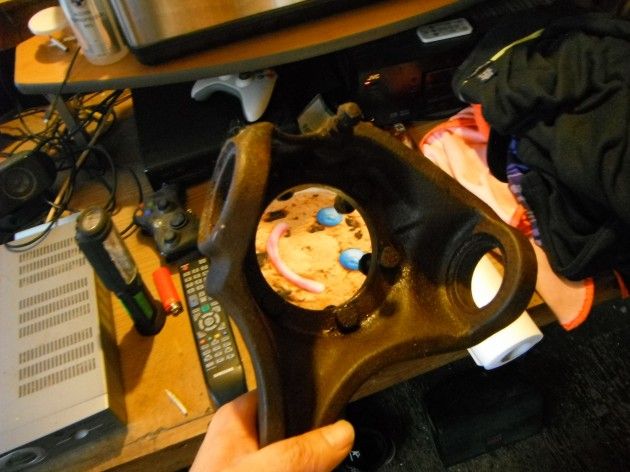 Been fighting the flu here so everything is taking time and working in slowmotion, but the other knuckle should even go faster. Matt Kenseth won the race btw, cheers. |
|
|
|
|
03-23-2013, 06:07 PM
|
#19 |
|
Registered User
Join Date: Mar 2012
Location: Red Lake, ON
Posts: 106
|
Re: '87 GMC Blue Rhino Project
It's been a long time but not forgotten. Having 2 other vehicles really takes its toll on time and the budget but I have been busy with this.
Before taking the diff apart I decided to measure the backlash just out of curiousity. I've never done this measurement before and I did it a few times just to get the hang of it, each time I got 11 thousands for the backlash. I don't have the specs handy but I'm thinking that is too sloppy.  Next step was to remove the pinion yoke but after fumbling with over sized wrenches and pipe wrenches and pry bars I made this tool out of scrap. I have holes to fit the 10 bolt yoke and later on the 14 bolt. I loosened the pinion nut with an impact but left it in place. I marked the end caps for the carrier and removed them. The carrier didnt come out as I figured it wouldn't. I wiggled the yoke with my handy tool and the whole carrier plopped out right thru my fingers before I was ready and before I could get a picture. Luckily I had rags on the floor to catch it so be carefull if you are attemting this. Having someone help you wiggle the yoke as you hang on the carrier could save a toe. 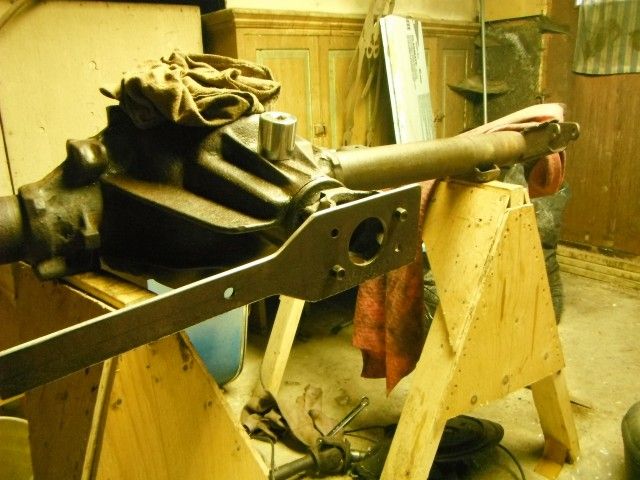 Now that the pinion yoke has done it's job, the wife in her pj's easily removed it. Luckily the yoke just slipped off, no tugging or pounding required. 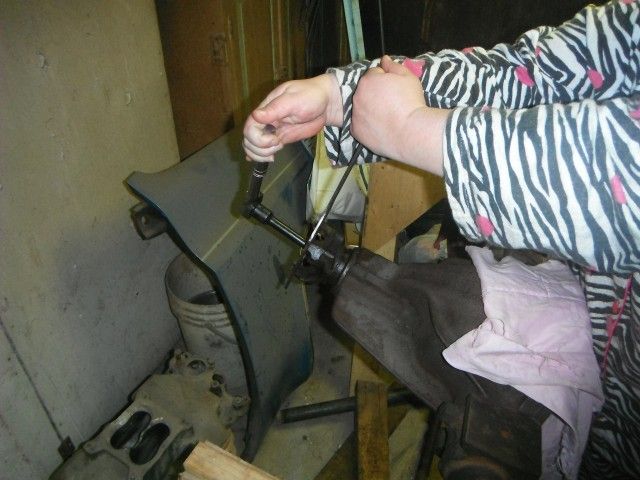 I layed out all the parts being careful not to mix up the caps, (even thou they are marked) and the shims. 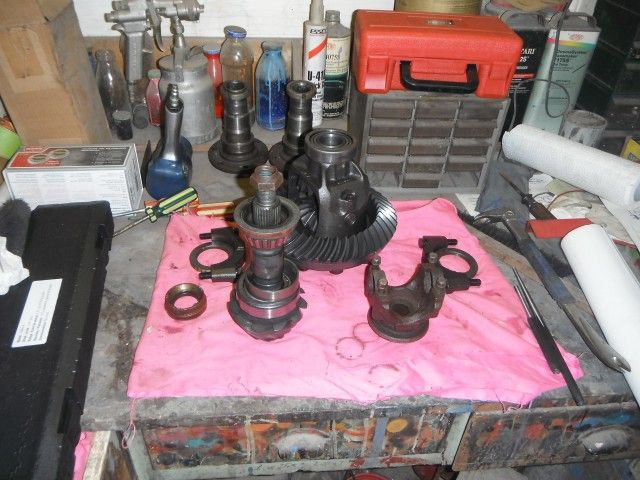 I used a small punch to knock out the races still in place. Here is the rear pinion bearing race on it's way out. 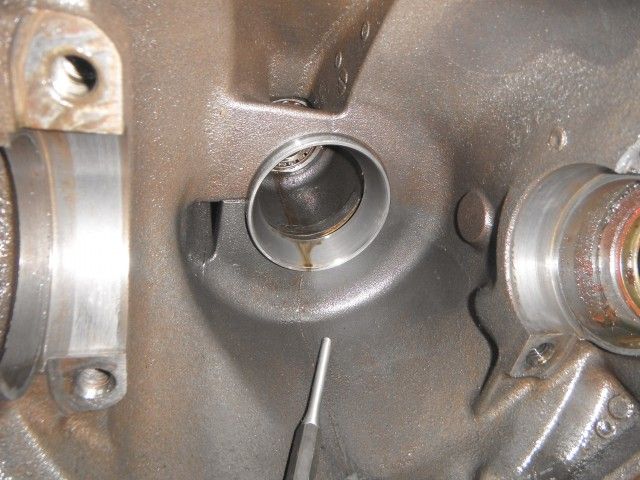 From the inside, I knocked out the front race, the bearing is still in place sitting behind the pinion seal. There are cutouts on each side of the race that made this very easy. 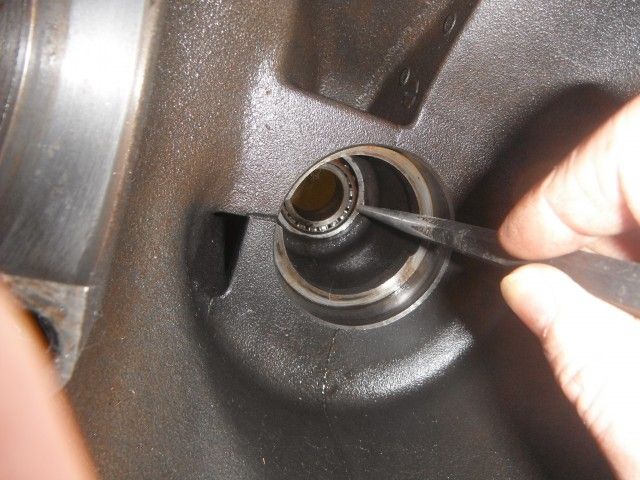 I didn't have to put much energy into the pinion seal as the front bearing pushed it out on its way out. 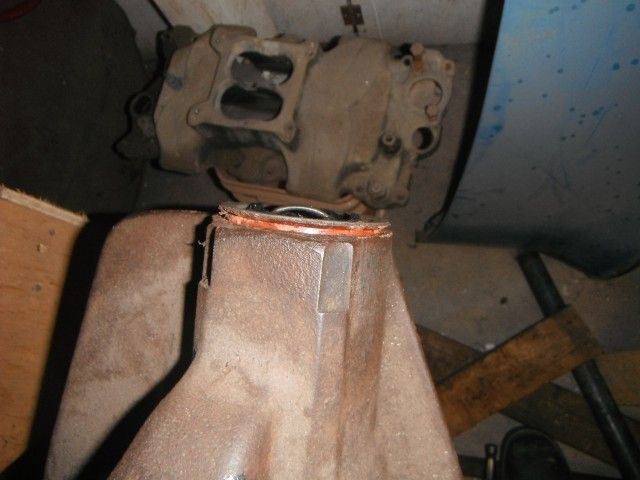 Now to the inner seals. A short bar easily knocked out the right side, I used a long piece of alumium rod to knock out the left side. It was very clear the tubes had a lot of mud and rust in them. 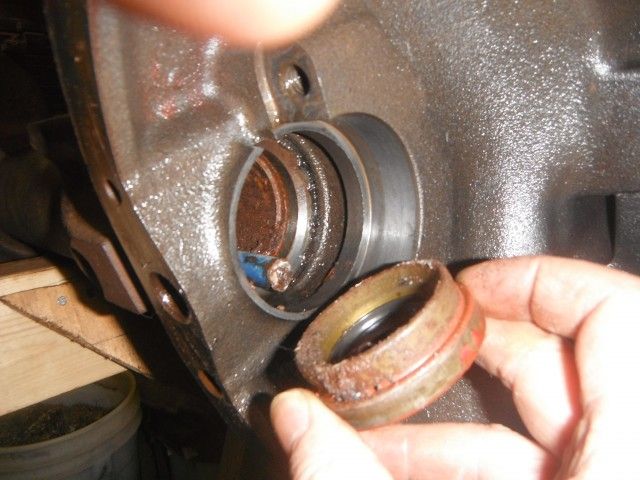 I soaked the tubes with WD-40 and pushed rags thru them but it wasn't working too well so I found an old wire brush meant for a drill and clamped it onto a rod, just a few passes and it was clogged. 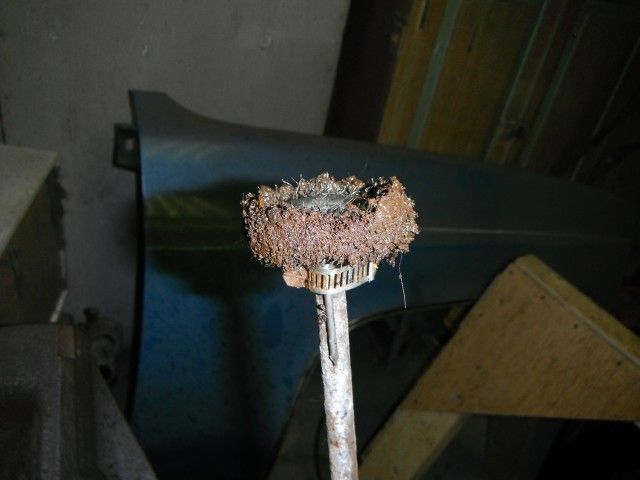 More WD-40 and I was still pulling out a ton of scmutz. The left side here was worse. It was so full of dirt I couldn't get the brush all the way thru. 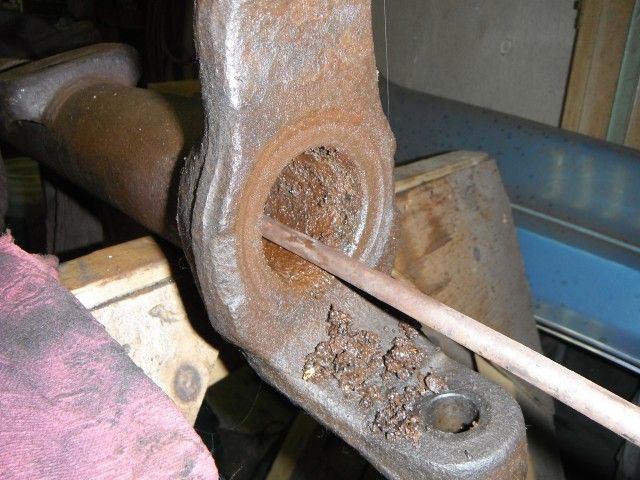 I left the tubes to soak some more and test fitted the new bracket for the steering shocks. This bracket will put the shocks ahead of the tie rod.  Althou the original shock mount did not interfere, I decided to remove it for a cleaner look. A cut-off wheel made short work of the welds. 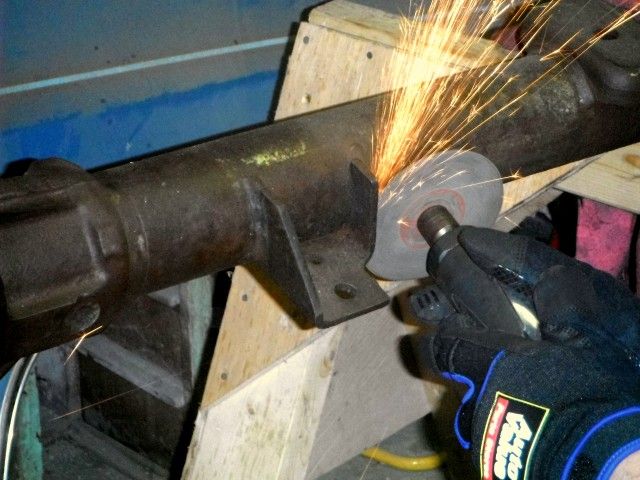 I bought a new sandblaster and it's all full of media and ready to go. I will wait for warmer weather and by then I should have my paint in. In the meantime I will clean up the axle tubes more and file down a ton of welding splatter that seems to be all over the place. 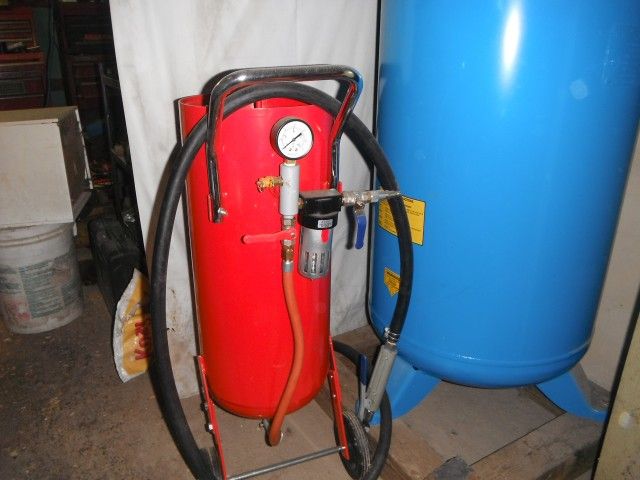 Thanks for looking in, Les |
|
|
|
|
03-23-2013, 06:46 PM
|
#20 |
|
Registered User
Join Date: Dec 2009
Location: Fairbanks, AK
Posts: 1,830
|
Re: '87 GMC Blue Rhino Project
Nice work, Les. I like the custom yoke wrench. That will be handy to have around. Are you regearing or just rebuilding?
Posted via Mobile Device
__________________
-Marcus 1991 V3500 L29 454 4L80E NP205 D60/14 Bolt 4.56's 1984 K30 292 TH400 NP205 D60/14 Bolt 4.56's flat bed 7'6" Meyer Plow 2022 Silverado 3500 L8T Project Daily Driver Project Heavy Hauler Project Plow Truck |
|
|
|
|
03-28-2013, 04:00 PM
|
#21 |
|
Mad Scientist
Join Date: Jul 2005
Location: Enola Arkansas
Posts: 380
|
Re: '87 GMC Blue Rhino Project
Nice work sir....keep the updates coming please
__________________
 Everythang relates to Beer! Everythang relates to Beer!86 1/2ton on tons! sbc/465/208/D60/14/35's 81 Postal....with 468 bbc 97 Merc Marq comuter 07 Suburban 02 Danger Ranger |
|
|
|
|
03-31-2013, 05:20 PM
|
#22 |
|
Registered User
Join Date: Mar 2012
Location: Red Lake, ON
Posts: 106
|
Re: '87 GMC Blue Rhino Project
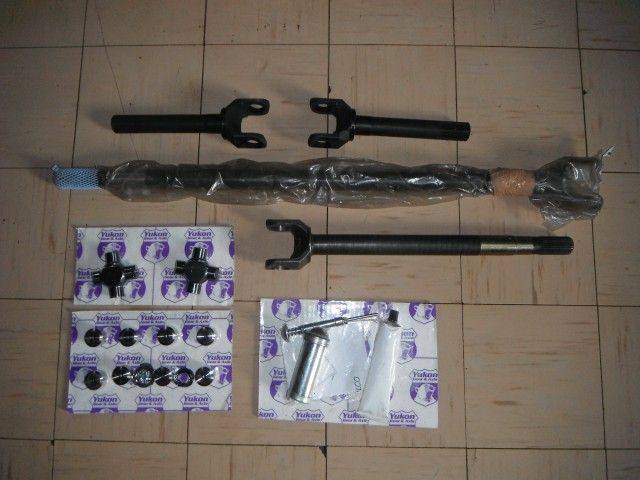
Thanks guys. MT, I will be replacing everything. I haven't decided yet but if I don't get a locker of some sort, I will be keeping the carrier only. Just got this in, Yukon's chrome-moly axle kit. Other parts are on the way and some like the ring and pinion I am still deciding on.
|
|
|
|
|
05-02-2015, 10:43 PM
|
#23 |
|
Registered User
Join Date: Mar 2012
Location: Red Lake, ON
Posts: 106
|
Re: '87 GMC Blue Rhino Project
Sorry for my absence, this is still on the go. Didn't get anything done worth posting last summer because of time spent on our other vehicles. Winters are just too cold here for any type of sandblasting or painting but I have been researching, saving and scrounging for parts the whole time.
One of the things I wanted to take care of first was the rear brakes. I had planned on a disc conversion from the start but not sure which path to go. I considered the Cadillac calipers but decided against them. I figured I could adapt existing Chevy parts and still have the parking brake system. We have random spot checks here by the Ministry and that's one of the first things they look at. Finding a rear axle from a 2005 Chevy one ton van was my starting point and I got these caliper mounts from it. I looked at some part numbers and I will be using 2005 Chevy 2500HD rotors, pads, shoes and hardware.  I had planned on getting some thick steel plate and fabbing up a mounting flange that I could weld onto the axle tube and then bolting this bracket to it. But I decided that was a bit over my head and beyond the tools I have so I just brought the whole axle assy home to take the flanges off and be done with it.  I just sliced through the axle tube to free up the flanges and then cleaned them up after. Part of the original axle was trapped inside the flange and I used a die grinder to open up the hole to fit onto my 14 bolt. Otherwise the original hole would have been much too big.  I was worried about precision and accuracy when welding this flange onto my axle and was hoping that I could incorporate the original flange to make things easier but the two are not even close plus the fact that the original was preventing the replacement flange to be where it should be so it was removed. 
|
|
|
|
|
05-02-2015, 11:03 PM
|
#24 |
|
Registered User
Join Date: Mar 2012
Location: Red Lake, ON
Posts: 106
|
Re: '87 GMC Blue Rhino Project
I ordered new dust shields but found that the center opening did not fit my bracket. I got the part number for the proper one but our supplier said they couldn't get them. So I opened up the hole with a die grinder.
 While I did this and almost finished the two halves came apart, looks like they were glued together with some kind of adhesive. Also looks like some slight rust has started on the unpainted sections. Not sure what I what I will do just yet. Maybe paint the insides with weld thru primer and spot weld the two halfs together, will think about it.  In the meantime I found this old huge mid '70's(?) GMC flat deck delivery truck that had a factory tach in it. I thought it was worth a shot and took it out. The tack at rest does not sit at zero but I was hoping once in the truck it would work properly.  I wired my aftermarket tach wires directly to this and same with the fuel gauge terminals as the original cluster basket did not have the proper connections. I carved away some plastic that held the idiot lights and located the brake and seat belt warning lights to another section of the dash and everything fit nicely. The tach does work properly when running but still takes it's resting place at 1000rpm when the engine is off. Very happy with the final result and the little bit of work involved, well worth the effort. Good luck taking a picture of gauges in the daytime, whew! 
|
|
|
|
|
05-02-2015, 11:20 PM
|
#25 |
|
Registered User
Join Date: Mar 2012
Location: Red Lake, ON
Posts: 106
|
Re: '87 GMC Blue Rhino Project
Well looking at the massive twin piston calipers going on the rear compared with the tiny grapefruit sized caliper on the fronts there was going to be a problem so I decided to tackle this before going any further. I got my original caliper mount and ground off the dust shield sections and ordered a front caliper for a 2005 Silverado 2500hd.
 I did some measuring and test fitted the new caliper bracket and here is what I was left with.  I started fabbing up some pieces and brackets from material that was about 1/4" thick and test fitted with the new caliper in place. I removed the clamps that held it all in alignment for picture purposes.  I am happy with the outcome so far and now I will sandblast these and get them ready for painting. I got carried away cleaning up the welds and am wondering if I should have just left them alone. But anywho, thanks for looking in, gang. 
|
|
|
|
|
| Bookmarks |
|
|


 Linear Mode

