
|
 12-27-2018, 06:50 PM
|
#151 |
|
Registered User
Join Date: Jun 2012
Location: Clearwater Beach Florida
Posts: 872
|
Re: What did you do to your truck today.The 3rd chapter
More body work on the Sea Ten. Door and antenna fill in. Was hoping to have it painted for Santa to use, oh well maybe he can fun with it in a month or 2. Nice to feel more confident in your body work as you do more and more of it.
|

|

|
|
12-28-2018, 09:53 PM
|
#152 |
|
Senior Member
 Join Date: Feb 2009
Location: Northern Nevada
Posts: 7,118
|
Re: What did you do to your truck today.The 3rd chapter
Installed the upper control arms today. I assembled them Grumpy style, by threading the bushings with the shaft installed on the truck. So if it doesn't work out, I know just who to blame
 Pretty much uneventful, but the RH side doesn't move up and down as freely as the LH side, couldn't tell you why. So I did the RH side over again, which was a wasted effort. It still doesn't move as freely, but I suspect it's good. EDIT: I think I do know why the RH control arm doesn't move as freely. The rear seal contacts the control arm bracket. There's plenty of clearance on the LH side, I don't know why there would be a difference. It's not as if you can install the shafts backwards, I think? Suppose I could add another shim. I installed the shims as they were beforehand. EDIT: That aint it. I pulled the cross arm off and it's stiff anyway. It moves well enough. IMO there's a design flaw on the RH side of some sort, probably in the bracket and/or shafts. Works anyway, so good enough for GM.
__________________
Tony 71 Custom Deluxe, SWB, 2WD, 402, A/C. I developed an assm. guide "kit" for restoring it from ground up. With assys, the guide accts for 1000s of OEM identifications and part numbers, all written in short order. 700+ images include assm, illust., charts, and points of interest. Much of the info. applies to all 67-72 GM trucks, and to a lessor degree all 67-72 GM vehicles. My build thread, and more on the guide https://67-72chevytrucks.com/vboard/...d.php?t=730025 Last edited by 71CHEVYSHORTBED402; 01-06-2019 at 03:54 PM. |
|
|
|
|
12-28-2018, 10:39 PM
|
#153 | |
|
Who Changed This?
Join Date: Jan 2013
Location: Simi Valley, CA
Posts: 10,081
|
Re: What did you do to your truck today.The 3rd chapter
Quote:
On my truck, I put in a new rear differential vent. I never noticed it before, but someone drilled a hole in the diff cover and put in a fitting. Then they ran the vent via a hose to the fitting on the cover. It was still vented, because the hose didn't fit the fitting on the diff cover tightly, and fell off. I don't know why I never noticed it before. Weird. There was also a fitting where the vent should have been, in order to run the hose to the diff cover.
__________________
~Steven '70 Chevy 3/4T Longhorn CST 402/400/3.56 Custom Camper Simi Valley, CA |
|

|
|
|
12-28-2018, 11:40 PM
|
#154 | |
|
Senior Member
Join Date: Feb 2009
Location: Northern Nevada
Posts: 7,118
|
Re: What did you do to your truck today.The 3rd chapter
Quote:
You lost me on the upper shafts, I don't see how it's possible to put them on backwards. There's no top or inside out that I see. If I'm mistaken clue me in dude, because wholly cow, I'll re-do it right. I may be off base, but I think the rear warrants a 1/32" shim or so to clear the bracket. It may work as is, but I think they're supposed to move freely. Like I said, I rebuilt it as I found it. The only changes are powder coat and new shafts. It strikes me that RH side did move more freely than it does now. I checked the old seals, there's no glaring damage, but I'm not sure it would show on the exterior side. The rubber is pretty tuff.
__________________
Tony 71 Custom Deluxe, SWB, 2WD, 402, A/C. I developed an assm. guide "kit" for restoring it from ground up. With assys, the guide accts for 1000s of OEM identifications and part numbers, all written in short order. 700+ images include assm, illust., charts, and points of interest. Much of the info. applies to all 67-72 GM trucks, and to a lessor degree all 67-72 GM vehicles. My build thread, and more on the guide https://67-72chevytrucks.com/vboard/...d.php?t=730025 Last edited by 71CHEVYSHORTBED402; 12-29-2018 at 12:28 AM. |
|
|
|
|
|
12-29-2018, 10:09 AM
|
#155 |
|
Senior Member
Join Date: Dec 2013
Location: Gods country East,Tn
Posts: 8,545
|
Re: What did you do to your truck today.The 3rd chapter
"Installed the upper control arms today. I assembled them Grumpy style, by threading the bushings with the shaft installed on the truck. So if it doesn't work out, I know just who to blame "
 I think what Steeveedee is referring to is the left upper arm can be installed on the right side and vice versa . I'm sure it's all fine and once aligned and with all the weight on it you'll balance out get some Dykem torque seal to mark your bushings it's a quick visual check to make sure nothings loose or moving every ones seen it before but not many use it on reinstall . . try to get the grease zerk fittings to point down . makes it easier to get the grease gun on the fitting later on . I'd get more pictures of mine done but it's already bagged in plastic to keep it clean . Dykem indicator paste --- https://www.emisupply.com/catalog/pa...1185_1215.html
__________________
 1967 Factory short bed - Old school '71 - 350 / 4bolt / 487 heads / Edelbrock C3BX Muncie M-22 4 speed / Hurst Comp plus Factory 12 bolt posi 3.73 / 255-70-15 Smoothed firewall / Factory cowl induction Power disc brakes / power steering / 3.5-5" drop |
|
|
|
|
12-29-2018, 07:25 PM
|
#156 |
|
Registered User
Join Date: Oct 2007
Location: Raytown, Missouri
Posts: 130
|
Re: What did you do to your truck today.The 3rd chapter
Simple: I bought it!
  
|
|
|
|
|
12-29-2018, 08:10 PM
|
#157 |
|
Senior Member
Join Date: Oct 2014
Location: New Palestine In
Posts: 930
|
Re: What did you do to your truck today.The 3rd chapter
I stripped down the drivers door on the 68 to clean, paint, and lube the window and door mechanisms. I've got all new glass run channels and anti rattle strips to put back in. The original parts are surprisingly in good shape. I need a door handle mechanism and a couple of window regulator rollers but that's it.
__________________
Phil "Money is only a tool to create and achieve what you want most in life" PayPal: rodnrudy@comcast.net |
|
|
|
|
12-29-2018, 08:35 PM
|
#158 | |
|
Senior Member
Join Date: Feb 2009
Location: Northern Nevada
Posts: 7,118
|
Re: What did you do to your truck today.The 3rd chapter
Quote:
I was hoping U might chime in  Good information. Against my first instinct I'll leave the shims to the pros.....Something is off on my RH side, either the bracket or A-arm. There's little clearance between the front of the bracket and the edge of the arm, but I think it's okay. The LH side is perfect all the way around..............Can't be the cross member, it only fits one way. Good information. Against my first instinct I'll leave the shims to the pros.....Something is off on my RH side, either the bracket or A-arm. There's little clearance between the front of the bracket and the edge of the arm, but I think it's okay. The LH side is perfect all the way around..............Can't be the cross member, it only fits one way. The only way to screw this up is are the bushings, and that's not it. I did the RH twice It's in my head, 4.5 360s both sides and you're a pinch off the A-arm I followed it all the way through. The shafts are nuts with the A-arms. A bushing on each side did have more to give, I believe that's normal, though I did see where you can make some adjustment. Speak of zerk fittings, I suspect Moogs parts are engineered enough you can use the zerk fittings tight as an indicator how the bushings should finish. Not that you can't adjust the fittings, perhaps even the bushings. That and when the bushings contact the shaft the tip on the nut is @ 12-O-clock. Makes for an easy mark.
__________________
Tony 71 Custom Deluxe, SWB, 2WD, 402, A/C. I developed an assm. guide "kit" for restoring it from ground up. With assys, the guide accts for 1000s of OEM identifications and part numbers, all written in short order. 700+ images include assm, illust., charts, and points of interest. Much of the info. applies to all 67-72 GM trucks, and to a lessor degree all 67-72 GM vehicles. My build thread, and more on the guide https://67-72chevytrucks.com/vboard/...d.php?t=730025 Last edited by 71CHEVYSHORTBED402; 01-06-2019 at 03:55 PM. |
|
|
|
|
|
12-29-2018, 08:39 PM
|
#159 |
|
Registered User
Join Date: Feb 2018
Location: Waterford, Wi
Posts: 73
|
Re: What did you do to your truck today.The 3rd chapter
We mocked up the motor and trans! Progress...
|
|
|
|
|
01-01-2019, 07:03 PM
|
#160 |
|
Registered User
Join Date: Feb 2018
Location: Doland SD
Posts: 836
|
Re: What did you do to your truck today.The 3rd chapter
I took apart the radio and painted the needle. The radio doent work but it will look better.
__________________
 ( second times the charm) 71 gmc c15 307 sbc 373 rear gears positrac sm 465 trans. ( not listed on spid but is original ) ( second times the charm) 71 gmc c15 307 sbc 373 rear gears positrac sm 465 trans. ( not listed on spid but is original )94 chevy k1500 350 tbi 373 rear gears 4l60e one wheel peel. Gutless 07 gmc sierra classic rcsb 4.3 lt 5 speed w/t 04 chevy Silverado 1500 ext cab 5.3 4l60e. 81 chevy Scottsdale k10 muncie sm465 Np208 10 bolt 8.2 ( Old Green) |
|
|
|
|
01-01-2019, 07:10 PM
|
#161 |
|
laying low
Join Date: Mar 2001
Location: Searcy, Ark. USA
Posts: 12,947
|
Re: What did you do to your truck today.The 3rd chapter
turn
__________________
Boog 69 Chevy stepside, 358/T350, 4.11 posi, 4.5/4 drop, rallys, poboy driver primer is finer 91 Chevy sportside, Tahoe, Yukon & GMC Crewcab All GM..'nuff said. I stand for the flag and kneel at the cross |
|
|
|
|
01-01-2019, 07:15 PM
|
#162 |
|
Registered User
Join Date: Feb 2018
Location: Doland SD
Posts: 836
|
Re: What did you do to your truck today.The 3rd chapter
Hers it put back together
__________________
( second times the charm) 71 gmc c15 307 sbc 373 rear gears positrac sm 465 trans. ( not listed on spid but is original )94 chevy k1500 350 tbi 373 rear gears 4l60e one wheel peel. Gutless 07 gmc sierra classic rcsb 4.3 lt 5 speed w/t 04 chevy Silverado 1500 ext cab 5.3 4l60e. 81 chevy Scottsdale k10 muncie sm465 Np208 10 bolt 8.2 ( Old Green) |
|
|
|
|
01-01-2019, 09:58 PM
|
#163 | |
|
Registered User
Join Date: Mar 2018
Location: Etowah, NC
Posts: 30
|
Re: What did you do to your truck today.The 3rd chapter
Quote:
Anyway, got to it tonight. The whole process worked out much better than I feared. My goal in all of this is for the drip edge to be weather tight, not looks. Before the Christmas road trip, I had sprayed on a coat of 2K Epoxy primer that I got in a rattle can from Advance Auto (who knew?). Primarily because the 3M instructions indicate to apply this on a 2K primer or bare metal. This will be the beige color in the pics below. Along with the 3M 8307 Self Leveling and the 3M 8308 heavy body, I also ordered the 3M gun (3M P/N 8571). I started with the vertical portions of the drip edge and laid down a pretty thick bead of the 3M 8308, starting right at the top of the upper curve. Then I simply used a gloved finger to smooth it out, trying to press it into the seam without squeezing it out. I left the beginning of the bead pretty thick, so it will act as a dam for the self leveling 8307. I also had a spot at the upper right corner where there was about a 1/8" gap between the roof skin and the rest of the metal that I filled with a small bead of 8308. Once both sides were done, I let it cure for about an hour, then took the 3M 8307 and got after it. Starting on one side, I began filling the drip edge, and worked my way around to the other side. The 8307 is definitely thinner than the 8308 and leveled out nicely. I then let that cure for about an hour, then masked off the cab and sprayed a coat of basic white rattle can primer over the newly sealed drip edge. Nothing fancy.
__________________
1970 C10 CST, PS, PB, AC, patina, original, work in progress |
|
|
|
|
|
01-02-2019, 10:28 AM
|
#164 |
|
Registered User
Join Date: Apr 2018
Location: Austin
Posts: 75
|
Re: What did you do to your truck today.The 3rd chapter
No longer in jackstand jail. Having trouble with brakes still though

|
|
|
|
|
01-05-2019, 08:03 PM
|
#165 |
|
Senior Member
Join Date: Oct 2014
Location: New Palestine In
Posts: 930
|
Re: What did you do to your truck today.The 3rd chapter
While I'm waiting for some parts to refresh my door mechanisms I decided to tackle a couple of rust issues in each outer corner and where it is split unde the vent wing. Also I'm getting rid of that God awful 6x9 speaker hole. here's a few pics of my progress.
__________________
Phil "Money is only a tool to create and achieve what you want most in life" PayPal: rodnrudy@comcast.net |
|
|
|
|
01-05-2019, 08:06 PM
|
#166 |
|
Senior Member
Join Date: Oct 2014
Location: New Palestine In
Posts: 930
|
Re: What did you do to your truck today.The 3rd chapter
And a few more of the rust repair and speaker hole.
__________________
Phil "Money is only a tool to create and achieve what you want most in life" PayPal: rodnrudy@comcast.net |
|
|
|
|
01-06-2019, 02:16 AM
|
#167 |
|
Registered User
Join Date: May 2017
Location: Seatac, wa
Posts: 172
|
Re: What did you do to your truck today.The 3rd chapter
Nice ride. Hope u get those brakes worked out before spring bro
|
|
|
|
|
01-06-2019, 07:22 AM
|
#168 |
|
Registered User
Join Date: Mar 2015
Location: Washington State
Posts: 1,644
|
Re: What did you do to your truck today.The 3rd chapter
moved the coil packs
|
|
|
|
|
01-06-2019, 04:28 PM
|
#169 |
|
Registered User
Join Date: Nov 2018
Location: Indianapolis
Posts: 130
|
Re: What did you do to your truck today.The 3rd chapter
I pulled my bench seat, removed last of the green shag carpet. So glad that is gone. I vacuumed floorboards. Installed new dome light I got for Christmas. Removed lower part of old door gaskets, they were holding moisture. Removed old stereo amp under the seat.
|
|
|
|
|
01-06-2019, 07:06 PM
|
#170 |
|
Senior Member
Join Date: Oct 2014
Location: New Palestine In
Posts: 930
|
Re: What did you do to your truck today.The 3rd chapter
I finished up welding up the patch for the ugly speaker hole in the door this afternoon Also I picked up this nice E brake cover at the swap meet this morning. Thanks Todd, nice meeting you.
__________________
Phil "Money is only a tool to create and achieve what you want most in life" PayPal: rodnrudy@comcast.net |
|
|
|
|
01-06-2019, 09:46 PM
|
#171 | |
|
Senior Member
Join Date: Mar 2011
Location: Hanover NJ
Posts: 4,105
|
Re: What did you do to your truck today.The 3rd chapter
Quote:
__________________
Doc & Kim build http://67-72chevytrucks.com/vboard/s...d.php?t=722288 I am from the desert http://67-72chevytrucks.com/vboard/s...d.php?t=650332 basket case build SOLD http://67-72chevytrucks.com/vboard/s...d.php?t=648557 |
|
|
|
|
|
01-07-2019, 10:38 AM
|
#172 |
|
Registered User
Join Date: Jul 2018
Location: Ozark, AL
Posts: 43
|
Re: What did you do to your truck today.The 3rd chapter
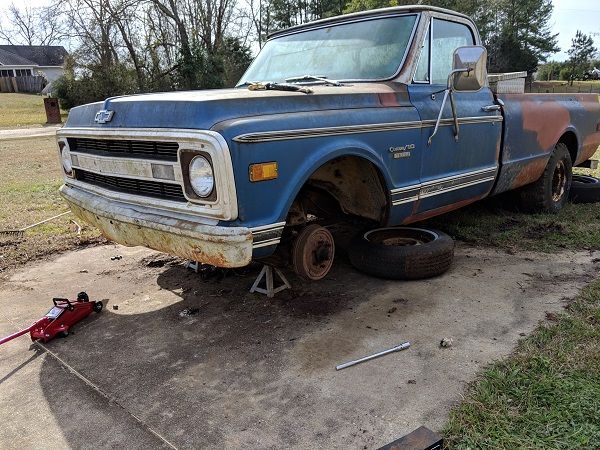
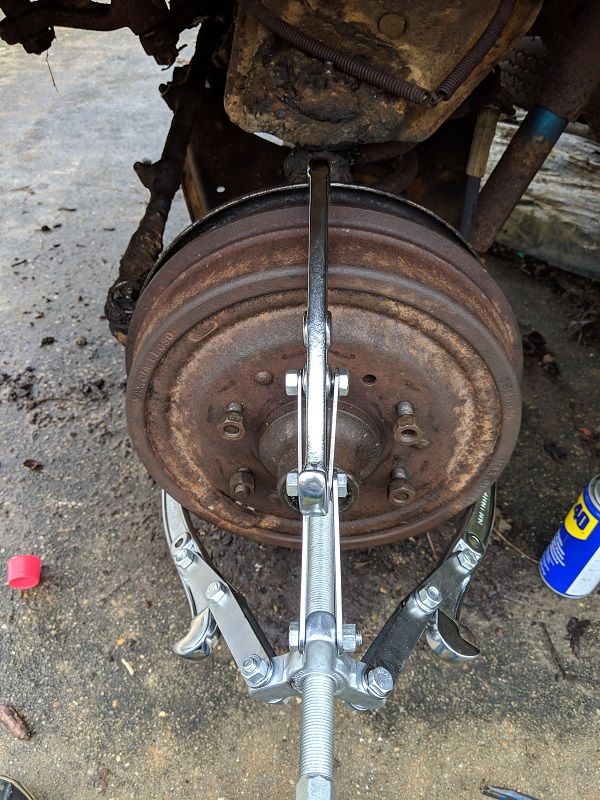
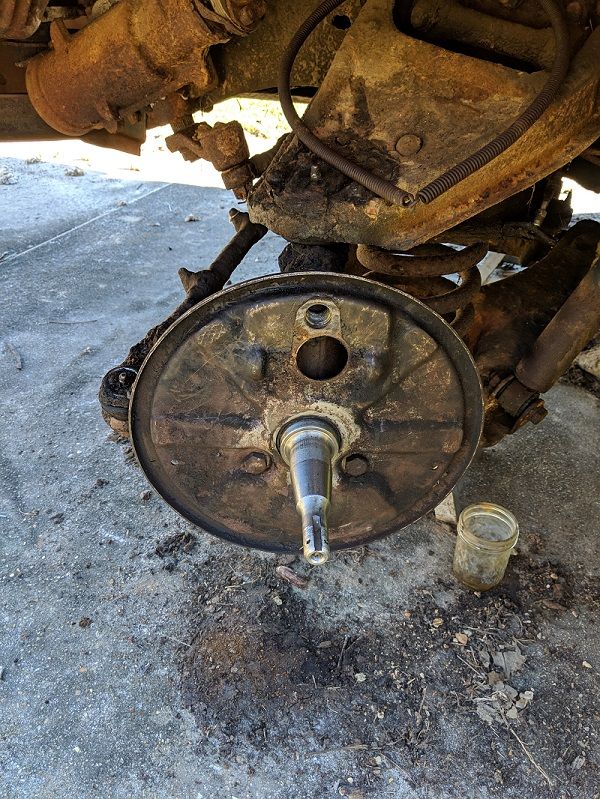
I finally got started on my project over the holidays, i'm going to try to upload photos shortly. Getting the front drums off, they were completely rusted solid, was a chore. But I have them off, and I've gotten all the parts to put it back together. I'm keeping the drum brakes for now, I hope in the future to go to disc.
|
|
|
|
|
01-07-2019, 12:41 PM
|
#173 |
|
Registered User
Join Date: Jul 2018
Location: Ozark, AL
Posts: 43
|
Re: What did you do to your truck today.The 3rd chapter
Let me see if I got the picture upload thing down?
|
|
|
|
|
01-09-2019, 12:00 AM
|
#174 |
|
Senior Member
Join Date: Feb 2009
Location: Northern Nevada
Posts: 7,118
|
Re: What did you do to your truck today.The 3rd chapter
Got my control arms in. I'm going to see if I can install the coil springs cleanly with an internal compressor. I'm not holding my breathe on that one. If I can't then I'll wait for the engine, see if that's enough weight. I'd like to put the suspension to rest already.
__________________
Tony 71 Custom Deluxe, SWB, 2WD, 402, A/C. I developed an assm. guide "kit" for restoring it from ground up. With assys, the guide accts for 1000s of OEM identifications and part numbers, all written in short order. 700+ images include assm, illust., charts, and points of interest. Much of the info. applies to all 67-72 GM trucks, and to a lessor degree all 67-72 GM vehicles. My build thread, and more on the guide https://67-72chevytrucks.com/vboard/...d.php?t=730025 |
|
|
|
|
01-09-2019, 12:22 AM
|
#175 | |
|
Senior Member
 Join Date: Sep 2008
Location: Harrison, Arkansas
Posts: 9,786
|
Re: What did you do to your truck today.The 3rd chapter
Quote:
__________________
other Larry Build thread, Arkansas K10 https://67-72chevytrucks.com/vboard/...=755797&page=5 The ability to speak several languages is an asset, but the ability to keep your mouth shut in any language is priceless. |
|
|
|
|
 |
| Bookmarks |
|
|


 Linear Mode

