
|
 12-08-2022, 03:23 PM
|
#126 |
|
Registered User
Join Date: Mar 2017
Location: Western Colorado
Posts: 30
|
Re: Long Time Coming......
Got it. Thanks.
|

|

|
|
12-08-2022, 03:28 PM
|
#127 |
|
Registered User
Join Date: Aug 2016
Location: Hunkered Down
Posts: 1,774
|
Re: Long Time Coming......
Are you planning on a main battery disconnect switch? I find this is the most used and depended on feature of my 54. Mine is rigged so that the tender can stay on when the disconnect switch is in off position It is also part of the anti-theft set up.
|
|
|
|
|
12-08-2022, 07:54 PM
|
#128 | |
|
Registered User
Join Date: Jan 2022
Location: Conn.
Posts: 184
|
Re: Long Time Coming......
Quote:
__________________
Glenn 1951 3100, Area51 1955 BelAir, 4EVER17 1987 R10, Ethel Copper Hill Rod & Custom http://67-72chevytrucks.com/vboard/s...d.php?t=829856 |
|
|
|
|
|
12-08-2022, 08:05 PM
|
#129 |
|
Registered User
Join Date: Aug 2016
Location: Hunkered Down
Posts: 1,774
|
Re: Long Time Coming......
Using a switch with a removal key seems best for peace of mind. My switch comes in handy for every bit of electrical work needed where its best to disconnect power. Also i use it every time i need to park the truck in both secure and unsecure locations. Right now key is out for winter hibernation altho tender is plugged in for sure starts. One real benefit is that if you ever have an electrical mishap/fire you can instantly react. Seen more than one guy have to cut wires in a panic!!
|
|
|
|
|
12-10-2022, 03:12 PM
|
#130 | |
|
Registered User
Join Date: Jan 2022
Location: Conn.
Posts: 184
|
Re: Long Time Coming......
Quote:
__________________
Glenn 1951 3100, Area51 1955 BelAir, 4EVER17 1987 R10, Ethel Copper Hill Rod & Custom http://67-72chevytrucks.com/vboard/s...d.php?t=829856 |
|
|
|
|
|
12-10-2022, 03:17 PM
|
#131 |
|
Registered User
Join Date: Aug 2016
Location: Hunkered Down
Posts: 1,774
|
Re: Long Time Coming......
IMHO Switch needs to be in cab, out of sight, and reachable from Drivers Seat. Have seen both positive and negative interrupting switches. Had very good luck with latter despite all the naysayers. Mine gets used more than the ignition switch!!!
|
|
|
|
|
12-10-2022, 03:26 PM
|
#132 |
|
Registered User
Join Date: Jan 2022
Location: Conn.
Posts: 184
|
Re: Long Time Coming......
Lets title today's episode as... What the heck is all of that!?!?
So I am bringing the bed to work Monday to spot in the color where the fuel filler is and also the rolled pan. With the bed out of the way I did some clean up today and moved the cab front and center. I am finally getting around too removing the windshield, the headliner and the last off the interior trim. I had always wondered why the candy red headliner was sagging in that one spot..... and then I saw this, the biggest mouse nest/bedding I've ever come across! I also found what can only be described as the first version of Dynamat sound deadener/insulation! Lol. Layers of cardboard glued to the inside of the roof. 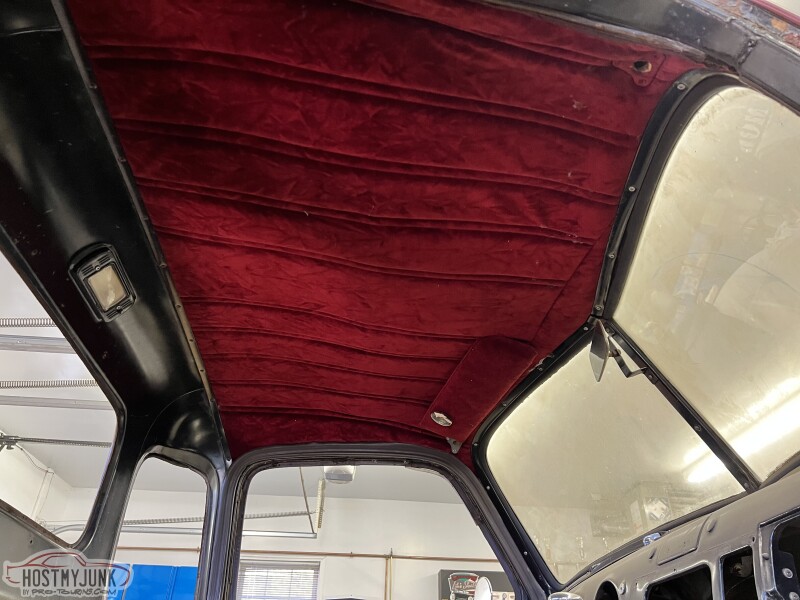 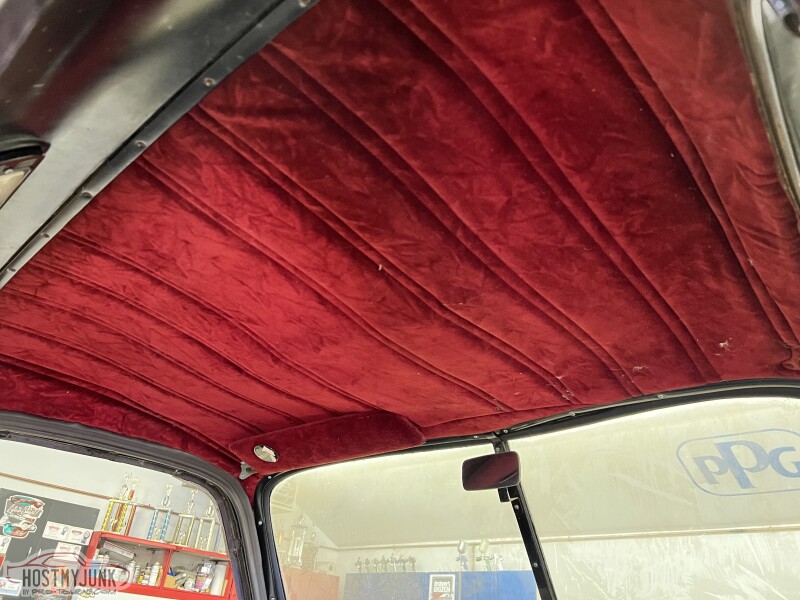 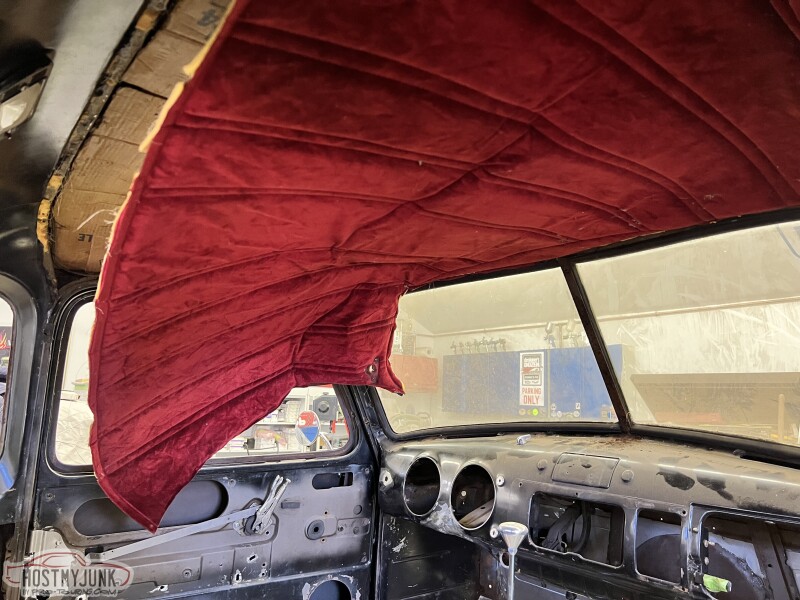 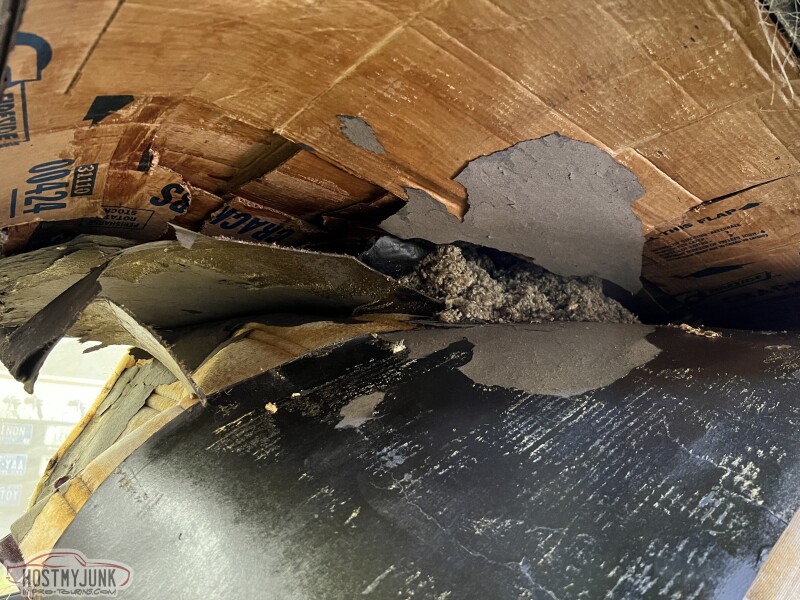   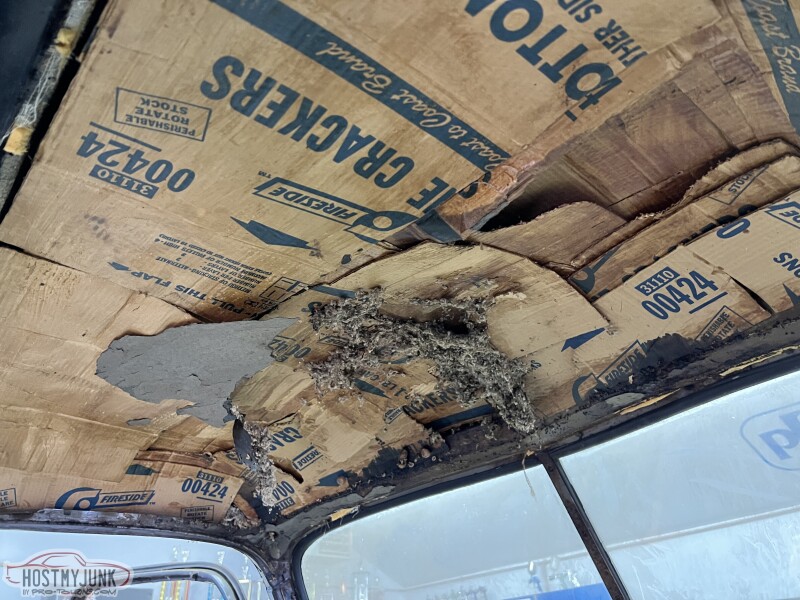 After cleaning all that up I popped the front fender wells back up on scissor stands and welded up the holes that I have now figured out what they are for and will not need in the future. 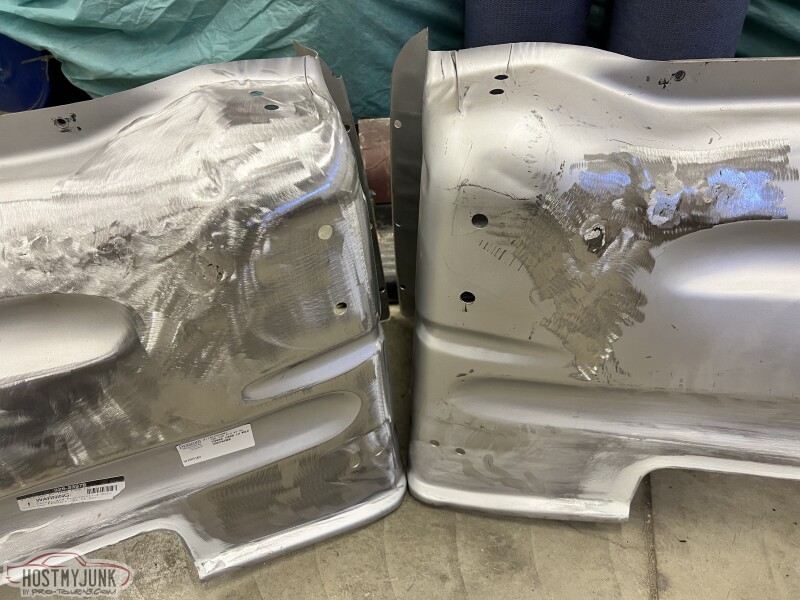 And lastly... I was asked to take a picture of me working on the truck. I take tons of pics to document the build and share with my dad, but I work alone and never have any with me in it. Today my wife came out and took some for me. Why you might be asking yourself? Well.... The editors of Classic Truck Performance have reached out to me. Some pictures of my build ran across their desk somehow and they like what they see. So they have decided to run a "Behind the Scenes/ Garage Built" type article on what I'm doing. For that they wanted a picture of me actually working on it. I suspect this will be out in the next few months, although I'm not really sure what to expect and how big it will be. I'm pretty stoked and honored. No pro builder here so I think its cool when home built vehicles get some ink. 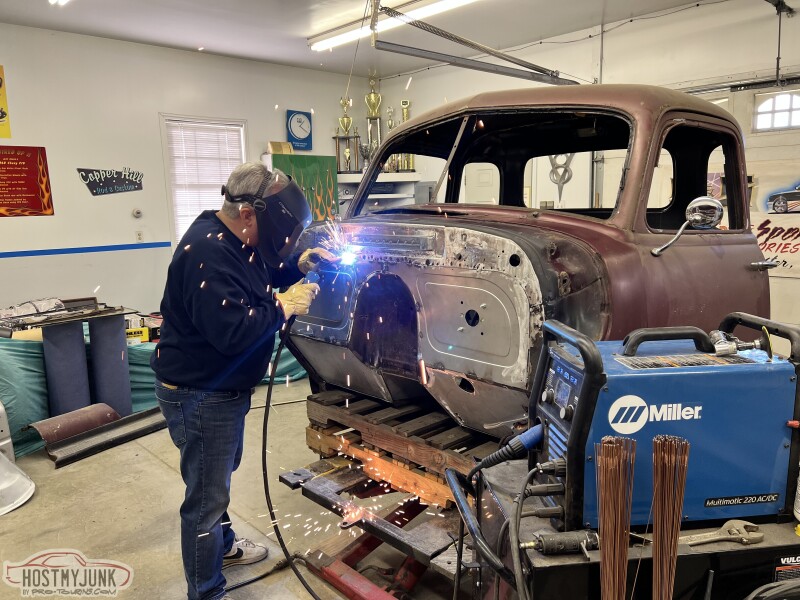
__________________
Glenn 1951 3100, Area51 1955 BelAir, 4EVER17 1987 R10, Ethel Copper Hill Rod & Custom http://67-72chevytrucks.com/vboard/s...d.php?t=829856 Last edited by gsinon; 12-10-2022 at 04:04 PM. |
|
|
|
|
12-10-2022, 03:27 PM
|
#133 | |
|
Registered User
Join Date: Jan 2022
Location: Conn.
Posts: 184
|
Re: Long Time Coming......
Quote:
__________________
Glenn 1951 3100, Area51 1955 BelAir, 4EVER17 1987 R10, Ethel Copper Hill Rod & Custom http://67-72chevytrucks.com/vboard/s...d.php?t=829856 |
|
|
|
|
|
12-10-2022, 03:29 PM
|
#134 |
|
Registered User
Join Date: Aug 2016
Location: Hunkered Down
Posts: 1,774
|
Re: Long Time Coming......
Wow! 30-06 sized rat!! No issues since putting rodent poison under seat.
|
|
|
|
|
12-10-2022, 03:31 PM
|
#135 | |
|
Registered User
Join Date: Jan 2022
Location: Conn.
Posts: 184
|
Re: Long Time Coming......
Quote:
__________________
Glenn 1951 3100, Area51 1955 BelAir, 4EVER17 1987 R10, Ethel Copper Hill Rod & Custom http://67-72chevytrucks.com/vboard/s...d.php?t=829856 |
|
|
|
|
|
12-10-2022, 04:59 PM
|
#136 | |
|
Registered User
Join Date: Aug 2016
Location: Hunkered Down
Posts: 1,774
|
Re: Long Time Coming......
Quote:
|
|
|
|
|
|
12-11-2022, 02:41 PM
|
#137 | |
|
Registered User
Join Date: Jan 2022
Location: Conn.
Posts: 184
|
Re: Long Time Coming......
Quote:
I have the corner speaker panels from LS Fab. I'm thinking that mounted to that panel might be a good place to have it accessible but out of the way also. I'll look at that, or somewhere back there to see what works best.
__________________
Glenn 1951 3100, Area51 1955 BelAir, 4EVER17 1987 R10, Ethel Copper Hill Rod & Custom http://67-72chevytrucks.com/vboard/s...d.php?t=829856 |
|
|
|
|
|
12-11-2022, 03:00 PM
|
#138 |
|
Registered User
Join Date: Aug 2016
Location: Hunkered Down
Posts: 1,774
|
Re: Long Time Coming......
This is kinda like what i used.
https://www.amazon.com/Ampper-Batter...%2C367&sr=1-16 Especially handy as i depend on AMP brand powered steps below my running boards to safely get in and out. When i need to leave it in the garage. i just open door which deploys steps and then turn switch off. |
|
|
|
|
12-12-2022, 03:53 PM
|
#139 |
|
Registered User
Join Date: Nov 2010
Location: calgary alberta
Posts: 7,831
|
Re: Long Time Coming......
cool that you get your pics in the big time. I really wish one of those publications would spend a little more time on joe average builds. some of the shows will show how they form a panel, things to watch out for etc. stuff a guy starting out would like to know.
I am in the same boat, work alone so no pics except for the ones I take. |
|
|
|
|
12-12-2022, 05:17 PM
|
#140 | |
|
Registered User
Join Date: Jan 2022
Location: Conn.
Posts: 184
|
Re: Long Time Coming......
Quote:
__________________
Glenn 1951 3100, Area51 1955 BelAir, 4EVER17 1987 R10, Ethel Copper Hill Rod & Custom http://67-72chevytrucks.com/vboard/s...d.php?t=829856 |
|
|
|
|
|
12-17-2022, 08:03 AM
|
#141 |
|
Registered User
Join Date: Jan 2022
Location: Conn.
Posts: 184
|
Re: Long Time Coming......
This week I brought the bed and rolled pan to work with plans to get it through the booth. I had a few of my students prep it for paint and get it all cleaned and ready. On Friday morning it all went into the booth for a few spots of color and then matte clear.
About a year ago I was able to find out what the color of the truck is. It is a 1986-92 GM color called Autumn Glow Metallic. PPG was generous enough to supply me with three quarts to spot in a few areas and paint the firewall and inner front fenders. They also gave me the matte clear for the job. But here is the kicker, the truck is painted in the late 80's in a single stage and I'm doing it with the new Deltron NXT basecaot system. Using all new tints the formulation has changed some and there is no way to make a base/clear have the exact same look as single stage. Add the fact PPG has not installed our new paint mixing system at the school yet, it is coming this Tuesday. So I have a color that is off a bit and I have no way to tint it to make it better. So I went with it as I need to get the job done and out of the school before the holiday break. While it isn't terrible, I was hoping the color to be a little closer. I really wish I had the new mixing bank as I could have tinted it to be closer. In any case..... Here is the rolled pan I painted in full, as well as spotting in the bed and then matte clearing the whole thing. The last pics are about an hour after clearing. They will continue to "dry down" and get a little less gloss as they sit over the weekend. 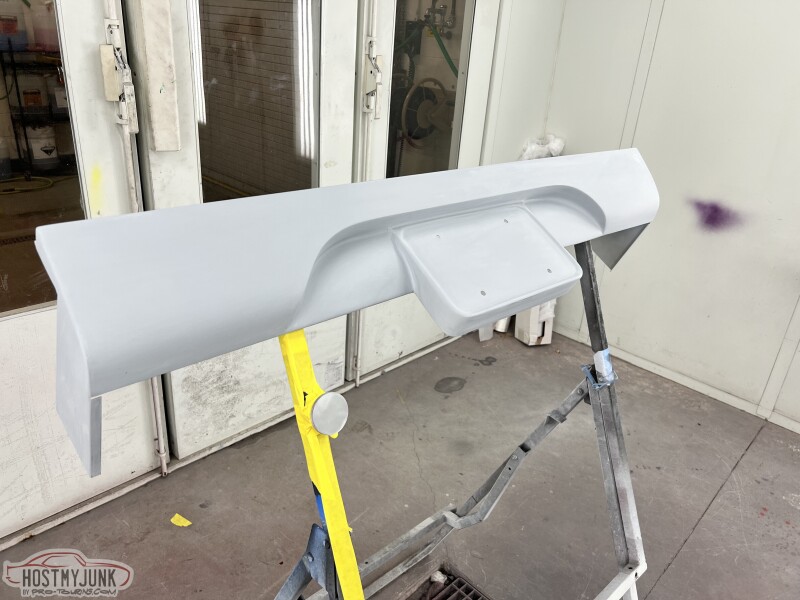 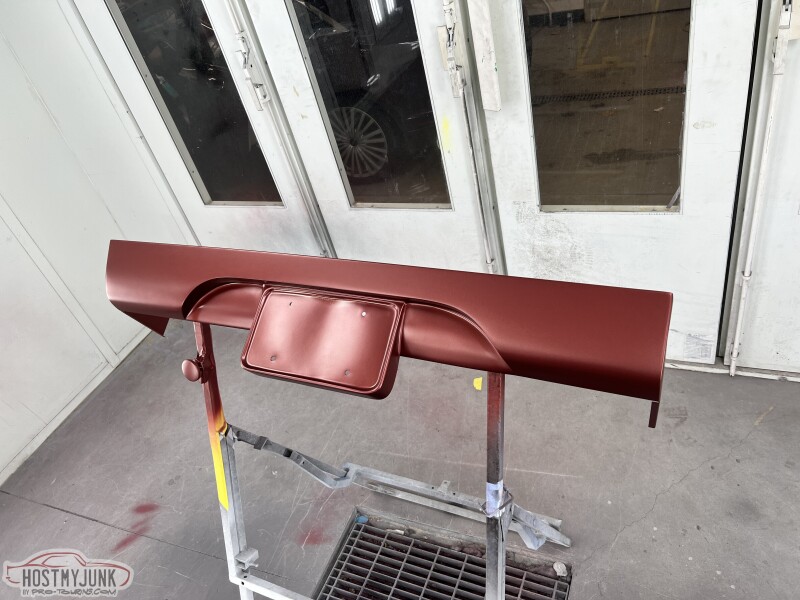 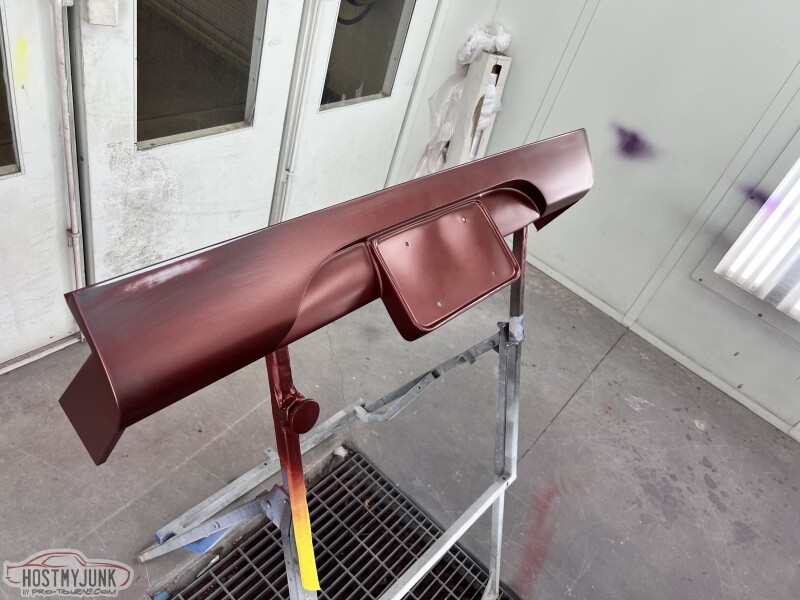 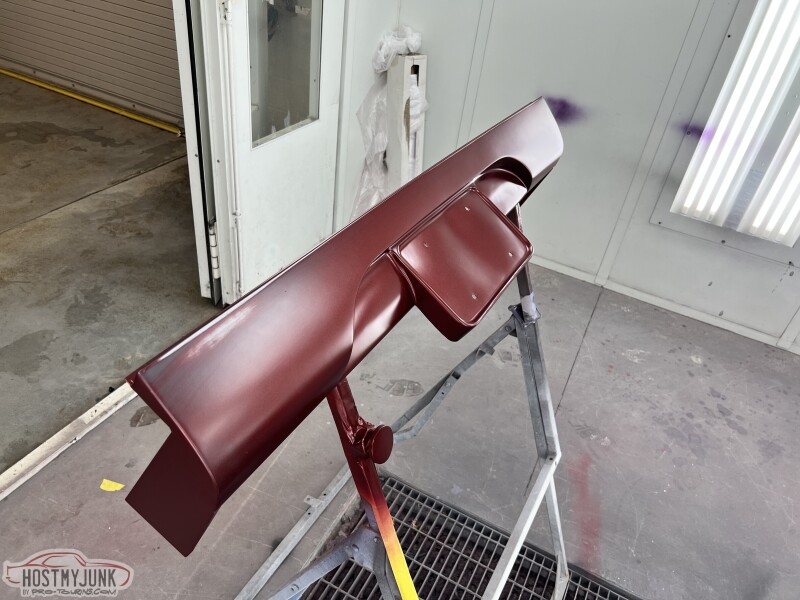 The gate.... 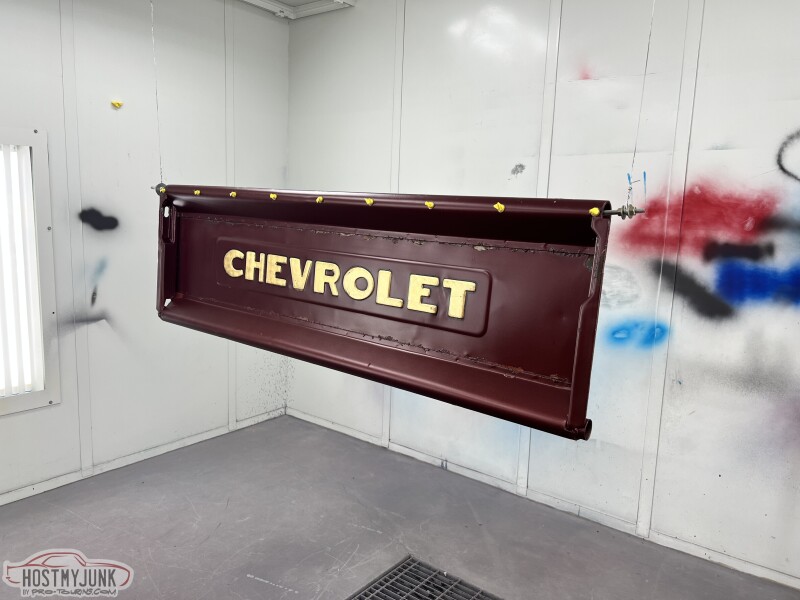 And the bed....  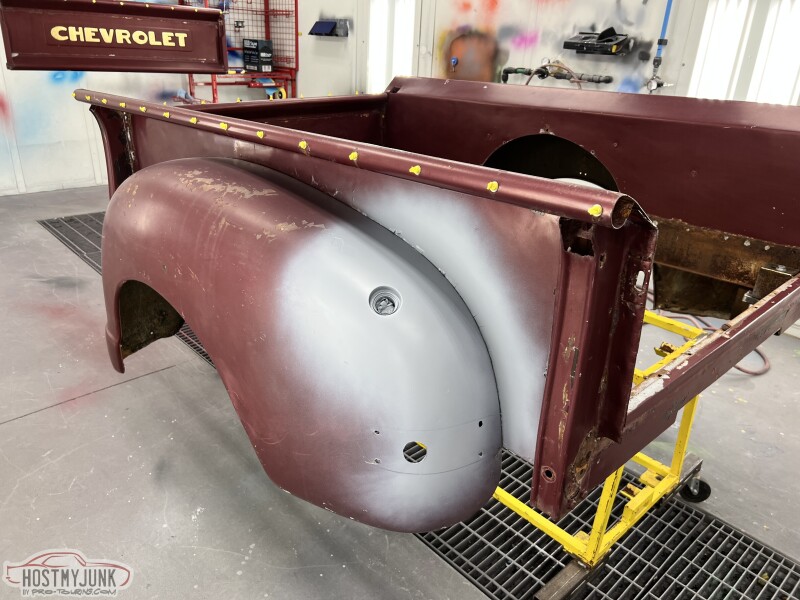 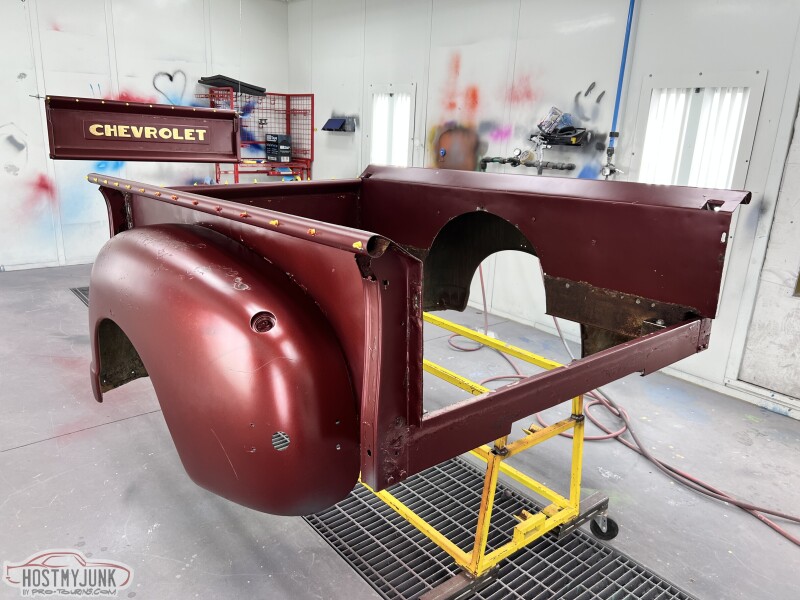 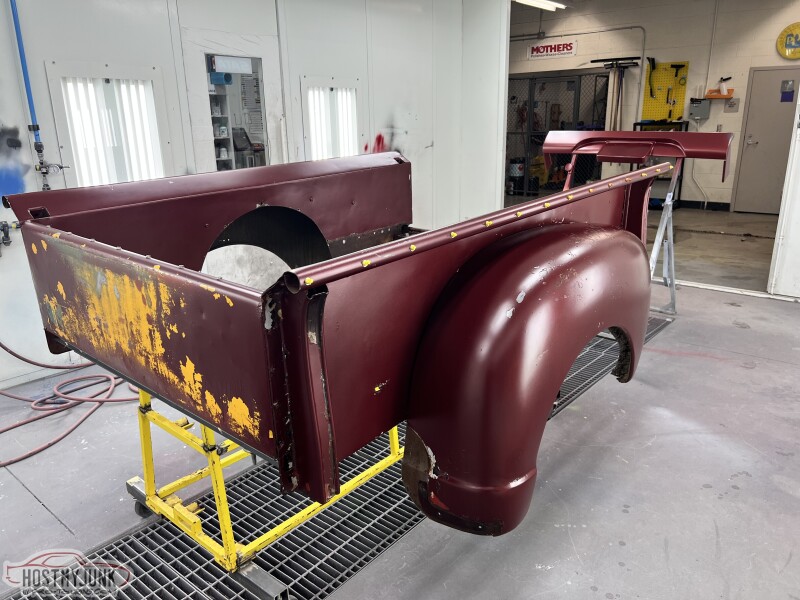
__________________
Glenn 1951 3100, Area51 1955 BelAir, 4EVER17 1987 R10, Ethel Copper Hill Rod & Custom http://67-72chevytrucks.com/vboard/s...d.php?t=829856 |
|
|
|
|
12-17-2022, 01:41 PM
|
#142 |
|
Registered User
Join Date: Aug 2016
Location: Hunkered Down
Posts: 1,774
|
Re: Long Time Coming......
I put the gas filler in about the same place as mine. Yours is much better done than mine. I will say refueling is like 10x easier just having cap on drivers side. Seems easier too in that area. I might add Here in OR we are generally not allowed to fill our own tanks at the station. The location however usually results in most attendants immediately asking me to do it due to potential damage issues. Also i have a locking cap which complicates things a bit. I do still get burping issues when full even with the 1/2" breather vent and was thinking of routing vent differently but not sure of best way.
Last edited by vintovka; 12-17-2022 at 02:18 PM. |
|
|
|
|
12-17-2022, 04:12 PM
|
#143 | |
|
Registered User
Join Date: Jan 2022
Location: Conn.
Posts: 184
|
Re: Long Time Coming......
Quote:
I plan on running a vent tube from the top of the tank all the way up to the top next to the fill tube. Hopefully that will help with flow and any burping issues. I had an older car a while ago that the vent and valve were too low and it caused issues like that. So now when I can I run it as high as I can.
__________________
Glenn 1951 3100, Area51 1955 BelAir, 4EVER17 1987 R10, Ethel Copper Hill Rod & Custom http://67-72chevytrucks.com/vboard/s...d.php?t=829856 |
|
|
|
|
|
12-17-2022, 04:24 PM
|
#144 |
|
Registered User
Join Date: Jan 2022
Location: Conn.
Posts: 184
|
Re: Long Time Coming......
Today I spent the day working in the cab for the most part. I got the LS Fab rear cab panels fitted the way I like. I also had to adjust and move the two rear speaker panels to align with the rear panels better. While at it I mounted the 6x9 speakers to check fit. Glad I did as the oval hole LS Fab puts in wasn't quite big enough, but with a little massaging they are good now.
I am still unsure if I will upholster these rear panels using the same material that is on the seat and door panels, or if I will just paint them. Decisions, decisions....... what I will be doing either way is painting the speaker grills the same color as the upholstery so they visually disappear. Same as I will do on the speakers in the front kick panels. 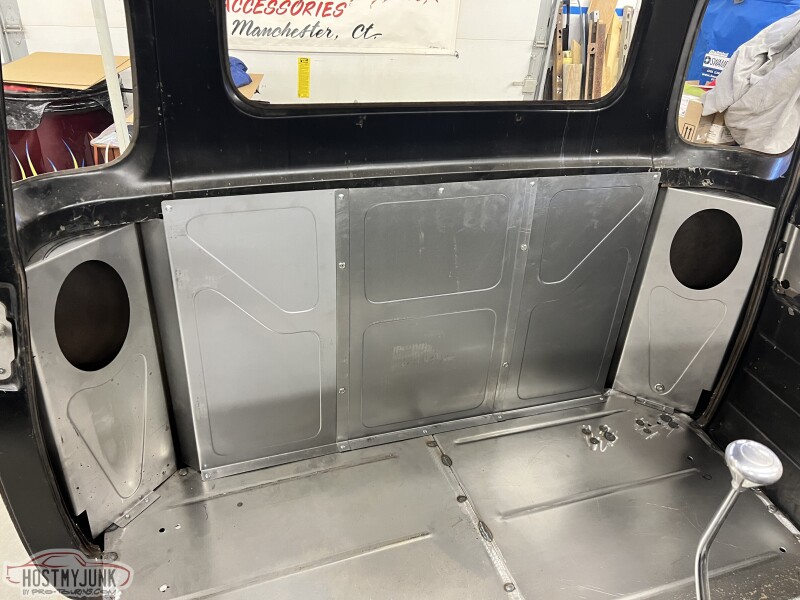 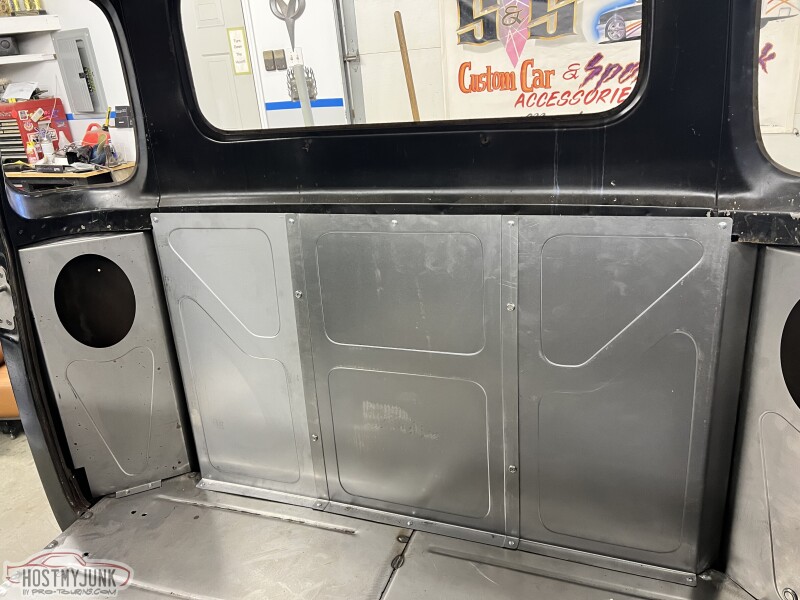 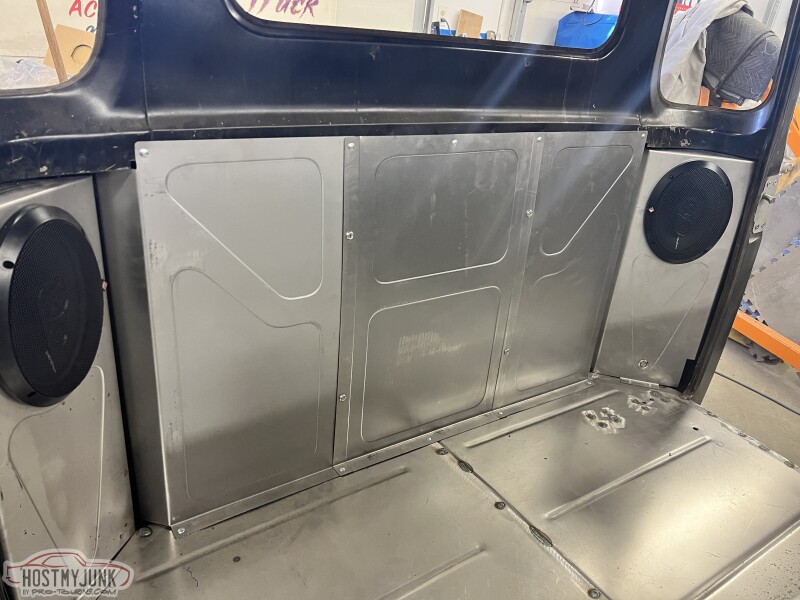 At this point I turned my attention to the dash and lower panel. I got the panel fitting a little better and also drilled the hole properly for the ignition switch that will mount to the right of the notch for the steering column. I also removed the radio delete plate and welded up the holes with the filler panels I made. I still have the two holes that are stacked next to the gauges to weld up and also the one for the wipers. Then I can strip the dash and start body work and primer steps. 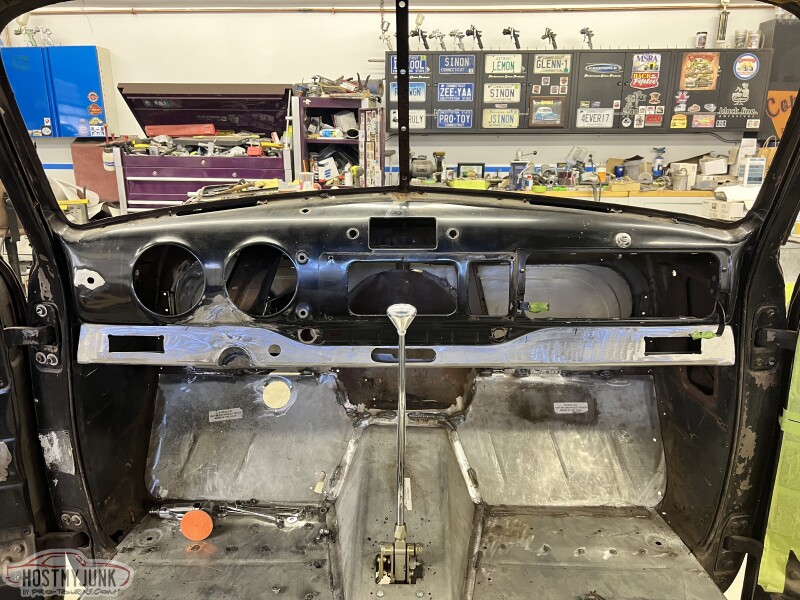 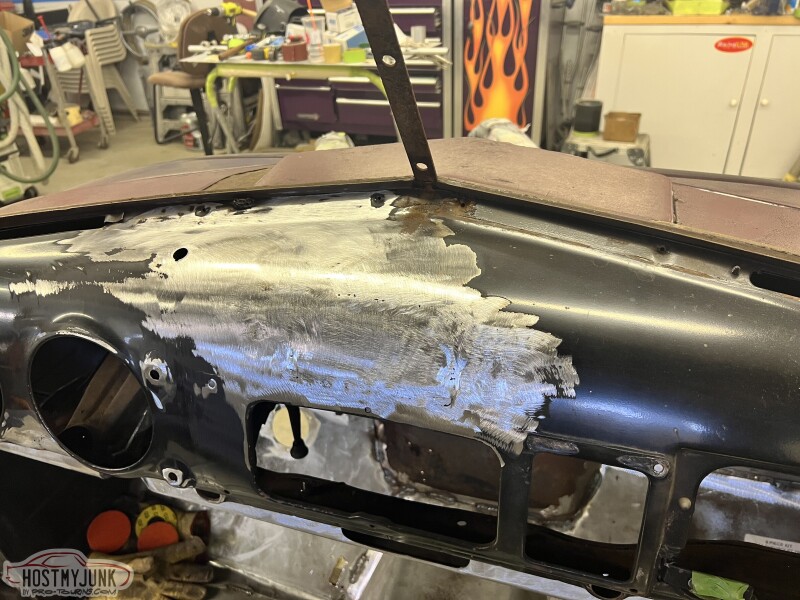
__________________
Glenn 1951 3100, Area51 1955 BelAir, 4EVER17 1987 R10, Ethel Copper Hill Rod & Custom http://67-72chevytrucks.com/vboard/s...d.php?t=829856 |
|
|
|
|
12-17-2022, 08:03 PM
|
#145 |
|
Registered User
Join Date: Oct 2009
Location: Hoskins nebraska
Posts: 397
|
Re: Long Time Coming......
Very nice work all the way through. I like the blackout treatment on the Ramjet. I have installed two of those in different builds. Both ran great and the low end torque is insane.
Did you get a different bracket for the kickdown cable? I had issues with mine using the supplied bracket and the post on the throttle body with a 700r4. It would shift fine at wide open throttle but slip at half throttle. I ended up making a new mount that bolts to the throttle arm to change the ratio. I would guess that someone makes one for it. I read through but don't remember seeing it, where is the battery going? Looking forward to your progress. Nick
__________________
Fast, Cheap, Reliable. You may pick two My 47/S10 build http://67-72chevytrucks.com/vboard/s...d.php?t=679723 |
|
|
|
|
12-18-2022, 08:14 AM
|
#146 | |
|
Registered User
Join Date: Jan 2022
Location: Conn.
Posts: 184
|
Re: Long Time Coming......
Quote:
Thanks for the comments and compliments. For the Ramjet I wanted a little different look then the grey they come. I was hoping that what I pictured in my head with the black would work. I was thrilled when I picked it up from the powder coater. The bracket I am using is from Lokar, I'm also using their throttle and Tv cable so I'm hoping it all works properly. I'm not sure I ever posted a picture with the battery mount. It is going on the outside of the frame right behind the front cab mount on the passenger side. I welded nuts inside the frame before boxing it. I am hopeful this will all work as planned, but I have to admit to never fitting the box there with the cab on. Just one of those things I forgot to do before removing it for the last time. So..... If it doesn't fit as I hope/expect it to I will make a mounting bracket and mount it to the front of the cab mount in the fender well. There is room there if I have to go that route. I would just make a cover for the battery so road debris coming off the tires wouldn't damage the battery should it get hit. I'm normally the guy that pre fits everything so these last minute things don't happen. However this one thing slipped through the cracks without me doing it. Thanks for following along.
__________________
Glenn 1951 3100, Area51 1955 BelAir, 4EVER17 1987 R10, Ethel Copper Hill Rod & Custom http://67-72chevytrucks.com/vboard/s...d.php?t=829856 |
|
|
|
|
|
12-18-2022, 10:37 AM
|
#147 |
|
Registered User
Join Date: Oct 2009
Location: Hoskins nebraska
Posts: 397
|
Re: Long Time Coming......
You should be good to go with the Lokar brackets.
I built a battery mount for mine that goes in the right rear wheel well. Two main reasons was I'm running an S10 frame and the frame rail goes right under the stock battery door and I also wanted the weight out back. Mounts off of two fender bolts and a couple new holes drilled below the floor. Might be an option.
__________________
Fast, Cheap, Reliable. You may pick two My 47/S10 build http://67-72chevytrucks.com/vboard/s...d.php?t=679723 Last edited by Rickysnickers; 12-18-2022 at 11:17 AM. |
|
|
|
|
12-18-2022, 04:21 PM
|
#148 |
|
Registered User
Join Date: Aug 2016
Location: Hunkered Down
Posts: 1,774
|
Re: Long Time Coming......
Interesting spot. Maybe a sliding bottom tray and longer cables for ease of access when tire is off. Wide HD 1/4" thick diamond plate Hinged (or QD removable) lid with lock ????. Lotsa high velocity rocks and rain out there. As a registered professional engineer I am really good at suggesting how to spend clients time and $.
|
|
|
|
|
12-18-2022, 05:16 PM
|
#149 |
|
Registered User
Join Date: Oct 2009
Location: Hoskins nebraska
Posts: 397
|
Re: Long Time Coming......
With the tire off it slides right out the front. It sucks pulling the tire but after that it comes out way easier than most of the drop down mounts I have used. I'm going to add a plastic splash shield on the front side. It will mount easy enough with screws in the square tubing.
Nick
__________________
Fast, Cheap, Reliable. You may pick two My 47/S10 build http://67-72chevytrucks.com/vboard/s...d.php?t=679723 |
|
|
|
|
12-18-2022, 06:19 PM
|
#150 |
|
Registered User
Join Date: Aug 2016
Location: Hunkered Down
Posts: 1,774
|
Re: Long Time Coming......
Do you think one of those plastic marine battery covers might help? Stuff might get everywhere back there. They chip seal roads around here and wheel wells take the brunt of it.
|
|
|
|
 |
| Bookmarks |
|
|


 Linear Mode

