
|
 02-04-2014, 04:21 AM
|
#1251 |
|
Senior Enthusiast
Join Date: Feb 2007
Location: Spokane Valley, WA
Posts: 8,356
|
Re: Markeb01 Build Thread
It's alive! Ran through the systems check and fired up the engine at 5:30 this evening. Details to follow.
__________________
My Build Thread: http://67-72chevytrucks.com/vboard/s...d.php?t=444502 |

|

|
|
02-04-2014, 12:17 PM
|
#1252 |
|
Registered User
Join Date: Apr 2012
Location: Searcy, AR
Posts: 4,203
|
Re: Markeb01 Build Thread
It's ALIVE!!!
 
__________________
DON Proverbs 27:17  US Air Force Retarded errr Retired My '65 Stepper Build:http://67-72chevytrucks.com/vboard/s...d.php?t=533920 My '60 Rusty Patina Build:http://67-72chevytrucks.com/vboard/s...66#post7402266 My '72 http://67-72chevytrucks.com/vboard/s...59#post7204359 SOLD |
|
|
|
|
02-04-2014, 12:29 PM
|
#1253 |
|
Registered User
Join Date: Nov 2011
Location: fayetteville nc
Posts: 10,338
|
Re: Markeb01 Build Thread
Very cool addition
__________________
1963 Short bed step side SBW 427 big block and borg warner T-16 HD 3 speed manual http://67-72chevytrucks.com/vboard/s...d.php?t=519869 1963 Short bed fleetside BBW 348 1st gen big block w/Powerglide http://67-72chevytrucks.com/vboard/s...d.php?t=619024 1964 Short bed trailer |
|
|
|
|
02-05-2014, 04:34 AM
|
#1254 |
|
Senior Enthusiast
Join Date: Feb 2007
Location: Spokane Valley, WA
Posts: 8,356
|
Re: Markeb01 Build Thread
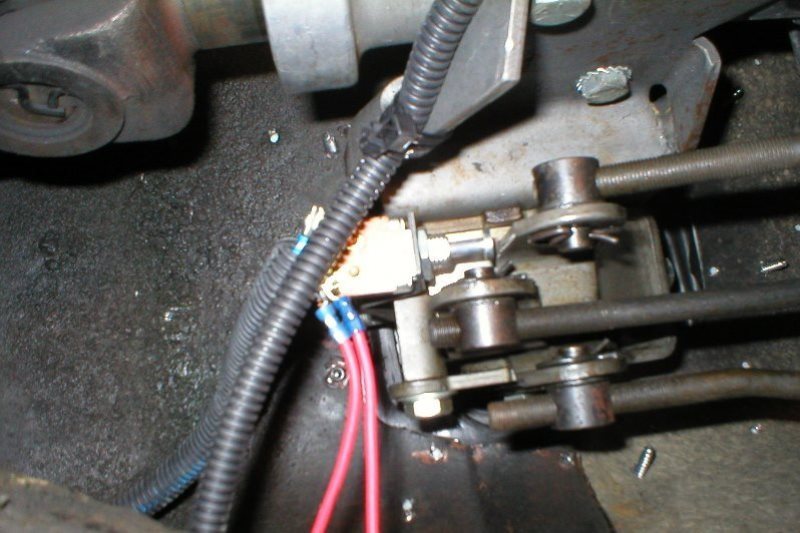
Before firing the engine yesterday, the final tasks were wiring up the reverse switch on the transmission, connecting the speed generator to the speedometer, and taking care of the rear lighting. Here’s the reverse switch on the Hurst shifter:
 I then moved on to the speed generator. Previously it had a cruise control pulse generator attached to the through-drive. It was very clunky and looked like this (looking down through the open floor pan: 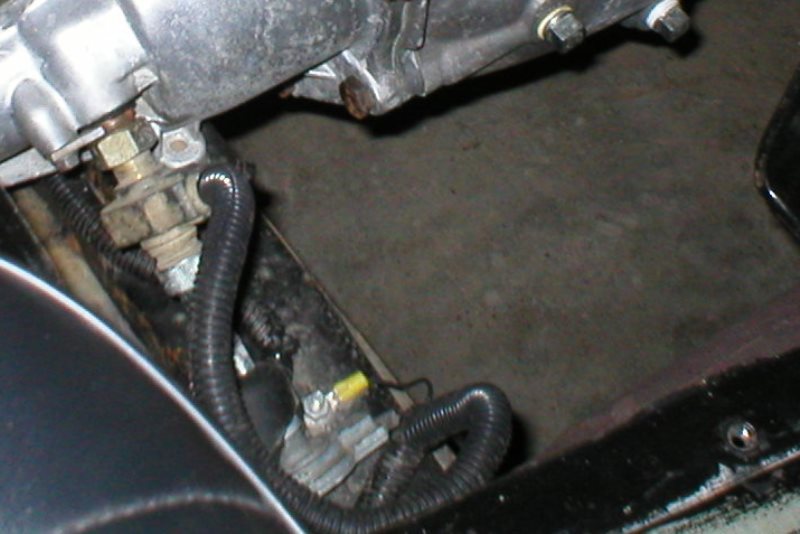 Here’s what it looks like now for comparison with the cruise portion gone: 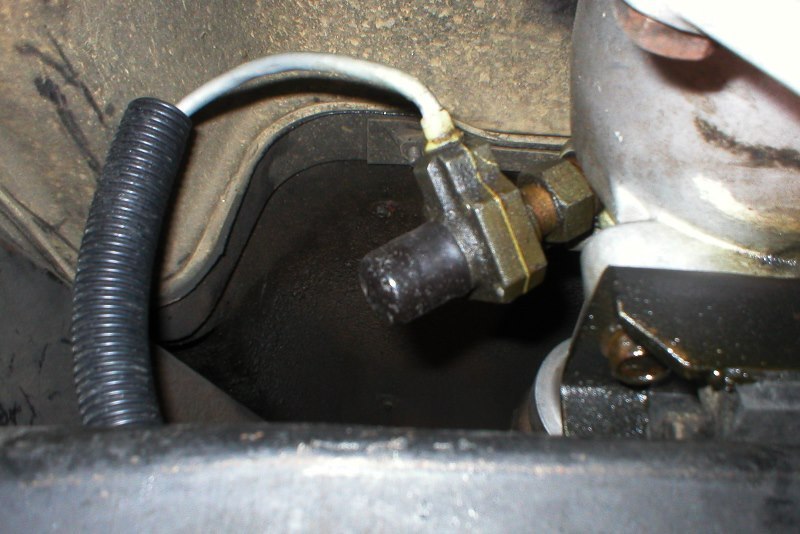 I cheated on the rear wiring. I’ve been on this project for 2 ½ weeks with subfreezing temperatures during the entire period. Right now it’s 8 degrees outside. I have a Harbor Freight propane heater that warms the garage up to 65 or so. The temps are tolerable in the garage, but the side benefit is an all-day headache from the combustion fumes. Long story short I just got tired of working on it and contemplated what I could put off until later. The rear lighting qualified. Since everything in the back of the truck is in perfect condition and marked identically to the new kit, I simply spliced the entire new harness to the existing wires right about the side step on the driver’s side. All the butt connectors are weather proof boat pieces. I rolled up and bagged all of the new wires and spliced the very ends to the old harness. I tied the bundle on top of the frame, so come the spring and some decent weather I can pull it out, cut the splices and run the rest of the new uncut harness to the rear and complete the job when I can leave the garage door open and enjoy the warm sunlight: 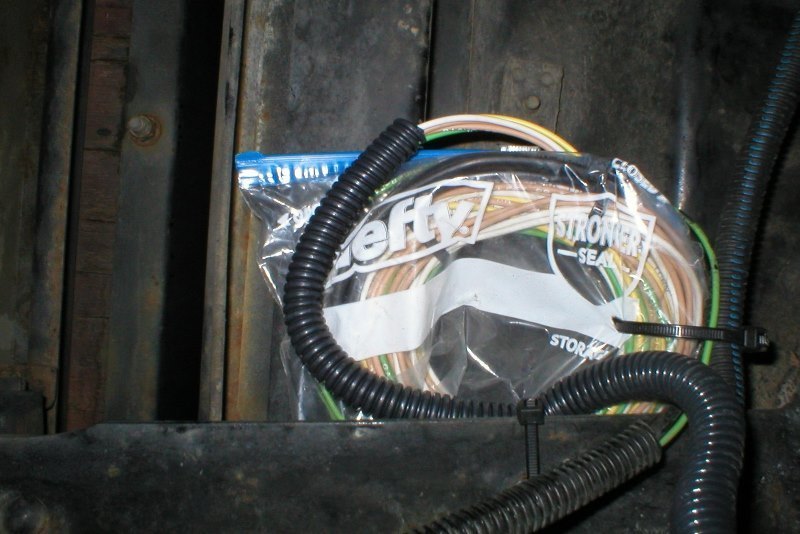 The rest of yesterday and today were both marathons again, sorting out the last couple of bugs. Even though the engine fired up and all the lights came on, I discovered two minor and one significant problem. The biggest one was in the ignition switch/starting system. The engine fired right up and ran fine, but when the key was switched off the starter drive was thrown into the flywheel causing the kind of loud noise expected. I knew immediately what it was, but not what was causing the problem. I spent about 6 hours going through every single wire multiple times and couldn’t find anything incorrect. So I gave up worrying about it and went to bed. I figured Ron Francis tech support should have an answer. The call first thing this morning was politely and professionally answered by Kyle. He put me in the queue for a call back. Scott called back about an hour later and after a brief description of the problem he suggested it was most likely my ignition switch doing something weird internally. I pulled the ignition switch out of the dash and checked everything externally, finding nothing suspicious. Another run attempt confirmed the problem still existed. The 2nd recommendation was to start the engine and then disconnect terminal 4 and see if the problem went away. Terminals 3 & 4 are for a neutral safety switch and must be connected for the engine to crank. I did as suggested and that cured the problem. Rather than spending another $30-$40 on a new ignition switch, I simply put toggle switch #3 under the red safety cover back into service as a momentary “crank to start” switch. The fix works perfect and adds another layer of theft protection as it now takes two hands to start the engine:  I’ll probably order a new safety cover for it titled “crank” or “start”. With that solved I addressed the two smaller issues. The easiest was the left hand door switch for the courtesy/dome lights. I simply forgot to hook it in the circuit. The other one was more of a pain and involved access to the headlight switch, so I pulled the steering wheel and instrument panel again. One of the benefits I enjoyed with my old Ron Francis kit, was installing the new headlight switch, which automatically caused the parking lights to stay on with the headlights. It’s been working that way since 1992 with no attention on my part. So when swapping to the new switch/kit I expected the same operation. I guess it pays to read every little detail because I missed a disclaimer found in the instructions that would have saved me a couple more hours of work. Here’s a condensed version: NOTE: The head light switch will turn the parking lights off when the head lights are on. To keep the parking lights on splice the park light wires into the tail light feed wires. I was more than annoyed. Who wants their brand new wiring system to kill the parking lights like the industry standard back in 1960?! Since I can’t crimp 4 wires together like they can, I had to make a Y adapter to hook the two pairs of wires into the headlight switch: 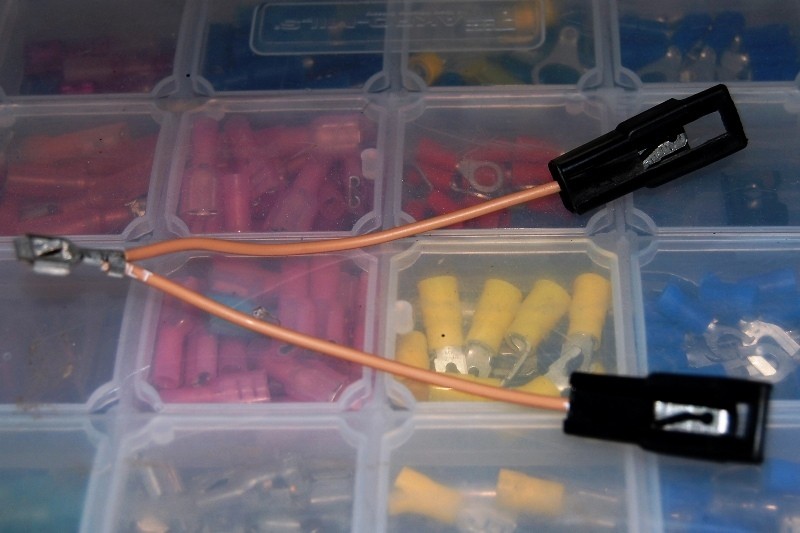 It certainly would have been easier if they shipped the kit in this configuration to begin with like they did in the past. I’m going to be writing them a letter along with a critique of the kit. They’ve incorporated the same downgrade on the indicator light wire connections as well, instructing these should be spliced in, instead of being provided with factory crimps to begin with (like they did before). Enough ranting, and the truth is on a 1-10 scale, my upset over this is about a 1 (being the least). I still love the Ron Francis wiring kit. There just isn’t anything else on the market that allows me to wire up a car the way I want to. So I finished those two repairs, reinstalled the panel and the steering wheel, cleaned everything up and went to reconnect the negative battery cable. I was surprised to see a tiny spark, as if something was turned on. I had the doors closed so the interior lights were off. I went ahead and connected the cable, and found all the brake lights were blazing away! I hit the books again and couldn’t figure out anything having to do with the headlight switch or dome light grounds that could have caused the problem. Assuming maybe I pinched a wire or something, I pulled the wheel and panel yet again! Nothing, I couldn’t find anything wrong. So the debugging began again, when I stopped and thought for a moment and wondered if the brake light switch could be out of alignment. It was just coincidental timing, that’s all that was wrong. It had nothing to do with any of the other work. With all the other activity the brake switch simply wiggled itself out of alignment enough that the plunger slipped off the brake pedal arm! After an hour of trying to adjust the darn thing, I decided to simply install a rubber block between the cage and the switch, trapping it in exact alignment. Another permanent, no cost fix. Now all the bugs are gone and everything is working perfectly. The layout is neat and easy to follow or fix in the future. My last task before trying to document all this in a separate thread is to go through and change out the fuses to the correct rating for each assigned circuit. I’m also going to see about having permanent laminated labels made for the panel itself, that indicate what I actually used them for, rather than some of the factory assignments like “spare battery”, A/C, ACC H, Power Windows, etc. I’m also going to identify which fuse feeds which terminal on the white plastic strips that snap on over the terminals. Then I’ll be done with the rewire project. The mascot in the glove box is my guardian angel that was a gift from my wife’s sister and always keeps me company: 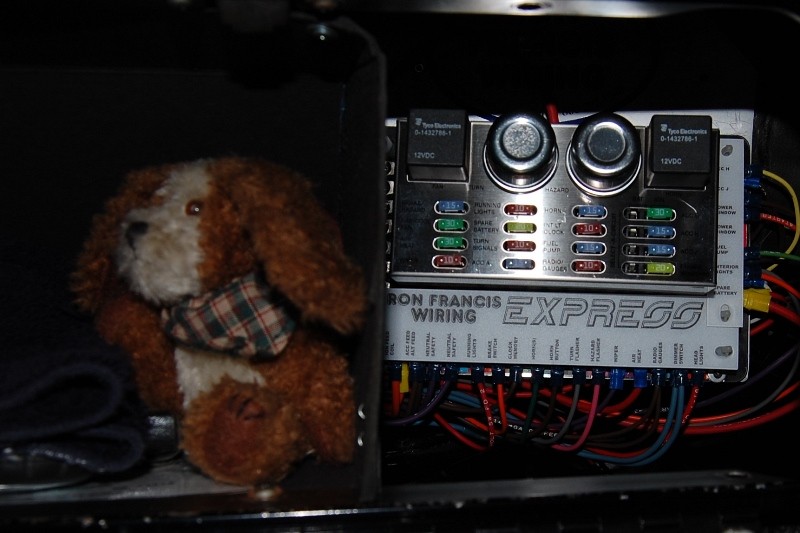 This has been the hardest physical task I’ve challenged since the MIP floor mat. I’m really pleased with the result, and thankful I am still capable of getting away with it. It has also established a new electrical modification policy. If a gauge or something needs replacing no problem, but there won’t be any more interior improvements that require wiring changes. If I can’t leave it alone and need to change anything else it will have to be something easy like a gear shift knob! And my new diamond stitched seat covers arrived yesterday. Pictures tomorrow. I also dropped off the GMC glove box emblem today for chroming. I might have it back in 3-4 weeks.
__________________
My Build Thread: http://67-72chevytrucks.com/vboard/s...d.php?t=444502 |
|
|
|
|
02-05-2014, 08:25 PM
|
#1255 |
|
Registered User
Join Date: Jun 2012
Location: Selkirk Ontario Canada
Posts: 1,141
|
Re: Markeb01 Build Thread
cool it's alive ..why so much time for chroming such a small part
__________________
My 63 GMC Panel Slow Build http://67-72chevytrucks.com/vboard/s...=1#post5457281 63 
|
|
|
|
|
02-05-2014, 08:39 PM
|
#1256 |
|
Senior Enthusiast
Join Date: Feb 2007
Location: Spokane Valley, WA
Posts: 8,356
|
Re: Markeb01 Build Thread
I thought it was pretty quick considering how much hand work is involved. Most guys I've talked to wait months to get their stuff back.
__________________
My Build Thread: http://67-72chevytrucks.com/vboard/s...d.php?t=444502 |
|
|
|
|
02-05-2014, 09:45 PM
|
#1257 |
|
Old and crusty
 Join Date: Jan 2009
Location: Surprise, AZ
Posts: 462
|
Re: Markeb01 Build Thread
Nice job on the re-wire, Mark. Now rest up that back by the wood stove the rest of the winter and get ready for the nice weather. I like your GMC emblem idea on the glove box door. I think I'll do the same with my Chevy and chrome that bowtie that came out of the center of my C60 grill. I've been looking for a spot for it.
__________________
65 Chevy long wide daily driver - SOLD! 64 Chevy Short Step LS |
|
|
|
|
02-05-2014, 09:57 PM
|
#1258 |
|
Senior Enthusiast
Join Date: Feb 2007
Location: Spokane Valley, WA
Posts: 8,356
|
Re: Markeb01 Build Thread
Thanks Dean. I’m planning to take a couple of weeks off, at least until my knees, neck, and back start working again!
Here’s the first peak at the new seat covers, propped up on an old kitchen chair. It will be a few days before the new button forms arrive. All the ones I have made up are prong type. I’m going to attempt pulling the new buttons directly through the foam cushions and tying them off behind (inside, forward of the rear cover) for the first time. They'll look a lot different when they've been stretched over the cushions and have some shape to them. 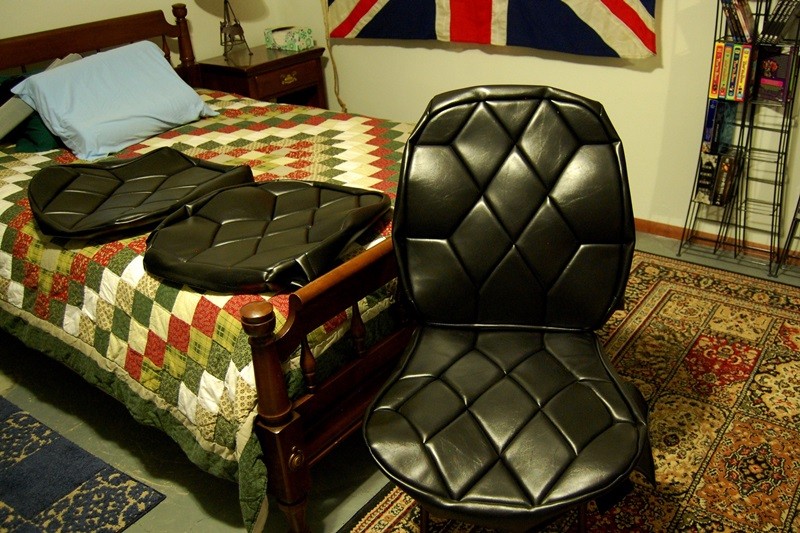 They sure feel rich compared to the Procar originals. My son said he’d never seen higher quality vinyl. I’m anxious to get them installed and in the truck, but not until it warms up a bit. I don't think it ever got above 8 degrees today.
__________________
My Build Thread: http://67-72chevytrucks.com/vboard/s...d.php?t=444502 Last edited by markeb01; 02-05-2014 at 10:02 PM. |
|
|
|
|
02-05-2014, 10:26 PM
|
#1259 | |
|
Old and crusty
Join Date: Jan 2009
Location: Surprise, AZ
Posts: 462
|
Re: Markeb01 Build Thread
Quote:
__________________
65 Chevy long wide daily driver - SOLD! 64 Chevy Short Step LS |
|
|
|
|
|
02-05-2014, 10:50 PM
|
#1260 |
|
Rollin' Old Skool
Join Date: Jun 2007
Location: Hattiesburg, MS
Posts: 5,371
|
Re: Markeb01 Build Thread
Been following along, but I haven't commented. I figured it gets old saying awesome work after every post,
 , but you're just that good! Congrats on getting the wiring 99% wrapped up, and very clean work as always. The seat covers look great as well, & I look forward to seeing them installed once it warms up. We got a rare ice/snow storm around this area last week, & it was chaos for a few days. I can't imagine living in the winter conditions that some of you guys experience. I'm ready for consistently warmer weather (hopefully around the corner), so that I can get back to cruise-ins & car/truck shows. Btw, I can't wait to see how that emblem turns out too. , but you're just that good! Congrats on getting the wiring 99% wrapped up, and very clean work as always. The seat covers look great as well, & I look forward to seeing them installed once it warms up. We got a rare ice/snow storm around this area last week, & it was chaos for a few days. I can't imagine living in the winter conditions that some of you guys experience. I'm ready for consistently warmer weather (hopefully around the corner), so that I can get back to cruise-ins & car/truck shows. Btw, I can't wait to see how that emblem turns out too.
__________________
_____________________________________________ Phillip My Build threads: 1966 Chevy C-10 "Black Betty" shortbed, fleetside, BBW, 327 V8/ Powerglide (under construction) http://67-72chevytrucks.com/vboard/s...ighlight=betty 1997 Chevy Tahoe, 2dr/2wd, mild custom (Daily driver) http://67-72chevytrucks.com/vboard/s...d.php?t=601142 Pics: '66 C-10 https://flic.kr/s/aHsjHWD4h9 '97 Tahoe https://flic.kr/s/aHsjGZ7wKP '93 C-1500 https://flic.kr/s/aHskxdpdnQ '88 S-10 Blazer https://flic.kr/s/aHsjYGx4Md Previous Rides: 1993 Chevy S-10 ext. cab, 4.3L, 4/5 drop (Sold) 1993 Chevy C-1500 short/step Retro-Rod (Sold) 1988 S-10 Blazer 2dr/2wd mild custom (Sold) |
|
|
|
|
02-06-2014, 11:40 AM
|
#1261 |
|
Registered User
Join Date: Jun 2012
Location: Portland
Posts: 1,330
|
Re: Markeb01 Build Thread
Awesome project! Good to see more GMCs getting the love. I may have missed it in this long thread, but where did you get or how did you make the gauge bezel? Seems like most aftermarket companies tailor to the Chevy version, but no love for the GMC. I'm still trying to figure out what I want to do for mine.
|
|
|
|
|
02-06-2014, 03:06 PM
|
#1262 |
|
Senior Enthusiast
Join Date: Feb 2007
Location: Spokane Valley, WA
Posts: 8,356
|
Re: Markeb01 Build Thread
Thanks Phillip, I almost wish I had drilled the door for the mounting screws before I dropped the emblem off for plating. I think its going to look sharp and unique once the insert area has been painted.
Siggy, after trying numerous and mostly boring dash layouts, I thought it would add more character if I could add something that simulated the general shape of the stock 1960 GMC dash insert: 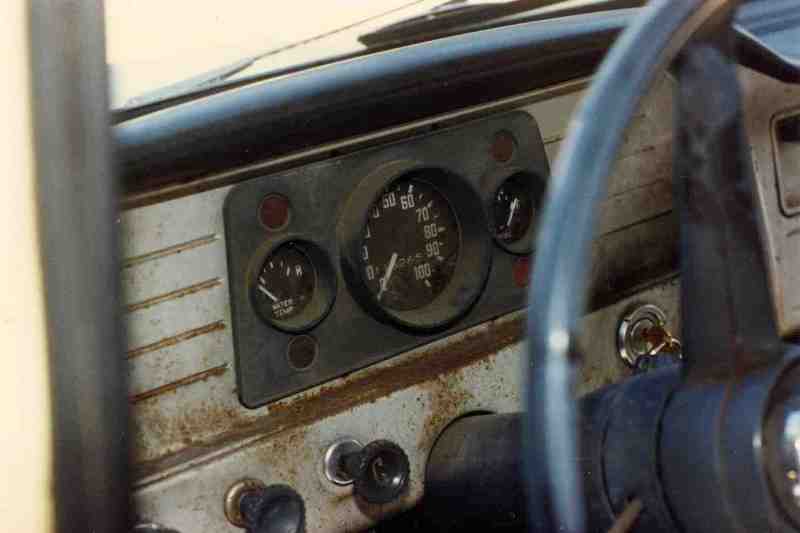 So while I was whittled up the steel back pan, my son fabricated the center panel out of aluminum. He was a machinist at the time with a lot of spare time available. He carved it up out of a chunk of aluminum on a mill with ball and end mill bits. Heres what it looked like before assembly: 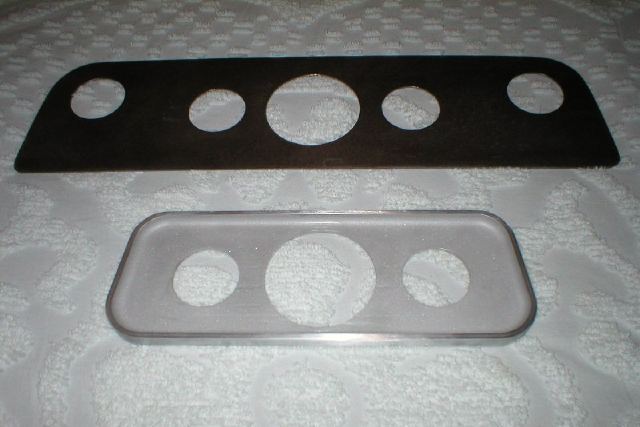 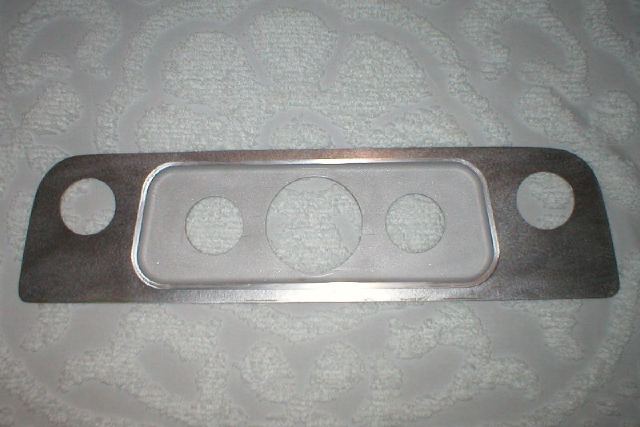 I added speed nuts around the perimeter of the sliced up original backing so I could easily remove the instrument cluster without scratching up the dash paint, which always happened when I tried pulling the steel original back pan. I thought about having it chromed, but settled on satin black on top of wrinkle black to give it some visual separation. Thanks for asking, and good luck on whatever you decide to do with yours. FYI if youre interested, the other various cluster layouts I tried before this one are shown on the first two pages of my build thread.
__________________
My Build Thread: http://67-72chevytrucks.com/vboard/s...d.php?t=444502 |
|
|
|
|
02-06-2014, 04:03 PM
|
#1263 |
|
Registered User
Join Date: Nov 2011
Location: fayetteville nc
Posts: 10,338
|
Re: Markeb01 Build Thread
Nice work on the wiring and the cluster will look great in the new housing your making.
__________________
1963 Short bed step side SBW 427 big block and borg warner T-16 HD 3 speed manual http://67-72chevytrucks.com/vboard/s...d.php?t=519869 1963 Short bed fleetside BBW 348 1st gen big block w/Powerglide http://67-72chevytrucks.com/vboard/s...d.php?t=619024 1964 Short bed trailer |
|
|
|
|
02-08-2014, 01:40 AM
|
#1264 |
|
Senior Enthusiast
Join Date: Feb 2007
Location: Spokane Valley, WA
Posts: 8,356
|
Re: Markeb01 Build Thread
Minor point of completion today. I picked up an electronic chime from Radio Shack a few days ago to use as a headlight reminder. Previously I used a headlight minder buzzer from Napa Auto. This is the old one:
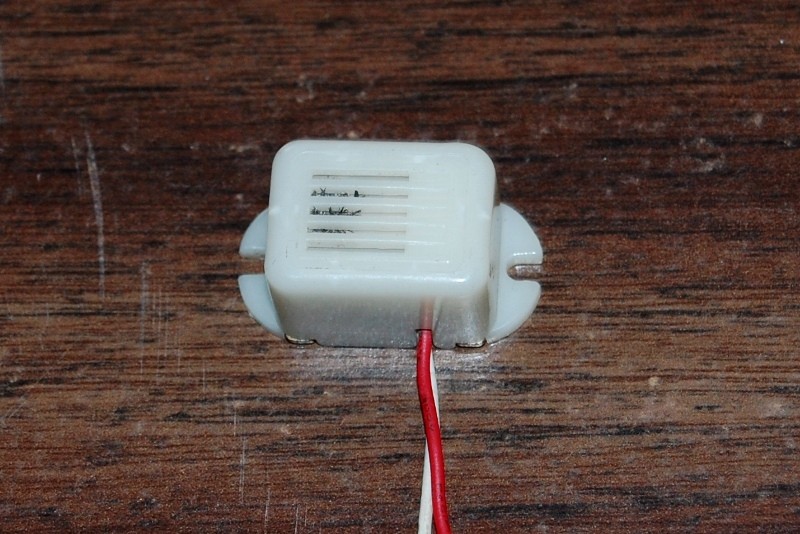 It is still in production and looks identical except it is now black, and the price has gone down. I think I spent around $10 on the old one 15-20 years ago. The new one is currently $5.99. I stuck it to the bottom of the old fuse panel, and connected the two short wires to different terminals on the panel. This photo of the old fuse panel is around 10 years old. Adding the buzzer was a simple 2 minute project:  I anticipated the same amount of effort this time, but quickly realized there are no longer any attachments at the fuse panel controlling the headlights or dash lights. All are now fed by the headlight switch. So I needed to locate another source of power for the chime. I still don’t want any unnecessary splices anywhere in the system, so I thought about the nearest source of dash light power and came up with the under dash gauge panel. I took a look at the wiring photos, and realized the harness connector for the lighting had two slots, one with one terminal, and another with two. I can terminate two wires easily, so I pulled the panel, and added another feed wire at the point shown by the arrow: 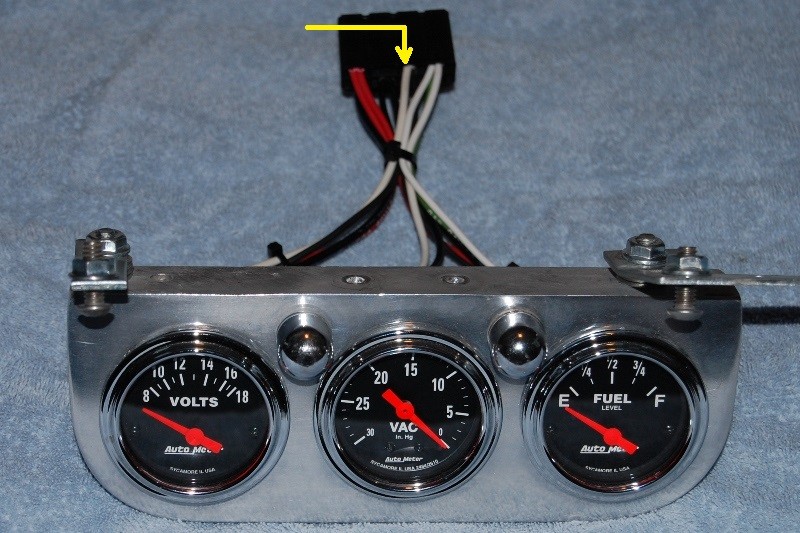 I added a factory disconnect coupler at the other end, so I can easily replace the chime if it ever fails. Here’s the new chime: 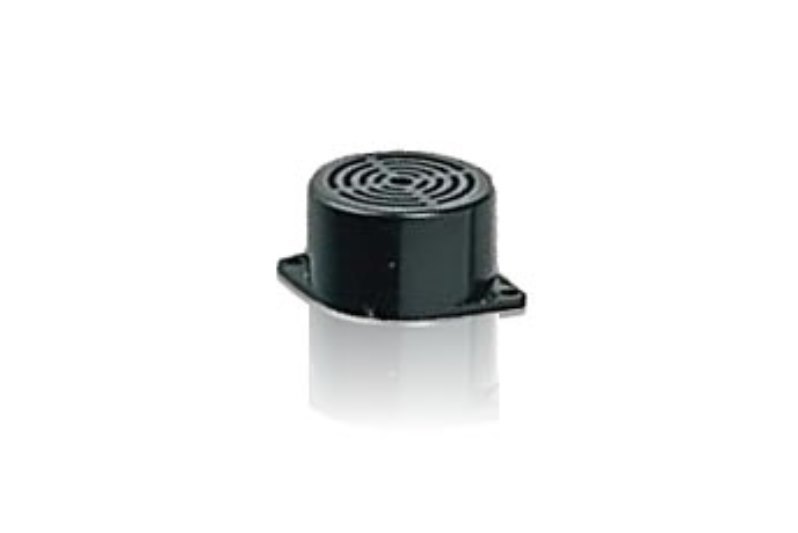 And here it is shown upside down: 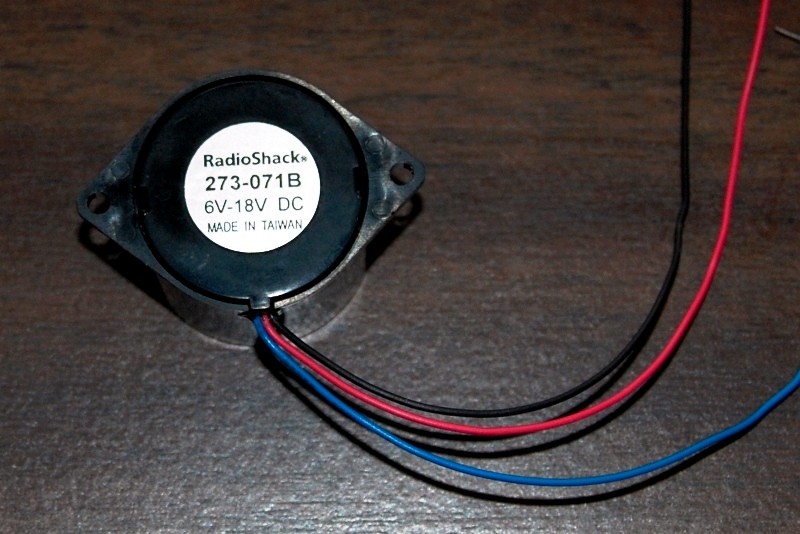 It is part number 273-071. The bag was marked 273-071, but the device is marked 273-071B. I’m not sure if there is any difference but it works fine and isn’t too loud. Due to the slightly larger size, it was mounted on top of the fuse panel using a small Velcro patch instead of double stick tape. Should it ever burn out, replacement will be clean and easy: 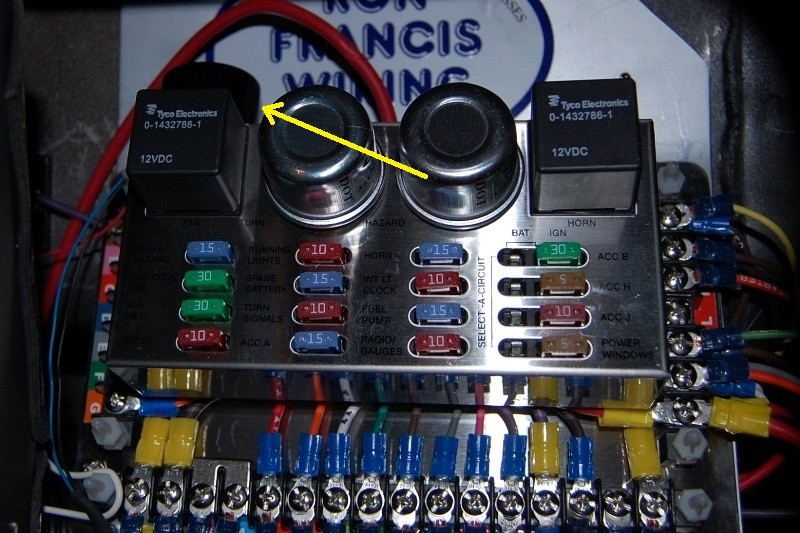 It works perfectly, and is much less annoying than the buzzer. I also went through and resized the fuses to match which circuit each is protecting.
__________________
My Build Thread: http://67-72chevytrucks.com/vboard/s...d.php?t=444502 |
|
|
|
|
02-08-2014, 10:54 AM
|
#1265 |
|
Registered User
Join Date: Dec 2006
Location: SLC, UT
Posts: 706
|
Re: Markeb01 Build Thread
I love everything about your truck.
Thank you for documenting your journey. There are a lot of cool tricks that others will benefit from seeing. |
|
|
|
|
02-08-2014, 12:24 PM
|
#1266 | |
|
Registered User
Join Date: Apr 2012
Location: Searcy, AR
Posts: 4,203
|
Re: Markeb01 Build Thread
Quote:
 I Must Agree! THANKS Again Mark!!! 
__________________
DON Proverbs 27:17 US Air Force Retarded errr Retired My '65 Stepper Build:http://67-72chevytrucks.com/vboard/s...d.php?t=533920 My '60 Rusty Patina Build:http://67-72chevytrucks.com/vboard/s...66#post7402266 My '72 http://67-72chevytrucks.com/vboard/s...59#post7204359 SOLD |
|
|
|
|
|
02-09-2014, 08:37 PM
|
#1267 |
|
Senior Enthusiast
Join Date: Feb 2007
Location: Spokane Valley, WA
Posts: 8,356
|
Re: Markeb01 Build Thread
Thanks for the comments and checking in.
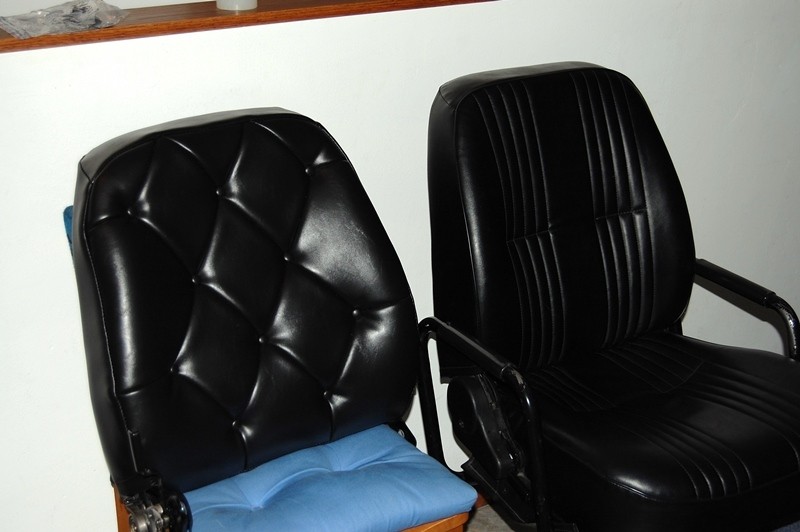
The tie down style button forms arrived yesterday, so I set up the press to begin assembling new buttons. This inspired me to get started installing the seat covers. The bottoms were easiest so I did both of those first, and they turned out beautifully. My son created the new upholstery to exactly match the sizing of the originals, making it very easy to fit them perfectly using all the factory connecting points. This is an original Procar seat: 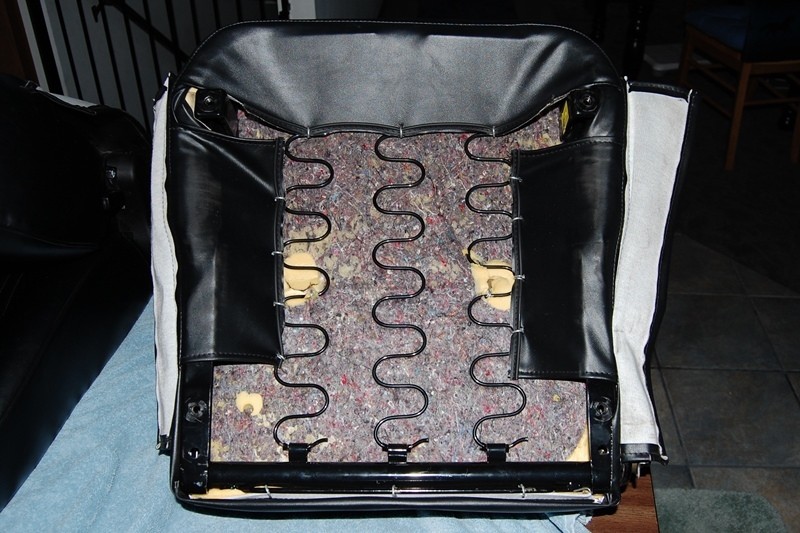 And this is the new diamond sewn seat cover minus the side flaps I wanted to delete:  I had to hold up finishing the backs, because I misplaced some of the listing wires. I knew they were critical so I put them in a safe place. I spent hours looking and couldnt find them, so I gave up and went to bed. With a fresh brain first thing this morning, I checked my desk (which was very near where I stripped the original cover before sending it to California) and there were the wires resting where I left them under a pile of papers! Five minutes later the first back was completed. It only took a few more minutes to finish the second back. It took about another hour to cut all the mounting holes in the fabric and assemble both seats. Heres what they look like in the truck:   I had him leave the concealing flaps off the sides. I thought they looked kind of silly, and would prefer having a clear view of the brackets. If I ever tire of open look, Ill make some simple upholstered panels and attach them to the seat brackets with Velcro. The original intention was to add buttons at the diamond intersections, allowing the seats to more closely match the diamond tufted panels. For now Im leaving them off. Unlike getting in and out of a chair where a person normally lifts up and forward, I scrub and grind across the seat getting in and out of the truck. Im concerned this may put excessive stress on the buttons and/or the button covers. The buttons may also add discomfort to my already sensitive back situation. The new seat covers are so incredibly comfortable and luxurious feeling compared to the originals, they are going to remain sans buttons, at least for now. The first attempt with true diamond tufted seats (shown below) made me feel like I was sitting on top of a beach ball. Although they looked pretty cool and exactly matched the door panels, the extra thick backs shortened the seat even further, ruining the driving experience: 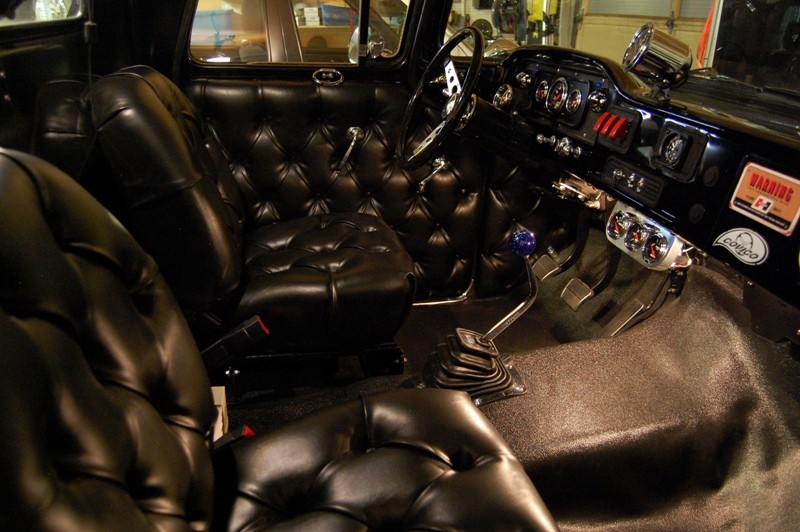 Diamond sewn seat covers was the best compromise I came up with. The new covers conform completely to the seats leaving the driving position exactly as it was prior to the upgrade. They are also more comfortable than ever before. In another couple of weeks the GMC emblem will go on the glove box door completing the interior for now. Who knows, perhaps a diamond headliner will still materialize sometime in the future.
__________________
My Build Thread: http://67-72chevytrucks.com/vboard/s...d.php?t=444502 |
|
|
|
|
02-10-2014, 02:21 AM
|
#1268 |
|
Senior Enthusiast
Join Date: Feb 2007
Location: Spokane Valley, WA
Posts: 8,356
|
Re: Markeb01 Build Thread
Studying the photos Ive come to accept the new seat covers arent living up to their potential without buttons. In real life they look fine. In photos they look really disappointing. So if I can possibly accomplish the task, the seats will grow buttons tomorrow. I also realized if the seat bottom cushion buttons ever have problems, it wont be much of an issue because they are easily replaced (compared to the back cushions).
__________________
My Build Thread: http://67-72chevytrucks.com/vboard/s...d.php?t=444502 |
|
|
|
|
02-10-2014, 09:42 AM
|
#1269 |
|
Registered User
Join Date: Jun 2012
Location: Selkirk Ontario Canada
Posts: 1,141
|
Re: Markeb01 Build Thread
did you sit on them yet ..how does it feel with out the buttons
__________________
My 63 GMC Panel Slow Build http://67-72chevytrucks.com/vboard/s...=1#post5457281 63
|
|
|
|
|
02-10-2014, 11:40 AM
|
#1270 |
|
Senior Enthusiast
Join Date: Feb 2007
Location: Spokane Valley, WA
Posts: 8,356
|
Re: Markeb01 Build Thread
They feel exactly like they did before, except with about 1/4" more padding (sewn into the covers), and with much more pliable vinyl. When sat upon, the upholstery presses down into the curvature of the seat cushions, unlike my tufted versions which did not.
Adding the buttons will pull the covers tight against the cushions and make the look more shapely, although I suppose a few weeks of use without buttons would do the same thing. I'm going to assemble enough buttons to do the whole job and then see if I proceed or not. The bottom cushions will be easy because the whole seat is open underneath. The backs won't be easy. One of the benefits of these seats is how easy they are to recover because they did them the lazy way at the factory. The backs are like pillow cases that just slide down from the top and clever engineering hides the exposed foam at the sides of the bottom. To install buttons Ill have to open the seat covers at the bottom, and work my arm up inside the back to secure the buttons. There isnt much stretch available to reach all the way to the top, so Im not sure if adding the buttons is even possible unless I give it a shot.
__________________
My Build Thread: http://67-72chevytrucks.com/vboard/s...d.php?t=444502 |
|
|
|
|
02-10-2014, 01:46 PM
|
#1271 |
|
Registered User
Join Date: Sep 2011
Location: Tacoma, WA
Posts: 2,425
|
Re: Markeb01 Build Thread
Your seats look absolutely wonderful Mark !!
Another fantastic job
__________________
Michael McMurphy My 66 Stepside My 64 Tow Truck My 66 Tempest Table Of Contents Added to Page1 |
|
|
|
|
02-11-2014, 03:32 AM
|
#1272 |
|
Senior Enthusiast
Join Date: Feb 2007
Location: Spokane Valley, WA
Posts: 8,356
|
Re: Markeb01 Build Thread
Thanks Mike. Im pretty sure they look even better now. Today was a 14 hour effort installing buttons on the new seat covers. Heres the first piece completed (the passenger back) compared to an unmodified Procar seat:
 And this is how the truck interior looks tonight. The pictures dont do them justice. They look spectacular in real life: 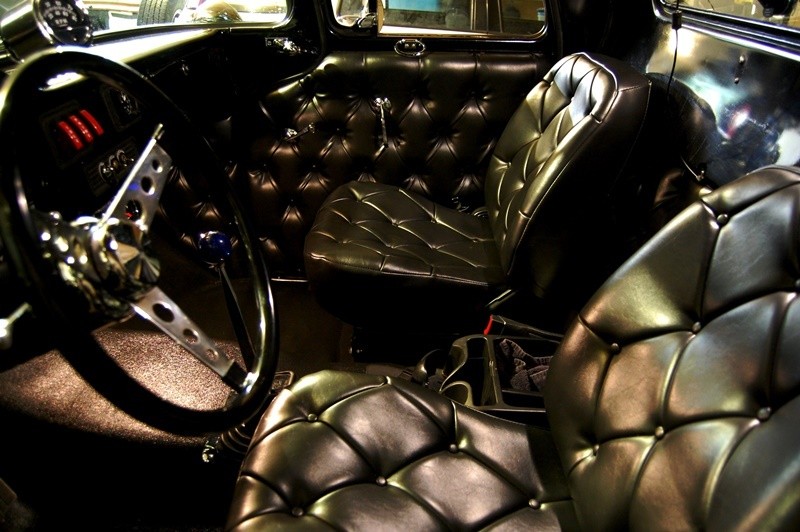 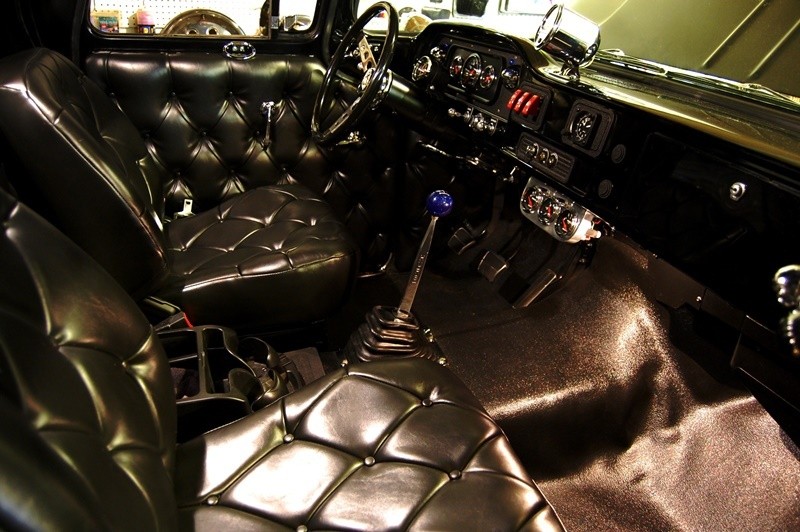 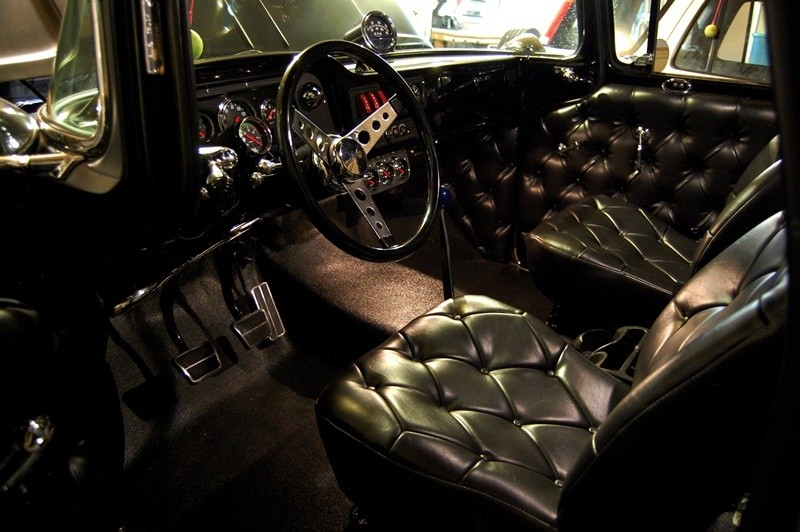 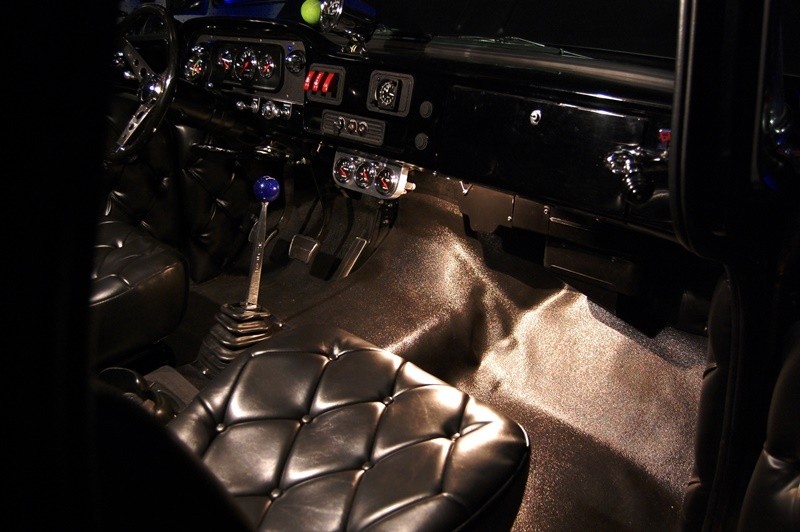 Now the covers are back to being the shape of the seats. To the uneducated they could easily pass for diamond tufted upholstery. Also the buttons are all below the surface of the cushions, so I neednt have worried about the scrubbing or wear issues. They are so incredibly comfortable we didnt want to get out of the truck, sitting in the nearly freezing cold garage! After the wiring and upholstery marathons I really am ready for a break! I just wish the weather would improve so I could get it out of the garage and determine how much better the exhaust cutouts sound with the new seat covers!
__________________
My Build Thread: http://67-72chevytrucks.com/vboard/s...d.php?t=444502 |
|
|
|
|
02-11-2014, 03:55 AM
|
#1273 |
|
Registered User
Join Date: Nov 2009
Location: Galt, Calif
Posts: 2,437
|
Re: Markeb01 Build Thread
Mark your over the top with it....awesome job.. a quote from you..(The temps are tolerable in the garage, but the side benefit is an all-day headache from the combustion fumes.) careful Mark...thats carbon-monoxide poisoning, first stage....! Even first stages can lead to a host of other issues, we don`t want to lose your valuble input here...!
__________________
`64 C10 vortec 350/350/373 posi `69 RS/SS 350/350/308 `37 Ford 406/350/324 traclock `68 Dart 370/904/323 suregrip |
|
|
|
|
02-11-2014, 04:38 AM
|
#1274 |
|
Senior Enthusiast
Join Date: Feb 2007
Location: Spokane Valley, WA
Posts: 8,356
|
Re: Markeb01 Build Thread
Thanks for the concern and input Rich. Thankfully my garage projects are done until spring. I've had enough!
__________________
My Build Thread: http://67-72chevytrucks.com/vboard/s...d.php?t=444502 |
|
|
|
|
02-11-2014, 10:54 AM
|
#1275 |
|
Rollin' Old Skool
Join Date: Jun 2007
Location: Hattiesburg, MS
Posts: 5,371
|
Re: Markeb01 Build Thread
Seats look great Mark; awesome job! I'm glad you reconsidered & installed the buttons, as I think it definitely looks best that way & ties everything together. Take a well deserved break, & hopefully warm weather will approach sooner than later.
__________________
_____________________________________________ Phillip My Build threads: 1966 Chevy C-10 "Black Betty" shortbed, fleetside, BBW, 327 V8/ Powerglide (under construction) http://67-72chevytrucks.com/vboard/s...ighlight=betty 1997 Chevy Tahoe, 2dr/2wd, mild custom (Daily driver) http://67-72chevytrucks.com/vboard/s...d.php?t=601142 Pics: '66 C-10 https://flic.kr/s/aHsjHWD4h9 '97 Tahoe https://flic.kr/s/aHsjGZ7wKP '93 C-1500 https://flic.kr/s/aHskxdpdnQ '88 S-10 Blazer https://flic.kr/s/aHsjYGx4Md Previous Rides: 1993 Chevy S-10 ext. cab, 4.3L, 4/5 drop (Sold) 1993 Chevy C-1500 short/step Retro-Rod (Sold) 1988 S-10 Blazer 2dr/2wd mild custom (Sold) |
|
|
|
 |
| Bookmarks |
| Thread Tools | |
| Display Modes | |
|
|


 Linear Mode

