
|
Register or Log In To remove these advertisements. |
|
|
|
|||||||
 |
|
|
Thread Tools | Display Modes |
 12-15-2023, 08:19 PM
|
#1 |
|
Senior Member
 Join Date: Mar 2022
Location: Lucas, TX
Posts: 458
|
Draft tube, oil leak, cracked end cap, pulled engine
I have a 261 cubic inch straight six out of a 1959 Chevy. What options are there to eliminating the road draft tube? I've heard about using a grommet and a modern PCV valve with tubing to the intake manifold, but worry that the small tubing may create back pressure on the engine. Thoughts?
__________________
1953 Chevy 3100 - 5 window 1/2 ton pickup My 1953 Chevy Work-In-Process Photo Gallery "I don't have a carbon footprint, I drive everywhere." Last edited by TX3100Guy; 01-23-2024 at 11:41 PM. |

|

|
|
12-15-2023, 11:50 PM
|
#2 |
|
Registered User
Join Date: Jul 2007
Location: Toppenish, WA
Posts: 15,286
|
Re: Eliminate draft tube options
Back pressure on the engine? Explain this please, as I am not understanding how that is possible when you get away from the guys at the spit and whittle club.
The way you mentioned is how Deve's Technical network shows http://devestechnet.com/Home/PCVInstall The second shot is from this 2014 thread. One of the members wanted a road draft tube that had been set up for PCV. This is similar to how I have done a couple over the past 50 years. Cut the road draft tube off about an inch or so out from the upright part, Either put in your grommet for the pcv valve or set it up for a fitting to connect the hose to and hook it up. You can get a PCV valve that will either screw into the intake with or without an adapter or one that connects to the road draft tube either with a grommet or to a fitting that is in the end of that tube like the photo shows. https://67-72chevytrucks.com/vboard/...d.php?t=635148 I'm wondering if any of those guys have even been on the board lately. Checking, Midlifer is the only one who is still active on the board and Newfisher was last on here in 2022. You have to change the oil cap for a breather cap so air can go in. if it has a regular oil filler cap. This diagram is a V8 but shows that you want air flowing in, through the crank case and flowing out through the PCV valve into the intake to be burned and flow out the tailpipe. That usually eliminates the blowby from flowing out from under the truck in a cloud as you are trying to impress the hottie in the sporty car in the next lane with your cool truck. 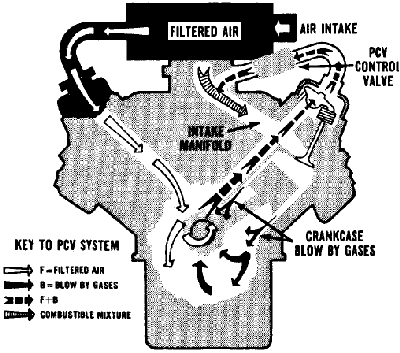
__________________
Founding member of the too many projects, too little time and money club. My ongoing truck projects: 48 Chev 3100 that will run a 292 Six. 71 GMC 2500 that is getting a Cad 500 transplant. 77 C 30 dualie, 454, 4 speed with a 10 foot flatbed and hoist. It does the heavy work and hauls the projects around. Last edited by mr48chev; 12-15-2023 at 11:57 PM. |
|
|
|
|
12-16-2023, 12:39 AM
|
#3 |
|
Registered User
Join Date: Nov 2010
Location: calgary alberta
Posts: 7,829
|
Re: Eliminate draft tube options
are you trying to get rid of the tube for aesthetics or are you trying to be nore eco friendly?
if using the original draft tube with a pcv valve in it you could plug the end at the bottom with a frost plug that has a small valve in it so you can drain out any residue that collects down there. it would look kinda stock still except for the vac line and pcv valve inserted further up the tube. that way the oil that comes out with the air will drop out in the tube and collect at the bottom for you to drain out. if there is a way for you to install some course stainless steel wool in the tube, before the pcv valve, that would also catch some oil but you would need a screen so it doesn't start to get sucked into the pcv valve. mr48 prolly knows more about it than me cuz I usually just keave them stock or upgrade them to a modern engine rather than rebuilding etc. |

|
|
|
12-16-2023, 01:38 AM
|
#4 |
|
Registered User
Join Date: Aug 2009
Location: Bowser
Posts: 13,515
|
Re: Eliminate draft tube options
Considering your motor is supercharged, a common pcv set up likely won’t be able to handle the volume of fumes.
You should look into a pan evacuation system. Like this one. https://www.moroso.com/crankcase-eva...n-system25900/ |
|
|
|
|
12-16-2023, 10:37 AM
|
#5 |
|
Registered User
Join Date: Nov 2010
Location: calgary alberta
Posts: 7,829
|
Re: Eliminate draft tube options
oh right, I forgot there is a cool old superchrger on this one.
rethink that pcv system. are you wanting to eliminate the draft tube because it doesn't work, it's messy or you want to upgrade for some reason? |
|
|
|
|
12-16-2023, 12:45 PM
|
#6 |
|
Senior Member
Join Date: Mar 2022
Location: Lucas, TX
Posts: 458
|
Re: Eliminate draft tube options
ok, here is the full story. A year ago I did see the article on Deve's website and bought his kit with a grommet, PCV, and stainless steel tubing over to my intake manifold. It enters the manifold at a tee fitting. The other side of the Tee fitting is a vacuum/boost sensor since I need to monitor that for the supercharger. Another sensor is affixed to the fuel pressure regulator to ensure that fuel pressure increases as normal vacuum at idle increases to boost pressure when the supercharger engages in higher rpm modes.
As I started test driving the truck, I was looking for any leaks given all the work done to the engine, transmission, brakes, and quick change differential. I noticed a drop here or there, which I would address but nothing major. Idling in the garage and/or the driveway produced no oil spotting (which make my wife happy) until I parked it overnight, then I noticed not a drip, but a puddle under the front of the engine. I'll spare you all the details of where and how I looked for the source of the leak, but I traced it to coming from behind the crank pulley. Given all the customization that's been done under the hood of this truck, that entailed removing the drivers side outer and inner fenders, the alternator and AC compressor, to get the radiator out so that I could get to the crank pulley/balancer. Luckily I hadn't yet installed the grille. The oil wasn't coming from the seal around the crank as I had surmised, instead it was coming from the bottom of the timing cover. Turns out, one of the bolts holding the bottom of the cover was stripped and the oil was coming out of the bolt hole. In the end, I used a tap to enlarge the hole one bolt size (fine thread) and eventually taped both of the holes of the timing cover and block. They are now held securely with Grade 8 - 7/16 bolts instead of the 3/8 that were there. I told this story to a good friend about the oil leak and before I could finish my thought, he asked me "did you try to rig up a PCV instead of the road draft tube". When I answered yes, he told me a story about doing something similar to an old Merc engine and that the amount of blowby coming out of the draft tube opening created a problem with some of the seals on his engine creating an oil leak. This is what got me thinking about setting up an alternative arrangement to the one I installed from Deve.
__________________
1953 Chevy 3100 - 5 window 1/2 ton pickup My 1953 Chevy Work-In-Process Photo Gallery "I don't have a carbon footprint, I drive everywhere." |
|
|
|
|
12-16-2023, 12:49 PM
|
#7 | |
|
Senior Member
Join Date: Mar 2022
Location: Lucas, TX
Posts: 458
|
Re: Eliminate draft tube options
Quote:
__________________
1953 Chevy 3100 - 5 window 1/2 ton pickup My 1953 Chevy Work-In-Process Photo Gallery "I don't have a carbon footprint, I drive everywhere." |
|
|
|
|
|
12-16-2023, 04:17 PM
|
#8 |
|
Senior Member
Join Date: Mar 2022
Location: Lucas, TX
Posts: 458
|
Re: Eliminate draft tube options
After a morning and partial afternoons work, I can assuredly say that the draft tube setup isn't even partially responsible for the oil leak and neither were the two stripped bolts at the bottom of the timing cover........
After reassembling all the parts that I had to take off the truck in order to get to the timing cover, I started the truck up and a constant drip was coming under the front engine mount. I'm not sure how the stock engine was mounted, but this engine is mounted to the front cross member under the front center of the engine. The front of the oil pan just clears this mounting point by about 1/2 inch. I can see that no oil is coming from the oil pan edges (front or sides) but the drip starts at the back edge of this front motor mounting point. Given that the radiator and crank pulley are reinstalled, its hard to completely see the timing cover, but the source of the oil doesn't appear to be from the front of the engine, although until I find the source, anything is possible. The photo below shows the drip. If I run the engine enough and there is enough dripping oil, it will also seep through the motor mount bolts that are illustrated too.
__________________
1953 Chevy 3100 - 5 window 1/2 ton pickup My 1953 Chevy Work-In-Process Photo Gallery "I don't have a carbon footprint, I drive everywhere." |
|
|
|
|
12-16-2023, 04:52 PM
|
#9 |
|
Registered User
Join Date: Aug 2009
Location: Bowser
Posts: 13,515
|
Re: Eliminate draft tube options
|
|
|
|
|
12-16-2023, 06:12 PM
|
#10 | |
|
Senior Member
Join Date: Mar 2022
Location: Lucas, TX
Posts: 458
|
Re: Eliminate draft tube options
Quote:
This afternoon, I backed the truck up from the shop to get it on the four post lift so I'd have a better view. I even fashioned a diaper for it to keep it from dripping. Needless to say, the diaper was not successful. The truck appears to be leaking more oil than before I worked on the timing cover bolts. I probably lost 1/2 quart just backing it out and pulling onto the four post lift. I have quite a mess to clean up......
__________________
1953 Chevy 3100 - 5 window 1/2 ton pickup My 1953 Chevy Work-In-Process Photo Gallery "I don't have a carbon footprint, I drive everywhere." Last edited by TX3100Guy; 12-16-2023 at 06:42 PM. |
|
|
|
|
|
12-16-2023, 07:17 PM
|
#11 |
|
Senior Member
Join Date: Mar 2022
Location: Lucas, TX
Posts: 458
|
Re: Eliminate draft tube options
Because I know that no one here is shy about expressing an opinion, I'm going to suggest my next moves and see what folks think.
I'm reluctant to take the entire front of the truck apart again unless I absolutely have to. So my thought is to unbolt the engine mount bolts, then use a bottle jack with a pieces of 2 x 4 on it under the front of the oil pan to lift the engine an inch or so, so that I can attempt to see where the oil is coming from. I've already ordered the dye and have a black light flashlight to attempt to spot the leak location. 1) put dye in the oil 2) start and run engine until I see the drip. 3) stop engine and unbolt the motor mount bolts 4) use the bottle jack and 2x4 to lift the engine under the oil pan 5) once the engine is clear of the mount, use the black light o look for the leak location. Thoughts? Alternatives?
__________________
1953 Chevy 3100 - 5 window 1/2 ton pickup My 1953 Chevy Work-In-Process Photo Gallery "I don't have a carbon footprint, I drive everywhere." |
|
|
|
|
12-16-2023, 11:48 PM
|
#12 |
|
Registered User
Join Date: Nov 2010
Location: calgary alberta
Posts: 7,829
|
Re: Eliminate draft tube options
ok, as a journeyman heavy duty mechanic, I have seen my share of hard to find oil leaks. I have used the dye and several other methods of detection but here is what I would suggest to do after jacking it up and setting it on stands at the same angle it normally sits at when it is on the ground. this is going to assume you have already checked for an internal engine venting problem, the oil level is correct when hot, the oil grade is correct and not diluted, doesn't have a gassey odor like it is diluted, the fuel pump has been checked for any leakage at the vent hole and gasket, the water pump weap home is dry, all the hose clamps for coolant etc are tight and don't show signs of weaping, etc etc
-1- start the engine and warm it up to get the oil warm and as thin as it is gonna get -2-let it sit for a bit to give any oil sitting in a seal lip or anything like that some time to finish finding its way out. -3- if you have any loose paint or rust in the area scrape that off as sometimes it can hold the old moisture behind it. I use an old wood chisel for this and it works pretty well. wire brush the area if you can access it. -4-check all the gaskets to ensure there isn't one that has a missing piece or has been overtightened and is squished out. look at the front crank seal as good as you can to see if there are any "clean" spots where the oil leak has washed away everything. also check the oil pan and front cover for wet spots that re-appear after wiping off. these can be caused from pin holes rusted through from the inside. -5- spray copious amounts of brake cleaner on the area and blow it all dry starting at the top and working down from there. ensure to clean out any blind bolt holes etc. if you have any damp areas respray those. do the area around the crank pulley and any gasket surfaces as good as you can. keep an eye out for any spots that seem to re-wet themselves as those can be where the problem is. -6-get some good lighting set up. personally I use a small LED penlight that is super bright and can fit into tight spots. have an inspection mirror handy and set yourself up to be able to crawl around under the truck. if you have a hoist, awesome. set it low enough so you can see up as far as possible on the engine -7- start it up and let it run for a few minutes, long enough to show up any oil leaks, then shut it off and get under there with your light and mirror. if you find a leak keep working your way up until the wet spot dissappears and then check very carefully in that area. -8- if still having trouble you can try sealing up the obvious leak spots, like the oil filler or vent cap and then apply a slight pressure with compressed air (and an air pressure regulator) through the dipstick tube. then recheck as above. -9- I have used the dye as a last resort because I find once the dye is outta the leak it seems to spread all over along gasket surfaces and casting bumps and you spend more time cleaning the area and positioning the blacklight that you do actually looking. I mean, sometimes it is obvious, but for those hard to find leaks I always do the other way first. if you have the engine jacked up be carefull starting it as sometimes the fan can interfere with the rad or hoses or wiring or a fuel line can get stretched etc. |
|
|
|
|
12-17-2023, 01:30 AM
|
#13 |
|
Registered User
Join Date: Mar 2022
Location: Surrey BC
Posts: 686
|
Re: Eliminate draft tube options
there is a pressure feed to the nozzle that oils cam gear, it passes through the front plate/engine mount and is a common source of leaks between the plate and block
|
|
|
|
|
12-17-2023, 01:43 AM
|
#14 | |
|
Senior Member
Join Date: Mar 2022
Location: Lucas, TX
Posts: 458
|
Re: Eliminate draft tube options
Quote:
__________________
1953 Chevy 3100 - 5 window 1/2 ton pickup My 1953 Chevy Work-In-Process Photo Gallery "I don't have a carbon footprint, I drive everywhere." |
|
|
|
|
|
12-17-2023, 01:50 AM
|
#15 | |
|
Senior Member
Join Date: Mar 2022
Location: Lucas, TX
Posts: 458
|
Re: Eliminate draft tube options
Quote:
The front of the timing cover is dry (no obvious oil leaks). When I had the crank pulley/harmonic balancer off, the crank seal was moist but not a source of the leak and I think I would have seen a track of oil down the timing cover from that seal. So the front of the engine looks clean. From under the car, the oil pan gasket is solid and show no leaks or weeping anywhere along its circumference. The oil drip is coming from the center mounted engine mount, just below the front of the oil pan, yet the RTV that was generously applied to the front edge of the oil pan also is dry. I have touched paper towels to it and get no oil residue. The leak seems to be coming from somewhere between the front face of the block and the back edge of the block where the front/center motor mount is (see my photo in a post above). Could this be where the nozzle that you mention passes through? How do I check that, let alone get to where it is located? Thank you for the idea.
__________________
1953 Chevy 3100 - 5 window 1/2 ton pickup My 1953 Chevy Work-In-Process Photo Gallery "I don't have a carbon footprint, I drive everywhere." Last edited by TX3100Guy; 12-17-2023 at 02:14 PM. |
|
|
|
|
|
12-17-2023, 02:11 AM
|
#16 |
|
Registered User
Join Date: Jul 2007
Location: Toppenish, WA
Posts: 15,286
|
Re: Eliminate draft tube options
There are two causes for engine oil leaks where the oil isn't under pressure from the oil pump. Something wrong with the gasket's sealing or excess pressure in the crankcase and internal spaces of the engine connected to the crank case such as timing cover and valve cover.
When I built my T bucket in Texas I put two breather caps on the valve covers and no pcv valve. = all the race cars had two breathers. Even with a fresh re-ring job on the 283 there was always some signs of oil around the breathers. Worse if I was driving at highway speeds for a distance and I drove it to school and work every day in good weather that summer. When I needed an engine in my 48 we pulled the 283 out of the T and sold the T and I put it in the 48. It ran like a bandit in the 48 and 80 mph was 3000 rpm. The engine always had oil coming out of the breathers and I had removed and plugged the road draft tube on the 61 engine. Dumb move by a 28 year old who should have known better but didn't figure it out until he read an article in a magazine about running a pcv valve system to alleviate the exact same issue I was having. 6 bucks worth of parts later I was in business and my oil mess went down a ton. Road draft tubes work but they only work when there is a decent air flow going past the end of the tube and the end of the tube is meeting that air flow just right, that is using venturi effect to draw the fumes through and out the engine into the air stream but does nothing when the vehicle is sitting at a stand still except let fumes if they are being pushed out by blow by drift up around the front of the car. Older guys always can remember that car in town that had a cloud of oil smoke around the front of it at every stop light. I'm not well versed in dealing with crank case pressure on a blower motor. I'm not sure the one guy that I know or knew is still alive or able to tell you. He drove a 29 Model A with a small block Chev with a 671 on the street and towed a camp trailer with it. He also crewed a AA fuel dragster at major meets.
__________________
Founding member of the too many projects, too little time and money club. My ongoing truck projects: 48 Chev 3100 that will run a 292 Six. 71 GMC 2500 that is getting a Cad 500 transplant. 77 C 30 dualie, 454, 4 speed with a 10 foot flatbed and hoist. It does the heavy work and hauls the projects around. |
|
|
|
|
12-17-2023, 02:16 AM
|
#17 |
|
Registered User
Join Date: Jul 2007
Location: Toppenish, WA
Posts: 15,286
|
Re: Eliminate draft tube options
Interesting reading here that might help. https://www.hotrodders.com/threads/p...or-not.445290/
__________________
Founding member of the too many projects, too little time and money club. My ongoing truck projects: 48 Chev 3100 that will run a 292 Six. 71 GMC 2500 that is getting a Cad 500 transplant. 77 C 30 dualie, 454, 4 speed with a 10 foot flatbed and hoist. It does the heavy work and hauls the projects around. |
|
|
|
|
12-17-2023, 03:02 AM
|
#18 |
|
Registered User
Join Date: Mar 2022
Location: Surrey BC
Posts: 686
|
Re: Eliminate draft tube options
Can't tell from the picture from underneath.
I think your engine will have this plate on it that is between block and timing cover, that is also the motor mount? Arrow points to the plate red circle is approximate location of oil squirter that sprays the cam gears, where it passes through the plate to the block can be a leak, runs down between plate and block. |
|
|
|
|
12-17-2023, 03:15 AM
|
#19 |
|
Registered User
Join Date: Mar 2022
Location: Surrey BC
Posts: 686
|
Re: Eliminate draft tube options
I think a normal PVC valve will seal under pressure - like from backfire, so it will probably be fine with some amount of boost and not pressurize the engine.
Even if the PVC lets boost pressure into the block, unless it badly overwhelms the breather I don't see there being enough pressure to blow out a seal or gasket, but if it allowed the supercharger to pump an air fuel mix into the block and that popped anything is possible. |
|
|
|
|
12-17-2023, 11:21 AM
|
#20 |
|
Registered User
Join Date: Nov 2010
Location: calgary alberta
Posts: 7,829
|
Re: Eliminate draft tube options
when you had the front pulley off did you change the seal? sometimes hammering a new seal in can dislodge the tension spring on the seal lips and you don't see it unless you actually look inside there.
if I were you I would do all the check points and go from there. you may need to jack the engine up off the front mount so you can see the whole area. |
|
|
|
|
12-17-2023, 01:17 PM
|
#21 |
|
Senior Member
Join Date: Mar 2022
Location: Lucas, TX
Posts: 458
|
Re: Eliminate draft tube options
Lots of good thoughts in all the posts above. I'll tell you what I know at this point. When running the engine yesterday (all while it was leaking) I removed the rubber hose that connects the Deve PCV kit that I installed where it connects to my intake manifold. Of course I had to plug the manifold port due to vacuum loss (and at idle and about 2000 RPM, the vacuum was substantial). With my thumb over the stainless steel tube from the PCV there wasn't a very noticeable amount of pressure. Given the vacuum at the manifold, I suspect there is a very good flow from the PCV to the manifold via suction rather than actual PCV induced pressure.
The supercharger runs in two modes, low idle and then there is a kick down switch at about 75% throttle that engages an electric clutch on the pulley to provide significantly more boost. At this point, I've rarely had the supercharger into high boost mode, all the leaking is occurring at idle or somewhat faster RPM, but not at high boost. Lee's photo is very similar to my engine's timing cover (the shape of the cover is the same) and I do have the plate he is referencing and at least from what I can see up front, there is no leak, but it is directly behind that plate towards the middle of the engine that the oil seems to be coming from. As for the pulley/balancer, I didn't pound it back on, I used a pulley/harmonic balancer installation tool along with my impact wrench to slowly drive the pulley onto the crankshaft. The timing cover and its seal went untouched and both are new in the past year as I was rebuilding much of this truck. The wife and went to a Christmas party last night, that combined with my depression at having such a leak yesterday, I've decide to not work on the truck today while I summon up the energy and courage to get back out there tomorrow. My plan is to use my bore scope to probe around the places I can't see well (an idea friend at the party gave me), install some of the oil dye (on Tuesday when it arrives) run for a short while to circulate the oil and build up any pressure necessary to start the leaking, then jack up the engine an inch or so, and then use the bore scope and black light to search for the source of the leaking. @leegreen I suspect that the fix, if it is that nozzle behind the timing cover, will require that I re-disassemble the front part of the truck to get to the timing cover, removed the timing cover and see if the nozzle passing though the plate attached to the block needs fixed/replaced. Is that the idea?
__________________
1953 Chevy 3100 - 5 window 1/2 ton pickup My 1953 Chevy Work-In-Process Photo Gallery "I don't have a carbon footprint, I drive everywhere." |
|
|
|
|
12-17-2023, 03:44 PM
|
#22 |
|
Registered User
Join Date: Nov 2010
Location: calgary alberta
Posts: 7,829
|
Re: Eliminate draft tube options
Sorry to hear you're down in the dumps because of your luck with the truck. Dont worry, its fixable. It sounds like what LG is describing may be your issue if you cant find another reason. Unfortunately taking it apart again means some redo of what you just did, by the sounds of it, but it will be easier this time because you've already been there so you know where all the fasteners are and what has to come off first etc.
I know where you are coming from. I just dabbed some sheet metal parts for a window surround. Some really hard angles and tedious labour. It turned out great but it is 1/16" to wide. Gotta redo that. Wife says it's only me who will know. I said yup. Gonna redo it. |
|
|
|
|
12-17-2023, 04:08 PM
|
#23 | |
|
Senior Member
Join Date: Mar 2022
Location: Lucas, TX
Posts: 458
|
Re: Eliminate draft tube options
Quote:
I know what you mean about re-doing tasks that only you will see, as I've said before I have Automotive CDO (that's OCD in alphabetical order). If I know something isn't right it will bug the hell out of me until I fix it properly.
__________________
1953 Chevy 3100 - 5 window 1/2 ton pickup My 1953 Chevy Work-In-Process Photo Gallery "I don't have a carbon footprint, I drive everywhere." |
|
|
|
|
|
12-17-2023, 05:19 PM
|
#24 |
|
Senior Member
Join Date: Mar 2022
Location: Lucas, TX
Posts: 458
|
Re: Eliminate draft tube options
Found this video which illustrates what everything under the timing cover looks like, including the nozzle (squirter he calls it). I don't know if this view makes me feel better or worse given some of the things that he talks about that could produce a leak. The engine was completely rebuilt long before I acquired the truck, but it hadn't been run very much (if at all) since the rebuild.
https://www.youtube.com/watch?v=p2RAiCRke1I
__________________
1953 Chevy 3100 - 5 window 1/2 ton pickup My 1953 Chevy Work-In-Process Photo Gallery "I don't have a carbon footprint, I drive everywhere." |
|
|
|
|
12-17-2023, 05:22 PM
|
#25 |
|
Registered User
Join Date: Mar 2022
Location: Surrey BC
Posts: 686
|
Re: Eliminate draft tube options
it has probably close on 40 years since I have had one of those apart, but I think this is the gasket and that slot you see is pressurized oil for the nozzle
|
|
|
|
|
| Bookmarks |
|
|


 Linear Mode

