
|
 08-23-2013, 09:33 AM
|
#51 |
|
Registered User
Join Date: Jan 2013
Location: Apple Valley, CA
Posts: 275
|
Re: 74' by Jabes...
Long shift at work... well, hoping to get off my duff and align the truck today, get the power point working and tune more of the mid to top end portion of the tune. To many of you good morning!.. and for me goodnight!
|

|

|
|
08-23-2013, 10:55 AM
|
#52 |
|
Registered User
Join Date: Jul 2010
Location: los angeles,ca
Posts: 3,617
|
Re: 74' by Jabes...
love the truck man. looks good. i have a lot of homies that live in victorville. theyre the Emperors car club. hot rods,customs and a few bikes.
Posted via Mobile Device |
|
|
|
|
08-23-2013, 06:13 PM
|
#53 |
|
Registered User
Join Date: Jan 2013
Location: Apple Valley, CA
Posts: 275
|
Re: 74' by Jabes...
I just purchased a new HVLP kit from Eastwood. It consists of a 1.4 tip finishing gun and a 1.8 tip primer gun. Out to the garage I go...
|
|
|
|
|
08-24-2013, 05:29 PM
|
#54 |
|
Registered User
Join Date: Jan 2013
Location: Apple Valley, CA
Posts: 275
|
Re: 74' by Jabes...
I used the old string alignment method to align the toe my truck. The steering wheel was a little off center and it was pulling to the right. While this method gets it close enough, it is not as accurate as a computer alignment. The key to the string method is consistency, you have to consistently measure the same way, from the same point every time. Measure and measure again, make an adjustment and measure, measure, measure.
I move the truck forward and back a few times, check the steering pitman arm and make sure its straight back. The steering wheel should be straight. I do not have a steering wheel tool to keep it straight so I use the steering lock on the column. You need four jack stands and any type of string. I used some monofilament 10lb test. The distance the jacks are from the vehicle doesn't really matter or affect the toe setting, however you have the ensure the strings are parallel to the rear wheels and tight. There is a method to ensure the rearend is squared, I did not make this measurement. The easiest way I've found to square the jacks is to place them as close to the body as possible without the string coming into contact with it. The front string is placed about a 1/16th away from front bumper and the rear jack is moved in small increments to ensure the strings are parallel to the rear rim. I make my measurement from the lip. Both measurements are the same from the rear rims lips, like I mentioned before, measure and measure some more to ensure as best you can the string runs parallel. You set the other side up the in the same manner.  The string runs parallel to the rear rim and is tight. Do not come into contact with the string while making adjustments or your adjustments will be off and you will have to reset the strings.  The lip is where I measured from. (Rear wheel pictured.)  Same measurement. Rinse, lather and repeat with the other side. Pictures are hard to take ,but both strings are parallel. (Rear wheel pictured.)  Measure in the same manner. (Front wheel pictured.)  The front wheel is parallel here, from here I toe it in 1/16th of an inch. Total toe will be 1/8th of an inch to the front of the vehicle. I also made an adjustment to the powersteering... super easy. Find the appropriate 3/16ths allen wrench and a 5/8ths wrench. Loosen the locking bolt with the wrench, tighten the adjustment screw all the way down with the allen wrench and back it off a quarter turn. Done. The steering is more crisp to input. Last edited by Jabes1; 08-24-2013 at 05:38 PM. Reason: . |
|
|
|
|
08-24-2013, 05:41 PM
|
#55 |
|
Registered User
Join Date: Jan 2013
Location: Apple Valley, CA
Posts: 275
|
Re: 74' by Jabes...
I need to add some caster to the setup, but I'm going to wait until I install new poly bushings...
|
|
|
|
|
08-24-2013, 09:09 PM
|
#56 |
|
Registered User
Join Date: Jan 2013
Location: Apple Valley, CA
Posts: 275
|
Re: 74' by Jabes...
Power point is powered now... moving like a snail, but its better than surfing the couch.
|
|
|
|
|
08-25-2013, 08:57 PM
|
#57 | |
|
72 BB C30 Super LongHorn
 Join Date: Nov 2002
Location: Chavez Ravine
Posts: 1,606
|
Quote:
 Below is a link to my 75 project. Maybe we can meet up some time and share our trucks...
__________________
72 BB C/30 Longhorn Super HO72 No-Spin, #'s matching, Tilt, Tach, AC, AM/FM HO72 build : http://67-72chevytrucks.com/vboard/s...d.php?t=714492 2017 SS 
|
|
|
|
|
|
08-26-2013, 12:32 AM
|
#58 |
|
Registered User
Join Date: Jan 2013
Location: Apple Valley, CA
Posts: 275
|
Re: 74' by Jabes...
Thanks Hopped up!
Thanks RPO.. yeah, sounds good. The power point is working, so I was able to do some tuning on my truck today. The one thing I've learned is there is a lot of gray area when it comes to the C950's manual. It says set it up one way, however its not always the case and hasn't been for me. The truck wasn't accelerating like it should... turns out the point it goes into open loop was set too high. I lowered it to half of what Holley suggests and the truck is starting to feel like it should. WOT isn't as complete as I would like it to be, but I feel more confident while passing or maneuvering traffic. I did some more data logging and called it a night. On the way home, a fuse blew taking out my taillights and dash lights. I found my rearview filled with red and blue lights two blocks from home. It was dark, I couldn't see how fast I was going, but thanks to the grace of God, he pulled me over for my taillights. I explained everything just went out including the dash lights, showed him even the cab lights were out and the let me go and told me to look into it. Wheeeeew!  Middle of nowhere... the only safe place to work WOT mapping.  Something about the desert, vintage trucks and cool evenings... Last edited by Jabes1; 08-26-2013 at 12:33 AM. Reason: . |
|
|
|
|
09-04-2013, 05:14 PM
|
#59 |
|
Registered User
Join Date: Jan 2013
Location: Apple Valley, CA
Posts: 275
|
Re: 74' by Jabes...
Well... not much work has been going on. I've been pretty sick this last week, didn't even make it to the 50% off sale at the junkyard :/ I don't get sick very often due to the nature of my line of work, but when I do its usually pretty bad. Welllss bells... hope to get back on it soon!
__________________
Welcome to my build thread: http://67-72chevytrucks.com/vboard/s...d.php?t=574370 |
|
|
|
|
09-06-2013, 03:27 AM
|
#60 |
|
Registered User
Join Date: Jan 2013
Location: Apple Valley, CA
Posts: 275
|
Re: 74' by Jabes...
Picked up some more parts from Campbell Sport Trucks. Power mirrors, harness and matching door panels with controls for a deal I couldn't refuse. Thank you Sir!!! I'm still feeling pretty sick so no pics or work has been preformed.
Posted via Mobile Device
__________________
Welcome to my build thread: http://67-72chevytrucks.com/vboard/s...d.php?t=574370 |
|
|
|
|
09-10-2013, 12:58 AM
|
#61 |
|
Registered User
Join Date: Jan 2013
Location: Apple Valley, CA
Posts: 275
|
Re: 74' by Jabes...
Picked up some more parts today at the junkyard a Windstar dual fan with shroud, some Bosch relays off an S10 with holder, a few MAP sensors and a pretty cool cluster from a 67-72 Sub. Need to get some work done installing these...
__________________
Welcome to my build thread: http://67-72chevytrucks.com/vboard/s...d.php?t=574370 |
|
|
|
|
09-11-2013, 12:45 AM
|
#62 |
|
Registered User
Join Date: Jan 2013
Location: Apple Valley, CA
Posts: 275
|
Re: 74' by Jabes...
I'm starting to feel better, installed the Windstar fans today. You can google install on these fans, its pretty straight forward and there are about a million and a half how to's, so I won't bore you with another one. There are many versions of the fans installed, but this is how I did mine. The fan covers my radiator pretty well, side to side, it fits perfectly. There is some slight trimming needed, which I did with a jig saw. At this point I had not even washed the fan.
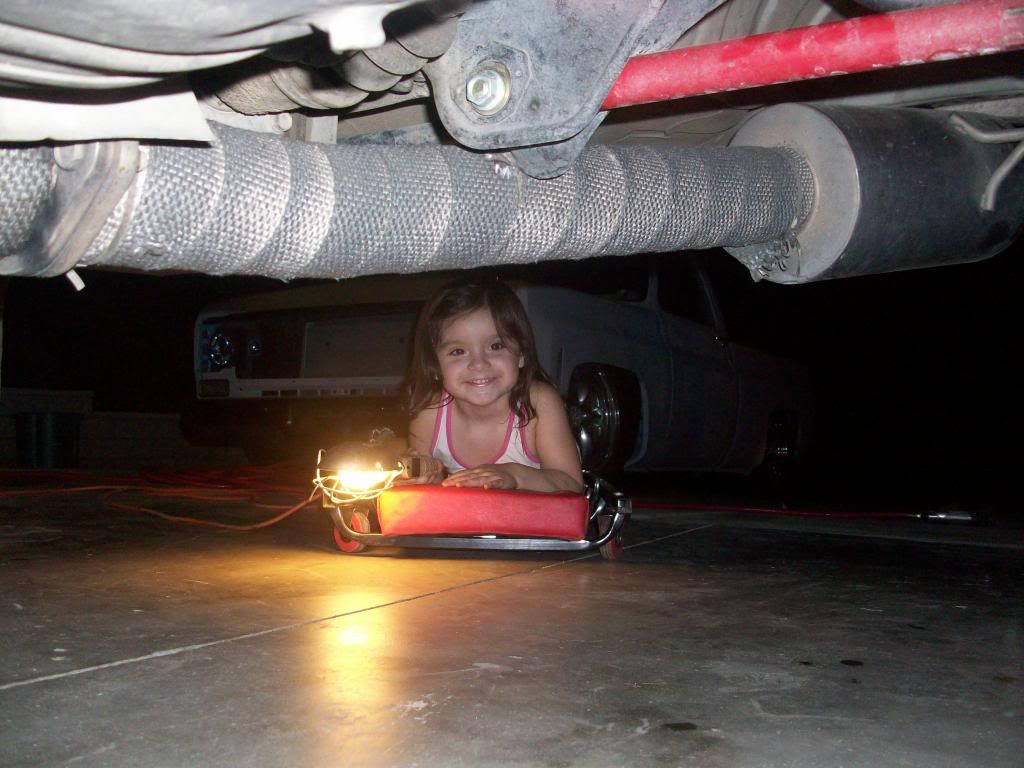
 You can easily see where it needs to be trimmed. Both areas aroud the water necks need trimming, around the petcock and the heater hose also need to be clearanced.  You can see where I trimmed around the upper water neck here. My little helper holding it place.... this girl loves to work on Daddy's Truck :]  The fans are mounted here, I lost the light so the photos aren't very good.  You can see where I mounted my relays. I wanted to keep it simple, not be super fancy and keep it functional... I love the idea of things that "quick release." I used some Bosch relays and bracket off of an S10 that I trimmed to fit. The relay bracket is spot welded to the radiator support. The relays are secure and can easily and quickly be changed out if need be. The fans are thermostatically controlled. I used the thermostat to trigger separate relays that power each fan.  A couple more views of the fans and relays.  
__________________
Welcome to my build thread: http://67-72chevytrucks.com/vboard/s...d.php?t=574370 |
|
|
|
|
09-12-2013, 02:08 AM
|
#63 |
|
Registered User
Join Date: Jan 2013
Location: Apple Valley, CA
Posts: 275
|
Re: 74' by Jabes...
Out to the garage I go... working on the power mirrors I acquired from Campbell Sport Trucks. The passenger side mirror was damaged, but I have a few ideas on how to go about fixing it. I'm not sure if they will bolt up to the power doors I came across as previously mentioned. I'm hoping I luck out and they will bolt in place of the SS elephant ear mirrors. I'm also planning on starting to sand and get the doors in primer, mounted gapped and wired in the near future. My truck is not period correct by any means. I'm loading it with the options that I want from the all the years of production of this body style from 73' to 91'. So far it will have, PW, PDL, Power mirrors. Its fuel injected as you can see, not exactly factory, but close lol. I plan on putting in cruise control, AC, heated seats and home link self dimming rear view mirror which isn't exactly factory as well, but its what I want for creature comforts. The idea behind my truck is to build a functional driver. I want to be able to go anywhere at anytime. I want to cruise vintage tin with as much modern day creature comforts as possible.
__________________
Welcome to my build thread: http://67-72chevytrucks.com/vboard/s...d.php?t=574370 |
|
|
|
|
09-12-2013, 04:45 AM
|
#64 |
|
Registered User
Join Date: Jan 2013
Location: Apple Valley, CA
Posts: 275
|
Re: 74' by Jabes...
The original owners of the 91 Burb must have whacked into something off-roading with the passenger side mirror. It was held in place with two black zip ties. Campbell Sport Trucks made me a deal I couldn't refuse and I acquired them in this shape. Super stoked!!! Im not putting these on my truck with zip ties. These mirrors can be purchased new for around $200, but at this point I don't want to spend the money. The mechanism that allows the mirror to fold has a spring and a retainer at the top. The metal retainer/clip is what is broken allowing the mirror to effortlessly fold back on itself. I'm not really interested in the fact that these mirrors collapse/fold back, so its not exactly pertinent that they retain this function at this time. I'm interested in the fact that I can adjust the mirror from the drivers side while parking next to a curb.
 I drilled three small holes in a triangle and inserted screws through the mount into the mirror housing. The screws will be hidden and nobody will be the wiser. Best of all...its reversible if I ever need to undo my fix. I drilled three small holes in a triangle and inserted screws through the mount into the mirror housing. The screws will be hidden and nobody will be the wiser. Best of all...its reversible if I ever need to undo my fix. This really burst my bubble... the idea that they would bolt up proved to be a big negative.  The mirrors will only use one factory mounting point. The other two holes will have to be welded shut and metal finished. Not a big deal or a whole lot of work, but still a bummer. The mirrors will only use one factory mounting point. The other two holes will have to be welded shut and metal finished. Not a big deal or a whole lot of work, but still a bummer.  Here's the original harness from the 91' Burbs power doors. My doors already have the harness, so I just need to separate the power mirror portion from the rest. I plan on keeping the harness just in case I may ever need a new one.  The harness for the power mirrors is stripped and ready to be integrated into the power doors I plan to use.  Original door panel in grey to match the interior. This switch is needed to control the power mirrors. I have everything from the Burb, so this should be plug and play. Someone could probably very easily integrate a newer more compact switch into the door panels or dash somewhere, but I think the General did a good job. So I'll apply the KISS motto here.  At the paint and body supply, I found two hues I like. I'm still undecided though... Sometimes I want to keep it simple and low key, like work truck white. Super straight and sano white.... these trucks look so good white. Other days I think about painting it a dark metallic blue such as the color of the power doors I acquired from a pick and pull. Decisions... decisions. 
__________________
Welcome to my build thread: http://67-72chevytrucks.com/vboard/s...d.php?t=574370 |
|
|
|
|
09-12-2013, 01:13 PM
|
#65 |
|
Registered User
Join Date: Nov 2011
Location: Tyler Texas
Posts: 145
|
Re: 74' by Jabes...
So this truck started out as a long bed?
__________________
1951 Styleline Deluxe 2dr 1957 Belair 4dr 1975 Scottsdale 1979 Silverado 1987 Silverado 1987 Cutlass Supreme (For Sale) |
|
|
|
|
09-12-2013, 01:24 PM
|
#66 | |
|
Registered User
Join Date: Jan 2013
Location: Apple Valley, CA
Posts: 275
|
Re: 74' by Jabes...
Quote:
__________________
Welcome to my build thread: http://67-72chevytrucks.com/vboard/s...d.php?t=574370 |
|
|
|
|
|
09-12-2013, 06:50 PM
|
#67 |
|
Registered User
Join Date: Jan 2013
Location: Apple Valley, CA
Posts: 275
|
Re: 74' by Jabes...
Here's a few Bezels I picked up, not sure if I'm going to use the Burlwood at this time. I have no AC, no tilt or cruise. I do like the fact that this bezel wouldn't look hacked if I went to a DIN and a half headunit though. I've always wanted a 67'-72' C10 SWB similar to the one in Dazed and Confused. I started collecting part of it LOL. I picked this cluster up recently. I love the fact that it has actual gauges instead of dummy lights. Its in pretty darn good condition for its age, it looks worse than it is. The chrome is coming off, but its nothing that couldn't be refinished. The circuit strip on the back is in great condition, just dusty.
 
__________________
Welcome to my build thread: http://67-72chevytrucks.com/vboard/s...d.php?t=574370 Last edited by Jabes1; 09-12-2013 at 06:52 PM. Reason: . |
|
|
|
|
09-13-2013, 07:53 PM
|
#68 |
|
Registered User
Join Date: Sep 2012
Location: salem oregon
Posts: 281
|
Re: 74' by Jabes...
Man I love your truck and thread!
Posted via Mobile Device
__________________
Faith and Patience with my truck, that is what i pray for every day! See my build http://67-72chevytrucks.com/vboard/s...d.php?t=580013 |
|
|
|
|
09-14-2013, 02:56 AM
|
#69 | |
|
Registered User
Join Date: Jan 2013
Location: Apple Valley, CA
Posts: 275
|
Re: 74' by Jabes...
Quote:
Thanks for the kind compliments nheller76!
__________________
Welcome to my build thread: http://67-72chevytrucks.com/vboard/s...d.php?t=574370 |
|
|
|
|
|
09-16-2013, 05:41 AM
|
#70 |
|
Registered User
Join Date: Jan 2013
Location: Apple Valley, CA
Posts: 275
|
Re: 74' by Jabes...
A little work done tonight... pulled the molding off of the doors which took a lot longer than I anticipated, even with using a heat gun. Well, going to take a break for a short bit, my life has a funny way of swerving time and again. Its all good, but need to tend to a few things.
__________________
Welcome to my build thread: http://67-72chevytrucks.com/vboard/s...d.php?t=574370 |
|
|
|
|
11-08-2013, 07:04 AM
|
#71 |
|
Registered User
Join Date: Jan 2013
Location: Apple Valley, CA
Posts: 275
|
Re: 74' by Jabes...
I took a break from documenting my truck, but work has been getting done. Welded the holes on both doors shut, just need to skim them with filler and primer. Also figured out a solution to bolt the mirrors to the doors, which I will document at a later time.
 Welded up nicely.  Repainted my runners and plenum with black crinkle paint... love that stuff.   I picked up this auto dimming mirror, which has temp and a compass for $6. I was going to get a home link mirror, but I didn't for security reasons. I love creature comforts. This isn't anything offered in 74' but is a current factory option and now its an option on my truck :] If you decide to equip your truck with one, you need the temp sensor which is located next to the horn on the front of the donor vehicle. Pick up two sensors since its hard to tell if a used one may or may not function. The compass is enclosed next to the mount of the mirror.   This is the harness de-pinned you don't need the three inside wires. Simply the pink, black, green and brown. Pink is switched igniton, black ground, green and brown go to the temp sensor.  I installed this grommet to keep the wiring from chafing and to attempt to make the wiring appear as it might from the factory in 74'.   Fishing the wires took quite some time, the hardest part was fishing them down the B-pillar. I used some think gauge welding filler wire.  The finished product. The interior is feeling a lot nicer now, good tunes, and the mirror is a nice touch. I had a billet mirror that didn't have the flip up button to block headlights from behind, so for me this is a huge plus.
__________________
Welcome to my build thread: http://67-72chevytrucks.com/vboard/s...d.php?t=574370 Last edited by Jabes1; 11-08-2013 at 07:09 AM. Reason: . |
|
|
|
|
11-09-2013, 02:40 PM
|
#72 |
|
Registered User
Join Date: Jan 2013
Location: Apple Valley, CA
Posts: 275
|
Re: 74' by Jabes...
I had ordered some parts and there currently installed. I ordered a black stripe th400 modulator. Black stripe is for low vacuum. My truck idles at 12" hg so with the red stripe modulator and the way the trans is set up it shifts super hard into reverse which I've always found annoying. The black stripe modulator helps it drop nicely into reverse and doesn't jerk hard like the red stripe. I also ordered SS braided lines from inline tube, however they sent me rubber lines and I'm not pleased, so hopefully they remedy it quickly. I'm planning on new front SS lines, and replacing the rear cylinders. The front calipers are relatively new. I've been DD'ing my truck... love it!
__________________
Welcome to my build thread: http://67-72chevytrucks.com/vboard/s...d.php?t=574370 |
|
|
|
|
11-16-2013, 09:26 AM
|
#73 |
|
Registered User
Join Date: Jan 2013
Location: Apple Valley, CA
Posts: 275
|
Re: 74' by Jabes...
There are a lot of little small things that are going to be getting attention here shortly. Since my truck has once again become my daily all the little things that have deteriorated in function will be addressed. My blinkers are a pain to operate. In a few hours when I wake up I'll be replacing the cam in the steering column, so that they self cancel and my hazards will function correctly in the case that I need them and also my horn will work... believe it or not, its all related to that old plastic cam. I have an exhaust leak from hell off my headers, one huge reason I hate headers. I purchased some Percy's dead soft aluminum header gaskets... never used them so this will be a first. I have some copper gaskets for my headers, but they are leaking sooooo this will be a priority. I had a short under my dash which reared its head not too long ago, I pulled the dash apart repaired a few connections and no problems since. Those stainless brake lines should be here later today and if I have time I'll put those on as well. I also ordered some new inner and outer tie rods for good measure, since most of the suspension has been replaced with exception to the bushings. Its all coming together slowly...
__________________
Welcome to my build thread: http://67-72chevytrucks.com/vboard/s...d.php?t=574370 |
|
|
|
|
11-16-2013, 07:29 PM
|
#74 |
|
Registered User
Join Date: Jul 2013
Location: fayetteville, nc
Posts: 136
|
Re: 74' by Jabes...
Subscribed!! Looking good!
__________________
1984 SWB C10 (http://67-72chevytrucks.com/vboard/s...d.php?t=687521) 1976 K5 super rusty fitech truck(http://67-72chevytrucks.com/vboard/s...d.php?t=740582) The one I'm keeping forever (Fingers crossed!) 1989 Suburban 2500 L83 6L80 (https://67-72chevytrucks.com/vboard/...d.php?t=818822) |
|
|
|
|
11-18-2013, 04:42 AM
|
#75 |
|
Registered User
Join Date: Jan 2013
Location: Apple Valley, CA
Posts: 275
|
Re: 74' by Jabes...
Tied up a few more odds and ends. I noticed my tail lights weren't as bright as I remembered them, I checked to make sure my charging system was functional and it was to spec. I pulled out my trusty die grinder... this tool comes in super handy. This brillo disc cuts paint, but doesn't grind down the metal.
 Touched up the grounds on the tail lights and the one under the bed as well...so much better. I had a spot of rust on the cab close to the doors... went ahead and took care of it.  Ground down, then finished with the die grinder, flap disc and then brillo.  While I had the die grinder out, I pulled the headers, cleaned up the ports on the headers and heads.  I purchased some Percy's dead soft aluminum header gaskets, kind of expensive and too rich for my blood, however I don't smoke and don't particularly like to smell my trucks exhaust in the cab with the heater on. You can see the copper gaskets I had on there from Summit had seen better days. If that's not an indication of a leak, I don't know what is!!! I picked the round port Percy's because they more closely followed the contour of the headers ports. The instructions say to make sure there are no remnants left of the old header material... these gaskets were too expensive to take the time to install and not properly prep the surface. Seem to be doing the trick so far :] 
__________________
Welcome to my build thread: http://67-72chevytrucks.com/vboard/s...d.php?t=574370 Last edited by Jabes1; 11-18-2013 at 04:45 AM. Reason: . |
|
|
|
 |
| Bookmarks |
|
|


 Linear Mode

