
|
 05-20-2013, 06:51 AM
|
#301 |
|
Registered User
Join Date: Apr 2003
Location: Indep, MO
Posts: 5,893
|
Re: Project '64 Cheapskate
You're a better man than me. AC stuff makes my eyes glaze over. Looks great!
Posted via Mobile Device
__________________
Boppa's Old Yeller Truck Build, Old Yeller's New Heart! Project Buzz Bomb Flyin' Low! |

|

|
|
05-20-2013, 12:40 PM
|
#302 |
|
Registered User
Join Date: Apr 2011
Location: .
Posts: 3,104
|
Re: Project '64 Cheapskate
That turned out way nice Man

|
|
|
|
|
05-20-2013, 05:48 PM
|
#303 |
|
Registered User
Join Date: Aug 2012
Location: Smithfield rhode island
Posts: 722
|
Re: Project '64 Cheapskate
Very clean work! I may have missed the process but saw you mention clr multiple times....it looks like it works awesome. Does it stop rust from continuing?thanks in advance!
 Posted via Mobile Device
__________________
My frame Layin 63 short bed project http://67-72chevytrucks.com/vboard/s...d.php?t=551353 |
|
|
|
|
05-20-2013, 07:34 PM
|
#304 | ||||
|
Registered User
 Join Date: Mar 2005
Location: apple valley, ca
Posts: 2,670
|
Re: Project '64 Cheapskate
Quote:
Quote:
Quote:
Quote:
__________________
Check out my latest endeavor: https://roundsixpod.com My build threads: '55 Chevy: http://67-72chevytrucks.com/vboard/s...d.php?t=247512 '64 C-20: http://67-72chevytrucks.com/vboard/s...d.php?t=446527 |
||||
|
|
|
|
05-20-2013, 08:03 PM
|
#305 |
|
Registered User
Join Date: Sep 2012
Location: Midway, NC
Posts: 3,275
|
Re: Project '64 Cheapskate
Really cool build. Decided to take some time to read through this and man I've got to say I really dig your build. Everything just seems to make sense. Nice and clean.
__________________
http://67-72chevytrucks.com/vboard/s...d.php?t=581873 The low buck build threads. Check'em out! http://67-72chevytrucks.com/vboard/s...d.php?t=666022 My build thread Crossmembers CC |
|
|
|
|
05-20-2013, 10:01 PM
|
#306 |
|
Rollin' Old Skool
Join Date: Jun 2007
Location: Hattiesburg, MS
Posts: 5,371
|
Re: Project '64 Cheapskate
Great job on the A/C parts!
__________________
_____________________________________________ Phillip My Build threads: 1966 Chevy C-10 "Black Betty" shortbed, fleetside, BBW, 327 V8/ Powerglide (under construction) http://67-72chevytrucks.com/vboard/s...ighlight=betty 1997 Chevy Tahoe, 2dr/2wd, mild custom (Daily driver) http://67-72chevytrucks.com/vboard/s...d.php?t=601142 Pics: '66 C-10 https://flic.kr/s/aHsjHWD4h9 '97 Tahoe https://flic.kr/s/aHsjGZ7wKP '93 C-1500 https://flic.kr/s/aHskxdpdnQ '88 S-10 Blazer https://flic.kr/s/aHsjYGx4Md Previous Rides: 1993 Chevy S-10 ext. cab, 4.3L, 4/5 drop (Sold) 1993 Chevy C-1500 short/step Retro-Rod (Sold) 1988 S-10 Blazer 2dr/2wd mild custom (Sold) |
|
|
|
|
05-20-2013, 10:49 PM
|
#307 |
|
Registered User
Join Date: Mar 2005
Location: apple valley, ca
Posts: 2,670
|
Re: Project '64 Cheapskate
I finished restoring the heater control tonight. I wound up swapping in a new fan switch because the original one was really stiff and felt like it was going to break. I spend a lot of time getting the levers nice and free, and they work and feel great. I did not want to respray the face because I want to leave the interior sheet metal in it's slightly-pantina'd condition.
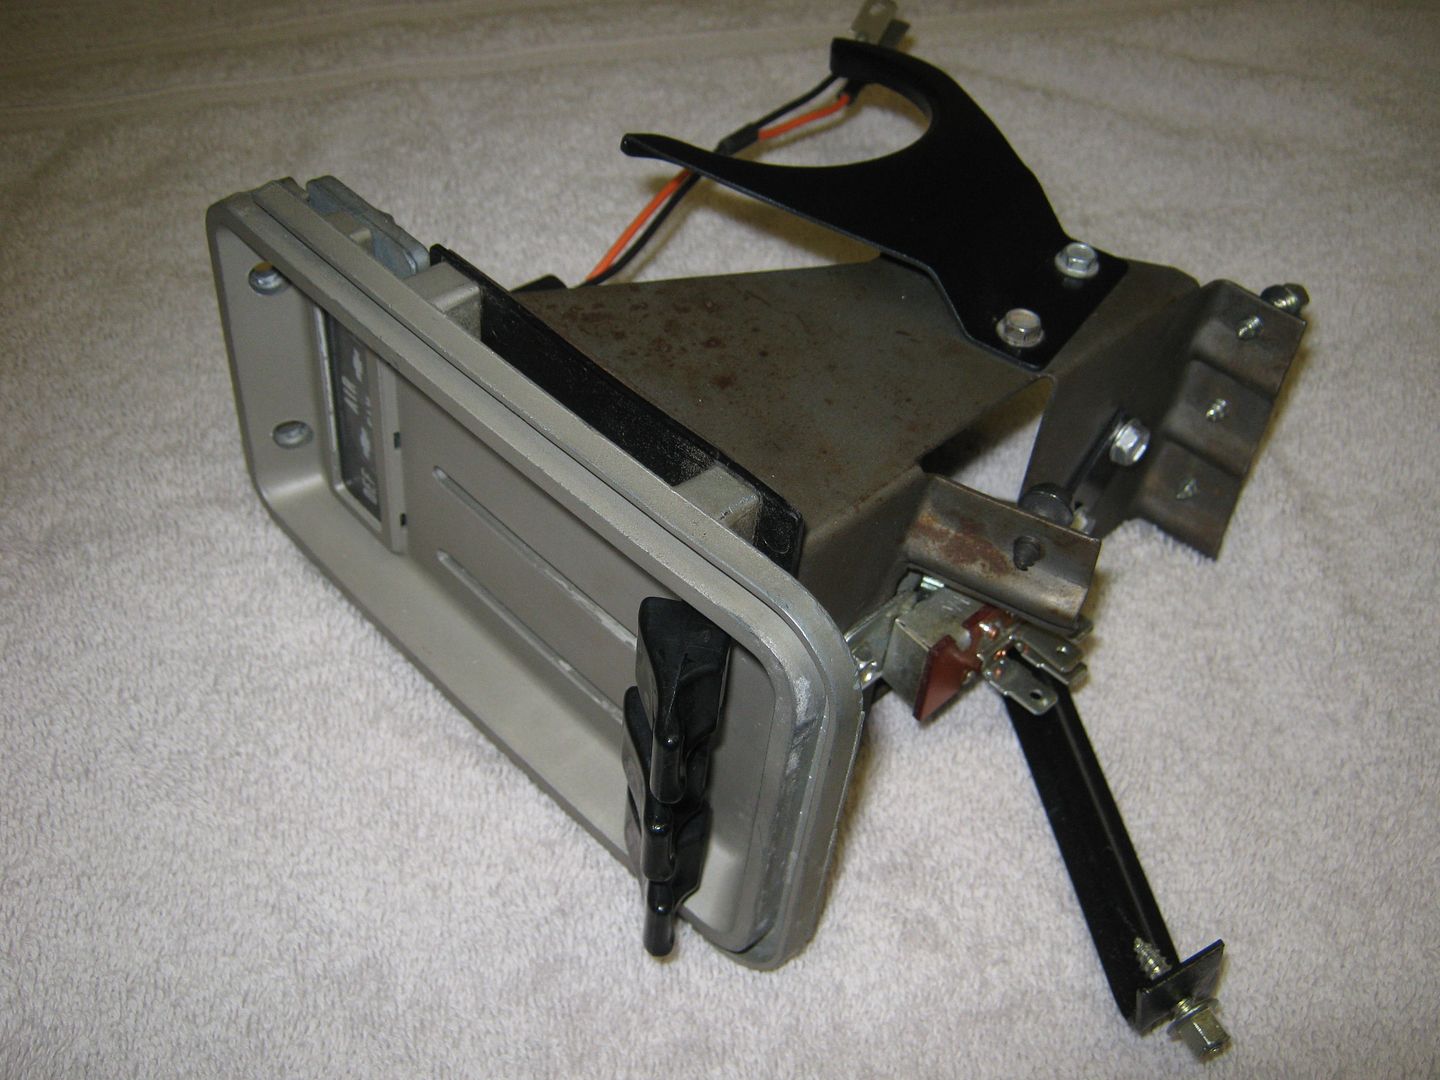 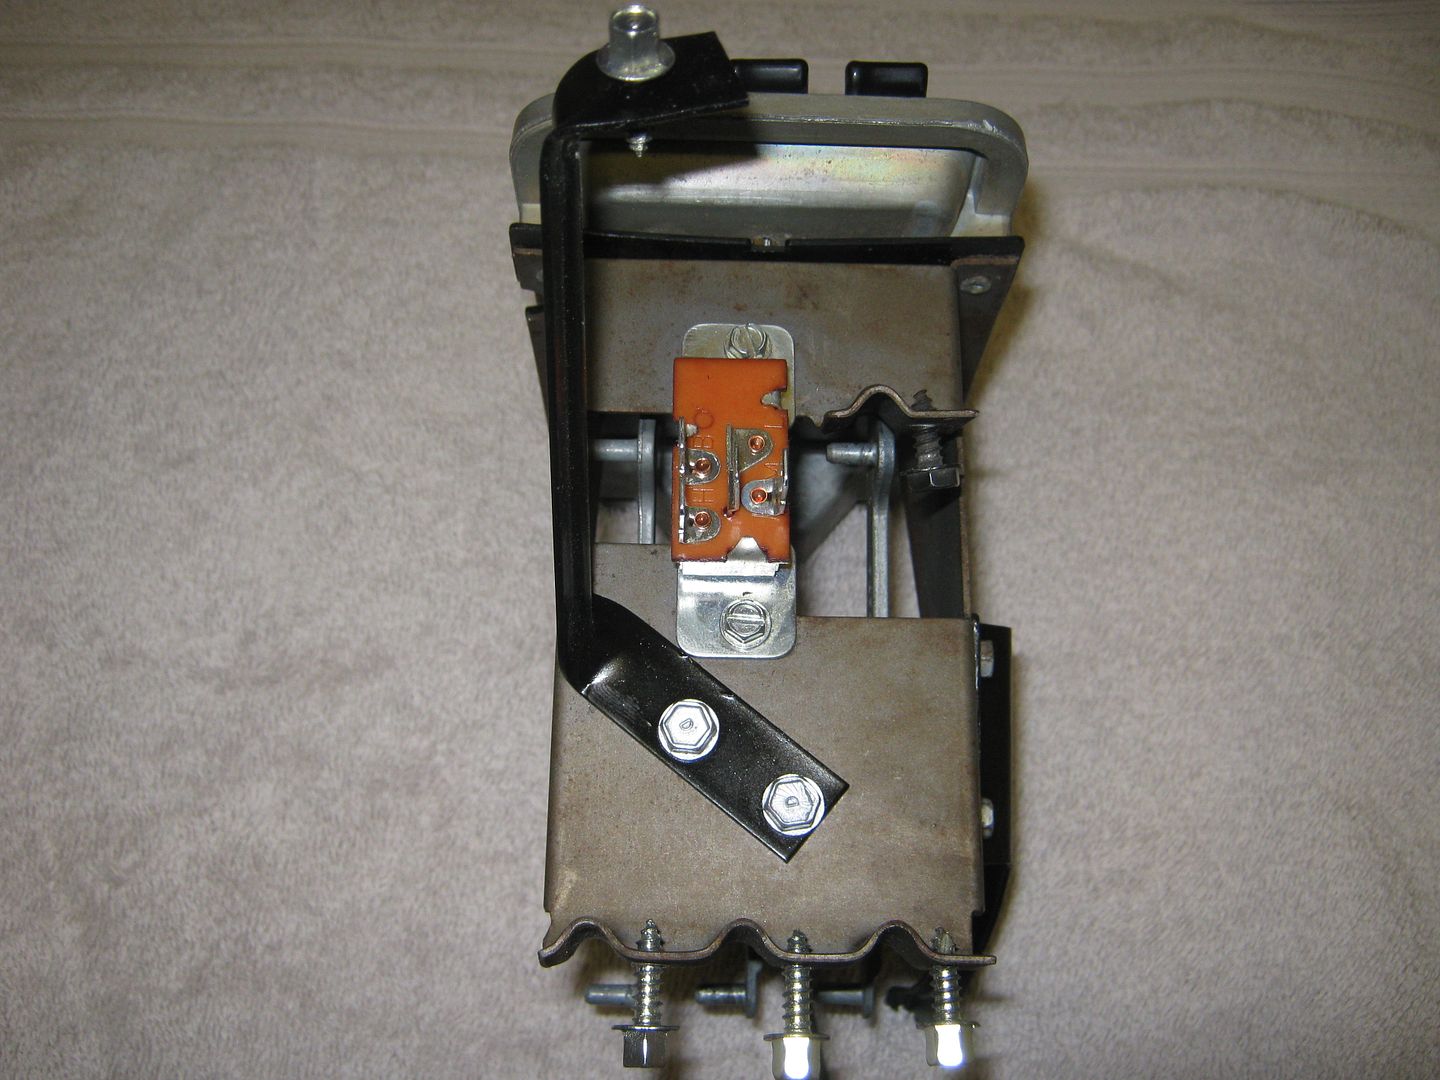 I am working on a slight twist to the normal operation of the heater control. The issue I have always had with the design of the A/C system on these trucks is the fact that the heater core is always at the coolant temperature (180 degrees+) and the outside fresh air supply has to go past the heater to get inside the inside air box. I want to use the second post on the "Temp" lever to actuate a cable to shut off the water supply to the heater. So when the lever is at the coldest setting, the cable will shut the water valve on the heater hose in the engine compartment, and coolant is no longer flowing to the heater core. I have a feeling that it might make a difference when the A/C is running. We'll see......
__________________
Check out my latest endeavor: https://roundsixpod.com My build threads: '55 Chevy: http://67-72chevytrucks.com/vboard/s...d.php?t=247512 '64 C-20: http://67-72chevytrucks.com/vboard/s...d.php?t=446527 |
|
|
|
|
05-22-2013, 05:21 AM
|
#308 |
|
Registered User
Join Date: May 2007
Location: Mooresville NC/Gainesville GA
Posts: 499
|
Re: Project '64 Cheapskate
A shut off valve will make a ton of difference. Great idea by the way. I installed a ball valve on my crew cab square and the difference was amazing.
__________________
Eric Evans Queen City Shop Truck http://67-72chevytrucks.com/vboard/s...34#post6139834 66 GMC http://67-72chevytrucks.com/vboard/s...d.php?t=543110 |
|
|
|
|
05-22-2013, 10:23 AM
|
#309 |
|
Registered User
Join Date: Apr 2003
Location: Indep, MO
Posts: 5,893
|
Re: Project '64 Cheapskate
Looks great! I wonder if you could adapt an electric heater control valve out of something? Seems like a ball valve'd have a pretty long throw, but I dunno, just spitballing. I'm also wondering how much residual heat you'd have from being connected to the system on the backside. Backflow, as it were. Not trying to be a jerk, I like the idea, just hmmmmm, thinking. Keep it up!
__________________
Boppa's Old Yeller Truck Build, Old Yeller's New Heart! Project Buzz Bomb Flyin' Low! |
|
|
|
|
05-23-2013, 10:41 PM
|
#310 |
|
Registered User
Join Date: Mar 2005
Location: apple valley, ca
Posts: 2,670
|
Re: Project '64 Cheapskate
Because I've been working on the interior stuff lately, I have really been thinking about what steering wheel I want to use. I've got a couple of Deluxe wheels, but I'm not crazy about the huge diameter and the thin rim, especially with the power steering I'm using. I don't like over-assisted steering with big steering wheels, so I went through my stash of old wheels to see if there was something that would work. I was originally going to use a mid-60s Vette 3-spoke wheel because I love the way they look, but they are the same diameter as the stock truck wheel. So, I looked a little deeper in the stash and found an old grungy wood-rimmed wheel that I bought at the Hot Rod Reunion swap meet a few years ago. It was nasty, and it looked like the guy who owned it worked as a mechanic because the wood was black (seriously). I paid $15 for it, and the seller looked at me like I was crazy for wanting it. I think it's either a Superior or a Grant, and probably late '60s vintage. Wood wheels in excellent shape go for a pretty good amount of money on ebay, so for $15, I couldn't go wrong.
After a few hours of scrubbing it with a red scotchbrite and acetone, the wood finally cleaned up. I didn't try to fill the gouges or other blemishes because I wasn't going for perfection. The chrome is in really bad shape, with a lot of thin spots and pits. Once I got the wood where I wanted it, I shot it with a satin polyurethane clear. It got a total of 6 coats, and after every 2 coats (fully dried), I worked it over with 0000 steel wool. Well, the old nasty wheel turned out pretty good: 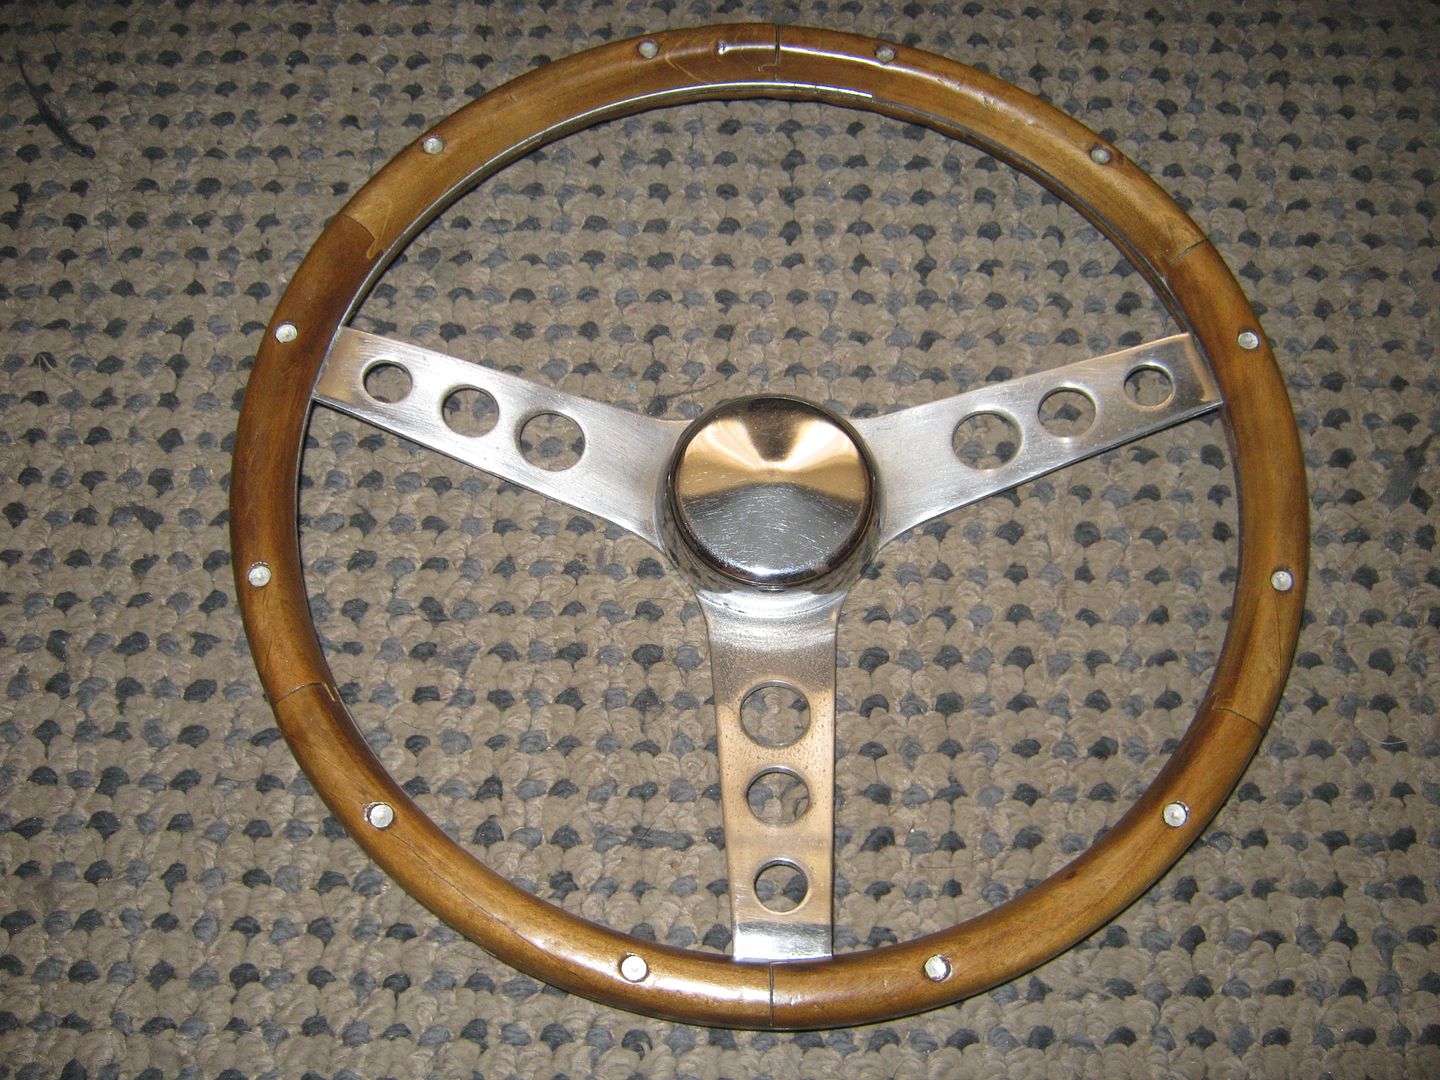 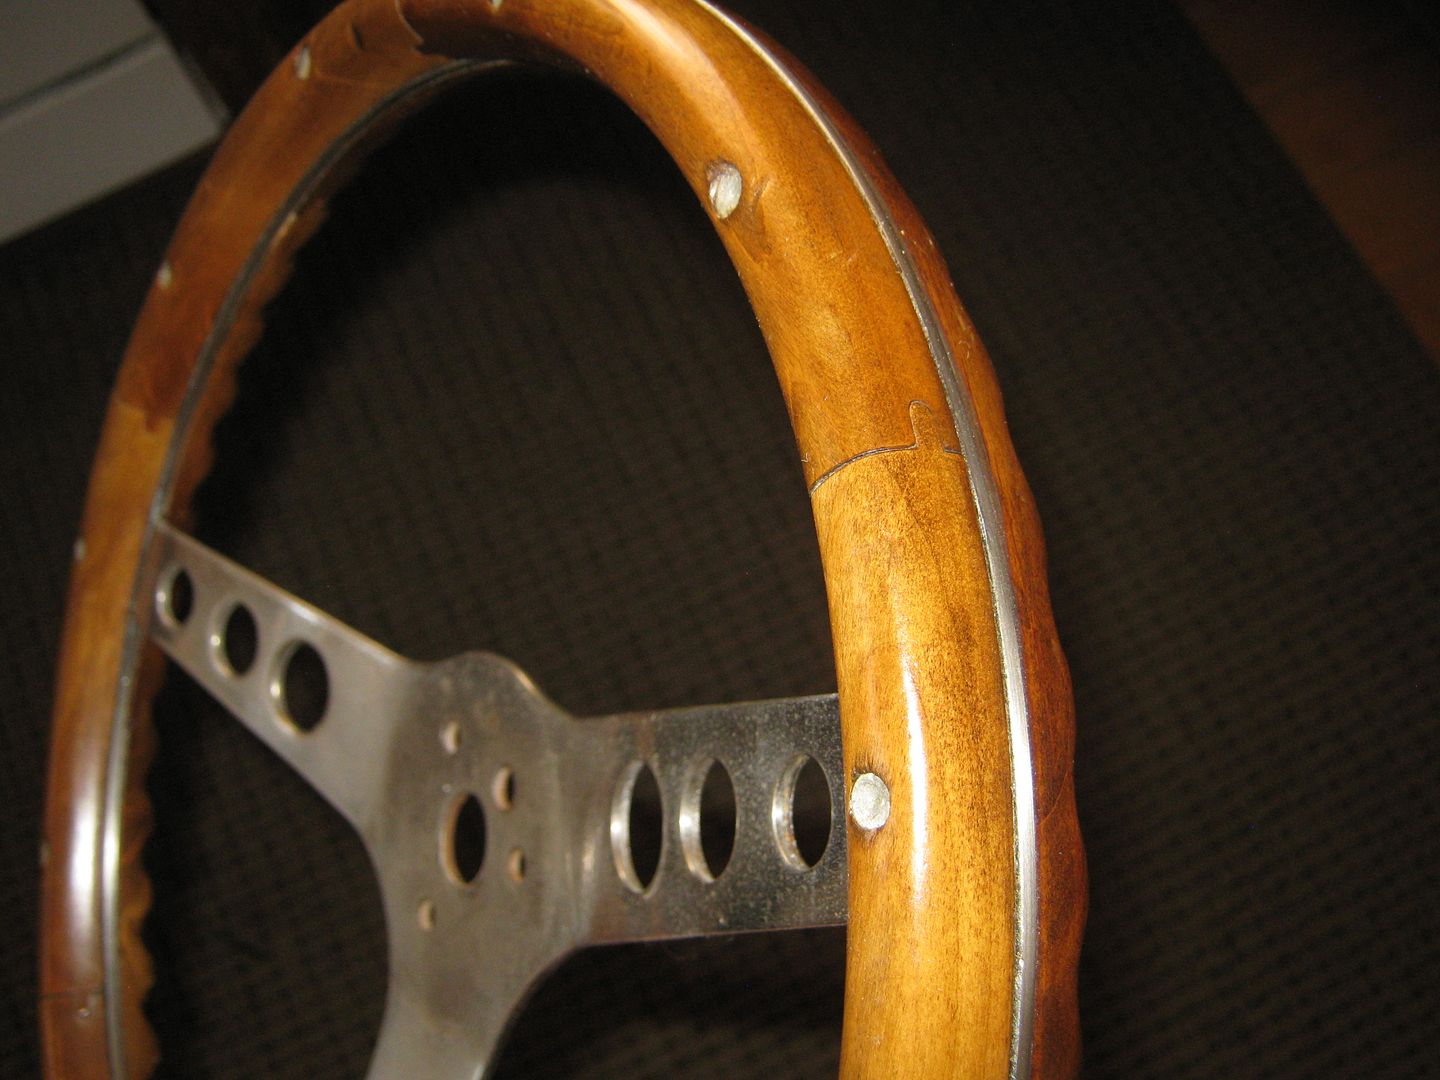 The horn button is an old one that Brad had in his stash. I have a new one, but the chrome is too nice compared to the chrome on the steering wheel. The jury is still out on this wheel, but it does what I'm looking for: a smaller diameter, it's almost completely flat for extra room inside the cab, and the rim is a nice and thick. I won't know until I get it bolted up in the truck.
__________________
Check out my latest endeavor: https://roundsixpod.com My build threads: '55 Chevy: http://67-72chevytrucks.com/vboard/s...d.php?t=247512 '64 C-20: http://67-72chevytrucks.com/vboard/s...d.php?t=446527 |
|
|
|
|
05-24-2013, 08:26 AM
|
#311 |
|
Registered User
Join Date: Apr 2003
Location: Indep, MO
Posts: 5,893
|
Re: Project '64 Cheapskate
Cleaned up good! I like that it perfectly matches the era of the build and the patina of the truck. Needs a Keep On Truckin' sticker on the horn button!
Posted via Mobile Device
__________________
Boppa's Old Yeller Truck Build, Old Yeller's New Heart! Project Buzz Bomb Flyin' Low! |
|
|
|
|
05-24-2013, 10:54 AM
|
#312 |
|
Registered User
Join Date: Apr 2011
Location: .
Posts: 3,104
|
Re: Project '64 Cheapskate
Nice work on the wood.
Makes me wonder if that "Flitz" cleaner stuff would clean up the spokes. I used it on the dash stuff and was amazed with the results. Again nice work on the wheel. |
|
|
|
|
05-24-2013, 11:23 AM
|
#313 |
|
Registered User
Join Date: Mar 2005
Location: apple valley, ca
Posts: 2,670
|
Re: Project '64 Cheapskate
I used every metal polish and cleaner I had, and it was beyond saving. It really pitted and the chrome has turned brown. I have to figure that it was a pretty crappy chrome job when it was new. I have thought about sanding the chrome off completely and then working it with 150 grit to give it a brushed finish and then shooting it in a matte clear. I'm still not 100% sold on this wheel yet.
Here is "Option 2" of the Steering Wheel Experiment. I really, really like the look of the old Corvette teak wood wheels from the mid-60s, but those things are spendy. Chevy did make a bunch of non-wood variants of that wheel, and one day during a "recon" trip to the local Pic-A-Part, I found a completely destroyed 3-spoke wheel in a gutted Corvair Monza. My buddies thought I was nuts When I showed it to them because it was junk. I bought the steering wheel epoxy repair kit and went to town. Man, does that job suck!! I ground out all of the cracks, added the epoxy, and started sanding. After two rounds of Rage Extreme, and many more hours of sanding, I had to walk away. I was totally burned out. Those guys who do steering wheel restoration must have unbelievable patience. My ultimate plan is to paint the rim the same fawn color as the interior. Never seen that done, not sure how it'll look. Here it is, waiting for a coat of primer so I can see just how much more work I have to do on it. I'm afraid to find out..... 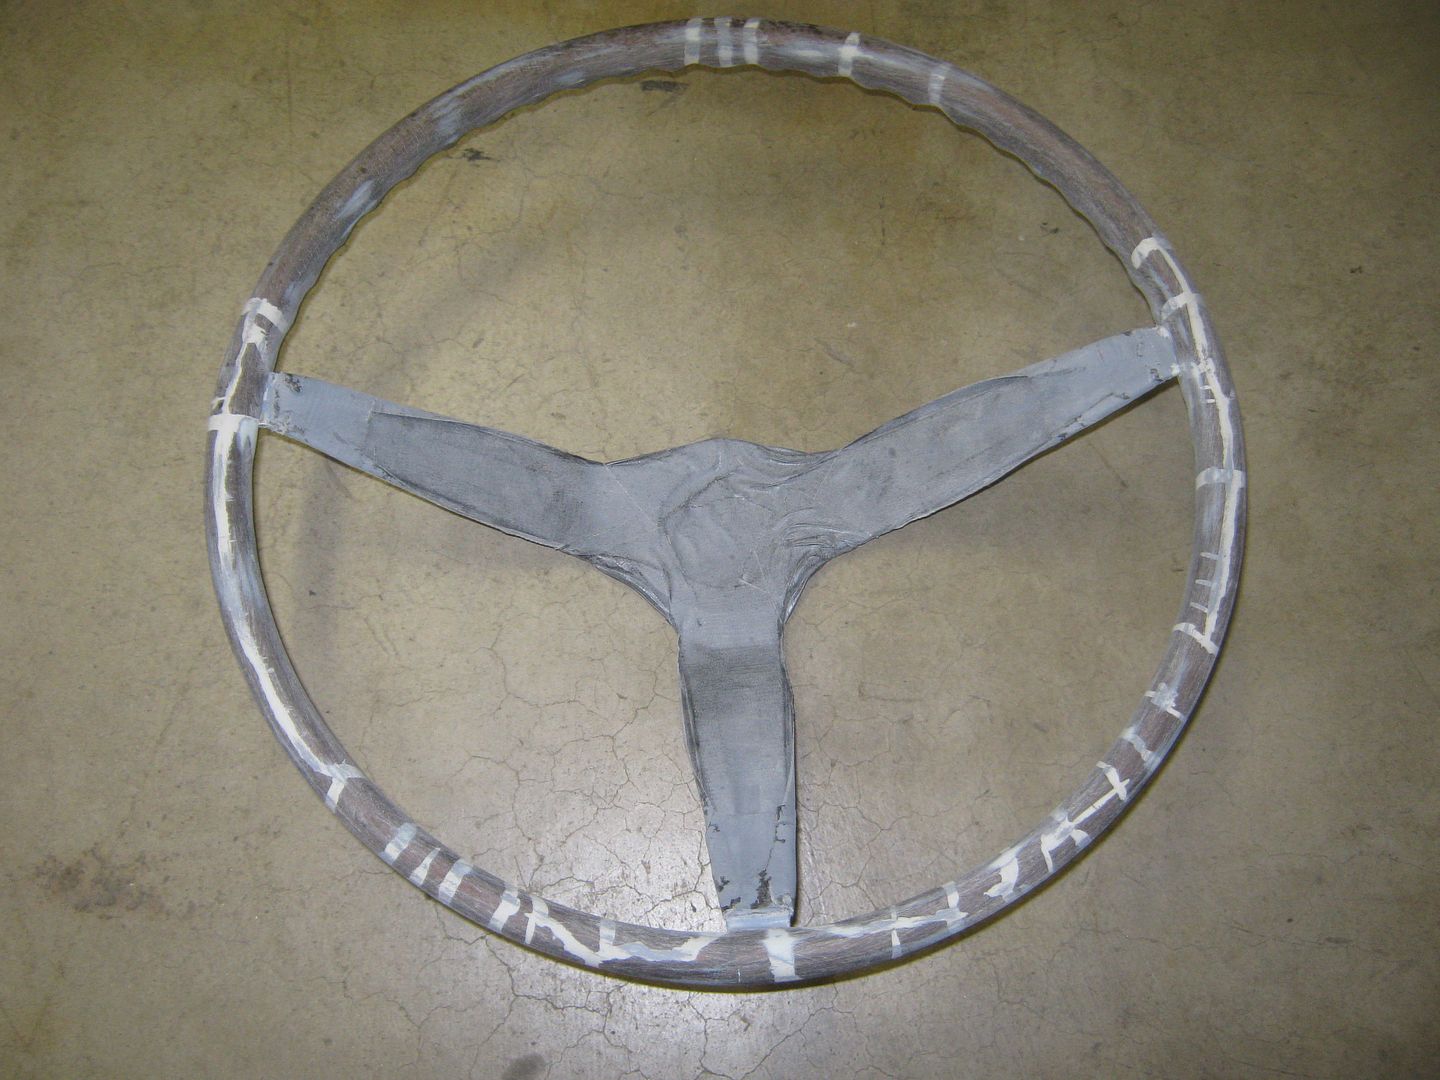 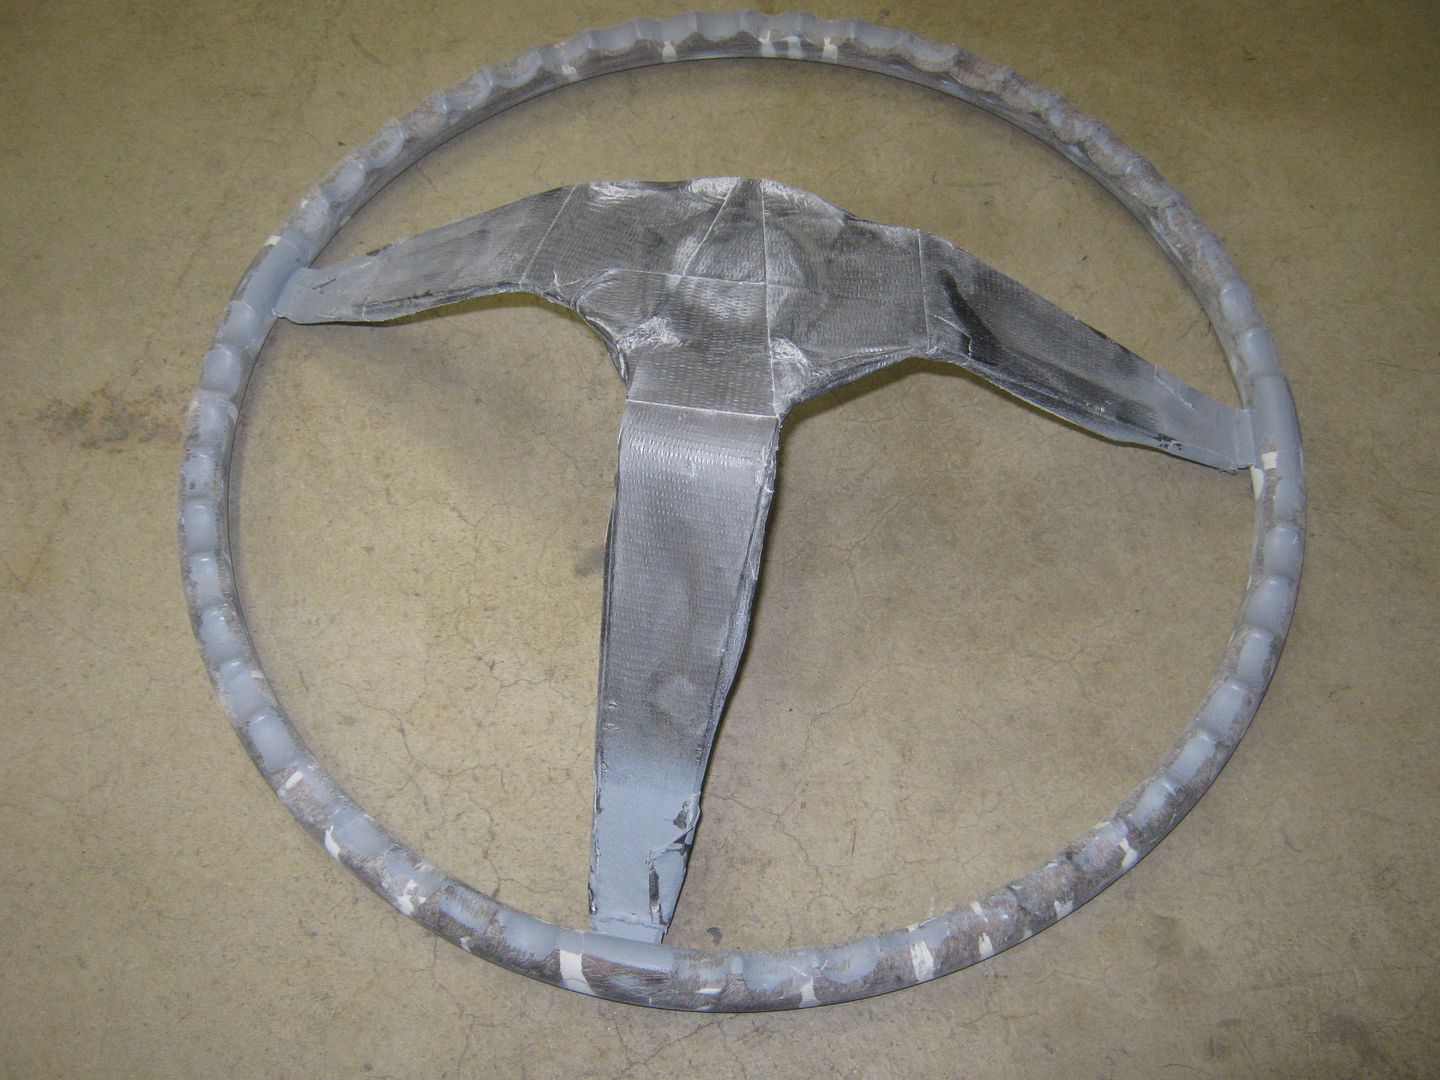 Everywhere you see white is where the cracks were in the wheel. It was totalled. My only issue with this wheel is the size and the deep dish. When you use the hub adapter, it comes way away from the dash, right in your lap.
__________________
Check out my latest endeavor: https://roundsixpod.com My build threads: '55 Chevy: http://67-72chevytrucks.com/vboard/s...d.php?t=247512 '64 C-20: http://67-72chevytrucks.com/vboard/s...d.php?t=446527 |
|
|
|
|
05-24-2013, 12:27 PM
|
#314 |
|
Registered User
Join Date: Jul 2006
Location: Willis, Texas
Posts: 754
|
Re: Project '64 Cheapskate
I'm anxious to see the results of your A/C restoration. I want to hear how well it cools.
__________________
65Gregg Blue long bed White TBSS 61 Impala The two most important days in your life are the day you are born and the day you find out why. Mark Twain |
|
|
|
|
05-24-2013, 03:12 PM
|
#315 |
|
Registered User
Join Date: Apr 2003
Location: Indep, MO
Posts: 5,893
|
Re: Project '64 Cheapskate
I like the first one. Fits the vibe better.
__________________
Boppa's Old Yeller Truck Build, Old Yeller's New Heart! Project Buzz Bomb Flyin' Low! |
|
|
|
|
05-24-2013, 07:13 PM
|
#316 | |
|
Registered User
Join Date: Mar 2005
Location: apple valley, ca
Posts: 2,670
|
Re: Project '64 Cheapskate
Quote:
__________________
Check out my latest endeavor: https://roundsixpod.com My build threads: '55 Chevy: http://67-72chevytrucks.com/vboard/s...d.php?t=247512 '64 C-20: http://67-72chevytrucks.com/vboard/s...d.php?t=446527 |
|
|
|
|
|
05-24-2013, 07:17 PM
|
#317 | |
|
Registered User
Join Date: Mar 2005
Location: apple valley, ca
Posts: 2,670
|
Re: Project '64 Cheapskate
Quote:
I'm very anxious, too. I think it's going to work pretty well. I've made a few subtle changes, like a more modern condenser and better connections, and I really want to see if they made a difference. When I get to having it serviced, I'll definitely post up the results.
__________________
Check out my latest endeavor: https://roundsixpod.com My build threads: '55 Chevy: http://67-72chevytrucks.com/vboard/s...d.php?t=247512 '64 C-20: http://67-72chevytrucks.com/vboard/s...d.php?t=446527 |
|
|
|
|
|
05-26-2013, 01:00 PM
|
#318 |
|
Registered User
Join Date: Mar 2005
Location: apple valley, ca
Posts: 2,670
|
Re: Project '64 Cheapskate
I worked on the yard for most of the day yesterday, but after dinner, I decided to tackle the voltmeter conversion. I'm not a fan of ammeters, and I've been wanting to do this for a while. Fortunately, there have been threads showing how some of the guys on the site have done theirs, and that gave me a bit of confidence.
I started with a voltmeter out of a 1979 Chevy truck. I carefully ground the rivets that attach the faceplate and removed it. I had to determine where the needle was going to sit in relation to the adjacent gauge, and when I got that figured, I used a 1.25" hole saw and opened up the gauge holder. With a little work with a die grinder, I opened the 1.25" hole to the O.D. of the gauge, 1.35". With the O.D. of the gauge housing figured out, I started searching for something that I could use as a spacer. I searched through my spare parts and found that the lower bearing retainer for a '67-'72 steering column would work. I had to grind the inside to match the gauge diameter, and after some measuring, I determined that it had to be .5" tall. I made a very simple retainer at the rear using some scrap sheet metal. I wound up using little grommets to isolate the terminal posts from the bracket. I did a fit test inside the gauge cluster and determined that I would have to shave some of the spacer so it would fit. I wound up using a couple of dabs of quick-set epoxy and securing the faceplate. After a little primer and paint, and a gauge overlay decal, here it is: 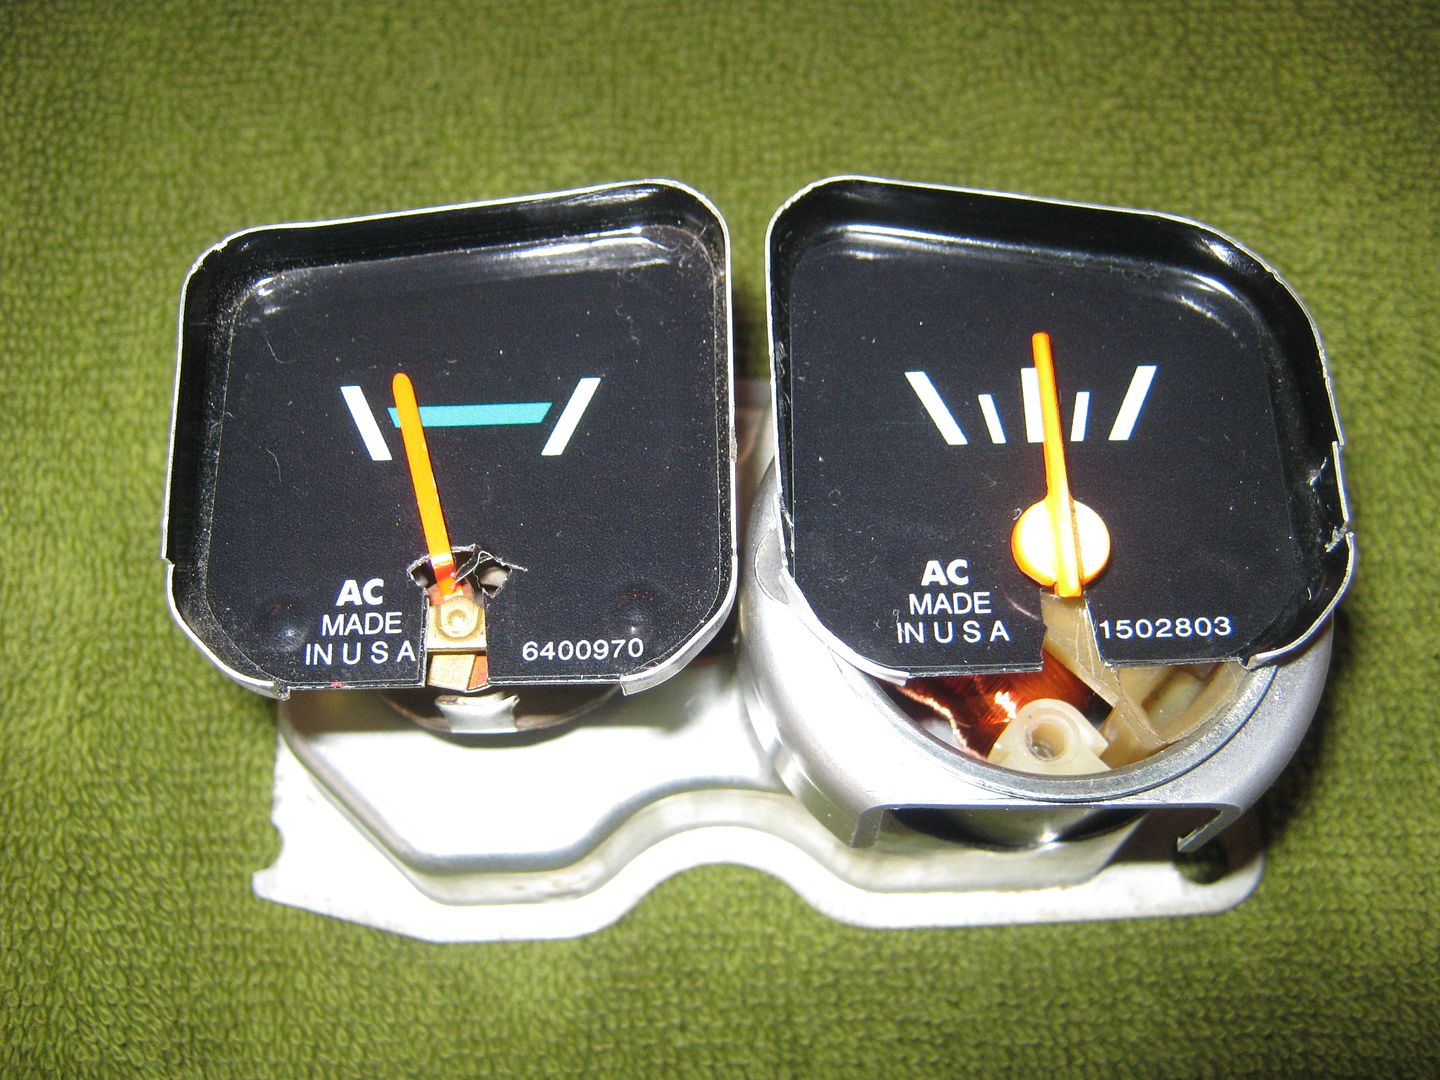 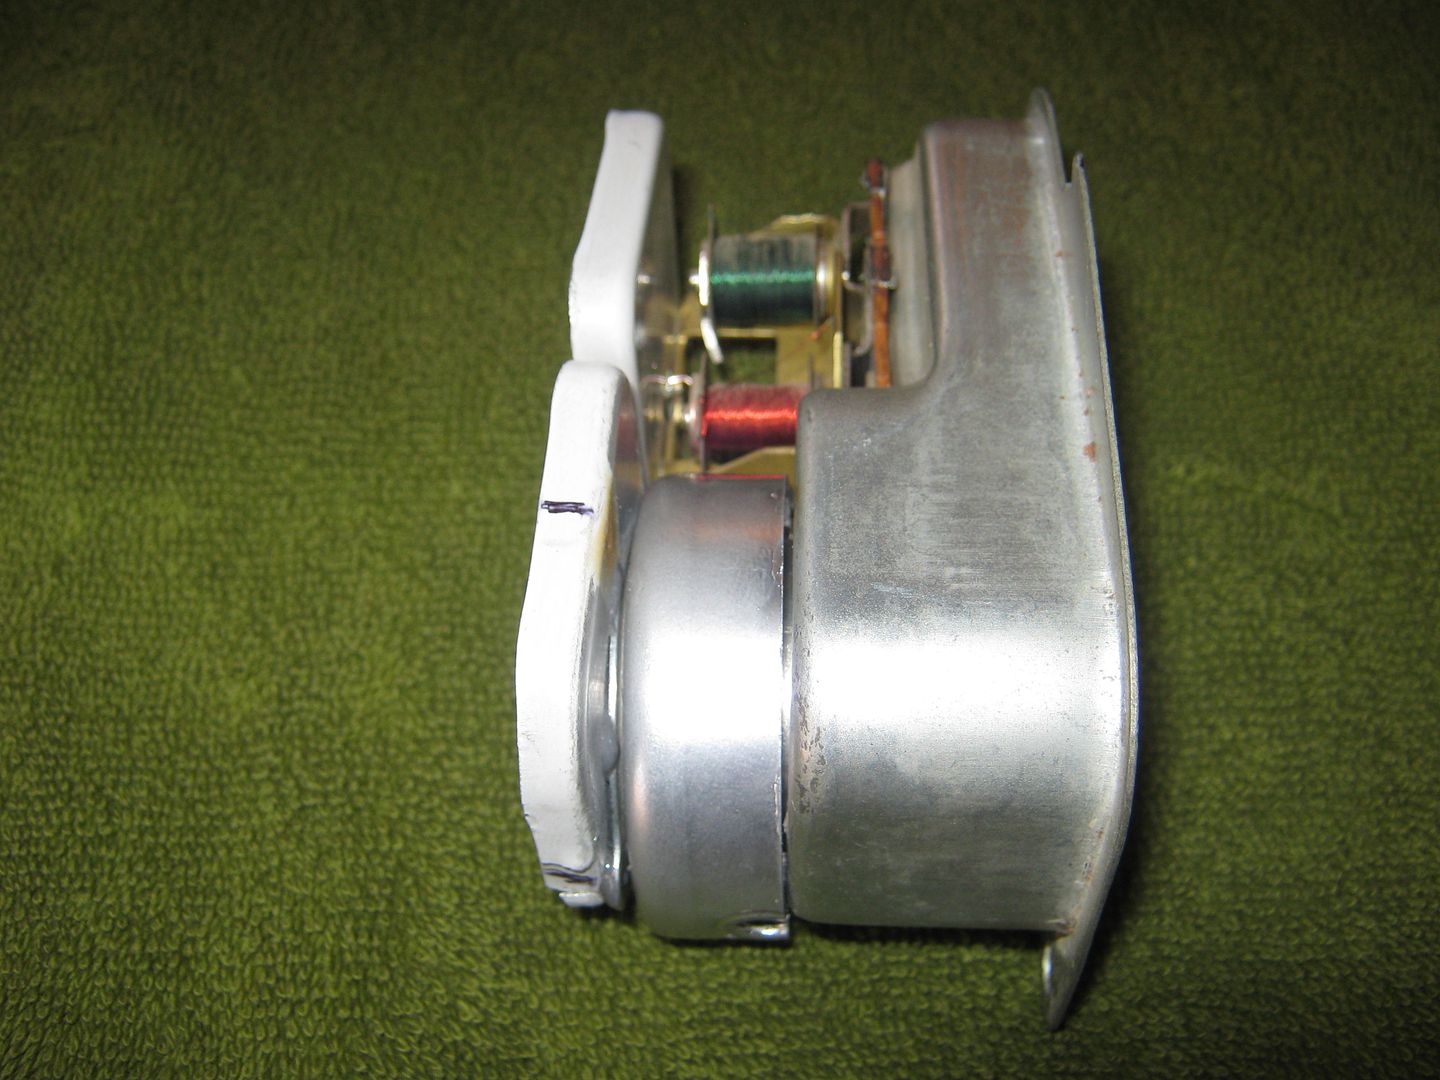 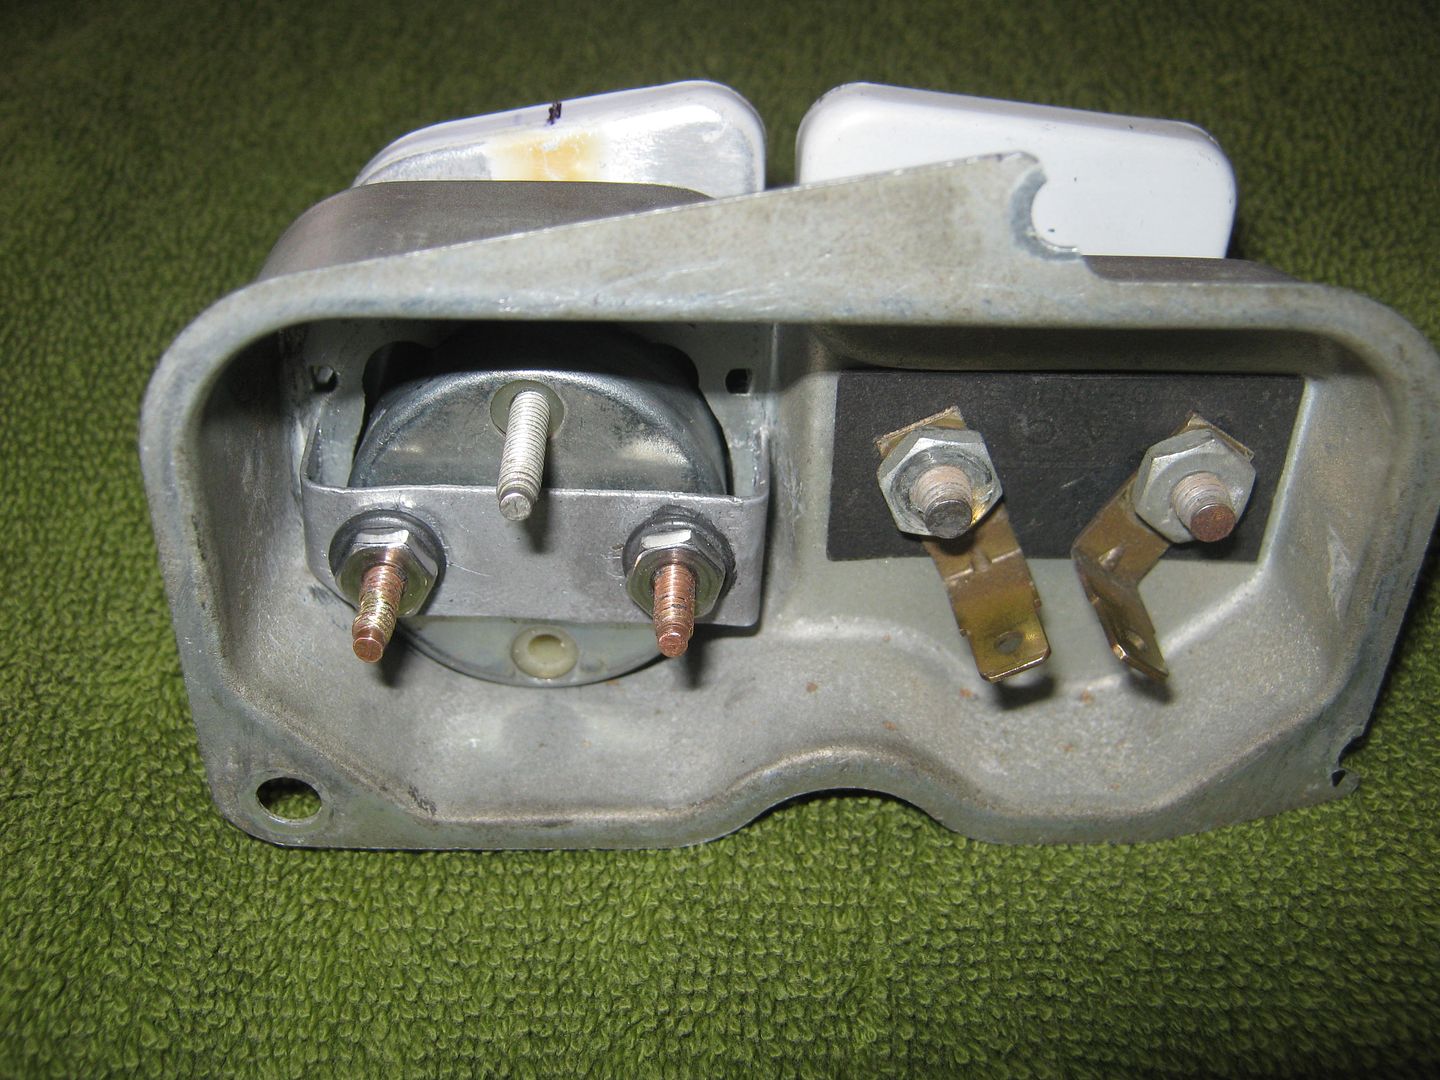 I haven't determined exactly where the needle needs to be placed on the gauge, but I'm going to take it to work and hook it up to a power supply and set it at 13.5 and then put the needle at dead center on the gauge.
__________________
Check out my latest endeavor: https://roundsixpod.com My build threads: '55 Chevy: http://67-72chevytrucks.com/vboard/s...d.php?t=247512 '64 C-20: http://67-72chevytrucks.com/vboard/s...d.php?t=446527 |
|
|
|
|
05-26-2013, 09:44 PM
|
#319 |
|
Registered User
Join Date: Mar 2005
Location: apple valley, ca
Posts: 2,670
|
Re: Project '64 Cheapskate
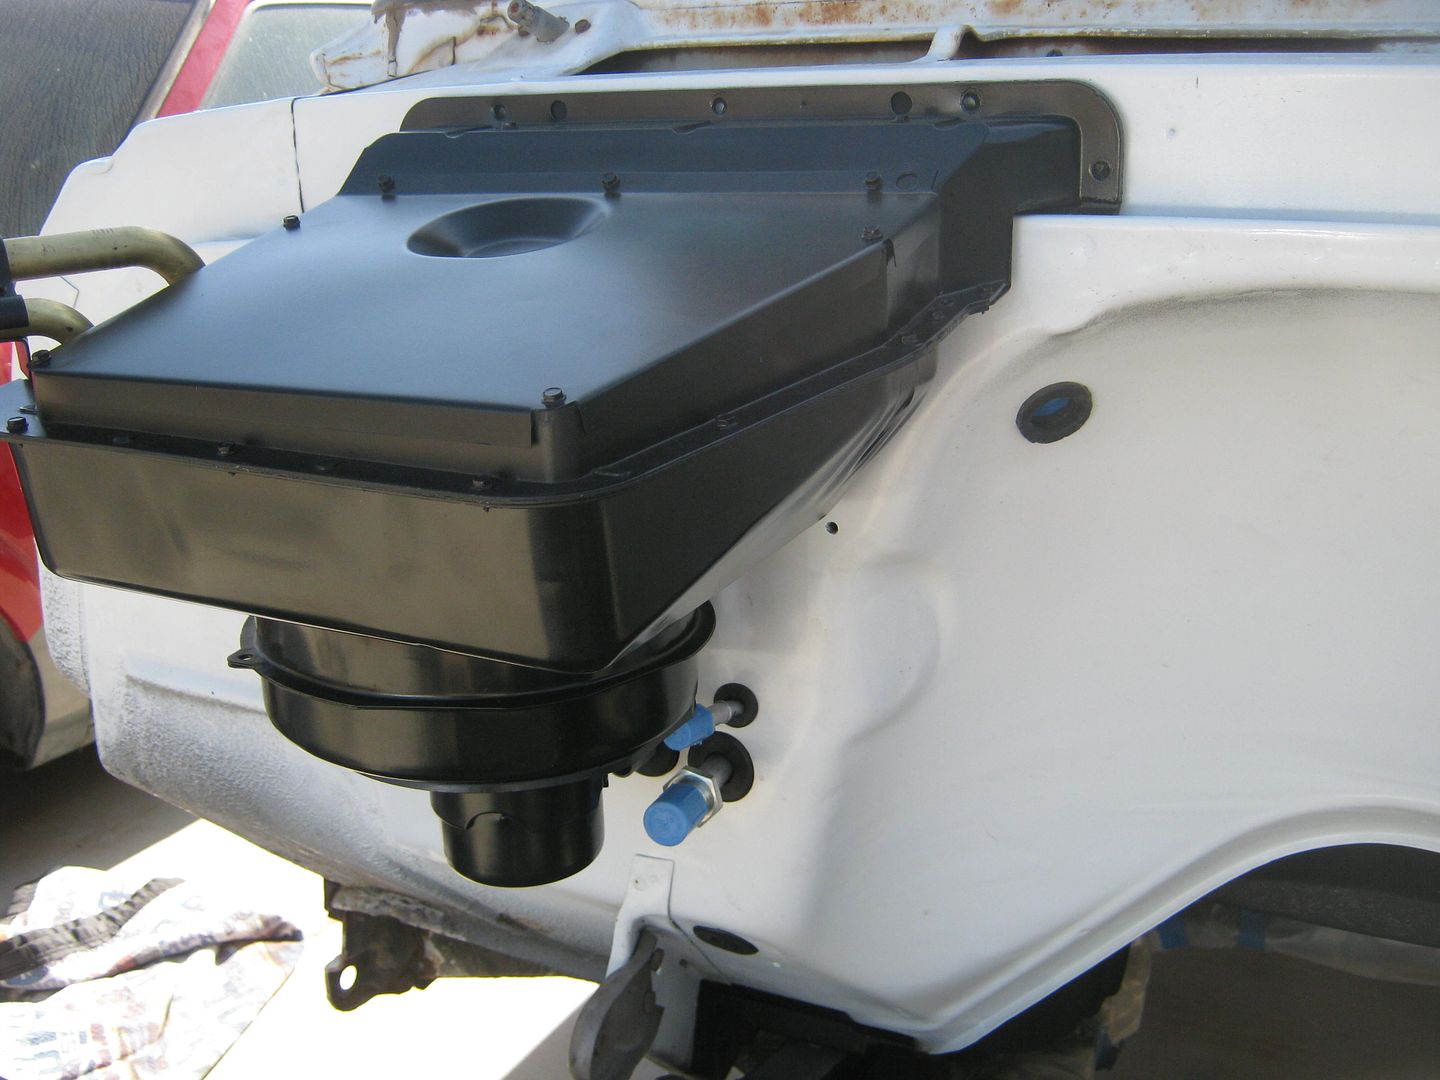
I had some time today, so I decided to finally install the A/C evaporator box and the heater box. I was rapidly running out of space on my workbench, so I really needed to start installing the parts I had restored. Both parts went in really well, no issues at all. If you recall in an earlier post, I spent a lot of time on my firewall getting the evaporator line feedthru holes sized so I could use a bulkhead grommet for a cleaner look. After seeing it all together, I think it turned out really nice and clean:
  here's an inside shot of the top of the evaporator box, looking from the glovebox. I spent a lot of time on the cables, cleaning and oiling them, and getting them routed with no binding, and they operate so easy now. 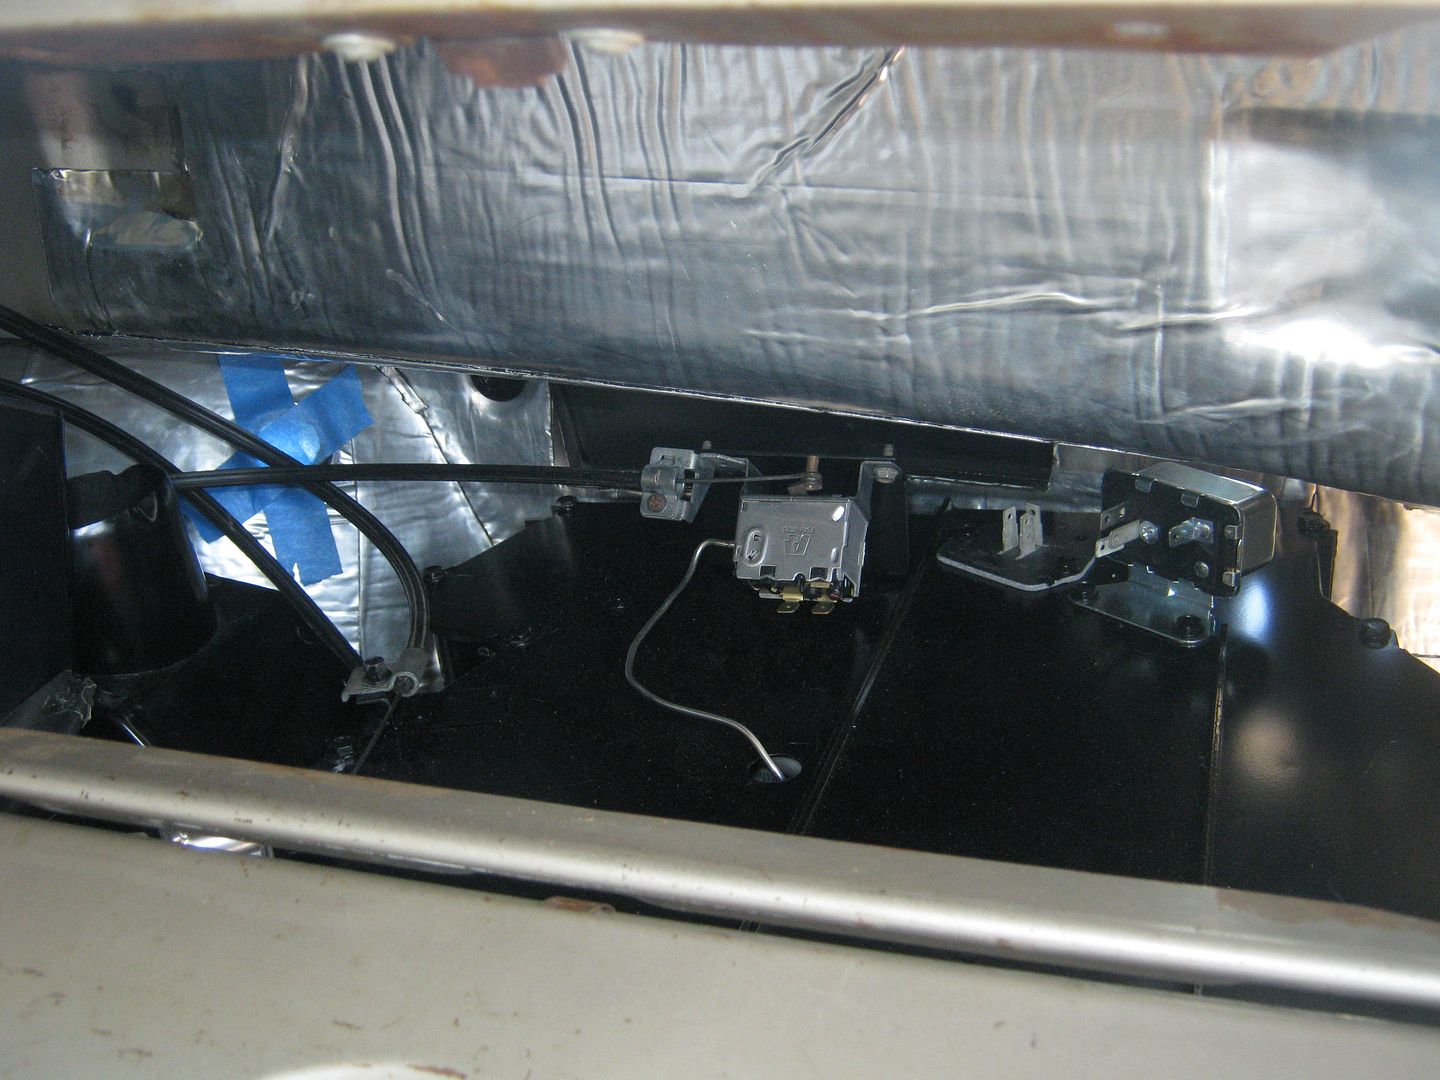 Tomorrow, I plan on final installing the heater box, installing the heater control panel and cables, installing the A/C center bezel, cutting off the clutch pedal, and continuing to install the sound deadener. A big thanks to Brad (hotrod49) for picking up the grommets while he was in L.A. doing a striping job on an ultra-secret project. Seriously, it's a hush-hush thing that he'll tell everybody about later.
__________________
Check out my latest endeavor: https://roundsixpod.com My build threads: '55 Chevy: http://67-72chevytrucks.com/vboard/s...d.php?t=247512 '64 C-20: http://67-72chevytrucks.com/vboard/s...d.php?t=446527 |
|
|
|
|
05-26-2013, 10:08 PM
|
#320 |
|
Registered User
Join Date: Sep 2012
Location: Midway, NC
Posts: 3,275
|
Re: Project '64 Cheapskate
Looks really clean!
__________________
http://67-72chevytrucks.com/vboard/s...d.php?t=581873 The low buck build threads. Check'em out! http://67-72chevytrucks.com/vboard/s...d.php?t=666022 My build thread Crossmembers CC |
|
|
|
|
05-26-2013, 10:45 PM
|
#321 |
|
Registered User
Join Date: Apr 2003
Location: Indep, MO
Posts: 5,893
|
Re: Project '64 Cheapskate
Ooooooo, cleeeeean! Yaaay, putting stuff together!
Posted via Mobile Device
__________________
Boppa's Old Yeller Truck Build, Old Yeller's New Heart! Project Buzz Bomb Flyin' Low! |
|
|
|
|
05-27-2013, 04:00 PM
|
#322 |
|
chevy only
 Join Date: Sep 2006
Location: Phoenix, AZ
Posts: 6,619
|
Re: Project '64 Cheapskate
man you do some nice work!
__________________
CHEVY ONLY... Nothin Else ! |
|
|
|
|
05-27-2013, 09:59 PM
|
#323 | |||
|
Registered User
Join Date: Mar 2005
Location: apple valley, ca
Posts: 2,670
|
Re: Project '64 Cheapskate
Quote:
Quote:
Quote:
Your "One and Done" event looked like a blast!! You guys knocked it out of the park!!
__________________
Check out my latest endeavor: https://roundsixpod.com My build threads: '55 Chevy: http://67-72chevytrucks.com/vboard/s...d.php?t=247512 '64 C-20: http://67-72chevytrucks.com/vboard/s...d.php?t=446527 |
|||
|
|
|
|
06-30-2013, 10:20 PM
|
#324 |
|
Registered User
Join Date: Mar 2005
Location: apple valley, ca
Posts: 2,670
|
Re: Project '64 Cheapskate
It's been awhile since I've posted on this thread, but that doesn't mean that I haven't been getting anything done on the '64. Quite the opposite, actually. I have been working on the brake system, and there is a design issue with the '60-'66 trucks that has always bugged me and I decided to do something about it. I have never liked the brake pedal height (way too high) and I have always thought that the trucks that have had the disc brake conversion have the wrong pedal ratio. There's too much brake pedal travel. After some thought, research, and fabrication, I may have come up with the answer.
I'm not a fan of buying expensive aftermarket parts because I try to stretch my "project money" as far as possible. I was adamant that this mod had to be inexpensive and utilize as many factory parts as possible. First of all, let's talk about brake pedal ratio. Instead of going through a long discussion about theory, here's a link that explains it easily: http://www.piratejack.net/index.php?...d=14&Itemid=21 I calculated the pedal ratio of the stock, manual brake pedal on my '64 and came up with 6.8-1. That's just fine for manual brakes, but wrong for power brakes. After some calculation, I determined that if you move the linkage attach point on the pedal down 1.5", you can get a brake ratio of 4.1-1, perfect for power brakes. So, I got a 3/8" drill bit and drilled the new hole. I mocked everything up, but I didn't like what I saw. Now, the linkage from the pedal to the booster would be going up at a steep angle to depress the plunger in the booster. I didn't like this at all: 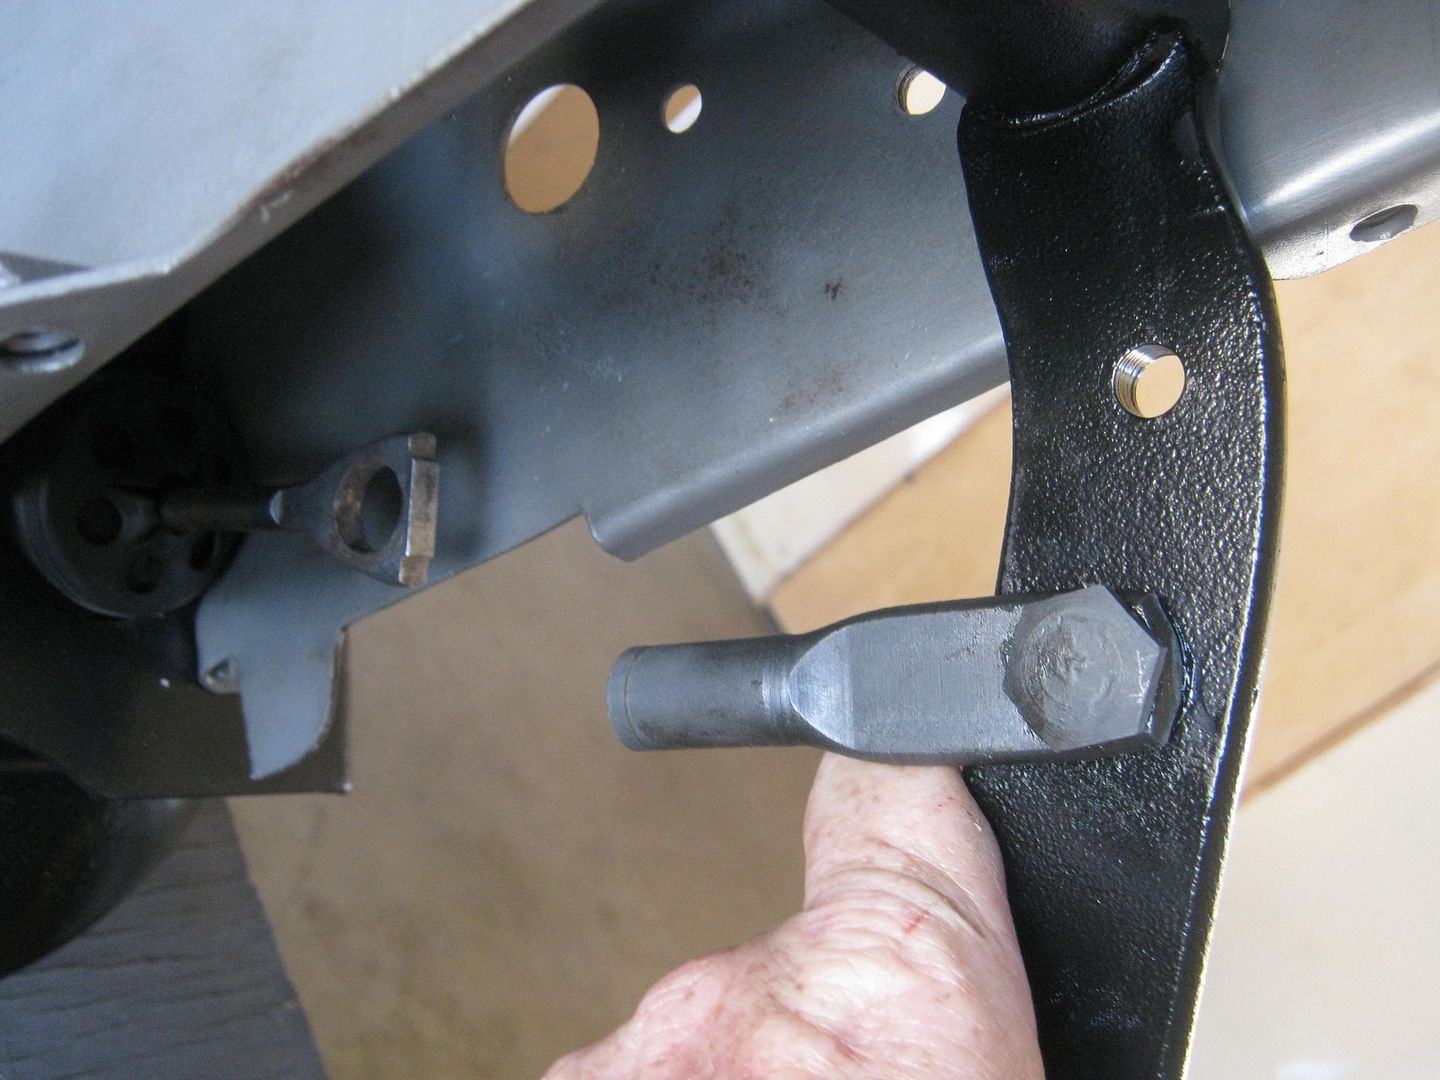 I have one of Capt. Fab's booster adapter brackets (HIGHLY recommended) and have a 1996 S-10 booster. The biggest issue (at least to me) about using a late model booster is what to do with the eyelet on the end of the booster rod. A lot of guys will chop them off and re-thread the rod for a clevis or a heim joint. I actually LIKE the eyelet, but just couldn't figure out how to integrate it into my linkage. The only way for it to work was that it had to be supported so the booster rod would stay in a stationary arc. I pulled the pedal/clutch pedal assembly out of the truck and noticed that there was an unused hole about 3" back from the brake pedal hinge pin. It was obviously used on another truck application, probably the C60 and up models. I measured the i.d. of the hole, and came to the conclusion that it was the exact same size hole as the brake pedal hinge pin. Thank You, GM!! 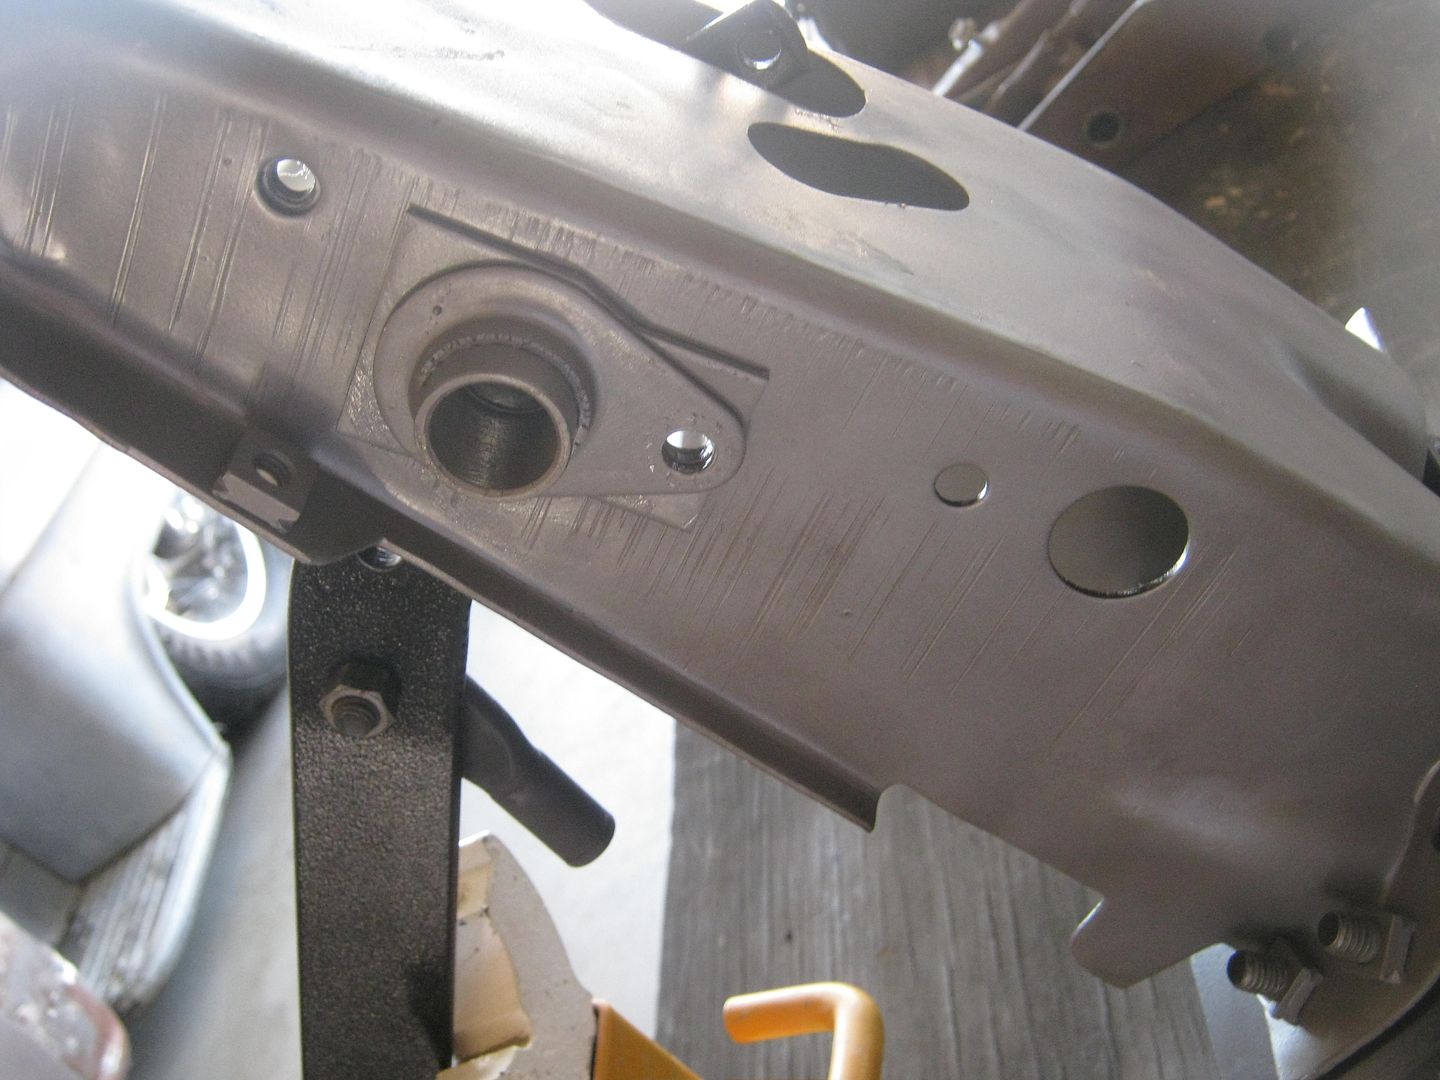 Now, I knew how I was going to support the booster eyelet. I went to the wrecking yard and got another brake pedal and hinge pin. I wound up getting the entire assembly for $12.50. In this picture, you can see the pin slid into the previously un-used hole, and the attach bolt lined right up. 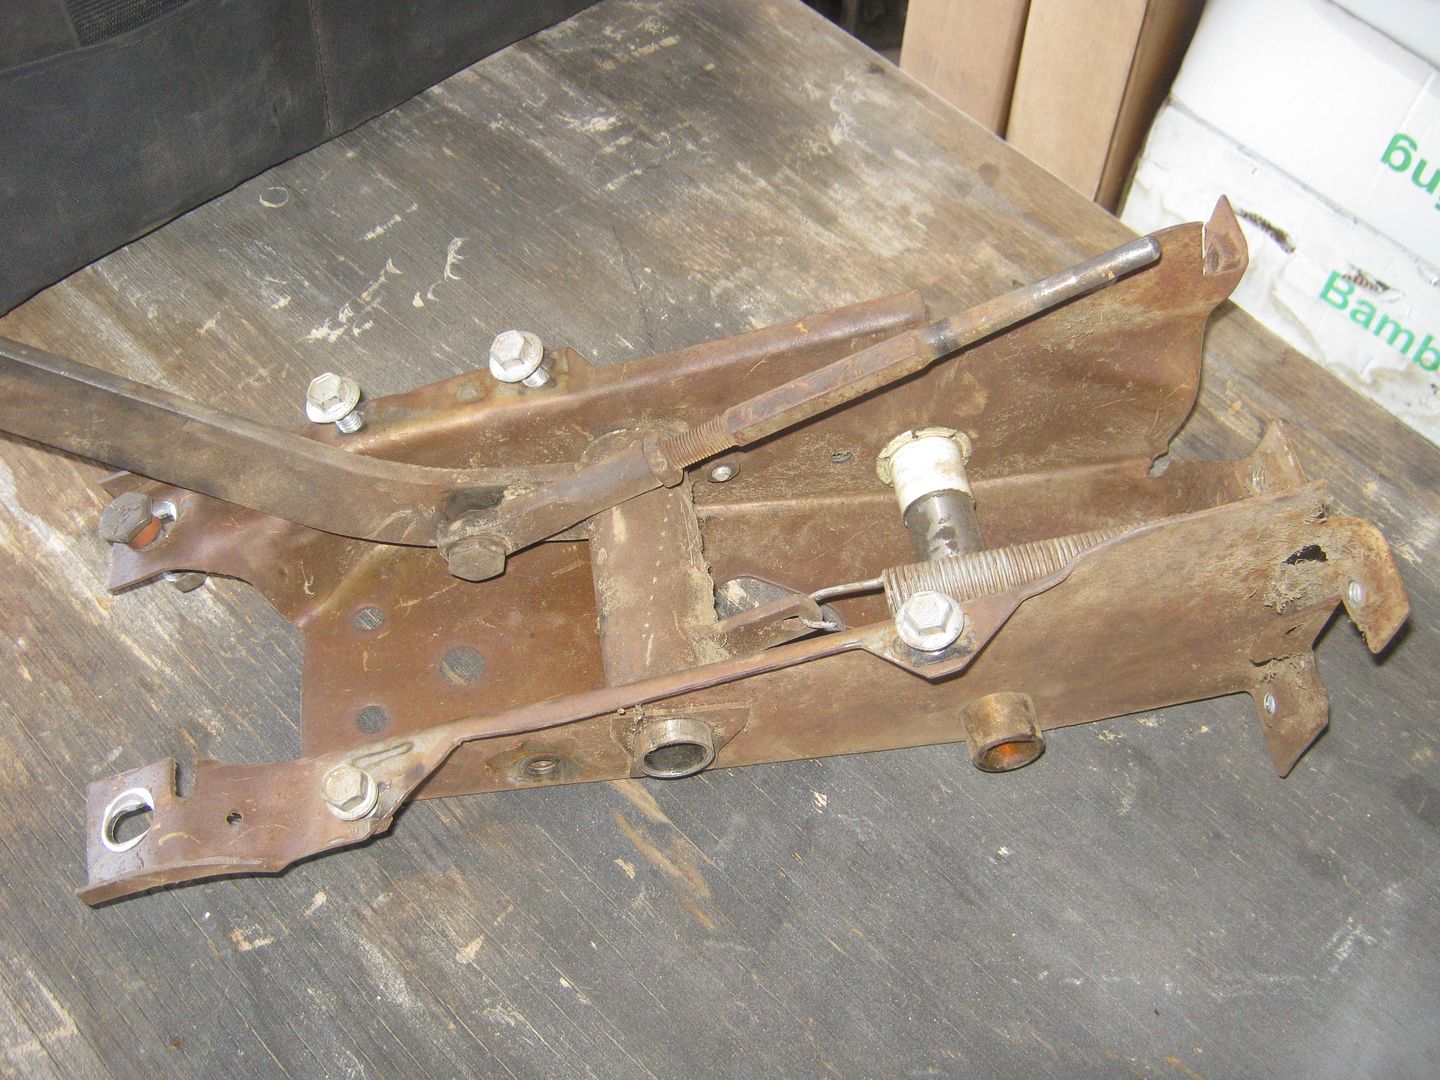 Here's the trial run mock-up. I did a quick chop on the extra brake pedal and basically turned it into a bellcrank. The existing hole in the brake pedal for the factory brake linkage worked out fine. You can see that the clevis on the brake pedal (the pedal painted black) will now attach to the tab on the chopped pedal. 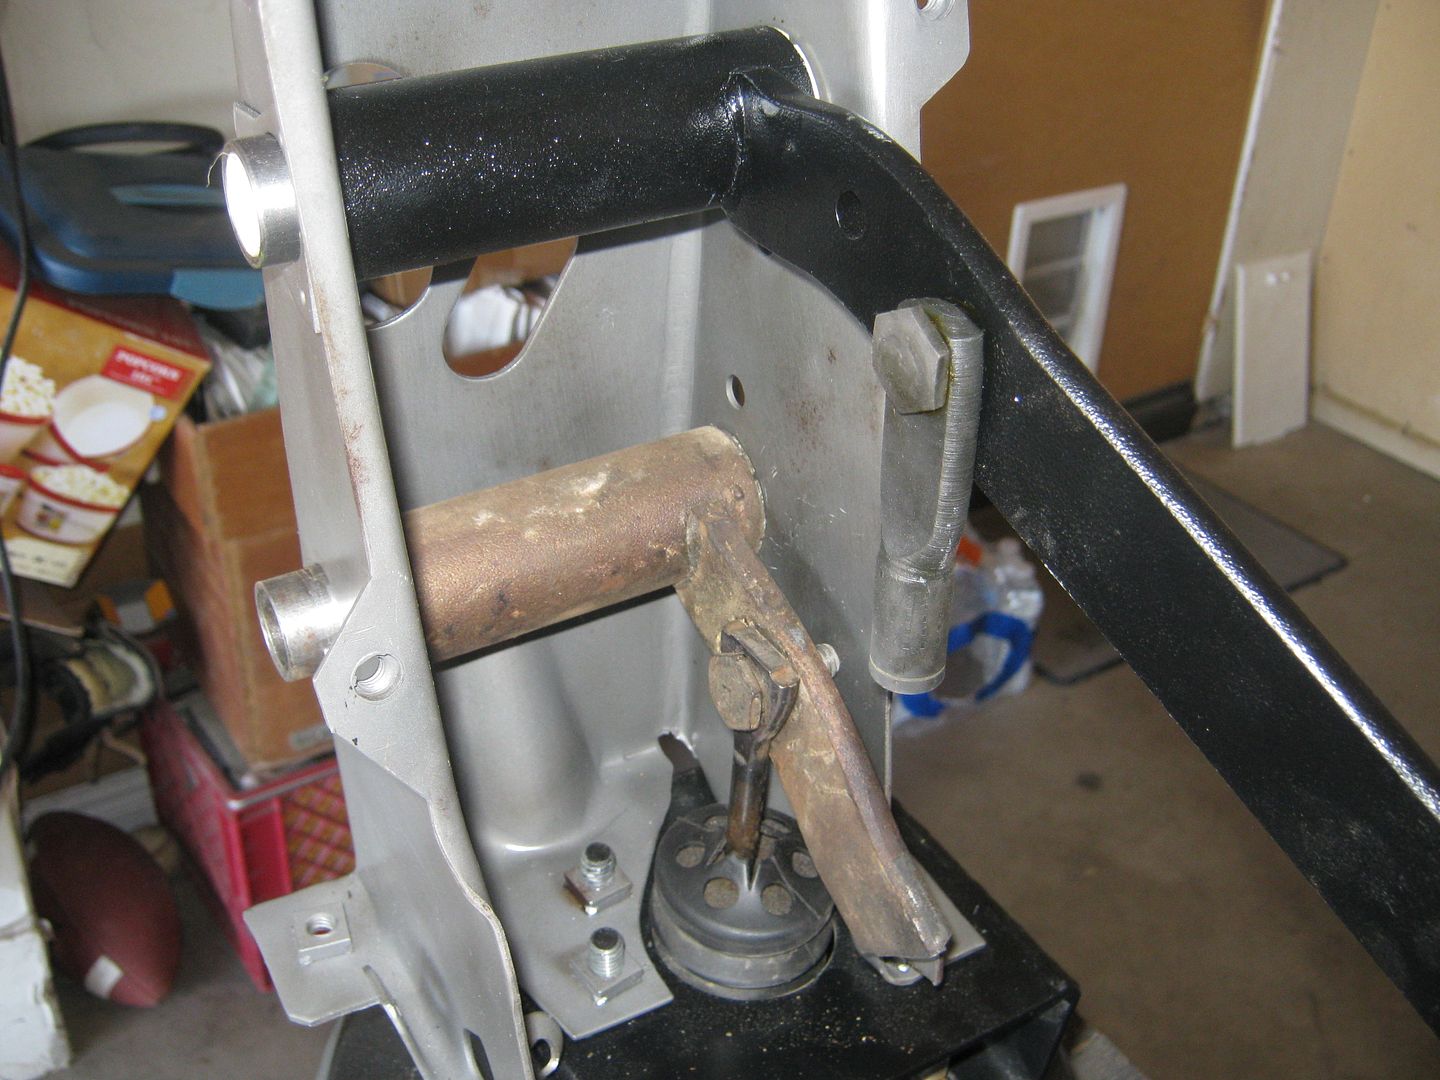 Here's what the chopped pedal looks like after a little grinding and some paint. I want this to look 100% factory. 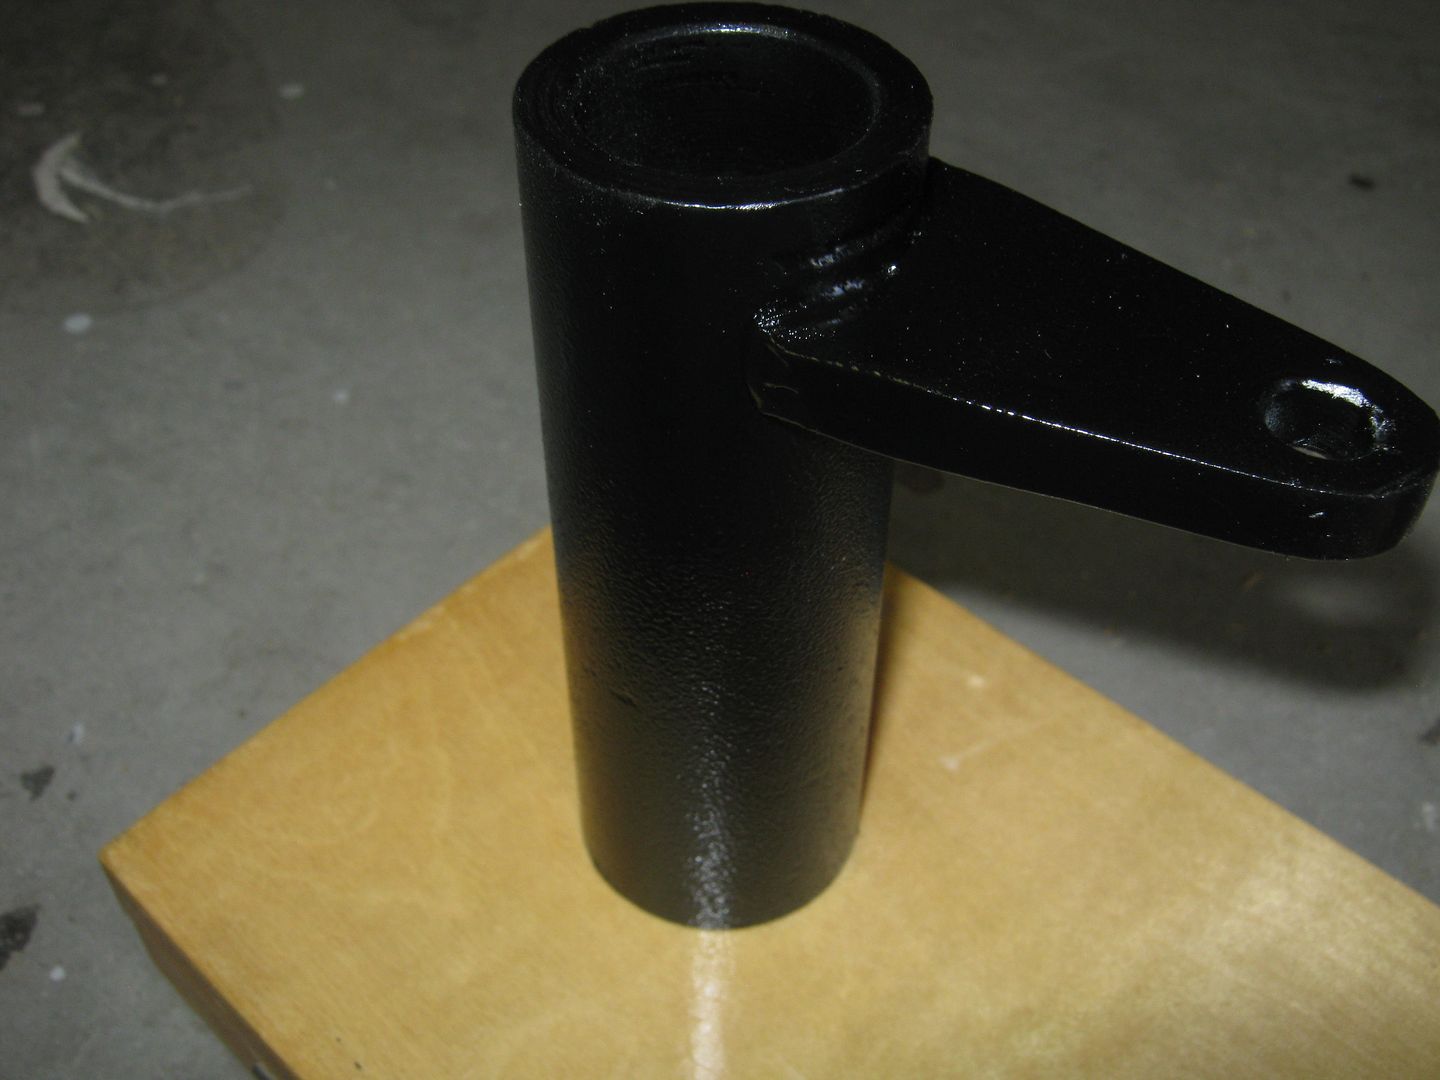 Here's a picture of the set-up mocked in place. You can see how the bellcrank now supports the eyelet. You can also see the reinforcement pieces around the penetration holes for the hinge pin on the rear pin. I drilled out the spot welds on the piece I got from the wrecking yard and spot-welded the plates to the pedal support in order to make it all look factory. The issue now is how to attach the bellcrank to the stock brake pedal. 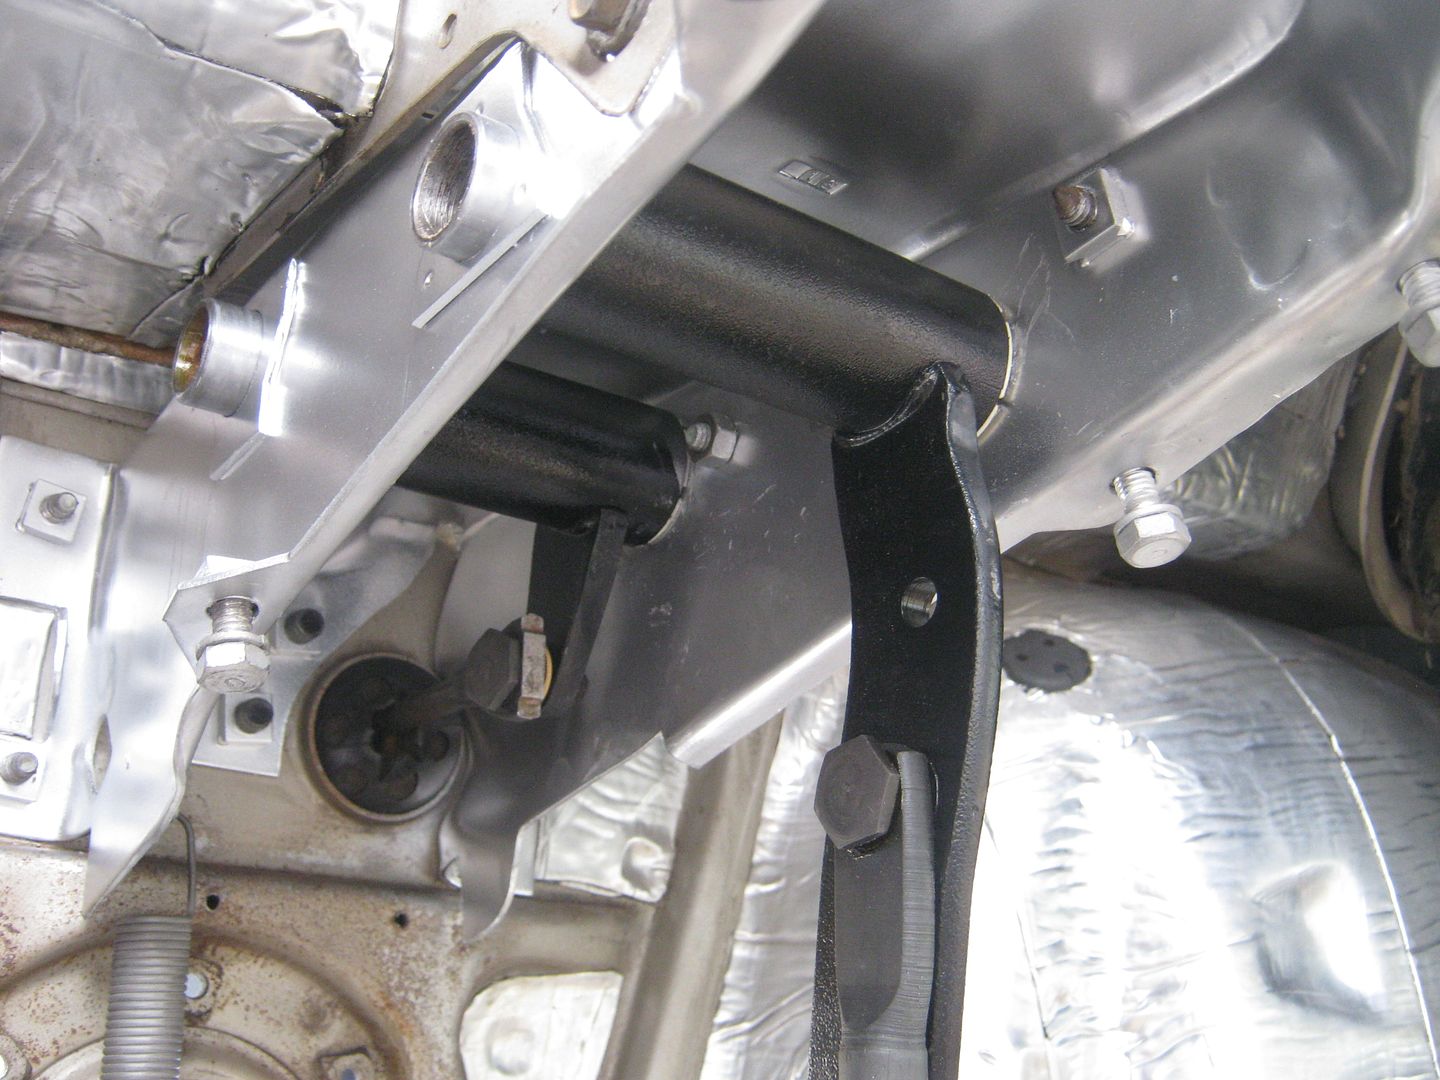 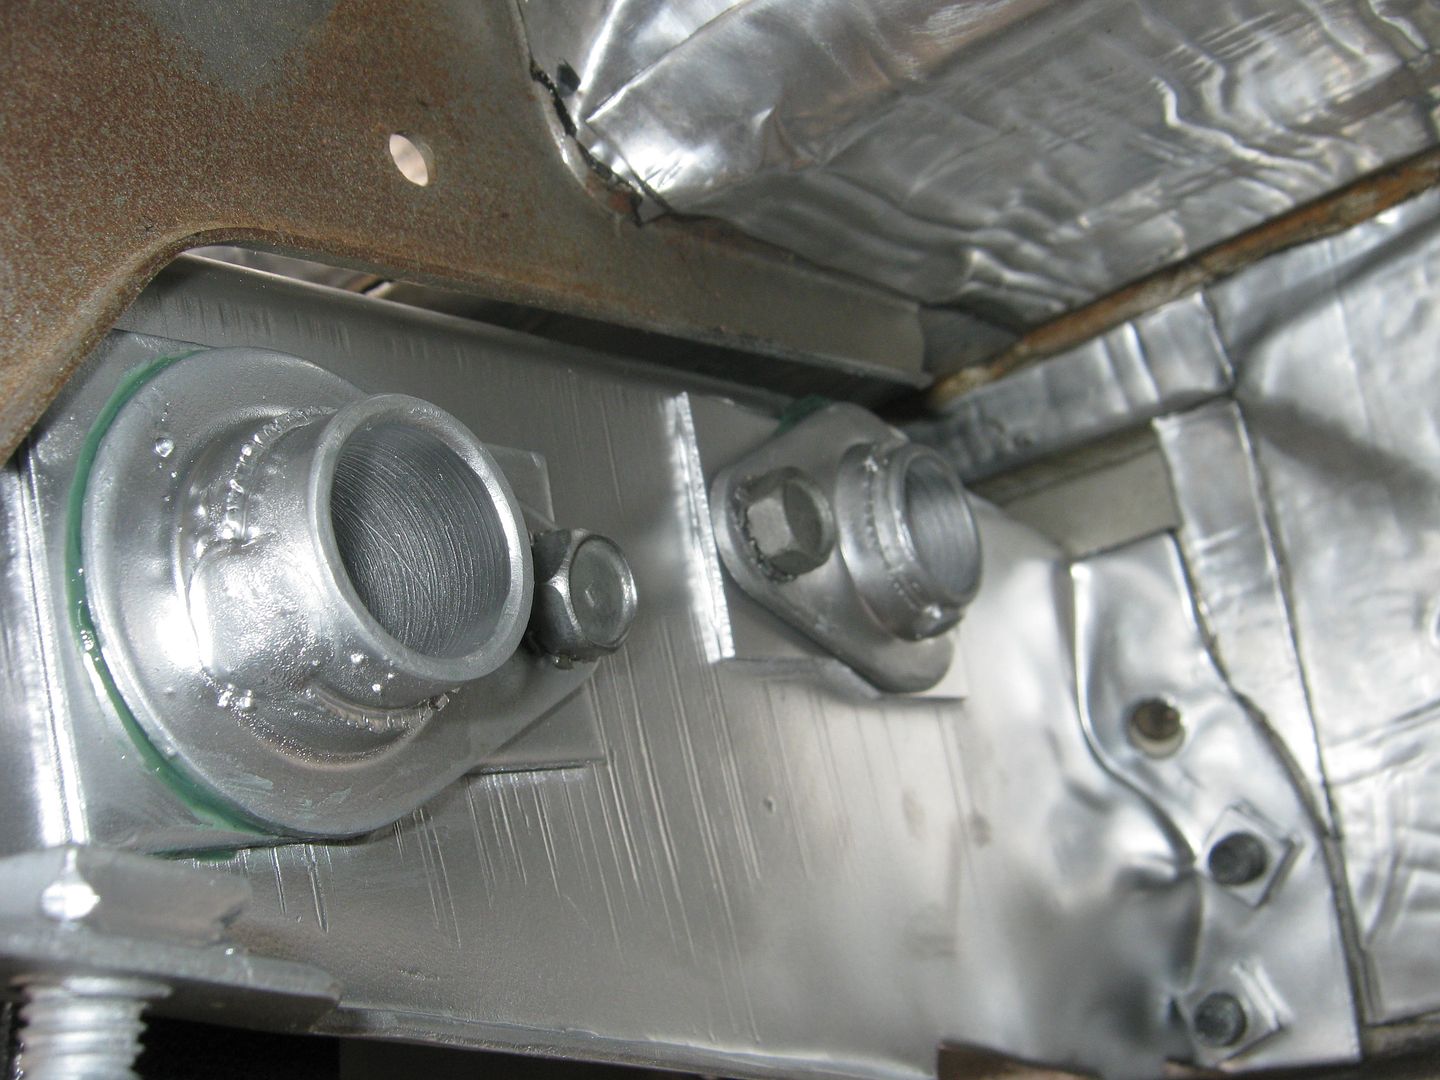 It had to be a clevis of some sort, preferably one that captured both sides of the bellcrank/booster rod connection. Brad was at the bolt shop and they had the perfect clevis. It's about 2.5" long, and the span of the jaw was .500", and it was a whopping $5. I measured the total width of the booster eyelet and the bellcrank tab, and it was .585", so the jaw was opened up slightly. The clevis is threaded on the end to accept a 7/16-20 fine thread bolt, just like the factory linkage. The only goofy thing about the clevis is that the eyelet holes are 7/16", so the factory hole in the brake pedal (which is now the bellcrank) needed to be opened up to 7/16". The eyelet in the booster is .640", which means that you will need to find or fab a bushing with an outer diameter of .640 and have an inner diameter of .437 (7/16"). I found a bronze bushing at Lowes with an o.d. of 5/8" (.625) and an i.d. of 3/8" (.375)., and it cost $3.88. The o.d. would work, but I opened the i.d. to 7/16" and chopped the total end to end length to .275. It worked perfectly. The linkage rod is merely a 2.5" 7/16-20 set screw, and it cost $1.80. The through bolt is a Grade 8, 2" long. The bolt head had to be ground down to about .250" tall in order to clear the side of the structure when the brake pedal is depressed. After all of the attach points were greased, the linkage works like butter, and the booster rod depresses the plunger with very little change in height. Another thing that this mod did was move the brake pedal closer to the floor. No longer will you have to lift your leg completely off of the seat to push the brake. Mission accomplished! 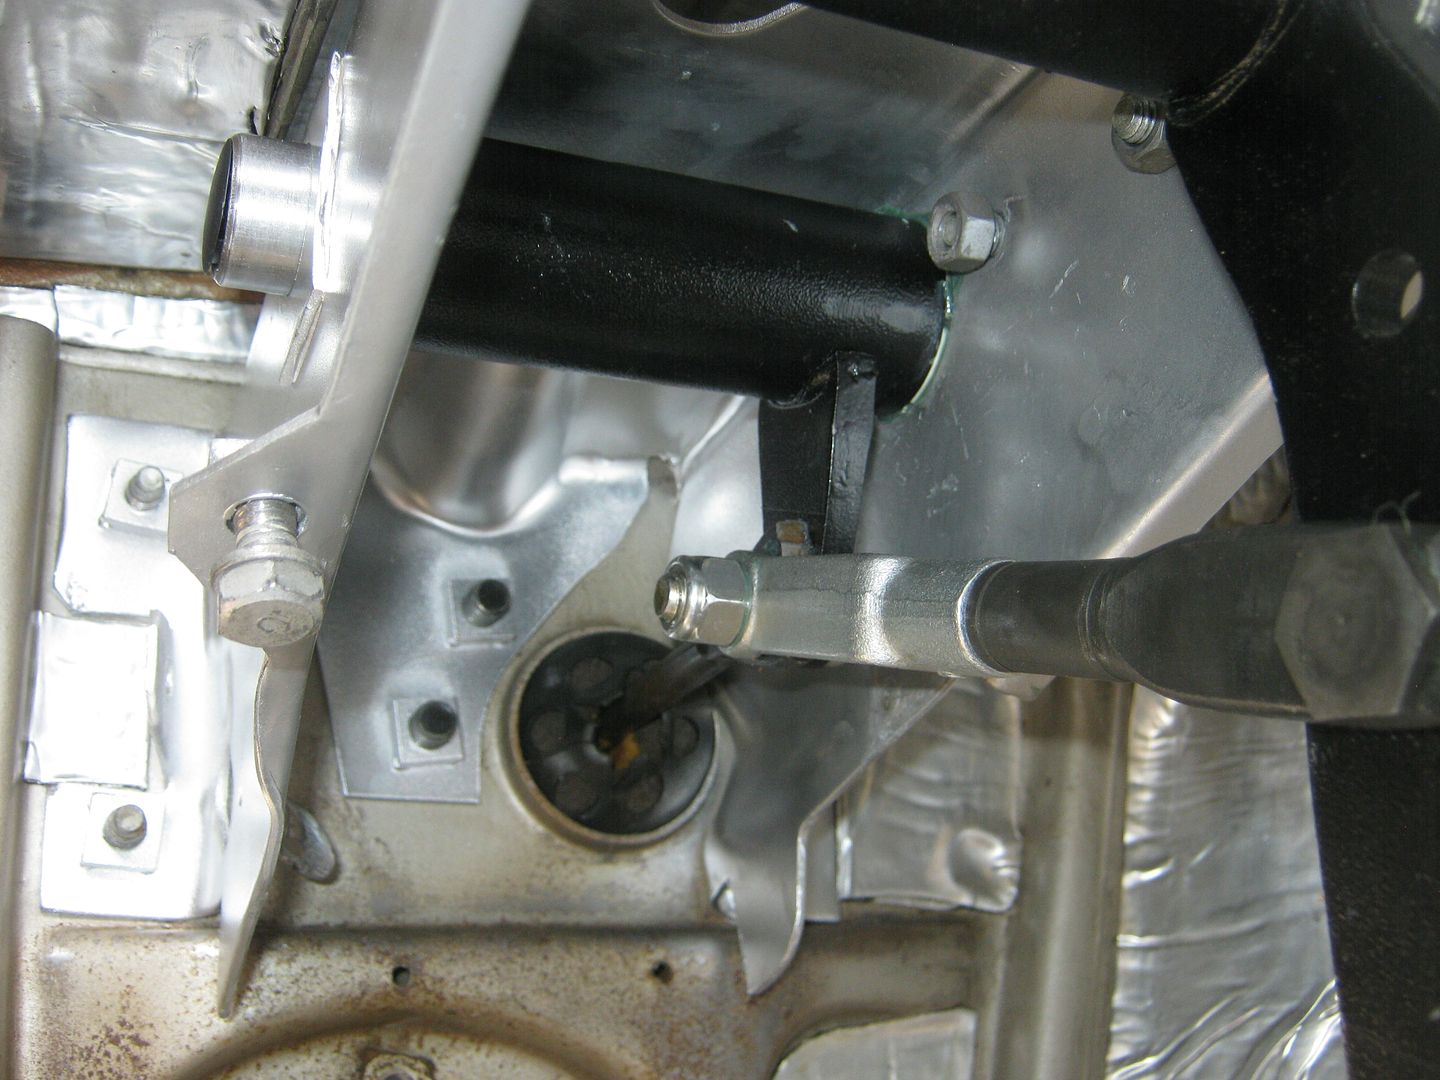 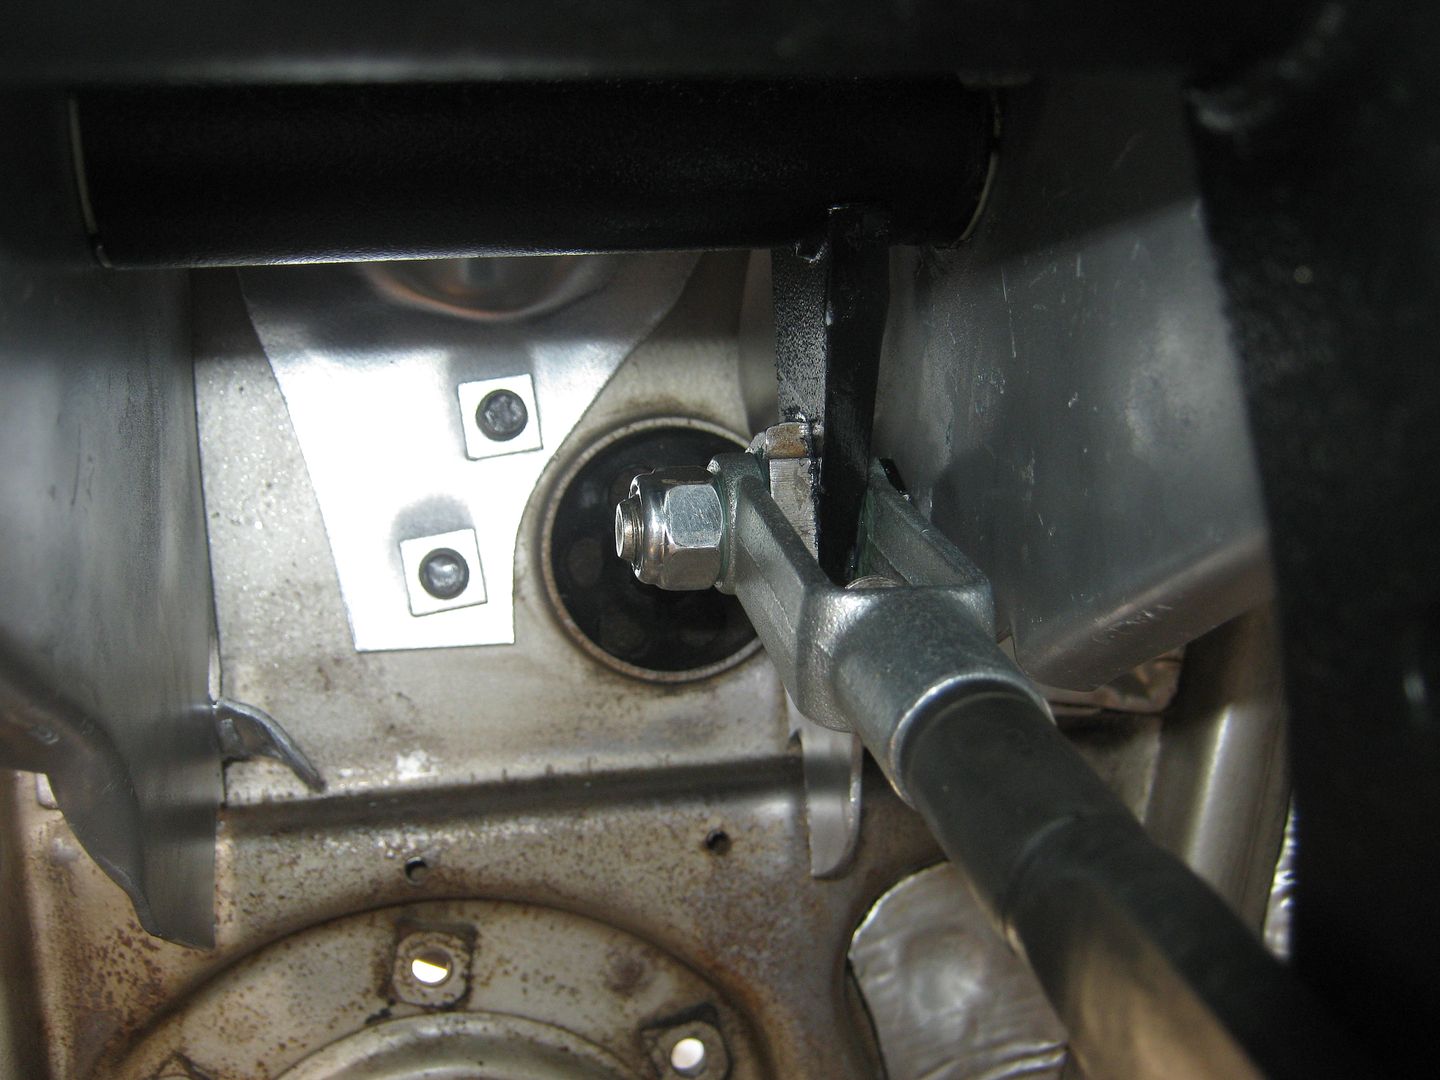 Sorry for the long explanation, but I think that this mod will help anybody wanting to make their brakes work better and have vastly improved ergonomics. Plus, it was cheap, and I like that!!
__________________
Check out my latest endeavor: https://roundsixpod.com My build threads: '55 Chevy: http://67-72chevytrucks.com/vboard/s...d.php?t=247512 '64 C-20: http://67-72chevytrucks.com/vboard/s...d.php?t=446527 Last edited by chevyrestoguy; 06-30-2013 at 10:26 PM. |
|
|
|
|
06-30-2013, 10:42 PM
|
#325 |
|
But Found Her 25yrs Later!
Join Date: Oct 2010
Location: Oregon City, Oregon
Posts: 10,471
|
Re: Project '64 Cheapskate
This is another one of my favorite threads.
Nice job. Posted via Mobile Device
__________________
I lost my 65 - Found it 25 years later: http://67-72chevytrucks.com/vboard/s...d.php?t=426650 66 C20 Service Truck: http://67-72chevytrucks.com/vboard/s...d.php?t=428035 |
|
|
|
 |
| Bookmarks |
|
|


 Linear Mode

