
|
 11-12-2021, 06:38 PM
|
#151 |
|
Senior Member
 Join Date: Sep 2017
Location: Bryan, Texas
Posts: 2,275
|
Re: Project Fargolet
That interior looks great!
__________________
8man-aka Robert 1948 on a S10 Frame, small block with a carb 1954 Cab, 53 Front and Bed, 50 Doors, S10 Frame, Power TBD Build thread: "]http://67-72chevytrucks.com/vboard/showthread.php?t=746899&highlight=wife%27s+48[/URL] [/URL]http://67-72chevytrucks.com/vboard/showthread.php?t=840204 |

|

|
|
11-12-2021, 10:18 PM
|
#152 |
|
Registered User
Join Date: Jan 2012
Location: Motown
Posts: 7,666
|
Re: Project Fargolet
nice work on the interior panels

__________________
cool, an ogre smiley  Ogre's 58 Truk build Ogre's 58 Truk buildhow to put your truck year and build thread into your signature shop air compressor timer |
|
|
|
|
11-27-2021, 07:56 AM
|
#153 |
|
Registered User
Join Date: May 2009
Location: Grey County Ontario
Posts: 205
|
Re: Project Fargolet
Thanks guys! This interior is actually turning out to be more interesting and fun than I expected. I made a little more progress, and I finally got my hands on a sheet of ABS plastic and here are the results.
The very first thing I worked on was a firewall pad. The good news was that a couple of years ago I got my hands on a cruddy old Fargo firewall section. I needed one tiny stainless steel loop that holds down the rear of the hood, and found an entire firewall section that still had the loop on it. I scooped it up for 20 bucks, removed the stainless loop and then forgot all about the cruddy, rotten firewall. I remembered it as I was getting ready to make a cardboard template, and dragged it out of the meadow and into my shed. What a delight it was to use that scrap piece to make a template without crawling around under a dash! Of course that old section of firewall didnt have all the stuff that I have attached to my firewall, and this is where I learned a valuable lesson about planning ahead. I had given absolutely no thought to installing a firewall pad when I modified and installed that monstrously over-gussetted S10 steering column support & brake booster/pedal assembly. I also wasnt thinking about firewall pads when I welded a bunch of studs and little brackets onto the firewall in order to easily secure the giant S10 wiring harness. As a result, my pad would not cover the entire firewall and had to deal with a lot of protrusions. Lesson learned! Here is the cardboard template sitting in that old section of a firewall:  Here is the ABS piece (prior to cutting all the required slots & holes):  Forming that ABS piece turned out to be a bit of a challenge. The ABS sheet I got is ⅛ inch, and while it does flex nicely into large gentle curves, it is still quite strong. The only way to form tight curves is to heat it (which I knew I would have to do). The slowdown in this process was due to the fact that my heat gun only puts out 1300 Watts, which is really not great when bending such a big piece of plastic. Here is the ABS piece, clamped in place and resisting my efforts to bend it:  I was finally able to do it, but it took a combination of heavy pressure and putting the heat gun right up close to the ABS to get full effect of what little heat my gun would put out. I wanted it to conform fairly tightly to my firewall curves, so I made this little gizmo:  And now it was just a matter of getting the plastic as hot as possible, while at the same time applying heavy pressure on the forming tool:  I also had jute padding under the ABS while I did all this so that the dimensions would be correct when I formed it. Here is the pad after forming and cutting to match up with obstructions/protrusions, and adding the jute layer:   And here it sits in place:   I also used ABS to replace the small masonite panel over the passenger shoulder area that I had cracked. What an absolute treat it is to work with this stuff! If I was to do this again on a future build I would: -Make the firewall pad when the cab is completely stripped and access is easy (I wont likely have a convenient scrap section of firewall like I did on this truck). Id make it full sized as I could always trim it to fit later. -Put more thought into how I mount stuff so that the pad is easier to install or remove -Use a far stronger heat gun More to follow! |
|
|
|
|
11-27-2021, 09:35 AM
|
#154 |
|
Senior Member
Join Date: Sep 2017
Location: Bryan, Texas
Posts: 2,275
|
Re: Project Fargolet
Looking good. You picked up working on that ABS fast.
__________________
8man-aka Robert 1948 on a S10 Frame, small block with a carb 1954 Cab, 53 Front and Bed, 50 Doors, S10 Frame, Power TBD Build thread: "]http://67-72chevytrucks.com/vboard/showthread.php?t=746899&highlight=wife%27s+48[/URL] [/URL]http://67-72chevytrucks.com/vboard/showthread.php?t=840204 |
|
|
|
|
11-27-2021, 12:02 PM
|
#155 |
|
Senior Member
Join Date: Mar 2011
Location: West Plains, Missouri
Posts: 7,553
|
Re: Project Fargolet
Nice job, thanks for posting...Jim
__________________
my build thread: http://67-72chevytrucks.com/vboard/s...d.php?t=459839 Jimbo's long bed step build:http://67-72chevytrucks.com/vboard/s...t=464626<br /> |
|
|
|
|
11-27-2021, 06:51 PM
|
#156 |
|
Registered User
Join Date: Sep 2019
Location: Maynooth, Ontario, Canada
Posts: 174
|
Re: Project Fargolet
Nice job as always.....Keep at it...I'm sure you will be done by spring.
__________________
http://67-72chevytrucks.com/vboard/s...82#post8619382 |
|
|
|
|
11-28-2021, 02:40 PM
|
#157 |
|
Senior Member
 Join Date: May 2007
Location: Doodah Kansas
Posts: 7,747
|
Re: Project Fargolet
your attention to detail is great!
__________________
the mass of men live lives of quiet desperation if there is a problem, I can have it. new project WAYNE http://67-72chevytrucks.com/vboard/s...d.php?t=844393 |
|
|
|
|
11-28-2021, 09:56 PM
|
#158 |
|
Registered User
 Join Date: Mar 2007
Location: Scotts, Michigan
Posts: 3,749
|
Re: Project Fargolet
That formed ABS panel looks great from here.
Marc
__________________
...........__________ .................. ((__|__||___\____ ..;.;;.:;:;.,;..;((_(O))____ (_(O)) 1948 Chevy Truck - Finished SOLD!! 1953 Chevy Suburban "Family Truckster" Completed: Spring of 2021 http://67-72chevytrucks.com/vboard/s...d.php?t=605484 1994 4x4 Blazer - "Field Find" https://67-72chevytrucks.com/vboard/...ferrerid=30857 |
|
|
|
|
01-03-2022, 07:23 PM
|
#159 |
|
Registered User
Join Date: May 2009
Location: Grey County Ontario
Posts: 205
|
Re: Project Fargolet
Door latches
I have wasted more time trying to find door latches for this build than you can possibly imagine. Original replacement latches for this truck simply cannot be had. The factory that has the tooling has apparently been promising the vendors that it will ship next month for the last year or two. The used supply has dried right up (you would not believe the calls I made trying to find some). I need some way to operate these doors, so I decided to go with some bear claws/jaws (Ive seen them referred to both ways). Once the new latches become available, I can easily toss in a set.
With this being said, I had to decide whether or not to post what I did on this forum. I have focussed so far on posting S10 swap details, or generic old truck stuff, as my truck is not an AD or TF. Im going to deviate just a bit here, as I had to figure out how to make a latch system for the Fargo. The process is however just a bunch of old truck stuff so I figured Id post anyhow, as some members may someday be faced with a similar situation on one of their builds. Of course for AD/TF trucks you can simply go and buy a brand new latch for $41.99 (I swear my next build will be something more popular so that I can actually get parts!). Here was the problem and the fix: This is what I started with. The truck came with the complete passenger side assembly, as well as the arm that runs from the inner handle remote to the latch on the driver side (I found that arm sitting in the bottom of the drivers door). The passenger assembly was in ghastly condition, with all springs broken and all moving parts worn down to nothing. The remote also had its moving parts worn smooth.  While I had previously posted a pic of the drivers side latch that came with the truck, I feel compelled to post it again!!!  I made a mockup of the small size latch assembly sold by hotrodlatches.com (they post excellent detailed dimensions on their website and have been favourably reviewed on other forums).  The original location of the factory latch assembly would not have been optimal, due to the large divot in the B-pillar where the factory striker was mounted. I was also hoping to leave things alone so that I have the option of returning to original latches and locks once they become available again. I played around, and sure enough I found a sweet spot where a new latch could sit above the old location. Now that I saw it would work, I ordered the latches (as an fyi, the owner of the company that sells the latches is very decent to deal with and he replies to tech questions quickly). Once I had the latches, I grabbed one and placed it where the old passenger side latch sat, then slid it upwards until it hit a glass run channel brace. In this position it leaves the old latch opening unobstructed. This turned out to be a very good thing during subsequent fab work. Id like to say I planned it this way, but as usual it was dumb luck. After examining the space available for the striker bolt on the cab body, I installed the bear claw on the door. I slid it ¼ inch away from the door corner to allow more room for linkages inside the door. Here is the latch, bolted in place, and the door cut away where the claws and striker pin sit.  I then fooled around with the factory handles to see if it would be feasible to hook these up to a bearclaw. Once again, dumb luck intervened on my behalf. The original arm that connects the interior handle remote control to the original latch reached the bearclaw location without any modifications. Hooking it up was simple. I needed to add a linkage post to that arm in order for it to attach to the bearclaw, so I just cut the threads off of a ¼ inch bolt, leaving the smooth round shoulder on. I then drilled a hole in the shortened bolt, so that later on I could assemble things using R clips (also called hitch pin clips, hair pin clips, etc.). Access is tight, so I needed something that could be installed and removed using needle nose pliers.  I tacked the post onto the arm, and a quick test showed that this would work. Heres a shot of that arm (actually this pic was taken a fair while later, as I eventually needed a 2nd post).  Now that I knew the inner handle would operate the bearclaw, I tackled the outer handle. This proved to be a little trickier. The outside handle assembly consists of the chrome handle, the small housing that screws against the door, and a 5/16 square rod that goes inside the door. It also has an internal spring and some sort of ball & socket cup that allows the handle and square rod assembly to swivel within the chrome housing (likely to allow for somewhat sloppy production tolerances). Heres a shot of me holding that assembly (Im squeezing it a bit to show how it can swivel within the chrome mounting housing).  The problem was that the 5/16 square rod was designed to be supported on the end where it slides into the stock latch assembly. Trying to fab up a mechanism that attached to the end of the square rod was futile (I tried!) because the swiveling of the rod & handle within the chrome mount always led to binding problems. The only solution I could see was to fab something that would anchor that loose end. Heres what I did: The square rod needed to be made a bit longer, so I welded on a piece of round rod to get the required length. I then added an arm, along with a ¼ inch attachment pin that would connect the handle assembly to the bearclaw latch via another arm. I then made a small cup assembly that would attach to the door and keep that handle assembly from flopping around and binding.   I had something a little more elegant in mind for all this, but then I remembered that whatever I add to that square rod has to fit through a rather small opening in the door. Here it is, being weaseled into place through that hole:  The cup was spot welded to the inner door, a bit of grease was added, and I now had a square shaft that rotated along a fixed line.  This made all the difference in the world, as the binding problem vanished. The location of the outer handle and square rod was not optimal for attaching directly to the bearclaw latch, so I simply fabbed an arm that connected the square shaft to the inner remote arm:  The next issue was the fact that the original factory latch mechanism had the springs that returned the 2 door handles to their resting position. Bearclaw latches do not provide this, so I needed to make something. This turned out to be quite easy, as all I needed to do was add a spring to what I had already fabbed. I added a hook to the inner remote arm .. 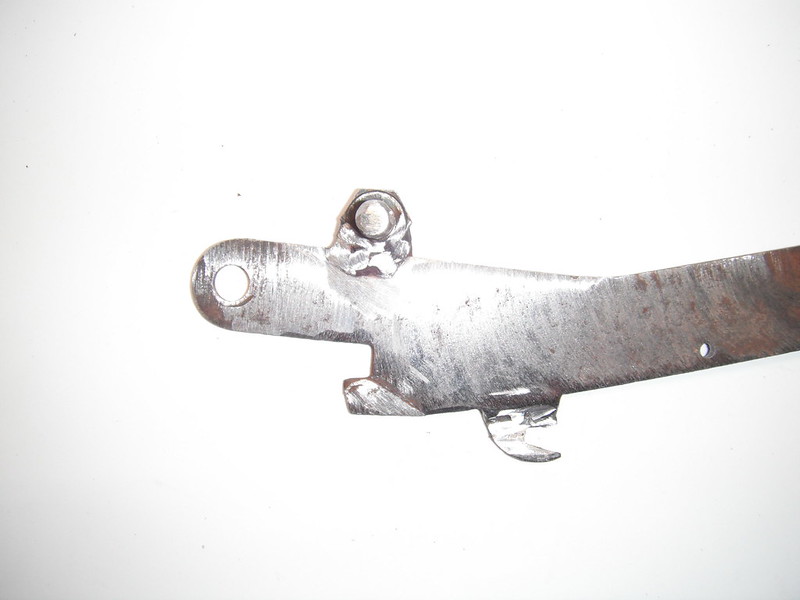 .and then I whipped up a little hook on a bracket ..  The hook/bracket combo was just bolted into the existing (and no longer needed) lower factory latch holes:   The fact that the bearclaw location left the original factory latch hole exposed really paid off during all of this work. Lots of stuff could easily be worked on, and now it was a simple task to use a pair of needle nose pliers to get a spring hooked up between the 2 hooks that I had just added. By adding the spring to the remote arm, both the inner and the outer door handles return to their resting position when released. Here is a shot of the works, laid out on a table:  And heres an idea of how it goes together (its impossible to get a pic of it inside the door):  I tossed it all back inside the door, and did some fine tuning. The return spring was too weak, so I grabbed a bigger spring which I had to mount a little differently, but what a difference it made.  I then made up a fresh arm for the outer door handle. Heres a pic of the old arm (the upper one in the pic), and the new arm.  The old arm design resulted in the outer door handle moving when you used the inner door handle. By adding an oblonged hole, the outer door handle now sits still when you open the door from within the truck. Just when I thought I had it all licked, I discovered that the oblonged hole also allows some unrestricted rotation of the outside door handle in a counter clockwise direction:  This would result in the handle bouncing upwards whenever I hit a bump (which is constant on the gravel roads around me). Thankfully the solution to this problem was simple. I added a small tab to the square rod of the handle, and a small shelf to the spring retaining bracket. This creates a hard stop, and ensures that the outer handle remains horizontal (the way it came from the factory):  Another reassembly of the entire system showed that things were finally in order. The outer handle sits level, and it is not influenced by the inner handle. Now all that was needed was some sort of cover that can be easily removed if I have to take things apart:   I still have to do the driver side, but thats only a couple of hours work. It was the sittin, starin and thinkin that burned off countless hours on the passenger side. |
|
|
|
|
01-04-2022, 12:43 AM
|
#160 |
|
Senior Member
Join Date: Mar 2011
Location: West Plains, Missouri
Posts: 7,553
|
Re: Project Fargolet
Great fabrication work and well thought out...Jim
__________________
my build thread: http://67-72chevytrucks.com/vboard/s...d.php?t=459839 Jimbo's long bed step build:http://67-72chevytrucks.com/vboard/s...t=464626<br /> |
|
|
|
|
01-04-2022, 09:29 AM
|
#161 |
|
Senior Member
Join Date: Sep 2017
Location: Bryan, Texas
Posts: 2,275
|
Re: Project Fargolet
^^^What he said! Nice work.
__________________
8man-aka Robert 1948 on a S10 Frame, small block with a carb 1954 Cab, 53 Front and Bed, 50 Doors, S10 Frame, Power TBD Build thread: "]http://67-72chevytrucks.com/vboard/showthread.php?t=746899&highlight=wife%27s+48[/URL] [/URL]http://67-72chevytrucks.com/vboard/showthread.php?t=840204 |
|
|
|
|
01-04-2022, 10:43 AM
|
#162 |
|
Registered User
Join Date: Sep 2018
Location: Ontario
Posts: 789
|
Re: Project Fargolet
^^^^^ Yes, what they said.^^^^^
Thanks for sharing
__________________
https://67-72chevytrucks.com/vboard/...=797726&page=3http://https://67-72chevytrucks.com/...=797726&page=3 51 Chev 5 window on S10 with SBC 1958 Pontiac Wagon build https://67-72chevytrucks.com/vboard/...d.php?t=849781 |
|
|
|
|
01-04-2022, 05:46 PM
|
#163 |
|
Registered User
Join Date: Sep 2019
Location: Maynooth, Ontario, Canada
Posts: 174
|
Re: Project Fargolet
You have the patients of a saint....
__________________
http://67-72chevytrucks.com/vboard/s...82#post8619382 |
|
|
|
|
05-07-2022, 08:03 PM
|
#164 |
|
Registered User
Join Date: May 2009
Location: Grey County Ontario
Posts: 205
|
Re: Project Fargolet
Thanks guys, those latch mechanisms were a bit of a bugger to figure out! The driver side went quickly though, and I just found a vendor that sells lockable replacement outer handles so I may spring for a pair of those. I am just waiting till I have my final list of missing bits and pieces so that I can do it all in one order, as shipping fees are brutal.
Little things ..I still had a pile of little things to do, but I have been severely slowed down by a basement renovation and the addition of a golden retriever puppy to our household in November. I had forgotten how much work puppies can be. I had been picking away at the Fargolet, but I had been lucky to get a couple of hours into it every few days. Heres whats happened: Door weatherstripping turned out to be fun. My vendor listed a door weatherstripping kit for this model and year of truck, but I later found out that these trucks only had a seal on the bottom edge of the door, and the rest of the sealing was handled by the interior windlace. My vendor sent me the wrong bottom seal, and a generic universal seal for me to figure out how to do the rest of the door. I was not impressed. I lucked out though as the generic seal was really decent and easy to work with. Im not sure if anyone else has used this, but its a Clesters model 8122-315.  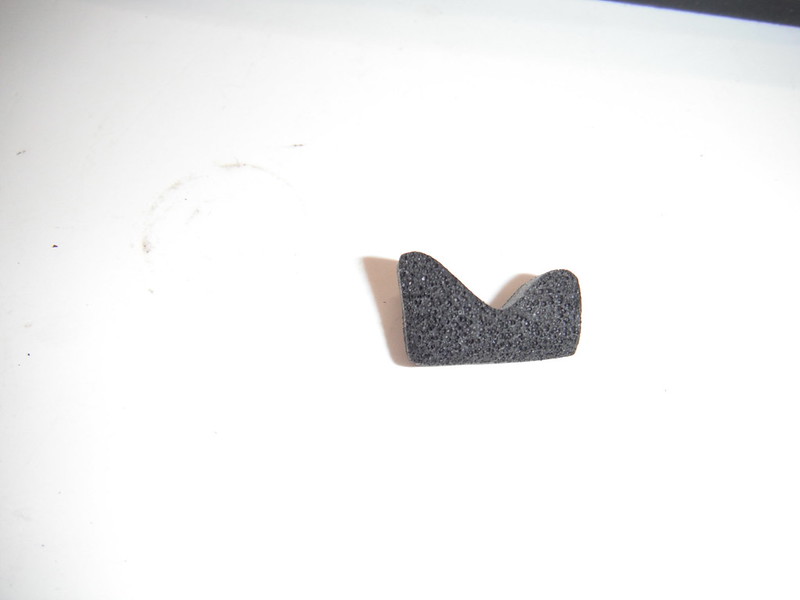 By applying it to the door, I was able to go all the way around (top, sides and bottom), and the seal would squish beautifully into the recessed lip that runs around the door like this:  Of course there had to be a problem. That little lip does not exist in the area of the original door latch:  So it was back to metalwork ..I grabbed a piece of sheet steel and bent it in half so that I would have a smooth, rounded edge that won't catch on clothing, and then bent/shaped it to conform to the weird body line in the area of the original door latch:  And then I grabbed the welder and air grinder and installed it:  Now I could glue down that weatherstripping into the corner of the doors, all the way around the doors:  I used the 3M weatherstrip adhesive, and that stuff is a treat to work with. After the 24 hour full cure time was done, I gave the doors a few gentle pushes to see how they closed (I had already done some tests earlier with the weatherstrip temporarily taped in place so I knew it should work). I was very happy with the results. The doors did require a gentle slam at first in order to squish down that brand new weatherstrip, but within a day it had broken in and both doors required only fingertip pressure to close firmly, with a satisfying thunk sound. The bearclaws worked perfectly, and the doors pop open slightly as soon as you turn the handles. On my last build, the weatherstripping kit included rubber that was so hard it took months before the doors would close without having to slam them. A flashlight test around the doors indicated no obvious daylight coming past the weatherstripping, but only a road test will confirm this. Time will tell, but so far I really like that weatherstrip. It squishes easily, and bounces right back to full size when I open the doors. Next came the door window sweepers. I was looking forward to popping them into place and seeing how it looked, but again my vendor sent me some generic universal clips instead of the originals. Here's the original clip in my hand, surrounded by what I received:  The originals (which are still reproduced) can be snapped onto the sweepers and then pushed into place in the door holes in seconds, and they are easily removable. The new universal ones were so tight (and shaped wrong) that I had to modify each one with a die grinder, then carve out some fuzzy material in the sweeper as the sharp prongs were too short, then use a hammer and punch to force the prongs to bend over and grab the sweeper.    Next came carpet. I put down some butyl vibration dampener first, then added a jute layer. I had made a template for the carpet piece out of construction paper and I transferred the pattern to the carpet I bought and then carefully cut it out. Of course I marked the carpet on the underside (where it's smooth and easy to mark), but I forgot to reverse the template. When I went to test fit it, I realized that I had done a perfect job of cutting out a mirror image of what I actually needed. My leftover carpet section was of course a few inches too small, so I had to run to town to get more carpet. I got the carpet, did it all over again (but remembered to flip the template this time), and did some test fitting and trimming. I had cut the carpet so that it slips under the kick panels and the firewall pad, but there were still exposed edges along the doors which are very visible. Someone had posted a video about dressing up carpet edges (it was here on this site, but I cant remember where), so I decided to give it a try. I cut up some black vinyl strips and sewed them down with the rear of the vinyl facing upwards, about a half inch in from the carpet edge:  The vinyl then gets wrapped around the edge, and secured by tape so that it does not shift during the next step: 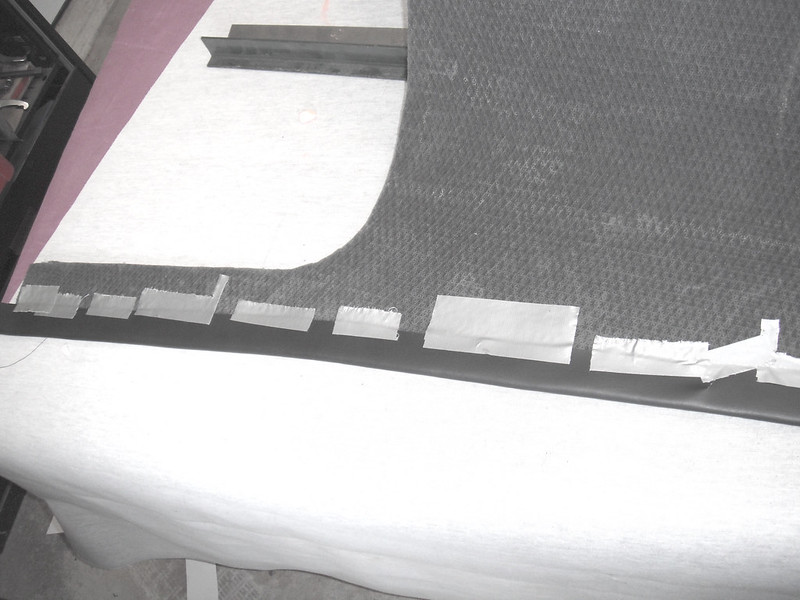 Another stitch line on the top surface is then added to secure the vinyl that is wrapped over the edge and taped underneath. The black thread completely disappears into the black carpet, and this is the trimmed up edge that results:  And here it sits where the carpet edge is most visible:  The bulk of the carpet is held firmly down by the kick panels and firewall pad, but I needed something along the door edges to keep it firmly in place. I used industrial velcro in my previous build and it worked well (actually too well, that stuff grabs like you wouldnt believe).  I also put carpet/jute/vibration damper under the seat and on the thin strip of floor behind the seat:  It was starting look kinda sharp, but the exposed seat frame detracted from it, so I grabbed some ABS scraps and made a couple of covers to dress up that area: 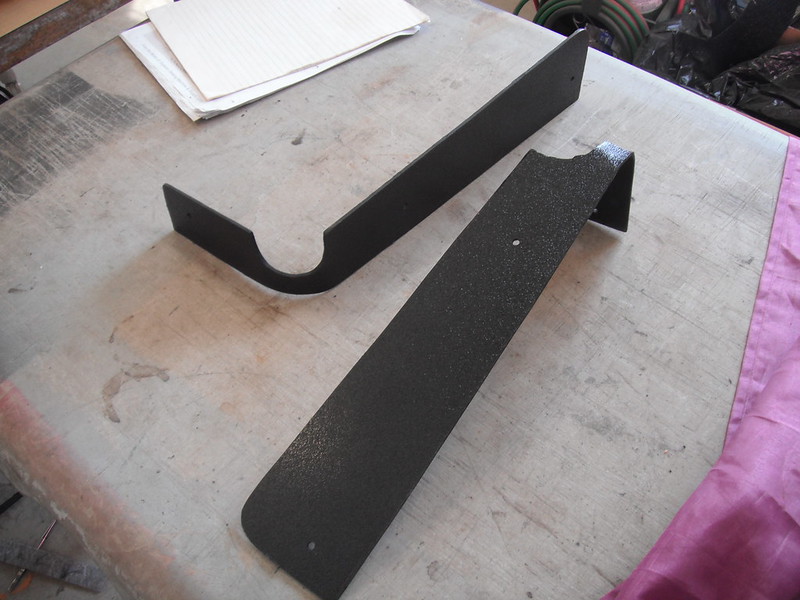  I now started to get quite excited about how things were shaping up, so I ran to town, grabbed a bunch of trim screws and started putting everything back together. I installed the rear window and added its trim, as well as remaining interior panels, door surround trim, seatbelts, etc. I eventually will cover the doors with matching vinyl, but I need to get my hands on something thinner to use as a backing material. Those black ABS panels are 1/8th thick, and by time I wrap the vinyl around them that's way too big to fit into that trim channel that runs across the top and one side.   As I had the sewing machine set up (and had retaught myself how to use it) I made up the required 4 strips of hood and cowl lacing seals and installed them (and yes, I still plan on replacing that horrible orange overflow hose with something more subtle!):   I finally got the wiper arms installed and set to the correct angles (I tried to figure out the resting position of both arms by looking at internet pics, only to discover that everybody does it differently). I opted for this:  I was pretty much ready, and was doing some pre-safety inspection checks when I realized that my brake pedal was spongy. I went through a bit of an ordeal before finally getting things sorted out. After that it was inspection time. I was pleasantly surprised when it passed! I then had to deal with some paperwork and get an appraisal done for insurance. Once that was completed it was off for a test drive and any required debugging. I was very pleased with the ride. Its tight and responsive (OK, its no sports car but it has a nice, firm feel). Braking is beautiful, potholes dont knock out my fillings, and best of all, its super quiet inside the cab. I am in the debugging stage, but so far all Ive identified has been some minor wind noise and a fuel gauge problem that appears to be the sender (which sucks because of its location). For now I will simply keep the tank topped up, as I will likely change the gauges in the future and the sender I need will depend on which gauge set I buy. To all of the members who have answered my many questions, as well as those who posted detailed descriptions of their S10 swaps, thanks!!!!!!! 
|
|
|
|
|
05-07-2022, 08:19 PM
|
#165 |
|
Senior Member
Join Date: May 2007
Location: Doodah Kansas
Posts: 7,747
|
Re: Project Fargolet
jeeze a lou thats really great work!
__________________
the mass of men live lives of quiet desperation if there is a problem, I can have it. new project WAYNE http://67-72chevytrucks.com/vboard/s...d.php?t=844393 |
|
|
|
|
05-08-2022, 08:36 AM
|
#166 |
|
Senior Member
Join Date: Sep 2017
Location: Bryan, Texas
Posts: 2,275
|
Re: Project Fargolet
That interior is gorgeous! Nice work all around.
__________________
8man-aka Robert 1948 on a S10 Frame, small block with a carb 1954 Cab, 53 Front and Bed, 50 Doors, S10 Frame, Power TBD Build thread: "]http://67-72chevytrucks.com/vboard/showthread.php?t=746899&highlight=wife%27s+48[/URL] [/URL]http://67-72chevytrucks.com/vboard/showthread.php?t=840204 |
|
|
|
|
05-09-2022, 08:07 AM
|
#168 |
|
Registered User
Join Date: Nov 2014
Location: somewhere, PA
Posts: 1,021
|
Re: Project Fargolet
congrats! that thing has made a huge transformation and it's awesome
|
|
|
|
|
05-09-2022, 09:53 AM
|
#169 |
|
Senior Member
Join Date: Mar 2011
Location: West Plains, Missouri
Posts: 7,553
|
Re: Project Fargolet
Great work, truck looks good...Jim
__________________
my build thread: http://67-72chevytrucks.com/vboard/s...d.php?t=459839 Jimbo's long bed step build:http://67-72chevytrucks.com/vboard/s...t=464626<br /> |
|
|
|
|
05-09-2022, 10:13 AM
|
#170 |
|
Registered User
Join Date: Sep 2018
Location: Ontario
Posts: 789
|
Re: Project Fargolet
Wow, that looks fantastic.
Congratulations on the 'first drive'. Thank you for sharing your skills with such detailed explanations, very informative. Time to get out there and enjoy the ride.
__________________
https://67-72chevytrucks.com/vboard/...=797726&page=3http://https://67-72chevytrucks.com/...=797726&page=3 51 Chev 5 window on S10 with SBC 1958 Pontiac Wagon build https://67-72chevytrucks.com/vboard/...d.php?t=849781 |
|
|
|
|
05-09-2022, 10:35 AM
|
#171 |
|
Registered User
Join Date: Mar 2007
Location: Scotts, Michigan
Posts: 3,749
|
Re: Project Fargolet
Looks great. Just think how easy it would have been to build this truck if there were aftermarket parts to support it. The amount of parts/stuff you made was crazy..
Well done Marc
__________________
...........__________ .................. ((__|__||___\____ ..;.;;.:;:;.,;..;((_(O))____ (_(O)) 1948 Chevy Truck - Finished SOLD!! 1953 Chevy Suburban "Family Truckster" Completed: Spring of 2021 http://67-72chevytrucks.com/vboard/s...d.php?t=605484 1994 4x4 Blazer - "Field Find" https://67-72chevytrucks.com/vboard/...ferrerid=30857 |
|
|
|
|
05-10-2022, 12:53 AM
|
#172 |
|
Senior Member
Join Date: May 2007
Location: Doodah Kansas
Posts: 7,747
|
Re: Project Fargolet
I agree with marc, its crazy how much (great) innovation there is in 7 short pages.
__________________
the mass of men live lives of quiet desperation if there is a problem, I can have it. new project WAYNE http://67-72chevytrucks.com/vboard/s...d.php?t=844393 |
|
|
|
|
05-10-2022, 08:45 AM
|
#173 |
|
Senior Member
Join Date: Sep 2017
Location: Bryan, Texas
Posts: 2,275
|
Re: Project Fargolet
Impressive work! Thanks for sharing.
__________________
8man-aka Robert 1948 on a S10 Frame, small block with a carb 1954 Cab, 53 Front and Bed, 50 Doors, S10 Frame, Power TBD Build thread: "]http://67-72chevytrucks.com/vboard/showthread.php?t=746899&highlight=wife%27s+48[/URL] [/URL]http://67-72chevytrucks.com/vboard/showthread.php?t=840204 |
|
|
|
|
07-16-2022, 03:33 PM
|
#174 |
|
Registered User
Join Date: May 2009
Location: Grey County Ontario
Posts: 205
|
Re: Project Fargolet
Thanks guys (and gal!). This build has been a lot of fun, and quite interesting as well. The debugging continues, and so far nothing serious has popped up. The truck runs nice & cool with that Speedway radiator and electric fan combo, which is good as shows & cruise nights are underway. I did learn a lesson about fuses for electric fans though. My fan is rated at 16.5 amps, but that is the constant draw when running. I had originally tossed in a 20 amp fuse, but the start-up draw blows those. A switch to a slightly bigger fuse fixed that.
I have been working my way through squeaks and rattles. On paved roads I have very little, but on washboard stretches of gravel roads I have some. To be fair, even my new vehicles dont like these stretches of road, so I shouldnt be too excited. Lesson learned though: next time pay close attention during the build and always test things to see if they could possibly shake and cause a racket. After adding a few bits of foam seal to the cab at the front of the passenger door, I was able to get rid of one loud bit of wind noise I was experiencing, and that cab is now pleasantly quiet. Its not perfect, but some wind noise on old trucks appears to be somewhat inevitable. I can however carry on a normal conversation at 50 mph (this is a first for me as my previous builds were all noisy inside!). The combination of thorough weatherstripping, vibration damper, jute padding and vinyl covered hardboard really worked. I added a beat up tool box to the bed to hold stuff like a jack, tools, hood props, etc:  The S10 seat still looks a bit out of place, but it is exceptionally comfortable. I can go for an hours drive and hop out just as fresh as when I got in. Ive been searching for some old style rims that will hold a dog dish hubcap (you know the ones-GM made zillions of them) but they appear to have all gone the way of the dodo around here. The S10 rims were really sticking out, but I realized that the silver colour of those rims wasnt helping matters so I coated them in flat black paint, and they no longer stick out like a sore thumb  I was pleased with the results, and all it cost me was a quart of Tremclad paint (in keeping with my ultra-lo-buck approach to this build). I have over 500 miles on it now, and am pleased with fuel consumption. Im getting just under 25 mpg as an overall average. With gas at 9 bucks a gallon, Im very happy. Best surprise was the total cost after going through my records for the build. I added everything up (and I mean every last penny, including bureaucratic fees, appraisal, taxes, etc), and I came up with a grand total of $9313 Canadian dollars (about $7200 bucks in US dollars). Not bad for a reliable, safe, fuel efficient truck that's 75 years old! I will post a more detailed breakdown of costs in the S10 Swap How To thread for anyone who is interested in the swap for economic reasons. I am now keeping an eye out for my next project. This build taught me a valuable lesson about the drawbacks of building something that's kinda rare. As youngrodder pointed out, things would have gone way faster if there was an aftermarket to support my build (and if I wasnt so cheap!). I probably spent a good ⅓ of my time fooling around making stuff that was either unavailable or unaffordable. My next build will either be something thats very common and well supported by the aftermarket, or something thats a little more rare as long as it has no missing parts at all (its way easier to fix a broken part than it is to fab up a new one from scratch). For now Im gonna keep driving around and enjoying the attention this old thing gets. I cant even gas it up without being accosted at the pumps (in a good way!). |
|
|
|
|
07-16-2022, 03:50 PM
|
#175 |
|
Senior Member
Join Date: May 2007
Location: Doodah Kansas
Posts: 7,747
|
Re: Project Fargolet
great price for a running driving little hot rod!
__________________
the mass of men live lives of quiet desperation if there is a problem, I can have it. new project WAYNE http://67-72chevytrucks.com/vboard/s...d.php?t=844393 |
|
|
|
 |
| Bookmarks |
|
|


 Linear Mode

