
|
 01-21-2011, 02:15 PM
|
#51 | |
|
Registered User
Join Date: Dec 2002
Location: Cactus Patch So. Az
Posts: 4,749
|
Re: Tami's 51 build
Quote:
__________________
53 TuTone Extended Cab 350 4-Spd 3:08 (SOLD) 53 Chevy Moldy pearl green ZZ-4 4L60E 9" 3:25 55 GMC 1st Black Mll (ZZ4) ZZ6 TKO 600 5 sp 3:73 62 Solidaxle Corvette Roman Red (327 340hp 4spd 3:36) C4 & C5 suspension tube chassis LS 3 4L70E 65 Corvette Coupe 327 350hp 4spd 4:11 78 Black Silverado SWB (350/350) 5.3 & 4L60E 3:42 2000 S-Type 3.0 (wife cruiser) 2003 GMC SCSB 5.3 4L60E 3:42 |
|

|

|
|
01-21-2011, 02:35 PM
|
#52 |
|
Certified Car Nut
Join Date: Jan 2005
Location: Inglewood, California
Posts: 3,118
|
Re: Tami's 51 build
Everything is looking good man, keep up the good work.
|
|
|
|
|
01-21-2011, 02:51 PM
|
#53 |
|
Registered User
Join Date: Oct 2010
Location: mt vernon, oh
Posts: 867
|
Re: Tami's 51 build
Hmmm, I deleted part of my previous post, afraid I might get yelled at for "offering up a part"? you know, selling things... so... what if I just built a couple pair and let you guys have them for cost?
Think I'd get in trouble for that? edit: got in trouble..guess there's always ebay Last edited by skip99; 01-21-2011 at 07:59 PM. |
|
|
|
|
01-21-2011, 03:44 PM
|
#54 | |
|
Registered User
Join Date: Aug 2009
Location: So.Utah
Posts: 112
|
Re: Tami's 51 build
Quote:
I think they claimed it would shear 36'' of 16 gauge |
|
|
|
|
|
01-21-2011, 04:00 PM
|
#55 |
|
Registered User
Join Date: Oct 2010
Location: mt vernon, oh
Posts: 867
|
Re: Tami's 51 build
this one wouldnt do 36" of 16, it would do small 18 g. and a full 30" ? of 20. so it is a lighter machine. but hey. $300 , right?
|
|
|
|
|
01-23-2011, 07:43 PM
|
#56 |
|
Registered User
Join Date: Oct 2010
Location: mt vernon, oh
Posts: 867
|
Re: Tami's 51 build
got around to finishing up at least one side of door handles..
I put in a pic of the connection at the latch, just elongate the hole in the strap ,and allow it to slide about 3/8 inch. that way it will open from the inside and then lock using the original setup.     
|
|
|
|
|
04-15-2011, 02:48 PM
|
#57 |
|
Registered User
Join Date: Oct 2010
Location: mt vernon, oh
Posts: 867
|
Re: Tami's 51 build
Had to take a break and make a little money, and now back to it a little.
wanted to french the lights, so bought these from Butch's . see the difference between 53 merc. and 51 chevy?  so, I had to cut a little off so the contour would match.   I made these just a little taller  See how they line up a little better?  remount the bucket to the inside  tack it  finish it ! 
|
|
|
|
|
04-29-2011, 10:06 AM
|
#58 |
|
Registered User
Join Date: Oct 2010
Location: mt vernon, oh
Posts: 867
|
Re: Tami's 51 build
Thought I would post this as good info.. I looked at other pics and location of steering wheels on here a while back, did the whole measurement thing, and decided I needed a 32 inch column. well I'm 6'2" ,, found a great deal on CL. for a brand new tilt Ididit for $200.
After placing seats and sitting in truck to mock it up, I could have gotten away with a 30" and even a 28 ", thought I would just post a few pics.. there is 4" of 2" tube extending out the firewall so , really a 30" would allow a little more play if you have alligator arms!   
|
|
|
|
|
04-29-2011, 10:50 AM
|
#59 |
|
Registered User
 Join Date: Mar 2007
Location: Scotts, Michigan
Posts: 3,750
|
Re: Tami's 51 build
I like the steering wheel....
Nice work. Marc
__________________
...........__________ .................. ((__|__||___\____ ..;.;;.:;:;.,;..;((_(O))____ (_(O)) 1948 Chevy Truck - Finished SOLD!! 1953 Chevy Suburban "Family Truckster" Completed: Spring of 2021 http://67-72chevytrucks.com/vboard/s...d.php?t=605484 1994 4x4 Blazer - "Field Find" https://67-72chevytrucks.com/vboard/...ferrerid=30857 |
|
|
|
|
07-21-2011, 09:09 PM
|
#60 |
|
Registered User
Join Date: Oct 2010
Location: mt vernon, oh
Posts: 867
|
Re: Tami's 51 build
this was supposed to be an easy add on. well..it wasnt.
I'll throw in the details in case someone has the same malfunction as me !! simply going to add power booster for front disc. rear drum. had 2 sets of pedals , one from a 55 or so chevy, and another from ? so, after doing all the measuring, it was apparent the 55 style was too short. so went with the other. it was 16" long from pivot to pedal. and after research and reading post. it seemed that a ratio of 4.5 was normal for power brakes. so, I measure down from pivot 3.5 " and drilled the hole for the booster rod connector. then it was just a matter of rewelding the connector to add some length and more thread, so it would reach. moved the brake light switch. also, had to cut off the old studs on the pedal assembly and welded in an adaptor to go with the aftermarket 8" booster. the did a little cut and shape so the whole thing would connect to the dash. I have about 5" of pedal travel, and about 1 1/4" master cyl. rod travel.. hope it works?!  
|
|
|
|
|
07-21-2011, 10:15 PM
|
#61 |
|
Registered User
Join Date: Mar 2007
Location: Scotts, Michigan
Posts: 3,750
|
Re: Tami's 51 build
Skip-
I wondered how your project has been going. Have been able to work on it quite a bit? Looks good. Marc
__________________
...........__________ .................. ((__|__||___\____ ..;.;;.:;:;.,;..;((_(O))____ (_(O)) 1948 Chevy Truck - Finished SOLD!! 1953 Chevy Suburban "Family Truckster" Completed: Spring of 2021 http://67-72chevytrucks.com/vboard/s...d.php?t=605484 1994 4x4 Blazer - "Field Find" https://67-72chevytrucks.com/vboard/...ferrerid=30857 |
|
|
|
|
07-22-2011, 09:28 AM
|
#62 |
|
Registered User
Join Date: Oct 2010
Location: mt vernon, oh
Posts: 867
|
Re: Tami's 51 build
been slow for a while, worked on other things like refinishing a log house..and picked up a 70 dart to paint for a guy..
|
|
|
|
|
07-22-2011, 10:06 AM
|
#63 |
|
Registered User
Join Date: Apr 2009
Location: Faribault, MN
Posts: 385
|
Re: Tami's 51 build
Very nice build skip. It just needs more Tami.
|
|
|
|
|
08-07-2011, 04:14 PM
|
#64 |
|
Registered User
Join Date: Oct 2010
Location: mt vernon, oh
Posts: 867
|
Re: Tami's 51 build
finally finished? all of the welding on the cab... and got a coat of duraglas on everything. havent been on it much, busy cleaning and staining the house..
we didnt want the total smooth look, so just kinda filled it in places, filled the vent, put in bear claw latches, smoothed the dash, cut out for radio and vintage air controller, made A/C vents in dash. welded all the seams at door openings, and filled gaps with rod around door. sure doesn't sound like much..oh. and the chop!   
|
|
|
|
|
08-07-2011, 09:40 PM
|
#65 |
|
Registered User
Join Date: Mar 2007
Location: Scotts, Michigan
Posts: 3,750
|
Re: Tami's 51 build
Skip
The chop looks like it turned out great. Not bad for your first chop huh.. Marc
__________________
...........__________ .................. ((__|__||___\____ ..;.;;.:;:;.,;..;((_(O))____ (_(O)) 1948 Chevy Truck - Finished SOLD!! 1953 Chevy Suburban "Family Truckster" Completed: Spring of 2021 http://67-72chevytrucks.com/vboard/s...d.php?t=605484 1994 4x4 Blazer - "Field Find" https://67-72chevytrucks.com/vboard/...ferrerid=30857 |
|
|
|
|
08-07-2011, 10:52 PM
|
#66 |
|
Registered User
 Join Date: Jul 2010
Location: memphis
Posts: 2,537
|
Re: Tami's 51 build
Killer build

__________________
1981 C-10 (Pop's) 1978 Camaro 2006 Lacrosse |
|
|
|
|
08-10-2011, 11:33 AM
|
#67 |
|
Senior Member
Join Date: Jun 2005
Location: Clovis Ca.
Posts: 3,311
|
Re: Tami's 51 build
Nice job so far! Looks like one she will be proud to own.
__________________
Classic Trucks Link http://www.classictrucks.com/feature...uck/index.html 1958 GMC.Project Build http://67-72chevytrucks.com/vboard/s...d.php?t=162816 1966 Chevelle Build http://67-72chevytrucks.com/vboard/s...d.php?t=443576 Video http://www.youtube.com/watch?v=prrNKo8F7Zw#GU5U2spHI_4 |
|
|
|
|
09-02-2011, 01:27 PM
|
#68 |
|
Registered User
Join Date: Oct 2010
Location: mt vernon, oh
Posts: 867
|
Re: Tami's 51 build
So...got a few good days on the truck cab. and kinda got sidelined ..AGAIN ! by a little part for the motor..first...got the cab body work close, and put 2 coats of epoxy on it , which will be followed by 2 coats of featherfill. then it gets pushed aside so I can do a PAYING job..LOL!
the last pic is of the little motor thing I picked up..we'll see if I can do it.. always wanted one... 3" rear, 31/2" front chop welded rear seam   smoothed and relocated stuff in dash..a/c vents built into area below radio and a/c controls  cowl vent smoothed  firewall took a lot of work!!  that little motor thing.... 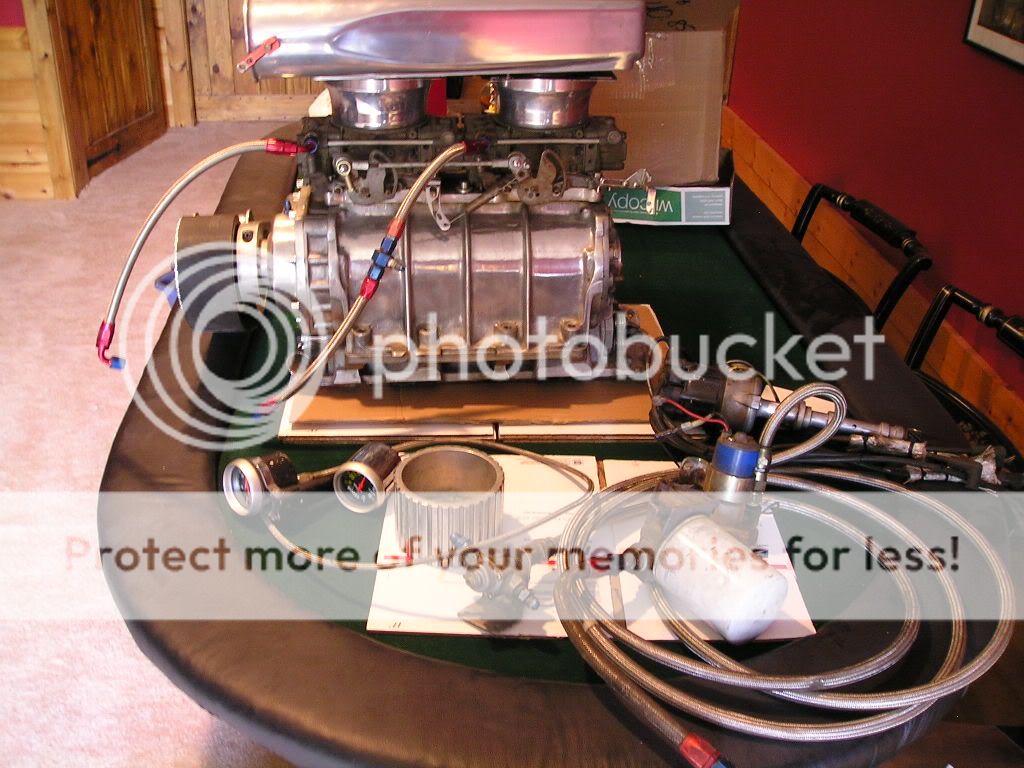
|
|
|
|
|
09-02-2011, 01:39 PM
|
#69 |
|
Registered User
Join Date: Mar 2007
Location: Scotts, Michigan
Posts: 3,750
|
Re: Tami's 51 build
Skip- The cab looks great. What a difference a little primer makes huh..
Keep up the good work. Best of luck with the blower..lord knoes that ther is enough room under the hood on these AD trucks. As a side note, I was able to put 50 miles on my truck last weekend...It felt awesome..... Marc
__________________
...........__________ .................. ((__|__||___\____ ..;.;;.:;:;.,;..;((_(O))____ (_(O)) 1948 Chevy Truck - Finished SOLD!! 1953 Chevy Suburban "Family Truckster" Completed: Spring of 2021 http://67-72chevytrucks.com/vboard/s...d.php?t=605484 1994 4x4 Blazer - "Field Find" https://67-72chevytrucks.com/vboard/...ferrerid=30857 |
|
|
|
|
09-12-2011, 01:04 PM
|
#70 |
|
Registered User
Join Date: Mar 2011
Location: Anthony New Mexico
Posts: 49
|
Re: Tami's 51 build
from one FF to another that is one nice looking build you have going there
|
|
|
|
|
12-15-2011, 07:32 PM
|
#71 |
|
Registered User
Join Date: Feb 2010
Location: Cardiff, CA
Posts: 131
|
Re: Tami's 51 build
Any updates?
|
|
|
|
|
01-22-2012, 11:34 AM
|
#72 |
|
Registered User
Join Date: Oct 2010
Location: mt vernon, oh
Posts: 867
|
1 piece manual window conversion
It's been a while since I got to work on the 51, had to paint a few money makers !!
The plan was to convert the 2 piece to 1 piece window..the initial info I got was that it was pretty easy, you just needed the 49 type mechanism..WRONG, WRONG WRONG !!!!lol.. I was already committed with these doors( chopped, bear claws) and couldnt find 49 doors here in ohio anyway..so....here is what I hope is a very comprehensive how to.. (ps..finding 1 piece doors is by far the easiest, if you know ahead of time..) here we go !! starting with the original 51..you see the single arm regulator..  this is the mechanism you will need, along with some extra track.  i used the track from one of the original pieces, and cut it in half.  you will also need to build a front glass run channel,( or as I found after I built mine, they now make a repro. that is narrow 5/8 just for this..$25 ea. just buy it !!  if you want to make your own..just copy the rear, and make a extension to mount it to the door. the new front track stans out about 3 1/2 inch from the door jamb. use 22 gauge steel, bend to 5/8 inside for 5/8 felt WITHOUT the metal around the glass.  here's something you never read...to get the rubber in place for the outside wiper, you need to extend the channel, luckily I had an extra old door and so I separated the 2 pieces of metal, welded on an extension and the tacked it back in the door, I have read where some have simply used fuzzies that fit and glued or dbl, side tape them in.. you cannot screw or rivet like on later cars, welded in new extension     close ups of where to drill    track cut from original 2 pc  templates make it a little easier   small track added.. when Installing.. I screwed one side and the pivot the other until the track is level. at the time of install, I'll probably tack it in place.but dont weld it first..  almost there  you'll need to fill in this notch, or use 49 style.  welded up..  with garnish in place...5/8 wide for glass WITHOUT metal trim around it  also have to bend up the area where the vent went.  finished ....I ordered new regulators.. these had busted springs and rollers, but worked for mock up..  I borrowed this pic, it helped a lot.thanks!!  Now I see why most just went with a power option!!.. also, if you want the metal trim glass, use wider glass run, and felt from a 49.original stuff should work, but again, we chose the hard route, but glass run was easy to find. cr lawrence? has it my local glass guy has it.. hope this helps!! |
|
|
|
|
02-12-2012, 04:04 PM
|
#73 |
|
Registered User
Join Date: Oct 2010
Location: mt vernon, oh
Posts: 867
|
Re: Tami's 51 build
got a little done...
  going to add an eaton posi unit with 342 gears.  trying to decide where to weld this.. 
|
|
|
|
|
02-16-2012, 08:25 PM
|
#74 |
|
Registered User
Join Date: Oct 2010
Location: mt vernon, oh
Posts: 867
|
Re: Tami's 51 build
working on adding the e brake...

|
|
|
|
|
04-16-2012, 01:24 PM
|
#75 |
|
Registered User
Join Date: Oct 2010
Location: mt vernon, oh
Posts: 867
|
Re: Tami's 51 build
still building...separated the hood, removed braces, repaired the rust and holes, welded up the seam and smoothed the metal a little.
   then,,,started building the bed...had 18g. bent and narrower top rail width, so i can scribe the tube into the stakepockets for a little cleaner, diferent look,   and used a plasma cutter for the cutouts where the mini-tubs will go.  also, added a pic of the gas tank install.. fabbed so it cam be removed from under the bed. 65 mustang tank sits on a sq. tube frame, the the frame is bolted up from underneath. 
Last edited by skip99; 04-16-2012 at 01:32 PM. |
|
|
|
 |
| Bookmarks |
|
|


 Linear Mode

