
|
 01-20-2019, 09:26 PM
|
#101 |
|
Post Whore
  Join Date: May 2015
Location: Alabama
Posts: 14,583
|
Re: 49 GMC Five Window
Haha...my bad on t stat...i edited....I didnt mean that...I meant temp probe for gauge....
__________________
Mongo...aka Greg RIP Dad RIP Jesse 1981 C30 LQ9 NV4500..http://67-72chevytrucks.com/vboard/s...d.php?t=753598 Mongos AD- LS3 TR6060...http://67-72chevytrucks.com/vboard/s...34#post8522334 Columbus..the 1957 IH 4x4...http://67-72chevytrucks.com/vboard/s...63#post8082563 2023 Chevy Z71..daily driver Last edited by mongocanfly; 01-20-2019 at 10:06 PM. |

|

|
|
02-01-2019, 06:23 PM
|
#102 |
|
Registered User
Join Date: Nov 2013
Location: Show Low, Arizona
Posts: 759
|
Re: 49 GMC Five Window
This week's progress report...........
I post over on classicparts.com too, so if you see this and read about it over there, you can skip this build thread and go onto the next. I finished fiberglassing the fan shroud. There's two layers of 1.5 oz mat on the back now. Made a jig for the router and cut the hole for the fan. Started sanding off the nibs and brush hairs that got in the epoxy. Will take this to Wyatt's next week and skim with a coat of filler in prep for a top coat  Here's the back side after I put the two layers of mat on it- I reinforced the corners with a couple layers of mat over the aluminum too. 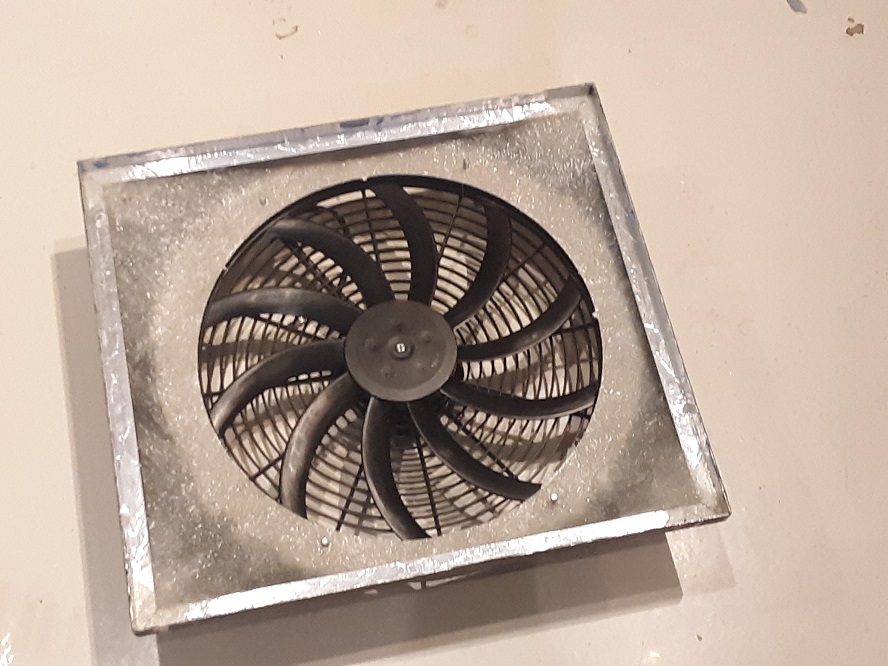 A quick trial fit on the radiator. Still have to figure out how to mount it. Here's the rework of the brackets for the 'custom fit' AC condenser from Vintage Air that didn't fit the GMC - ready for a trial fit in the truck as soon as someone wanders by to help me lift it into the engine bay. Still pissed at VA that I paid $325 and all I got was a cheap condenser, a drier and a couple of tubes and a bracket I had to put four hours labor into to make work. I didn't want to make the fussy clip that attached the condenser to the bracket, so I cut the VA ones off and used aircraft rivets to attach them to the new bracket. 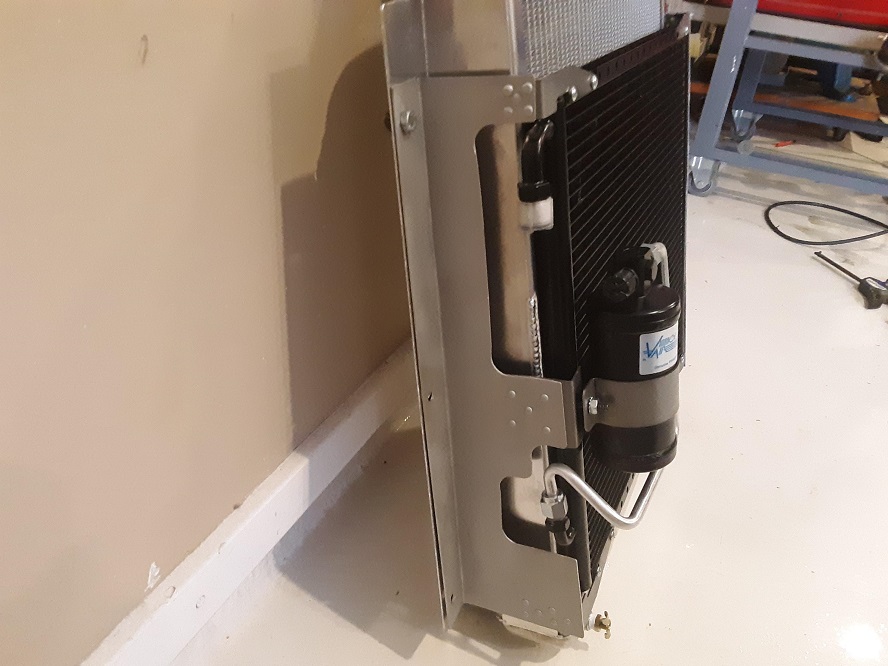 I mounted the PCM under the dash using some strap and an ebay over-center latch. Sticks out like a sore thumb so I'll have to hit it with some trim black. 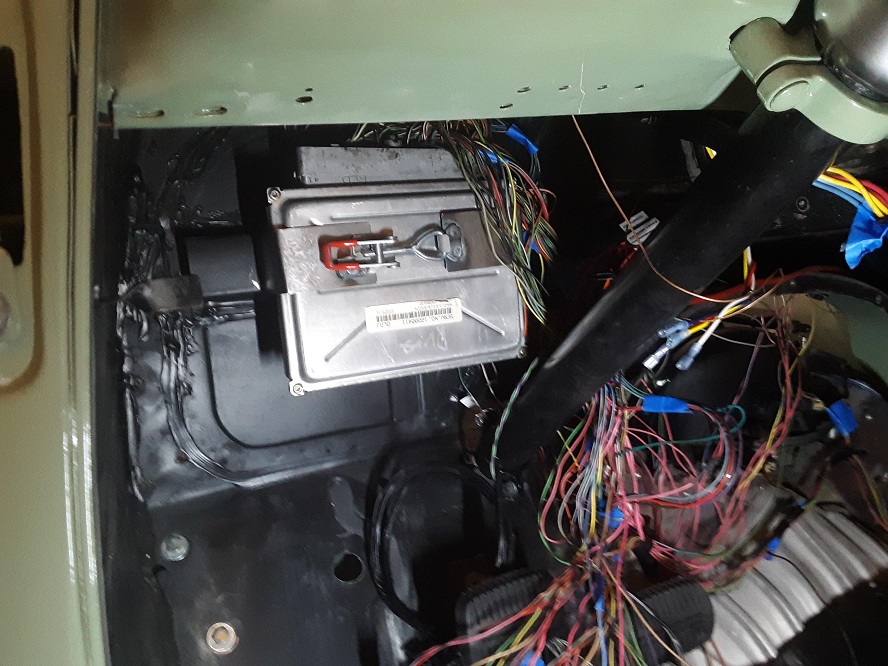 I strung the wiring harness out on the engine and connected all the sensors, then pulled all the excess wire into the cab - what's here is what has to be shortened. It looks like a rat's nest but really isn't so bad as most of the pink wires will pair to the injectors. The good news was I won't have to extend any wires in the harness (except for the coils, and I just bought a harness extension that's plug and play)  Here's the harness on the topside of the engine. All the injector leads are too long (what is draped over the fenders) so I will shorten them topside - I have to change the plugs to the EV1 style anyway. Thinking about some sort of tube to run the wires through to hide them and bought some aluminum tube today to experiment. 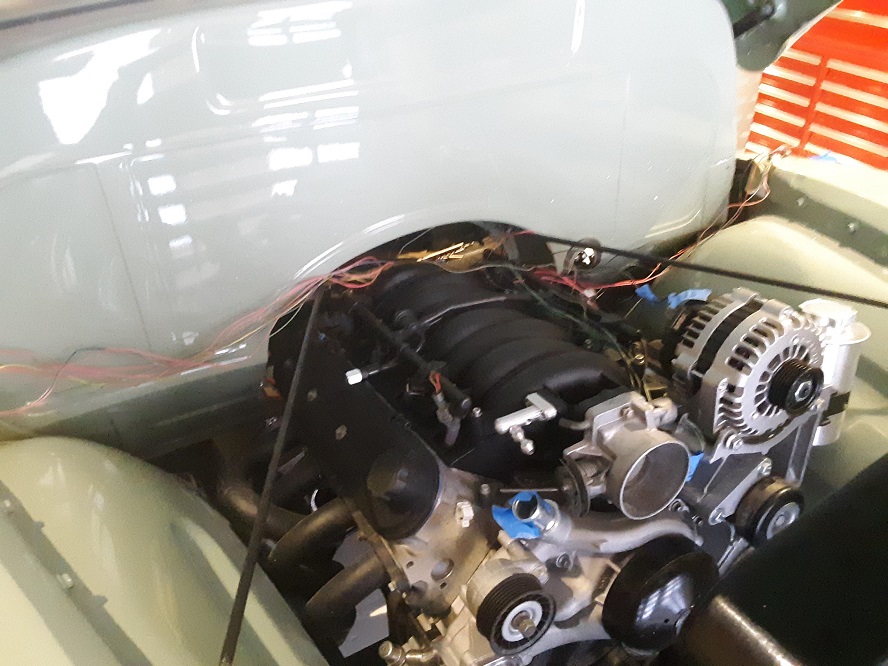 I ordered some 3" mandrel bends for intake tubing along with some silicone couplers. There's going to be a fight for real estate between the engine and radiator where I need to fit the hoses, fan shroud/fan, and the filter/MAF/ducting. Dang, those bend radii look big. 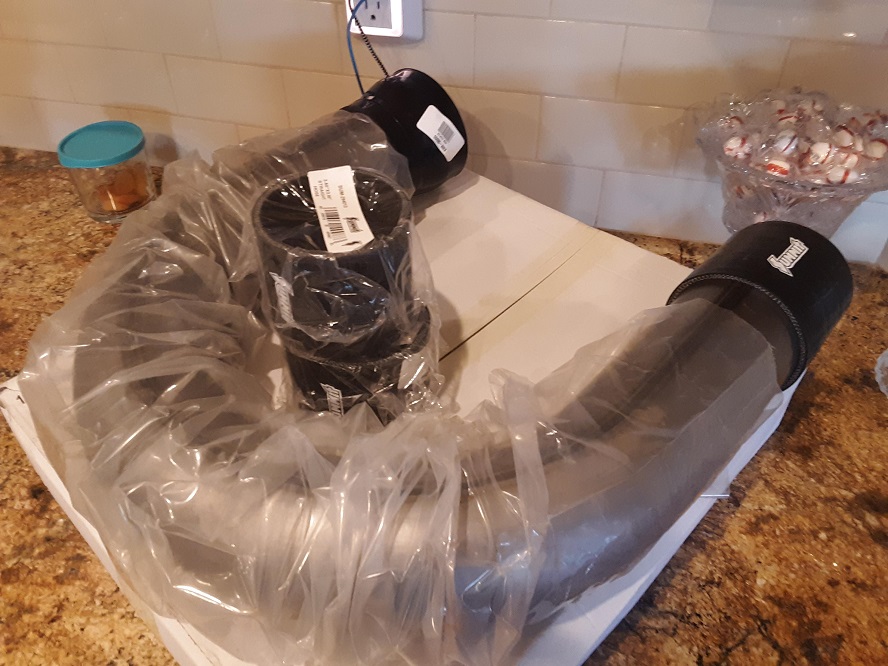 Summit had polished stainless tube for the same price as unpolished, so I bought some for radiator hose. I really should have a back purge of argon when I weld these up, so I'll have to make a jury-rigged system to trap gas in the tube. If my stainless welds look nice, I'll polish them on Wyatt's big wheel polisher, but if not there's always the old-standby of filing them flat and sanding them smooth before polish. 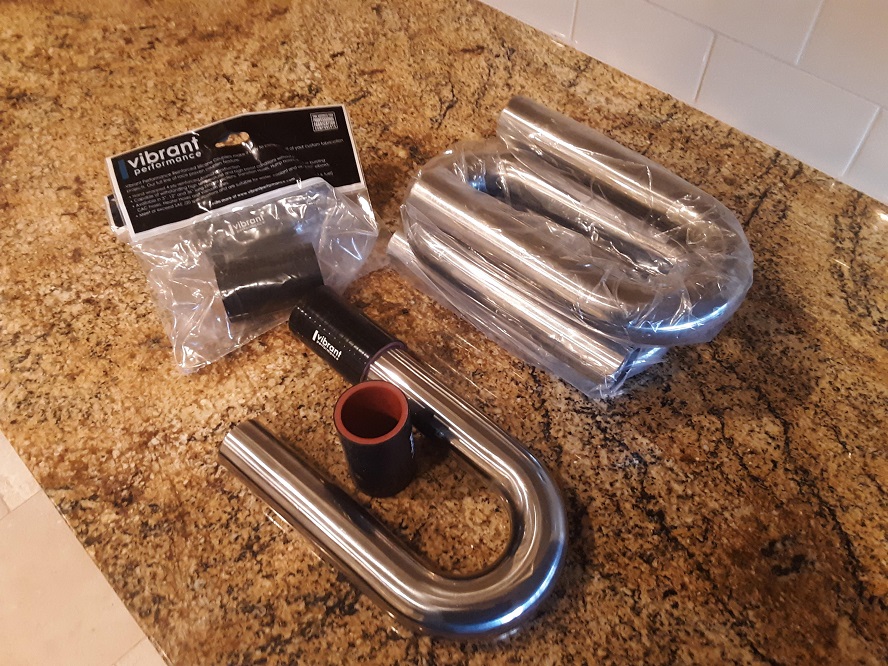 Next week will be getting the intake, radiator hoses and fan shroud to all fit and in mock-up. I'll pull the harness back off the engine and start looming that up too. Next report will be how all the inlet and cooling fits in the engine bay - with photos I hope. |

|
|
|
02-02-2019, 12:31 AM
|
#103 |
|
Senior Member
Join Date: Jul 2012
Location: Oblong, Illinois
Posts: 7,017
|
Re: 49 GMC Five Window
Nice work, the fan shroud is very creative.
|
|
|
|
|
02-09-2019, 12:58 AM
|
#104 |
|
Registered User
Join Date: Nov 2013
Location: Show Low, Arizona
Posts: 759
|
Re: 49 GMC Five Window
A little progress this week.
Pulled my engine wiring harness out of the truck and shortened all the wires that needed it. I mounted the PCM to the left of the steering column under the dash, and I didn't have to extend any wires in a factory harness, only shorten a dozen or so. After I shortened all the wires that needed it, I unpinned PCM red and blue connectors to clean up the tangles at the PCM. I took the wiring harness and taped it to the workbench in kind of a 2D approximation to how it will fit in the truck. Since I was changing the injector connectors from the EV6 type to the earlier EV1 type, I included the fuel rail to get the proper spacing on the injector connectors  Here is the fuel rail with the new connectors installed. I didn't trust the Russel adapter that went from the factory push-lock connector to a -6 AN fitting for the fuel supply, so I cut the fuel rail near the fuel damper thingy and put a Swagelok fitting on it. I'm not a big fan of compression fittings, but my son says he uses them all the time on quite high pressure lines and has never had a problem, so I will give it a try. 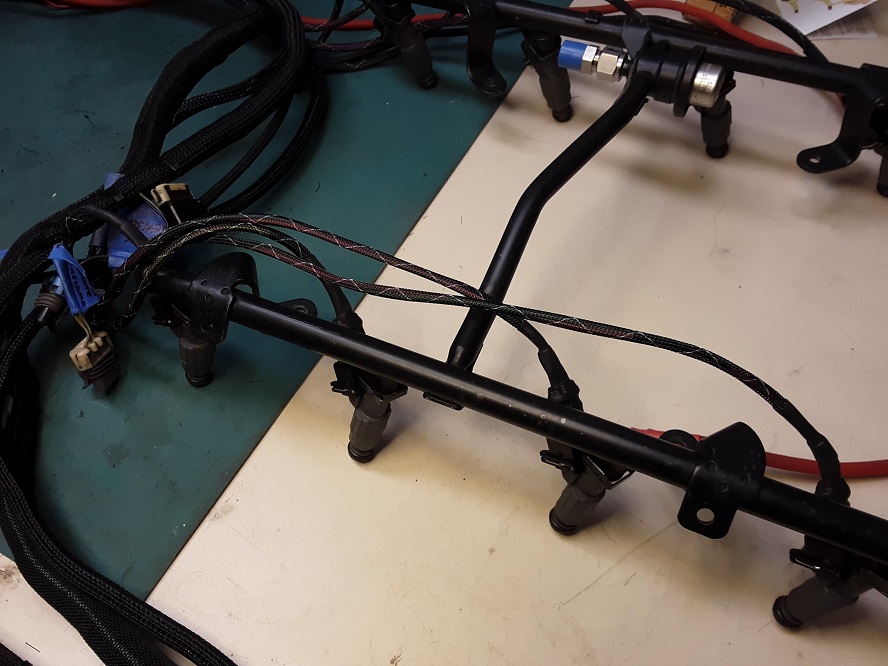 I loomed the modified harness with ICO-flex mesh loom I bought from Aircraft Spruce (they sell it by the foot - about $15 for the whole harness). I used the non-split mesh loom on the injector leads since I had to remove the connectors anyway, but the split loom looked so good in the other locations, I'd use it everywhere next time. Here is the harness ready to go back into the truck after I check all the pin-outs on the PCM connectors and verify my grounds. 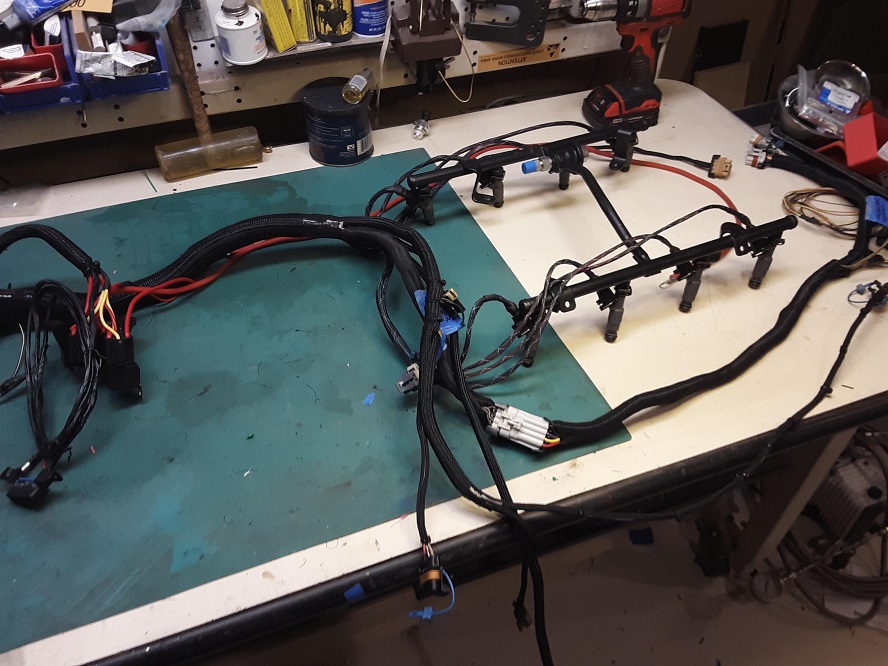 All told I have about 25 hours in modifying a factory harness. If I had it to do over again, I'd order a new one. My idea of using a 3.5" mandrel bend for an air inlet duct for the engine was a pipe dream. (pun intended) Despite having a GMC radiator that sets deep in the support, a thin fan shroud, and my engine moved back an extra two inches, I was short about 2 inches. Plan 'B' is a silicone coupling, so I ordered one, but it came in and was the wrong inlet size. The correct one will be here in a couple days and I can finish fabing the inlet. 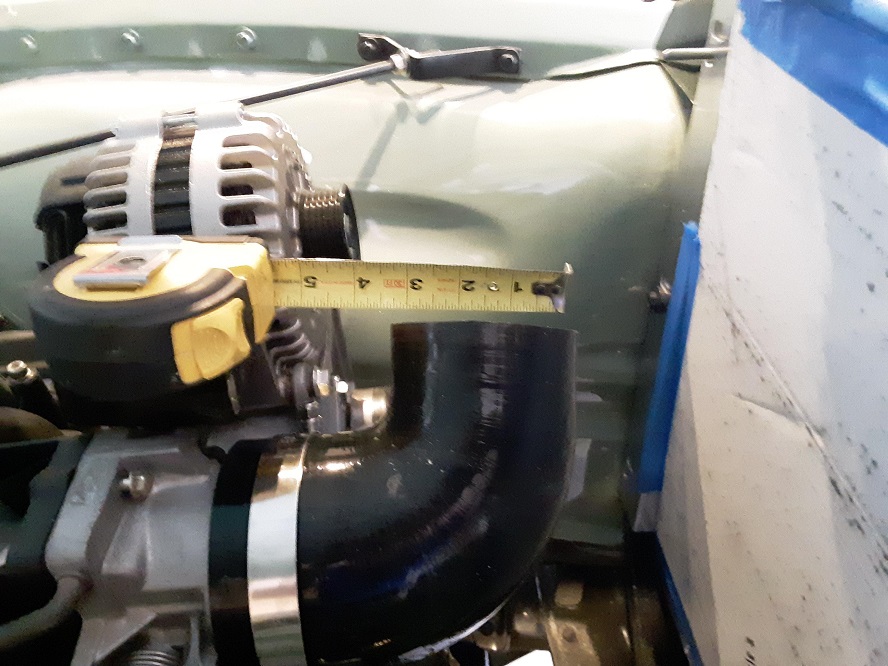
|
|
|
|
|
02-09-2019, 10:41 AM
|
#105 |
|
Senior Member
Join Date: Mar 2011
Location: West Plains, Missouri
Posts: 7,553
|
Re: 49 GMC Five Window
Nice job on the harness...Jim
__________________
my build thread: http://67-72chevytrucks.com/vboard/s...d.php?t=459839 Jimbo's long bed step build:http://67-72chevytrucks.com/vboard/s...t=464626<br /> |
|
|
|
|
02-09-2019, 11:47 AM
|
#106 |
|
Registered User
Join Date: Nov 2013
Location: Show Low, Arizona
Posts: 759
|
Re: 49 GMC Five Window
Thanks Doug and Jim.
Trying to work on it steady and finish it up before summer is done. It seems like the last 20% of a build takes 80% of the time. The biggest trap for me it to start anther 'science project' instead of just buying something off the shelf that would work. The engine wiring harness is a good example - I paid myself about $10 an hour to get it done when I could have bought one and been time ahead. I try to post my progress about once a week as it helps with my own accountability to get things done. Thanks for reading and posting. Phil |
|
|
|
|
02-10-2019, 02:53 AM
|
#107 |
|
Senior Member
Join Date: Jul 2012
Location: Oblong, Illinois
Posts: 7,017
|
Re: 49 GMC Five Window
Well, at least with your harness it is custom fit. Well done!
I have to address the air intake tube to radiator clearance too. Looks like you have yours handled. |
|
|
|
|
02-16-2019, 01:43 PM
|
#108 |
|
Registered User
Join Date: Mar 2013
Location: Edmonton, AB
Posts: 298
|
Re: 49 GMC Five Window
Loom looks great. Where did you buy the non-split mesh loom you used on the injector leads?
|
|
|
|
|
02-16-2019, 08:54 PM
|
#109 | |
|
Senior Member
 Join Date: May 2007
Location: Doodah Kansas
Posts: 7,747
|
Re: 49 GMC Five Window
Quote:
very true! 
__________________
the mass of men live lives of quiet desperation if there is a problem, I can have it. new project WAYNE http://67-72chevytrucks.com/vboard/s...d.php?t=844393 |
|
|
|
|
|
02-16-2019, 10:51 PM
|
#110 |
|
Registered User
Join Date: Nov 2013
Location: Show Low, Arizona
Posts: 759
|
Re: 49 GMC Five Window
84 Blaze
The closed loom is called ICO-Flex and is manufactured by ICO-Rally You can buy it by the foot at Aircraft Spruce - search 'ICO-flex' https://www.aircraftspruce.com/ |
|
|
|
|
02-17-2019, 02:25 PM
|
#111 |
|
Registered User
Join Date: Nov 2013
Location: Show Low, Arizona
Posts: 759
|
Re: 49 GMC Five Window
Inching forward.
Installed the harness back in the truck and I'm pretty happy with the fit. At the risk of starting another 'science project' I think I'm going to slit some 1.5" mandrel bends to make some injector covers.  Cut and welded some 304 mandrel bends to use as radiator hose, but I don't like the way it looks. I'm going to bead blast it to a satin finish and see if it looks any better, and it that doesn't work, I'm going to paint them satin black. The bottom one looks ok though 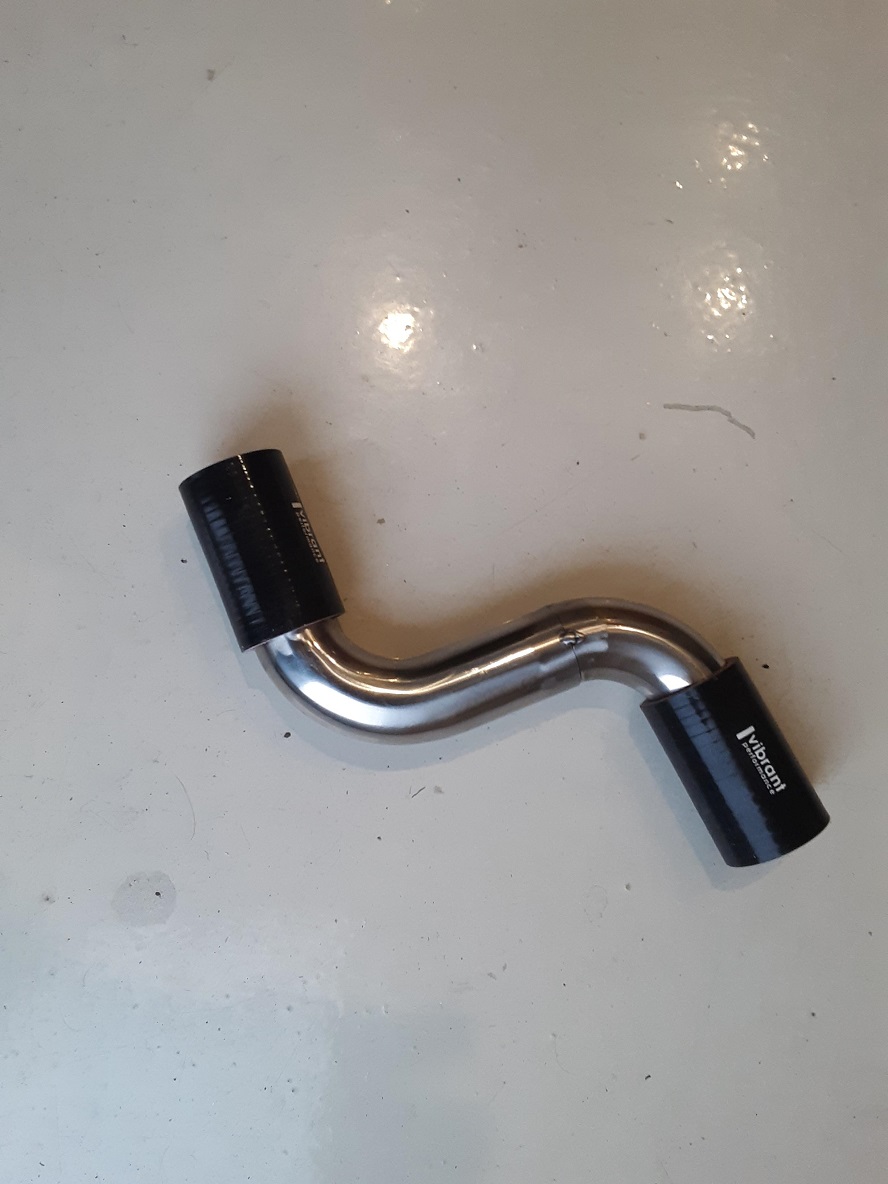 Here's another view with stretched t-shirt fiberglass fan shroud all painted and mounted in place 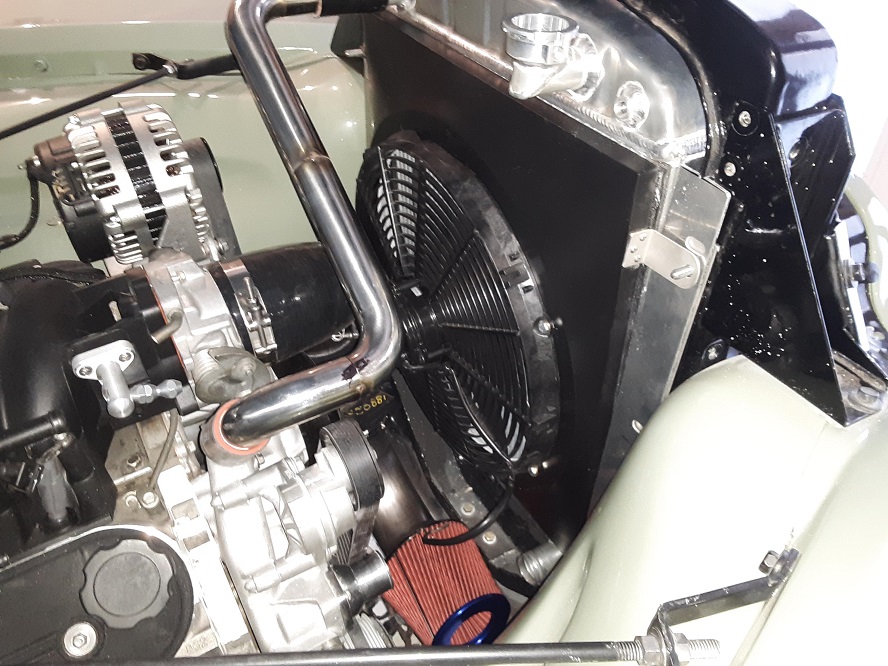 The air intake tube is in place, but still need to fab some brackets to keep it from flopping around on the silicone coupler. This intake puts the filter down to about the bottom of the radiator. If I ever drive it in deep water there's a very good chance I could hydrolock the motor, but in AZ I'm willing to live with it. 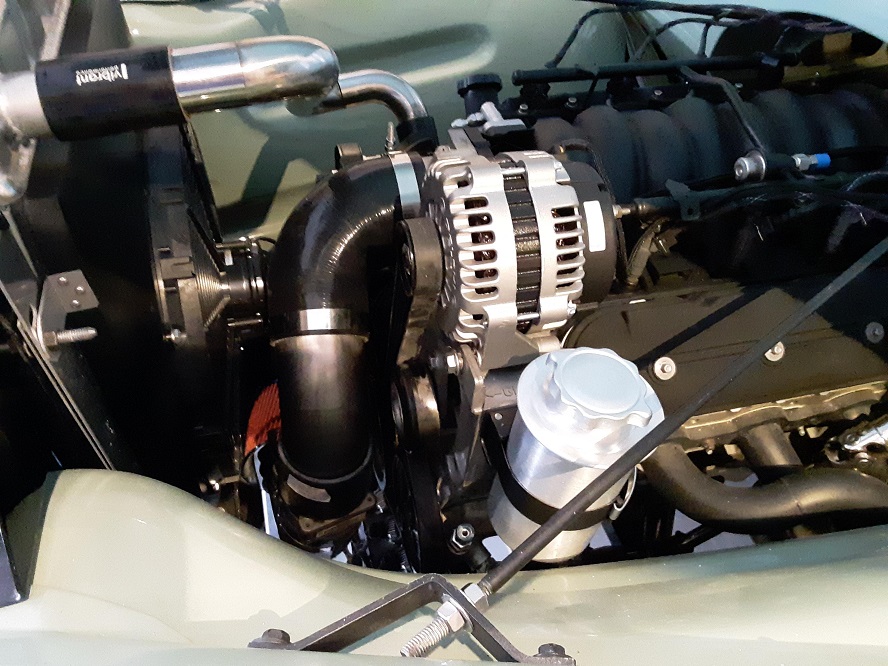 Here is the assembly out of the truck 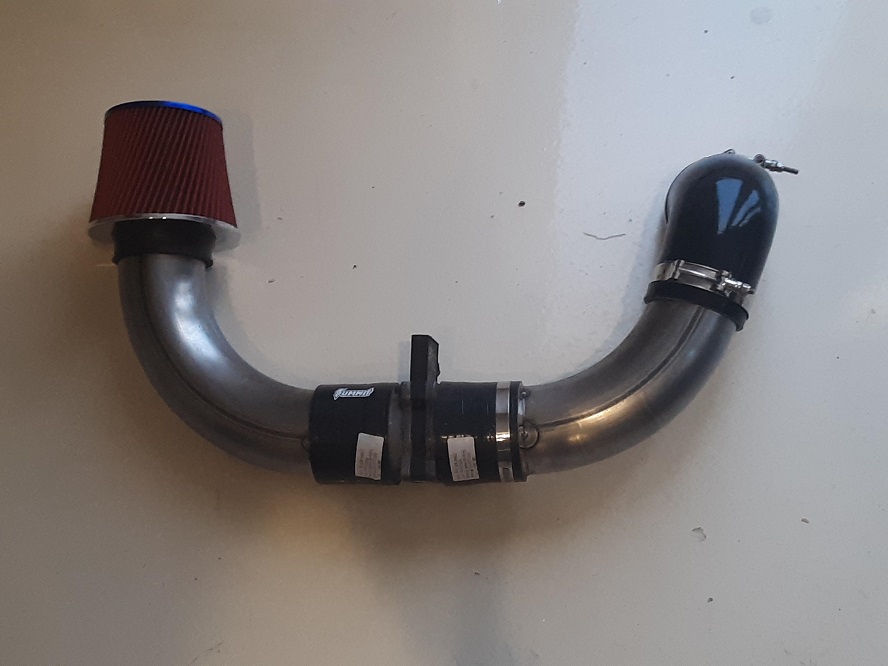 I wanted to mount the factory front sway bar to the truck's frame, so some brackets were in order because the Jag's sway bar mount points are 1.5" outside the frame 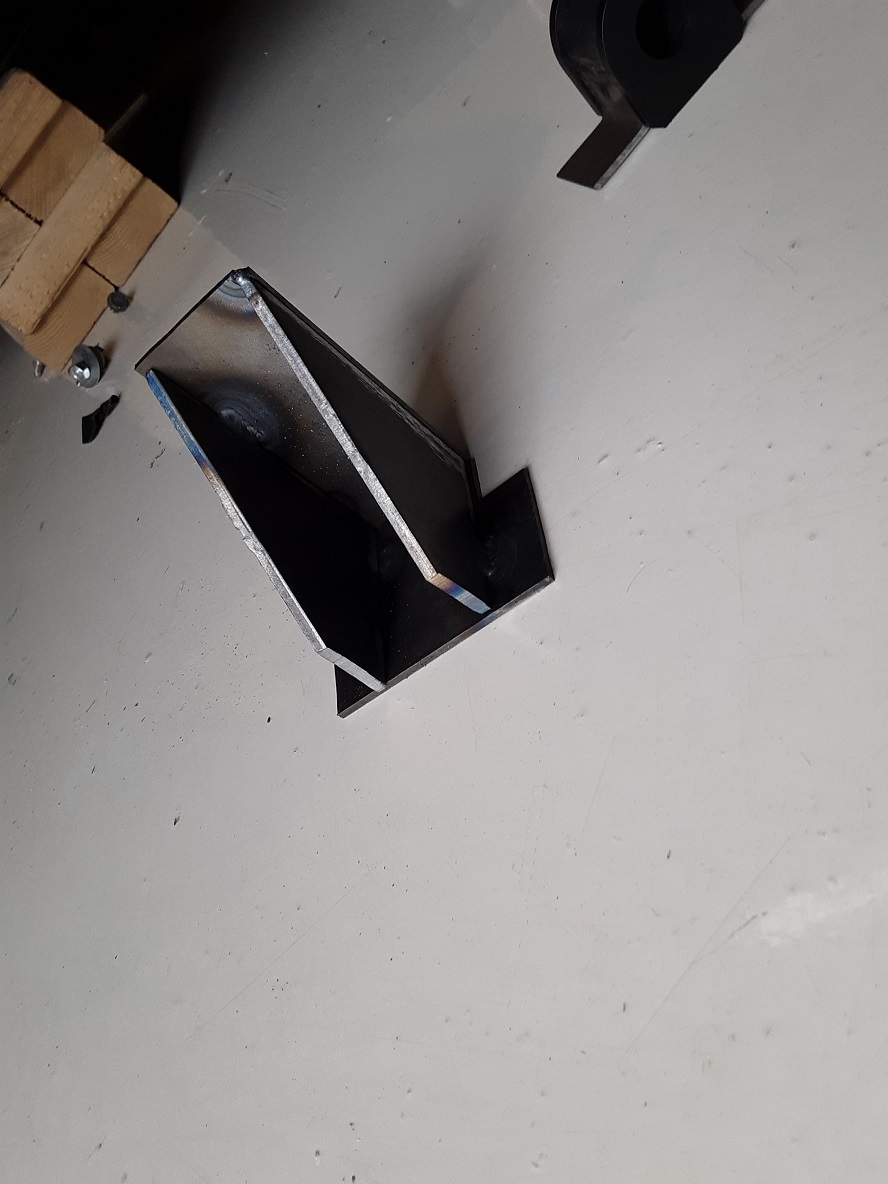 I ordered urethane bushings, but the Jag part wouldn't fit them so I fabricated these out of what remains of my old steering column and some scrap angle iron. 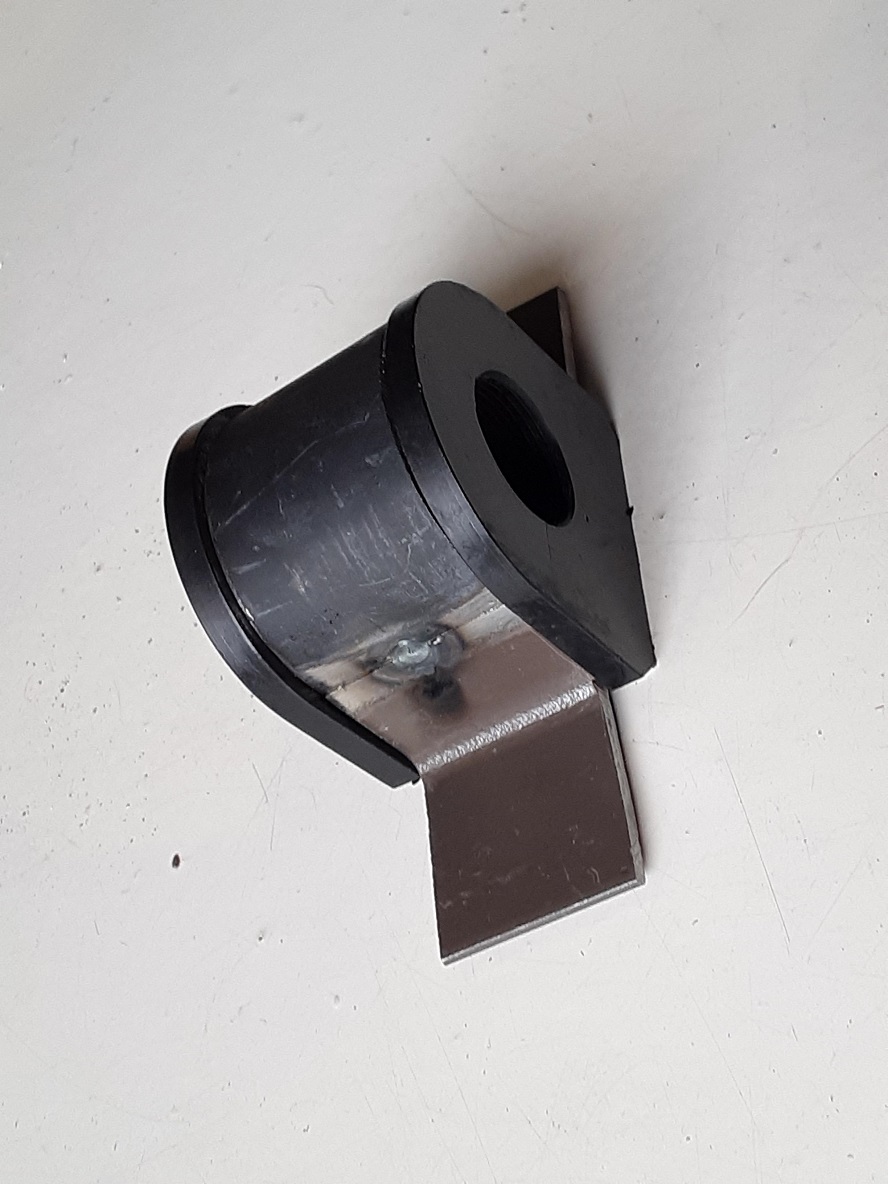 Argon tank is empty and will weld them up as soon as I can get a refill. Couldn't get a decent flare on the stainless tube on the tank sender, so I just put Swagelok fittings on them. I'm starting to dislike working with stainless. The tubes were sealed to the flange with a solder joint that had come loose. I tied them together and sealed it with a swipe of JB weld. Just about ready to start plumbing for fuel. 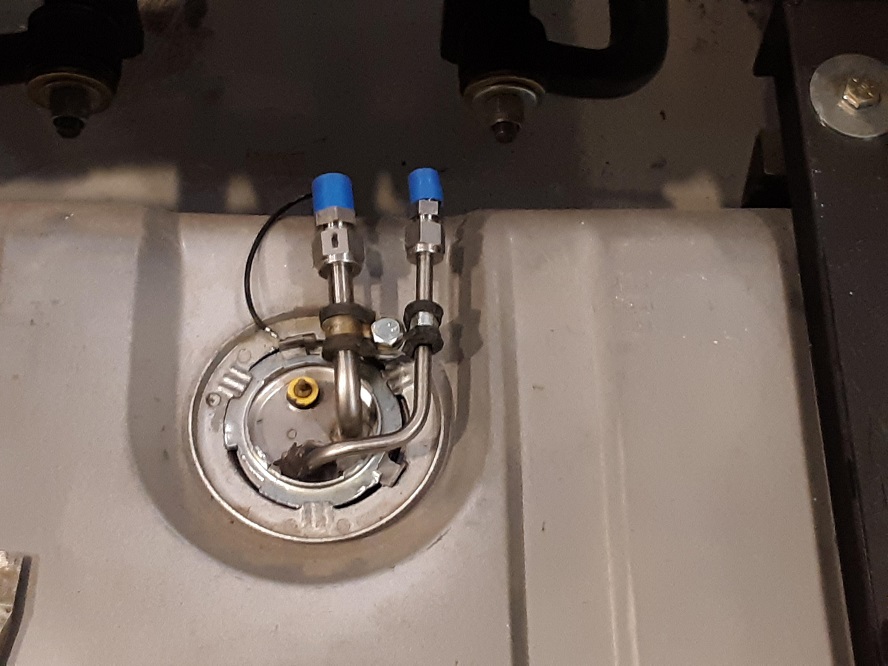 Nits and lice........ Shop checked the camber, caster and toe on the front end and it looks like it is good enough to get it to the alignment shop. Mounted the Viair compressor on the frame rail next to the battery box. Cycled the front suspension from stop to stop and lock to lock on the steering and have a little tire rub at full lock and the airbag nearly at its lower bump stop. I think it will be ok (Thanks again JoeDoh for your airbag suspension advise) Starting plumbing next week - finally |
|
|
|
|
02-17-2019, 11:58 PM
|
#112 |
|
Senior Member
Join Date: Mar 2011
Location: West Plains, Missouri
Posts: 7,553
|
Re: 49 GMC Five Window
Nice update, and things are looking great...Jim
__________________
my build thread: http://67-72chevytrucks.com/vboard/s...d.php?t=459839 Jimbo's long bed step build:http://67-72chevytrucks.com/vboard/s...t=464626<br /> |
|
|
|
|
03-21-2019, 01:45 PM
|
#113 |
|
Registered User
Join Date: Mar 2019
Location: Toronto, ON
Posts: 1
|
Re: 49 GMC Five Window
Beautiful work man! Gotta appreciate the creativity and patience with every detail.
What oil pan are you using? I have a similar 5.3 LM4 going in to my -50 Chevy truck (out of a -03 Envoy) and the original pan is 7.5" deep. Best option I have found so far is Holley 302-x pan. Only reason I haven't pulled trigger yet is the cost ~$400 with dipstick. Last edited by DBL07; 03-21-2019 at 01:52 PM. |
|
|
|
|
03-21-2019, 02:05 PM
|
#114 |
|
Registered User
Join Date: Nov 2013
Location: Show Low, Arizona
Posts: 759
|
Re: 49 GMC Five Window
I used a stock 5.3L truck pan. There's a sticky over on LS1Tech that has a pretty extensive summary of all the oil pan options for the LS motors -maybe you can find a better option there- Here's a link-
https://ls1tech.com/forums/conversio...-oil-pans.html When I fabricated the motor mounts I made sure that the pan's bottom wasn't any lower than the front crossmember. The Jag cross member is 'rear steer' so that's about all I could do for a pan. For other LS conversions that I've done, I've cut the bottom off the truck oil pan and shortened the oil pickup tube. The truck LS holds a quart more oil than the F-body LS, so I figured the engine could spare it. Filled the bottom of the pan with a quart of water and cut it there, then welded on a piece of 6061 Al plate to the bottom. Only cost me about $10 in aluminum, but I sure caught hell for running the pan through the wife's dishwasher multiple times so I could weld it. For other conversions where I didn't have interference with the front cross member or rack, I've used the F-body oil pan to pick up some ground clearance. |
|
|
|
|
03-21-2019, 02:07 PM
|
#115 |
|
Registered User
Join Date: Nov 2013
Location: Show Low, Arizona
Posts: 759
|
Re: 49 GMC Five Window
And thanks for reading my build thread and the nice words........
|
|
|
|
|
03-21-2019, 03:02 PM
|
#116 |
|
Post Whore
Join Date: May 2015
Location: Alabama
Posts: 14,583
|
Re: 49 GMC Five Window
(but I sure caught hell for running the pan through the wife's dishwasher multiple times so I could weld it.)
Hahahahahahahahahaha!!!!!!!!!!
__________________
Mongo...aka Greg RIP Dad RIP Jesse 1981 C30 LQ9 NV4500..http://67-72chevytrucks.com/vboard/s...d.php?t=753598 Mongos AD- LS3 TR6060...http://67-72chevytrucks.com/vboard/s...34#post8522334 Columbus..the 1957 IH 4x4...http://67-72chevytrucks.com/vboard/s...63#post8082563 2023 Chevy Z71..daily driver |
|
|
|
|
03-21-2019, 07:42 PM
|
#117 |
|
Senior Member
Join Date: Mar 2011
Location: West Plains, Missouri
Posts: 7,553
|
Re: 49 GMC Five Window
Don't you know, that you do that stuff, when you know for sure she won't be home...Jim
__________________
my build thread: http://67-72chevytrucks.com/vboard/s...d.php?t=459839 Jimbo's long bed step build:http://67-72chevytrucks.com/vboard/s...t=464626<br /> |
|
|
|
|
03-21-2019, 08:36 PM
|
#118 |
|
Senior Member
Join Date: May 2007
Location: Doodah Kansas
Posts: 7,747
|
Re: 49 GMC Five Window
great stuff! I love the attention to even minute details on this truck
__________________
the mass of men live lives of quiet desperation if there is a problem, I can have it. new project WAYNE http://67-72chevytrucks.com/vboard/s...d.php?t=844393 |
|
|
|
|
03-21-2019, 10:49 PM
|
#119 |
|
Registered User
Join Date: Nov 2013
Location: Show Low, Arizona
Posts: 759
|
Re: 49 GMC Five Window
Oldman - waiting till the wife is away doesn't always work either.
I made a set of headers and was too cheap to have them Jethot coated, so I bought some DIY coating from Tech Line and figured I'd do them myself and cure them in the oven in the house. I waited till one Saturday when she was gone and put them in the oven to cure. I don't know if they were oily or the coating just off-gassed a lot, but there was a pretty serious smell of smoke in the house. I figured that I could get the evaporative cooler going and get the smell pushed out of the house, and by the time she got back you could still smell it a little - she was pretty suspicious. Sunday was the next day and she went to use the oven for dinner, turned on the light and said 'what the hell did you do to my oven? I can't see through the door anymore!' I found that a electric oven has two panes of glass and evidently there's some airflow to cool it, and whatever was left inside the header tubes or the Tech Line coating had precipitated out onto the glass. I took it apart but no amount of steel wool or razor blades would get the glass clean. She put her foot down and said there was no way she was cooking anything in that oven anymore, and i should replace the oven. Something about not wanting chemicals in her food. $500 later I had a good used oven installed. JetHot coating would have cost me about $250 We're not married anymore. |
|
|
|
|
03-21-2019, 11:13 PM
|
#120 |
|
Senior Member
Join Date: Mar 2011
Location: West Plains, Missouri
Posts: 7,553
|
Re: 49 GMC Five Window
Heck of a story, but I've heard similar from other car guys, it's just in our blood I guess...Jim
__________________
my build thread: http://67-72chevytrucks.com/vboard/s...d.php?t=459839 Jimbo's long bed step build:http://67-72chevytrucks.com/vboard/s...t=464626<br /> |
|
|
|
|
03-25-2019, 03:41 PM
|
#121 |
|
Registered User
Join Date: Nov 2013
Location: Show Low, Arizona
Posts: 759
|
Re: 49 GMC Five Window
Short update on progress - most of it is under the truck and hard to photograph
Ran the fuel line in 3/8" 3003 aluminum tube. The larger of these two lines feeds the boost pump that keeps the swirl pot full for the fuel injection. The 1/4" return line draws off the top of the swirl tank keeping it full for the Walbro high pressure pump. I didn't want any o-rings or rubber hose anywhere in the system, so it is hard-lined all the way from the main tank to the fuel spider. The pumps, tank and Corvette FPR are all mounted on the passenger frame rail and are easy to get to for maintenance or repair and can all be removed with a 1/2" and 9/16" wrench. Everything is held in pkace with ADEL clamps and I drilled and tapped the frame for #10 machine screws to hold the tubes in place. 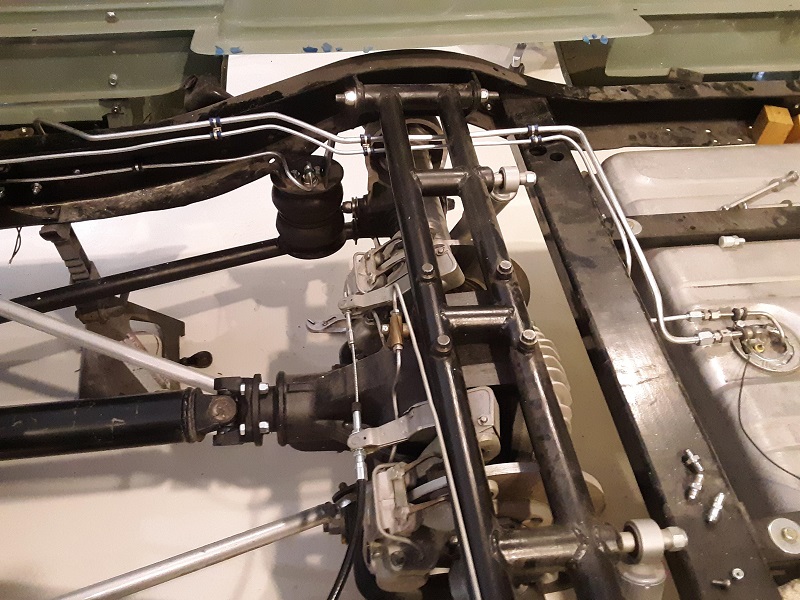 I turned the fuel spider 180 degrees so the fuel fitting was facing back towards the cab. A stainless Swagelok fitting with a mechanical seal to the spider tube is the adapter that gets the fuel rail to a -6 JIC male fitting. 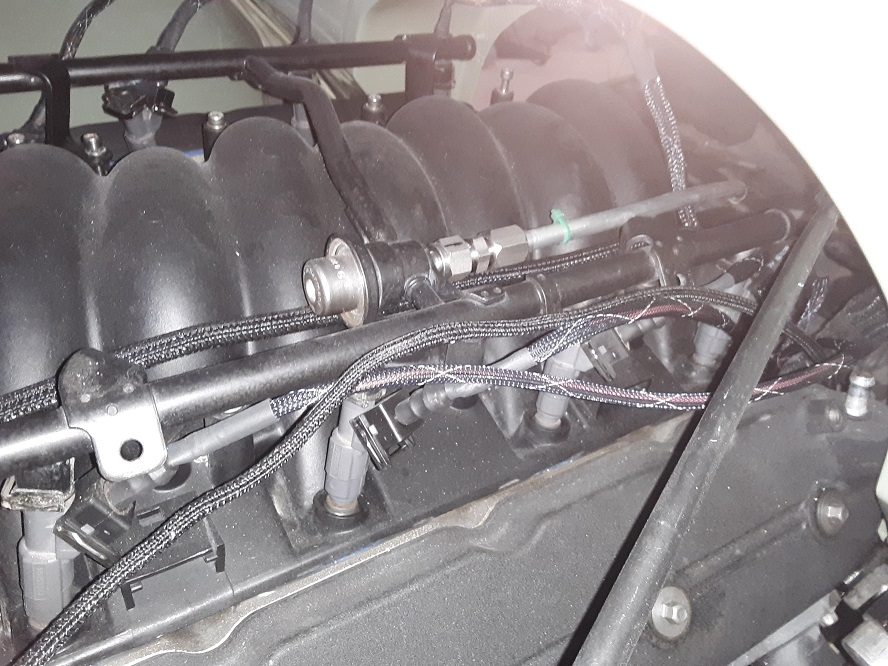 I plumbed the airbags/compressor/tank/valves in 1/4" aluminum tube too, but I had to use some flexible hose to get the air into the cab, but I went to the hydraulic hose store and had them made up with crimped-on fittings. Fingers crossed that this will result in a fairly leak-free system. Here's an airbag plumbed with hard-line- 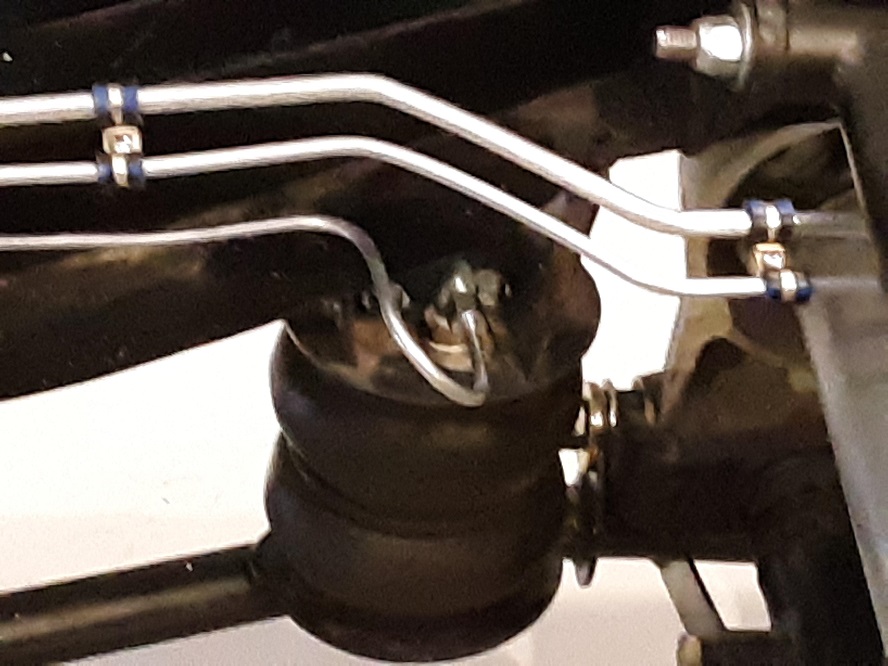 Since the airbags are for ride comfort and I'm an old coot who isn't interested in 'airing out' my truck, I am going to use miniature air pressure regulators to control my ride height - one for each of the front wheels and another for both rear wheels teed together. I used brass bulkhead fittings to get the air in/out of the cab and the regulators will sit just under the seat where they can be easily adjusted by the driver. (Russ - comments and critique of this method is welcome - please weigh in) 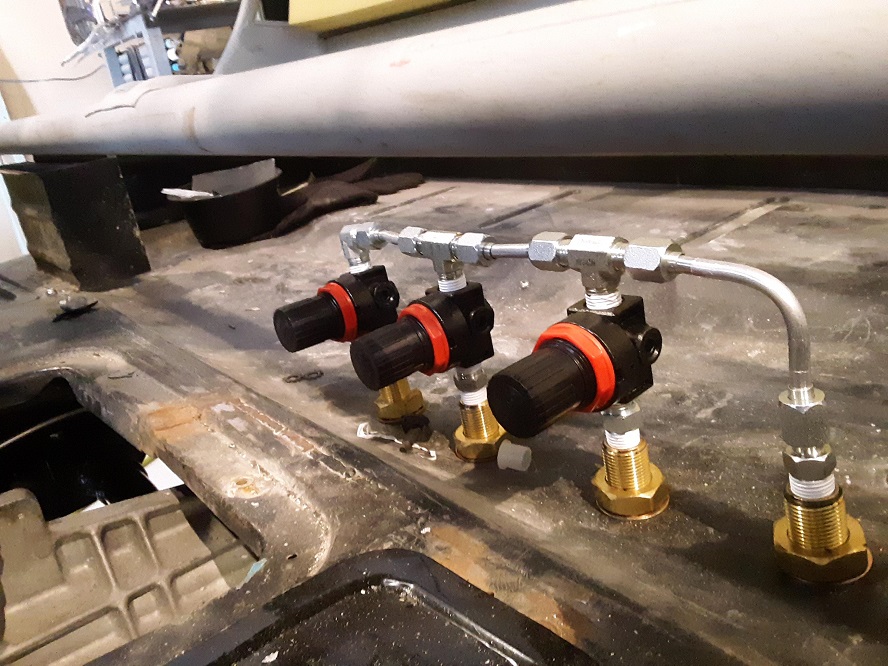 There's a 4 gallon air tank for the system fed by a Viair compressor - probably a little small for the truck. The tank pressure compressor switch is set for 180 PSI to make up for the smallish tank. The front airbags begin to lift the car at about 90 PSI and the rear bags only need about 55 PSI. The regulators say they're good to regulate to 9 bar, so they should be good for the application. I welded a bung onto the bottom of the tank at its lowest point so I can install a ball valve to drain out water by reaching under the running board. I also put an air chuck fitting on the discharge of the drain valve so I can hook the truck's air system to shop air to troubleshoot it. I like belt-and-suspenders designs, so I put a Schrader valve on the tank too as an alternate way to fill it or check pressure. Brakes are done too, with the exception of one bubble flare that i'll need a tool I'll have to borrow. If you'll recall, I had to remote mount my hydroboost and master cylinder back further on the frame rail, so I need to cut a hole for access in the floor pan under the seat. I used the NiCopp 3/16" brake line and it's very easy to work with -highly recommend it. Next I have to plumb the Hydroboost and power steering - going tomorrow to the hydraulic shop to get some hose and loose fittings. I'll have hoses with 90s on both ends so I'll need to make sure they're clocked correctly to fit before I have them crimped. Phil |
|
|
|
|
03-25-2019, 09:33 PM
|
#122 |
|
Senior Member
Join Date: May 2007
Location: Doodah Kansas
Posts: 7,747
|
Re: 49 GMC Five Window
I have never seen pressure regulators used for ride height, frankly I am racking my brain for why it wont work and coming up blank.
on the one hand if you have a leak the system will just leak down to the ground then lift back up (slowly) when you turn the compressor on. on the other if you have a leak free system the compressor will never run at all. I would want to drive it and see what happens, as a wheel goes over a bump the bag will displace and with regular valves the pressure will spike, but with a regulator I am not sure of the mechanism, it may be like an adjustable check valve? speaking of check valves, you might consider them because a hole in a line or a bag would drain the whole system and leave the whole truck flat.
__________________
the mass of men live lives of quiet desperation if there is a problem, I can have it. new project WAYNE http://67-72chevytrucks.com/vboard/s...d.php?t=844393 |
|
|
|
|
03-25-2019, 10:48 PM
|
#123 |
|
Registered User
Join Date: Nov 2013
Location: Show Low, Arizona
Posts: 759
|
Re: 49 GMC Five Window
I guess there's only one thing to do, as you suggest - try it. Going to try my best to have as leak-free system as possible. (but I'm a little concerned about these Chinese regulators)
I'll try it without check-valves first, but it will be easy to plumb them in if need be. Thanks for the benefit of your thoughts Phil |
|
|
|
|
03-28-2019, 08:56 PM
|
#124 | |
|
Registered User
Join Date: Oct 2018
Location: Hudsonville
Posts: 11
|
Re: 49 GMC Five Window
Quote:
Regulators will bleed off pressure when it gets past the setpoint automatically, so when your driving and go over a bump (or say a speed bump), I would be concerned that the regulator will see that spike and bleed off that spike pressure leaving you low on pressure when everything returns back to normal. the compressor will have to compensate for the pressure loss.... A workaround might be a check valve downstream of the regulator, however, then you will never get the air out of the system unless you have another valve upstream of the check valve, unless you use a Pilot operator check which has an air release to it. I do really like the idea, one thing I've always been wondering about is how the airbag systems work under varying pressure levels. Love the build. I have a 48 5-window that I'm just starting the build on. Great work! |
|
|
|
|
|
03-28-2019, 09:23 PM
|
#125 |
|
Senior Member
Join Date: May 2007
Location: Doodah Kansas
Posts: 7,747
|
Re: 49 GMC Five Window
makes sense! now that you said it I do remember when you turn a regulator down there is a hiss from releasing the extra pressure.
__________________
the mass of men live lives of quiet desperation if there is a problem, I can have it. new project WAYNE http://67-72chevytrucks.com/vboard/s...d.php?t=844393 |
|
|
|
 |
| Bookmarks |
|
|


 Linear Mode

