
|
Register or Log In To remove these advertisements. |
|
|
|
|||||||
 |
|
|
Thread Tools | Display Modes |
 12-02-2009, 10:18 PM
|
#1 |
|
Senior Member
Join Date: Jul 2005
Location: Winters Ca. 95694
Posts: 4,843
|
LFD's How-To "PorterBuilt Hood Hinges"
PorterBuilt's DropMember Hood Hinges How-To LFD style So I have been killing my self setting my hood on and off during my 72 Tahoe build. With a 30.5" tall front tire little things like hood hinges kind of get in the way. So my thoughts are that since Nate from PorterBuilt street rods is the reason I am so low and can not run a stock hinge that he should be the one to fix the problem as well! And now he has!! What Nate has come up with is a cowl mounted Hinge kit that really works. Not like the others that only let your hood open half way or the $1K scissor type that are hard to set up right then they still are not real stable (side to side) when they are up. This install took me about 4 hours to complete and the results are out standing. Easy to install with basic tools (plus a welder), the hood opens up 7" higher then stock hinges, way more solid and firm then any hoods I have dealt with. Also since these are a single pivot point style hinge un-like the factory hinges you will not have to push the rear of the hood down for it to close all the way. It will line up the same way every time you open or close the hood. Their were a few snags and we will get to that as they come up in the install. Lets get to it! Ok first thing to do is remove the hood, cowl and stock hood hinges. Then you need to find the center point of the front of the cowl area and put a piece of masking tape their that you can write on. Then from this center mark you will go left and right 23" each way so the hinges will be 46" from center to center. I used masking tape to make all my marks on so it is easy to change if you make a mistake and also it will help protect the paint for the painted guys. Ok so once you make your two hinge marks 46" apart from each other you are ready to make a templet so you can transfer the hinge mounting holes and center slot. So the first step is to mark the hinges for Passenger and Drivers side. Take the hinge box's and set them side by side so the top of the box's are touching like in the pic and not the bottoms. Once you have done this put a P on the left one for Passenger and a D on the right one for Drivers side. [IMG]  [/IMG] [/IMG]Take one of the hinges and place it face down on a piece of poster board and trace the out line of the hinge box, center slot and the 4 mounting holes. Now their is a P and a D to this templet as well so put a mark showing what is what. After I cut this out I placed the box back over it and used a transfer punch to get exact centers for the holes. [IMG] 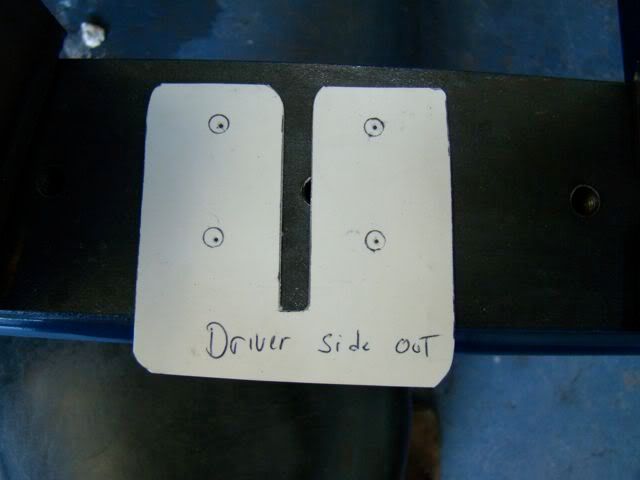 [/IMG] [/IMG]Then take the templet and place it so the 46" marks you made are in the center of the slot you cut out and that the bottom of the templet is tight to the bottom of the wire gutter. I used 2 small magnets to holt it in place while I transferred the mounting holes with a center punch. and marked the slot with a pen. [IMG] 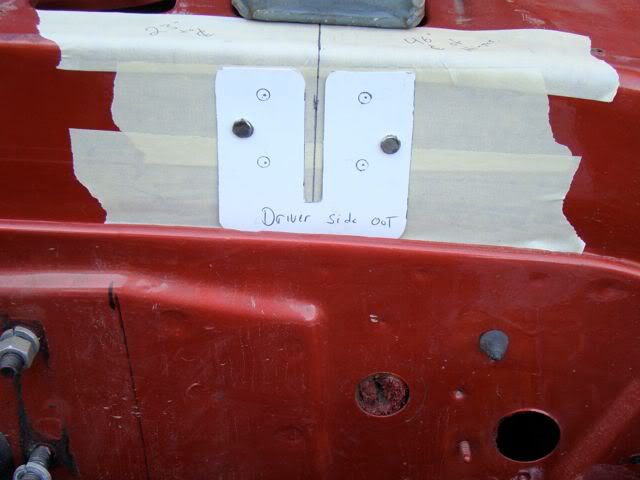 [/IMG] [/IMG]Then I drilled out the the 4 mounting holes with a 5/16" bit but I did not cut the slot out yet. First I set the Passenger side box over the area where it will go and marked out the area I needed to remove so it could slide into the cowl. Only remove as little as you have to so it will fit. Then slide it into place and install 4 bolts just to locate it in the correct spot. It should be sitting flat to the bottom of the cowl at this time. I then used a C clamp to hold it tight so I could mark and drill the 2 bottom holes that will go through the cowl in to the cabin. Note! At this point I chose to use regular hardware for all my mock up because SS is great but does not lend it self well for going in and out too much. So I will keep the SS in a bag and when I am ready for final assembly I will set it all with the regular hardware, tighten it all down and then when I am happy with it I will remove 1 bolt at a time and install the SS with a bit of anti-sieze. [IMG] 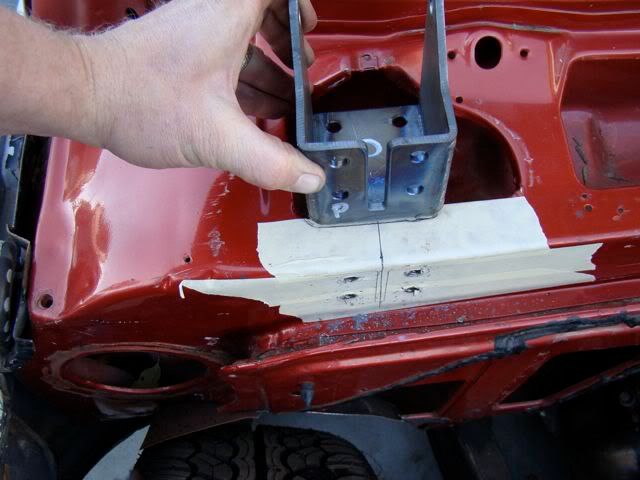 [/IMG] [/IMG][IMG] 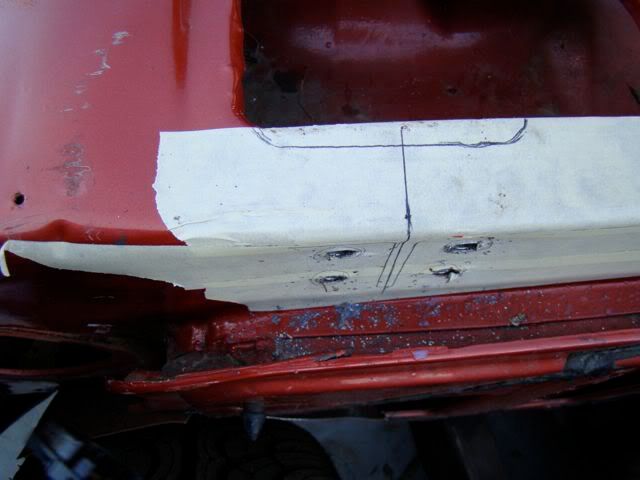 [/IMG] [/IMG][IMG] 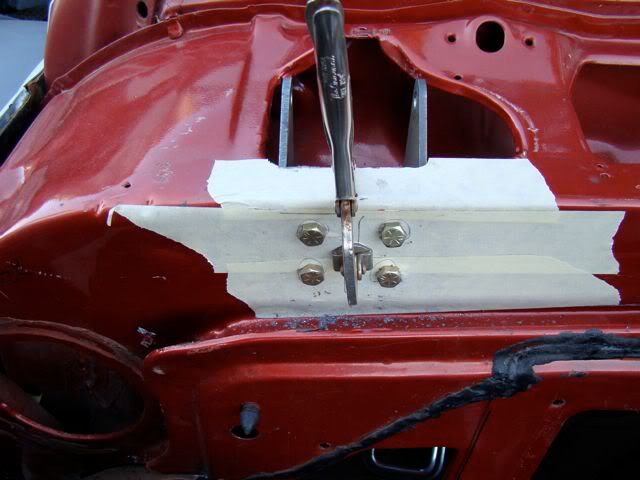 [/IMG] [/IMG][IMG] 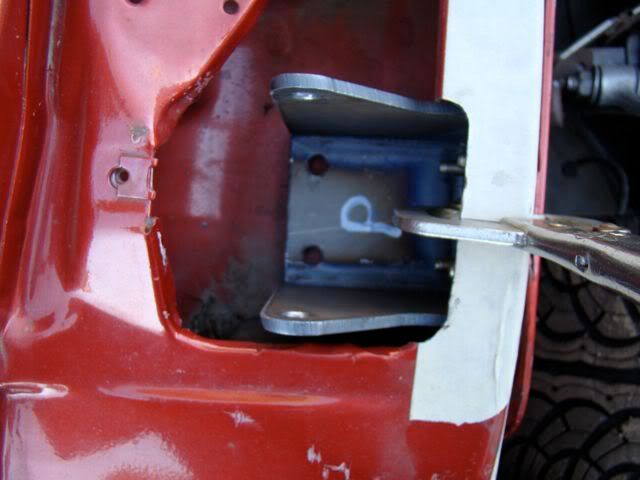 [/IMG] [/IMG]Then I marked for the (2) 3/8" holes for the center slot. The first one went at the bottom of the marked out slot but 1/4" up. The top hole will be for now right on the corner of the top of the cowl. After they are drilled I removed the tape and scribed 2 lines from top to bottom of each hole. I marked mine just inside the lines of where I thought it would end up then I cut out the section. I then clamped the box back in place using the bolts to align it once again. I then took a die grinder and gently remove the rest of the metal around the slot until it was just flush with the slot cut in the box. By doing it this way you end up with a very clean hole that just looks right. [IMG] 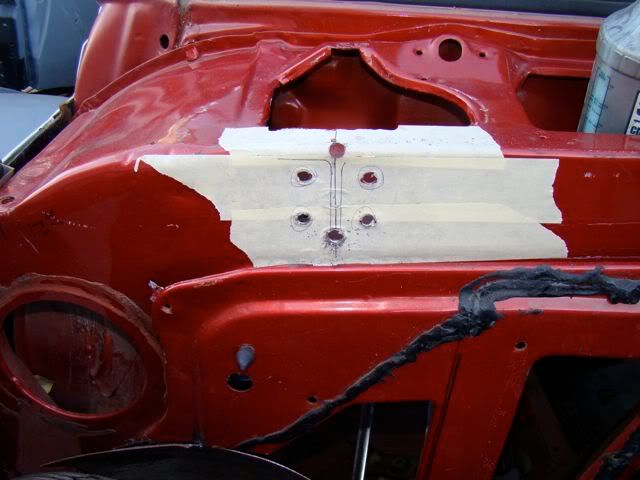 [/IMG] [/IMG][IMG] 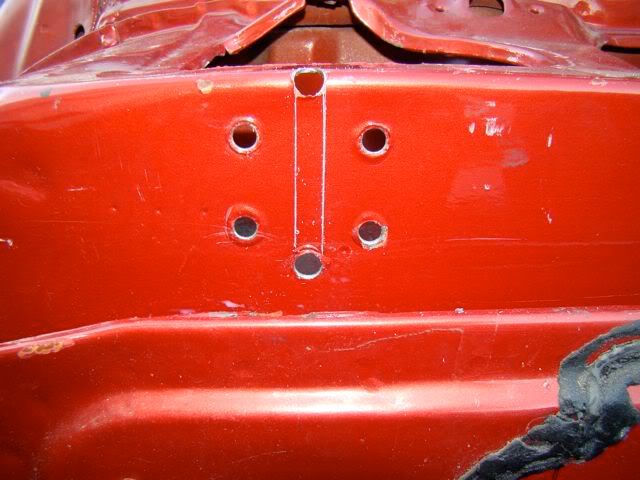 [/IMG] [/IMG][IMG]  [/IMG] [/IMG]Kevin LFD Inc. Last edited by Rokcrln; 12-03-2009 at 02:00 AM. |

|

|
|
12-02-2009, 10:18 PM
|
#2 |
|
Senior Member
Join Date: Jul 2005
Location: Winters Ca. 95694
Posts: 4,843
|
Re: LFD's How-To "PorterBuilt Hood Hinges"
I then did the same for the drivers side but had to do a bit more trimming to get everything in place. After the face holes were drilled and the top of the cowl was cut to get the box inside I found that the holes did not line up. The box was tight against the left side of the opening in the cowl and as you can see in the pic it still has to go over a bit. So I trimmed more off the one side of the cowl until it lined up then I found I need to do a bit more for the bolt head to clear as well.
[IMG] 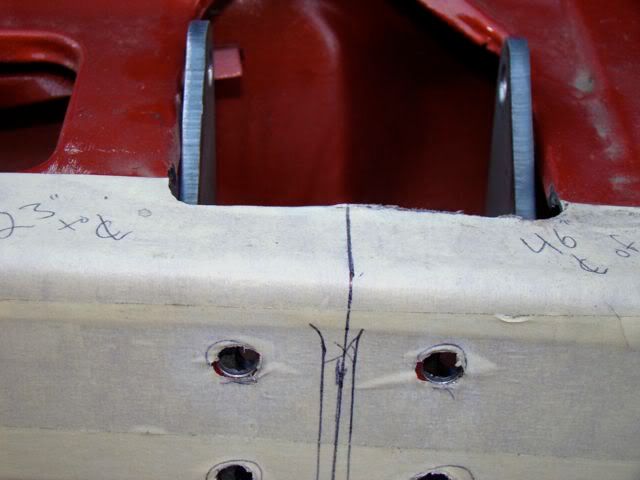 [/IMG] [/IMG][IMG] 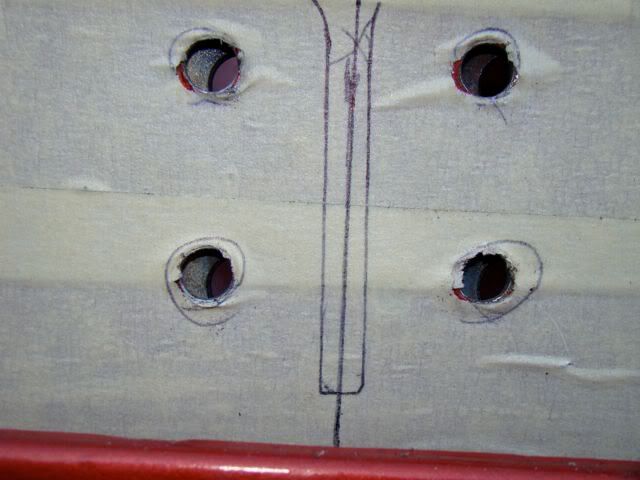 [/IMG] [/IMG][IMG] 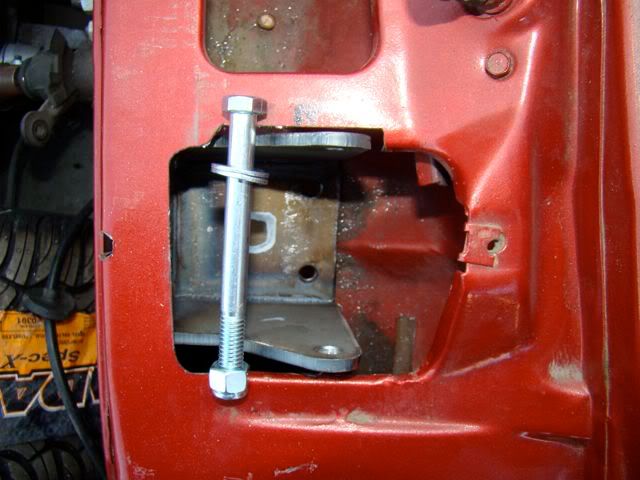 [/IMG] [/IMG]Next it was time to install the hinge arm before bolting in the boxes! If you bolt the box in first you will not be able to slide the bolts into place to hold the arms. Now their is a P and a D to the arms as well. The angle on the end of the mounting plate of the arm will slope in towards the center of the cowl. So imagine a line going from the head light to the center of the cowl and the angle in the arm will follow this same line. Note If you are already painted or going to be driving it for some time you will want to paint these parts and seal up the bottom bolt holes with silicone. To do this put a large amount of silicone under the box around the two holes and then put some more in the holes before inserting the bolts. Yes this is a bit messy but better that then water or rust coming through later. So I assembled the arms on the boxes with everything setting in the cowl openings. Once the arms were bolted in I went ahead and started the 4 front bolts but before tightening them up I dropped the other 2 bolts in place going into the cabin. Then tighten them all up starting with the 4 in front and moving on to the 2 on the bottom. Now that the boxes are tight you can set the tension on the hinge arms. What I did was tighten them up just so the arm will stay up and require a very small amount of force to lower. What this does is makes everything nice and snug and does not allow any slop in the operation of the hinges. Next you will want to adjust the up travel of the hinge arms so they are even with each other like in the pic below. [IMG] 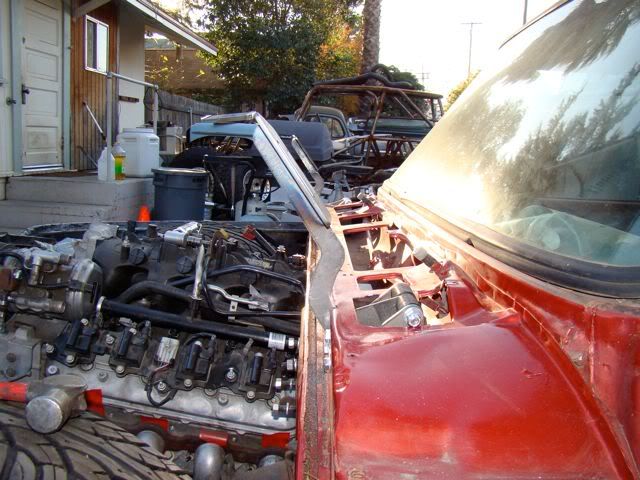 [/IMG] [/IMG]To do this you will take your die grinder or file and adjust the top of the slot so the arms will come up to the same point. You may want to sit the cowl back in place and see where the front edge is location to the top of the slot. You do not want the slot to go into the cowl panel so make a mark at the front edge and work towards that. [IMG] 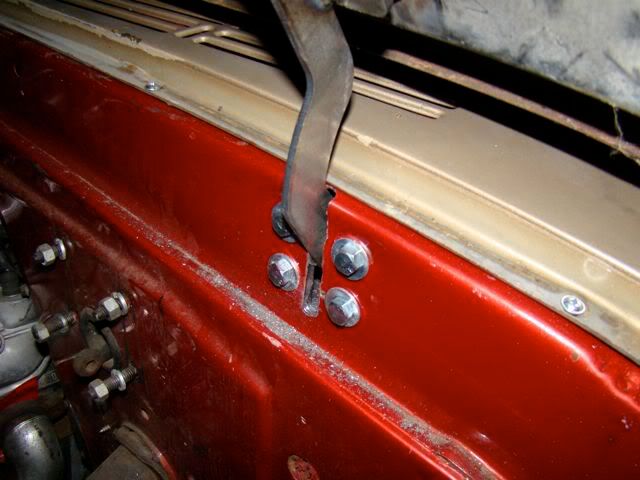 [/IMG] [/IMG][IMG] 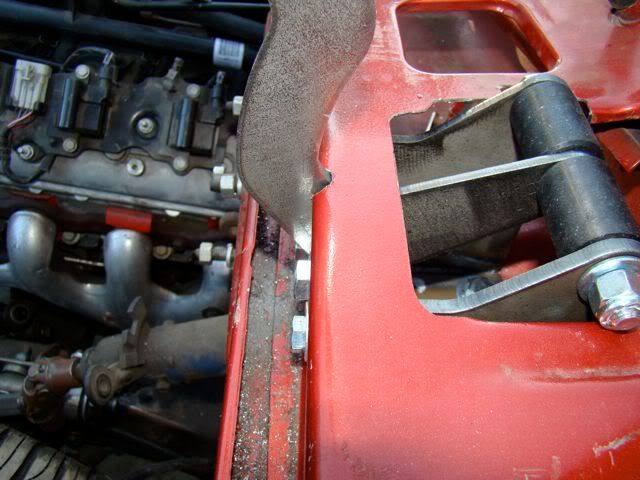 [/IMG] [/IMG]Once you are happy with both sides you can bolt the cowl panel back in place and start on the hood. Note The very first thing you want to do is make sure all the bolts can be screwed all the way into the mounting plate. If you have any problems you should run a tap through the hole first. I had one that did not go and found out after it was welded in place. I have already spoke with Nate about this and he is fixing this so it will not even be a possible problem on later kits. Also note their is a passenger and a driver side to these plates as well. The angle on the plate will follow the angle on the hood brace. So find a good place to lay your hood up side down and grab your tape measure. You will once again want to find the center of the hood along the rear brace. Their is a factory hole that is almost exactly center but double check it before moving to the next step. Once you find center you will want to measure out 23" each way just like on the cowl. This again is the center of the hinge mounting plate but since these plates are 2 1/2" wide now measure to one side 1 1/4" so you have a good mark to line the edge of the plate up with. Put the plate down and trace around it withy a pen then remove the plate and clean all the paint off this area so you will get a good weld in a later step. Now re measure and place your marks one more time (don't forget the 1 1/4" offset line) and using a framing square you will want to make sure these plates are square with the rear of the hood and 1" in front of the back of the brace. This should also be about 2 1/2" from the very back edge of the hood. Once you have this I recommend just doing one tack weld per piece first. After both sides are tacked re-check your 46" number to make sure it is correct then finish welding. I only did about a 1" weld in each corner and I feel that is more than enough to secure the hood for good. [IMG] 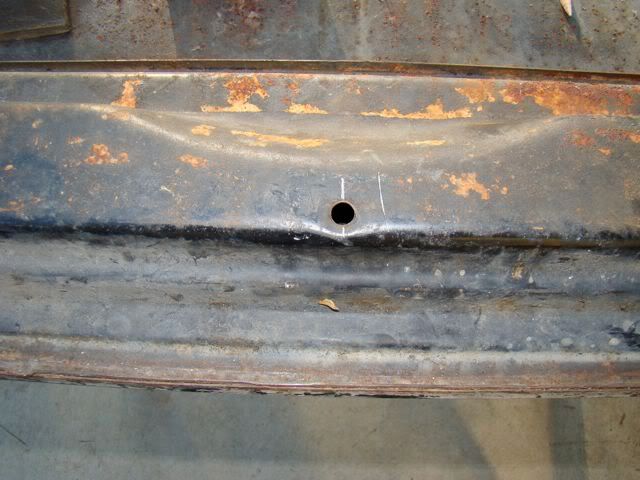 [/IMG] [/IMG][IMG] 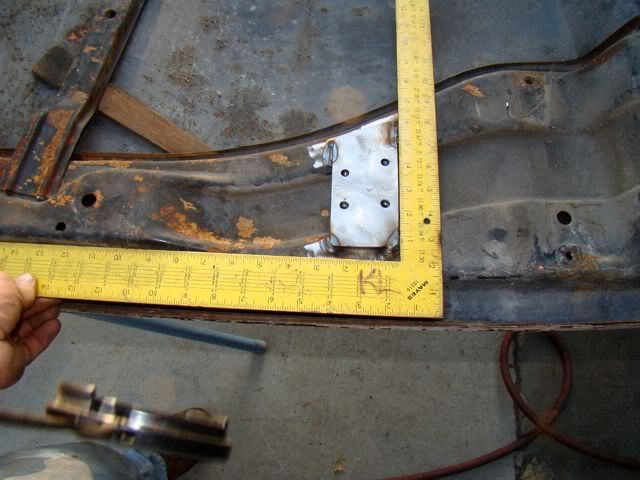 [/IMG] [/IMG][IMG] 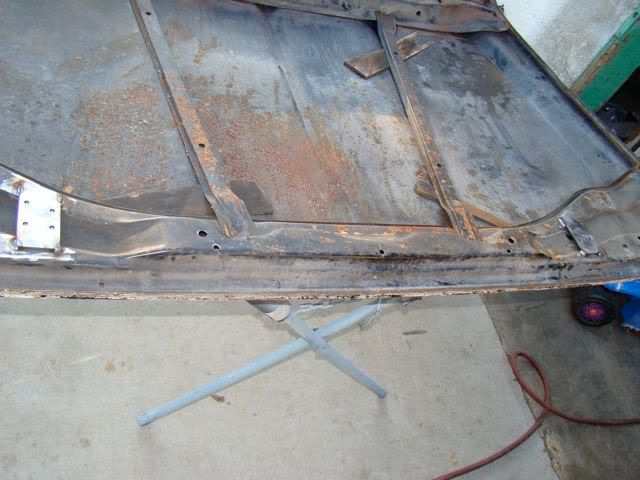 [/IMG] [/IMG]Kevin LFD Inc. Last edited by Rokcrln; 12-03-2009 at 01:10 AM. |
|
|
|
|
12-02-2009, 10:19 PM
|
#3 |
|
Senior Member
Join Date: Jul 2005
Location: Winters Ca. 95694
Posts: 4,843
|
Re: LFD's How-To "PorterBuilt Hood Hinges"
Now just bolt the hood on a drive, well almost. With the hood up (helps with 2 guys) I started all the bolts (do not use the SS bolts for this step yet) and once they were snug I adjusted the hood so that the mounting plate for the hood was about 1/4" in front of the plate on the arm. This gave some extra clearance for the cowl on the first shutting but still be careful that the hood does not contact the cowl. I did mine this way and when it was said and done I only had the hood slid out about 1/16" past the plate on the arm.
Now my hood was 1/8" lower than the cowl and needed to come up. I had some spacers that were 1/8" so I loosened one side at a time and slid in the shims and re-tightened the bolts. This put the hood perfectly flush with the cowl and the hood to fender gap was great as well. I have Talked with Nate and he will be suppling (2) 1/8" and (2) 1/16" shims with the next kits. [IMG] 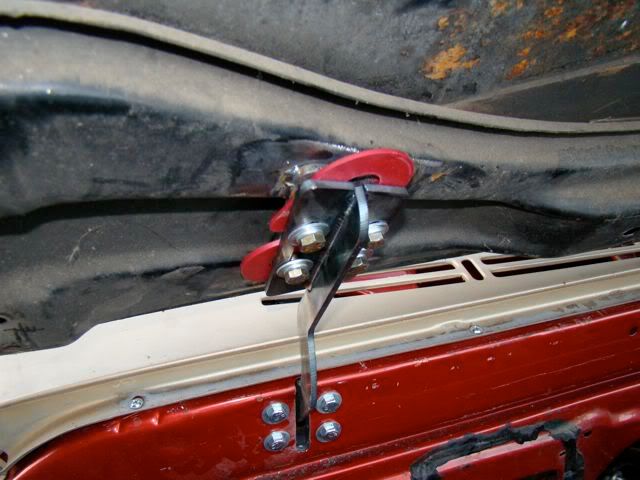 [/IMG] [/IMG][IMG] 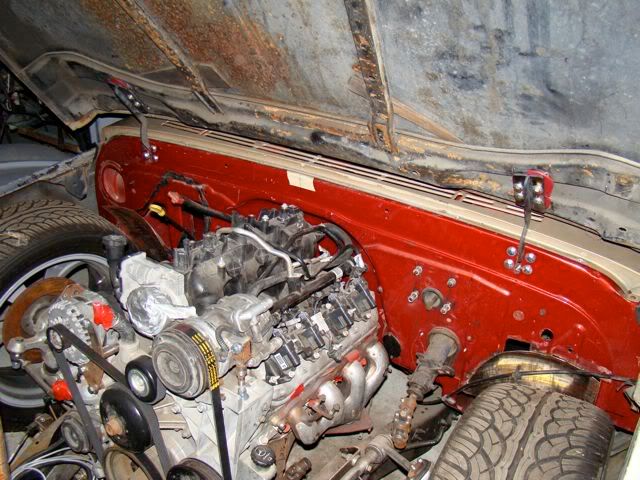 [/IMG] [/IMG]No worries about chipping paint with these hinges, once they are set correctly. [IMG]  [/IMG] [/IMG][IMG]  [/IMG] [/IMG][IMG] 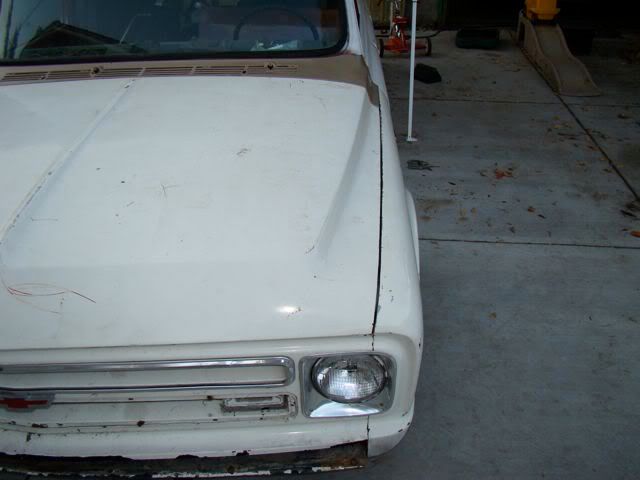 [/IMG] [/IMG][IMG] 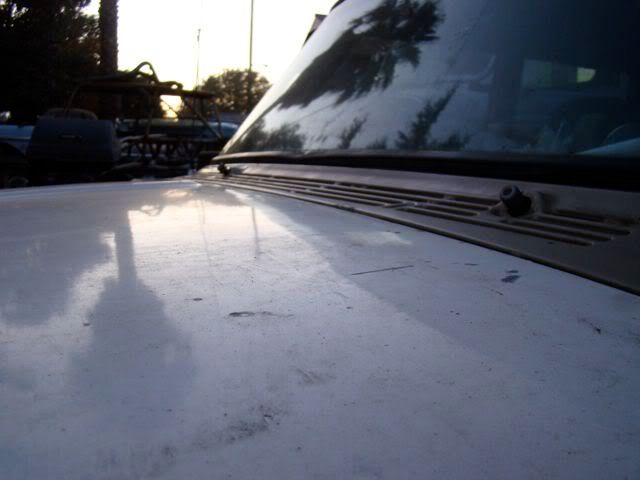 [/IMG] [/IMG]How is this for a hood opening! I checked on low buck and had an opening of 39" (blue hood) between the hood latch and latch pin and on the Tahoe ( white hood) with Nate's kit I had 46"! A total gain of 7"! [IMG] 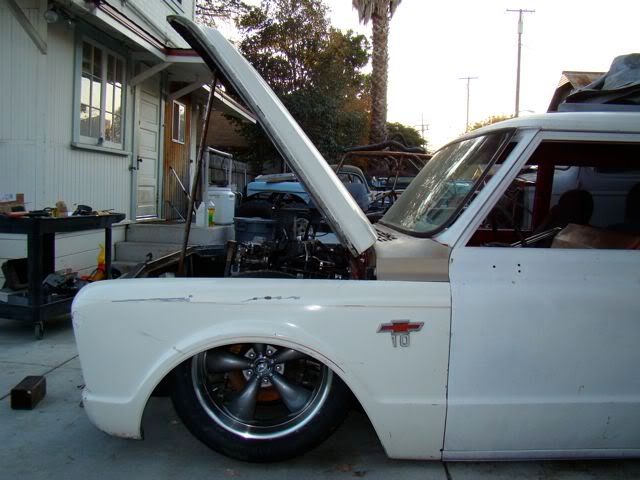 [/IMG] [/IMG][IMG] 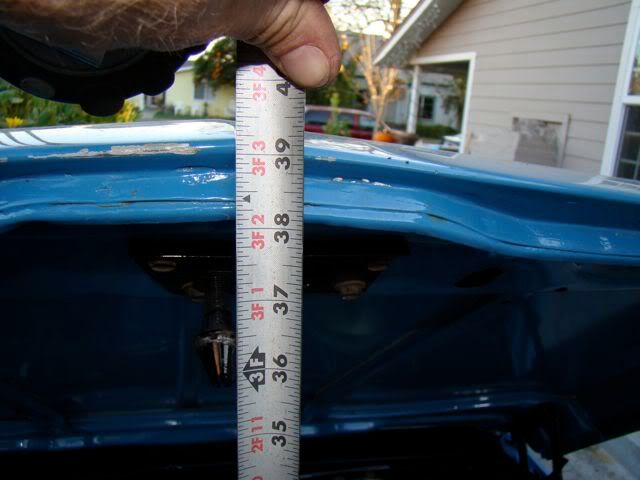 [/IMG] [/IMG][IMG] 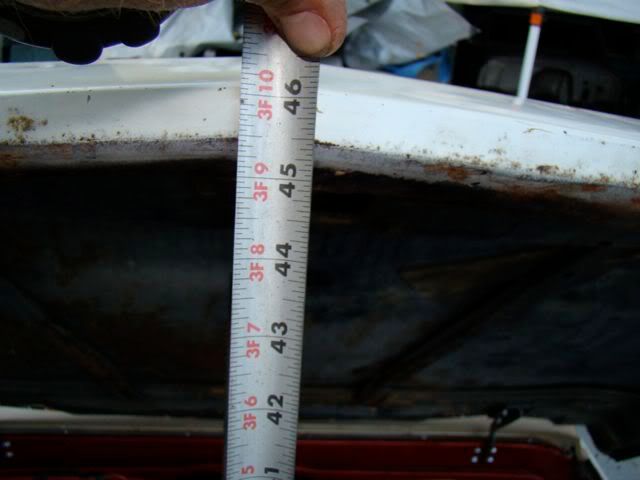 [/IMG] [/IMG]So now you can be this low, rolling on 30" tires and still take your hood with you all for about 4 hours work. [IMG] 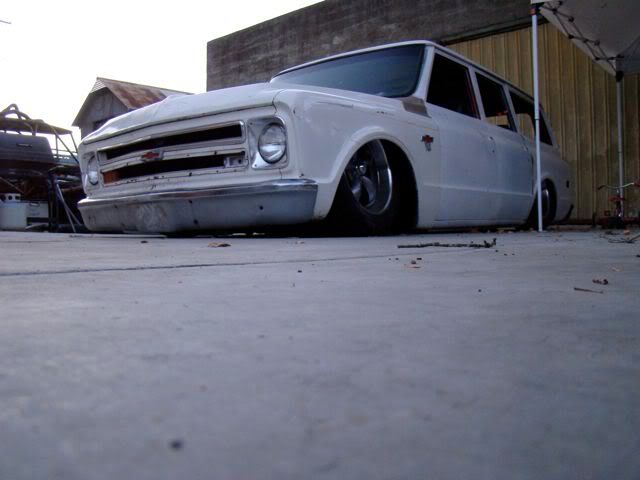 [/IMG] [/IMG]Kevin LFD Inc. Last edited by Rokcrln; 12-03-2009 at 01:36 AM. |
|
|
|
|
12-02-2009, 10:19 PM
|
#4 |
|
Senior Member
Join Date: Jul 2005
Location: Winters Ca. 95694
Posts: 4,843
|
Re: LFD's How-To "PorterBuilt Hood Hinges"
Now for the changes I would like to see Nate make or do and after talking with him tonight it looks like he will be doing all of them.
1) Is to enlarge the holes in the hood mounting plate about 3/32" to avoid any problem screwing the bolts in. 2) To provide the template needed for marking out the cowl bolts and slots on the face. You will still be on your own for the 2 bottom bolts in to the cabin and the opening of the cowl top to fit the boxes. 3) Pre mark all the pieces with a P (passenger side) or a D (driver side) just so their is less of a chance to make a mistake as you are rushing to get this done. 4) Provide (4) shims with the kit for hood adjustment (2) 1/8" and (2) 1/16" same shape as the mounting plate but with larger holes. 5) Maybe include some mock up hardware so you can save the SS for final assembly. This one he does not know about yet but it would be great at least for the hood to arm connection because this is the easiest part to mess up a SS bolt and ruin the threaded plate causing some big nightmares.  Just to clarify none of these changes are needed but knowing how anal Nate is with his quality I knew he would want my feed back to make it even better of a kit (if that is even possible)! So if you have any questions or need other pics just ask! Kevin LFD Inc. Last edited by Rokcrln; 12-03-2009 at 02:58 AM. |
|
|
|
|
12-02-2009, 10:26 PM
|
#5 |
|
Account Suspended
Join Date: Oct 2008
Location: Gulfport, Ms
Posts: 833
|
Re: LFD's How-To "PorterBuilt Hood Hinges"
Mine just came in!
|
|
|
|
|
12-02-2009, 11:29 PM
|
#6 |
|
67-72 parts collector,
 Join Date: Nov 2002
Location: Mid-MO
Posts: 22,681
|
Re: LFD's How-To "PorterBuilt Hood Hinges"
subscribing,...
__________________
Keith Convert to disc brakes. http://67-72chevytrucks.com/vboard/s...d.php?t=444823 |
|
|
|
|
12-03-2009, 01:51 AM
|
#7 |
|
Senior Member
Join Date: Jul 2005
Location: Winters Ca. 95694
Posts: 4,843
|
Re: LFD's How-To "PorterBuilt Hood Hinges"
So here are a few more pics for fun now that my hood stays on!
Kevin LFD Inc. [IMG] [/IMG][IMG] 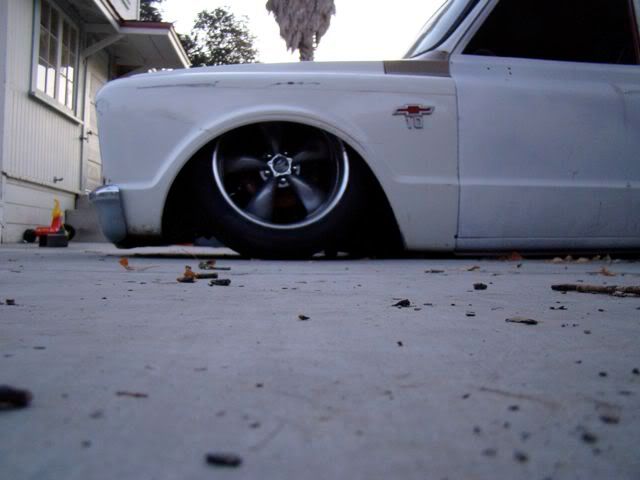 [/IMG] [/IMG][IMG] 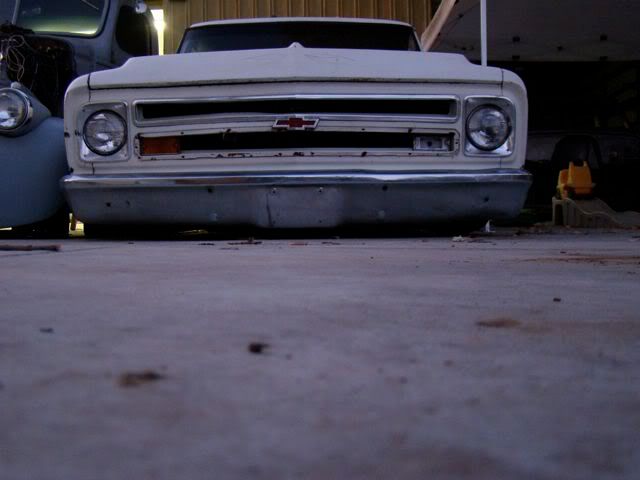 [/IMG] [/IMG]
|
|
|
|
|
12-03-2009, 02:25 AM
|
#8 |
|
Senior Member
Join Date: Dec 2003
Location: Mesa,Az
Posts: 3,981
|
Re: LFD's How-To "PorterBuilt Hood Hinges"
So, where does the product stand on a scale of 1 to 10?
What do you think of the pricing (the $200 is just an introductory price and will increase after the first of the year).
__________________
www.PorterbuiltFabrication.com Phone: 480-297-2621 E-mail: sales@pbfab.com Find us on FaceBook under Porterbuilt Fabrication Specializing in Chassis and Suspension Components for your Classic Chevrolet Truck. We offer components from the following manufacturers: Porterbuilt Accuair Ridetech (Air Ride Technologies) Air Lift Wilwood Intro Unisteer ECE Gotta Show Air Lift Borgeson CPP Supporting this forum since 2003! |
|
|
|
|
12-03-2009, 02:44 AM
|
#9 |
|
Registered User
Join Date: Aug 2009
Location: Austin, Tx
Posts: 516
|
Re: LFD's How-To "PorterBuilt Hood Hinges"
Great write up Kevin! I had the same problem with the bolts not screwing into the nuts. I had to tap all the nuts and cut one off and use another.
|
|
|
|
|
12-03-2009, 02:55 AM
|
#10 | |
|
Senior Member
Join Date: Jul 2005
Location: Winters Ca. 95694
Posts: 4,843
|
Re: LFD's How-To "PorterBuilt Hood Hinges"
Quote:
 and that leaves a small amount of room to improve with a gas strut system then that would put it at an easy 10. This is by far one of the easiest mods that has yielded the biggest return for time and money invested. and that leaves a small amount of room to improve with a gas strut system then that would put it at an easy 10. This is by far one of the easiest mods that has yielded the biggest return for time and money invested.So now the cost question. Well being that I was in the $200 orders I don't need to worry about my answer but here it is. As the kit stands now (with the 5 listed tweaks) and knowing a bit about marketing (very small bit) I would say that since you went with a $200 price to "test the waters" and get a few out their that that is not much above your (material, hardware, time to develop, labor and over head) break even point. Being that you are your own business and need to turn a profit if we want you to be able to come up with more and better products I would say a good market would be in the $350-400 range. Knowing then (before ordering) what I know now I would have gone for the $350 easy and if their was a gas shock kit available as well then bump it to $400-450. This still put the product under priced to some other possible options out their but at the same time your performs in every way it should. So I would say guys if you are on the fence about this kit now is the time to buy because I think it will be about 50-75% less then the price next year. Kevin LFD Inc. |
|
|
|
|
|
12-03-2009, 03:52 PM
|
#11 |
|
Registered User
Join Date: Jul 2008
Location: Buckeye, Arizona
Posts: 694
|
Re: LFD's How-To "PorterBuilt Hood Hinges"
I'm sure Nate will still give the local folks a special price, that's how Nate rolls
__________________
"Fear makes the wolf look bigger" http://67-72chevytrucks.com/vboard/s...d.php?t=305629 |
|
|
|
|
12-03-2009, 03:54 PM
|
#12 |
|
Tot Roddin'
Join Date: Apr 2005
Location: Mid-MO
Posts: 24,461
|
Re: LFD's How-To "PorterBuilt Hood Hinges"
Awesome writeup Kevin!
FAQ worthy
__________________
-Nate  1969 CST SWB - Project Blank Slate (4.5/6" ECE Static Drop, 6-lug disc brake upgrade (manual), Billet Specialties Vintec 20x8.5 255/40 (F) 20x10 295/40 (R), 250 I-6) 1960 AMF Skylark - Tot Roddin' (Lowered with custom frame; soon to include custom push bar and interior) 2008 Silverado CrewCab 1LT (5.3L, 3:73, 4x4, LT1, Z-71, Towing Package) |
|
|
|
|
12-03-2009, 06:28 PM
|
#13 |
|
Going Down?
Join Date: Jun 2009
Location: Rocky Point
Posts: 157
|
Re: LFD's How-To "PorterBuilt Hood Hinges"
Thanks Kevin!... That was Dam nice of you to do that "how to" thread!
And that "Burb" is SICK! by the way... I've been checkin' this one out... it's abandoned over by the railroad tracks. OK Nate... reserve me a set
__________________
Just another day in Paradise Rebuild thread http://67-72chevytrucks.com/vboard/s...d.php?t=354512 |
|
|
|
|
12-03-2009, 07:23 PM
|
#14 |
|
Registered User
Join Date: Jun 2006
Location: Indiana
Posts: 4,859
|
Re: LFD's How-To "PorterBuilt Hood Hinges"
I was going to give you props, but I see you already have one holding up you hood!
__________________
'70 GMC C1500 LWB Power disc brakes. WooHoo! Posi 6 Lug Dana 60 |
|
|
|
|
12-04-2009, 10:09 AM
|
#15 |
|
Happy to be here
 Join Date: Mar 2000
Location: Cypress, TX
Posts: 39,023
|
Re: LFD's How-To "PorterBuilt Hood Hinges"
Great write up on a much needed product.
You mention the additional hood opening range as being an advantage. My guess is this will somewhat diminish once the struts are added. Any thoughts?
__________________
Follow me on Facebook and Instagram @N2trux.com Articles- "Jake" the 84 to 74 crewcab "Elwood" the77_Remix 85 GMC Sierra "Scarlett" "Refining Sierra" |
|
|
|
|
04-02-2012, 08:51 PM
|
#16 |
|
Registered User
Join Date: May 2007
Location: Deale Md
Posts: 4,663
|
Re: LFD's How-To "PorterBuilt Hood Hinges"
This is a great write up and yeah I know it's from 2009 but by chance did you up grade to the struts ?
__________________
James 63 GMC V6 4speed carryall 65 chevy swb bbw V8 auto 68 K20 327/4 speed, buddy buckets 2002 GMC CC Dually Duramax 64 GMC lwb 3/4 V6 4speed SOLD 66 GMC swb bbw buddy buckets SOLD IG duallyjams The only thing that stays the same is constant change! |
|
|
|
|
04-02-2012, 09:37 PM
|
#17 | |
|
Registered User
Join Date: May 2008
Location: Florida
Posts: 281
|
Re: LFD's How-To "PorterBuilt Hood Hinges"
Quote:
|
|
|
|
|
|
04-02-2012, 10:01 PM
|
#18 |
|
low n' slo
Join Date: Mar 2009
Location: rosenberg, texas
Posts: 5,133
|
Re: LFD's How-To "PorterBuilt Hood Hinges"
__________________
67 1/2 ton Suburban - Project DRGNWGN. Build thread  -_--_--_ _________ _--_-_ -/____|__|__\__ ,.,,,.,.,,.,|_O _______ O_] |
|
|
|
|
04-02-2012, 10:06 PM
|
#19 |
|
Registered User
Join Date: May 2007
Location: dallas ga
Posts: 1,503
|
Re: LFD's How-To "PorterBuilt Hood Hinges"
The struts work great but they limit the travel of the hood.... it doesn't open up as high as stock with the strut option.... I like them it is just something I noticed when I installed them
|
|
|
|
|
05-23-2012, 08:02 PM
|
#20 | |
|
Registered User
Join Date: Feb 2011
Location: Beverly, MA
Posts: 472
|
Re: LFD's How-To "PorterBuilt Hood Hinges"
Quote:
|
|
|
|
|
|
06-03-2012, 07:09 PM
|
#21 |
|
Registered User
Join Date: Jul 2011
Location: Farmville, Va
Posts: 3,027
|
Re: LFD's How-To "PorterBuilt Hood Hinges"
that was very infrmative and your ride is very slick
|
|
|
|
|
07-25-2012, 03:56 PM
|
#22 |
|
Registered User
Join Date: Jul 2012
Location: south houston tx.
Posts: 16
|
Re: LFD's How-To "PorterBuilt Hood Hinges"
that's some sick work.........
|
|
|
|
|
08-09-2012, 08:35 AM
|
#23 |
|
Registered User
Join Date: May 2012
Location: Canyon Lake, TX
Posts: 94
|
Re: LFD's How-To "PorterBuilt Hood Hinges"
Do we have install procedures for those of us with welded gutter?
|
|
|
|
|
08-09-2012, 10:38 AM
|
#24 |
|
Registered User
Join Date: Apr 2007
Location: dequincy la.
Posts: 1,465
|
Re: LFD's How-To "PorterBuilt Hood Hinges"
not closeup but i can get em...had to split outer piece into 2 halfs ...works good......jim
__________________
Build thread at http://67-72chevytrucks.com/vboard/s...d.php?t=475791 Last edited by jtp67-72; 08-09-2012 at 10:44 AM. |
|
|
|
|
08-09-2012, 12:22 PM
|
#25 | |
|
Registered User
Join Date: May 2012
Location: Canyon Lake, TX
Posts: 94
|
Re: LFD's How-To "PorterBuilt Hood Hinges"
Quote:
Posted via Mobile Device |
|
|
|
|
|
| Bookmarks |
|
|


 Linear Mode

