
|
 12-01-2022, 06:15 PM
|
#1 |
|
Senior Member
 Join Date: Sep 2017
Location: Bryan, Texas
Posts: 2,274
|
My 54
In the "Wife's 48" thread, I started on a 54 when I thought the 48 was going to a friend. When his health kept him from taking the project, I got back on it, but I had started the 54. So, the start of this truck in in http://67-72chevytrucks.com/vboard/s...87#post9150387 page 94 the two are mingled together from there. I could repost pictures if it makes the build more cohesive. Let me know.
Well, MD2020 got me all inspired to try something out of my skill set - fabricating a part. I have a dash that was cut up by a PO, so I tried to rebuild it to hold two ac vents and a double din stereo, someday. I thought about plastic under dash vent holders, but just didn't like the idea. So, MD got me thinking. Go see his work for how it's done. Look at my work if you don't mind chuckling a little. First, I started with the front bed panel from a junk bed.  IMG_1173 (1) by Robert Moorman, on Flickr IMG_1173 (1) by Robert Moorman, on FlickrNow I'll give you your first chuckle, I didn't realize it was at least 16-gauge metal. Talk about hard to bend! So here are some of the hammers and dollies I had to use.  IMG_1183 by Robert Moorman, on Flickr IMG_1183 by Robert Moorman, on FlickrI used the 4 lb hammer the most. It is still really hard to make it do anything. The first thing I did was use the bed roll at the top and I cut the spot welds out and it sprung open just a little.  IMG_1176 by Robert Moorman, on Flickr IMG_1176 by Robert Moorman, on FlickrSo, I strapped it down, and used that 4 lb hammer and bent a lip over so it will be stiffer length wise, and I won't cut my hand when I reach under the dash for something.  IMG_1175 (1) by Robert Moorman, on Flickr IMG_1175 (1) by Robert Moorman, on FlickrThen I cut a strip and bent a lip on it to use for the top part that bolts to the underside of the dash. I then used a couple of clamps and clamped it to the dash I bought for use just in case this doesn't all work out.  IMG_1179 by Robert Moorman, on Flickr IMG_1179 by Robert Moorman, on FlickrAfter a day of welding and grinding, here is what I have.  IMG_1185 by Robert Moorman, on Flickr IMG_1185 by Robert Moorman, on FlickrAnd the scallps on the end to mimic the dash.  IMG_1184 by Robert Moorman, on Flickr IMG_1184 by Robert Moorman, on FlickrThat's it for today.
__________________
8man-aka Robert 1948 on a S10 Frame, small block with a carb 1954 Cab, 53 Front and Bed, 50 Doors, S10 Frame, Power TBD Build thread: "]http://67-72chevytrucks.com/vboard/showthread.php?t=746899&highlight=wife%27s+48[/URL] [/URL]http://67-72chevytrucks.com/vboard/showthread.php?t=840204 |

|

|
|
12-02-2022, 10:33 AM
|
#2 |
|
Senior Member
 Join Date: Oct 2014
Location: Eagle, ID
Posts: 2,933
|
Re: My 54
Looks good. Please, if you have two different builds going, it'd be great if you can keep the threads separate. I know it's a bit of a pain, but it would make following them much easier.
|
|
|
|
|
12-02-2022, 07:45 PM
|
#3 |
|
Senior Member
 Join Date: May 2007
Location: Doodah Kansas
Posts: 7,747
|
Re: My 54
lookin good!
__________________
the mass of men live lives of quiet desperation if there is a problem, I can have it. new project WAYNE http://67-72chevytrucks.com/vboard/s...d.php?t=844393 |
|
|
|
|
12-03-2022, 09:19 AM
|
#4 |
|
Senior Member
Join Date: Sep 2017
Location: Bryan, Texas
Posts: 2,274
|
Re: My 54
Thank you both.
__________________
8man-aka Robert 1948 on a S10 Frame, small block with a carb 1954 Cab, 53 Front and Bed, 50 Doors, S10 Frame, Power TBD Build thread: "]http://67-72chevytrucks.com/vboard/showthread.php?t=746899&highlight=wife%27s+48[/URL] [/URL]http://67-72chevytrucks.com/vboard/showthread.php?t=840204 |
|
|
|
|
01-25-2023, 06:04 PM
|
#5 |
|
Senior Member
Join Date: Sep 2017
Location: Bryan, Texas
Posts: 2,274
|
Re: My 54
I have been sleeping a lot, so I don't have much to report, but I have started working on the 54.
First is the cowl/side panel joint.  IMG_1207 by Robert Moorman, on Flickr IMG_1207 by Robert Moorman, on FlickrWho knew that lead was so easy to get out of the joint, it even cleaned up easy. So, I welded in the patch. 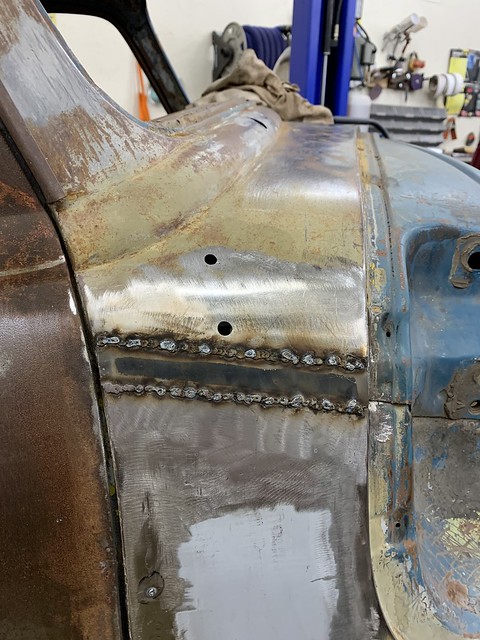 IMG_1212 by Robert Moorman, on Flickr IMG_1212 by Robert Moorman, on FlickrI made one more pass with the welder and clean up after this, but didn't get the picture.  IMG_1213 by Robert Moorman, on Flickr IMG_1213 by Robert Moorman, on FlickrThen I filled in that filler neck and a bad weld spot where I put in a patch panel, or 2.  IMG_1208 by Robert Moorman, on Flickr IMG_1208 by Robert Moorman, on Flickr IMG_1216 by Robert Moorman, on Flickr IMG_1216 by Robert Moorman, on FlickrThose random welds in the filler cap picture are where I found some pinholes in the weld where I put on the patch. Tomorrow will be grinding and checking for pinholes on these. I am having a dickens of a time getting the .023 wire out of my little Lincoln MIG to penetrate all the way through the thin sheet metal. I have tried all the heat settings and adjusted the speed from really slow to really fast, and still not penetrating all the way. On a smooth test piece, it'll bubble a little on back, but where I have a joint I'm having trouble. Any thoughts?
__________________
8man-aka Robert 1948 on a S10 Frame, small block with a carb 1954 Cab, 53 Front and Bed, 50 Doors, S10 Frame, Power TBD Build thread: "]http://67-72chevytrucks.com/vboard/showthread.php?t=746899&highlight=wife%27s+48[/URL] [/URL]http://67-72chevytrucks.com/vboard/showthread.php?t=840204 |
|
|
|
|
01-25-2023, 08:03 PM
|
#6 |
|
Senior Member
Join Date: May 2007
Location: Doodah Kansas
Posts: 7,747
|
Re: My 54
looking good!
on sheetmetal I use an unconventional way to set the welder, i turn the heat all the way down and the wire about half, and put a long tack on, like a full second if you said "ONE" out loud deliberately. if it pushes back on my grip I turn the wire down. if it pops and crackles I turn the wire up. with 0.23 I have a hard time getting enough filler in the weld so my setting is kind of high. i actually like using 0.30 wire for sheetmetal, my 0.23 wire is still on the spool when i used it probably 10 years last.
__________________
the mass of men live lives of quiet desperation if there is a problem, I can have it. new project WAYNE http://67-72chevytrucks.com/vboard/s...d.php?t=844393 |
|
|
|
|
01-26-2023, 12:19 AM
|
#7 |
|
Registered User
Join Date: Nov 2010
Location: calgary alberta
Posts: 7,825
|
Re: My 54
I find that a small gap between the parts helps with the penetration but also helps with the burn through. I like to try a practice piece of metal the same thickness and get things dialed up close beforei start the actual weld. try to keep the gun angles the same, the wire stick out the same, the distance from the work the same. like joedoh says, if it is burning back increase the wire speed, if it is pushing into the weld puddle and popping and sputtering then decrease the wire speed. also, don't be afraid to increase the voltage and try it. ensure the metal is clean on both sides too, like shiny steel. contaminants can be drawn into the weld from the back side (or front side) and mimmick a voltage ot wire speed problem.
check out welding tips and tricks for some good info does your welder have a chart for metal thickness and start off points for the settings? have you tried starting all over from scratch? setting and checking the gas flow etc etc? |
|
|
|
|
01-26-2023, 12:23 AM
|
#8 |
|
Registered User
Join Date: Nov 2010
Location: calgary alberta
Posts: 7,825
|
Re: My 54
|
|
|
|
|
01-26-2023, 12:25 AM
|
#9 |
|
Registered User
Join Date: Nov 2010
Location: calgary alberta
Posts: 7,825
|
Re: My 54
|
|
|
|
|
01-26-2023, 09:38 AM
|
#10 |
|
Senior Member
Join Date: Sep 2017
Location: Bryan, Texas
Posts: 2,274
|
Re: My 54
Thanks guys, I will be cutting and cleaning two new scraps of sheet metal and trying all over again to see if I can get it work.
I did start with the machine's suggested settings and then went up on wire speed and then up on volts, starting over on wire speed, trying a bunch of settings. I'll read the write ups and try it again.
__________________
8man-aka Robert 1948 on a S10 Frame, small block with a carb 1954 Cab, 53 Front and Bed, 50 Doors, S10 Frame, Power TBD Build thread: "]http://67-72chevytrucks.com/vboard/showthread.php?t=746899&highlight=wife%27s+48[/URL] [/URL]http://67-72chevytrucks.com/vboard/showthread.php?t=840204 |
|
|
|
|
01-26-2023, 09:57 AM
|
#11 |
|
Registered User
Join Date: Nov 2010
Location: calgary alberta
Posts: 7,825
|
Re: My 54
he has a few videos on mig welding basics, I think this is the first, where he talks about getting things set up correctly as far as contact tip protrusion, gas settings, wire stick out etc and then the next one is how to set up the welder even if there are no settings.
https://www.weldingtipsandtricks.com...ng-basics.html |
|
|
|
|
01-26-2023, 10:12 AM
|
#12 |
|
Registered User
Join Date: Nov 2010
Location: calgary alberta
Posts: 7,825
|
Re: My 54
its also important to have the correct shade of welding lens. you don't wanna go too light, for obvious reasons, but if you go too dark then you have a hard time seeing the puddle. being able to see the puddle is important so you can make sure it contacts both pieces of metal without leaving a crater. when doing patches, like you have shown, I usually tack a spot at 12 oclock, check positioning and fitment, tack nother spot on the other side at 6 o clock, recheck fit, tack another spot on a third side at 3 o clock, check fit, tack the next spot at 9 o clock, check fit, then start tacking at the midway points between the tacks and allow to cool between. allow to cool so it is like room temp so it will be nice and flat when done. sometimes I use an air blow gun to help cool a large area. sometimes I spot, hammer on dolly a couple of hits to expand the tack, then cool. this is because if you force cool the tack can shrink more than the surrounding metal and it will warp the patch area. since mig isn't that appreciative of hammer on dolly when cooled off I hammer it when it's still really hot right after welding.maybe thats wrong, dunno, but it seems to work for me. when I get enough tacks so they are about 1/2 to 3/4" apart then sometimes I will lay a short bead down to connect the tacks. I start on one tack and end on the other tack so I run right over the original tacks. that way there is less chance of a pin hole. grinding the tacks down before starting this can help. there are also a couple different mig wires you can choose, one works better for dirty metal but is less appreciative of the hammer and dolly after. it may leave a brown looking bubble on the tops of the welds. the other one is good for cleaner steel. gotta be clean on both sides too. I think the videos may mention that wire use thing, can't remember. your wire supplier could likely tell you.
|
|
|
|
|
01-26-2023, 11:19 AM
|
#13 |
|
Senior Member
Join Date: Sep 2017
Location: Bryan, Texas
Posts: 2,274
|
Re: My 54
Thanks Raven. I may not get the chance to start today, but before I do any more welding on the truck, I'll be burning some wire on some scrap pieces.
__________________
8man-aka Robert 1948 on a S10 Frame, small block with a carb 1954 Cab, 53 Front and Bed, 50 Doors, S10 Frame, Power TBD Build thread: "]http://67-72chevytrucks.com/vboard/showthread.php?t=746899&highlight=wife%27s+48[/URL] [/URL]http://67-72chevytrucks.com/vboard/showthread.php?t=840204 |
|
|
|
|
01-26-2023, 05:14 PM
|
#14 |
|
Registered User
Join Date: Sep 2018
Location: Ontario
Posts: 788
|
Re: My 54
dash extension looks really good, nice job.
I enjoy metal fab as well, but don't know why, because I'm not very good at it. keep at it, looking good
__________________
https://67-72chevytrucks.com/vboard/...=797726&page=3http://https://67-72chevytrucks.com/...=797726&page=3 51 Chev 5 window on S10 with SBC 1958 Pontiac Wagon build https://67-72chevytrucks.com/vboard/...d.php?t=849781 |
|
|
|
|
01-26-2023, 05:56 PM
|
#16 |
|
Senior Member
Join Date: Sep 2017
Location: Bryan, Texas
Posts: 2,274
|
Re: My 54
Thanks Tempest, I do enjoy it, but would like to get much better at it.
__________________
8man-aka Robert 1948 on a S10 Frame, small block with a carb 1954 Cab, 53 Front and Bed, 50 Doors, S10 Frame, Power TBD Build thread: "]http://67-72chevytrucks.com/vboard/showthread.php?t=746899&highlight=wife%27s+48[/URL] [/URL]http://67-72chevytrucks.com/vboard/showthread.php?t=840204 |
|
|
|
|
01-27-2023, 04:43 PM
|
#17 |
|
Senior Member
Join Date: Sep 2017
Location: Bryan, Texas
Posts: 2,274
|
Re: My 54
Thanks Jan. I had a problem with the cruise on the 48 and am waiting on a new part from Dakota Digital. When it's installed, it's off to the interior and then more pictures.
Welding, one thing I can say for certain is that my welding sucks! I did as Russ suggested and held my "bursts" longer to get more heat and thus more penetration. So now they are all welded up, and NO pinholes. However, I am not a smart man, and I got in two big of a hurry and I have some heat shrink that isn't pretty! I have used a long thin piece of steel shaped to the side of the truck to check and none of the weld is up to that smooth shape of the panel, so it will fill with filler.  IMG_1218 by Robert Moorman, on Flickr IMG_1218 by Robert Moorman, on Flickr IMG_1217 by Robert Moorman, on Flickr IMG_1217 by Robert Moorman, on FlickrSo now I have a hammer and dolly after it, and I've worked them to the point where it will take less than 1/4" of filler to smooth them out. I am still going to work it some more, because it needs it, but it is solid and I don't think a small area with less than 1/4" of filler will be a problem.
__________________
8man-aka Robert 1948 on a S10 Frame, small block with a carb 1954 Cab, 53 Front and Bed, 50 Doors, S10 Frame, Power TBD Build thread: "]http://67-72chevytrucks.com/vboard/showthread.php?t=746899&highlight=wife%27s+48[/URL] [/URL]http://67-72chevytrucks.com/vboard/showthread.php?t=840204 |
|
|
|
|
01-28-2023, 10:50 AM
|
#18 |
|
Registered User
Join Date: Nov 2010
Location: calgary alberta
Posts: 7,825
|
Re: My 54
have you thought of trying a shrinking disc or a shrinking method like that? I have heard that some have used a laundry iron set to very hot as well. basically the flat hot thing heats up the high spots, not too much-just enough to cause some steam when you cool it with a wet rag, and that shrinks just the high spots down o be more level with the low spots. I have a small and large disc set from Wray Schelen (?) and have used them a bunch on my rear fenders. they were bad but after a bunch of hammer and dolly work they came out pretty smooth after the disc work. no filler used, just some high build primer, sand, etc.
if you haven't already tried it, a big fat tip marker from the dollar store works pretty well to show high spots. rub the marker all over the area, then when you use a flat sanding board (I use a piece of 3/4 plywood with a sanding strip stapled on because it doen't bend like the plastic boards do) the board sands off the high spots and shows the low spots where the marker hasn't been sanded off yet. then use a flat faced hammer and a dolly that is shaped close to the shape you need to massage out the hogh spots and/or bring up the low spots to flatten out the area and if it ends up lookinh like a bubble then shrink disc the whole area to take the bubble out. I also use a slapper made from a truck spring as a hammer sometimes because it is way wider than a hammer face for some of the larger areas. worked for me. keep plugging away and soon you will be done. turn the shop lights off after and use a bright light on the inside of the area so you can detect any pin holes. |
|
|
|
|
01-29-2023, 09:28 AM
|
#19 |
|
Senior Member
Join Date: Sep 2017
Location: Bryan, Texas
Posts: 2,274
|
Re: My 54
Raven, thank you.
I have been watching Wray for a while, and I have the large makers, I used an LED work light to check for pin holes and I've been using the hammer and dolly on the weld areas, bringing up the lows and down the highs. I spent about 4 hours yesterday on it and it is significantly better than it was. I plan to spend a few more hours on it to see if I can make it any better. I am at about 1/16" low in a few small areas, as best as I can tell with my hand bent template. I have tried Wray's shrinking discs on the back. I think they worked on the areas where I used them, the welds are still too rough for that. The area under the old gas filler hole was dented in pretty bad at the door jamb. I got it into pretty good shape, but it will take some filler there to get it back to level with the door. With the door jamb and the 90-degree bends in that steel, it's not moving very good. I may need a bigger hammer to get that last bit.
__________________
8man-aka Robert 1948 on a S10 Frame, small block with a carb 1954 Cab, 53 Front and Bed, 50 Doors, S10 Frame, Power TBD Build thread: "]http://67-72chevytrucks.com/vboard/showthread.php?t=746899&highlight=wife%27s+48[/URL] [/URL]http://67-72chevytrucks.com/vboard/showthread.php?t=840204 |
|
|
|
|
01-29-2023, 11:17 AM
|
#20 |
|
Registered User
Join Date: Nov 2010
Location: calgary alberta
Posts: 7,825
|
Re: My 54
i try to use an actual grinding disc on high sot weld, rather than a flap disc. it only touches the high spots and not the metal nect to the welds. that makes that area thinner.
|
|
|
|
|
01-29-2023, 11:27 AM
|
#21 |
|
Senior Member
Join Date: Sep 2017
Location: Bryan, Texas
Posts: 2,274
|
Re: My 54
Raven, you already know what I'm learning. I thank you for sharing because I as I said, I am trying to learn.
This is the most welding and finishing I have done on sheet metal, but I have not used a flap disc on my body work. I start by knocking the tops of the welds off with a grinding wheel on a 4 1/2" grinder and then go to a 3" die grinder with 36 grit and then to 60 grit to try and get just the weld. I'm trying to avoid taking any sheet metal.
__________________
8man-aka Robert 1948 on a S10 Frame, small block with a carb 1954 Cab, 53 Front and Bed, 50 Doors, S10 Frame, Power TBD Build thread: "]http://67-72chevytrucks.com/vboard/showthread.php?t=746899&highlight=wife%27s+48[/URL] [/URL]http://67-72chevytrucks.com/vboard/showthread.php?t=840204 |
|
|
|
|
01-29-2023, 06:41 PM
|
#22 |
|
Senior Member
Join Date: Sep 2017
Location: Bryan, Texas
Posts: 2,274
|
Re: My 54
A couple more hours of hammer and dolly today. First I laid out a grid so I can see where I'm working.
 IMG_1219 by Robert Moorman, on Flickr IMG_1219 by Robert Moorman, on FlickrThen I took a thin piece of sheet metal and hand bent it to fit the driver's side, which is in better shape.  IMG_1220 by Robert Moorman, on Flickr IMG_1220 by Robert Moorman, on FlickrWith that as my template, I began working on the rider's side. I used a multitude of hammers and dollies as well as the shrinking disc to raise and lower metal, and I have worked those ugly welds out to where I'll need no more than 1/16" filler in only a few places. I tried to get a picture of it with the template, but it just didn't show up. I'm looking at one of the "metal" fillers and posted up on the forum looking for tips and tricks using it. Next time I get on this cab, I'm hoping it'll be to use the filler.
__________________
8man-aka Robert 1948 on a S10 Frame, small block with a carb 1954 Cab, 53 Front and Bed, 50 Doors, S10 Frame, Power TBD Build thread: "]http://67-72chevytrucks.com/vboard/showthread.php?t=746899&highlight=wife%27s+48[/URL] [/URL]http://67-72chevytrucks.com/vboard/showthread.php?t=840204 |
|
|
|
|
02-01-2023, 09:54 PM
|
#23 |
|
Registered User
Join Date: Nov 2010
Location: calgary alberta
Posts: 7,825
|
Re: My 54
I suggest that you epoxy the bare metal before you do filler. that is because filler is usually porous and sometimes allows moisture to penetrate to the metal underneath. y=this causes rust and eventually the filler either falls off or the panel rusts out under the filler.do some direct to metal epoxy, apply the filler before the 24 hr cut off period to recoat the epoxy, so it sticks like a second coat of epoxy, then rough shape it or apply another coat as required, then coat it with high build primer, tghat acts like spray on filler, then wet block sand so the paper doesn't plug uo. you will be surprisd at how fast a 220 wet sand will tyake off high build. stop before you sand through to the metal. recoat with high build, repeat.
|
|
|
|
|
02-01-2023, 09:56 PM
|
#24 |
|
Registered User
Join Date: Nov 2010
Location: calgary alberta
Posts: 7,825
|
Re: My 54
sorry about all the spelling mistakes. I fat finger the keyboard alot and should proof read before I hit post. you get the gist of it all though.
|
|
|
|
|
02-01-2023, 10:03 PM
|
#25 |
|
Registered User
Join Date: Nov 2010
Location: calgary alberta
Posts: 7,825
|
Re: My 54
good idea with the template. I have used posterboard before and also have used thin sheet metal as a contour guide too. the metal is less forgiving than the posterboard for sure. I make a posterboard template, ensure it fits perfect, then lay that out on the thin sheet metal and go from there. lots of times you can get thin sheet metal cheap from an outfit that does furnace replacements or does heating/ventilating duct work. actually, sometimes they make a mistake and have the leftover pieces kicking around and they sell them cheap because they were already written off and also because they are in the way. yep, they are galvanised, so not good for body panels necessarily, but great for templates etc. otherwise they have the used vent pipes that would normally go to the recycler.
|
|
|
|
 |
| Bookmarks |
|
|


 Linear Mode

