
|
|
|
 11-22-2018, 12:38 PM
|
#1 |
|
Registered User
Join Date: Jan 2013
Location: Leonardtown, MD
Posts: 1,636
|
Re: 55 Wagon Progress
Happy Thanksgiving everyone!
Had a request to show how the inside corners were tipped for wire edging the AC condenser opening. Here's a video (with poor audio.. iPhone seems to want to do a noise cancelling) that shows stretching the inner corners. I do spend a bit more time and accuracy on the real part, this was a quick, down and dirty demonstration.  https://www.youtube.com/watch?v=bkfr...ature=youtu.be We drilled out mounting hole pattern in the AC condenser to the radiator, and added AVK style rivet nuts to the radiator cross bars to secure.. 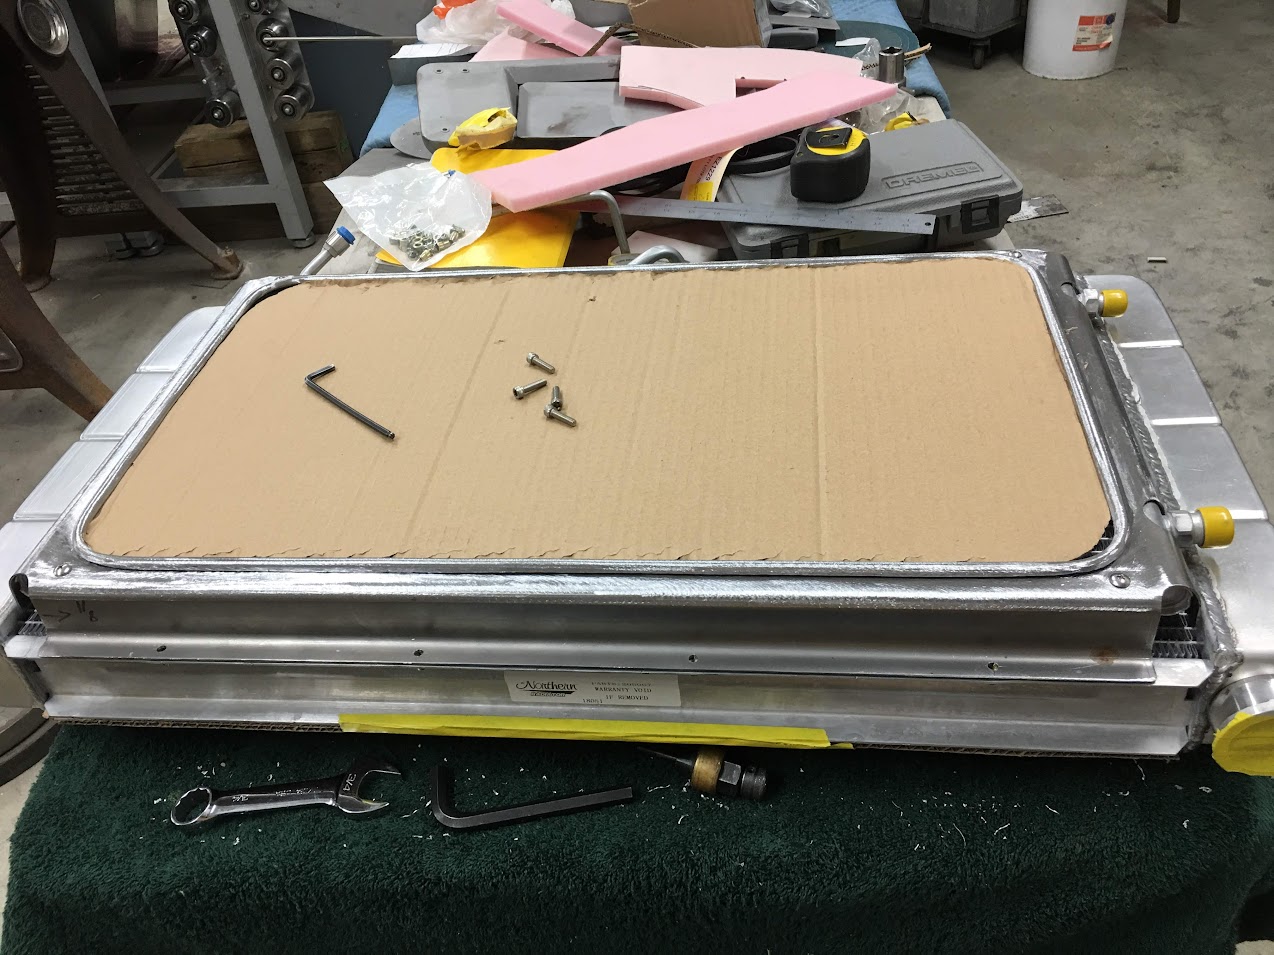  Installed, this will be the profile of the upper mounting bracket (about 24+ inches wide), that will share the AC condenser upper mounting screws. Not sure if we want to do this in polished stainless or paint. Thoughts?  The upper bracket will be attached to the core support also using rivet nuts, mainly from the back side to hide some of the hardware.. 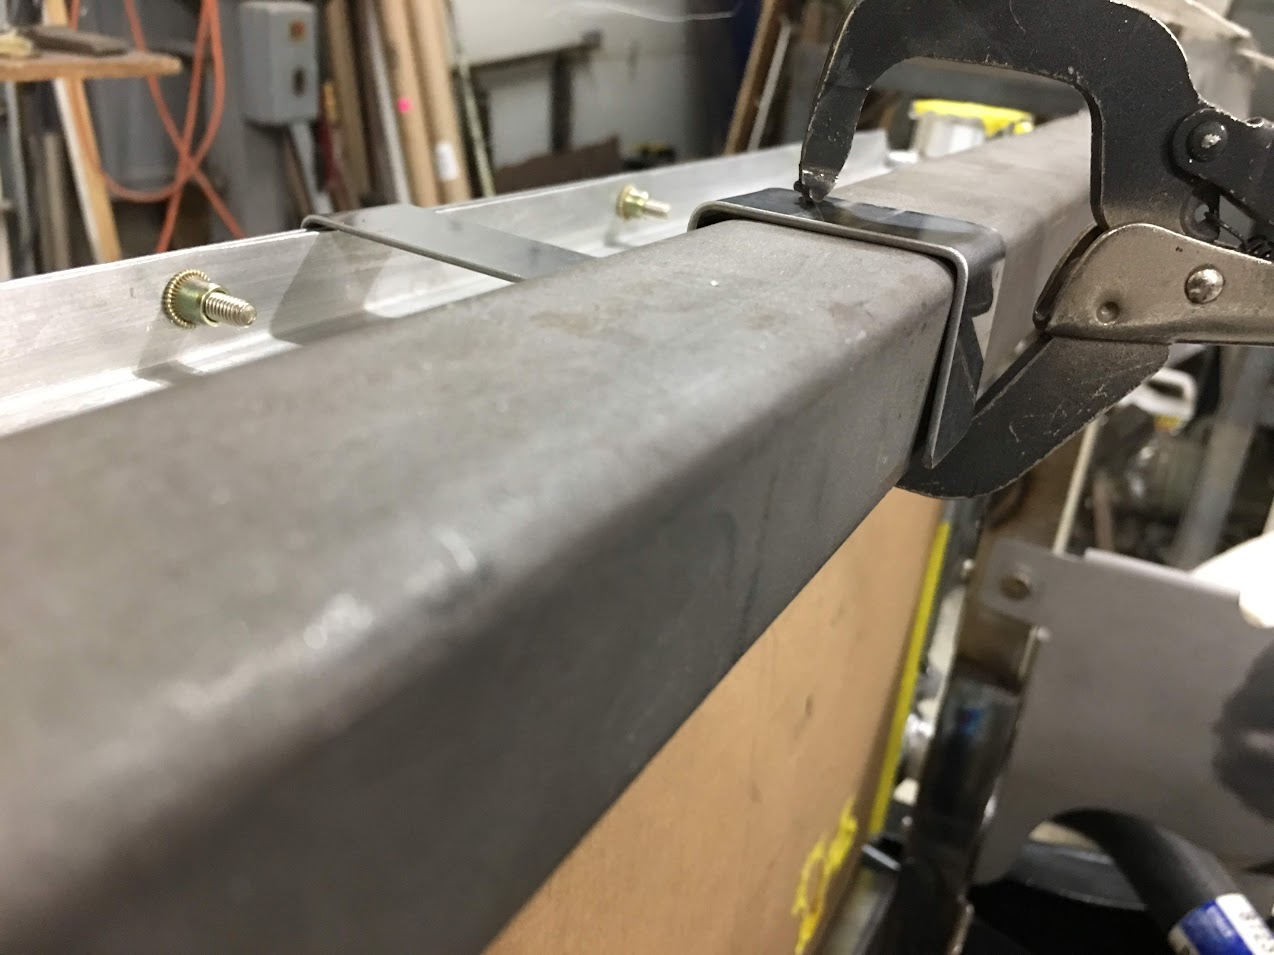 
__________________
Robert Last edited by MP&C; 11-23-2018 at 12:32 PM. |

|

|
|
11-26-2018, 10:58 AM
|
#2 |
|
Registered User
Join Date: Jan 2013
Location: Leonardtown, MD
Posts: 1,636
|
Re: 55 Wagon Progress
So this weekend I worked on the "new" dolly to remove some of the rust..
 Started with the media blaster to remove all the rust and scale...   Next, the pits were removed using 60 grit roloc sanding discs, followed by brown, red, and then blue scotchbrite discs. Then some media blasting to give a good finish..  Lastly, some 320 on the DA to remove scratches from the dolly face, and a trip to the pedestal buffer with some thick gloves.  All that fun aside, back on radiator mounts. The upper will be a combination mount and also cover for the top of the core support. This will be 44" long, so to help the magnetic brake make some more crisp bends we'll thin the bend lines in the Lennox using a tipping die. the 44" length on the panel is a bit long for my 48" linear slide, so another section is added to give us 96" to play with. Just clears the Pexto shear..   Motion picture of the process: https://www.youtube.com/watch?v=rCxakebyQzs Bend lines in place .... 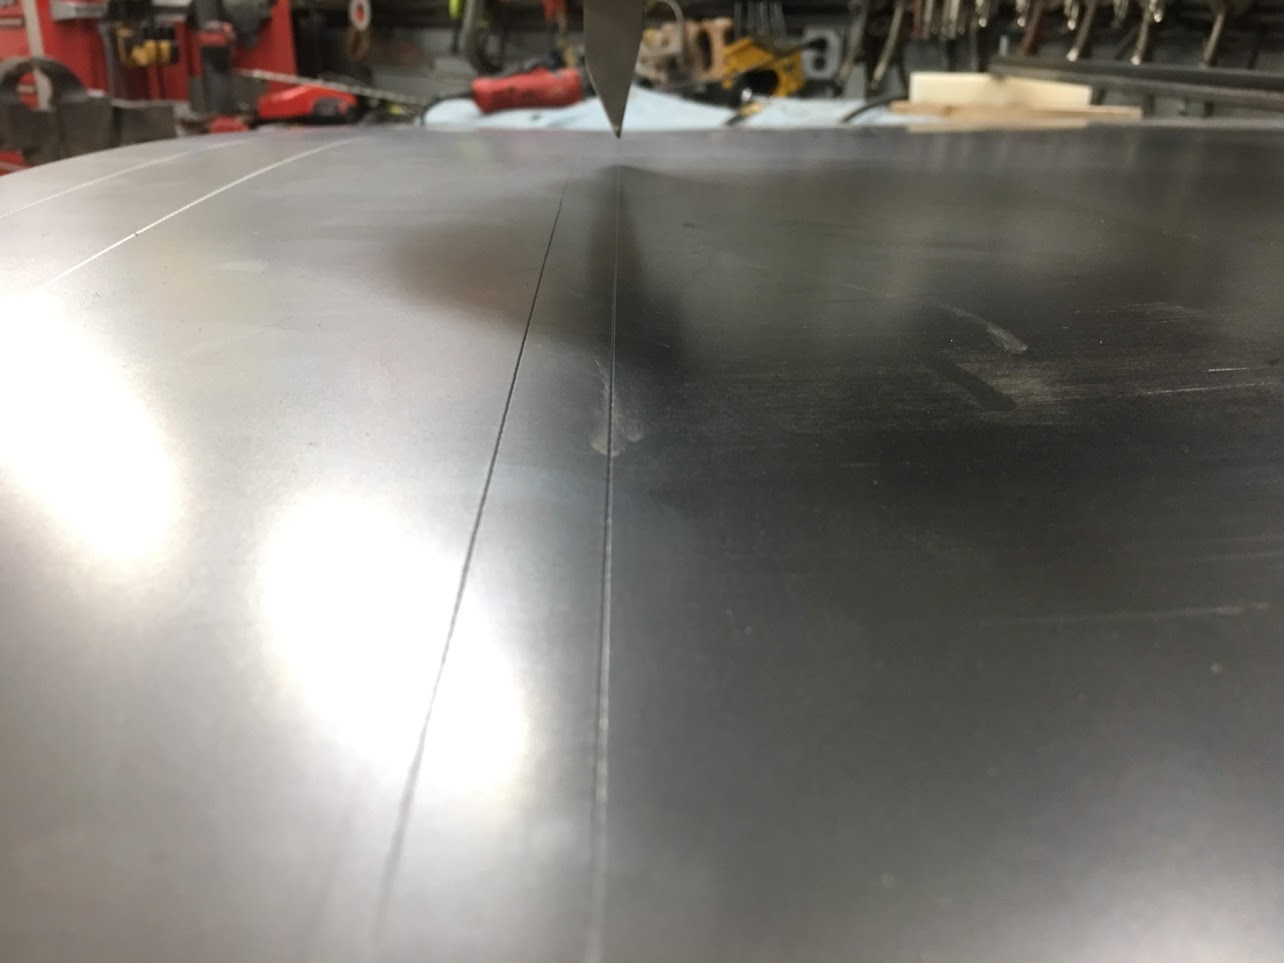 ….and we left off there for some turkey dinner. Should get it trimmed on the sides and folded up this Tuesday night.
__________________
Robert |
|
|
|
|
11-26-2018, 12:44 PM
|
#3 |
|
Post Whore
  Join Date: May 2015
Location: Alabama
Posts: 14,596
|
Re: 55 Wagon Progress
That dolley turned out really nice!!
__________________
Mongo...aka Greg RIP Dad RIP Jesse 1981 C30 LQ9 NV4500..http://67-72chevytrucks.com/vboard/s...d.php?t=753598 Mongos AD- LS3 TR6060...http://67-72chevytrucks.com/vboard/s...34#post8522334 Columbus..the 1957 IH 4x4...http://67-72chevytrucks.com/vboard/s...63#post8082563 2023 Chevy Z71..daily driver |
|
|
|
|
11-26-2018, 07:25 PM
|
#4 | |
|
Registered User
Join Date: May 2010
Location: Lawrenceville, Ga
Posts: 2,640
|
Re: 55 Wagon Progress
Quote:
|
|
|
|
|
|
11-26-2018, 08:23 PM
|
#5 |
|
Senior Member
Join Date: Mar 2011
Location: West Plains, Missouri
Posts: 7,555
|
Re: 55 Wagon Progress
Most people would have thrown it away, not you, very nice save...Jim
__________________
my build thread: http://67-72chevytrucks.com/vboard/s...d.php?t=459839 Jimbo's long bed step build:http://67-72chevytrucks.com/vboard/s...t=464626<br /> |
|
|
|
|
11-28-2018, 12:50 AM
|
#6 |
|
Registered User
Join Date: Jan 2013
Location: Leonardtown, MD
Posts: 1,636
|
Re: 55 Wagon Progress
Thanks guys!
Our 18 Gauge upper radiator mount / core support cover is cut out and bent to fit. Still needs some minor trimming around the radiator top and then we’ll make some threaded spotters to mark our rivet-nut holes.    https://www.youtube.com/watch?v=5ZbACO-IHY4 .
__________________
Robert |
|
|
|
|
11-28-2018, 09:59 AM
|
#7 |
|
Senior Member
Join Date: Mar 2011
Location: West Plains, Missouri
Posts: 7,555
|
Re: 55 Wagon Progress
very nice...Jim
__________________
my build thread: http://67-72chevytrucks.com/vboard/s...d.php?t=459839 Jimbo's long bed step build:http://67-72chevytrucks.com/vboard/s...t=464626<br /> |
|
|
|
|
12-02-2018, 12:55 PM
|
#8 |
|
Registered User
Join Date: Jan 2013
Location: Leonardtown, MD
Posts: 1,636
|
Re: 55 Wagon Progress
Thanks for checking out the progress Jim!
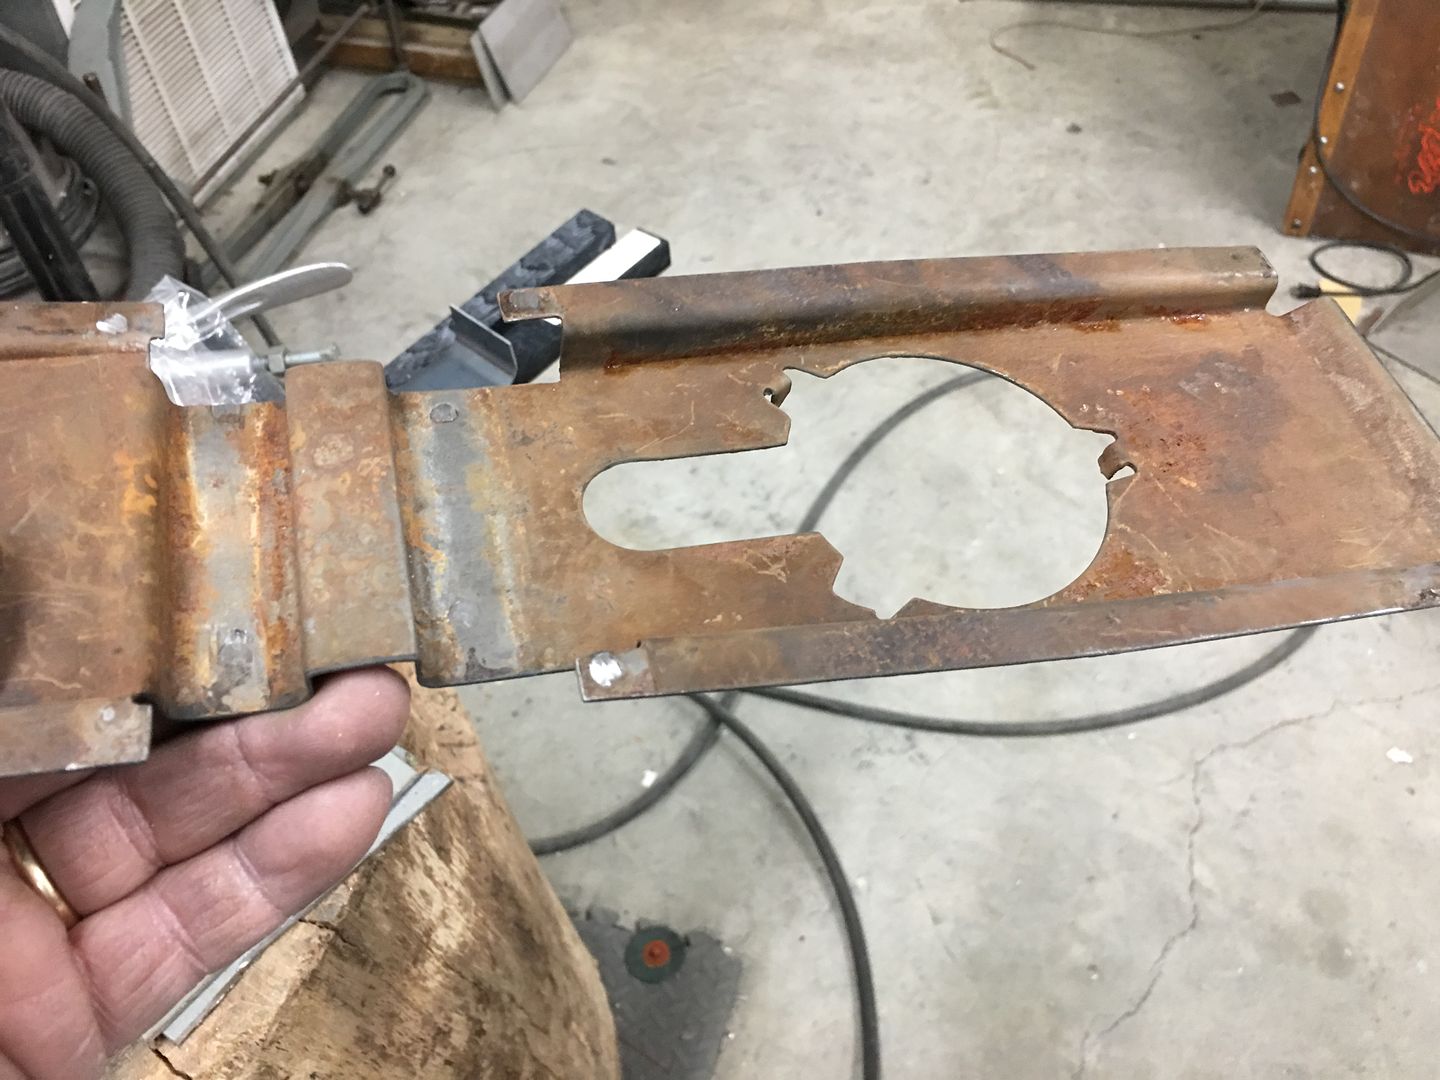
Well as normal, one change leads to one or more others. We thought we'd test fit to check out the clearance for the hood latch striker out in front of the AC condenser. 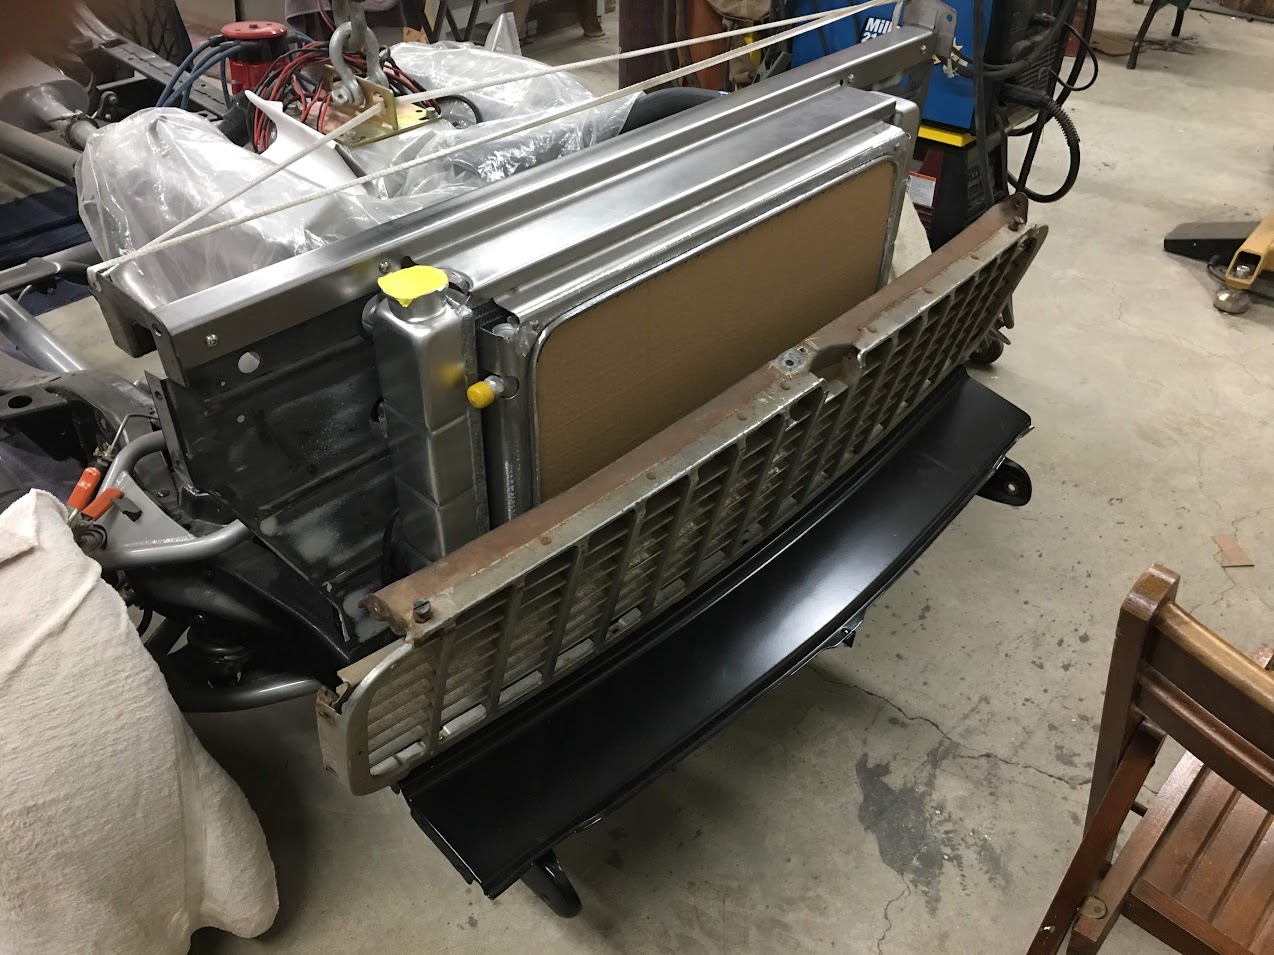 I missed getting a picture of our attempt, but here's a view of the original from the service manual. 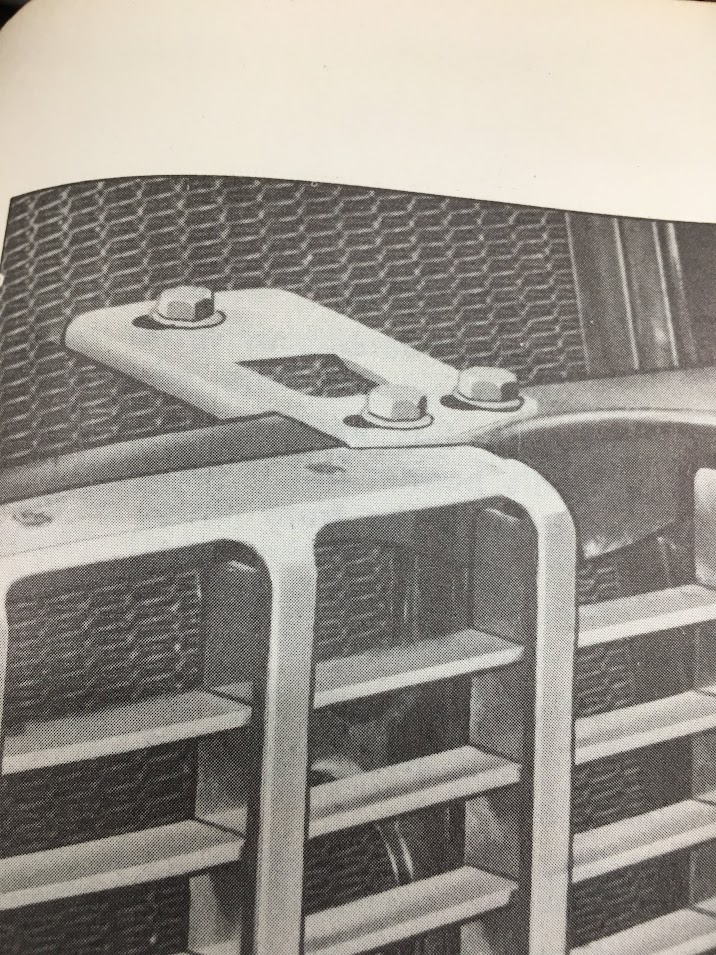 No way the original latch striker will work with the AC condenser that far forward. So we filled in the rear bolt hole and bent the latch striker as close as we could to the latch hole, which gave us 1-1/2” more room.   The support structure would no longer have the rear bolt hole in the same location, and we needed to slim it down to the same width as the modified striker...   Next, the rear bolt for the striker will need to be horizontal now, so a stud is fabricated and welded in place, and the support bracket modified for this bolting arrangement as well.     Media blasted....   test fit....  https://www.youtube.com/watch?v=d5iE1T77WHQ .......and on to the next hurdle
__________________
Robert |
|
|
|
|
12-02-2018, 09:36 PM
|
#9 |
|
Senior Member
Join Date: Mar 2011
Location: West Plains, Missouri
Posts: 7,555
|
Re: 55 Wagon Progress
Great work Robert, most people (including myself), will think it's stock...Jim
__________________
my build thread: http://67-72chevytrucks.com/vboard/s...d.php?t=459839 Jimbo's long bed step build:http://67-72chevytrucks.com/vboard/s...t=464626<br /> |
|
|
|
|
12-08-2018, 02:44 AM
|
#10 |
|
Registered User
Join Date: Jan 2013
Location: Leonardtown, MD
Posts: 1,636
|
Re: 55 Wagon Progress
Thanks Jim, the subtlety we were looking for..
I took delivery the other day on a set of slide tracks so we used the opportunity to get the Arbor Press metalshaping dies from Pat Brubaker mounted under the table for better use of space. We used the Diacro press brake to bend some 1/8" aluminum for making some angle brackets for mounting. 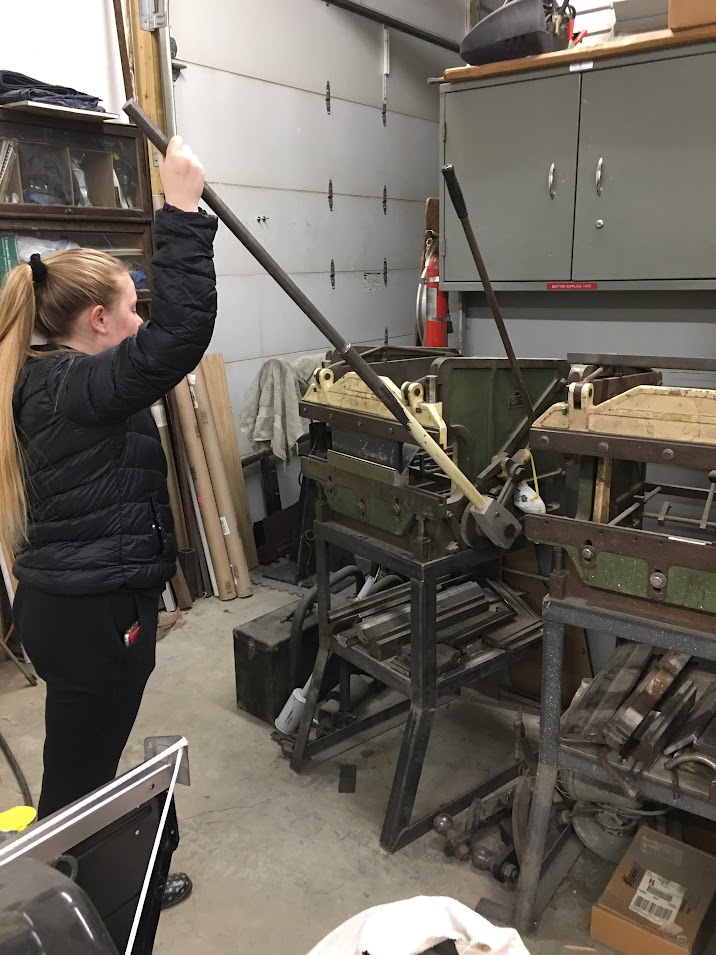 For those with a Diacro manual press brake, be aware the factory cast parts may not be 100% compatible with cheater bars. This happened a few months back, and our billet steel replacement is holding up much better, still has yet to transfer the problem farther down the line, knock on wood.   E got the holes drilled out in the brackets, and I assembled the pieces..  This is much better.. a good start to cleaning off the table.. https://www.youtube.com/watch?v=i65pvDZGzio A demo of the process of using the arbor press.... https://www.youtube.com/watch?v=MUQghpUVohU .....and then today, Mike and I worked on blocking and straightening out the roof to get it a bit closer for painting.  We did find a stretched spot in the roof, and chased it around a few times in using the body hammer and shot bag. No matter what we did, it tended to still have an up and down wave, so too much metal. The roof has been covered in SPI Epoxy for a while and I had no intention of removing the epoxy, so we opted for the donut dolly (this one home made) as it would leave the paint intact over using a torch....  Part of the difficulty in using the donut dolly is insuring the hammer aligns with the dolly for the most effective shrink.  So we employed our magnet trick seen here: https://www.youtube.com/watch?v=Ubq89aPMJjY .......once the trouble areas needing a bump outward were located (they were stretched inward), the magnet was placed directly over the spots and then we could trace the locations on the inside for proper hammer strike while the donut dolly was held over the corresponding location on the outside. This was about the best results I've had using the donut dolly. Here are a few of the shrink locations used to straighten out the roof and its waves... 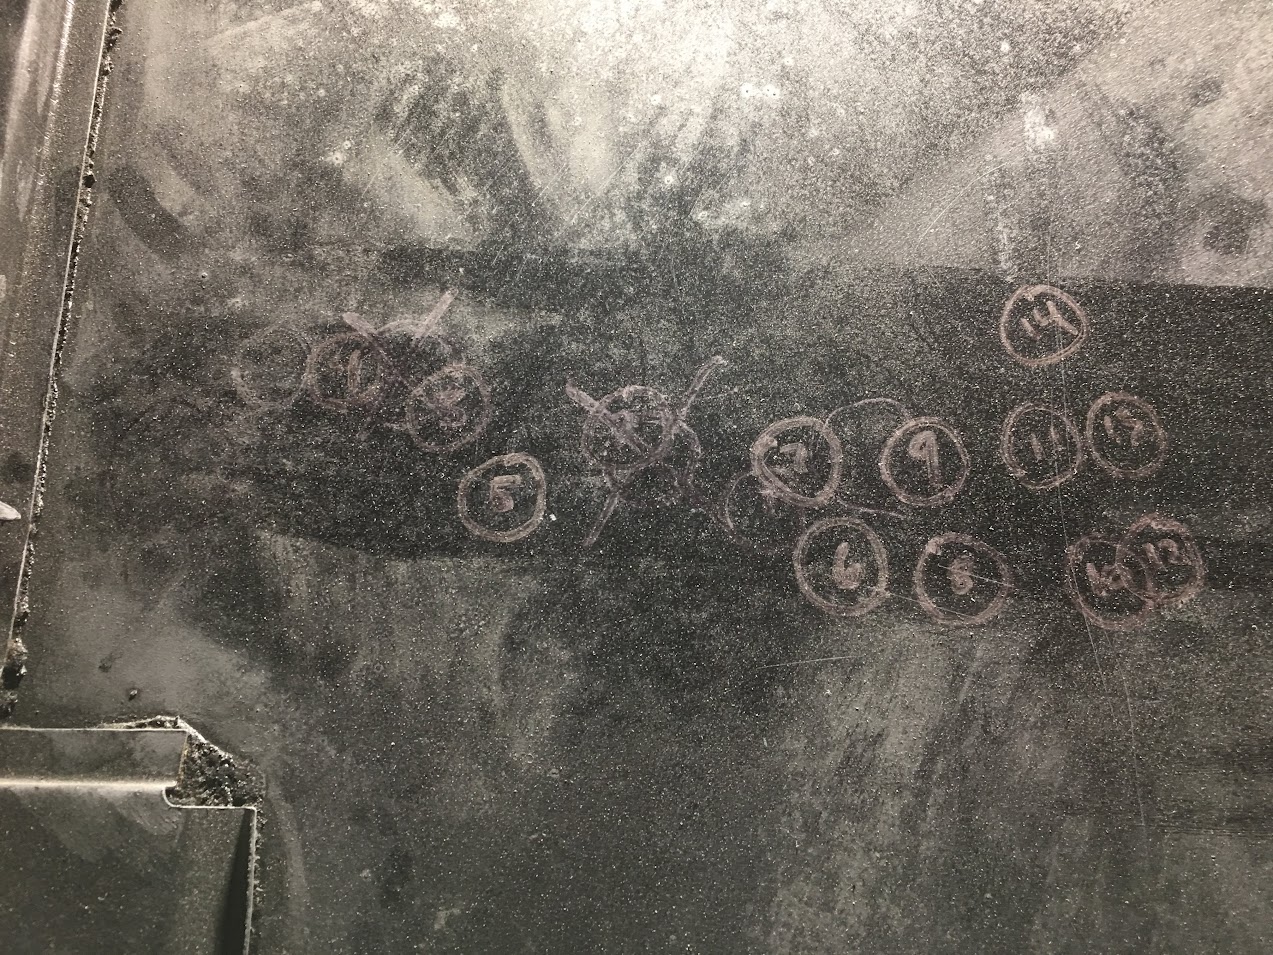
__________________
Robert |
|
|
|
|
12-10-2018, 11:14 AM
|
#11 |
|
Registered User
Join Date: Jan 2013
Location: Leonardtown, MD
Posts: 1,636
|
Re: 55 Wagon Progress
https://www.youtube.com/watch?v=pTp3yWKFTdk
Had a couple questions about the donut dolly. Basically this is just like off dolly but on steroids, as supporting the panel surrounding the hammer strike gives a much more effective capture and shrink of the dent. This also helps to explain why alignment of the hammer to the dolly is so critical, and why the magnet alignment trick I showed in the earlier post works so well to make your shrinking more effective. The dolly should always be placed on the concave side to be able to hammer into the dolly and bring the panel back straight. For a larger, more pronounced dent I’ll use a flat hammer, like the Snap-on BF603. If the panel is wavy but still somewhat flat, then I’ll use a crowned hammer such as the Snap-on BF618. Use caution with the crowned hammer to not hit hard enough to add a dent, ideally we want to hit so that the metal pushes slightly into the dolly but the springback would bring it back to flush. (This comes with experience) It’s at this point that the donut dolly is most effective. The video shown simulates using a flat faced hammer on a large radius/dent. This could be used to remove the dent altogether, or perhaps just reduce the sharpness of the radius, like the rear roof corner on a Model A. None of the tools we have will do everything, but I’ve found the donut dolly especially useful in shrinking where you don’t want to use heat (torch).
__________________
Robert |
|
|
|
|
12-16-2018, 01:46 AM
|
#12 |
|
Registered User
Join Date: Jan 2013
Location: Leonardtown, MD
Posts: 1,636
|
Re: 55 Wagon Progress
More progress on the wagon, we are adding a second interior light, so an original was sourced so they would match...
 .....and media blasted, ready for primer.. 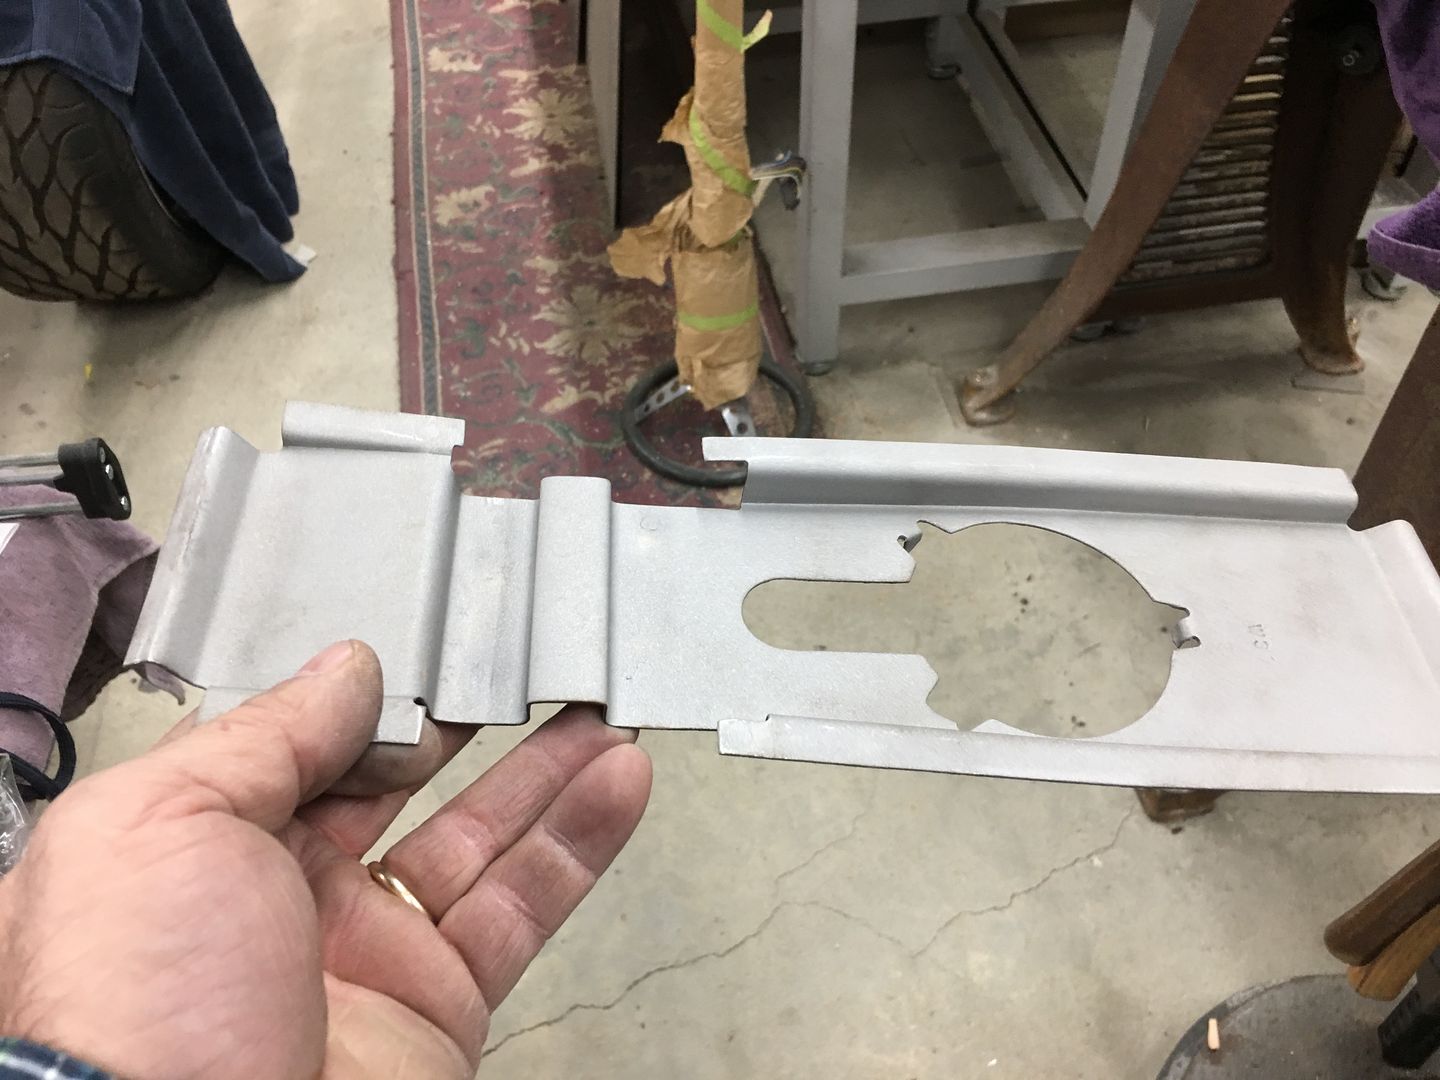 Gary dropped off the rear seat so we could match drill holes into the side bolsters and install 5/16 rivet nuts for attachment..  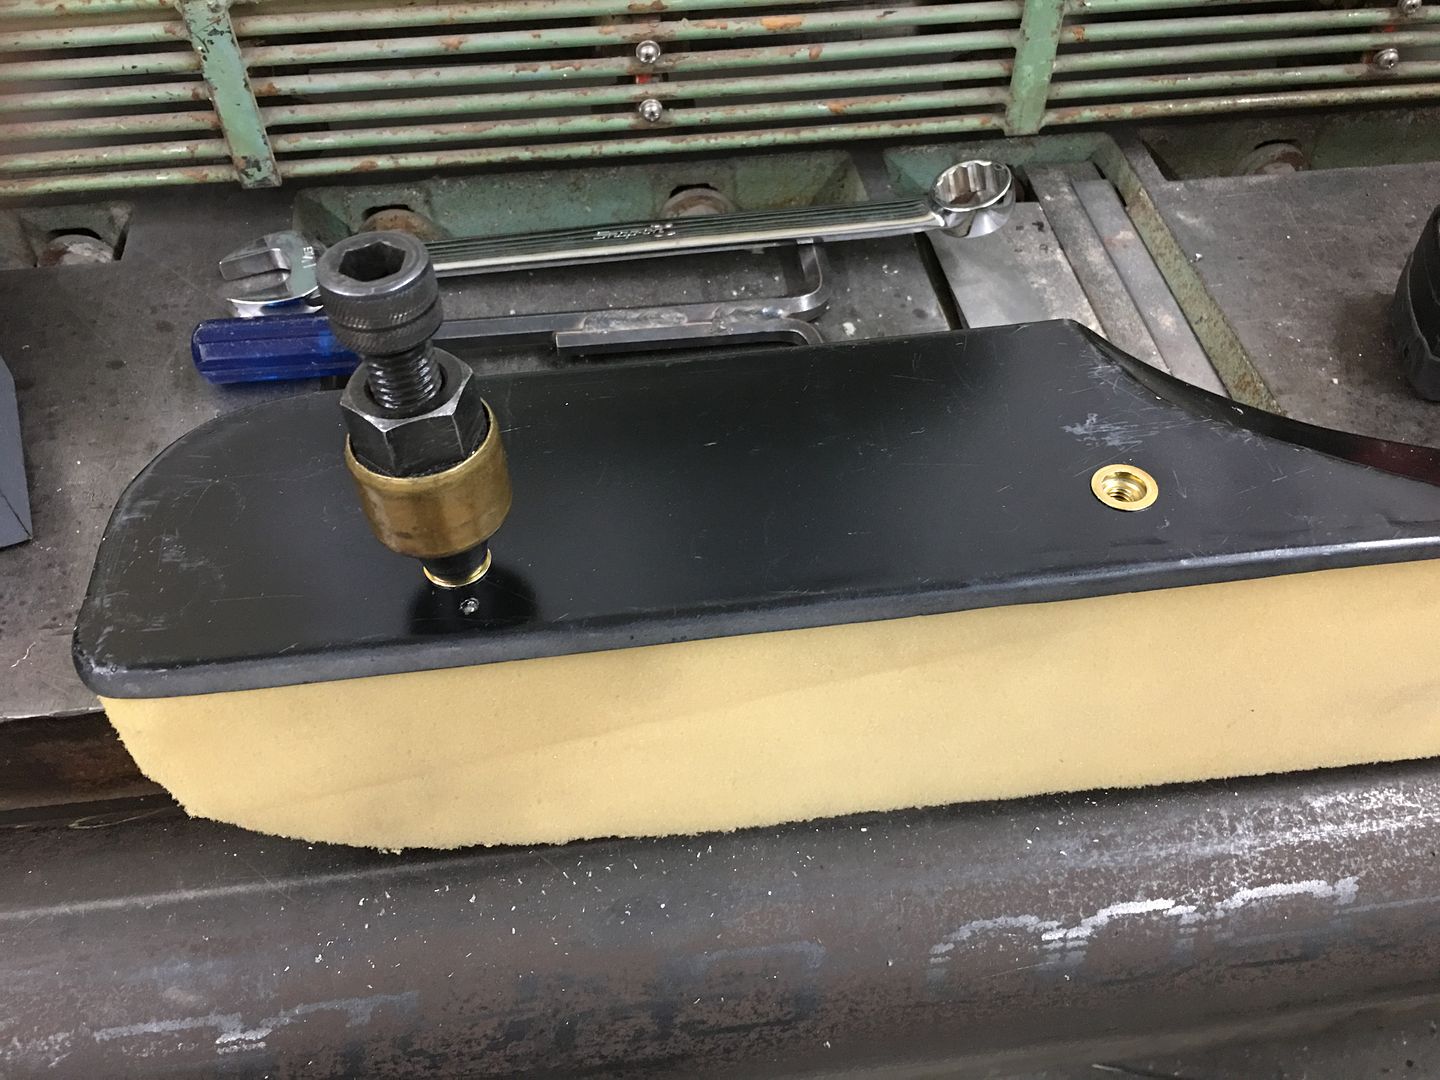 And we found another low spot in the roof, likely due to media blasting the light bracket too close to the roof skin. We used the rare earth magnet trick to accurately locate the inside to outside for exact alignment of the hammer to the donut dolly.. 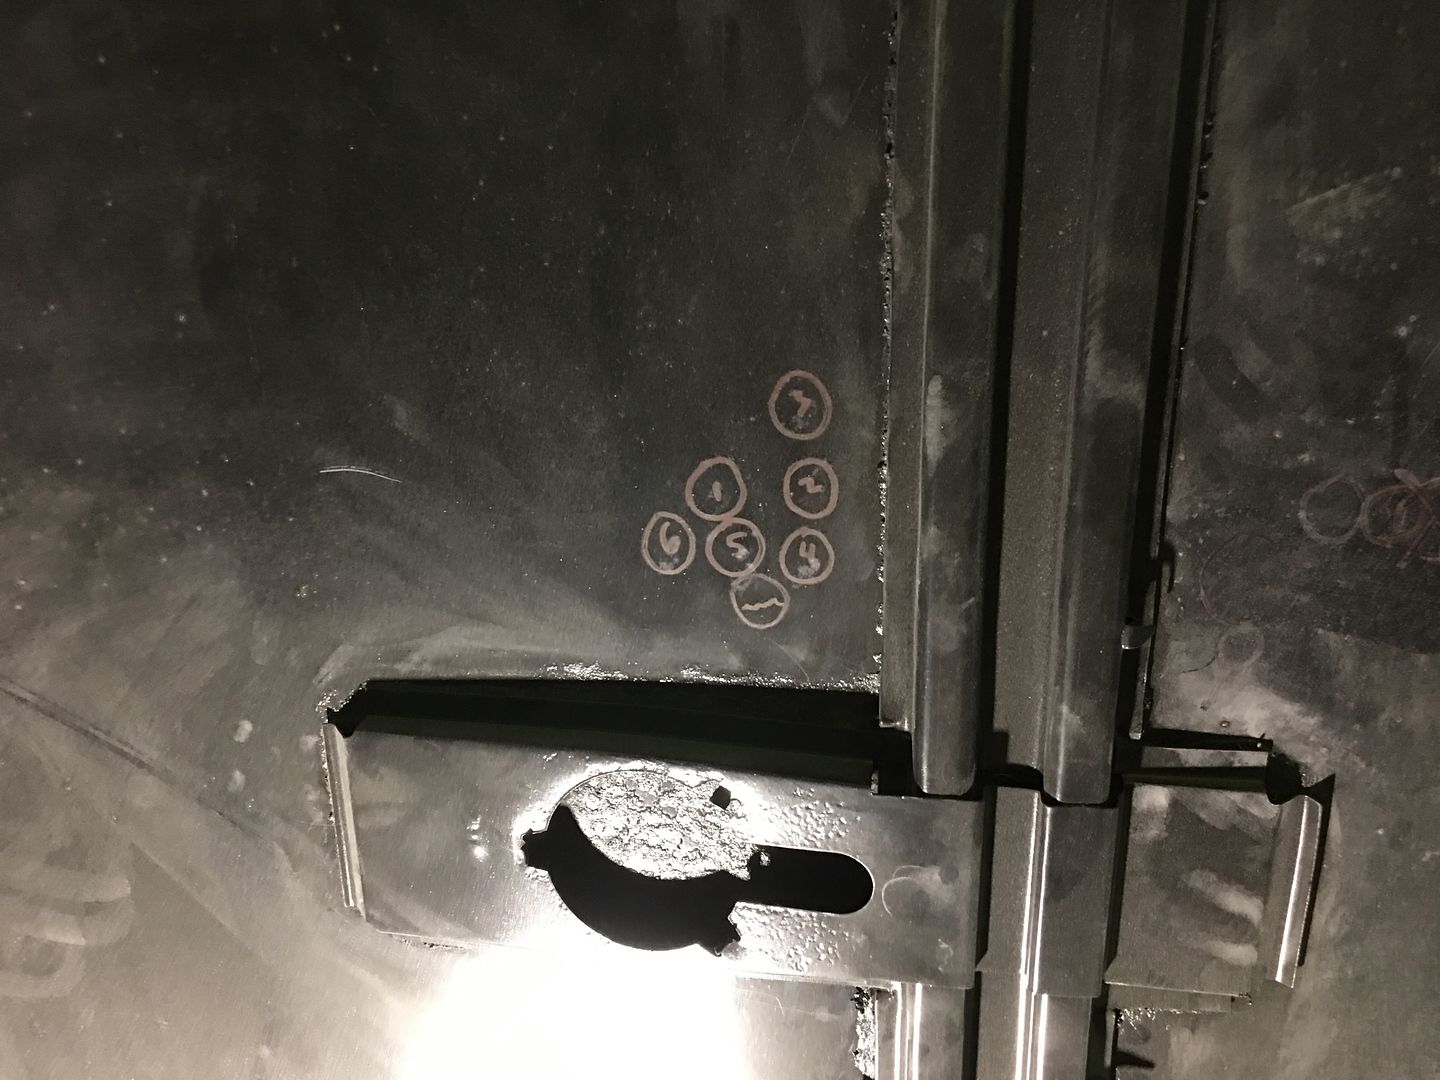 outside, where we used the donut dolly to hammer into... 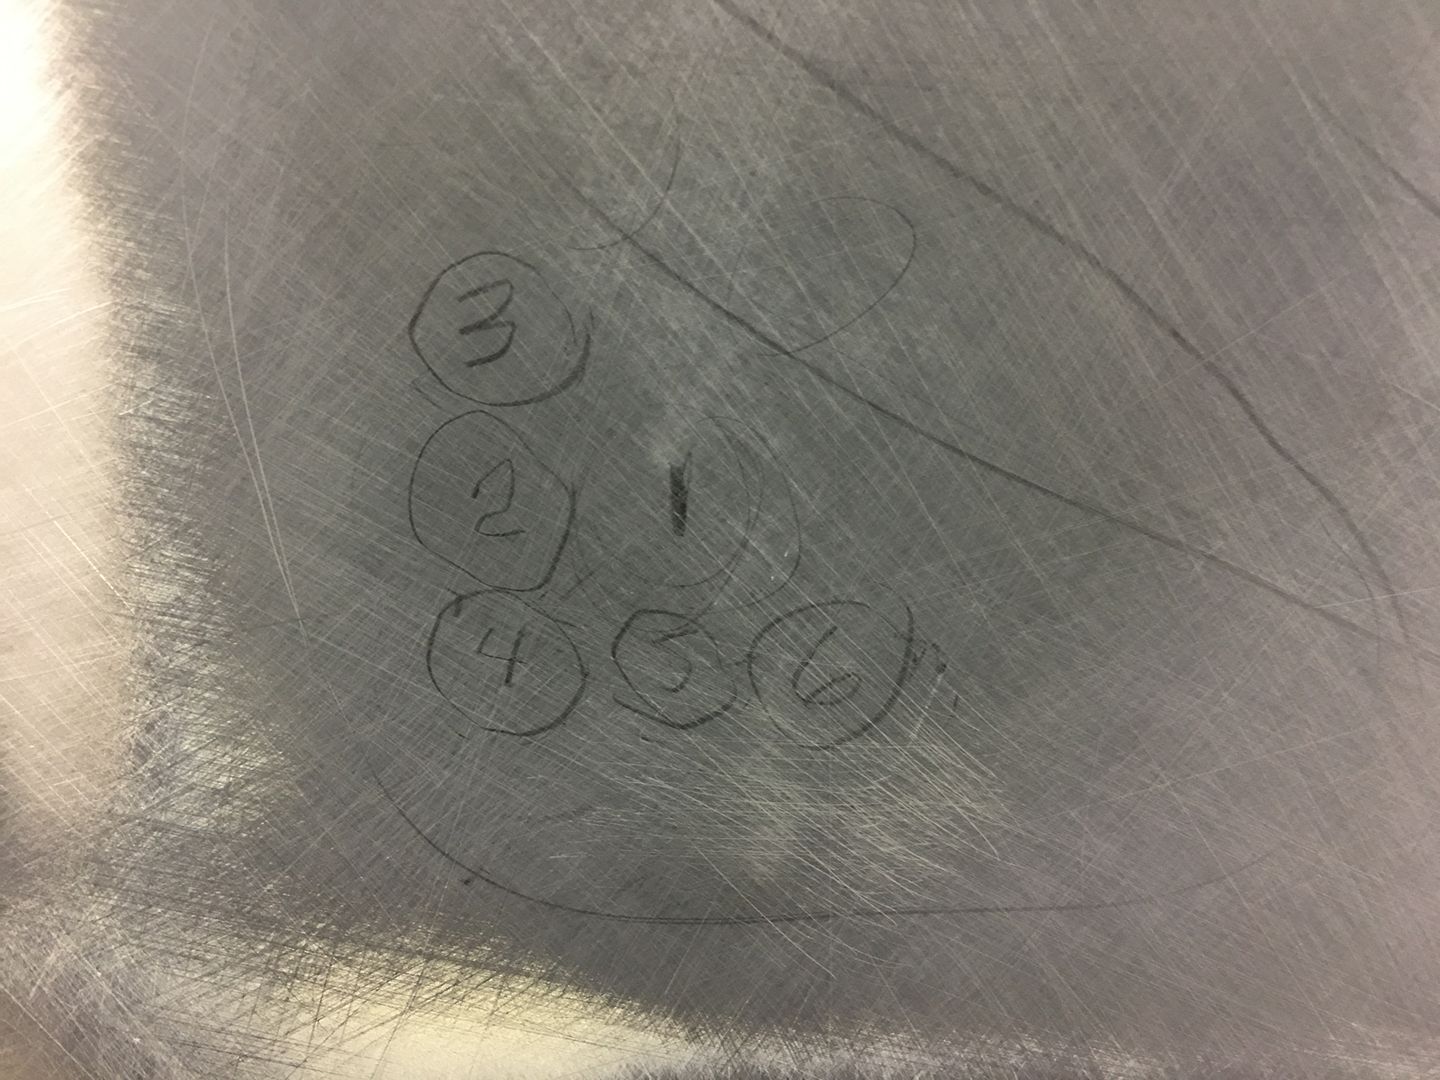 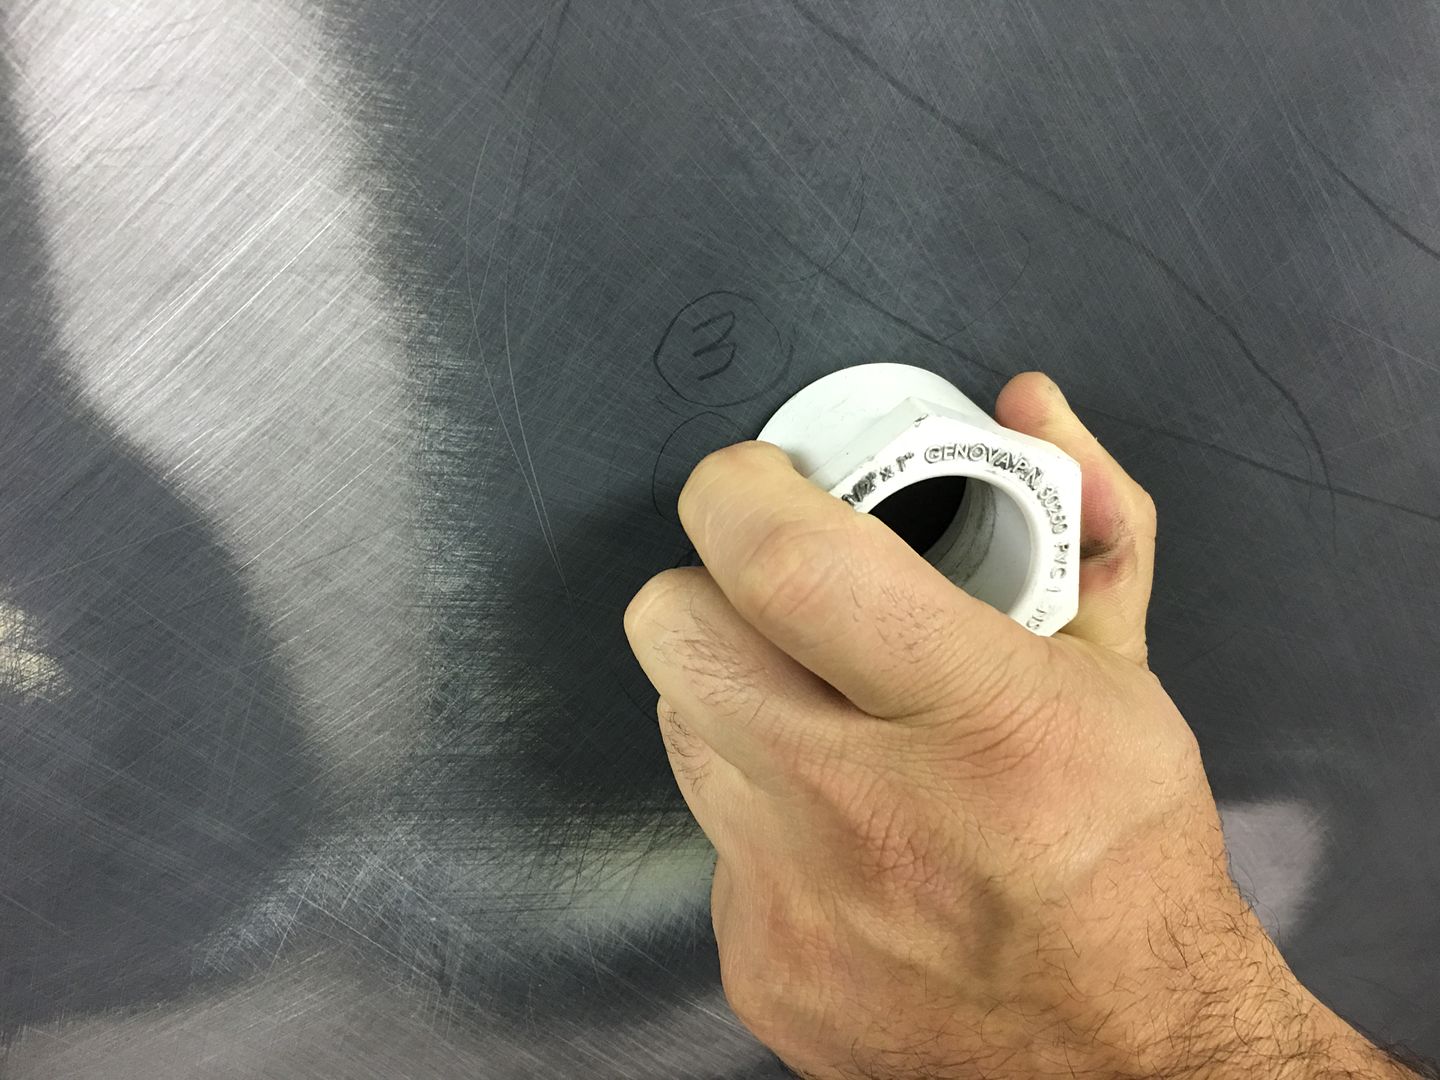 ....and the inside, where we use the crowned hammer..... 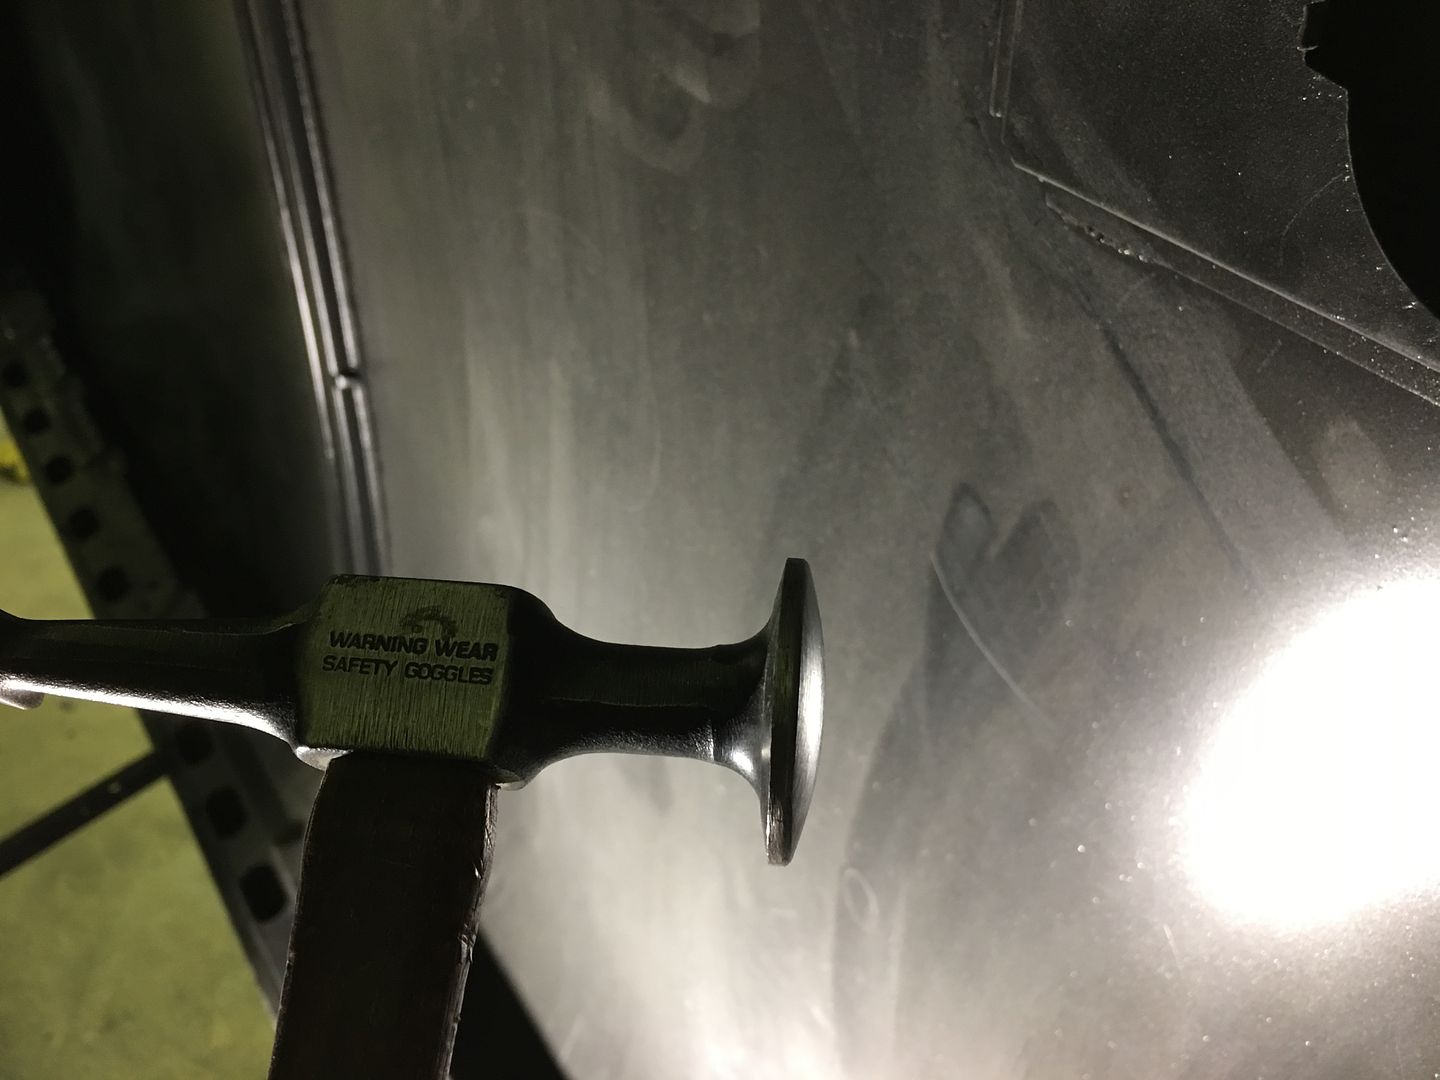 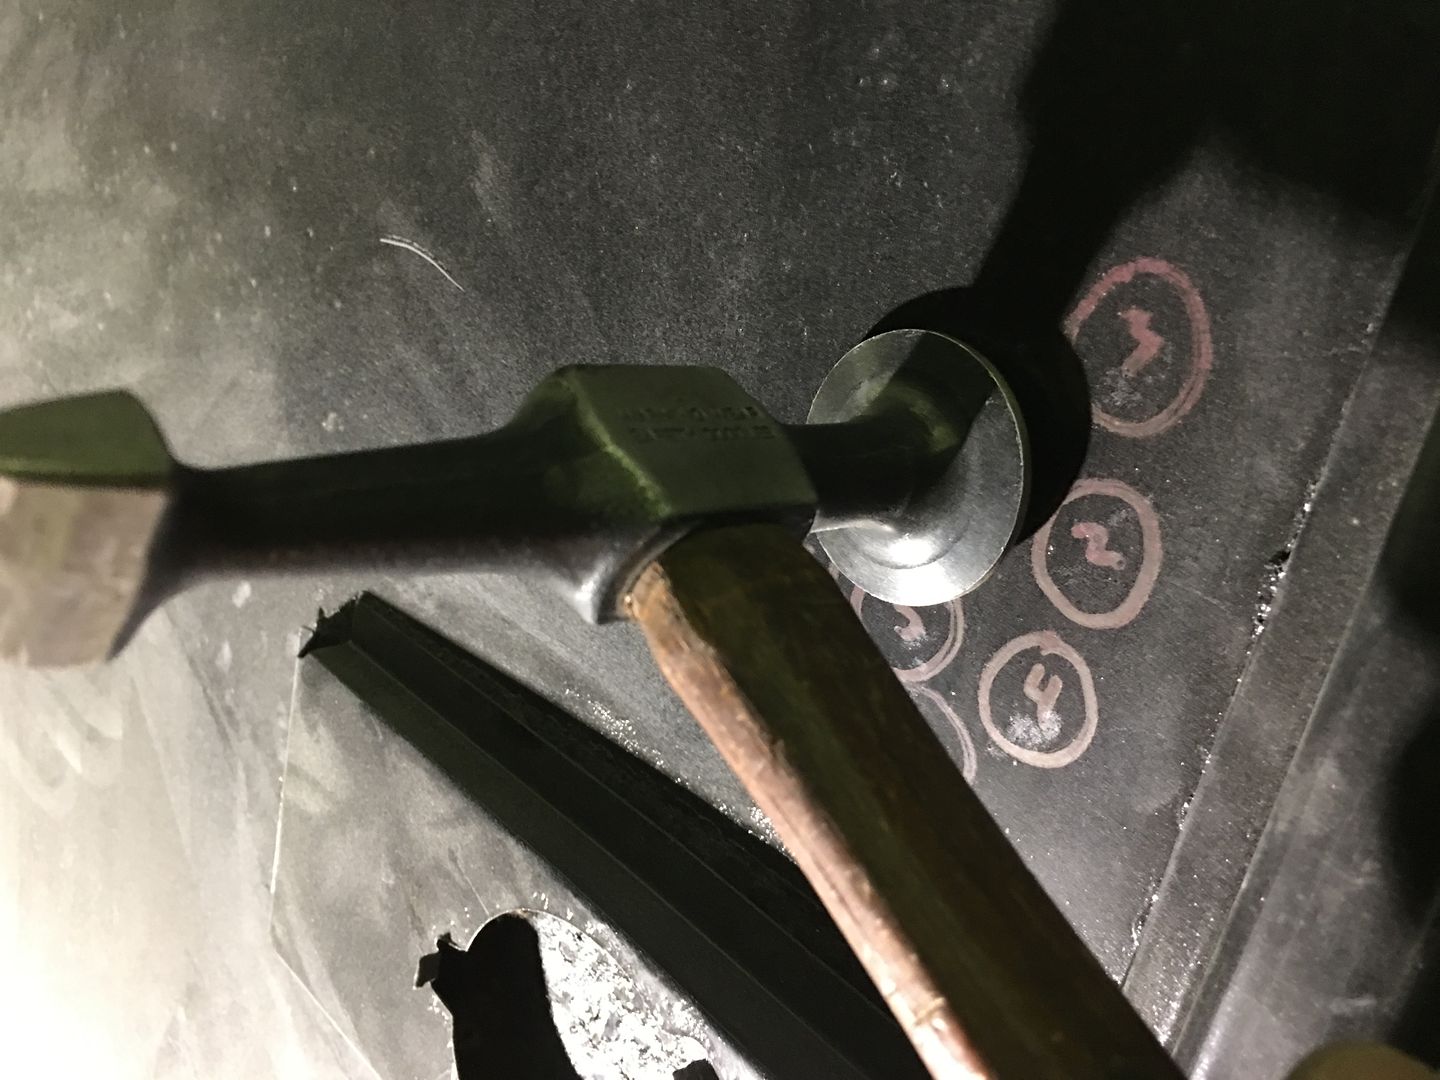 Using this method we were able to locate, layout, and bump all of the low spots to a consistent crown to match the surrounding panel, all in less than 5 minutes. In this case, a much better option than mixing and sanding filler. This video better shows the concept.. https://www.youtube.com/watch?v=HHHT...ature=youtu.be
__________________
Robert |
|
|
|
|
12-16-2018, 10:47 AM
|
#13 |
|
Senior Member
Join Date: Mar 2011
Location: West Plains, Missouri
Posts: 7,555
|
Re: 55 Wagon Progress
Thanks for update...Jim
__________________
my build thread: http://67-72chevytrucks.com/vboard/s...d.php?t=459839 Jimbo's long bed step build:http://67-72chevytrucks.com/vboard/s...t=464626<br /> |
|
|
|
|
12-22-2018, 12:44 AM
|
#14 |
|
Registered User
Join Date: Jan 2013
Location: Leonardtown, MD
Posts: 1,636
|
Re: 55 Wagon Progress
Thanks for checking out the progress Jim!
Today we were working on more interior parts for Gary to upholster. Here is the design for the trim rings for our speakers, the cutaway shows the relief on the bottom which provides clearance for stainless mesh. This should provide a more 55 correct grill for the speakers than the plastic ones it came with. My cousin JB is making the trim rings for us..   Mike trimmed out the slots we previously had for the bass speaker, it will also get the trim ring and mesh treatment. 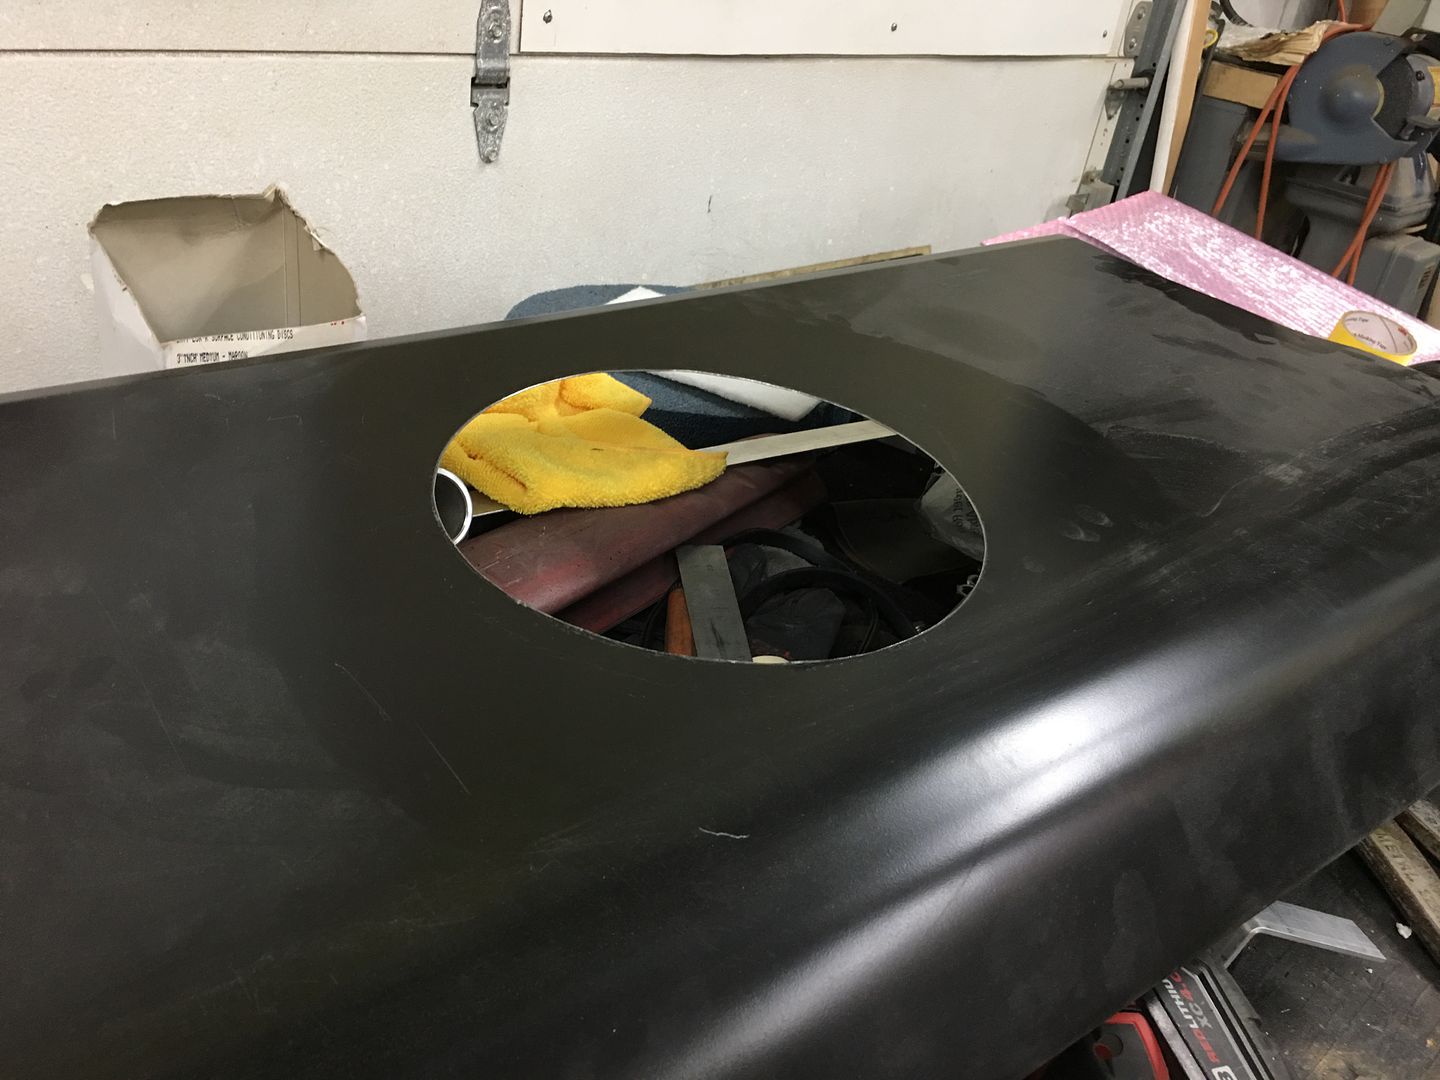 We drilled holes in the rear kick panel arm rest for panel clips to hold the arm rest down. I thought these would be a better option than the wire clips.. 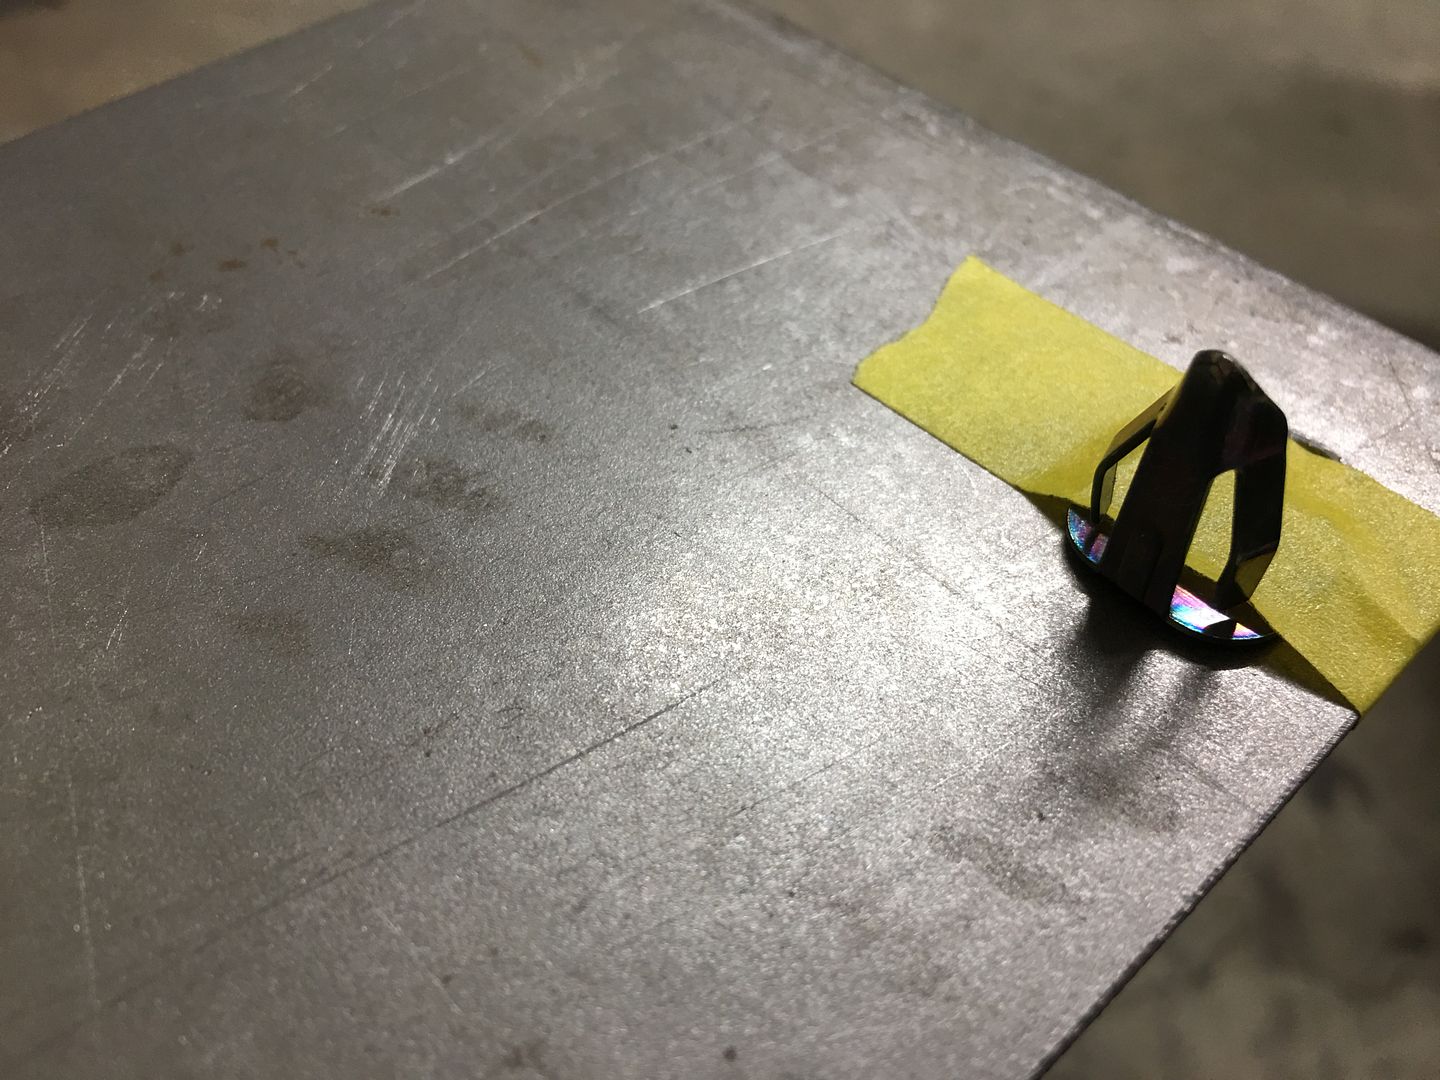 We also needed an escutcheon for our seat belt to pass through the arm rest, as the retractor is located behind the kick panel. Not finding much in the local salvage yard but plastic to choose from, and little in aftermarket, we opted to make a sample out of steel to insure the seat belt buckle and harness support would pass through. We will make the final version out of stainless and polish them.. 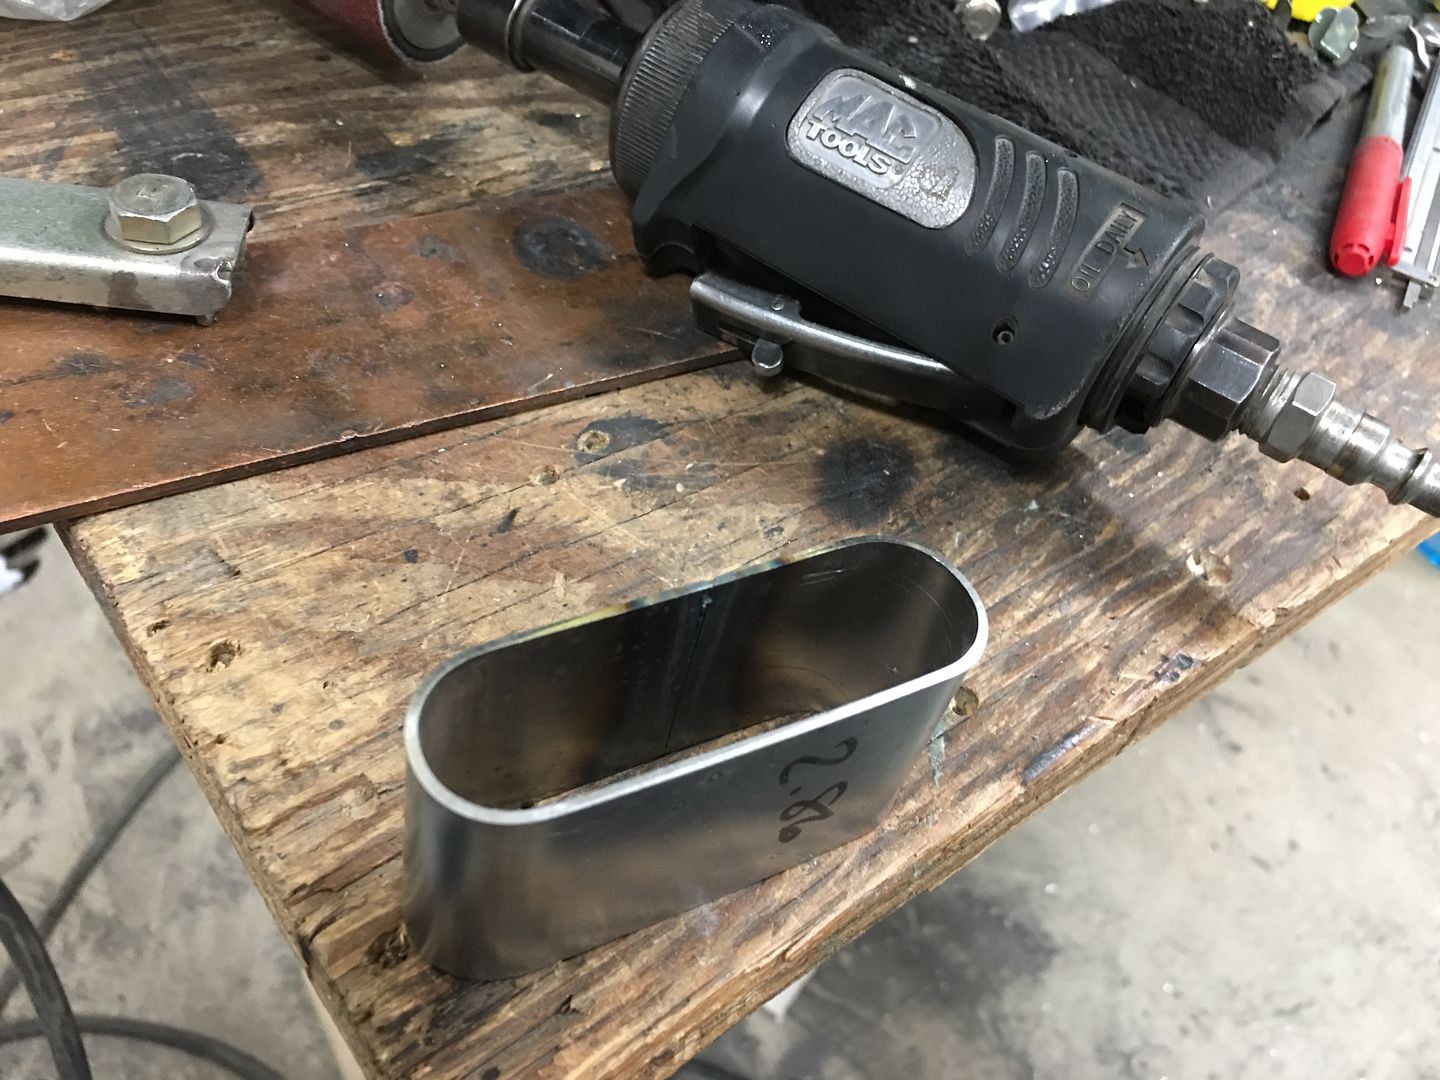 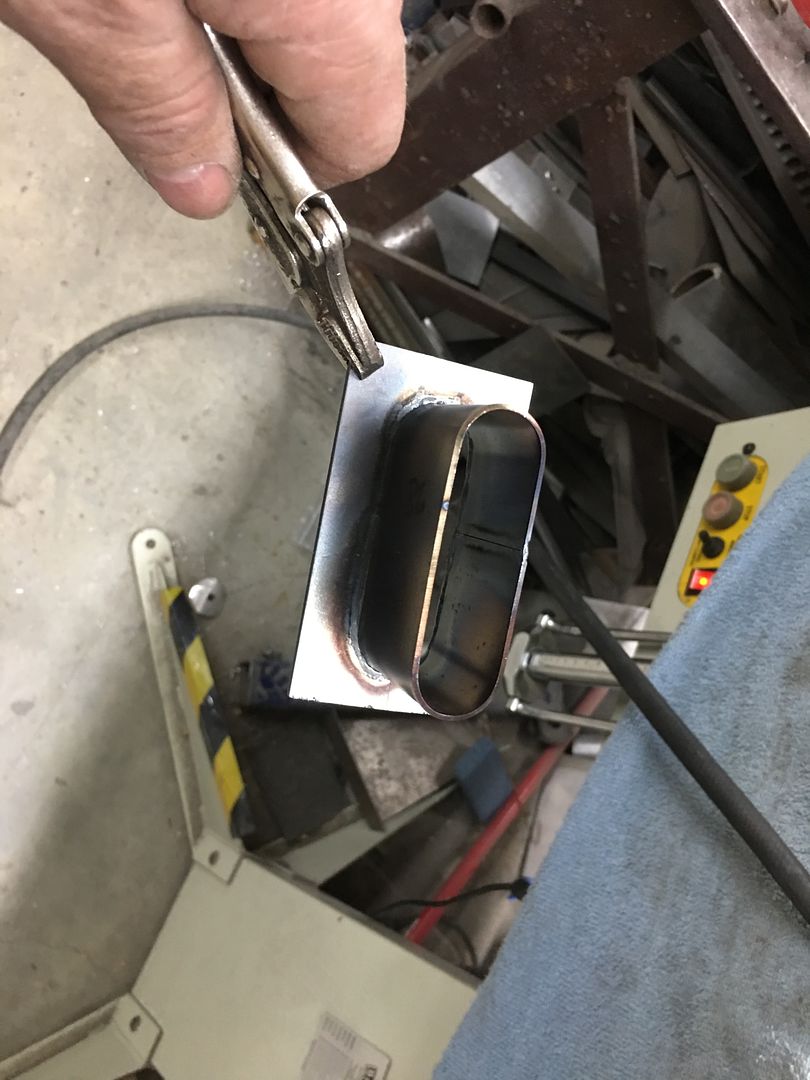 Cleaned up and "polished" with Scotchbrite rolocs to simulate what the stainless should look like.. 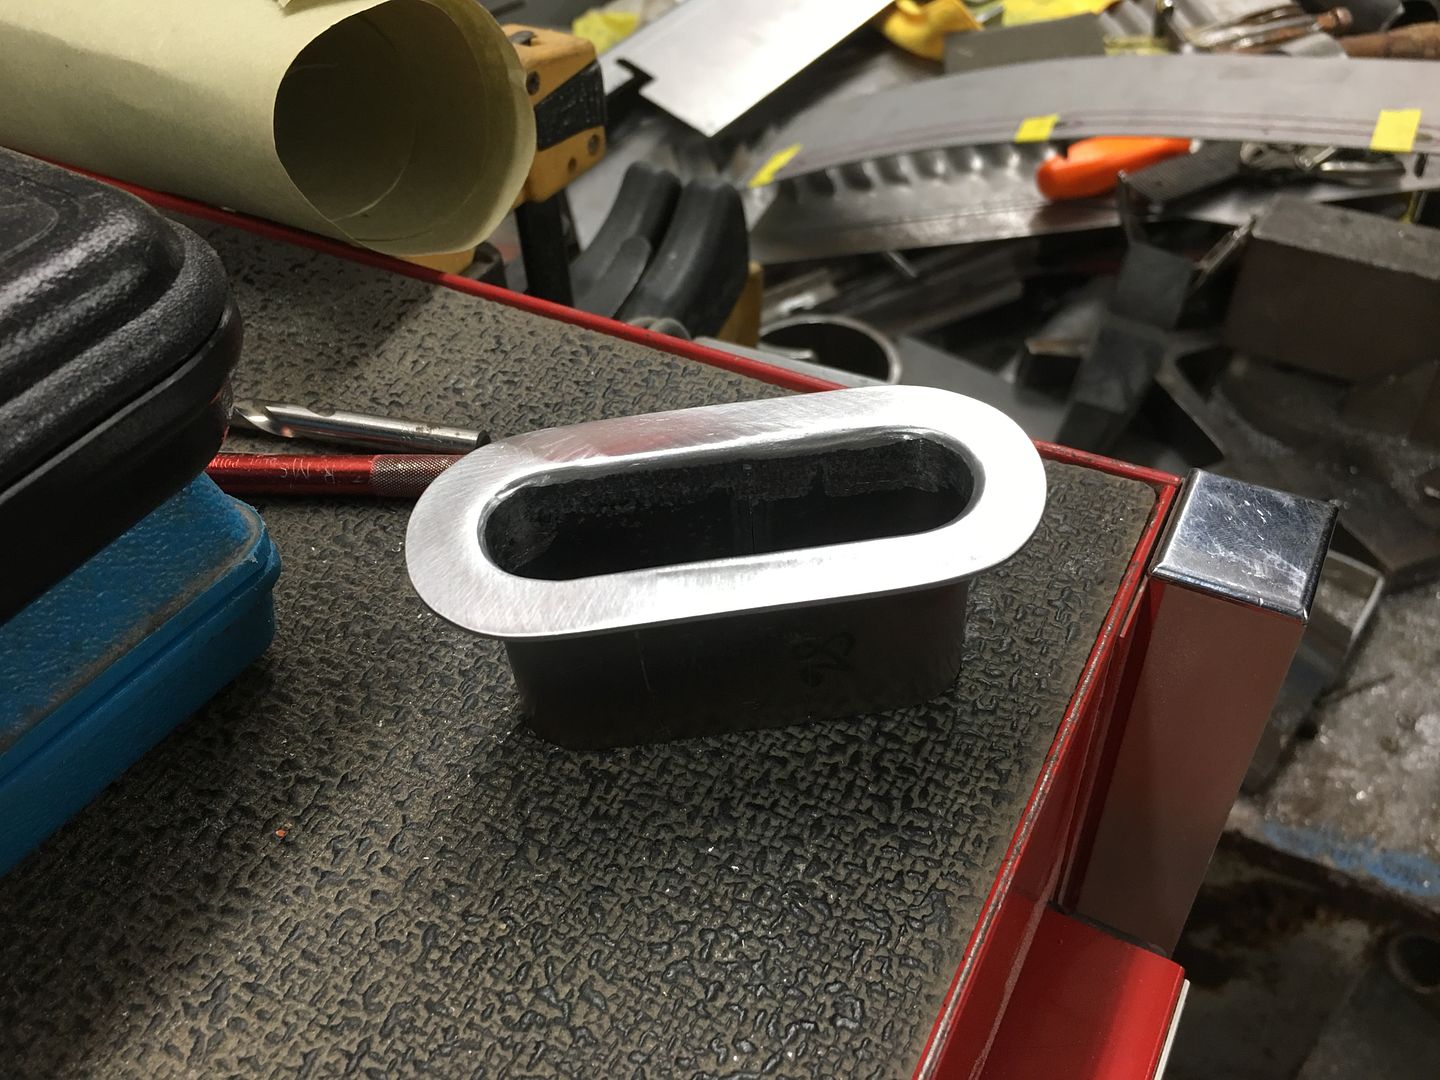 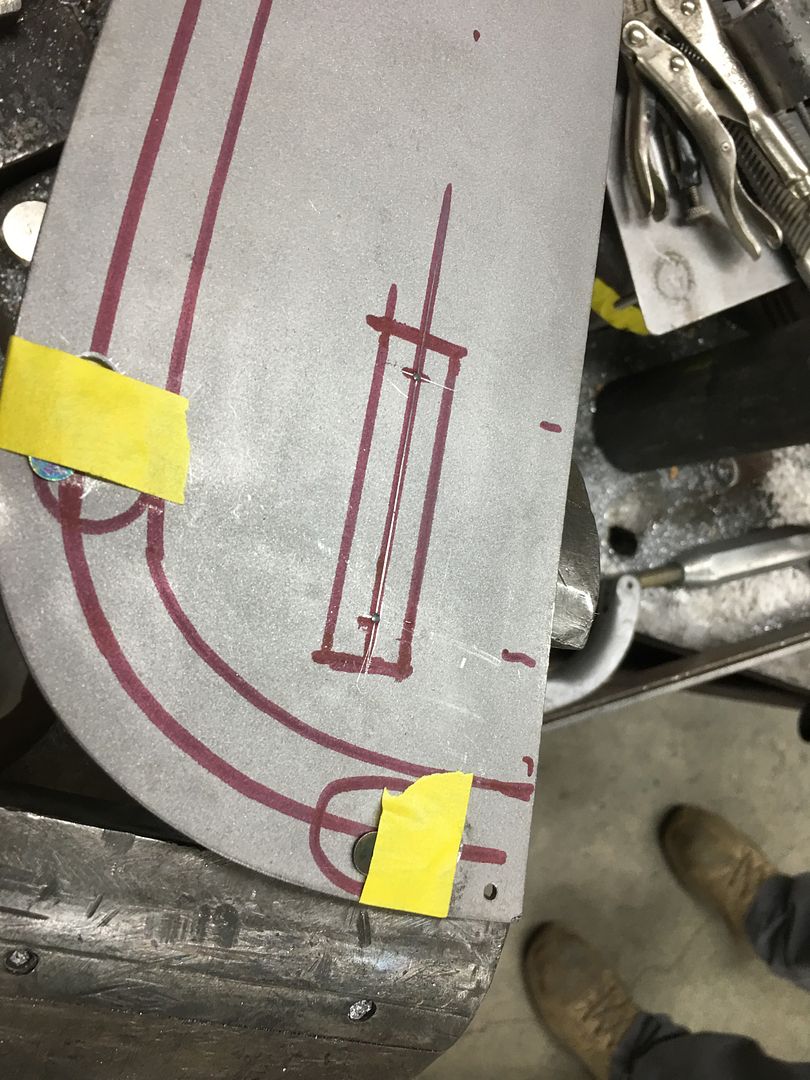 In our arm rest two clearance holes are drilled, then a cut made between the two. Next, the two "tabs" are hammered downward to provide the void needed for the escutcheon such that they are tight enough to hold it in place. 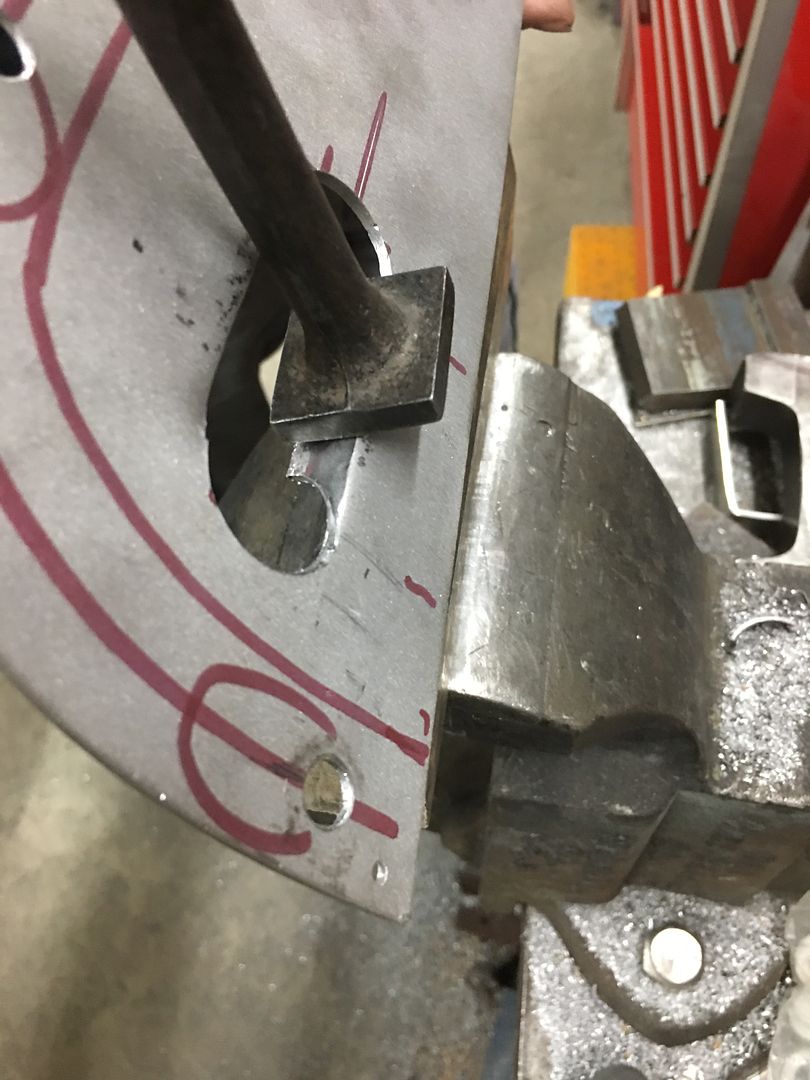 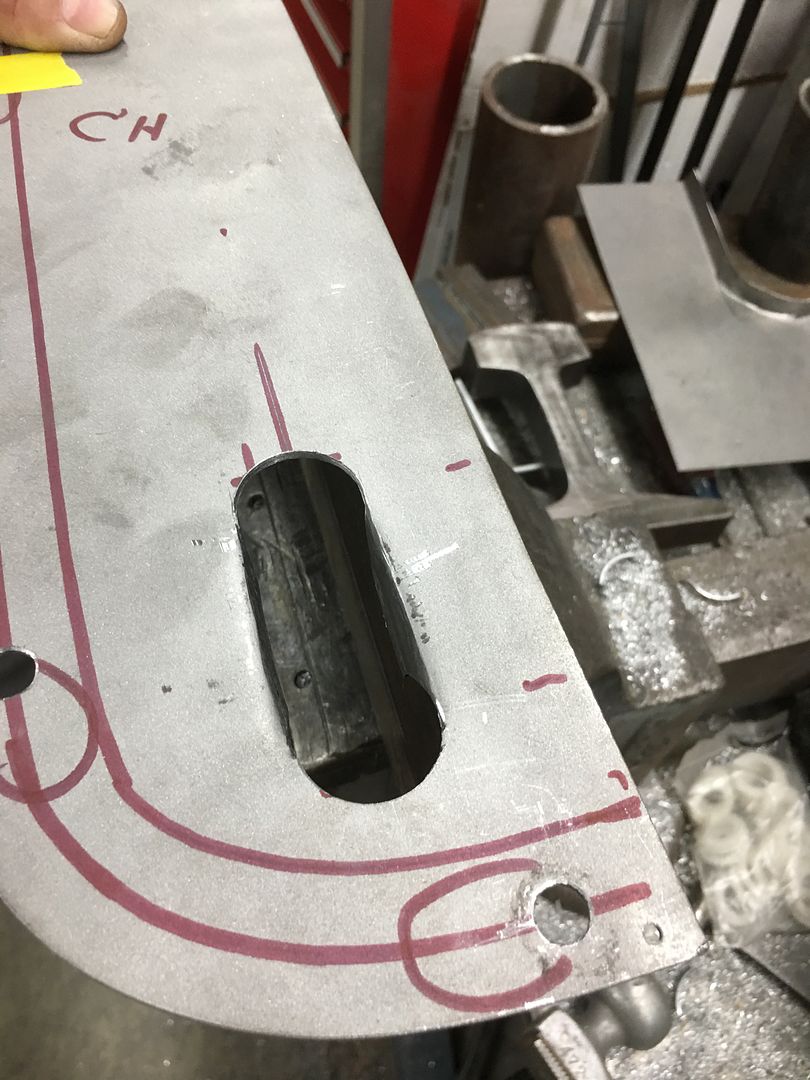 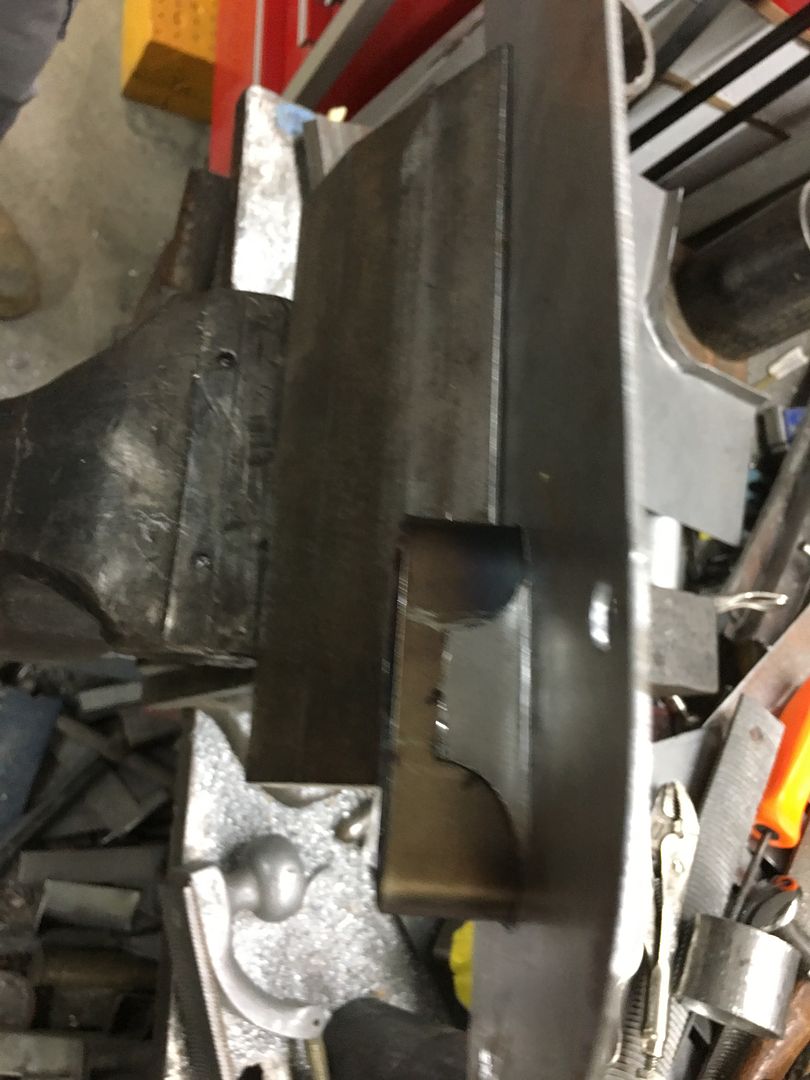 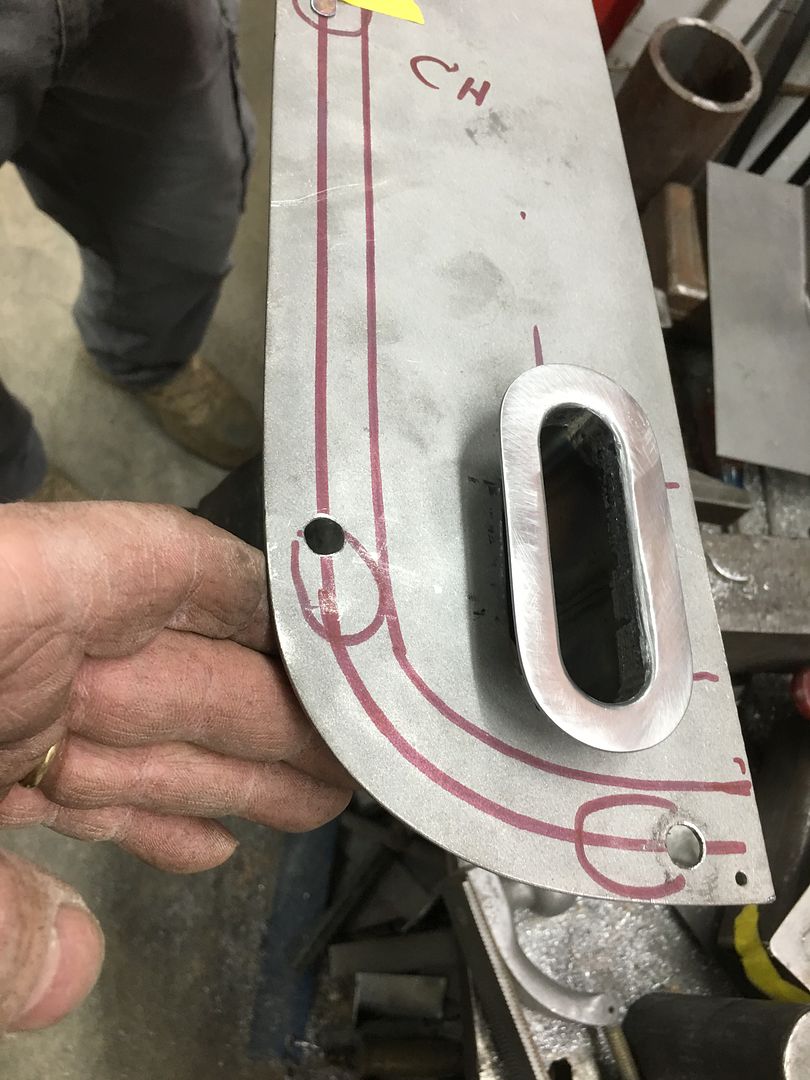 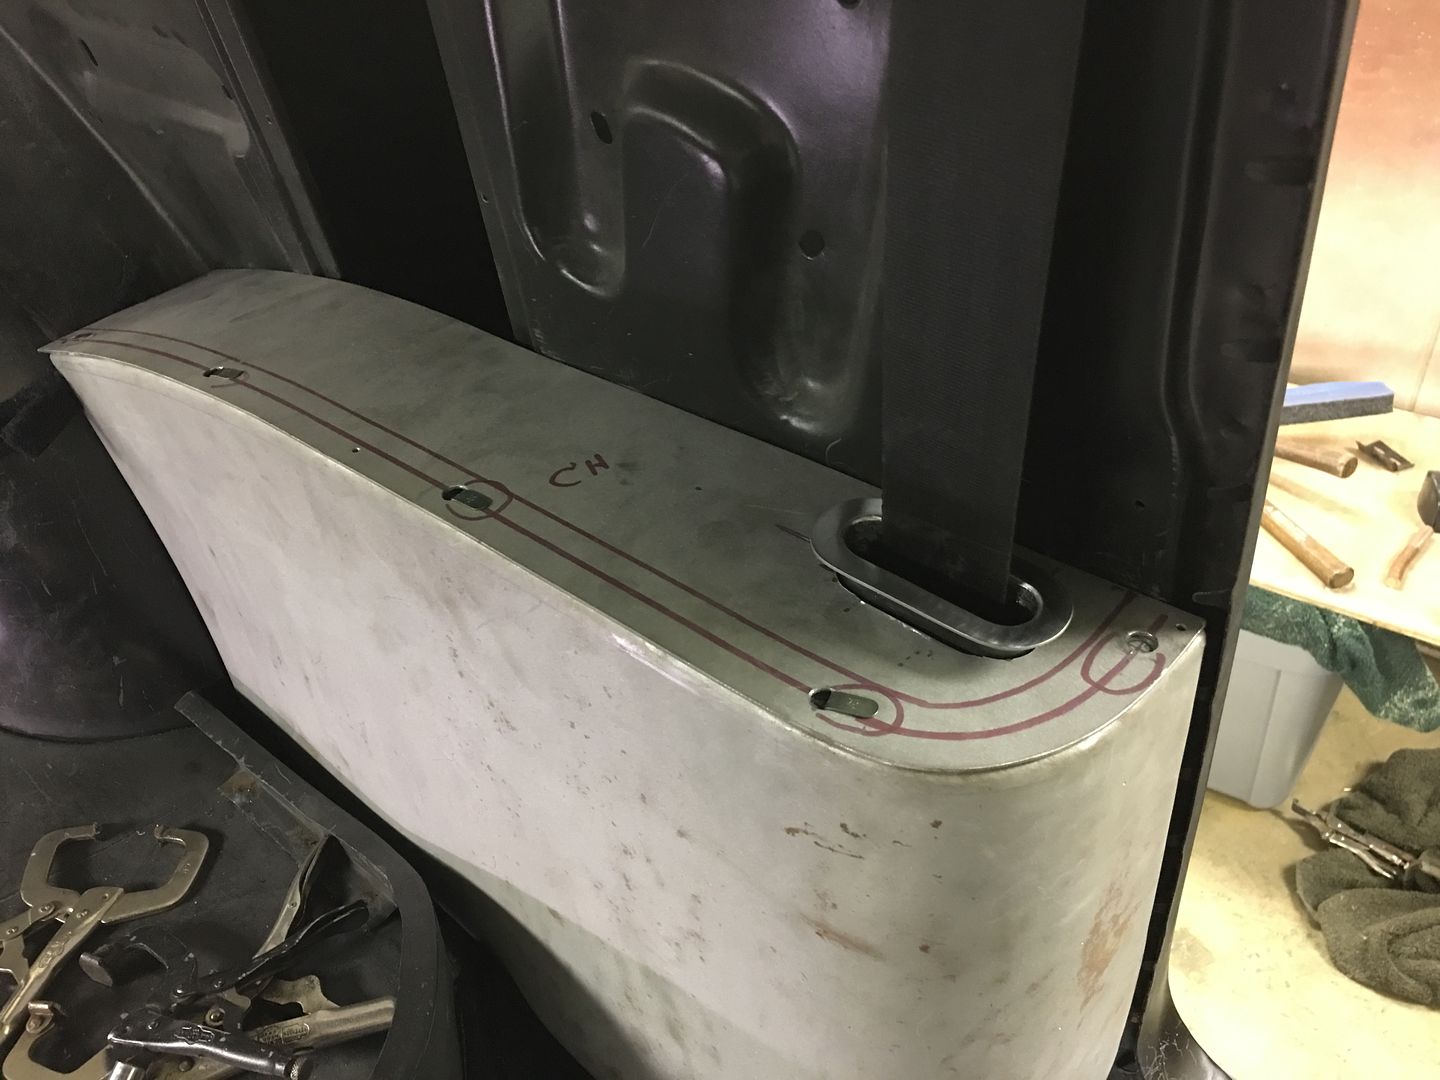
__________________
Robert |
|
|
|
|
12-22-2018, 10:16 AM
|
#15 |
|
Registered User
Join Date: Nov 2011
Location: West Plains Missouri
Posts: 2,088
|
Re: 55 Wagon Progress
Came out nice Robert.
Mark
__________________
http://67-72chevytrucks.com/vboard/s...d.php?t=645774 Project Orangepeel 52 A.D. http://67-72chevytrucks.com/vboard/s...d.php?t=653337 John's LS 49 dodge http://67-72chevytrucks.com/vboard/s...d.php?t=655780 Blake's 67 GMC LS stepside http://67-72chevytrucks.com/vboard/s...d.php?t=690527 Reed 78 FJ40 Rebuild http://67-72chevytrucks.com/vboard/s...d.php?t=733259 Barger's 78 FJ40 |
|
|
|
|
12-22-2018, 11:04 AM
|
#16 |
|
Senior Member
Join Date: Mar 2011
Location: West Plains, Missouri
Posts: 7,555
|
Re: 55 Wagon Progress
Robert, I would be happy with the sample you made, nice work...Jim
__________________
my build thread: http://67-72chevytrucks.com/vboard/s...d.php?t=459839 Jimbo's long bed step build:http://67-72chevytrucks.com/vboard/s...t=464626<br /> |
|
|
|
|
12-27-2018, 08:19 AM
|
#17 |
|
Registered User
Join Date: Jan 2013
Location: Leonardtown, MD
Posts: 1,636
|
Re: 55 Wagon Progress
Thanks for the comments guys!
Got a new addition to the shop, this Meco came from TM Technologies, or TinManTech. I got it hooked up last night and ran a couple passes. 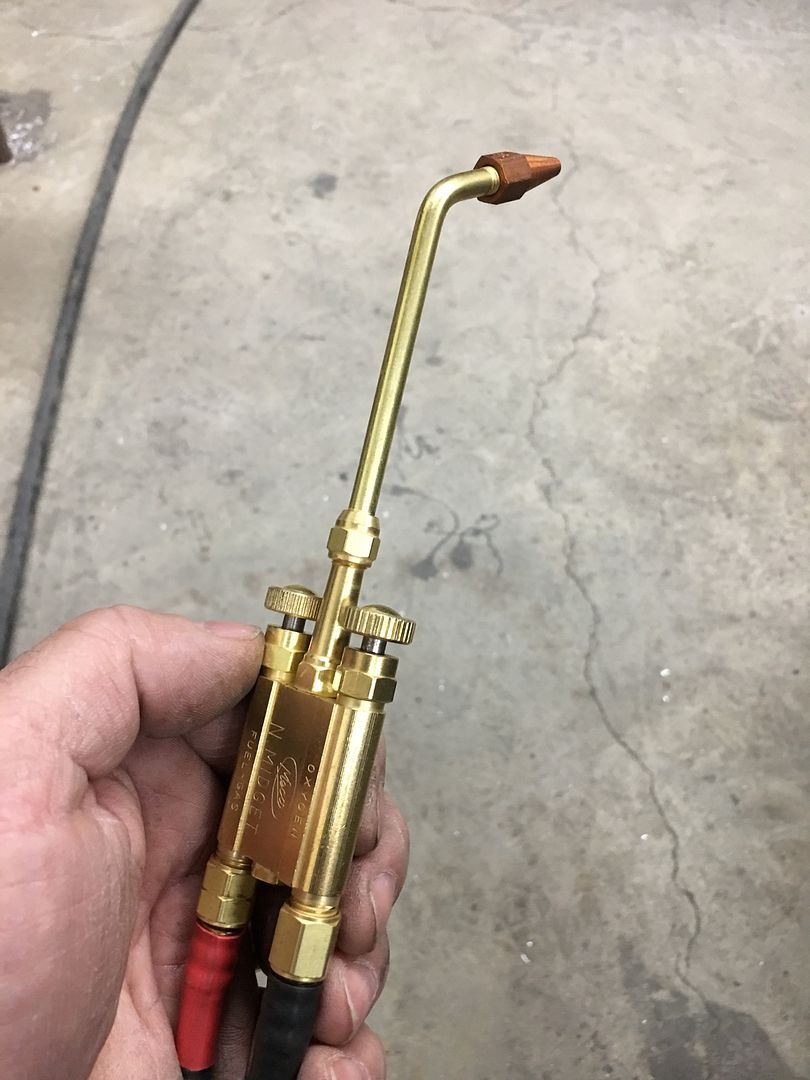 Let me start by saying I am not a gas welder. I have a Henrob torch that I have found awkward to use, likely the operator, so I have always used either MIG or TIG. This video shows my second attempt with the Meco, the first attempt I did not have sufficient heat as I was worried about blowing holes. The two “scraps” were picked off the floor and tacked together about every 3/4”, then fusion welded the distance shown, yielding a full penetration weld with nice HAZ conisistency. Very impressed with the light weight and ease of use, even for an old dog learning new tricks. Video shows in order: front, back, planished, and bent at 90* for our destruction test. https://www.youtube.com/watch?v=td4y...ature=youtu.be Tacks, front side.. 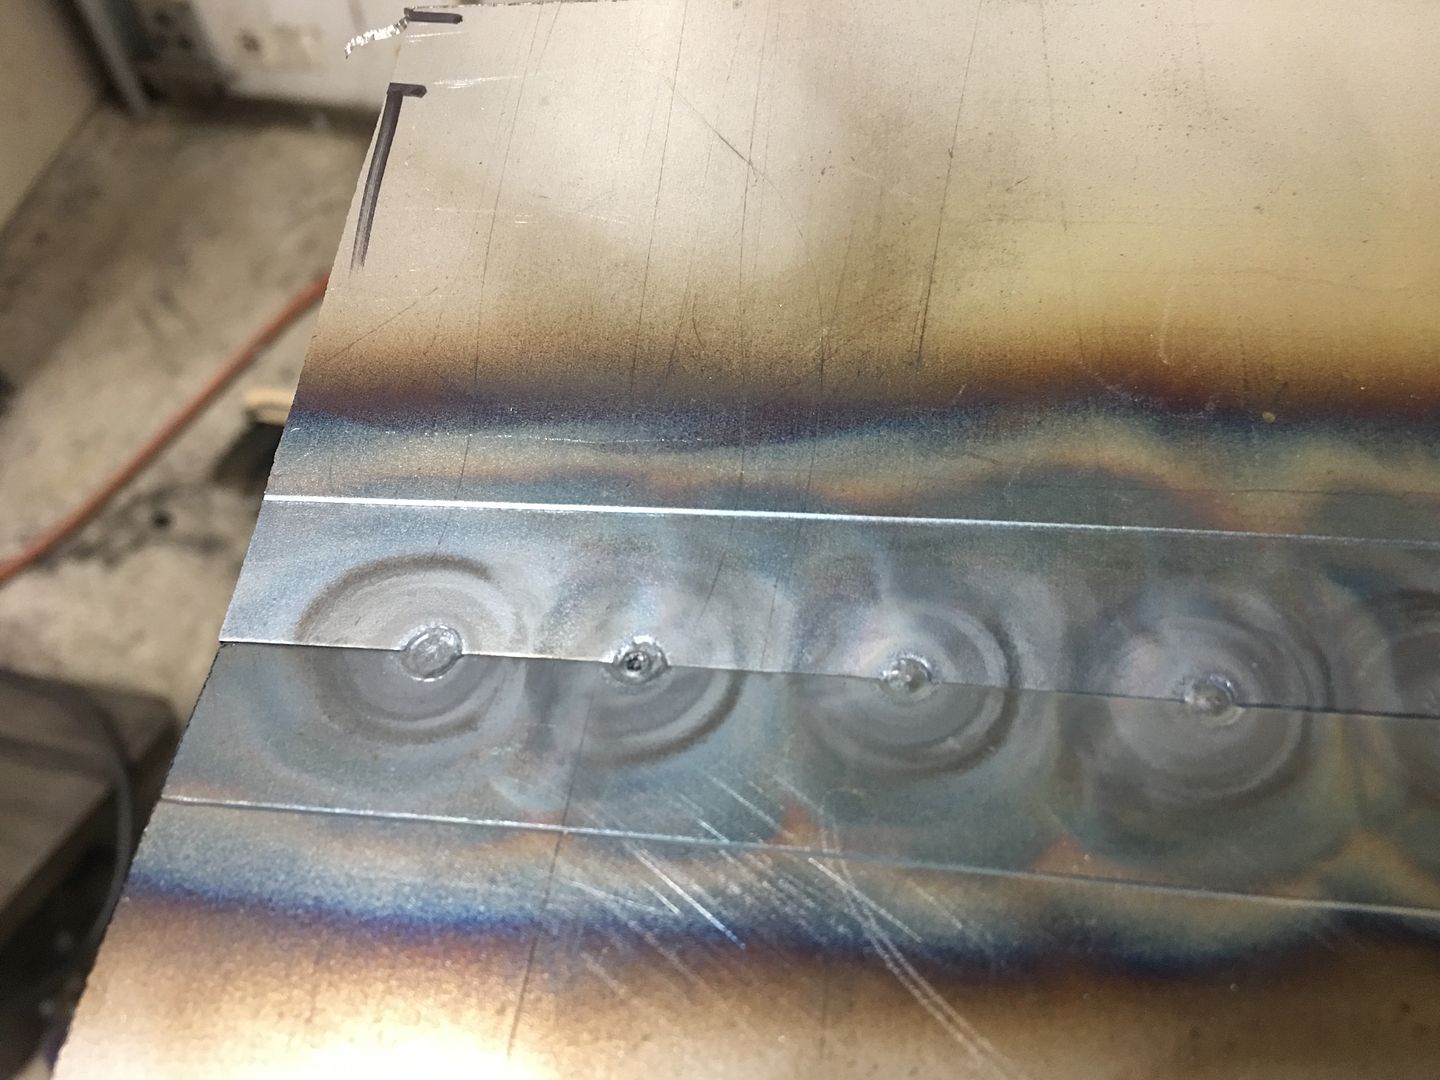 Rear side, full penetration... 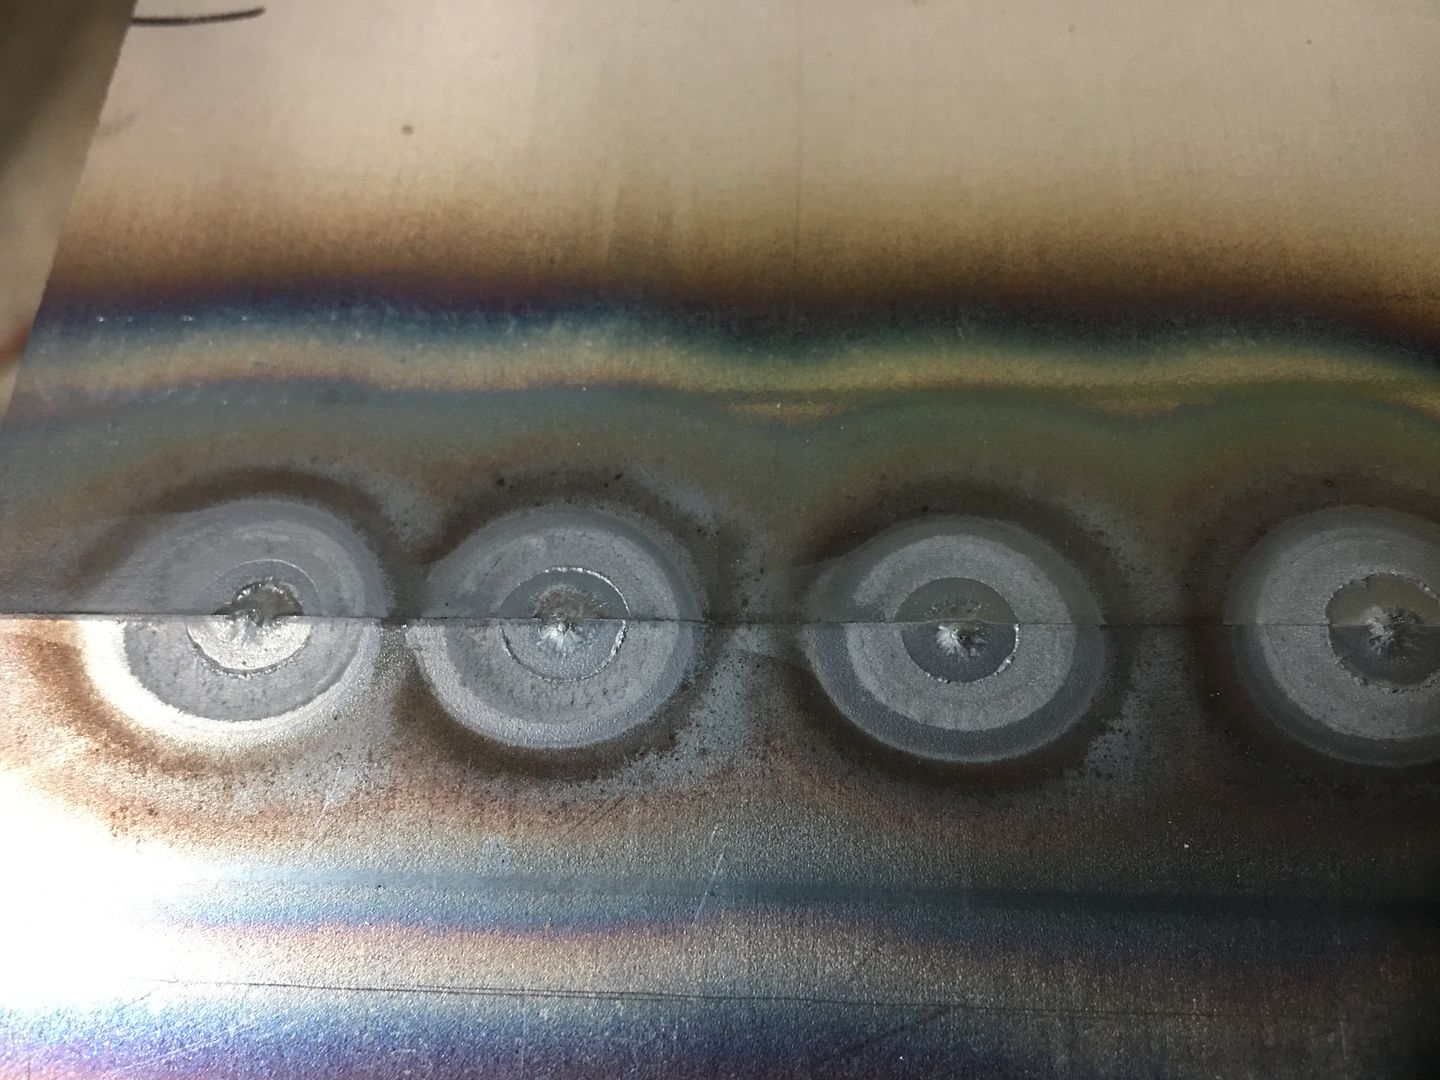 Full pass with full weld penetration, bent 90* for destruction test.. Line shown is mark left by press brake die.... 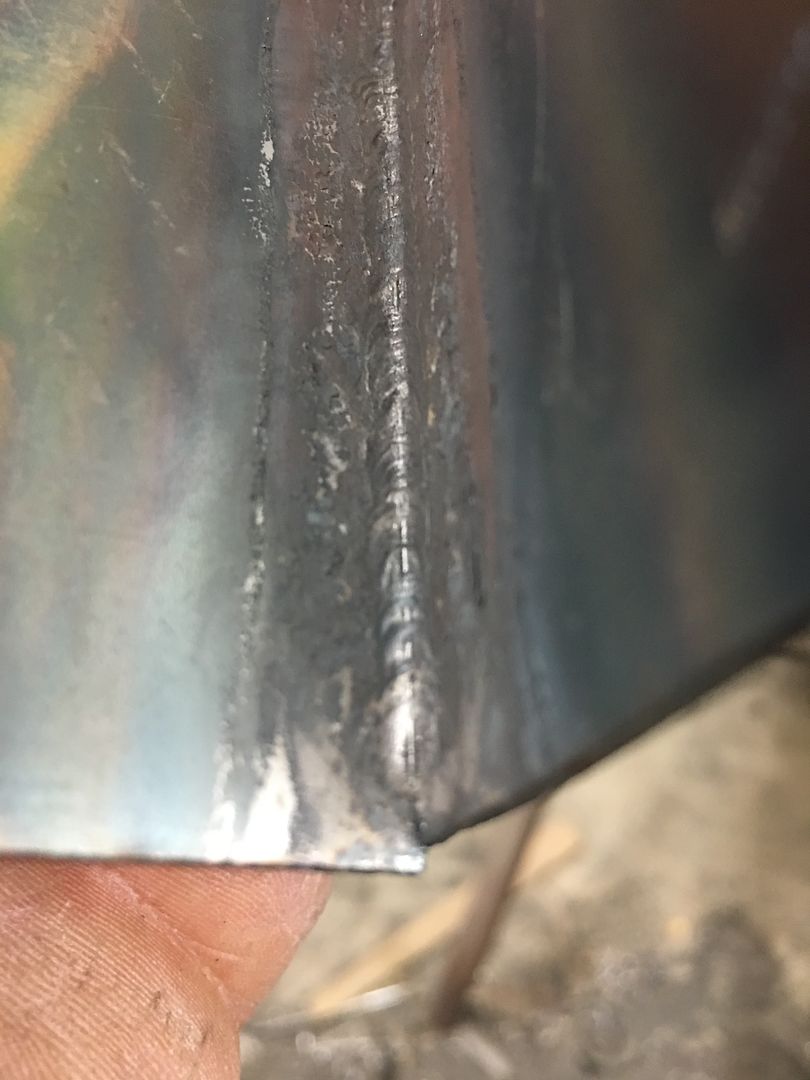 Rear side held up well 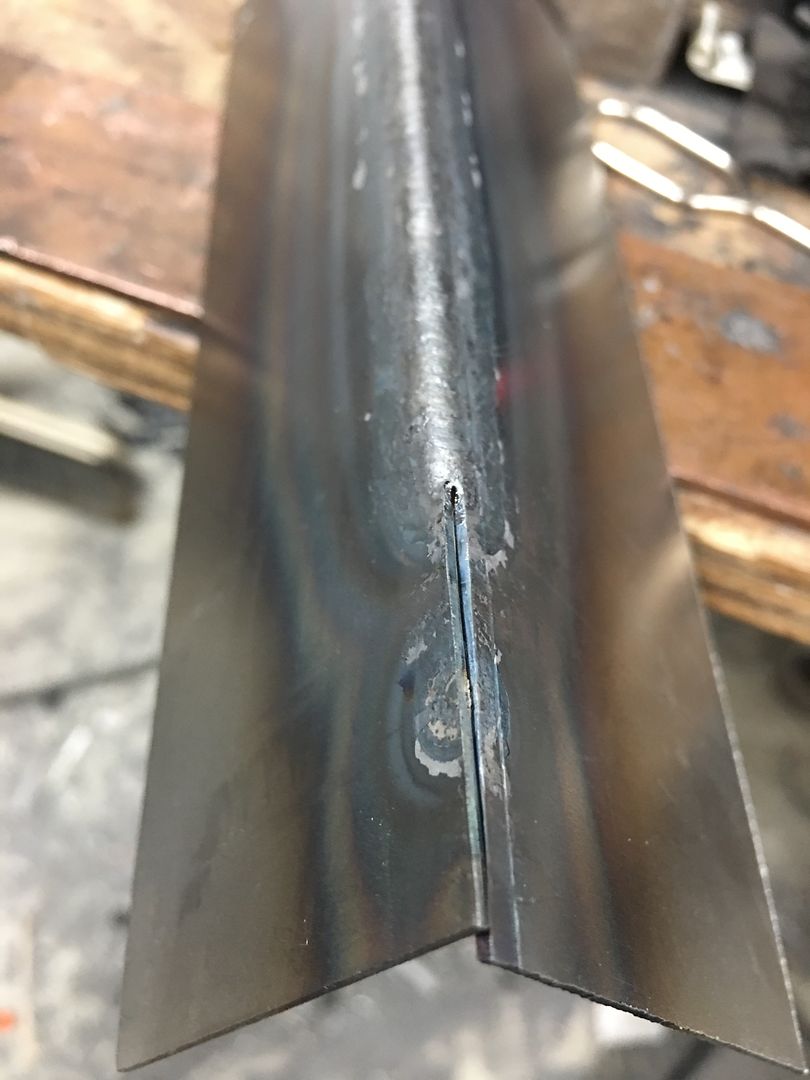 Very impressed with this torch, one handed valve adjustments are a breeze, light weight and easy to use..
__________________
Robert |
|
|
|
|
12-27-2018, 08:49 AM
|
#18 |
|
Post Whore
Join Date: May 2015
Location: Alabama
Posts: 14,596
|
Re: 55 Wagon Progress
That's sweet Robert....been along time since I did fusion welding...that "tiny"torch looks to have done a good job.....
__________________
Mongo...aka Greg RIP Dad RIP Jesse 1981 C30 LQ9 NV4500..http://67-72chevytrucks.com/vboard/s...d.php?t=753598 Mongos AD- LS3 TR6060...http://67-72chevytrucks.com/vboard/s...34#post8522334 Columbus..the 1957 IH 4x4...http://67-72chevytrucks.com/vboard/s...63#post8082563 2023 Chevy Z71..daily driver |
|
|
|
|
12-28-2018, 02:20 PM
|
#19 |
|
Registered User
Join Date: Jan 2013
Location: Leonardtown, MD
Posts: 1,636
|
Re: 55 Wagon Progress
Thanks Greg!
I was asked to bend the weld sample to a complete 180* to give the weld a "REAL" test. So the following video does such, please excuse the erratic movement of the camera operator, he also had to close the vise and position the sample as well.. and then there's the drop test.... https://www.youtube.com/watch?v=JzfLxkMZbEk .
__________________
Robert |
|
|
|
|
12-28-2018, 02:49 PM
|
#20 |
|
Registered User
Join Date: Nov 2013
Location: Antioch, Ca.
Posts: 444
|
Re: 55 Wagon Progress
Hey wait Robert you're here too? I read this thread on Tri-Five too!
__________________
Take Care Troy |
|
|
|
|
01-02-2019, 08:49 AM
|
#21 |
|
Registered User
Join Date: Jan 2013
Location: Leonardtown, MD
Posts: 1,636
|
Re: 55 Wagon Progress
Best wishes to everyone for a healthy and prosperous New Year!
Some wagon updates, we've been tying up loose ends to get parts ready for upholstery and the roof ready for paint. With the arm rest details ironed out, E is unbolting the kick panels so we can cut out the speaker holes. Mike is getting the roof skin blocked out.. 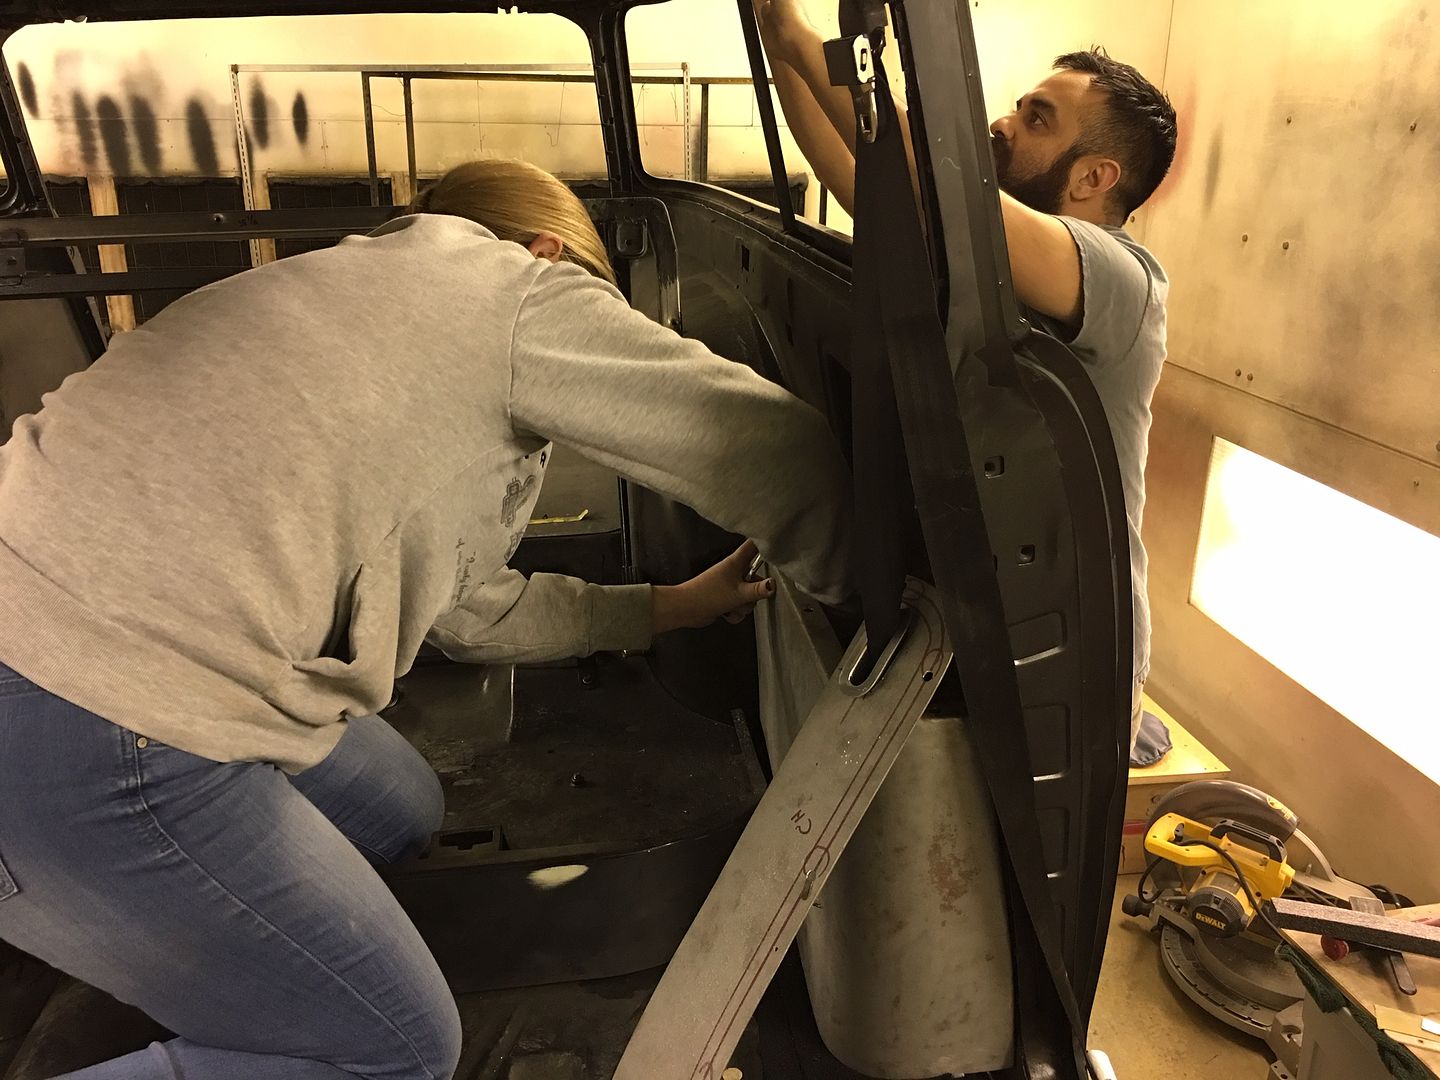 Here's the last detail for the console, we still need our latching mechanism. To keep a minimalist approach, we're going to flush recess some rare earth magnets in the lid, so here's our "pockets" that will be welded into the lid. Starting with some .065 wall tubing the end was faced on the lathe, and the end plates turned to a welding diameter of slightly undersized than the tubing, which allows for a good fusion weld. 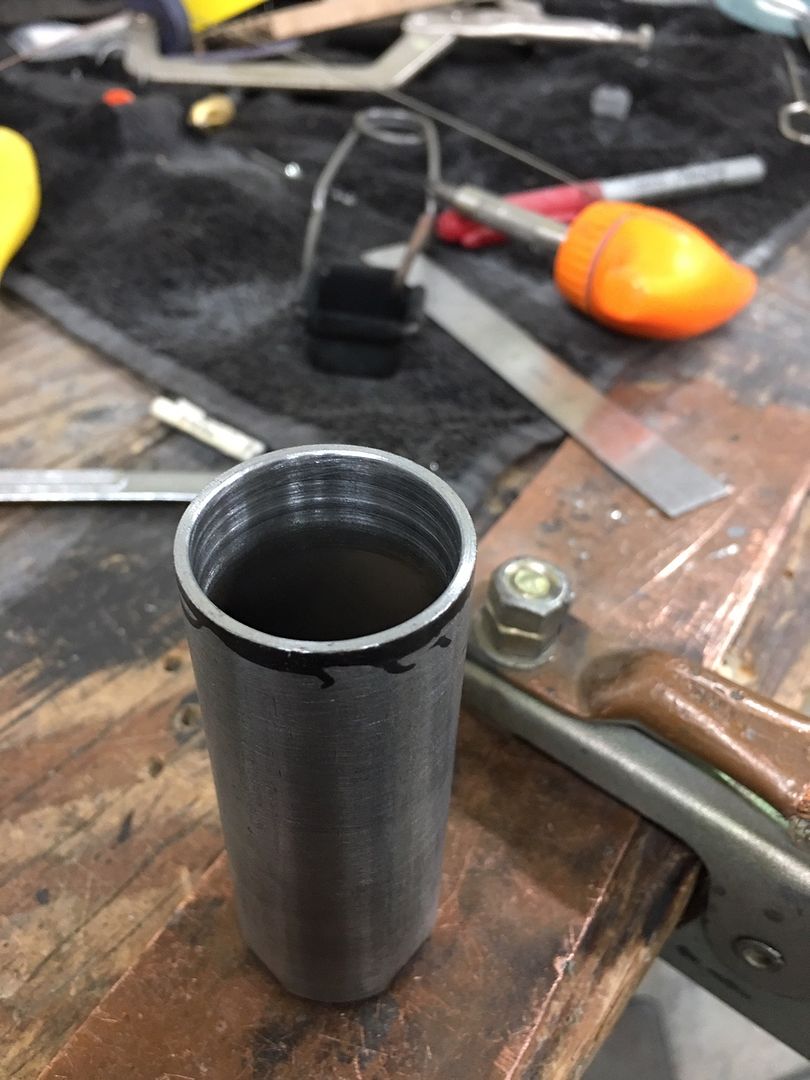 Tacked: 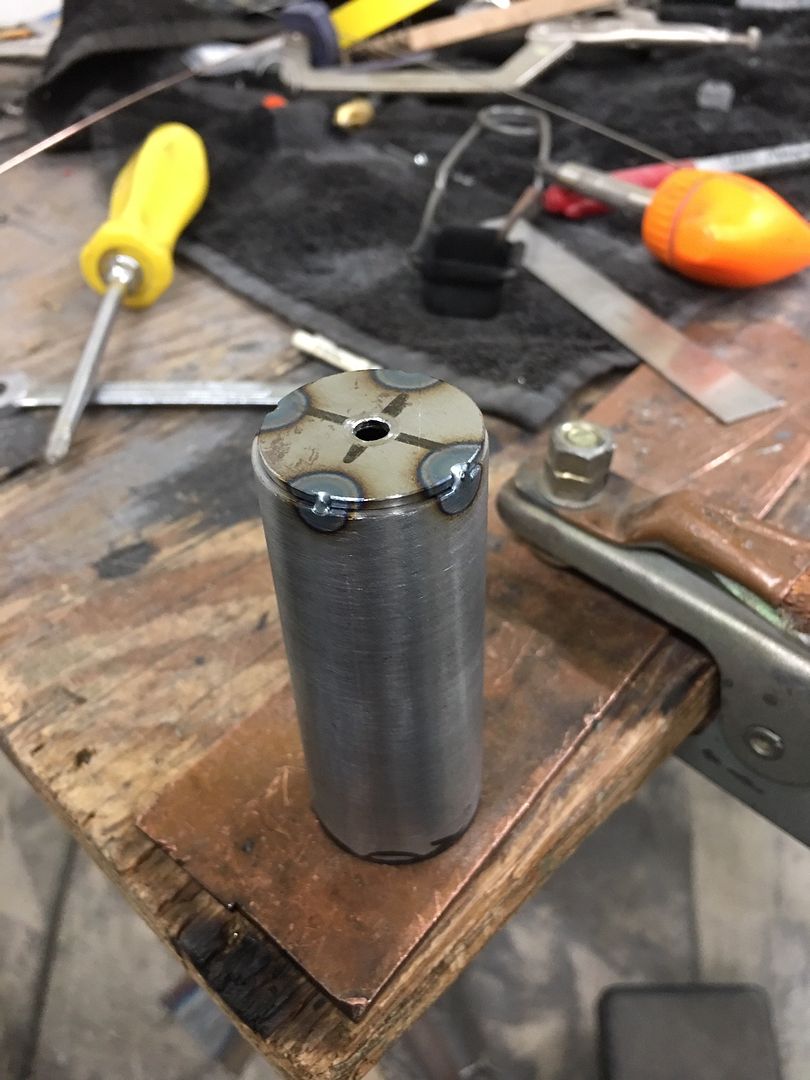 Fusion welded using the TIG: 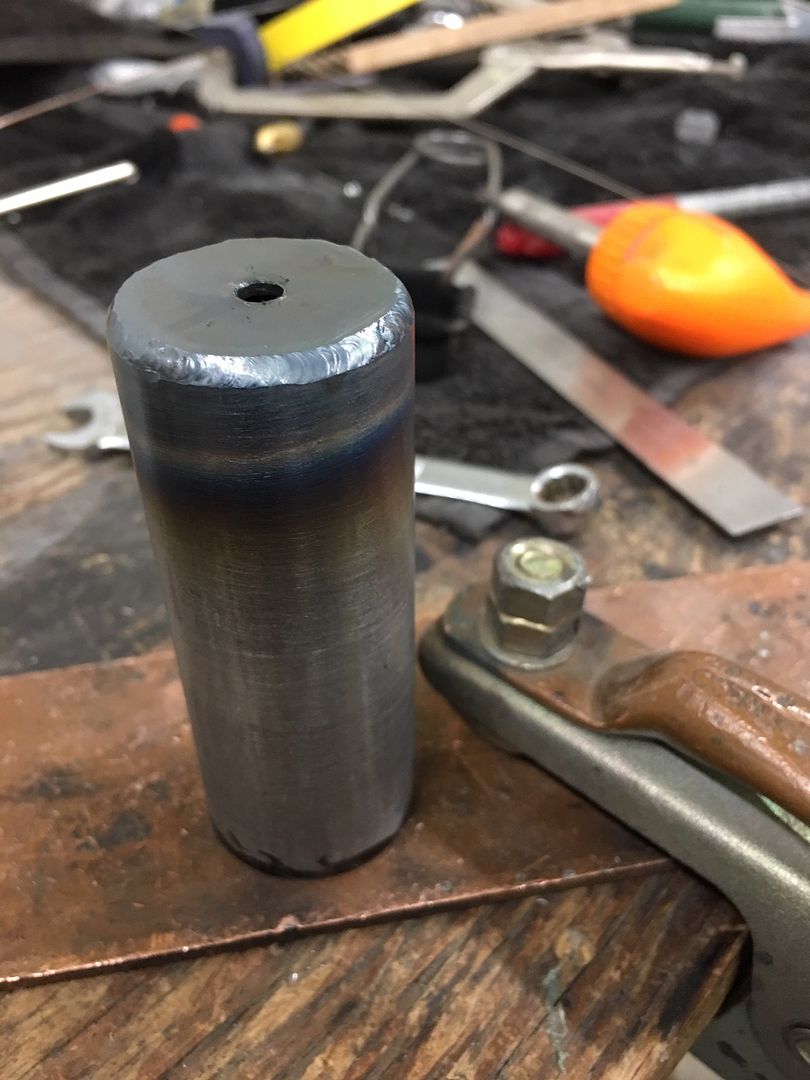 10-32 hex nut for magnet attachment is tacked on.... 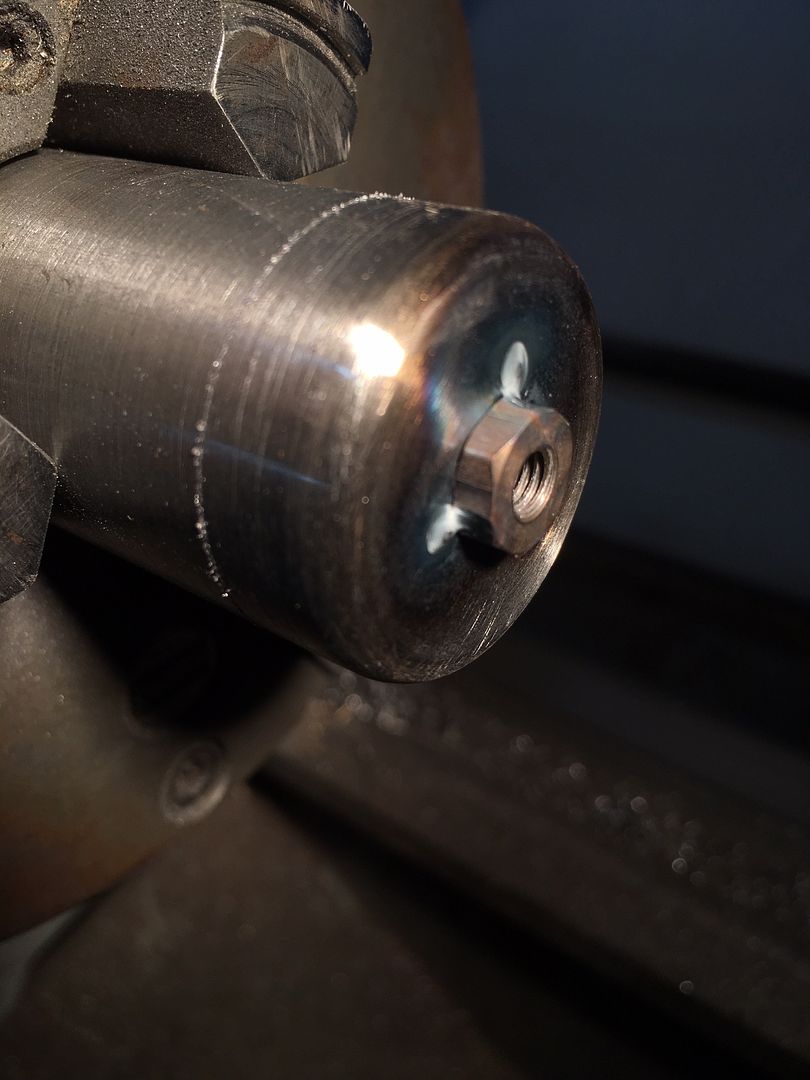 Trimmed to size... 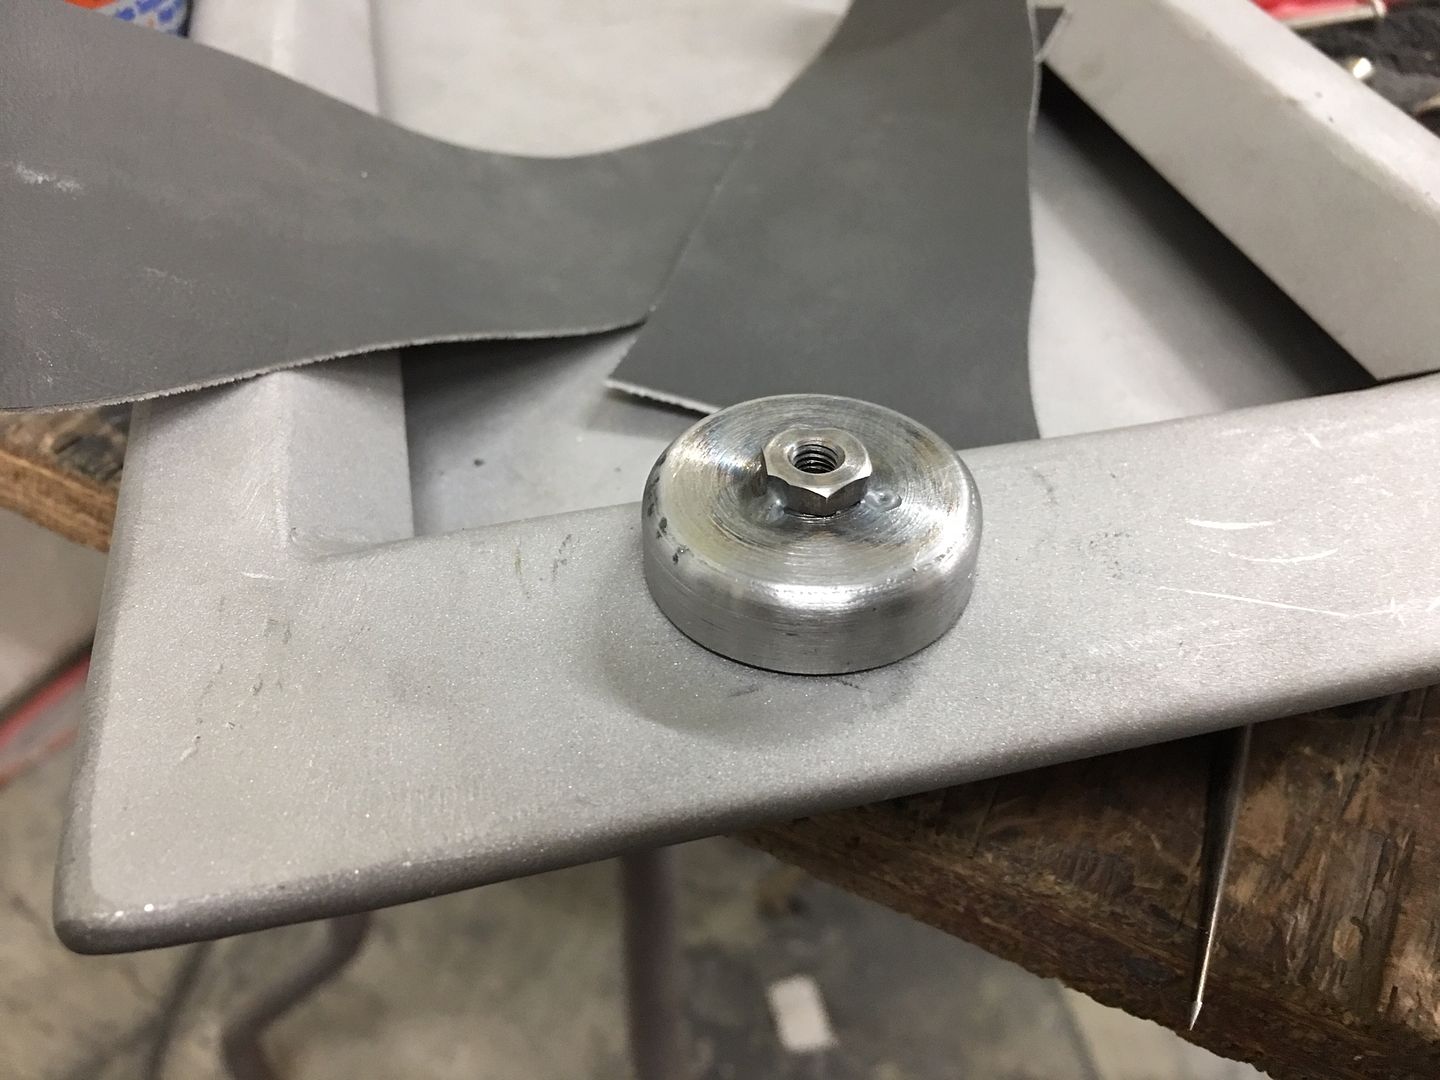 The material scraps shown were to simulate what will be covering the console and lid for the "pull test". Three magnets appeared to work too well, so we are going drill holes and weld in our recess pockets to use two magnets but leave a space in the center for a third, just in case... Once welded and fitted we'll do one more pull test just to make sure the third one isn't needed..  We also had some parts water jetted out of stainless for our seat belt escutcheons, this should help us get better consistency between parts.....and save time.. 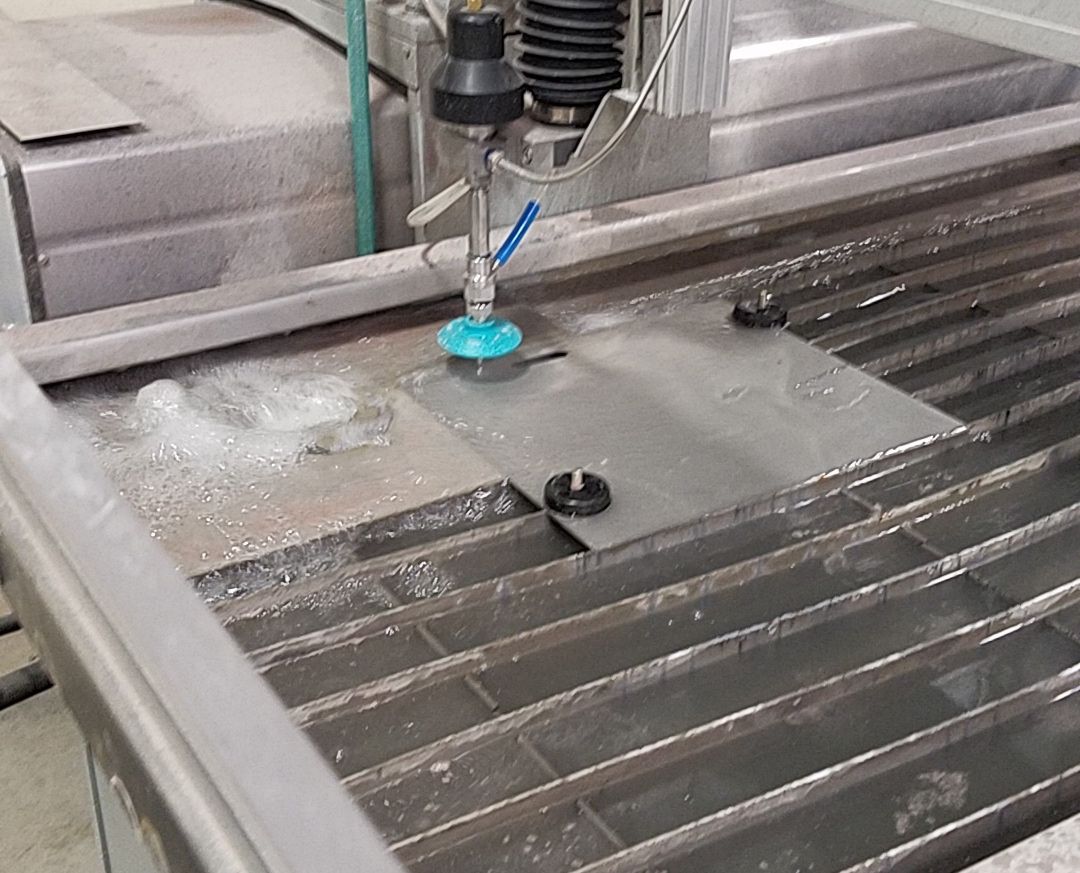 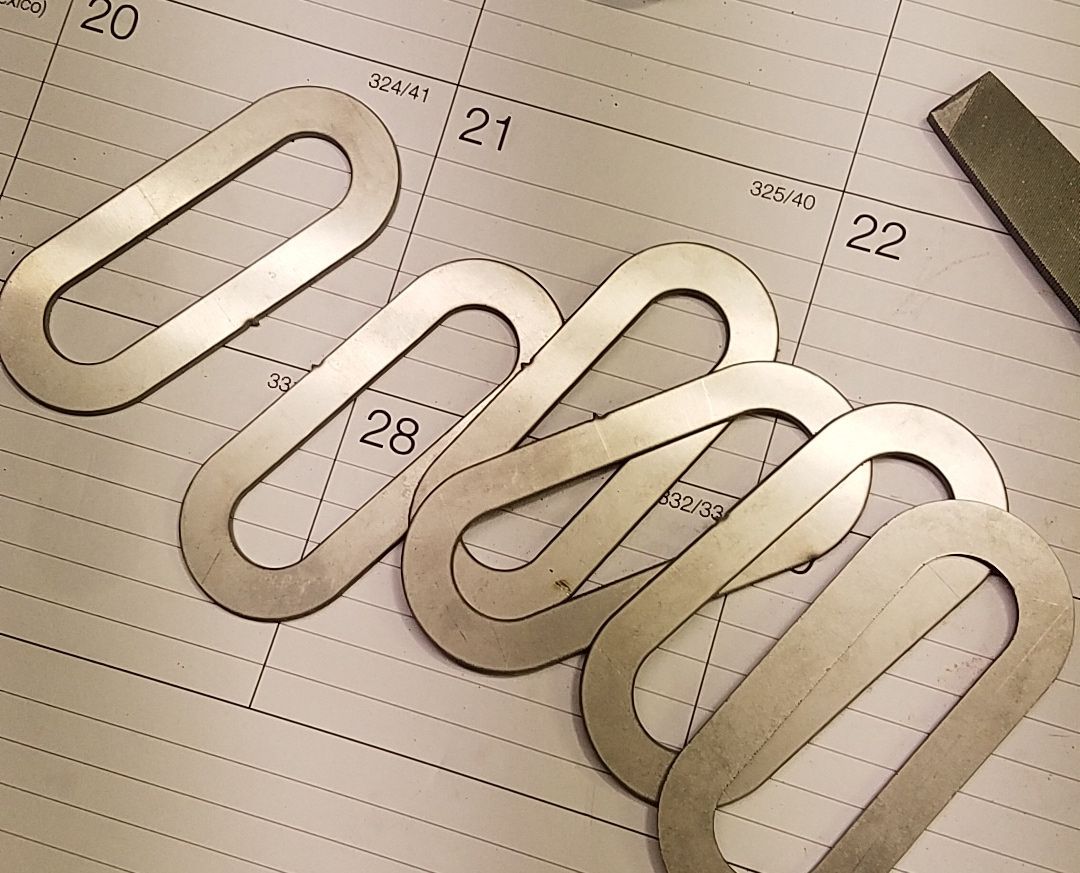
__________________
Robert Last edited by MP&C; 01-02-2019 at 03:45 PM. |
|
|
|
|
01-02-2019, 05:55 PM
|
#22 |
|
Post Whore
Join Date: May 2015
Location: Alabama
Posts: 14,596
|
Re: 55 Wagon Progress
nice work...waterjet does make it nice...
__________________
Mongo...aka Greg RIP Dad RIP Jesse 1981 C30 LQ9 NV4500..http://67-72chevytrucks.com/vboard/s...d.php?t=753598 Mongos AD- LS3 TR6060...http://67-72chevytrucks.com/vboard/s...34#post8522334 Columbus..the 1957 IH 4x4...http://67-72chevytrucks.com/vboard/s...63#post8082563 2023 Chevy Z71..daily driver |
|
|
|
|
01-02-2019, 08:34 PM
|
#23 |
|
Senior Member
Join Date: Mar 2011
Location: West Plains, Missouri
Posts: 7,555
|
Re: 55 Wagon Progress
Robert, nice work as always...Jim
__________________
my build thread: http://67-72chevytrucks.com/vboard/s...d.php?t=459839 Jimbo's long bed step build:http://67-72chevytrucks.com/vboard/s...t=464626<br /> |
|
|
|
|
01-04-2019, 12:25 AM
|
#24 |
|
Registered User
Join Date: Jan 2013
Location: Leonardtown, MD
Posts: 1,636
|
Re: 55 Wagon Progress
Thanks guys!
We got the holes added in the console lid for the pocket recesses..... 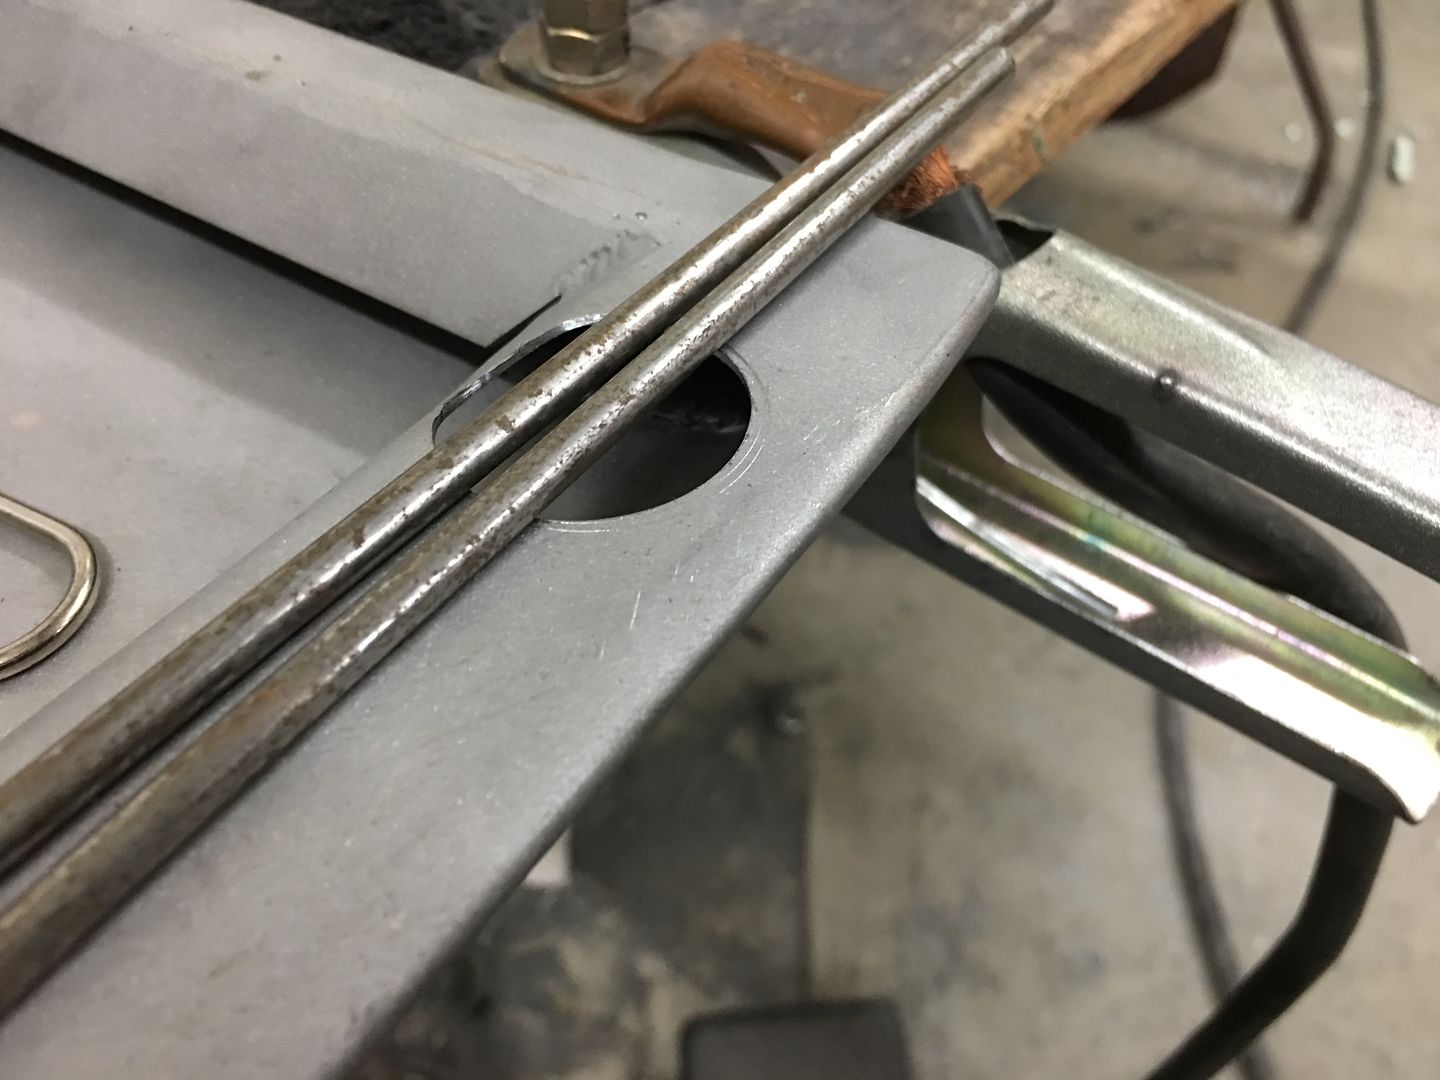 A bent fender washer and 3/16 rods serve to hold the pockets in place while tacked in with the TIG.... 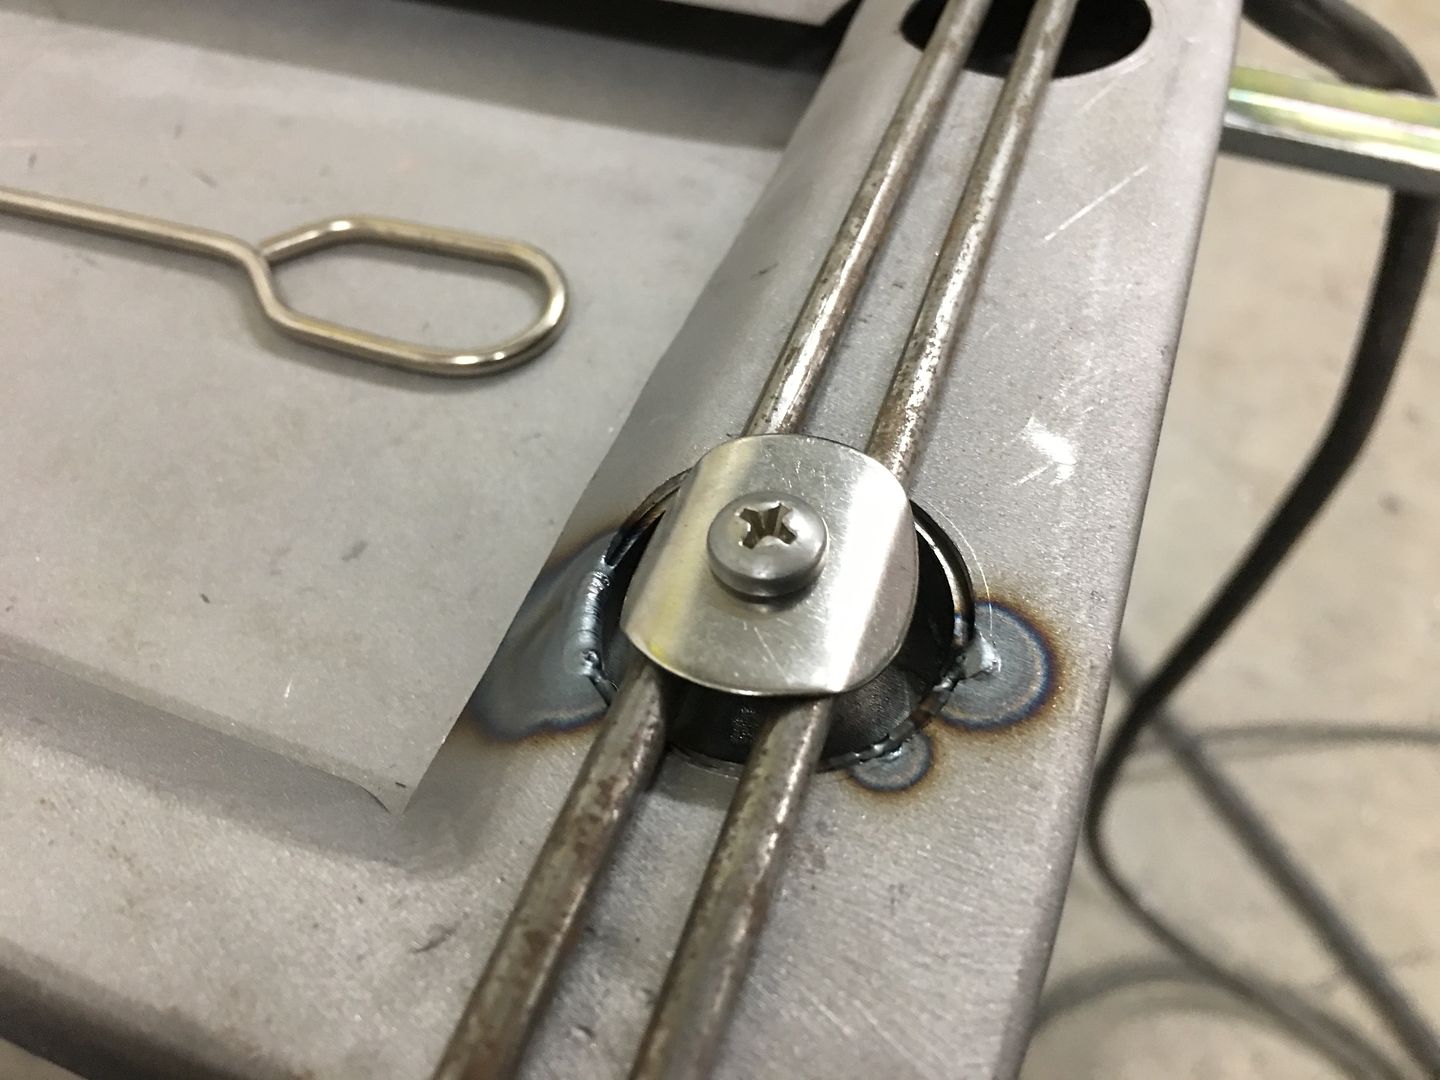 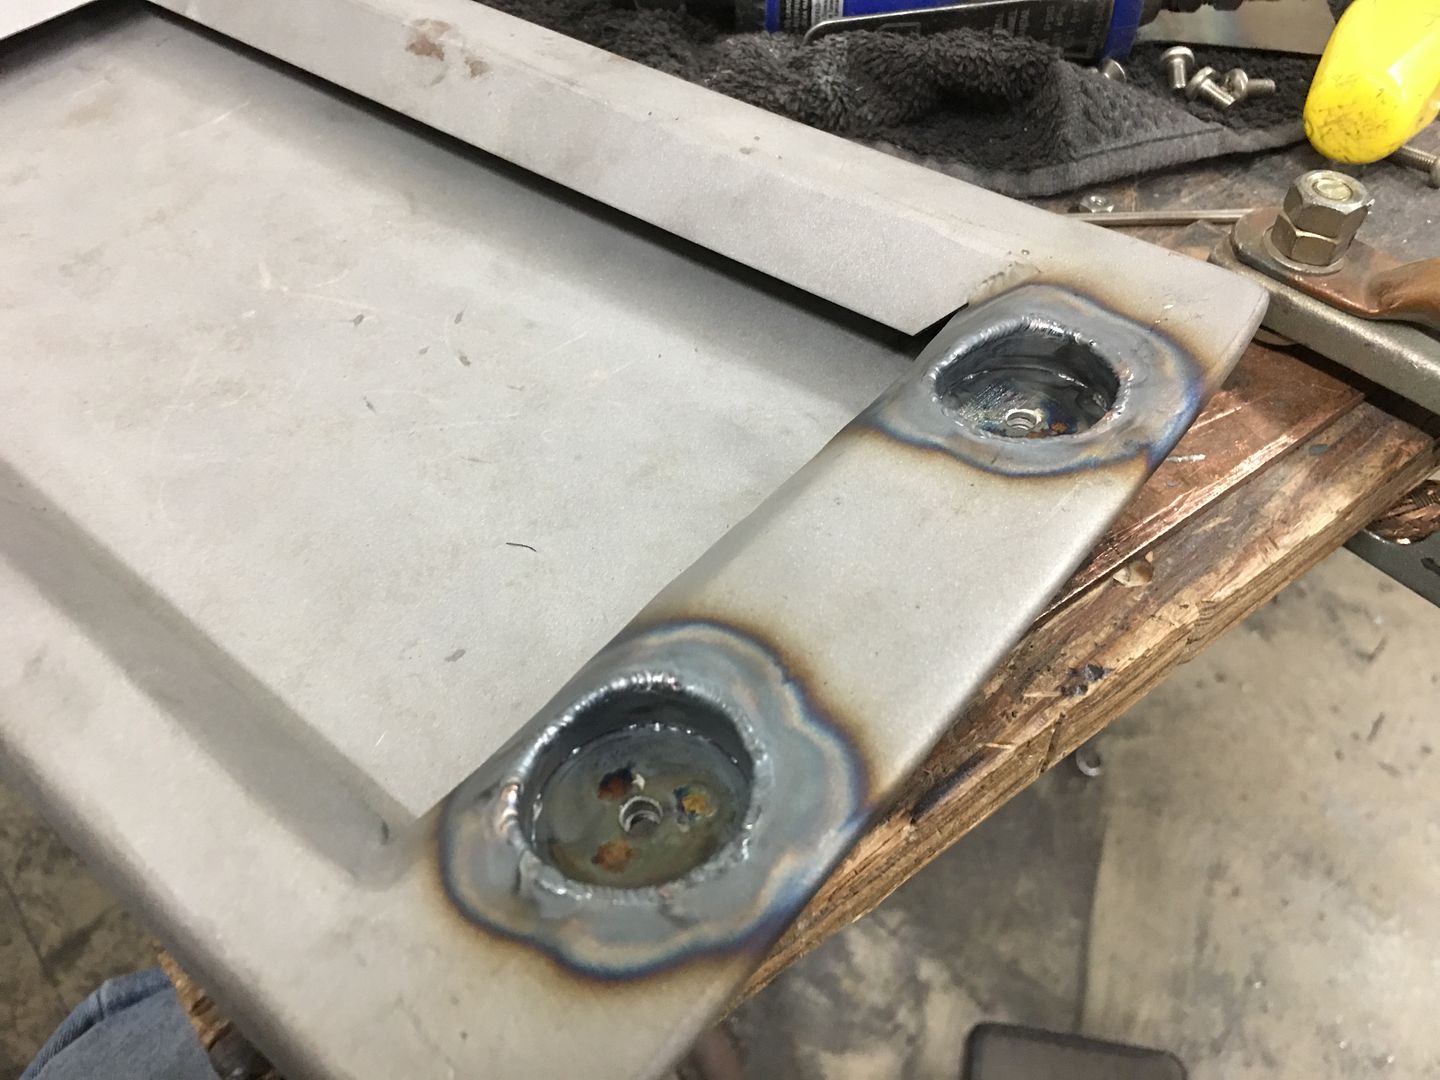 Test fit of the magnets... 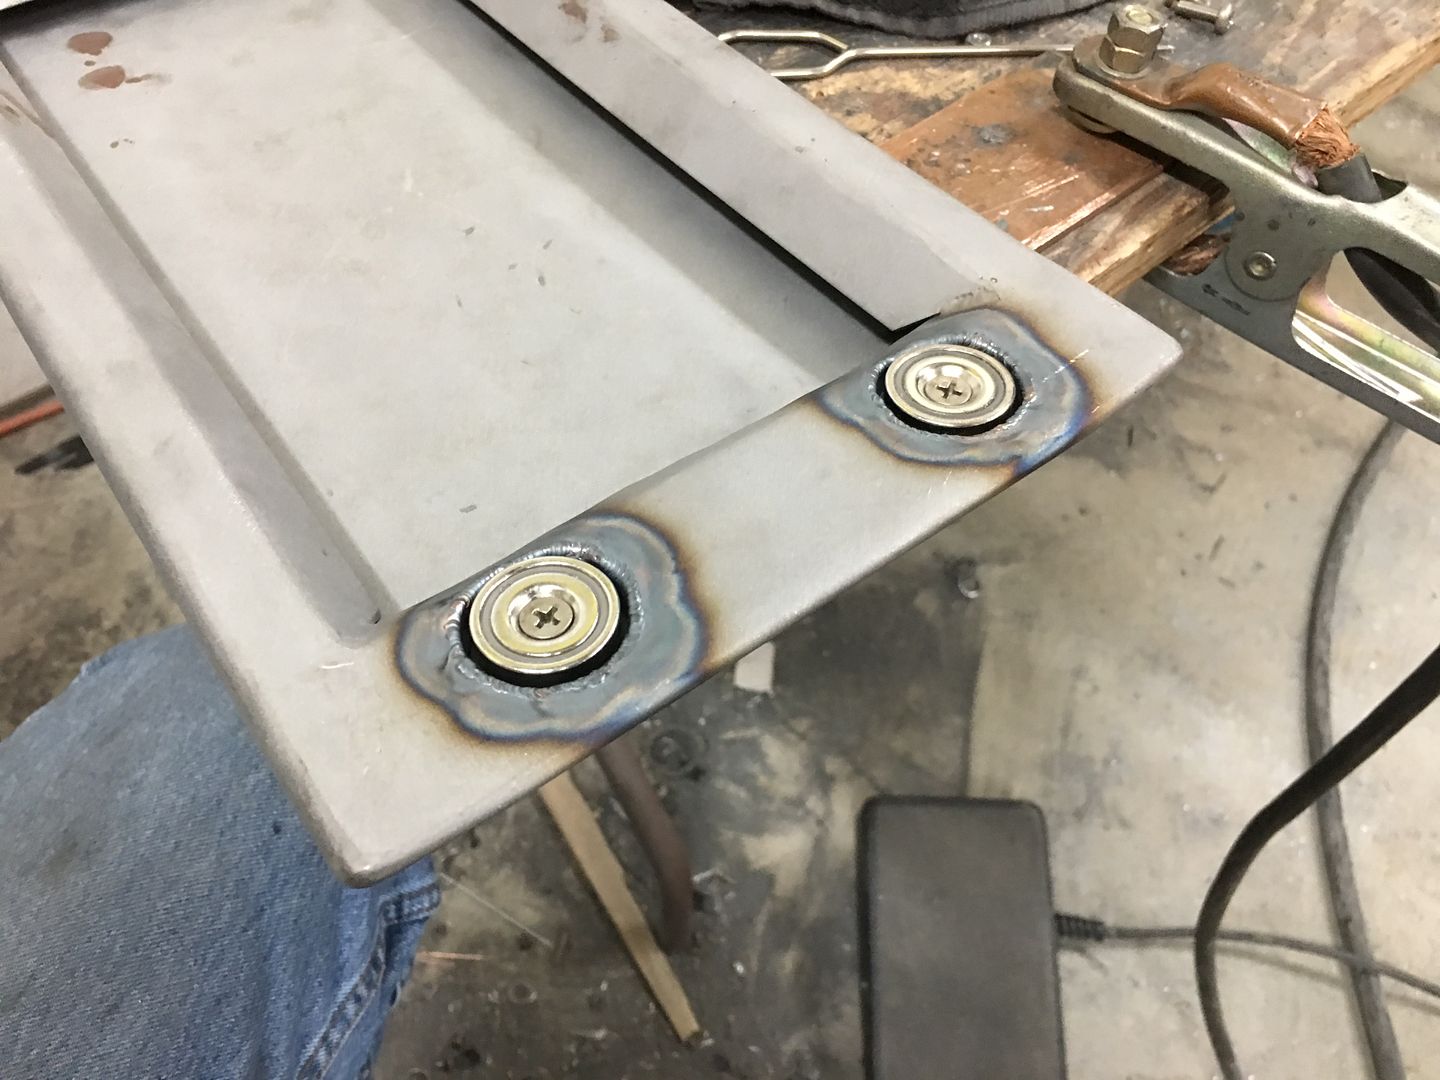 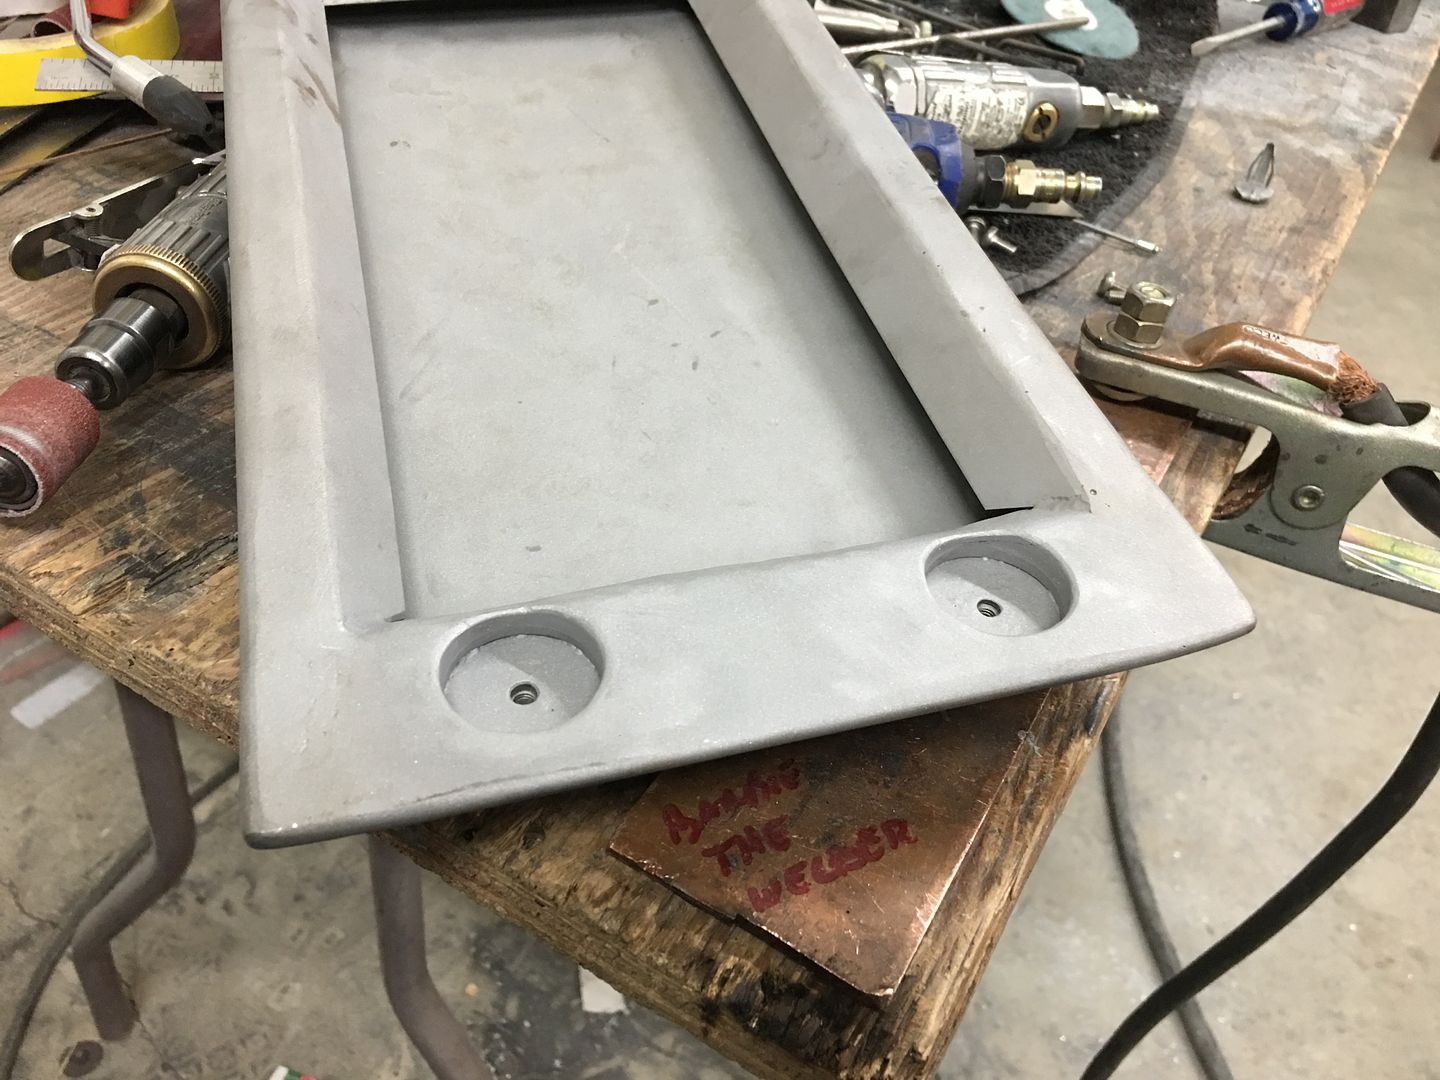 Video of the console lid, testing the magnet pull for our latching method.. https://www.youtube.com/watch?v=vgJM...ature=youtu.be .
__________________
Robert |
|
|
|
|
01-04-2019, 10:29 AM
|
#25 |
|
Post Whore
Join Date: May 2015
Location: Alabama
Posts: 14,596
|
Re: 55 Wagon Progress
That works great!! Nice work..
__________________
Mongo...aka Greg RIP Dad RIP Jesse 1981 C30 LQ9 NV4500..http://67-72chevytrucks.com/vboard/s...d.php?t=753598 Mongos AD- LS3 TR6060...http://67-72chevytrucks.com/vboard/s...34#post8522334 Columbus..the 1957 IH 4x4...http://67-72chevytrucks.com/vboard/s...63#post8082563 2023 Chevy Z71..daily driver |
|
|
|
 |
| Bookmarks |
|
|


 Hybrid Mode
