
|
 04-29-2012, 04:46 PM
|
#951 |
|
Certified Car Nut
Join Date: Jan 2005
Location: Inglewood, California
Posts: 3,118
|
Re: Kabwe's aka Bam's build
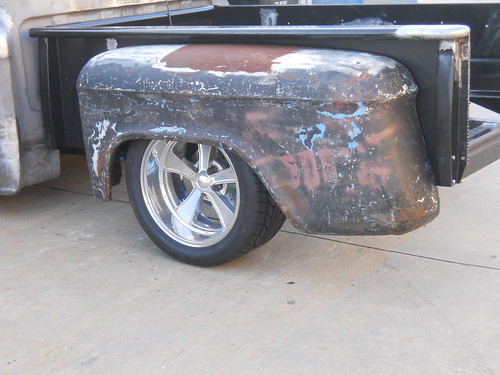
Well I decided to start getting the rear fenders ready for primer. I wanted to use these for the truck because they were giving to me by a buddy who bought new ones and he has passed away (He knew they were rough but did not want to throw them away). So I wanted something of his on the truck, so I went to through the trouble of saving them.
My question is do you know what evils lives under your primer?  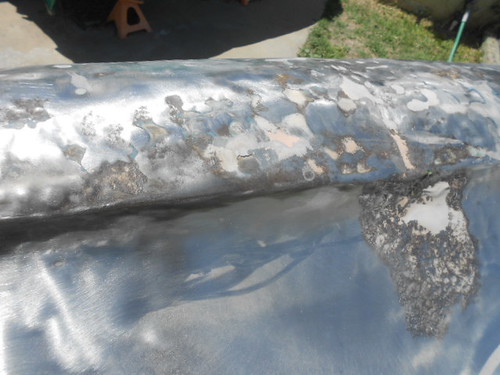 This is what I had to cut away. Yikes  Remember those repop fenders that I told you I like keeping just incase? Well they provided the majority of the patch panel. A little tweaking and they worked fine. That little rust spot that was left I just formed my hand. 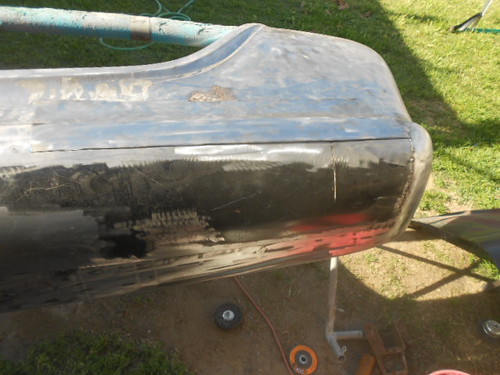 And here it is, almost ready for primer a little more welding and hammer and dolly work to do and very little filler will be needed now.lol 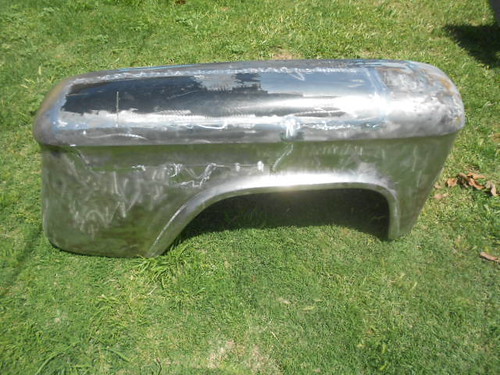 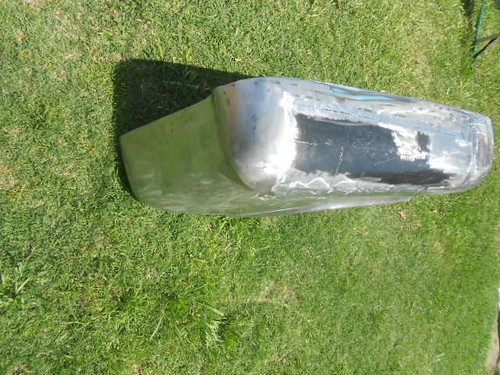
Last edited by Kabwe; 04-30-2012 at 12:59 PM. |

|

|
|
04-29-2012, 04:55 PM
|
#952 |
|
Registered User
Join Date: Nov 2011
Location: Langley, BC
Posts: 702
|
Re: Kabwe's aka Bam's build
Remember......................it's Sunday. No "hammer and dolly work" before 11:00 am. That neighbor thing.
|
|
|
|
|
04-29-2012, 05:51 PM
|
#953 | |
|
Registered User
Join Date: Dec 2011
Location: Mobile, Alabama
Posts: 996
|
Re: Kabwe's aka Bam's build
Quote:
__________________
My Build - http://67-72chevytrucks.com/vboard/s...d.php?t=515876 |
|
|
|
|
|
04-29-2012, 06:22 PM
|
#954 |
|
Registered User
Join Date: Mar 2011
Location: Queensland, Australia
Posts: 120
|
Re: Kabwe's aka Bam's build
nice work on incorporating your mate's panels, well worth the effort for the memories
|
|
|
|
|
04-29-2012, 07:24 PM
|
#955 | |||
|
Certified Car Nut
Join Date: Jan 2005
Location: Inglewood, California
Posts: 3,118
|
Re: Kabwe's aka Bam's build
Quote:
Quote:
Quote:
Last edited by Kabwe; 05-03-2012 at 12:00 PM. |
|||
|
|
|
|
04-29-2012, 07:44 PM
|
#956 |
|
Registered User
Join Date: Aug 2007
Location: Corona, California
Posts: 7,998
|
Re: Kabwe's aka Bam's build
As always Bam very nice work.
Kim |
|
|
|
|
04-29-2012, 07:56 PM
|
#957 |
|
Registered User
Join Date: Jan 2012
Location: Motown
Posts: 7,677
|
Re: Kabwe's aka Bam's build
looking good kabwe
at least they attempted to (poorly) hammer that out there was a full inch of filler over this, the whole left side was a mess i'm not sure they even tried to hammer anything out boy that metal is thick, took a 5lb hammer to get the worst of it out.  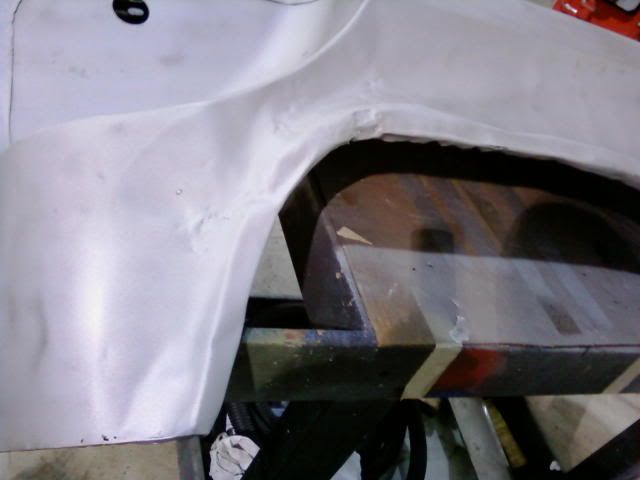
__________________
cool, an ogre smiley Ogre's 58 Truk buildhow to put your truck year and build thread into your signature shop air compressor timer |
|
|
|
|
04-29-2012, 09:09 PM
|
#958 |
|
Senior Member
 Join Date: Mar 2011
Location: West Plains, Missouri
Posts: 7,555
|
Re: Kabwe's aka Bam's build
Very nice work on the fender, looks great.....Jim
__________________
my build thread: http://67-72chevytrucks.com/vboard/s...d.php?t=459839 Jimbo's long bed step build:http://67-72chevytrucks.com/vboard/s...t=464626<br /> |
|
|
|
|
04-30-2012, 12:16 PM
|
#959 |
|
Certified Car Nut
Join Date: Jan 2005
Location: Inglewood, California
Posts: 3,118
|
Re: Kabwe's aka Bam's build
Thanks Ogre and oldman3
|
|
|
|
|
04-30-2012, 08:35 PM
|
#960 |
|
Senior Member
Join Date: Jul 2011
Location: Hawthorne, CA
Posts: 458
|
Re: Kabwe's aka Bam's build
Well Kabwe, looks like your moving now. Keep Going the finish line is there so where.
|
|
|
|
|
05-01-2012, 07:16 PM
|
#961 | |
|
Certified Car Nut
Join Date: Jan 2005
Location: Inglewood, California
Posts: 3,118
|
Re: Kabwe's aka Bam's build
Quote:
|
|
|
|
|
|
05-04-2012, 08:35 PM
|
#962 |
|
Registered User
Join Date: Oct 2010
Location: mt vernon, oh
Posts: 867
|
Re: Kabwe's aka Bam's build
I'm all caught up now.....looks great!
|
|
|
|
|
05-04-2012, 08:57 PM
|
#963 | |
|
Registered User
Join Date: Oct 2009
Location: Broken Arrow, OK
Posts: 1,220
|
Re: Kabwe's aka Bam's build
Quote:
I HAVE to get mine finished or I might never get to start the next one!
__________________
56 GMC BUILD THREAD: http://67-72chevytrucks.com/vboard/s...d.php?t=368649 69 long bed Chevy turned 67 gmc jimmy roadster: https://67-72chevytrucks.com/vboard/...d.php?t=851167 |
|
|
|
|
|
05-06-2012, 01:36 PM
|
#964 |
|
Certified Car Nut
Join Date: Jan 2005
Location: Inglewood, California
Posts: 3,118
|
Re: Kabwe's aka Bam's build
Hey xpickup aka Shannon
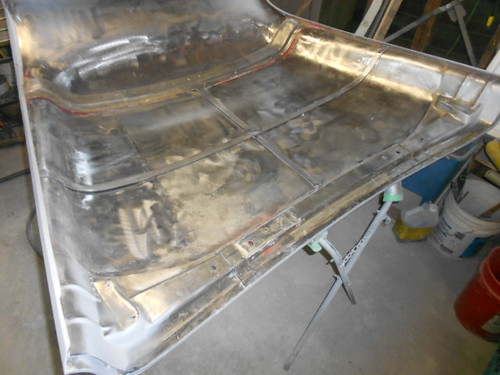
I remember we were talking a talking sheetmetal so I snapped this pics for you. I used a 3/32 2% ceriated tungsten and 1/16 filler rod and tried to keep the smallest HAZ I could. Tig sheetmetal is great you can see how low the bead profile is and some of the metal finishing I started. Man you can hammer and dolly that HAZ to your hearts desire. 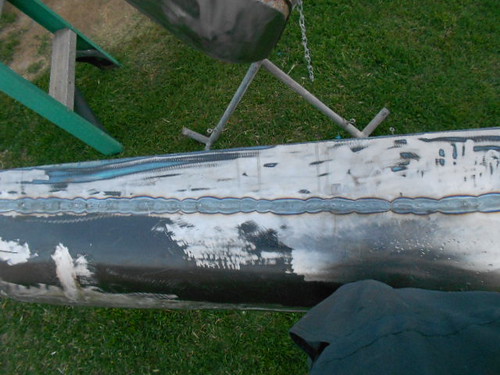 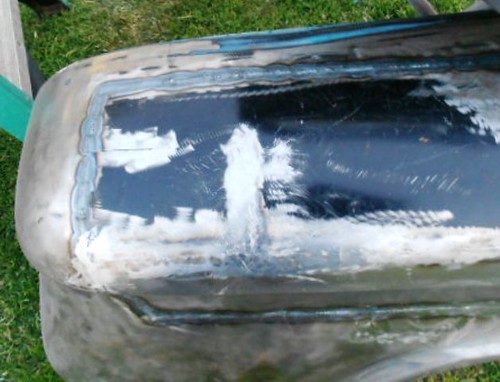 
Last edited by Kabwe; 05-06-2012 at 08:42 PM. |
|
|
|
|
05-06-2012, 01:47 PM
|
#965 |
|
56 - autocross
Join Date: Apr 2010
Location: Camarillo, Ca
Posts: 1,121
|
Re: Kabwe's aka Bam's build
what is the purpose to hammer haz? Is it done a certain way?
|
|
|
|
|
05-06-2012, 01:54 PM
|
#966 | |
|
Certified Car Nut
Join Date: Jan 2005
Location: Inglewood, California
Posts: 3,118
|
Re: Kabwe's aka Bam's build
Quote:
Over this years this truck was really used. Man this fender has dents and digs all alone the top area. I used a big red marker to color in the top which I will block sand to see the highs and lows. 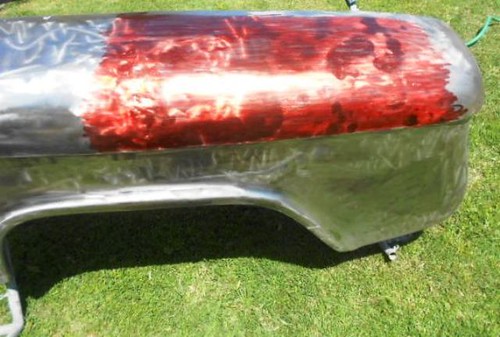 Weapons of choice 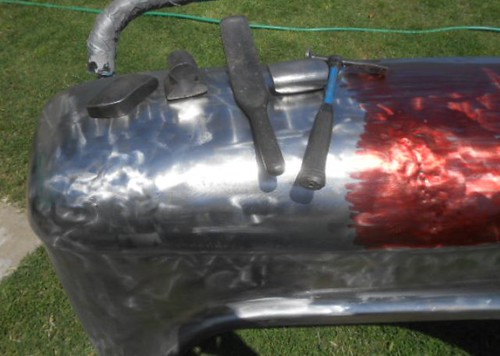 I also made this slapper and find it does a great job.  On the back side you must choose a dolly that is very close to the contour of the sheet metal. 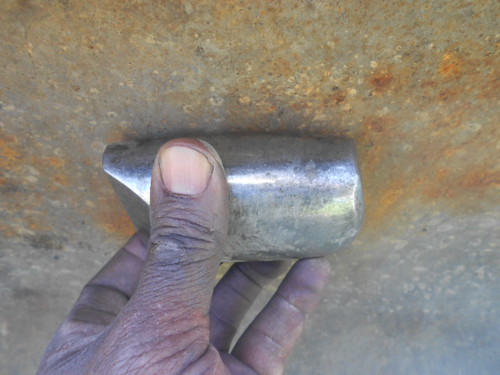 After sanding here is what I had  After the first use of my slapper and dolly I sanded again and here what I have. As you can see the low area is getting smaller. Sanding between hammer and dolly work shows me were I need to concentrate. 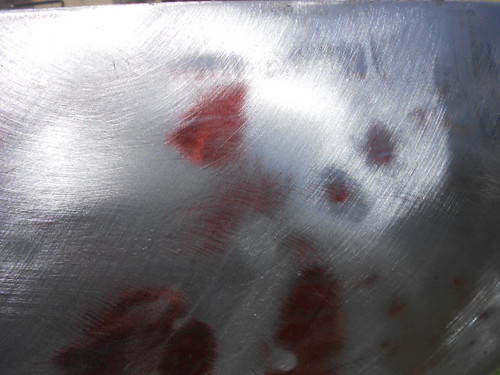 Worked some more and sanded and had this.  Here what I accomplished the first day, still a lot of work to do but a fender that most would have trashed or covered with way too much filler will be used with very little filler when done. After I remove all the major of the dents I will red marker again and try to fix all the imperfections. All the red markets that are left need to be worked but as you can see there is already a world of difference. 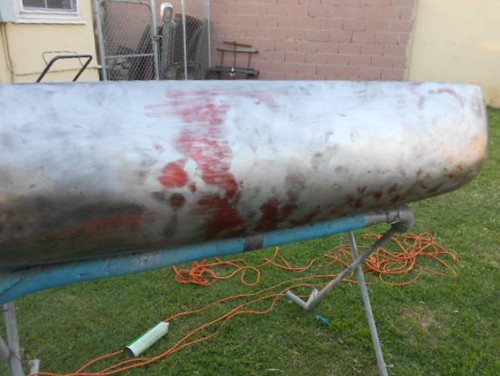 It just takes patience and work. Last edited by Kabwe; 05-06-2012 at 08:52 PM. |
|
|
|
|
|
05-06-2012, 02:04 PM
|
#967 | |
|
Certified Car Nut
Join Date: Jan 2005
Location: Inglewood, California
Posts: 3,118
|
Re: Kabwe's aka Bam's build
Quote:
Last edited by Kabwe; 05-06-2012 at 08:54 PM. |
|
|
|
|
|
05-06-2012, 02:10 PM
|
#968 |
|
56 - autocross
Join Date: Apr 2010
Location: Camarillo, Ca
Posts: 1,121
|
Re: Kabwe's aka Bam's build
Thanks. Do you do this with all haz areas after welding sheetmetal as a general rule? Also, what did u make the slapper from?
|
|
|
|
|
05-06-2012, 02:21 PM
|
#969 | |
|
Certified Car Nut
Join Date: Jan 2005
Location: Inglewood, California
Posts: 3,118
|
Re: Kabwe's aka Bam's build
Quote:
I made that slapper from some 1/4 thick metal you can also make them from old leaf springs. I have several slappers but I wanted one that was flat. Last edited by Kabwe; 05-06-2012 at 08:58 PM. |
|
|
|
|
|
05-06-2012, 05:44 PM
|
#970 |
|
Senior Member
Join Date: Mar 2011
Location: West Plains, Missouri
Posts: 7,555
|
Re: Kabwe's aka Bam's build
Kabwe, thanks for the lesson on sheet metal work. You do a great job and its good to see you pass along your knowledge....Jim
__________________
my build thread: http://67-72chevytrucks.com/vboard/s...d.php?t=459839 Jimbo's long bed step build:http://67-72chevytrucks.com/vboard/s...t=464626<br /> |
|
|
|
|
05-06-2012, 07:02 PM
|
#971 | |
|
Registered User
Join Date: May 2007
Location: Deale Md
Posts: 4,663
|
Re: Kabwe's aka Bam's build
Quote:
__________________
James 63 GMC V6 4speed carryall 65 chevy swb bbw V8 auto 68 K20 327/4 speed, buddy buckets 2002 GMC CC Dually Duramax 64 GMC lwb 3/4 V6 4speed SOLD 66 GMC swb bbw buddy buckets SOLD IG duallyjams The only thing that stays the same is constant change! |
|
|
|
|
|
05-06-2012, 08:44 PM
|
#972 | |
|
Certified Car Nut
Join Date: Jan 2005
Location: Inglewood, California
Posts: 3,118
|
Re: Kabwe's aka Bam's build
Quote:
|
|
|
|
|
|
05-06-2012, 09:40 PM
|
#973 |
|
Registered User
Join Date: Aug 2007
Location: Corona, California
Posts: 7,998
|
Re: Kabwe's aka Bam's build
Great info Bam.
Kim |
|
|
|
|
05-06-2012, 10:19 PM
|
#974 |
|
Registered User
Join Date: Feb 2011
Location: Boise, Idaho
Posts: 610
|
Re: Kabwe's aka Bam's build
Nice work, that's going to come out excellent.
|
|
|
|
|
05-06-2012, 10:50 PM
|
#975 |
|
Registered User
Join Date: Sep 2009
Location: Albuquerque, NM
Posts: 540
|
Re: Kabwe's aka Bam's build
Thanks for the tutorial. Every bit of info helps. Also I am sorry to hear about your friend and know that he would be happy to see the progress you have made on the fenders he gave you.
__________________
FAT MIKE My 59 http://67-72chevytrucks.com/vboard/s...d.php?t=400201 My 47 http://67-72chevytrucks.com/vboard/s...d.php?t=386848 |
|
|
|
 |
| Bookmarks |
|
|


 Linear Mode

