
|
Register or Log In To remove these advertisements. |
|
|
|
|||||||
 |
|
|
Thread Tools | Display Modes |
 03-07-2012, 12:26 PM
|
#101 |
|
Registered User
Join Date: Nov 2011
Location: Winlock Wa
Posts: 584
|
Re: My 1957 Chevy Truck "Journey"
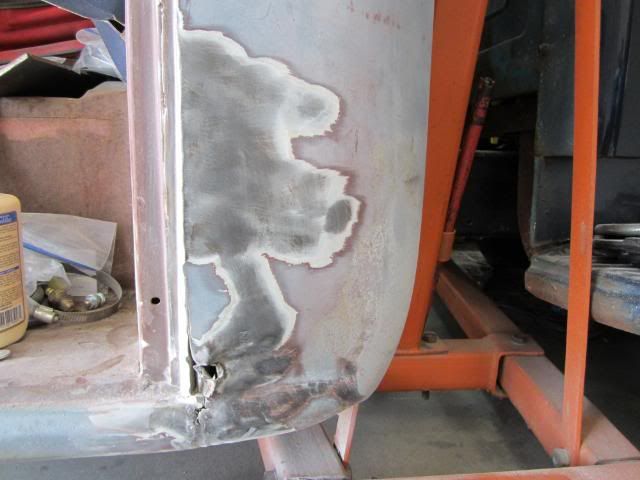
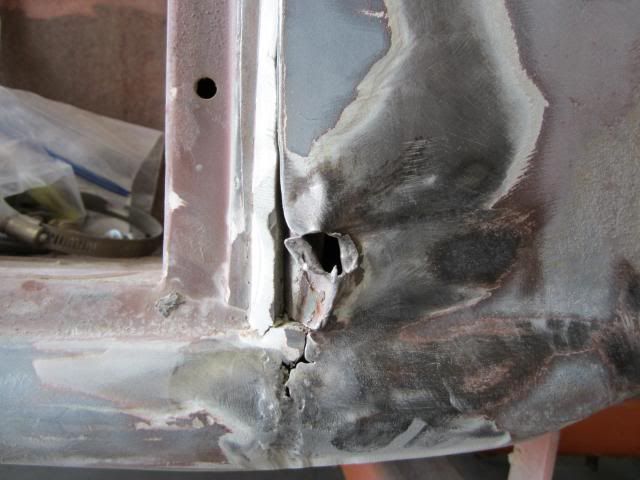
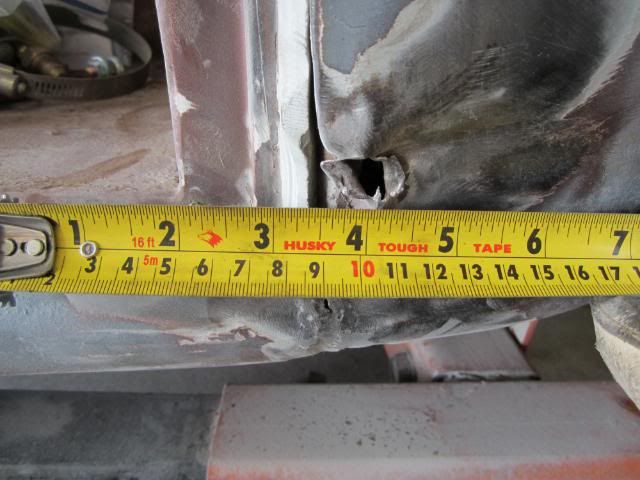
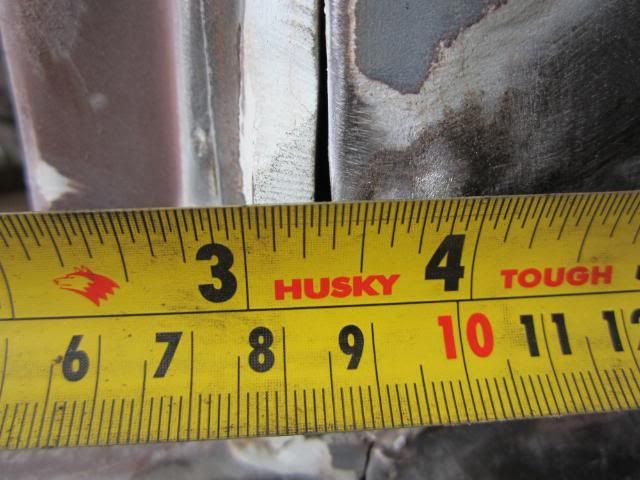
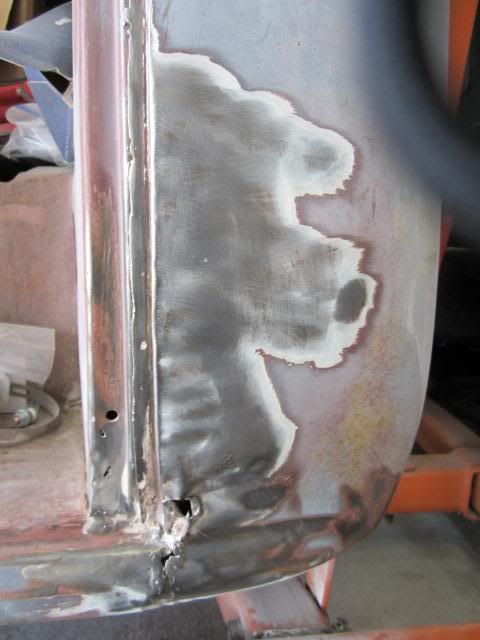
Not too bad really, looks like someone tried to squeeze thru the barn door and hooked it. It should weld up fine. The grinder, a 4" one can be your friend.
__________________
Retired and too busy to work. |

|

|
|
03-08-2012, 09:05 PM
|
#102 | |
|
'57 Rosa
 Join Date: Sep 2009
Location: Fitzgerald,GA
Posts: 162
|
Re: My 1957 Chevy Truck "Journey"
Quote:
__________________
My '57 Truck Build "Rosa" (Current Project) http://67-72chevytrucks.com/vboard/s...21#post4118721 2003 Dodge Dakota 4X4 (Daily Driver) Only two defining forces have ever died for us: CHRIST died for our salvation and VETERANS died for our freedoms. Glorify CHRIST and thank VETERANs  Dru~ USN Retired Dru~ USN Retired
|
|
|
|
|
|
03-08-2012, 09:25 PM
|
#103 |
|
Registered User
Join Date: Aug 2009
Location: Corinth, TX
Posts: 210
|
Re: My 1957 Chevy Truck "Journey"
^^Thanks that is good to know.
__________________
Better to have it and not need it, then to need it and not have it. Fork In The Road....Cummins Build My Build Thread... Alternative A/C Mounting for LS Engines 4L60E Transmission Rebuild Info Trailing Arm How To |
|
|
|
|
03-08-2012, 09:41 PM
|
#104 |
|
Registered User
Join Date: Aug 2009
Location: Corinth, TX
Posts: 210
|
Re: My 1957 Chevy Truck "Journey"
Well, I had previously made some engine mounts and did not like the way they sat when installed. So, I made some new ones. I have seen some like these for sale but, all the materials were free.....it was all made from scrap metal from around our shop. Maybe a little overkill on the tubing but oh, well.
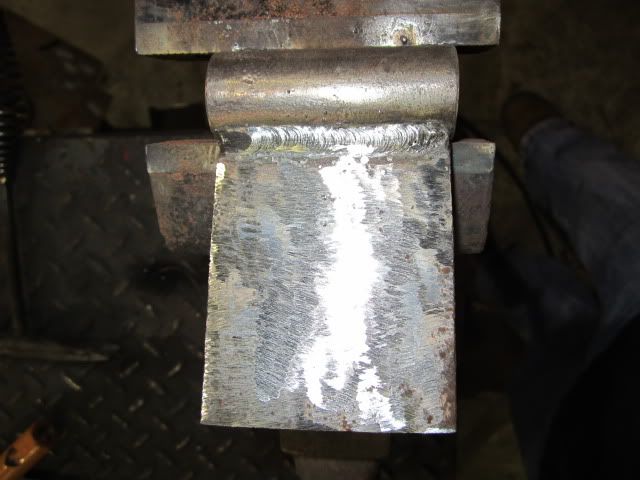 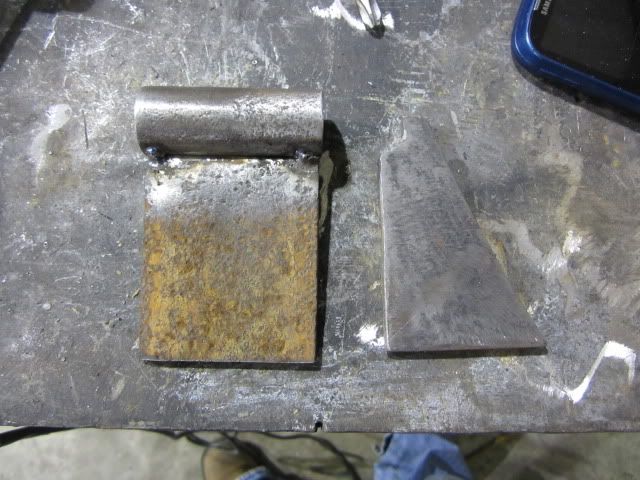 The parts I cut out. 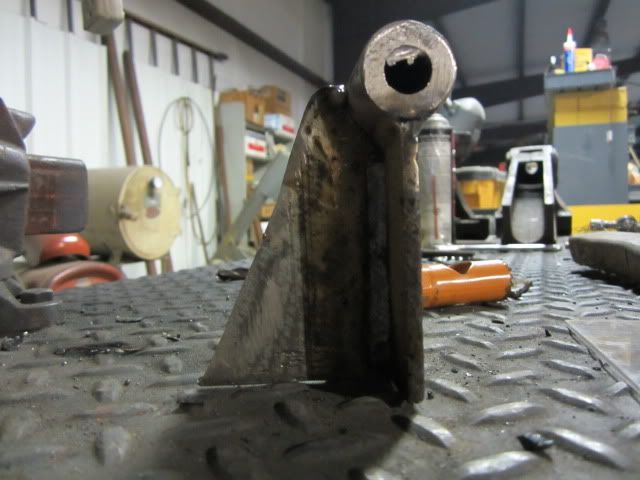 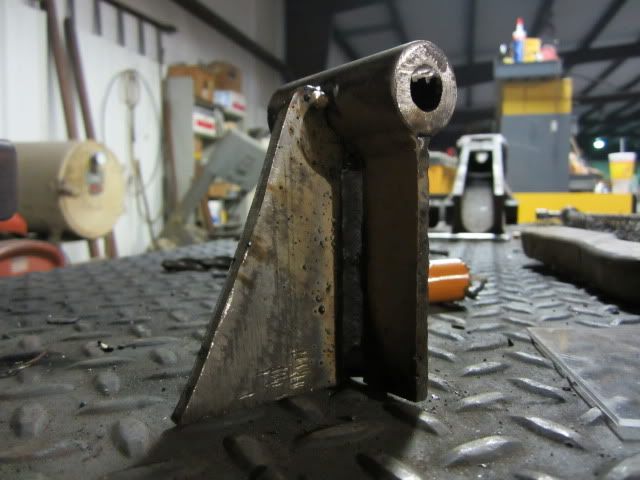 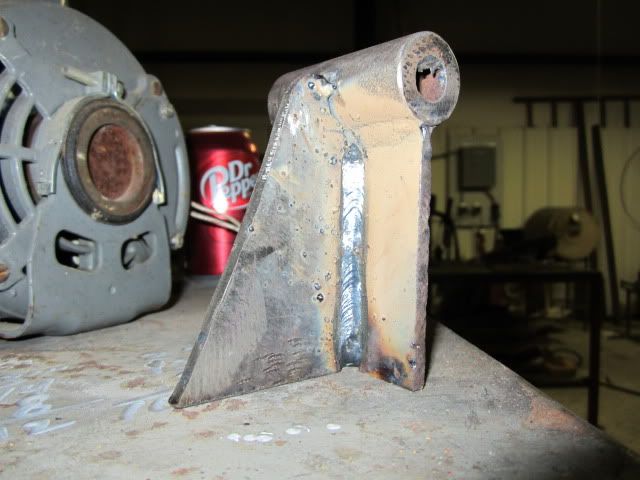 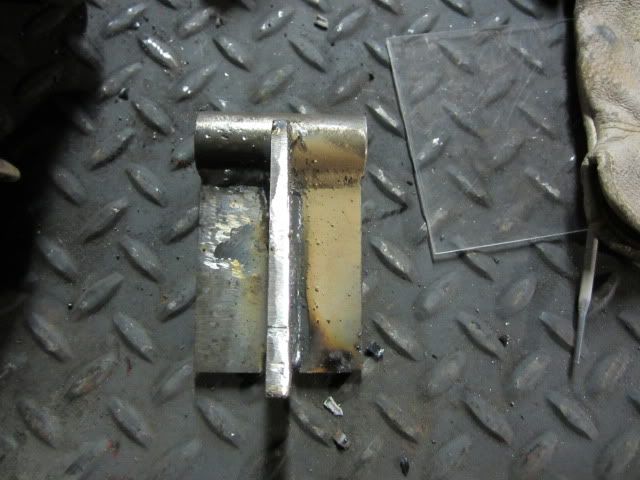 I need to finish welding them tomorrow...ran outta time today. And I will have to paint them too.
__________________
Better to have it and not need it, then to need it and not have it. Fork In The Road....Cummins Build My Build Thread... Alternative A/C Mounting for LS Engines 4L60E Transmission Rebuild Info Trailing Arm How To |
|
|
|
|
03-10-2012, 09:19 PM
|
#105 |
|
Registered User
Join Date: Feb 2004
Location: lynchburg ohio
Posts: 736
|
Re: My 1957 Chevy Truck "Journey"
Cool project!
|
|
|
|
|
03-10-2012, 09:38 PM
|
#106 | |
|
Registered User
Join Date: Aug 2009
Location: Corinth, TX
Posts: 210
|
Re: My 1957 Chevy Truck "Journey"
Thanks....Slow going but, its going...
 Quote:
__________________
Better to have it and not need it, then to need it and not have it. Fork In The Road....Cummins Build My Build Thread... Alternative A/C Mounting for LS Engines 4L60E Transmission Rebuild Info Trailing Arm How To |
|
|
|
|
|
03-17-2012, 11:22 PM
|
#107 |
|
Registered User
Join Date: Aug 2009
Location: Corinth, TX
Posts: 210
|
Re: My 1957 Chevy Truck "Journey"
I found the measurements that I was looking for regarding the older Camaro mounts that some have been using.
For one it is 2" from the base to the center of the bolt hole on them mount the other was 2-3/16" from the base to the center of the bolt hole. Now with those measurements I could not get my engine to sit level.....left to right. The only way I could get it level was to make the mount that was 2-3/16" taller....2-5/8"....now I have another problem. In order to get my 3* downward angle I have to lift the tail of the tranny too high....almost to where the tail shaft hits the cab....it is about 2" from the cab floor...I test fitted the drive line and it hits the cross-member behind the cab....granted the rear axle is hanging lower than it will be at ride height but, it still will not work. I think I am going to have to shorten the mounts to get it where it needs to be. I am open to suggestions too...I tried the heights for the mounts others have used but for some reason I could not get it to work. I just wonder if there engines are not centered and they are using the camaro mounts and it is actually offset like the engine in the camaro was to begin with??? Here are some pics for your viewing pleasure. 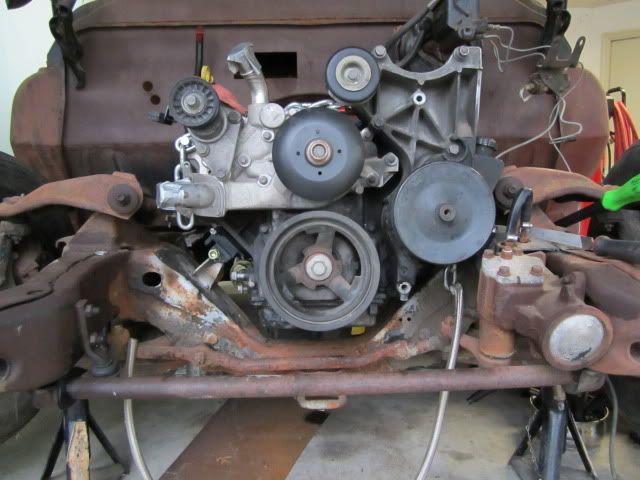 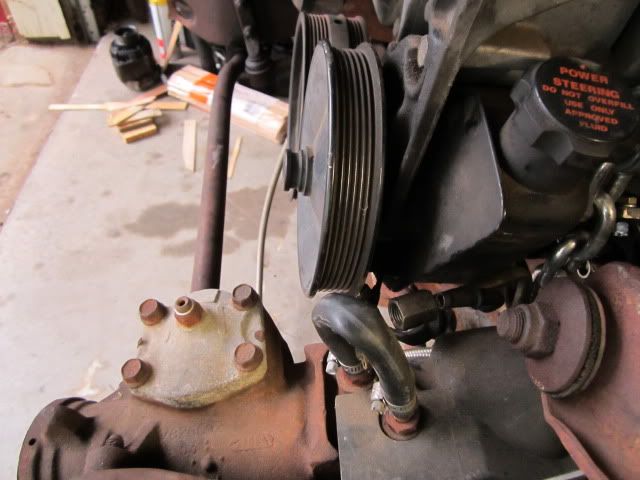 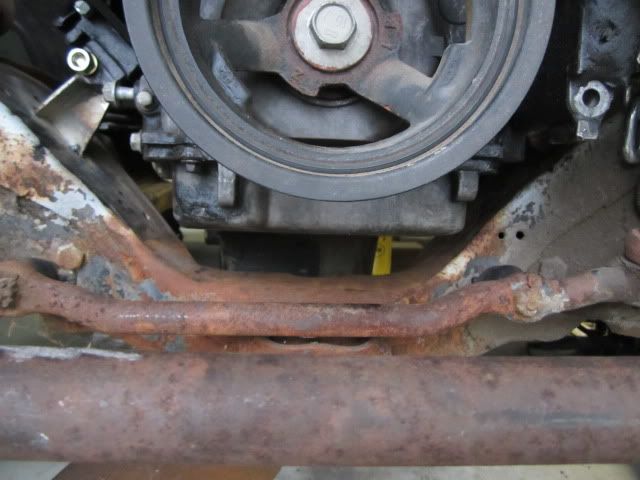 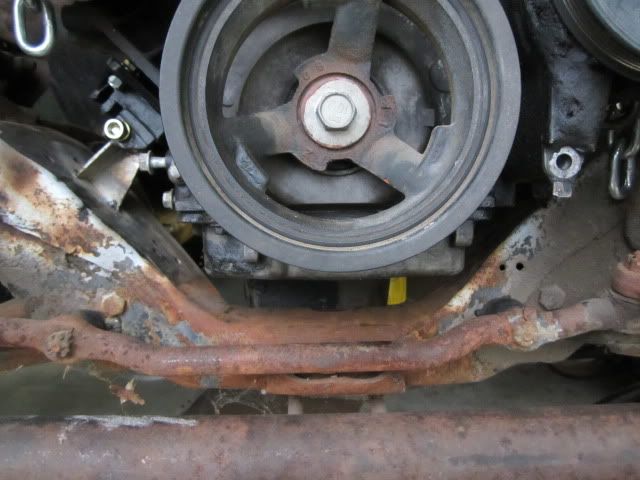  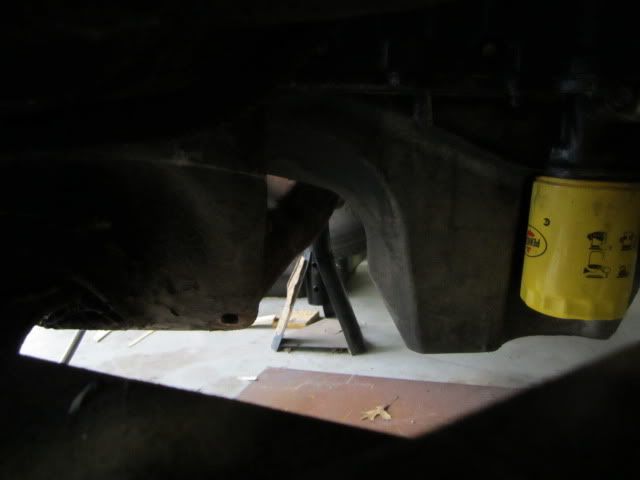
__________________
Better to have it and not need it, then to need it and not have it. Fork In The Road....Cummins Build My Build Thread... Alternative A/C Mounting for LS Engines 4L60E Transmission Rebuild Info Trailing Arm How To |
|
|
|
|
03-18-2012, 12:31 AM
|
#108 |
|
Registered User
Join Date: Aug 2007
Location: Corona, California
Posts: 7,998
|
Re: My 1957 Chevy Truck "Journey"
Tim
These things can be a real pain some times. Looking at the pics it seems the passenger side frame where the engine mount goes isn't as steep as the drivers side. If you want your engine centered in that area your mounts may need to be different lengths. As far as the tail shaft getting close to the cab mine did also. I'm just going to add a slight hump and not worry about it. You will probably have to modify your cross member to make it all work. Sorry I don't have better answers for you. Kim |
|
|
|
|
03-18-2012, 12:47 AM
|
#109 | |
|
Registered User
Join Date: Aug 2009
Location: Corinth, TX
Posts: 210
|
Re: My 1957 Chevy Truck "Journey"
Thanks Kim...
Yea, the camaro clips are not symmetrical on the cross-member at all.....I know in the camaro's these engines favored the passenger side to make room on the driver side to clear all the stuff over there. I have been looking at some stuff on LSTech to where people have swapped these in the second gen camaro's but, what they are doing/using I cannot get to work. I like the clearance that I have...but not too sure about modding that cross member....If I can clear everything up front I might lower it some....not sure though at this point. Quote:
__________________
Better to have it and not need it, then to need it and not have it. Fork In The Road....Cummins Build My Build Thread... Alternative A/C Mounting for LS Engines 4L60E Transmission Rebuild Info Trailing Arm How To |
|
|
|
|
|
03-18-2012, 10:36 AM
|
#110 |
|
Registered User
Join Date: Aug 2007
Location: Corona, California
Posts: 7,998
|
Re: My 1957 Chevy Truck "Journey"
I would watch the oil pan location more than anything else.
If you're going to have your truck lowered it may present a problem. I made sure I got mine level with the bottom of the cross member and went from there. Holley makes a swap pan that has a shallower sump but I found it a bit pricey. Kim |
|
|
|
|
03-18-2012, 11:02 AM
|
#111 |
|
Registered User
Join Date: Aug 2009
Location: Corinth, TX
Posts: 210
|
Re: My 1957 Chevy Truck "Journey"
Yea, it still has the truck pan on it and I am looking to get an LS1 pan.....If I kept the truck pan on then I would have to go up quite a bit more and that would make even more issues. At its current height it would actually be above the cross member by about an inch or so, with an LS1 pan on there.
I am kinda like you ......I want to stay with the cast aluminum pan....do to the structural rigidity that the pan adds to the bottom end. Might not be much but it is more than a shetmetal pan.
__________________
Better to have it and not need it, then to need it and not have it. Fork In The Road....Cummins Build My Build Thread... Alternative A/C Mounting for LS Engines 4L60E Transmission Rebuild Info Trailing Arm How To |
|
|
|
|
03-19-2012, 11:53 PM
|
#112 |
|
Registered User
Join Date: Sep 2011
Location: Out There
Posts: 88
|
Re: My 1957 Chevy Truck "Journey"
Tim
I wouldn't try and get that motor down so deep in the crossmember. There are many people who raise a sbc because it looks so deep in the bay....... when they put a gen I sbc in the stock camaro clip local. I would imagine there is plenty of vertical real estate for you to raise that LS1 aswell. probably save you a lot of headaches and maybe look better from the topside when you are done to? My son has an LS1 and they have oil leak issues something to do with the pan. Apparently a labor some fix to? If you do change the pan maybe look up the pan leak issue fix at the same time? Gonna be killer. I like the stance and the front wheels location looks perfect. 
|
|
|
|
|
03-21-2012, 02:05 PM
|
#113 | |
|
'57 Rosa
Join Date: Sep 2009
Location: Fitzgerald,GA
Posts: 162
|
Re: My 1957 Chevy Truck "Journey"
Quote:
__________________
My '57 Truck Build "Rosa" (Current Project) http://67-72chevytrucks.com/vboard/s...21#post4118721 2003 Dodge Dakota 4X4 (Daily Driver) Only two defining forces have ever died for us: CHRIST died for our salvation and VETERANS died for our freedoms. Glorify CHRIST and thank VETERANs Dru~ USN Retired
|
|
|
|
|
|
03-21-2012, 03:10 PM
|
#114 |
|
Registered User
Join Date: Aug 2009
Location: Corinth, TX
Posts: 210
|
Re: My 1957 Chevy Truck "Journey"
^^^ Thanks for that....I now have one of those books.
__________________
Better to have it and not need it, then to need it and not have it. Fork In The Road....Cummins Build My Build Thread... Alternative A/C Mounting for LS Engines 4L60E Transmission Rebuild Info Trailing Arm How To |
|
|
|
|
04-24-2012, 07:25 PM
|
#115 |
|
Registered User
Join Date: Aug 2009
Location: Corinth, TX
Posts: 210
|
Re: My 1957 Chevy Truck "Journey"
Ok, after making a mountain out of a mole hill. I finally got my engine mounts and positioning sorted out.
I ended up measuring the stock mounts for a camaro (frame mount) and it was 1-1/8" from the bottom to the center of the bolt hole...then I measured the "elephant ear" mount that bolts to the engine and found that mine were 2-15/16" to the center of the bolt hole. Note: Mine were actually for a truck, I found that out later and found that the height for the camaro version is close to 2" to the center of the bolt hole. So, what I did was take that measurement and add it to the frame mount...which yielded 3-1/8" total height. The engine mounts on the LS conversion kit are 2-3/16" from base to center of the bolt hole....then add the 1/4" for the mounting plate to get 2-7/16" so I just made my counts right at 2" from base to center of bolt hole...which lifted the engine a little over an 1" from the stock camaro location. It looks good to me and it is offset to the passenger side just like in the camaro and I am going to have to redo the trans cross member due to the offset. So, I used a laser and plumb bobs and hung on off the diff, trans tailshaft and check to make sure all is in line and it was dead on. Here are a few pics of the mounts and the position of the trans in the tunnel, I will definitely have to mod the trans tunnel but, I was going to do that anyway. Oh, and another thing....I have found a T56 at a good price I hope to be able to get it this weekend. From all the measurements on the T56 that I have found on the net...it looks like I will have to cut into the front brace right behind the trans tunnel....I will know more when I get the trans. 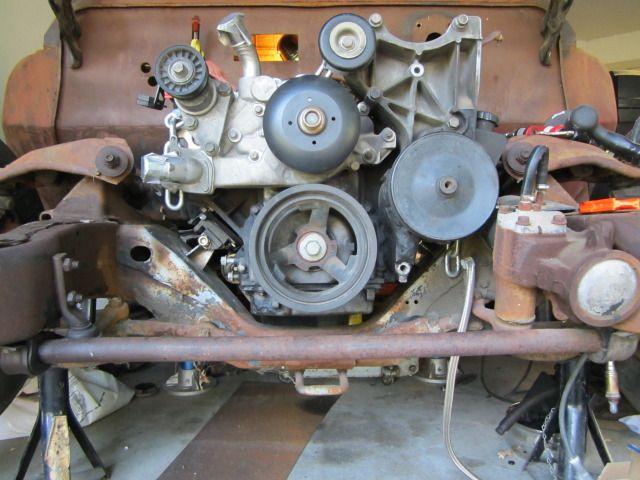  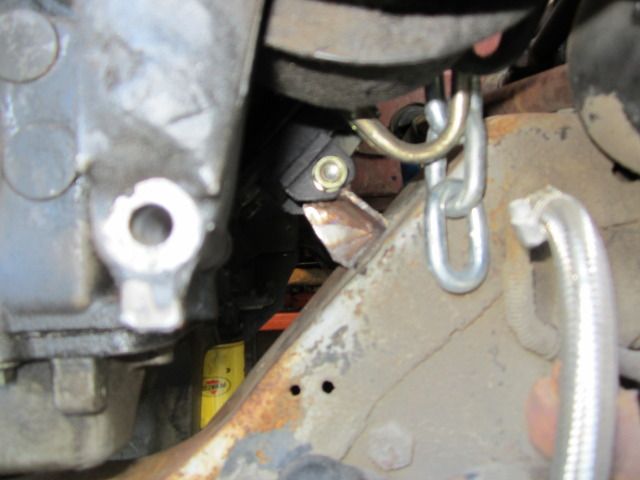 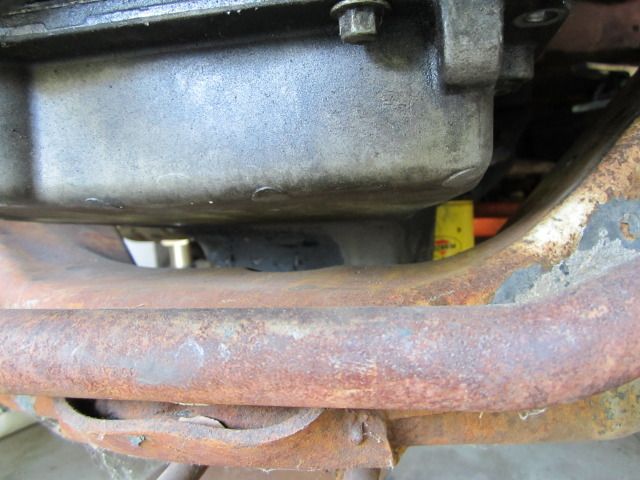 This is the truck pan and I will replace it with the LS1 pan before I am finished. 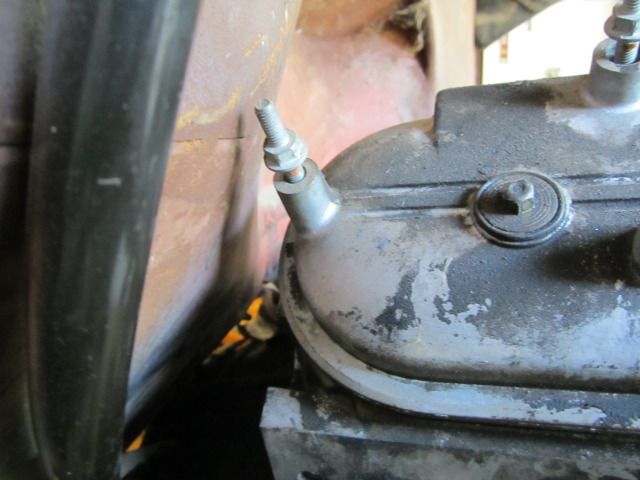 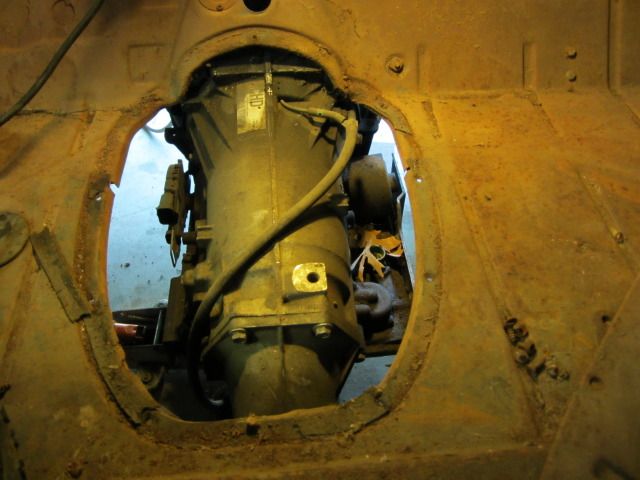
__________________
Better to have it and not need it, then to need it and not have it. Fork In The Road....Cummins Build My Build Thread... Alternative A/C Mounting for LS Engines 4L60E Transmission Rebuild Info Trailing Arm How To |
|
|
|
|
04-24-2012, 07:38 PM
|
#116 |
|
Registered User
Join Date: Aug 2007
Location: Corona, California
Posts: 7,998
|
Re: My 1957 Chevy Truck "Journey"
Cool. It's always a big step when you get the engine mocked up.
Kim |
|
|
|
|
04-24-2012, 09:00 PM
|
#117 |
|
Senior Member
Join Date: Nov 2008
Location: Fannystelle, Manitoba, Canada
Posts: 849
|
Re: My 1957 Chevy Truck "Journey"
Looks really good.
__________________
Jean-Marc Lacasse 57 GMC 55 GMC 55 Belair 99 S10 http://67-72chevytrucks.com/vboard/s...d.php?t=316140 http://67-72chevytrucks.com/vboard/s...d.php?t=806011 |
|
|
|
|
04-24-2012, 09:05 PM
|
#118 | ||
|
Registered User
Join Date: Aug 2009
Location: Corinth, TX
Posts: 210
|
Re: My 1957 Chevy Truck "Journey"
Quote:
Quote:
JML55 good to see you back on the board....How is your truck coming along? I failed to mention that the mounts that I made are the same height on both sides.
__________________
Better to have it and not need it, then to need it and not have it. Fork In The Road....Cummins Build My Build Thread... Alternative A/C Mounting for LS Engines 4L60E Transmission Rebuild Info Trailing Arm How To |
||
|
|
|
|
04-24-2012, 09:06 PM
|
#119 |
|
Registered User
Join Date: Dec 2009
Location: Melbourne Australia
Posts: 549
|
Re: My 1957 Chevy Truck "Journey"
Yep its looking real good!
__________________
RIP John (Lambis), my beloved Father & best Friend. My Build 56 GMC http://67-72chevytrucks.com/vboard/s...d.php?t=486721 |
|
|
|
|
04-24-2012, 09:07 PM
|
#120 | |
|
Registered User
Join Date: Aug 2009
Location: Corinth, TX
Posts: 210
|
Re: My 1957 Chevy Truck "Journey"
Thanks Red...yours is looking good too!!! Especially that engine!
Quote:
__________________
Better to have it and not need it, then to need it and not have it. Fork In The Road....Cummins Build My Build Thread... Alternative A/C Mounting for LS Engines 4L60E Transmission Rebuild Info Trailing Arm How To |
|
|
|
|
|
04-25-2012, 04:04 PM
|
#121 |
|
Registered User
Join Date: Aug 2009
Location: Corinth, TX
Posts: 210
|
Re: My 1957 Chevy Truck "Journey"
Ok, I have a question.
Has anyone installed power brakes under the floor with a standard transmission?? I am needing to purchase a brake pedal setup seeing how my original disappeared and I was looking at the speedway motors unit. But, it states automatic only not for use with factory clutch pedal. Then I found these.....but, man that is pricey!!! I don't need all that stuff just the pedal assembly. What would be my other alternative?? Any one have a clutch and brake pedal assembly they want to get rid of??
__________________
Better to have it and not need it, then to need it and not have it. Fork In The Road....Cummins Build My Build Thread... Alternative A/C Mounting for LS Engines 4L60E Transmission Rebuild Info Trailing Arm How To |
|
|
|
|
02-08-2013, 12:43 PM
|
#122 |
|
Registered User
Join Date: Sep 2010
Location: Plano, TX
Posts: 319
|
Re: My 1957 Chevy Truck "Journey"
Im at the same point too. You can have it on the chassis is you decide to use a cable or hydraulic throw out bearing because the Z bar and clutch fork will be gone. I am going to use hydraulic on mine since they make em for the muncie. HTH
__________________
My '59 Build Thread |
|
|
|
|
08-05-2013, 11:44 PM
|
#123 |
|
Registered User
Join Date: Aug 2009
Location: Corinth, TX
Posts: 210
|
Re: My 1957 Chevy Truck "Journey"
Have not posted here in a long time. Well, I hope to get to working on the truck soon. We had an addition to the family in November...now that makes 3 and there birthdays are all the same week of November and they are 10, 6 and new born...LOL! Well, nothing has been done to the truck since last April I am waiting for this good ol Texas heat to calm down a little...happy wrenching guys.
T
__________________
Better to have it and not need it, then to need it and not have it. Fork In The Road....Cummins Build My Build Thread... Alternative A/C Mounting for LS Engines 4L60E Transmission Rebuild Info Trailing Arm How To |
|
|
|
|
08-12-2013, 08:49 PM
|
#124 |
|
Navy Radioman Veteran
Join Date: Jul 2007
Location: Western Kentucky
Posts: 1,350
|
Re: My 1957 Chevy Truck "Journey"
Hang in there... I sat on mine for 24 years and finally decided to get back on it 2 months ago... big progresses in the last 60 days.
Family comes first.
__________________
1987 Chevrolet R10 Silverado BBC Build thread - SOLD 1986 GMC Sierra Classic - SOLD 1957 Chevy Step Side - At the Body Shop Daily Driver; 2005 Chevrolet Silverado 4x4 Z71 Stepside |
|
|
|
|
02-18-2014, 02:42 AM
|
#125 |
|
Registered User
Join Date: Jun 2012
Location: alberta
Posts: 9
|
Re: My 1957 Chevy Truck "Journey"
hi, what is the title of this book with the spot weld locations?
|
|
|
|
|
| Bookmarks |
|
|


 Linear Mode

