
|
 07-28-2011, 09:44 PM
|
#51 |
|
Custom Builder
 Join Date: Jun 2003
Location: Carlsbad, California
Posts: 908
|
Re: 1966 K20 Project
Thanks! It is coming along slowly.
I have a bunch of sheetmetal finished in DP now. Just the Cab, Doors and Hood to finish straightening before we start test fitting for gaps and high build primer. The block sanding will be the longest work, but I want it straight for the paint we are using.
__________________
1932 Chevy Roadster Car and Pick-Up - http://67-72chevytrucks.com/vboard/s...d.php?t=465709 1966 K20 Factory 4X4 - http://67-72chevytrucks.com/vboard/s...d.php?t=455484 (Sold) 1972 K5 Blazer (Sold) - http://67-72chevytrucks.com/vboard/s...ad.php?t=87530 2007 TrailBlazer SS - http://67-72chevytrucks.com/vboard/s...34#post4706534 |

|

|
|
07-29-2011, 04:49 PM
|
#52 |
|
What?
Join Date: Jun 2007
Location: Southern California
Posts: 7,617
|
Re: 1966 K20 Project
Good lookin build!
Curious as to where you had the media blast done for the cab and other sheet metal? I am North of you in the Temecula area. What kind of cash did you have to drop on the whole media blast project?
__________________
Chris 1968 K20 Suburban 1972 K10 LWB PU |
|
|
|
|
07-29-2011, 05:23 PM
|
#53 | |
|
Custom Builder
Join Date: Jun 2003
Location: Carlsbad, California
Posts: 908
|
Re: 1966 K20 Project
Quote:
__________________
1932 Chevy Roadster Car and Pick-Up - http://67-72chevytrucks.com/vboard/s...d.php?t=465709 1966 K20 Factory 4X4 - http://67-72chevytrucks.com/vboard/s...d.php?t=455484 (Sold) 1972 K5 Blazer (Sold) - http://67-72chevytrucks.com/vboard/s...ad.php?t=87530 2007 TrailBlazer SS - http://67-72chevytrucks.com/vboard/s...34#post4706534 |
|
|
|
|
|
08-11-2011, 08:04 PM
|
#54 |
|
Custom Builder
Join Date: Jun 2003
Location: Carlsbad, California
Posts: 908
|
Re: 1966 K20 Project
A few better pictures and some small finish work.
VAC/Tach Gauge Cluster - Polished up the Chrome a little. Now it is hard to take pictures! 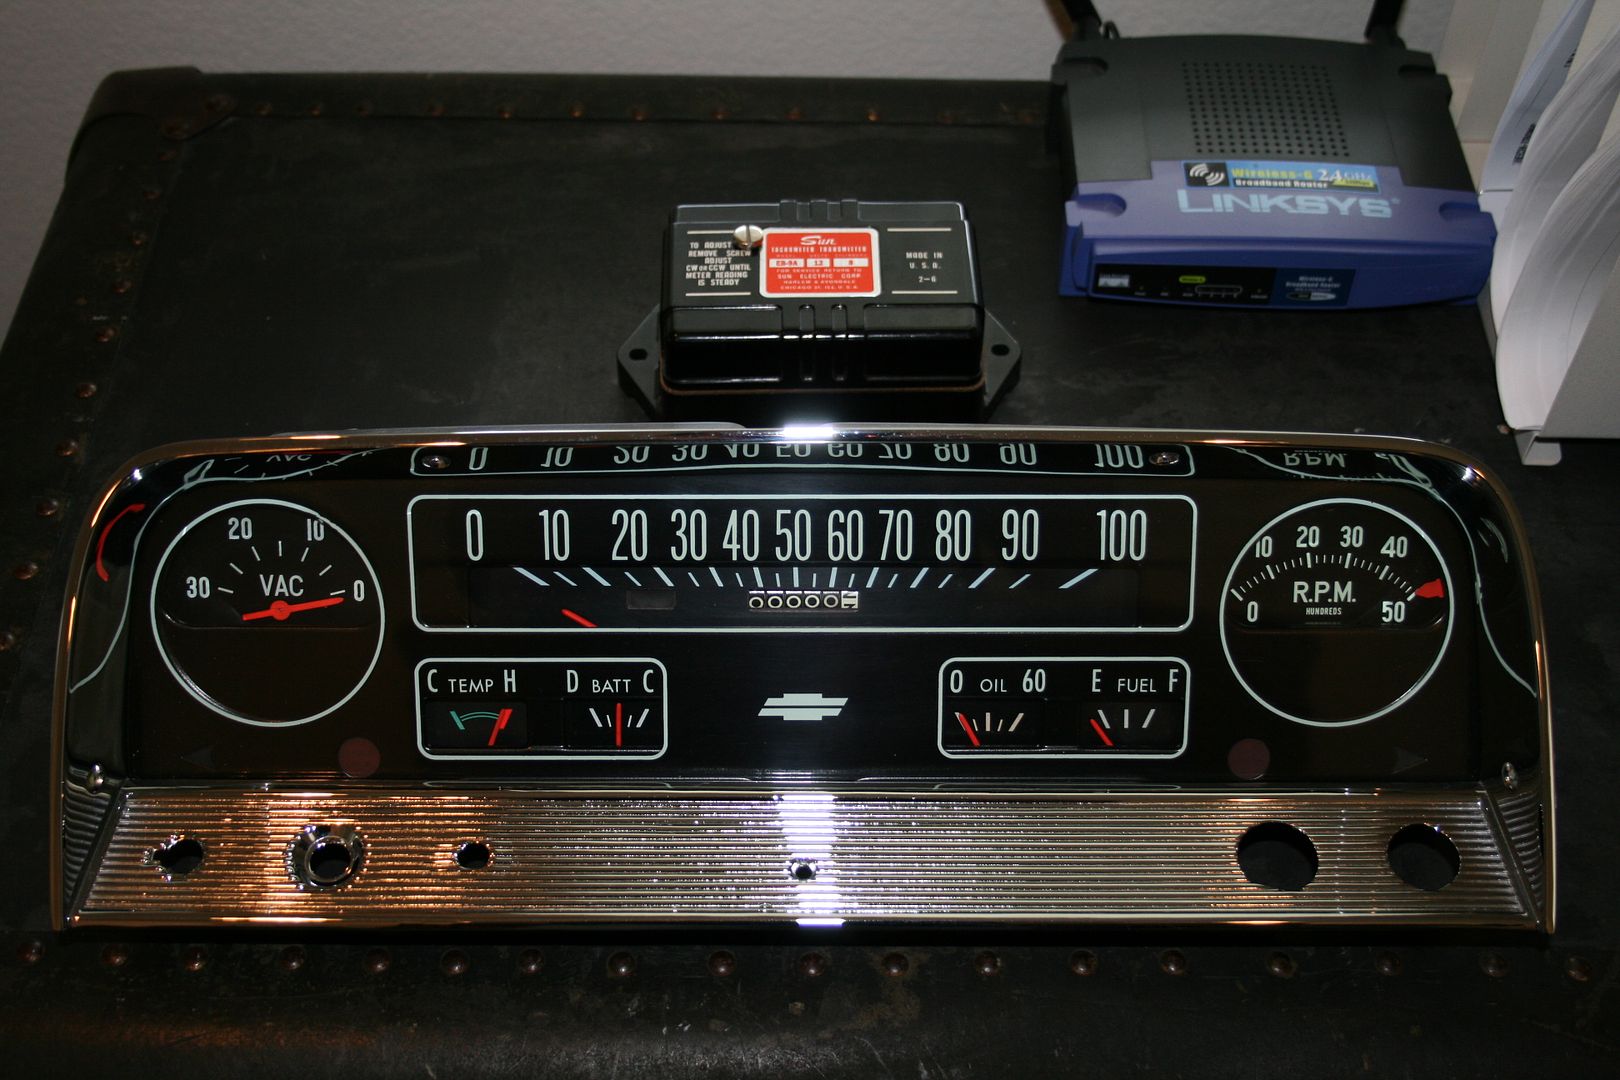 Factory AM Radio - I picked this up and just cleaned it all up. It has a couple of small pits in the original chrome. I will rechrome the face at a later date. 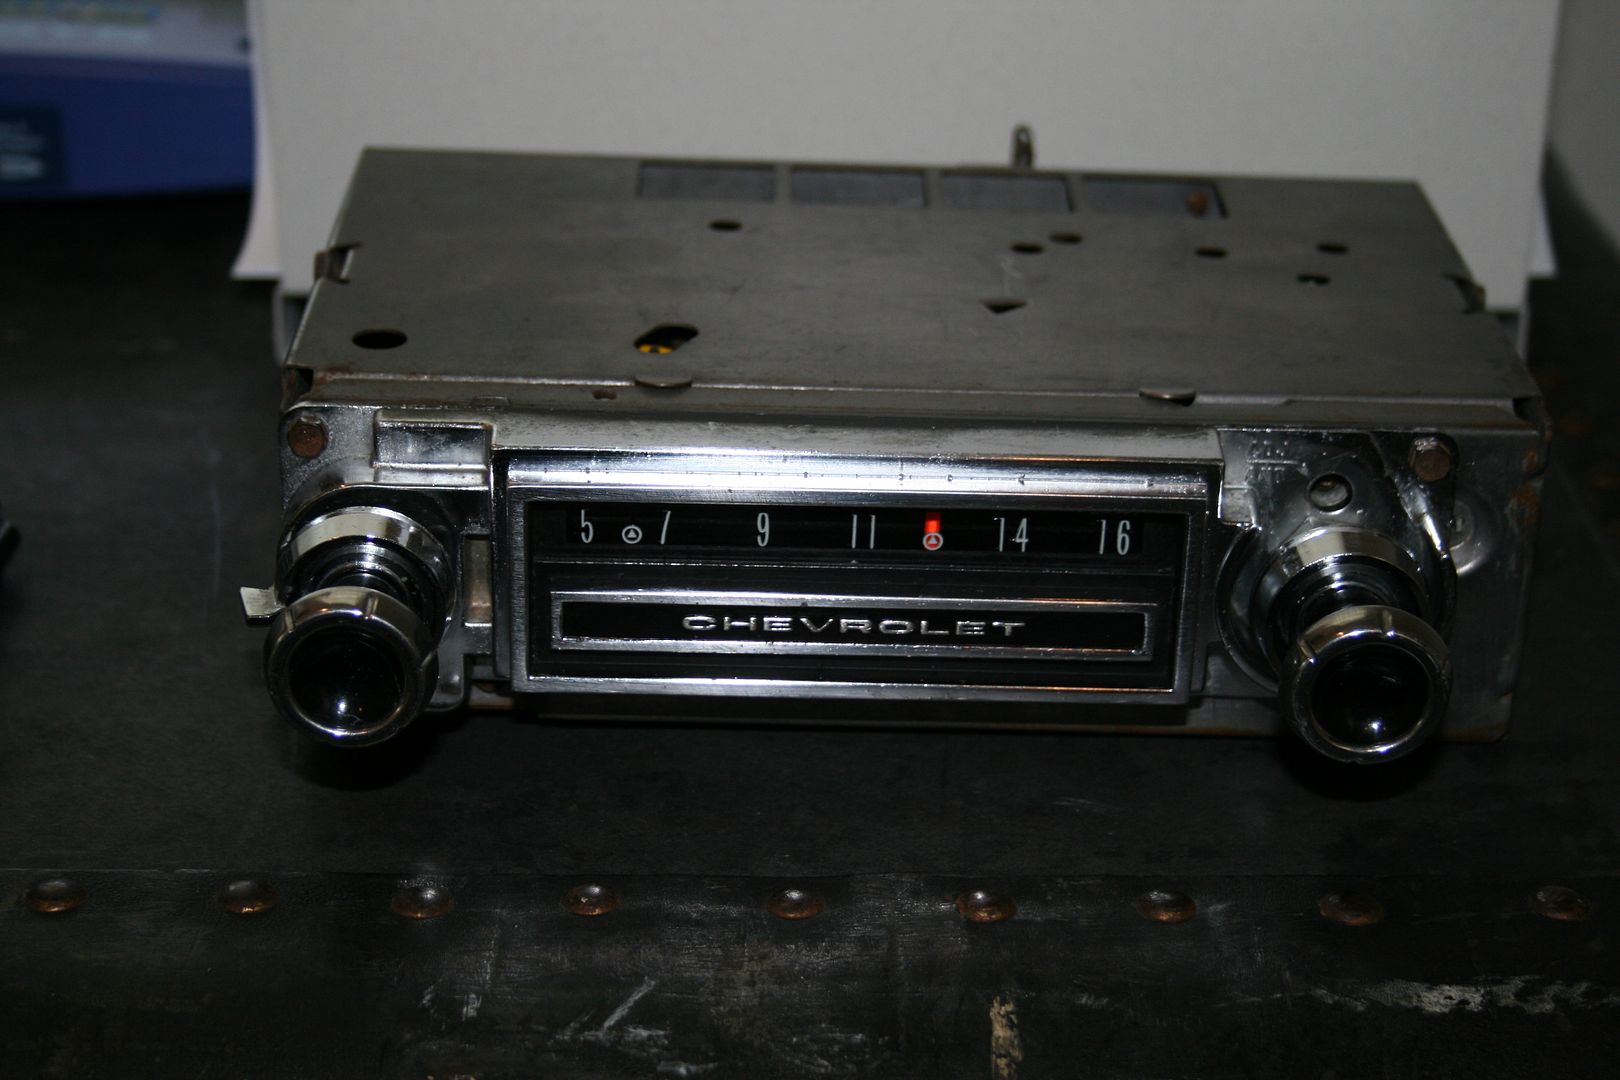 1966 Deluxe Steering Wheel - I picked this up and have plans to do it custom with Gloss Black in the center and Satin Black on the top and bottom. The Gloss and Satin will be seperated by the stainless rings.  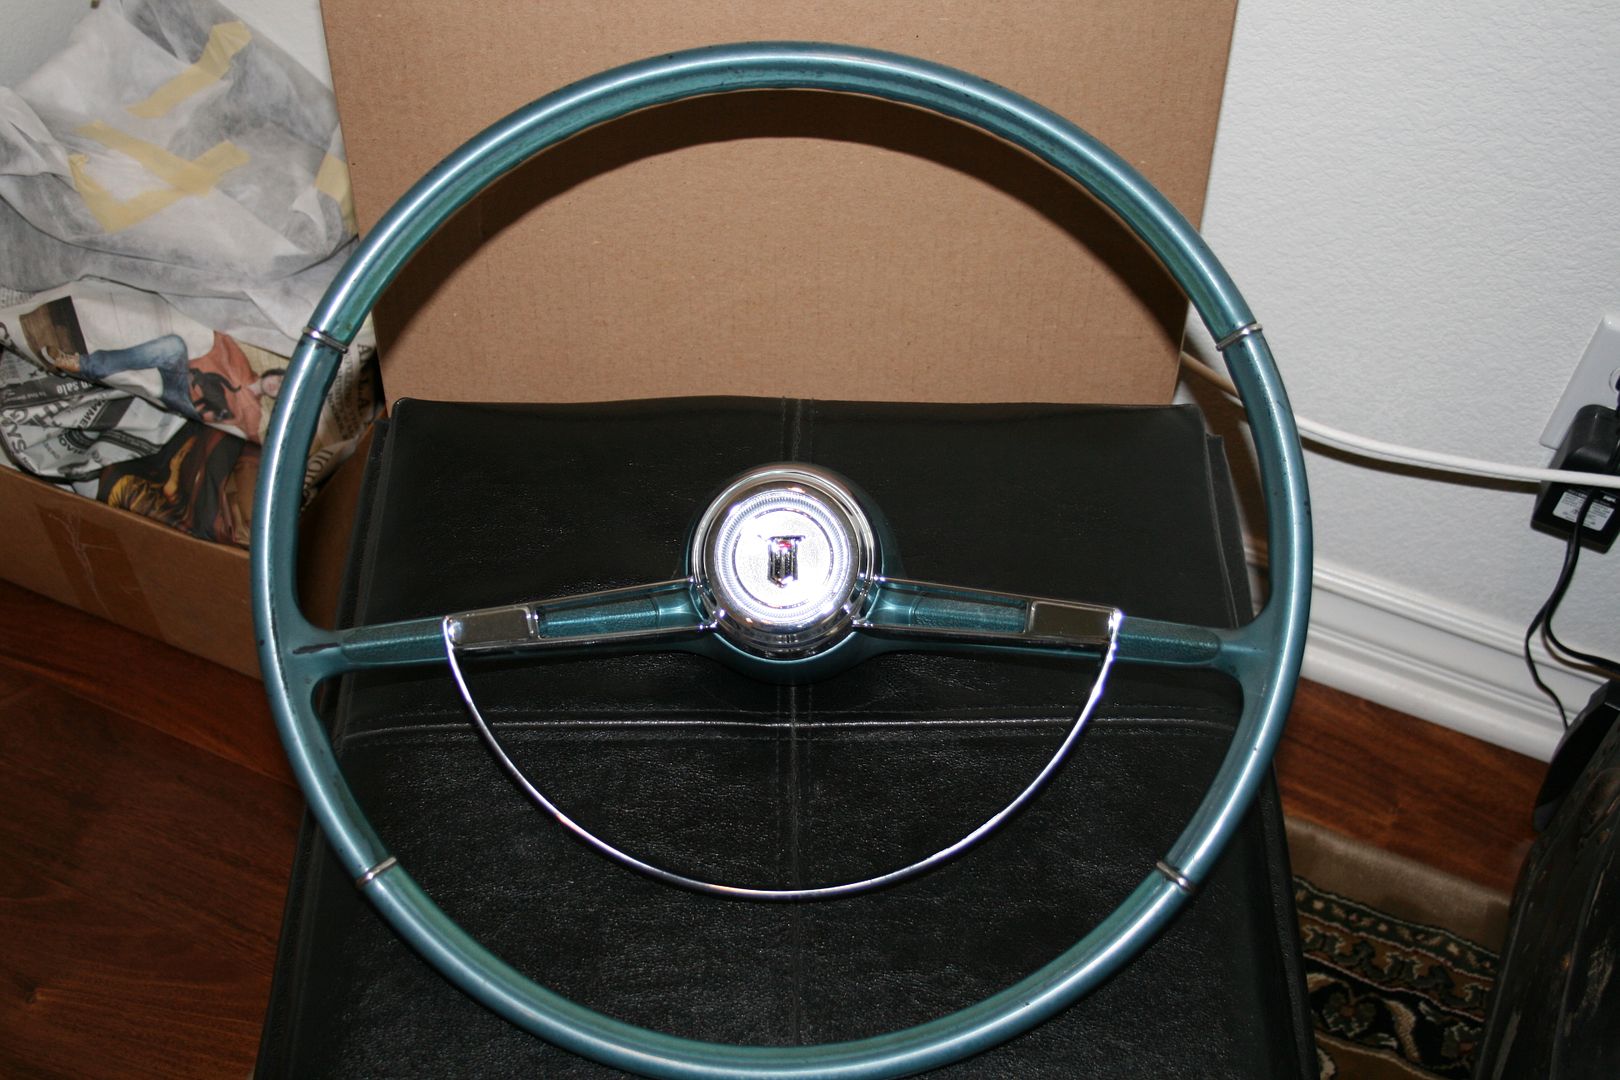
__________________
1932 Chevy Roadster Car and Pick-Up - http://67-72chevytrucks.com/vboard/s...d.php?t=465709 1966 K20 Factory 4X4 - http://67-72chevytrucks.com/vboard/s...d.php?t=455484 (Sold) 1972 K5 Blazer (Sold) - http://67-72chevytrucks.com/vboard/s...ad.php?t=87530 2007 TrailBlazer SS - http://67-72chevytrucks.com/vboard/s...34#post4706534 Last edited by LeftCoast32; 08-11-2011 at 08:51 PM. |
|
|
|
|
08-11-2011, 10:28 PM
|
#55 |
|
Resident of Here
Join Date: May 2008
Location: Wesley Chapel, FL, USA
Posts: 7,716
|
Re: 1966 K20 Project
Nice bling!
__________________
~Bradley~ 2004 Black GTO LS2/T56 too much to list  Miss having a truck 
|
|
|
|
|
08-11-2011, 10:59 PM
|
#56 |
|
Junk Yartist
Join Date: Jul 2009
Location: Greeley, CO
Posts: 2,203
|
Re: 1966 K20 Project
I'm liking this build so far!
__________________
-Jeremy YOU ONLY FAIL IF YOU STOP TRYING 70 Crew Cab Build Link 70 GMC Suburban 4X4 build thread 95 Yukon Daily Driver Rebuilding an NP205 |
|
|
|
|
08-12-2011, 10:51 AM
|
#57 |
|
Custom Builder
Join Date: Jun 2003
Location: Carlsbad, California
Posts: 908
|
Re: 1966 K20 Project
Thanks!
Everything is getting done slowly. I only work on the parts as I have spare time with my business. We have the Front Fenders, Grill Surround, 3 Cowl Pieces and door panels finished in DP. We are still working on the Doors and Hood before starting on the Cab. We are straightening the metal as much as possible before the DP is shot. Once all the metal work is done we will get it all shot in High Build Primer and start Block Sanding the front sheet metal. The Bed will be last. I still have to disassemble the bed I have now for the sides. I have a '72 Steel Bed Floor that I will use, I am not a fan of the wood floors in a shop truck that gets used all the time. I will use Mar-K for the Front Bed Panel, Tailgate and then the Inner Fenders from the 67-72 bed to match the '72 Steel Bed Floor I have.
__________________
1932 Chevy Roadster Car and Pick-Up - http://67-72chevytrucks.com/vboard/s...d.php?t=465709 1966 K20 Factory 4X4 - http://67-72chevytrucks.com/vboard/s...d.php?t=455484 (Sold) 1972 K5 Blazer (Sold) - http://67-72chevytrucks.com/vboard/s...ad.php?t=87530 2007 TrailBlazer SS - http://67-72chevytrucks.com/vboard/s...34#post4706534 Last edited by LeftCoast32; 08-12-2011 at 11:51 AM. |
|
|
|
|
09-14-2011, 12:33 PM
|
#58 |
|
Custom Builder
Join Date: Jun 2003
Location: Carlsbad, California
Posts: 908
|
Re: 1966 K20 Project
Up For Sale - http://67-72chevytrucks.com/vboard/c...p?product=5750
__________________
1932 Chevy Roadster Car and Pick-Up - http://67-72chevytrucks.com/vboard/s...d.php?t=465709 1966 K20 Factory 4X4 - http://67-72chevytrucks.com/vboard/s...d.php?t=455484 (Sold) 1972 K5 Blazer (Sold) - http://67-72chevytrucks.com/vboard/s...ad.php?t=87530 2007 TrailBlazer SS - http://67-72chevytrucks.com/vboard/s...34#post4706534 Last edited by LeftCoast32; 09-14-2011 at 09:09 PM. |
|
|
|
|
09-14-2011, 09:10 PM
|
#59 | |
|
Custom Builder
Join Date: Jun 2003
Location: Carlsbad, California
Posts: 908
|
Re: 1966 K20 Project
Quote:
Everything in this thread goes with it for the asking price in the for sale section. This includes everything from the '64 parts truck (no frame), and all the other parts like axles, wheels, other restored and chrome parts..
__________________
1932 Chevy Roadster Car and Pick-Up - http://67-72chevytrucks.com/vboard/s...d.php?t=465709 1966 K20 Factory 4X4 - http://67-72chevytrucks.com/vboard/s...d.php?t=455484 (Sold) 1972 K5 Blazer (Sold) - http://67-72chevytrucks.com/vboard/s...ad.php?t=87530 2007 TrailBlazer SS - http://67-72chevytrucks.com/vboard/s...34#post4706534 |
|
|
|
|
|
09-16-2011, 06:44 AM
|
#60 |
|
Junior Member
Join Date: Jun 2004
Location: Murfreesboro, Tn
Posts: 1,092
|
Re: 1966 K20 Project
Sorry too see your K10 up for sale again. Some one is gong to get a really nice project!! Good luck with the sale.
__________________
1969 impala conv 427 #s loaded. dad bought new 1969 "Judge" RA-3, rare warwick blue/white, #'s 1968 vet convertible #s 427/435 tripower (sold) 1968 belair 2door post #s 427/385 1936 ford 5w coupe dads 1st car 1969 camaro ss (17,xxx) miles Wanted: 69-72 suburban project, 69 camaro convertible. also any big block cars. 69-70 gto judge project. |
|
|
|
|
09-16-2011, 08:42 AM
|
#61 | |
|
Custom Builder
Join Date: Jun 2003
Location: Carlsbad, California
Posts: 908
|
Re: 1966 K20 Project
Quote:
__________________
1932 Chevy Roadster Car and Pick-Up - http://67-72chevytrucks.com/vboard/s...d.php?t=465709 1966 K20 Factory 4X4 - http://67-72chevytrucks.com/vboard/s...d.php?t=455484 (Sold) 1972 K5 Blazer (Sold) - http://67-72chevytrucks.com/vboard/s...ad.php?t=87530 2007 TrailBlazer SS - http://67-72chevytrucks.com/vboard/s...34#post4706534 |
|
|
|
|
|
09-16-2011, 01:45 PM
|
#62 |
|
Custom Builder
Join Date: Jun 2003
Location: Carlsbad, California
Posts: 908
|
Re: 1966 K20 Project
More pictures added to the for sale section - http://67-72chevytrucks.com/vboard/c...p?product=5750
__________________
1932 Chevy Roadster Car and Pick-Up - http://67-72chevytrucks.com/vboard/s...d.php?t=465709 1966 K20 Factory 4X4 - http://67-72chevytrucks.com/vboard/s...d.php?t=455484 (Sold) 1972 K5 Blazer (Sold) - http://67-72chevytrucks.com/vboard/s...ad.php?t=87530 2007 TrailBlazer SS - http://67-72chevytrucks.com/vboard/s...34#post4706534 |
|
|
|
|
10-04-2011, 08:57 PM
|
#63 |
|
Custom Builder
Join Date: Jun 2003
Location: Carlsbad, California
Posts: 908
|
Re: 1966 K20 Project
Started on the Floor Repairs.
Last week we cut out the rockers, partial floors, cab corner (1) and kick panels and ran it over for a touch up on the Media Blasting. 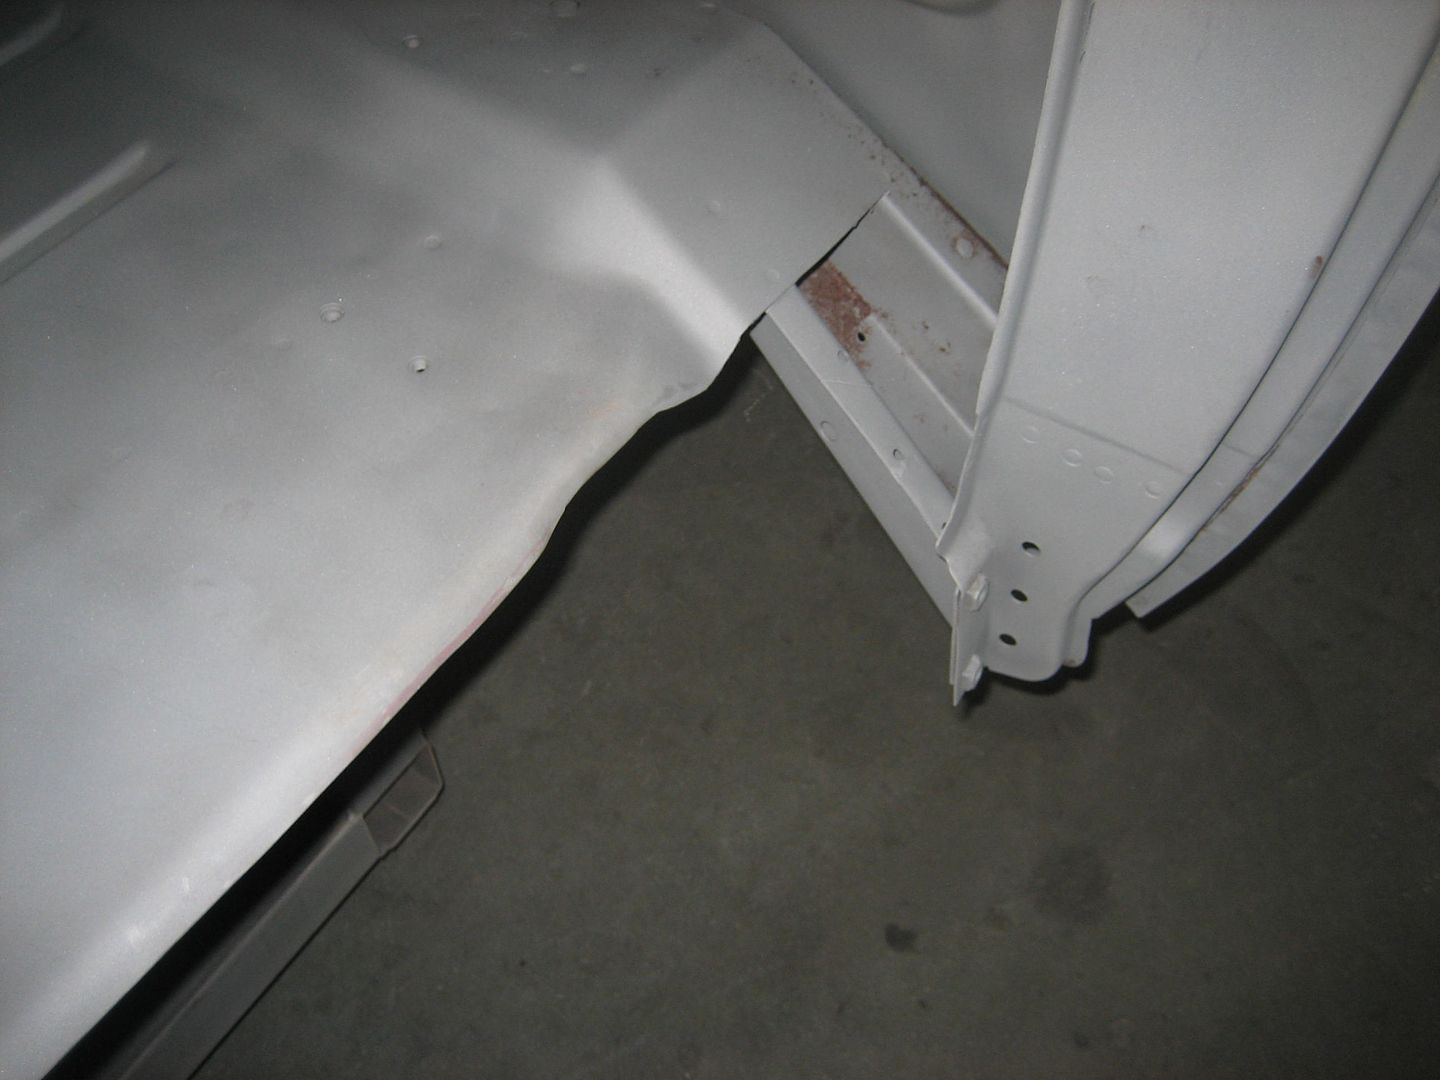 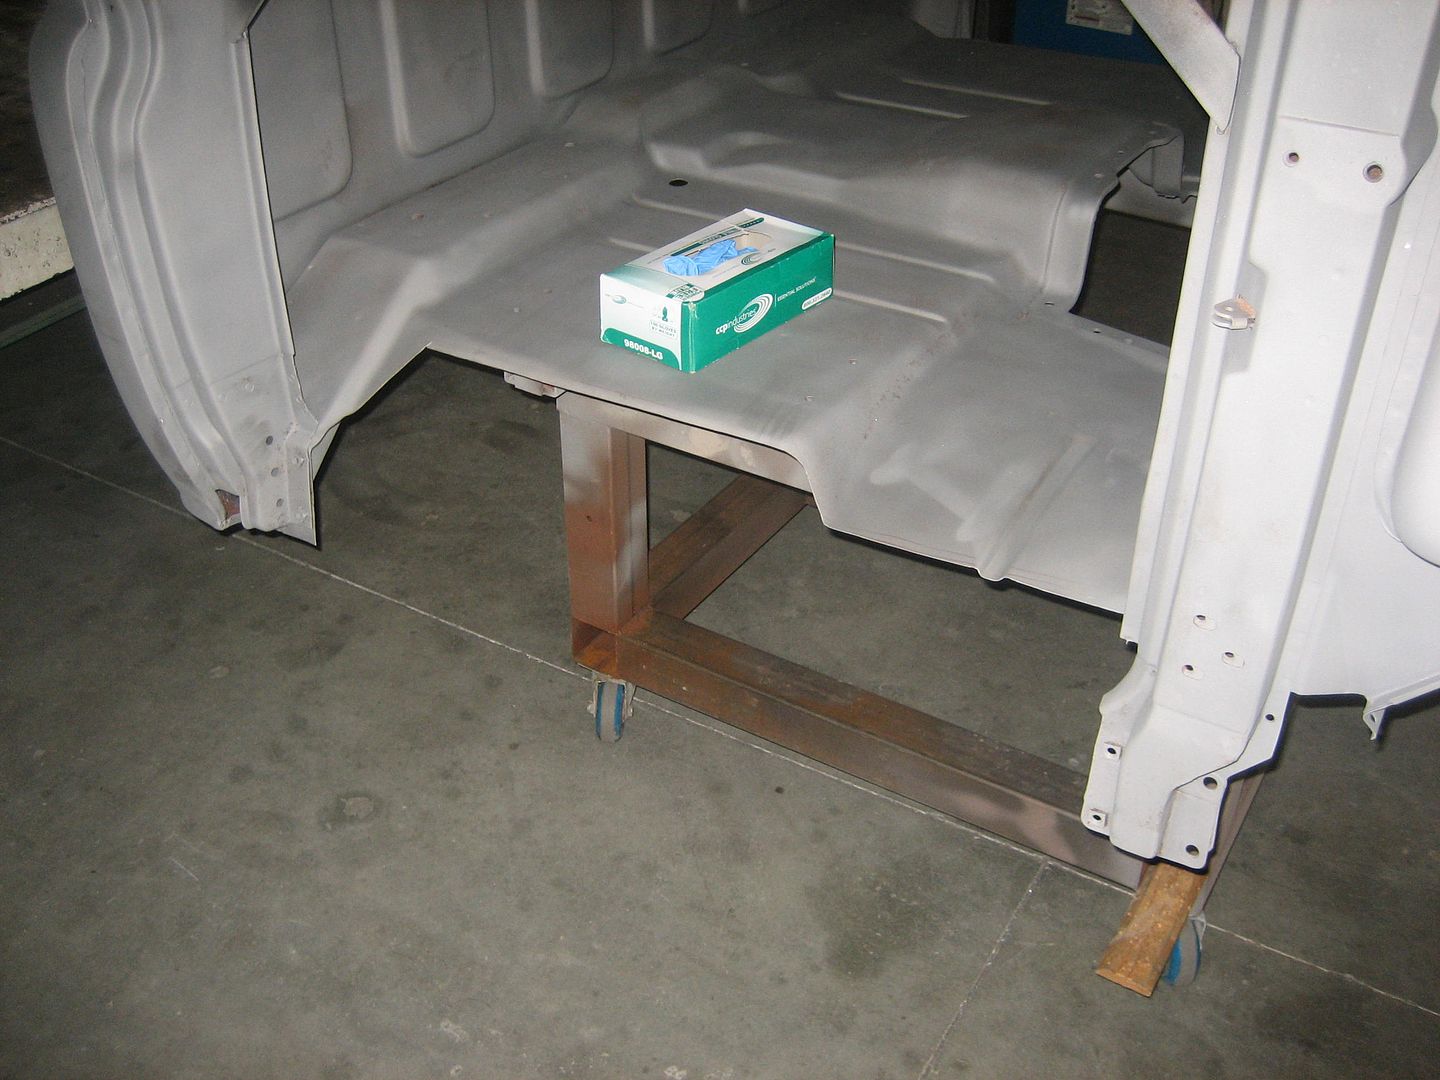  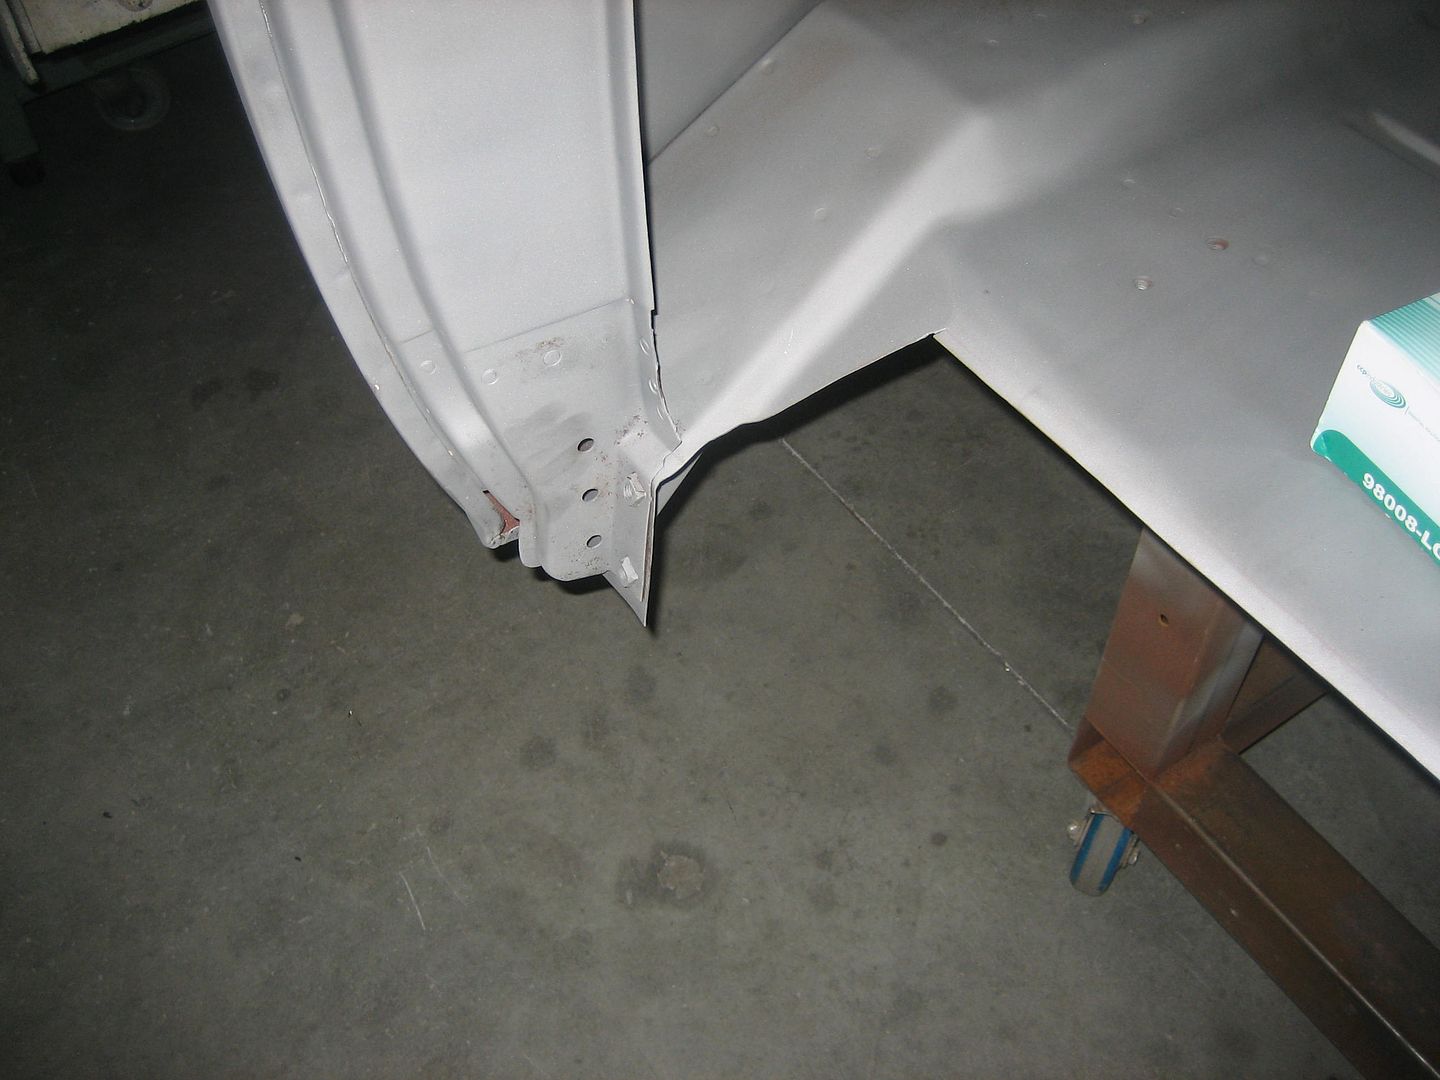 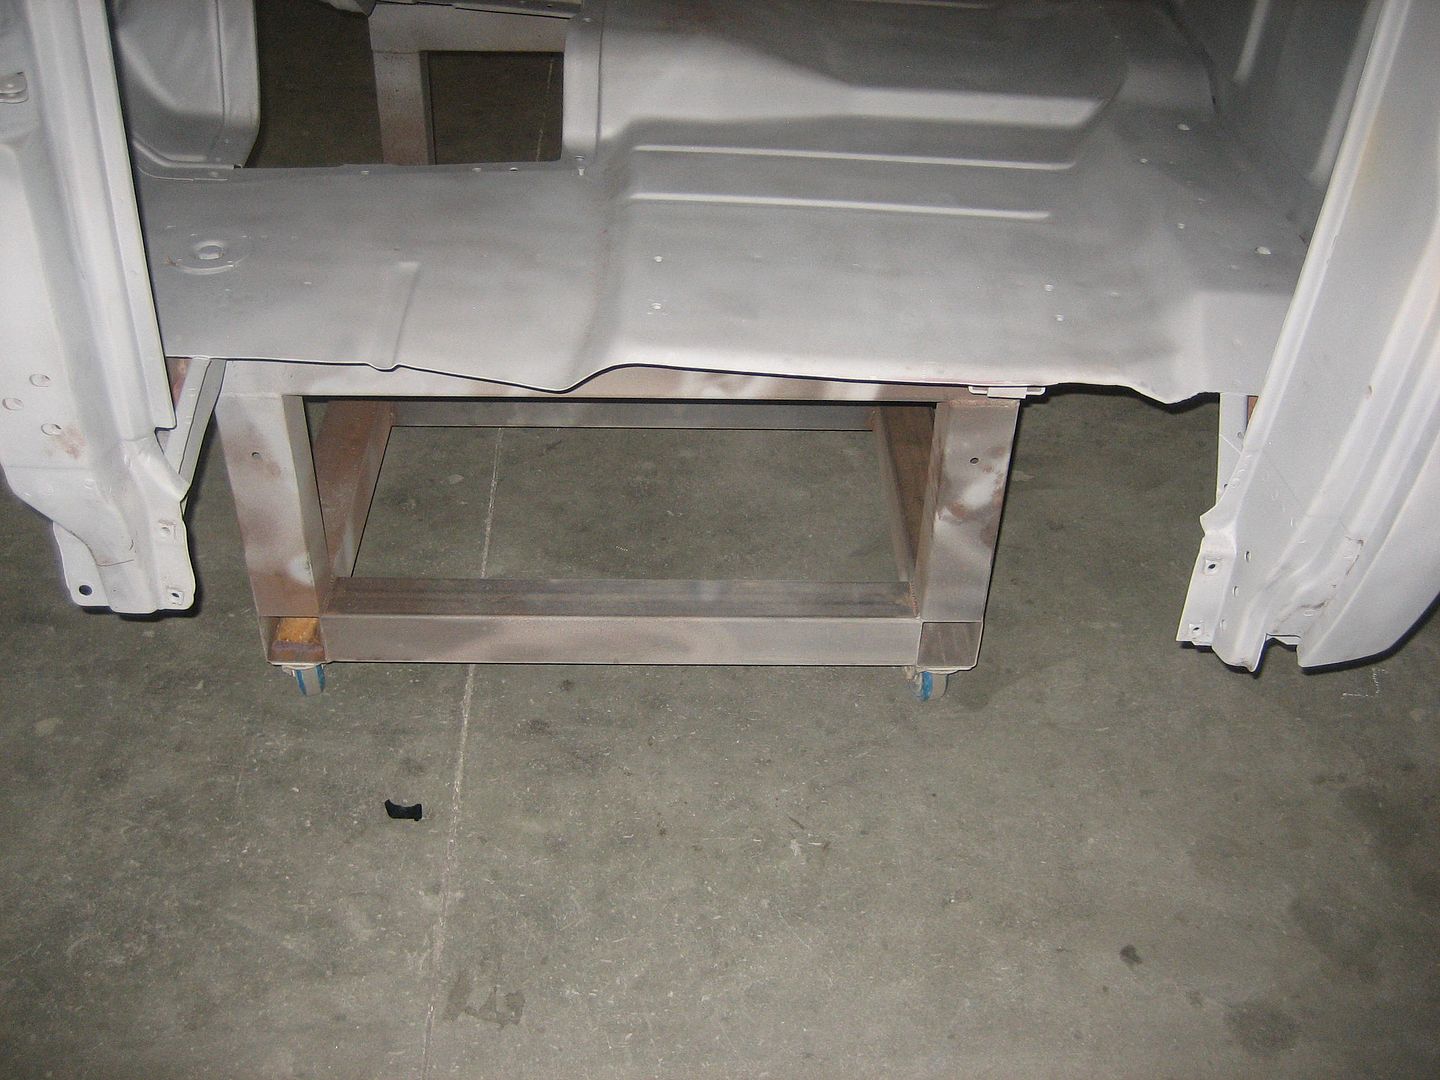  Today we cut the patch panels to fit and started stitch welding them in. We are using TIG and will blend all the welds so the repairs disappear.  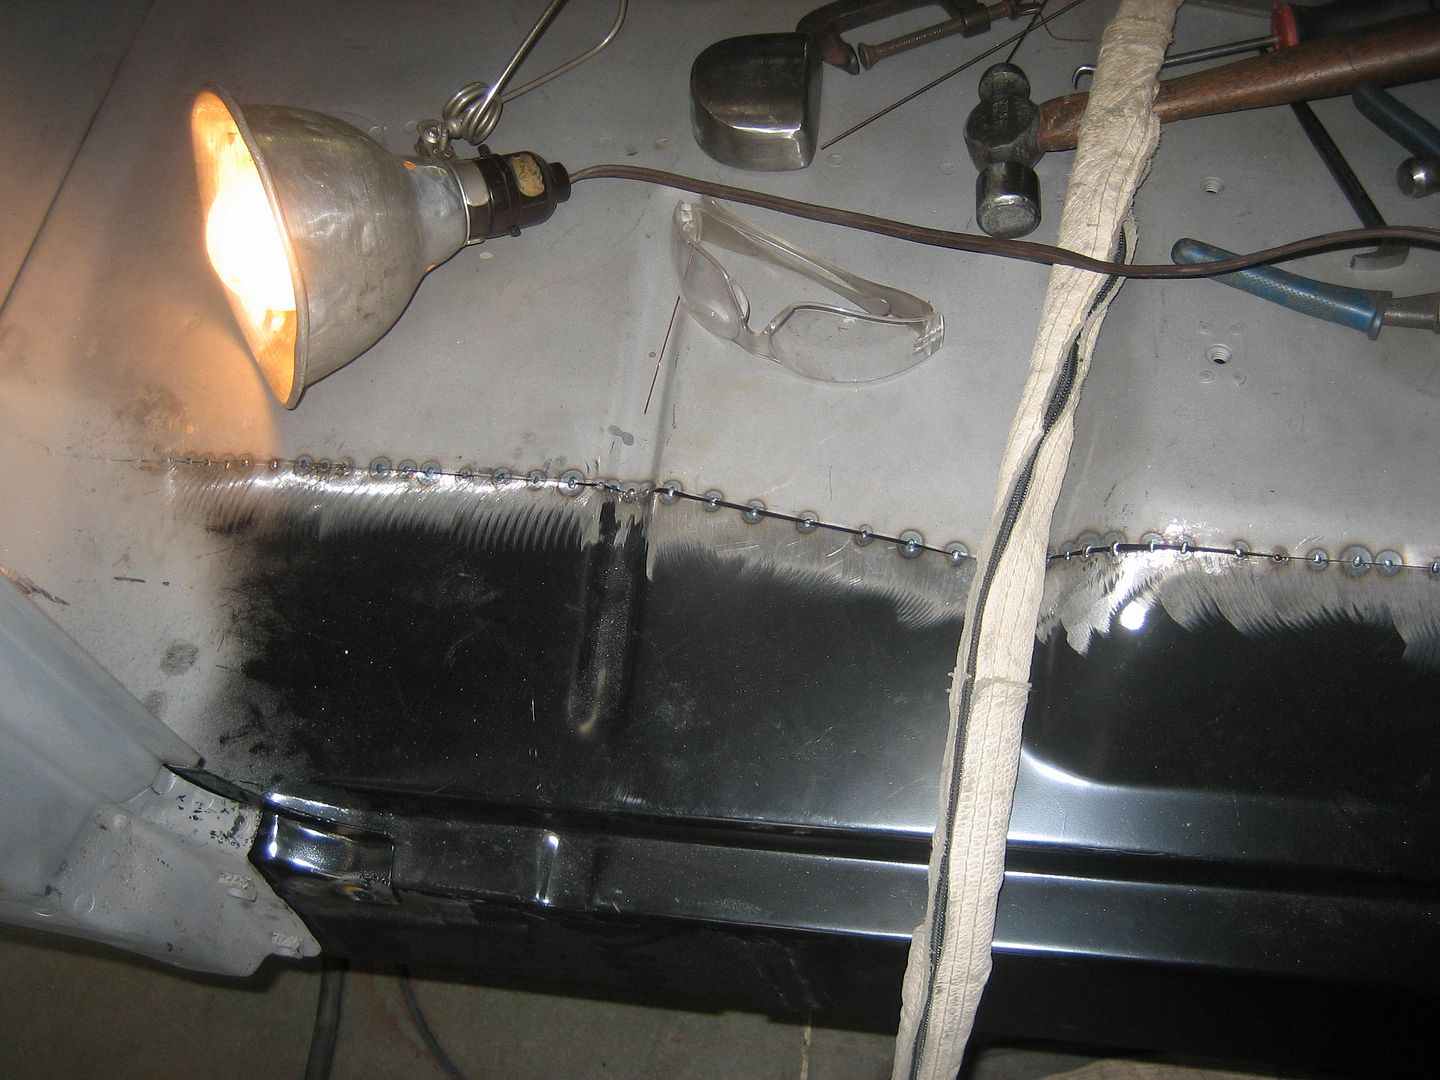  
__________________
1932 Chevy Roadster Car and Pick-Up - http://67-72chevytrucks.com/vboard/s...d.php?t=465709 1966 K20 Factory 4X4 - http://67-72chevytrucks.com/vboard/s...d.php?t=455484 (Sold) 1972 K5 Blazer (Sold) - http://67-72chevytrucks.com/vboard/s...ad.php?t=87530 2007 TrailBlazer SS - http://67-72chevytrucks.com/vboard/s...34#post4706534 |
|
|
|
|
10-05-2011, 07:06 PM
|
#64 |
|
Custom Builder
Join Date: Jun 2003
Location: Carlsbad, California
Posts: 908
|
Re: 1966 K20 Project
More Pictures
We were able to get a little more done with the floors today. The grey paint in the pictures is cold zinc. It is applied to keep any surface rust down until it makes it over for DP90 and High Build Primer.  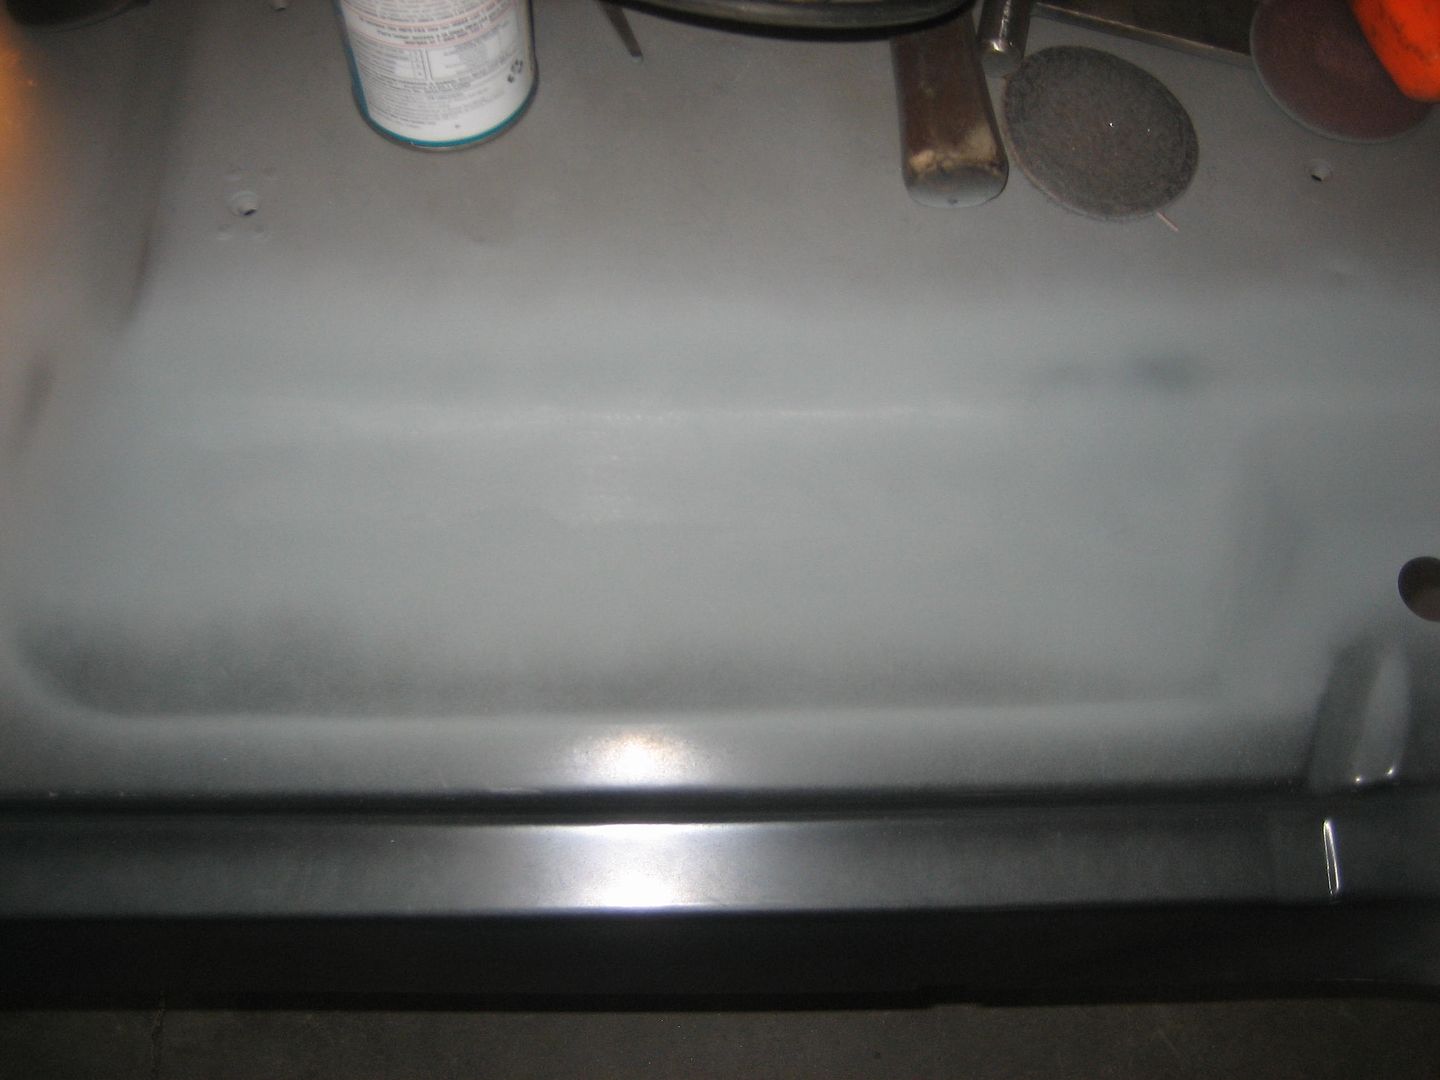 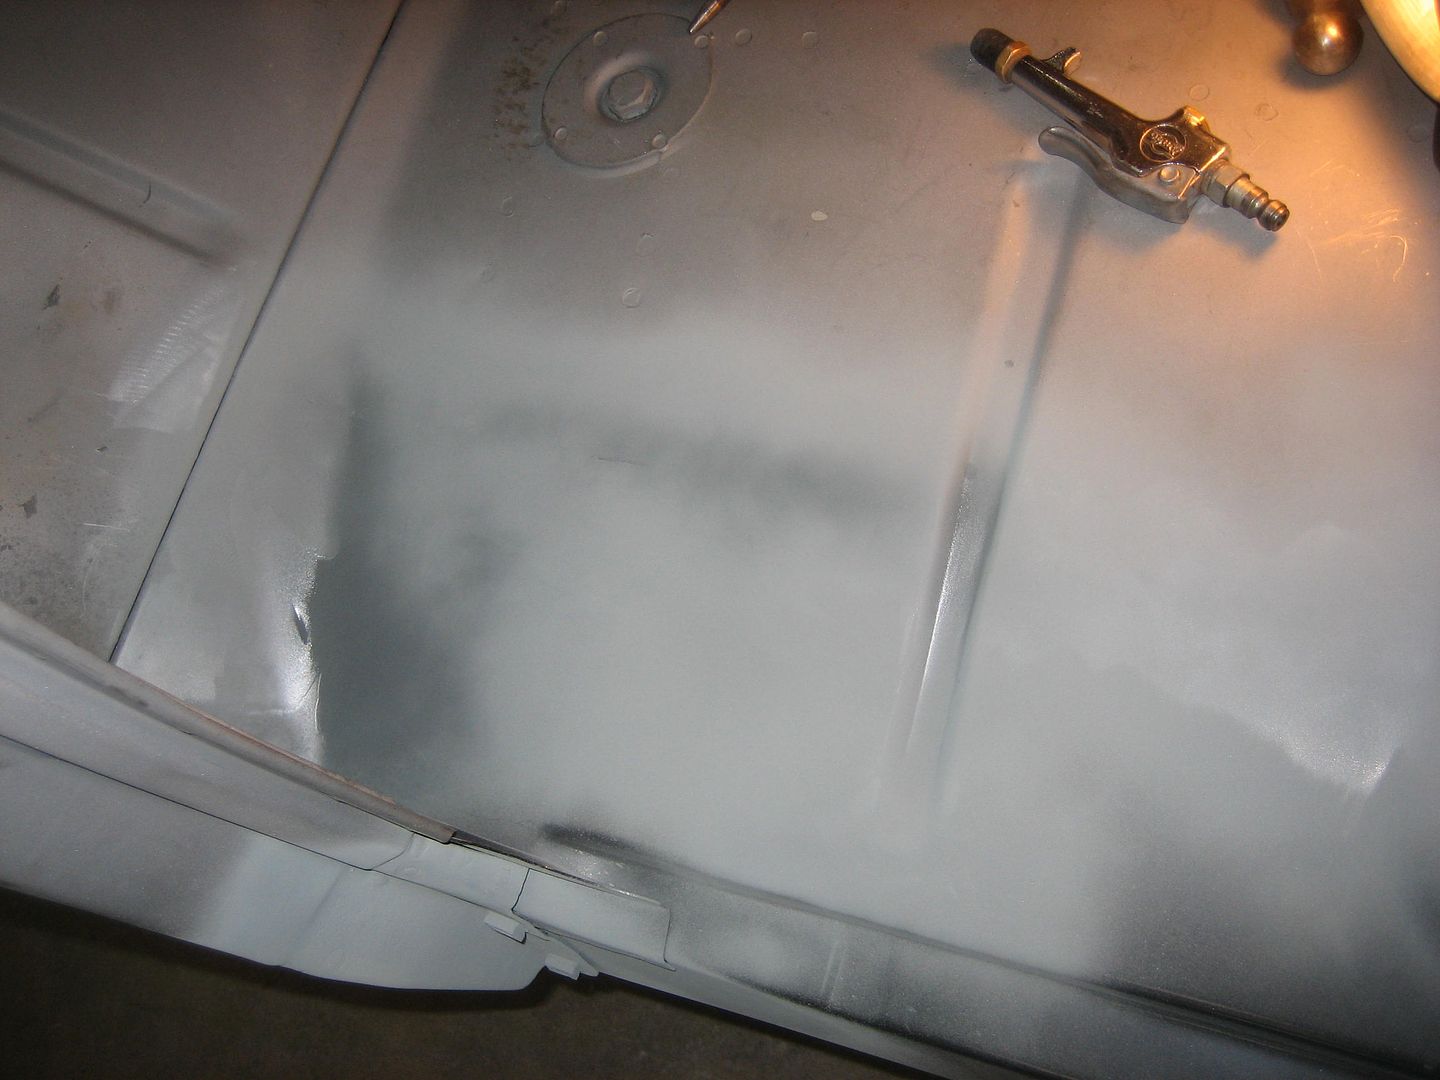   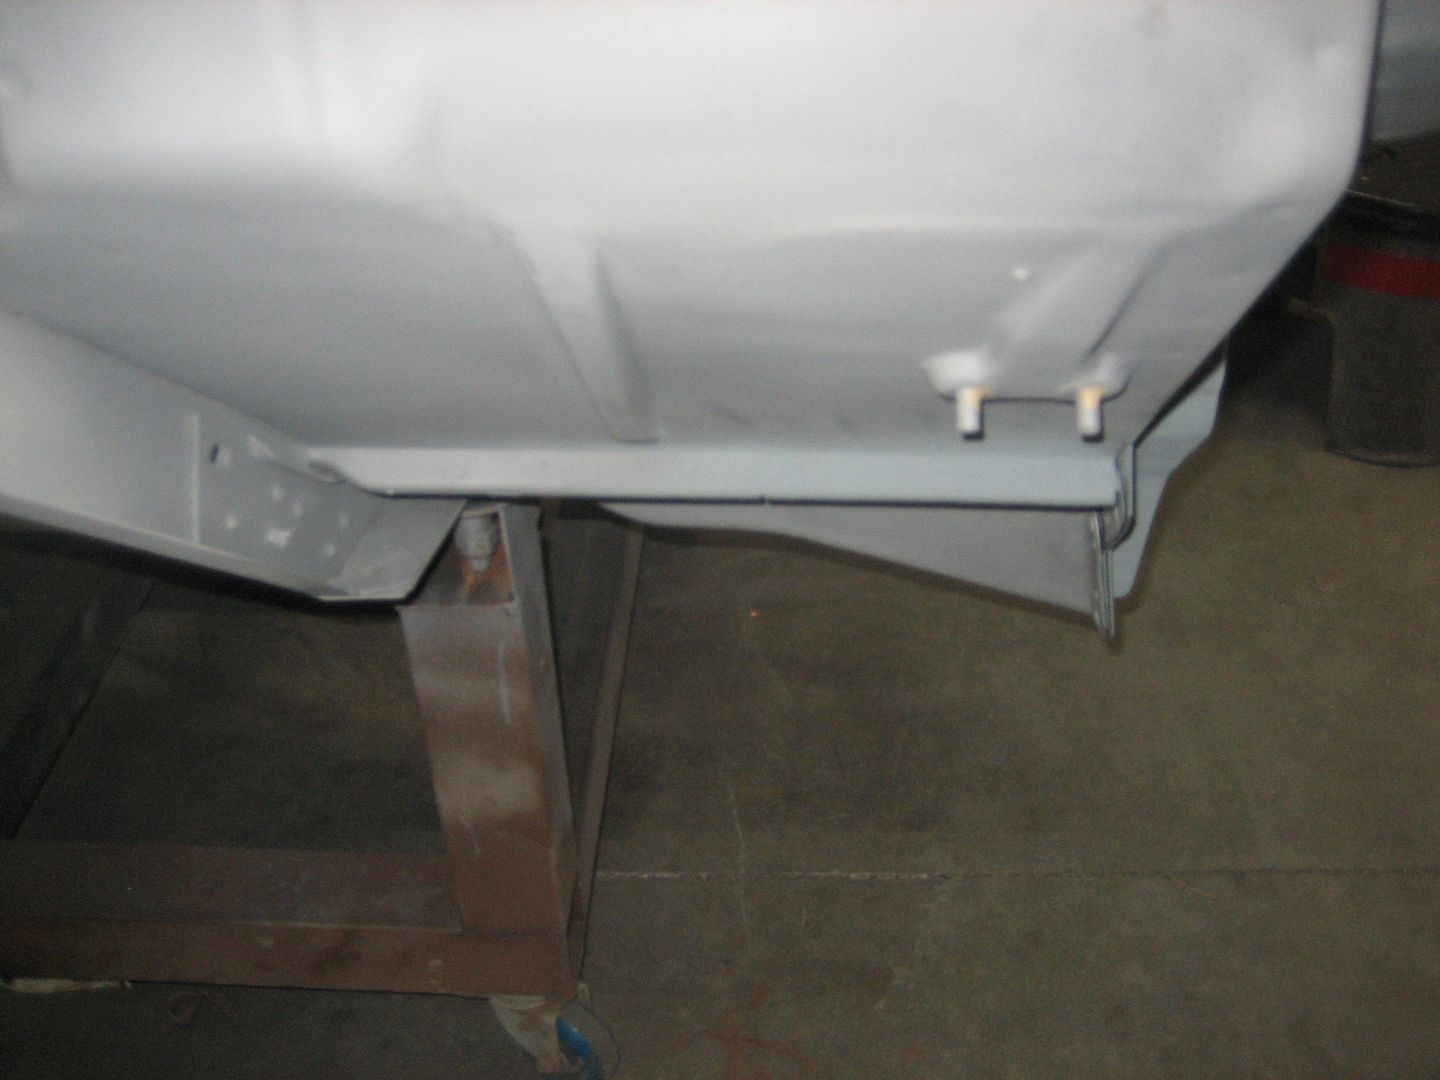
__________________
1932 Chevy Roadster Car and Pick-Up - http://67-72chevytrucks.com/vboard/s...d.php?t=465709 1966 K20 Factory 4X4 - http://67-72chevytrucks.com/vboard/s...d.php?t=455484 (Sold) 1972 K5 Blazer (Sold) - http://67-72chevytrucks.com/vboard/s...ad.php?t=87530 2007 TrailBlazer SS - http://67-72chevytrucks.com/vboard/s...34#post4706534 Last edited by LeftCoast32; 10-05-2011 at 07:16 PM. |
|
|
|
|
10-06-2011, 09:54 PM
|
#65 |
|
Custom Builder
Join Date: Jun 2003
Location: Carlsbad, California
Posts: 908
|
Re: 1966 K20 Project
I was only able to stay around long enough to help fit the floor panel today. John did all the welding and blending in my absence. It is turning out great!
We will work on it again tomorrow and hope to have all the welds blended inside. Then we will work on getting the gas filler hole patched and the rockers hung. It will take 3 of us to hold the doors (gapped) and set up the rockers, this takes a little more time. 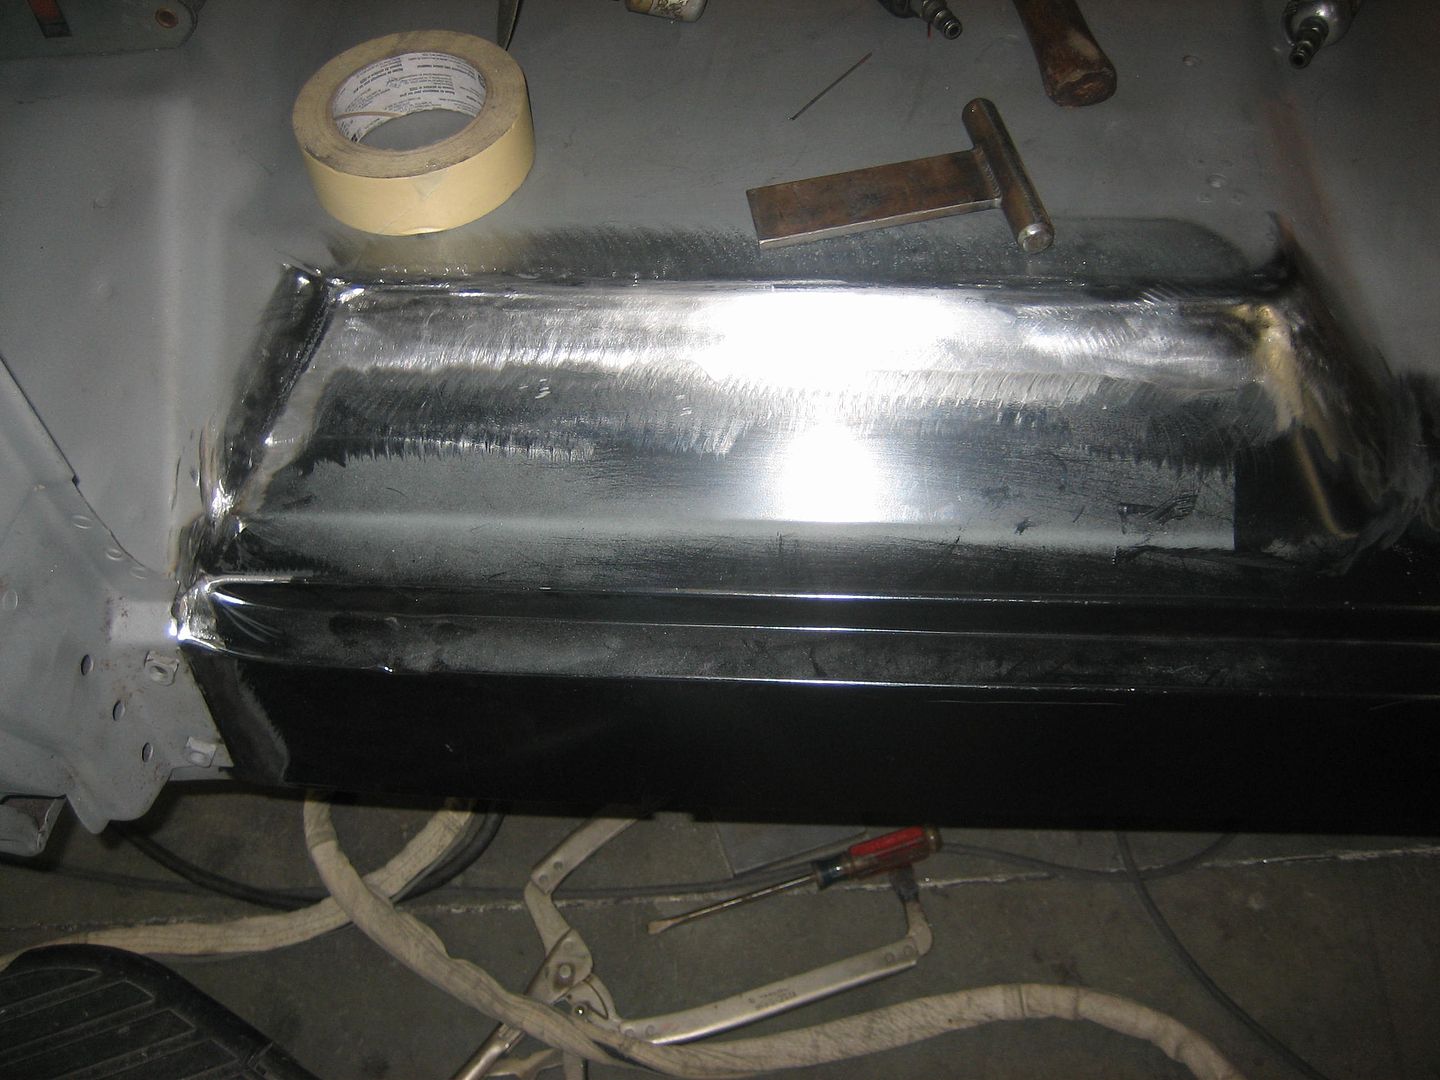 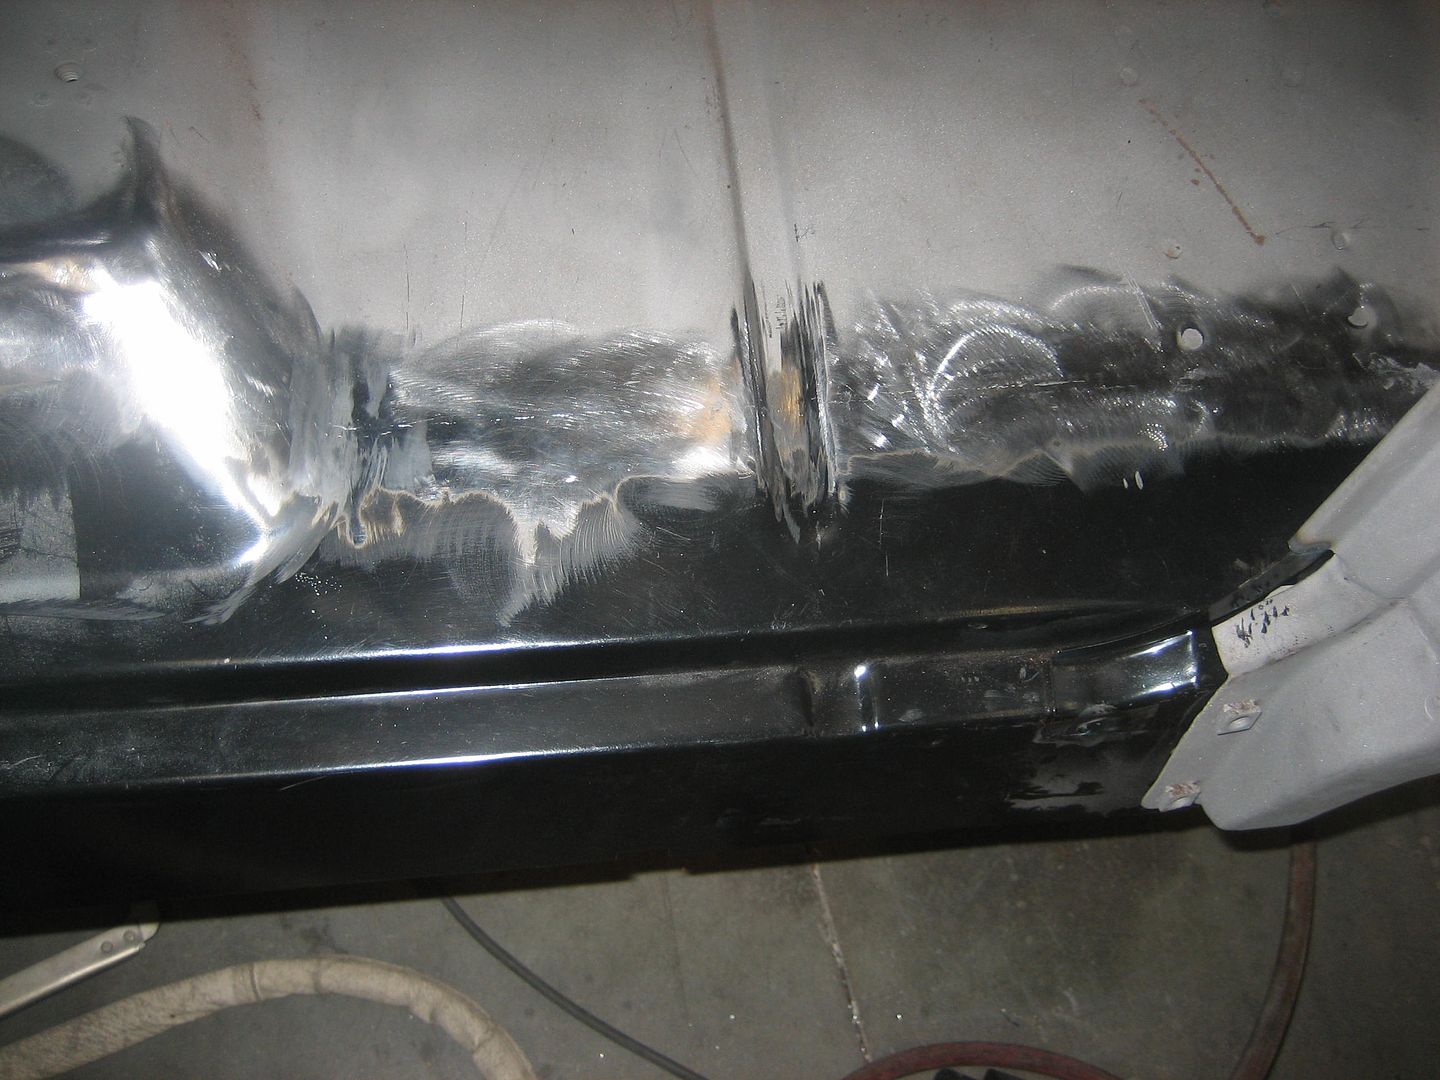 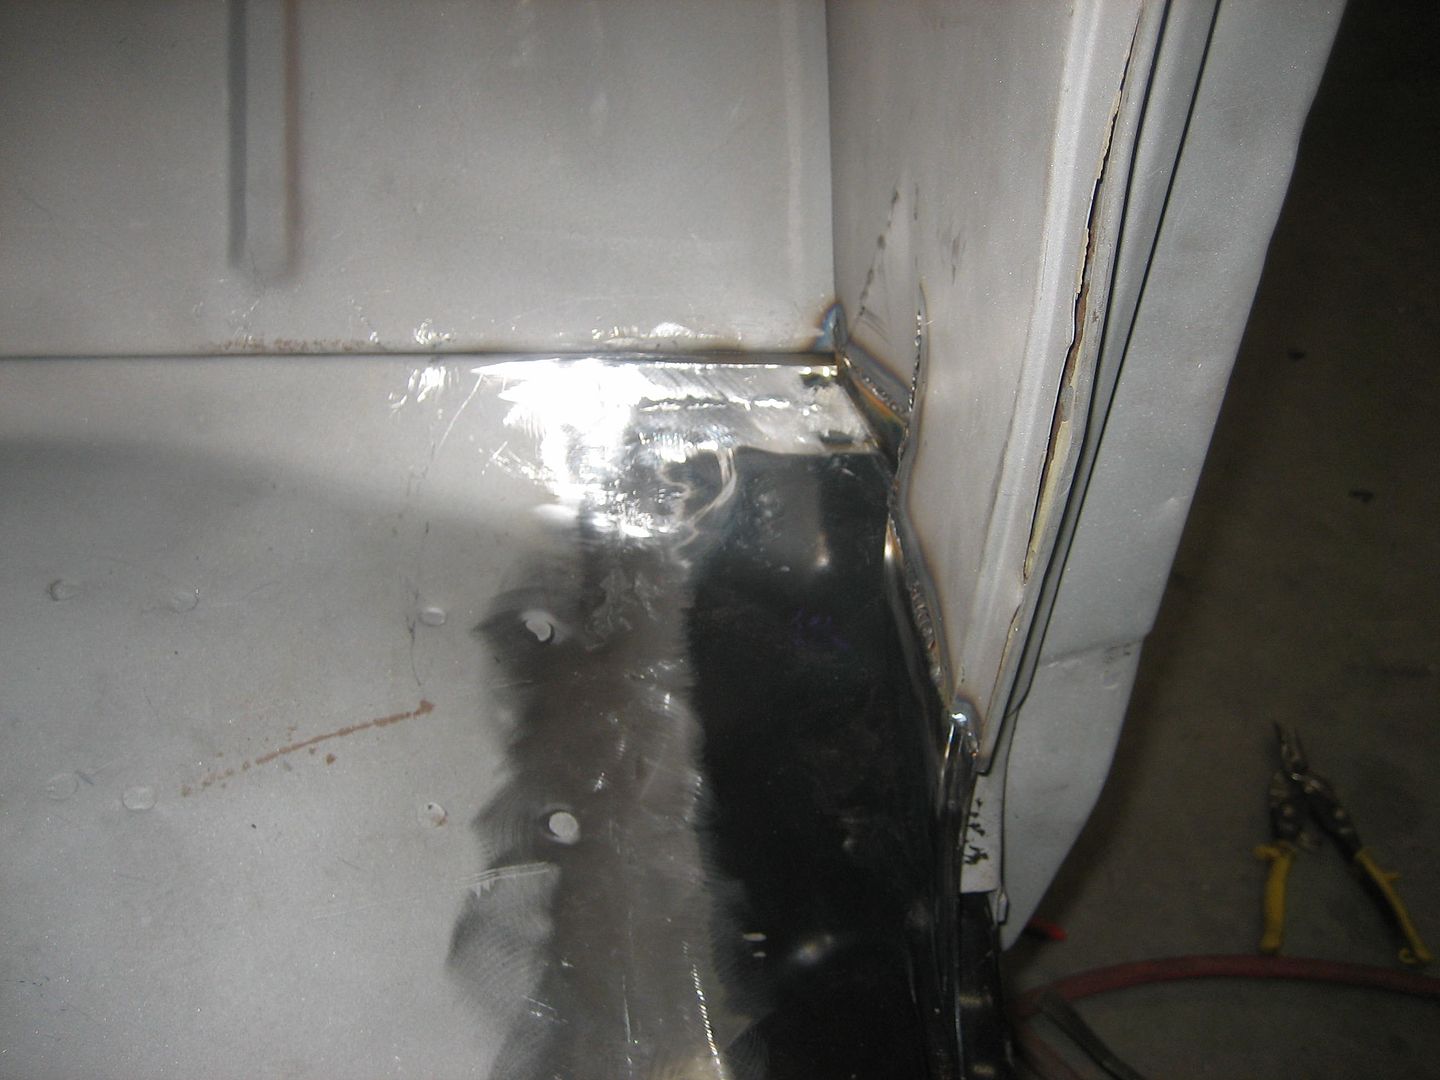
__________________
1932 Chevy Roadster Car and Pick-Up - http://67-72chevytrucks.com/vboard/s...d.php?t=465709 1966 K20 Factory 4X4 - http://67-72chevytrucks.com/vboard/s...d.php?t=455484 (Sold) 1972 K5 Blazer (Sold) - http://67-72chevytrucks.com/vboard/s...ad.php?t=87530 2007 TrailBlazer SS - http://67-72chevytrucks.com/vboard/s...34#post4706534 |
|
|
|
|
10-09-2011, 10:23 AM
|
#66 |
|
Custom Builder
Join Date: Jun 2003
Location: Carlsbad, California
Posts: 908
|
Re: 1966 K20 Project
We spent the day yesterday splitting and reforming the rockers to fit the cab. 10 hours working on the rockers is a little excessive but they really turned out great. Every one of the seams where they meet the body had to be split and welded.
3 of us worked together to hold the doors in place and align the rockers before welding them to the body. The fit is great now! We will be taking a few days off and will get back on it on Tuesday first thing. We have between 1-1.5 days of work left getting everything ready for DP and High Build Primer. We have to finish blending the TIG for all the spot welds. We have to fit the bottoms of the rockers to the inner rockers. We have to weld in a cab corner patch also. Lastly we have to roll it on its back and blend off all the welds underneath the floors. I want to thank my friends Tony and John for all the help and great work on the cab. 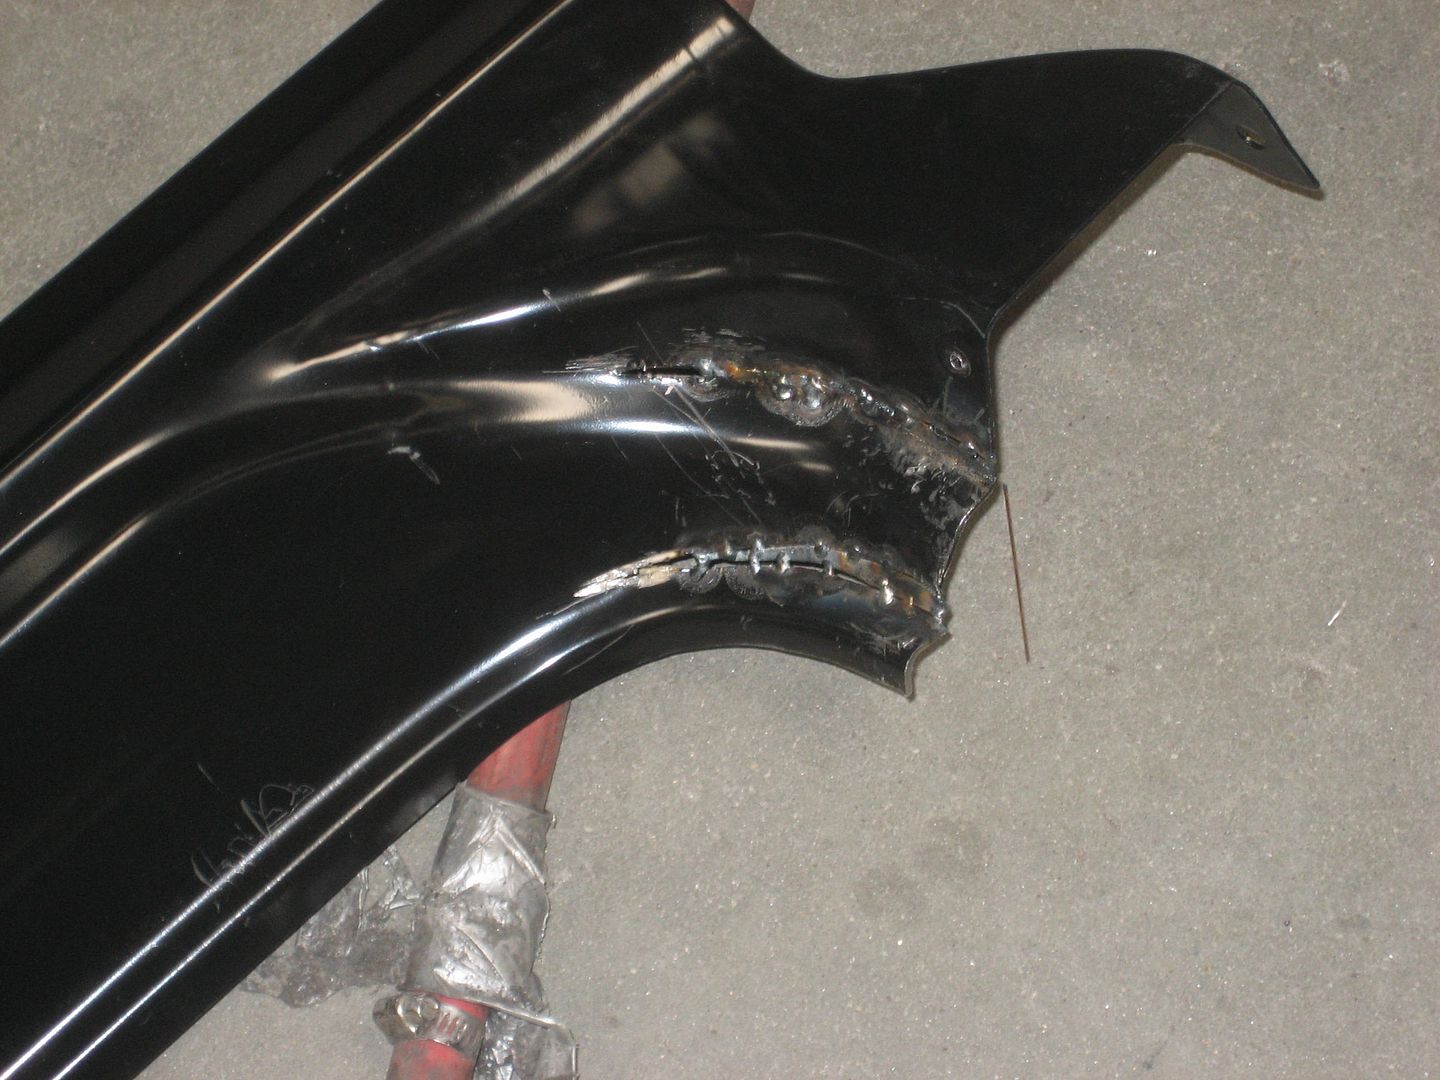 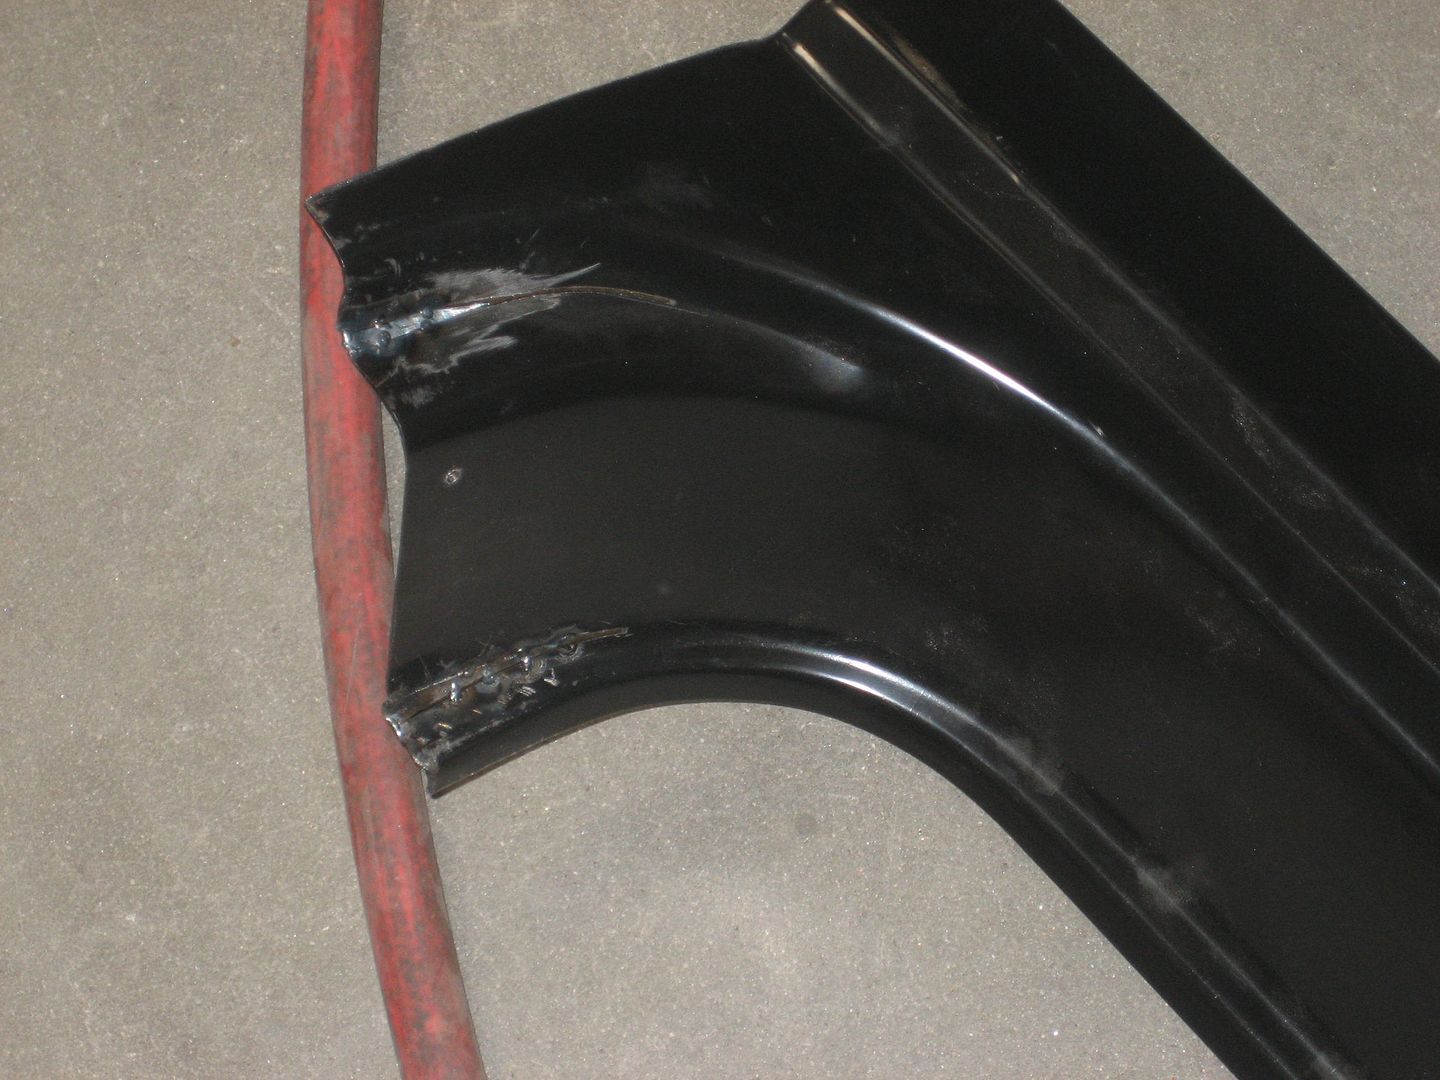 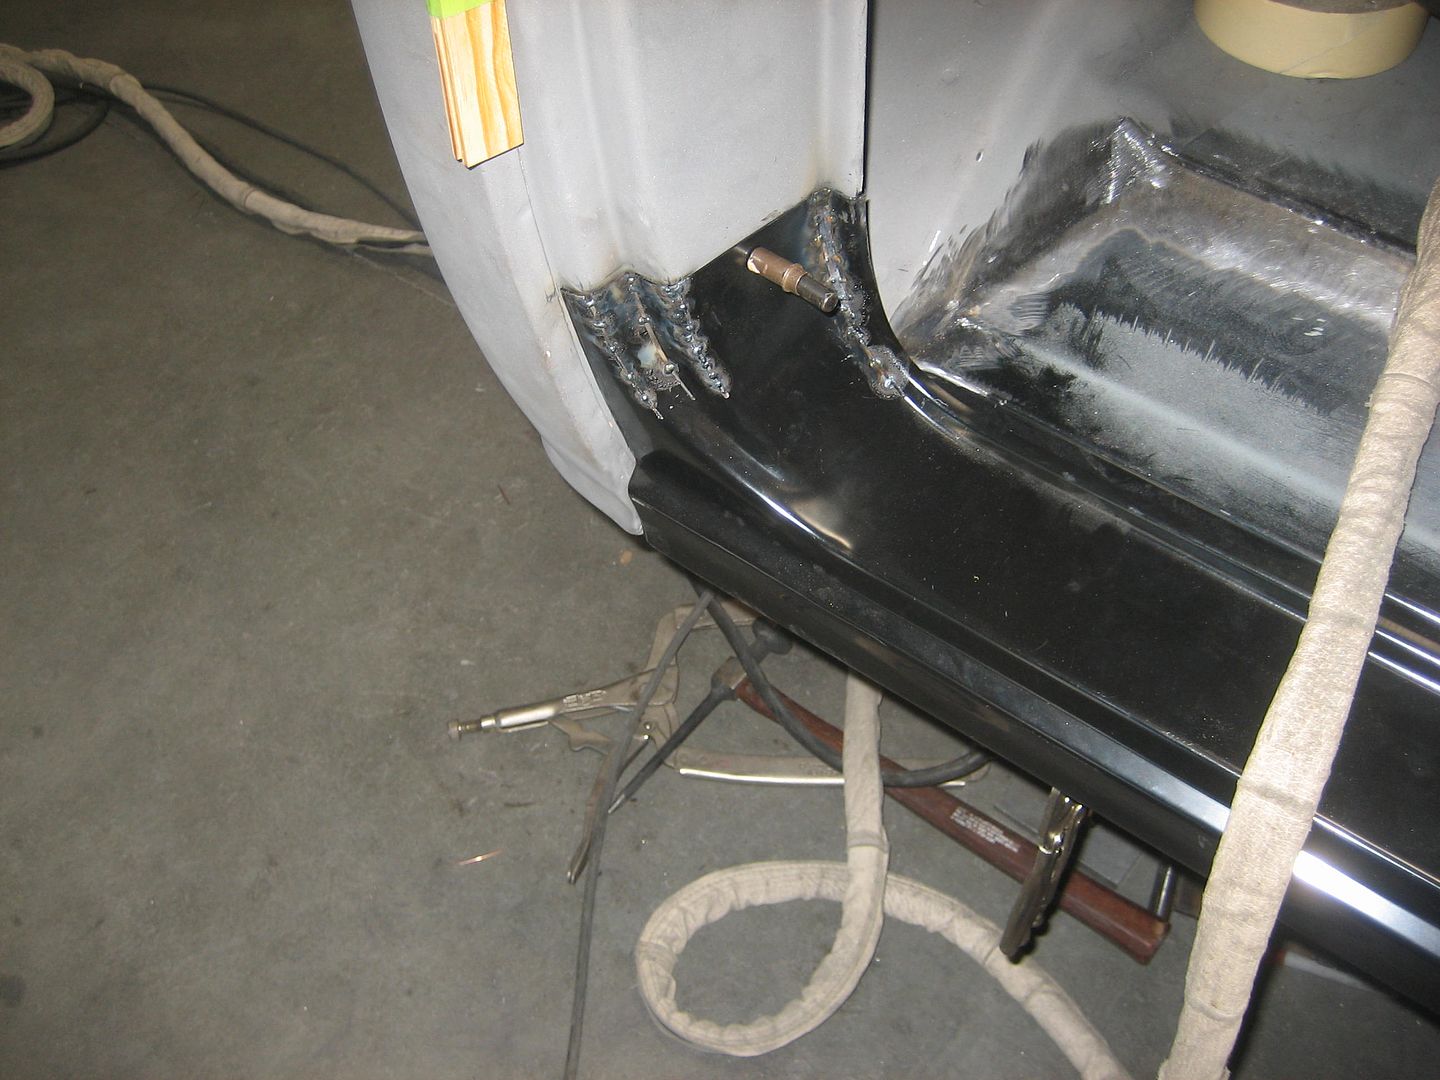 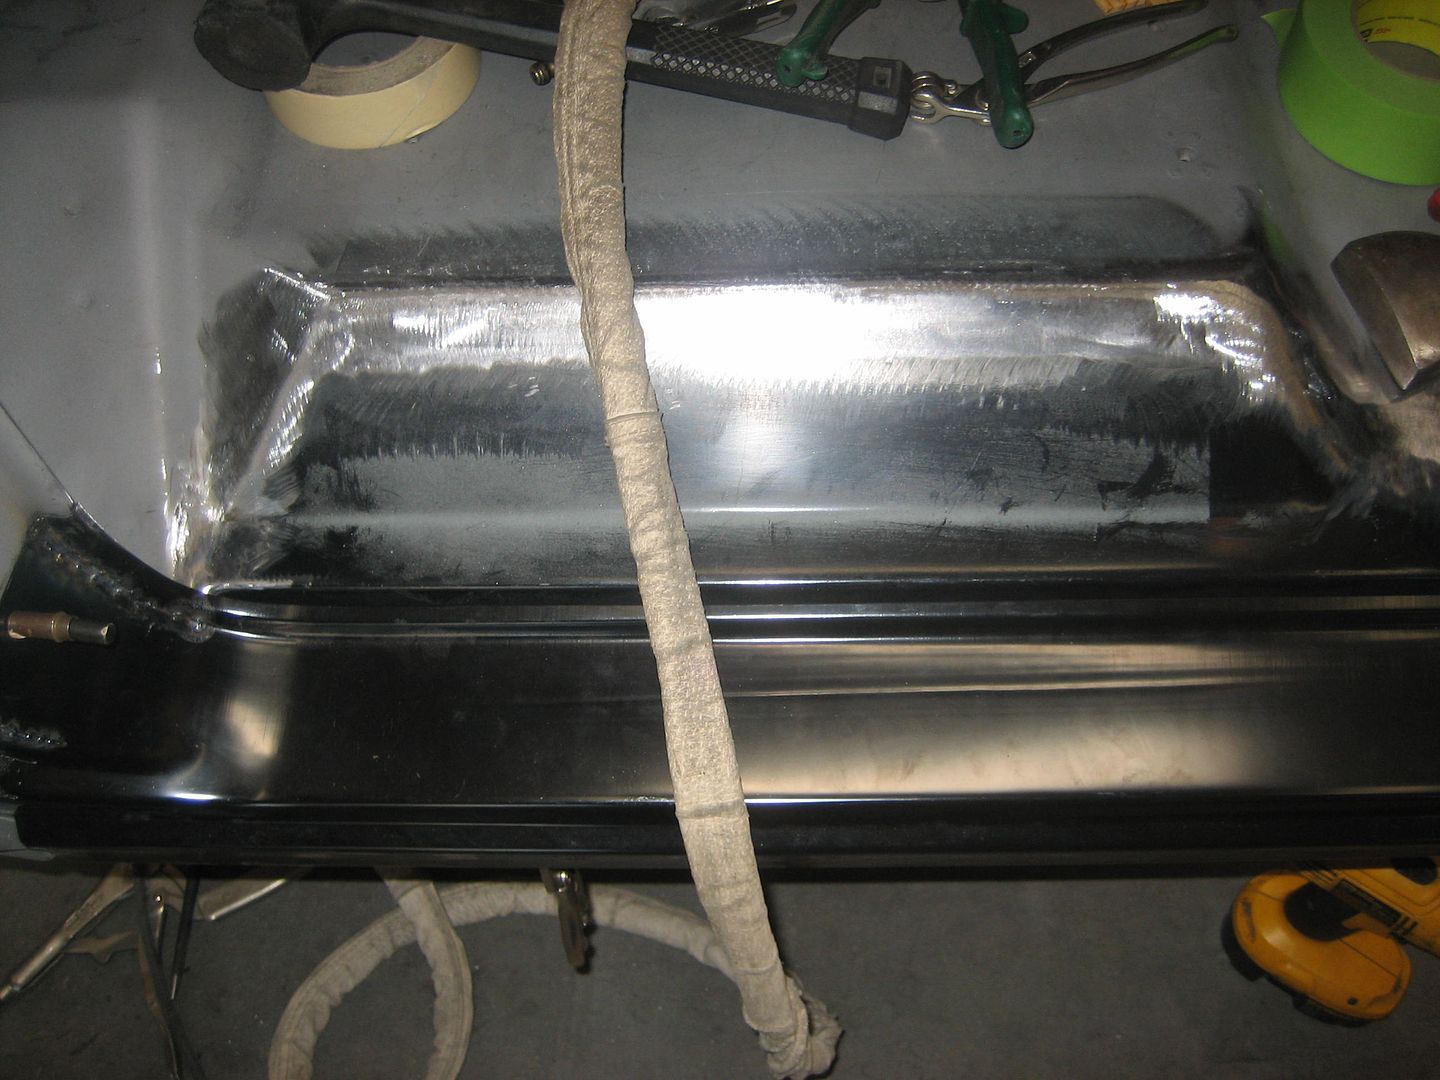 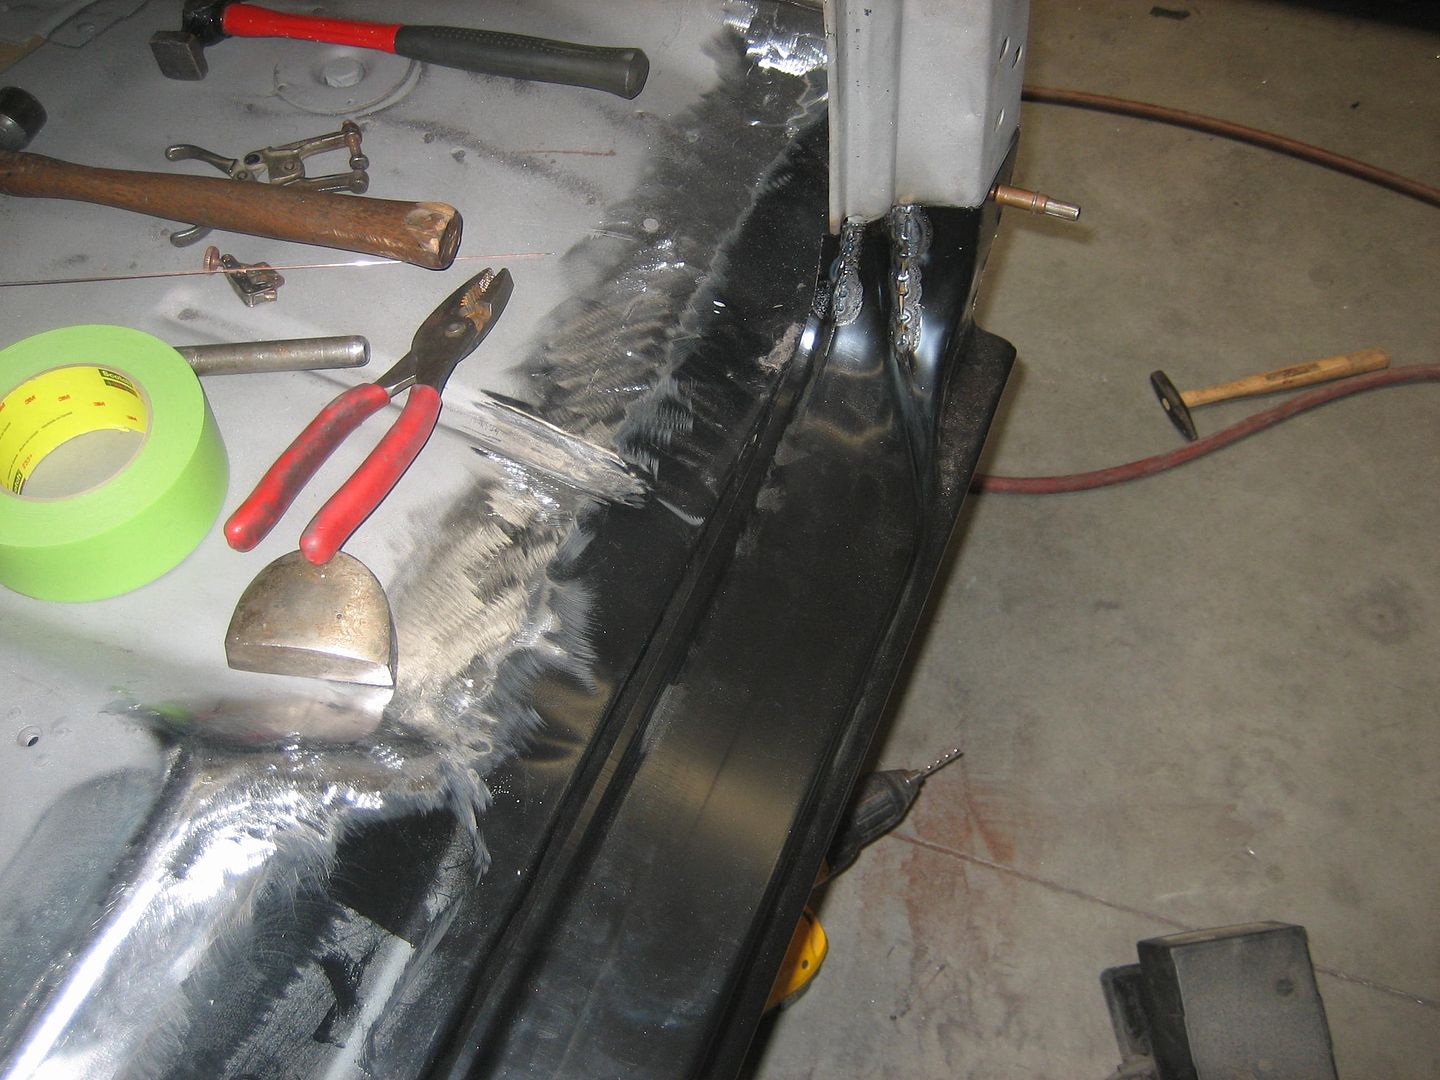 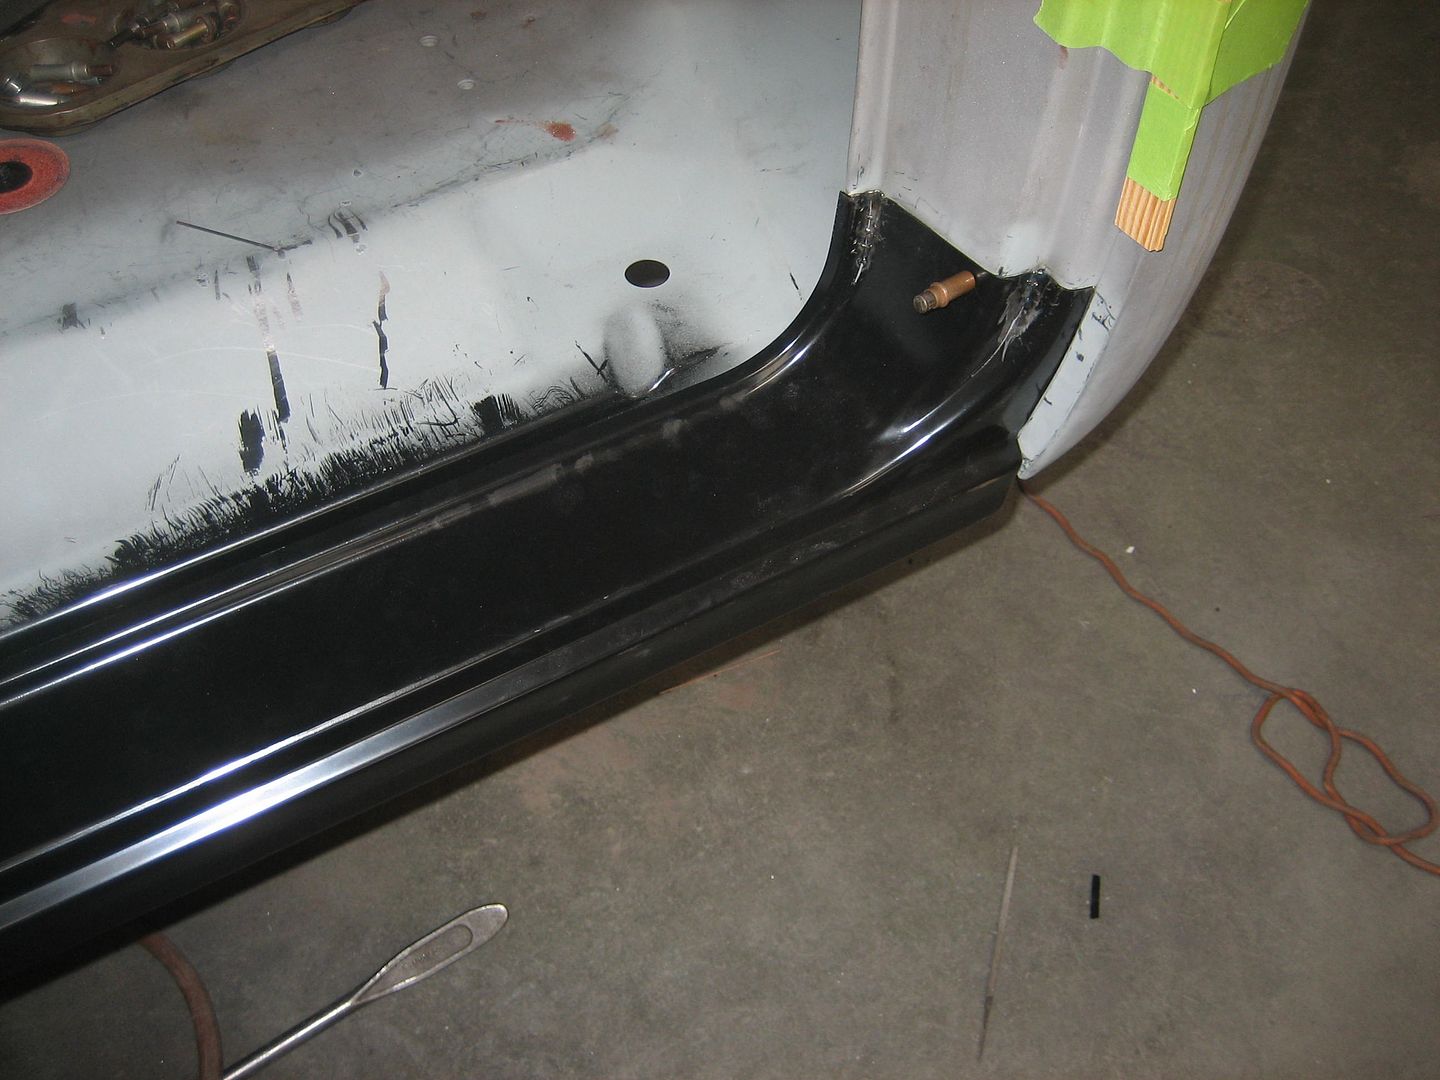 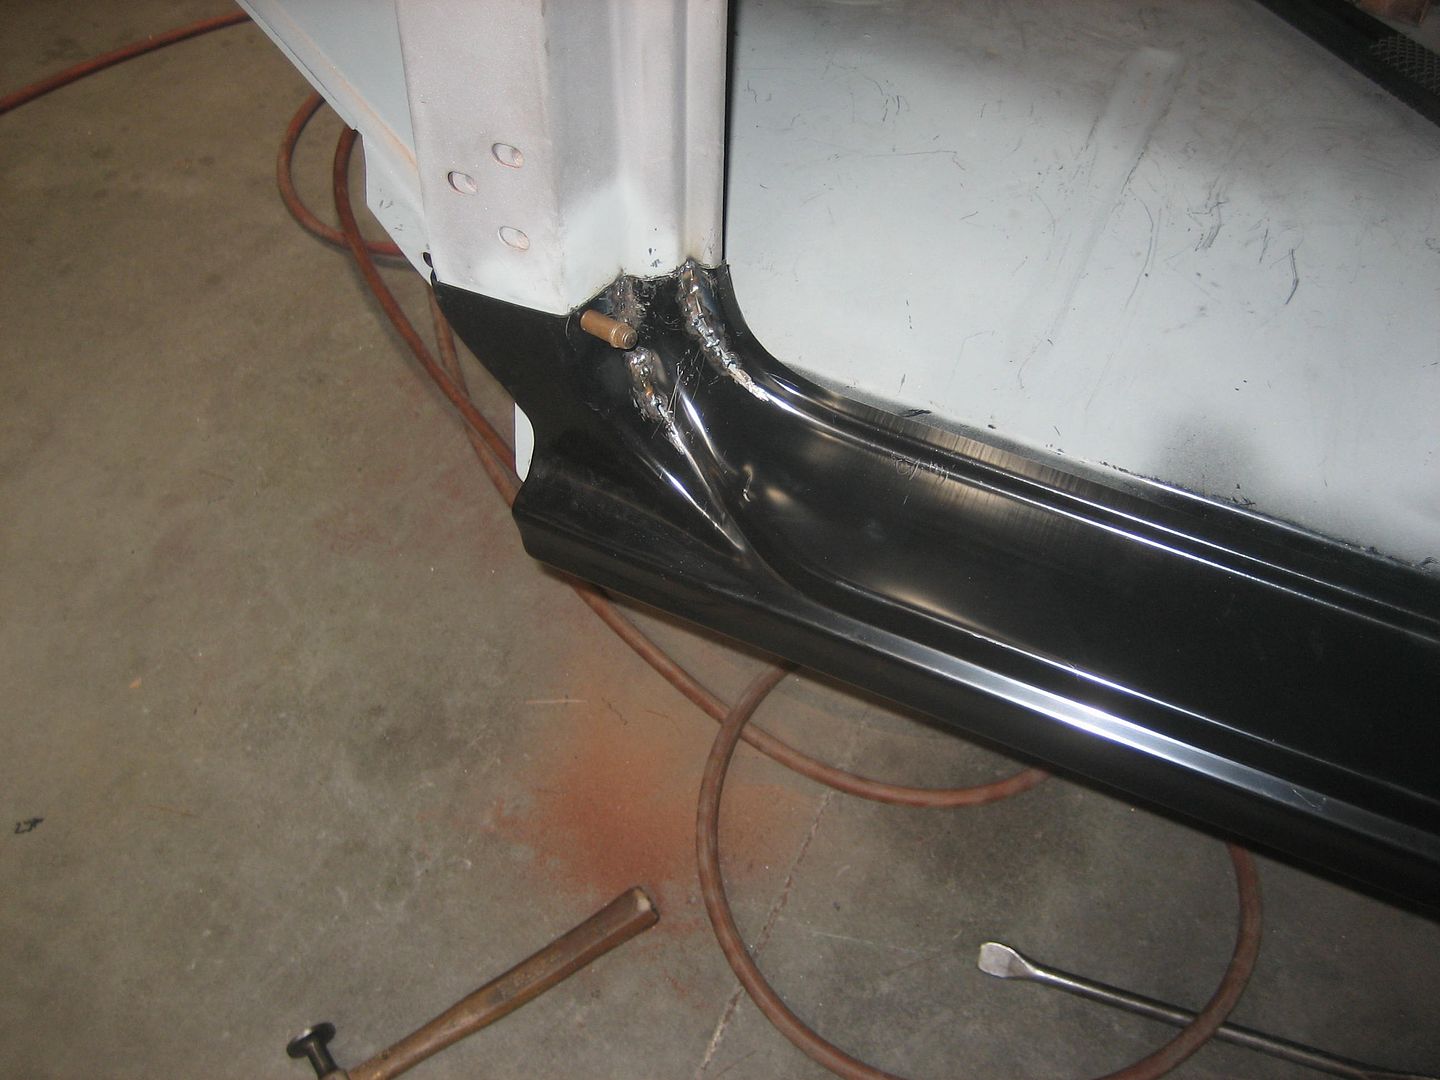  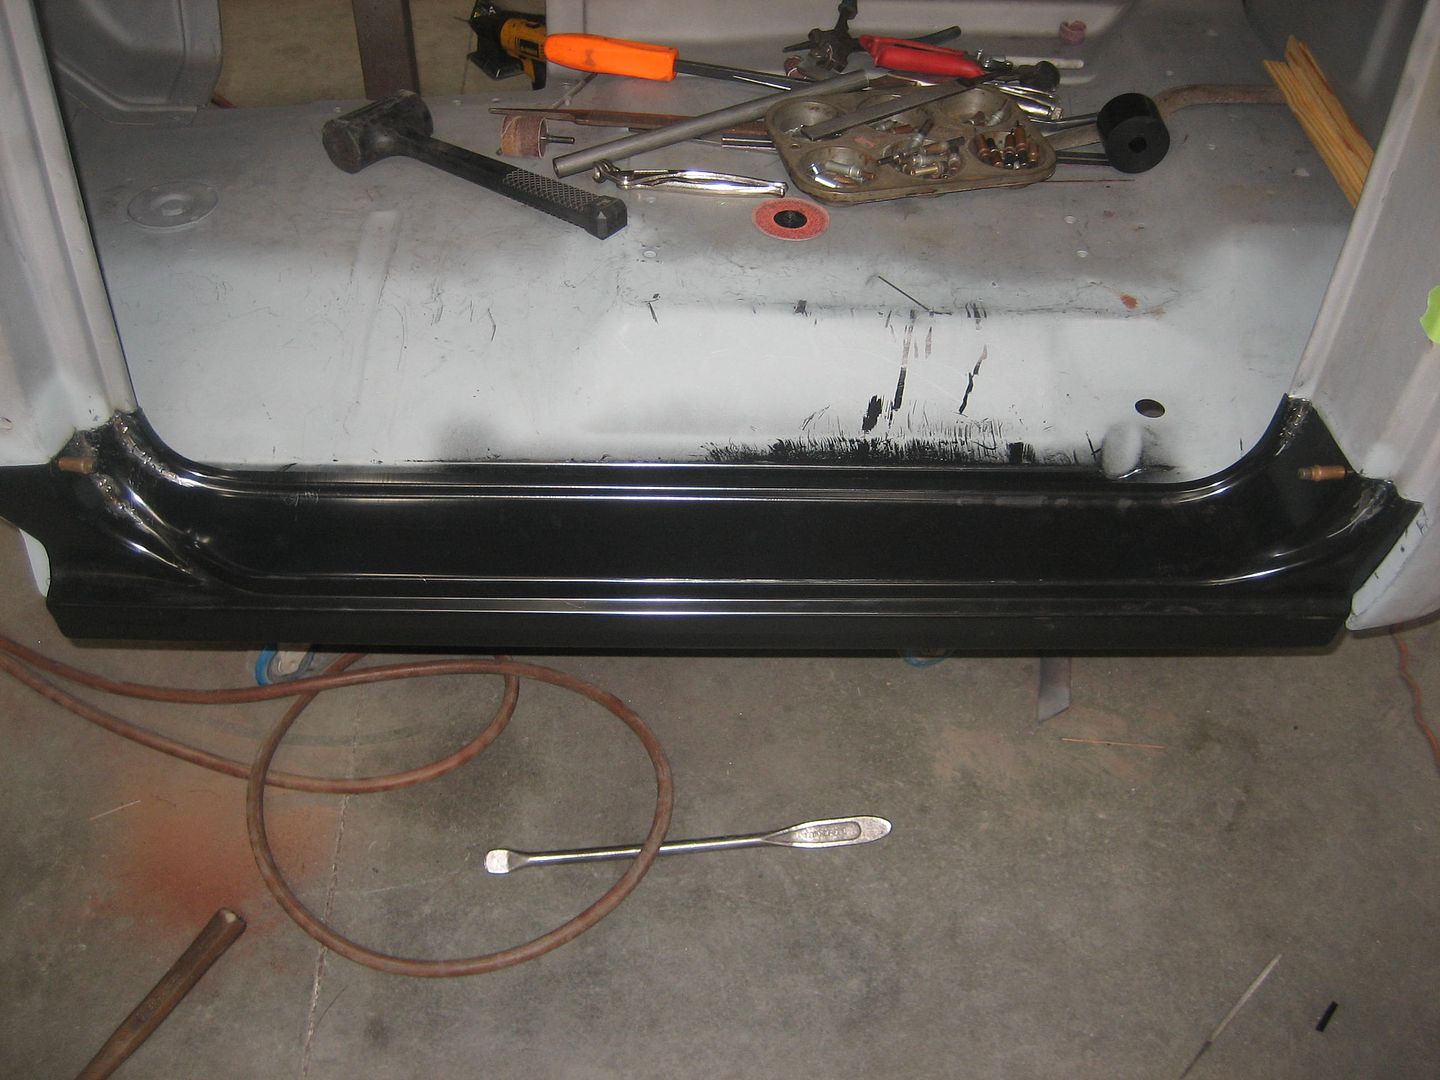   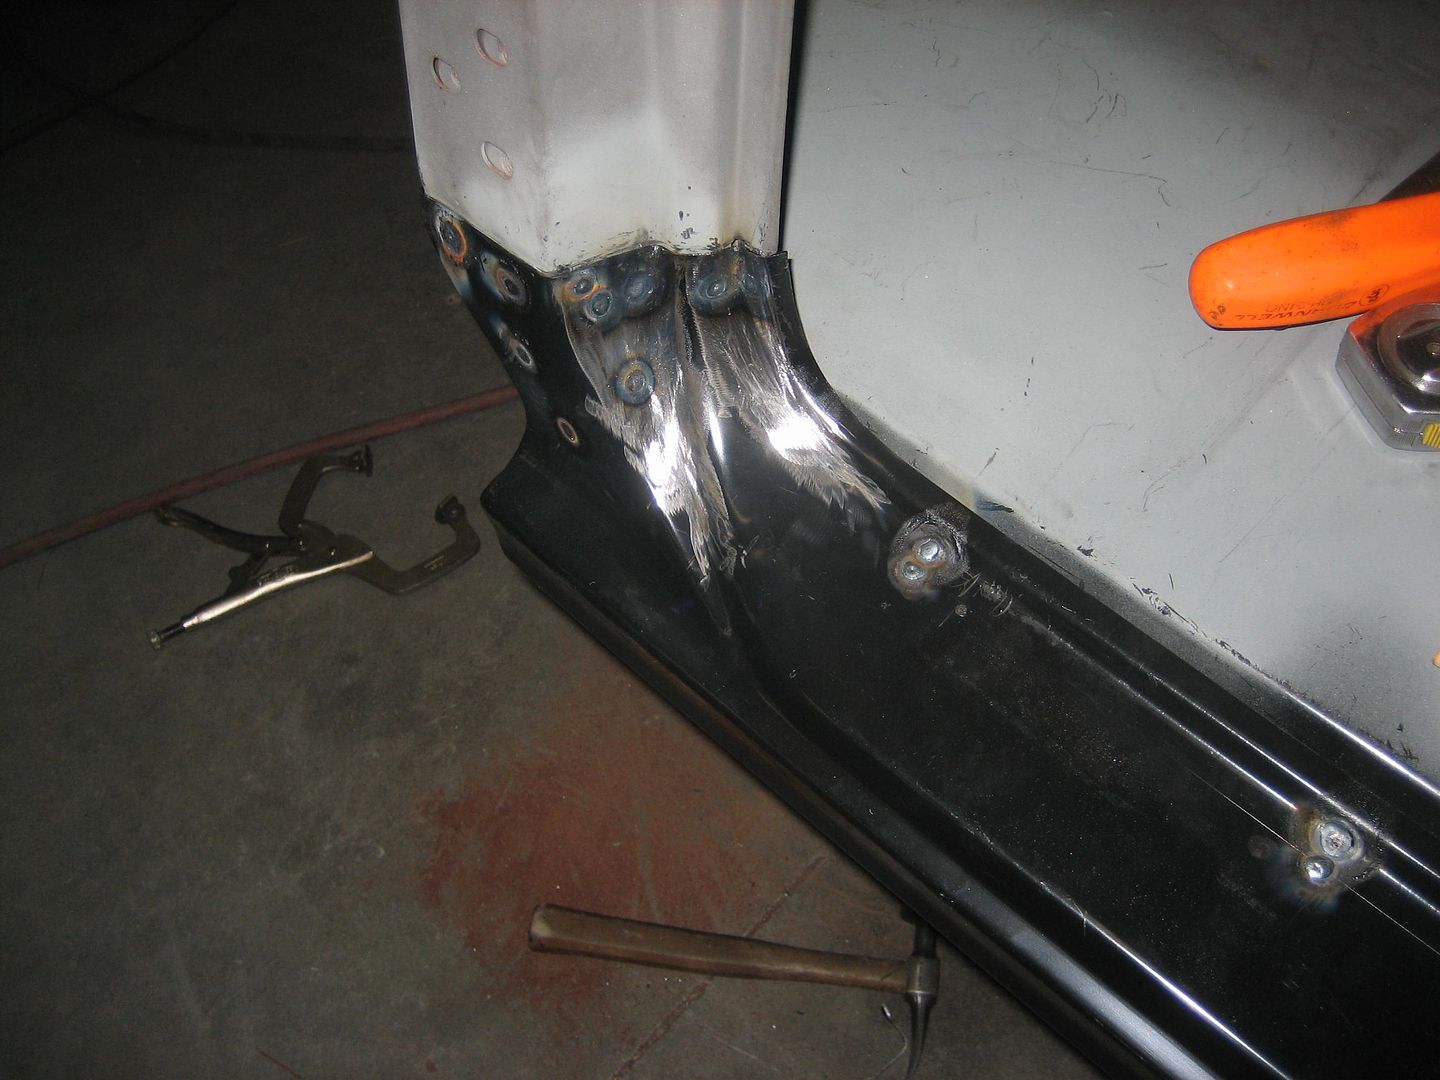 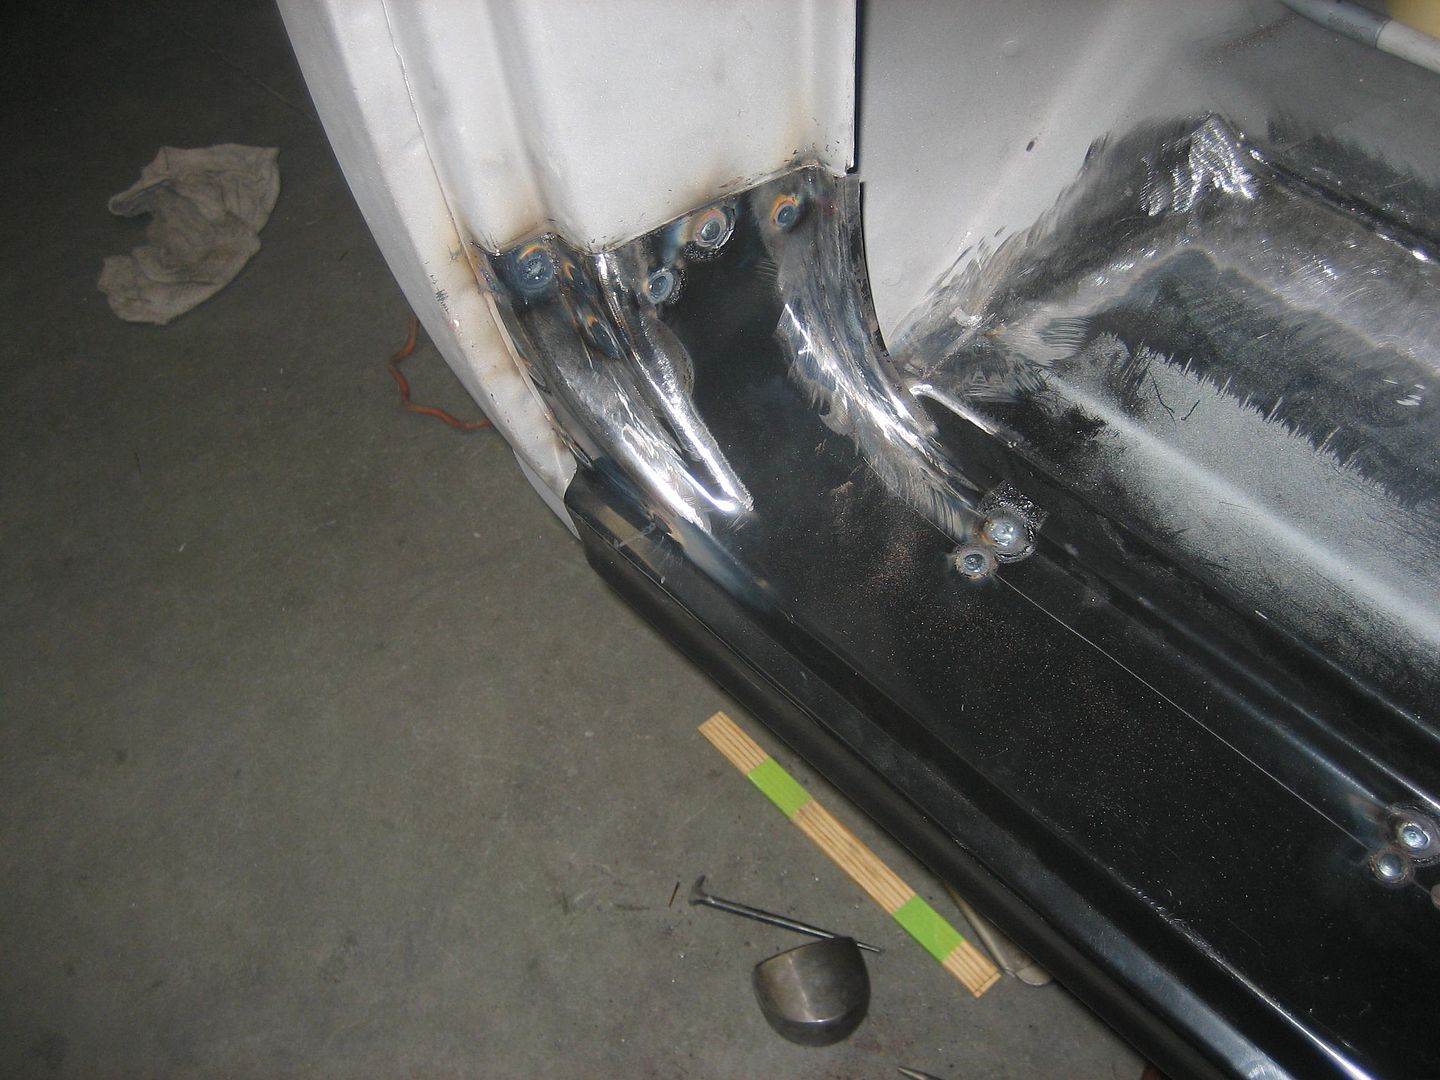 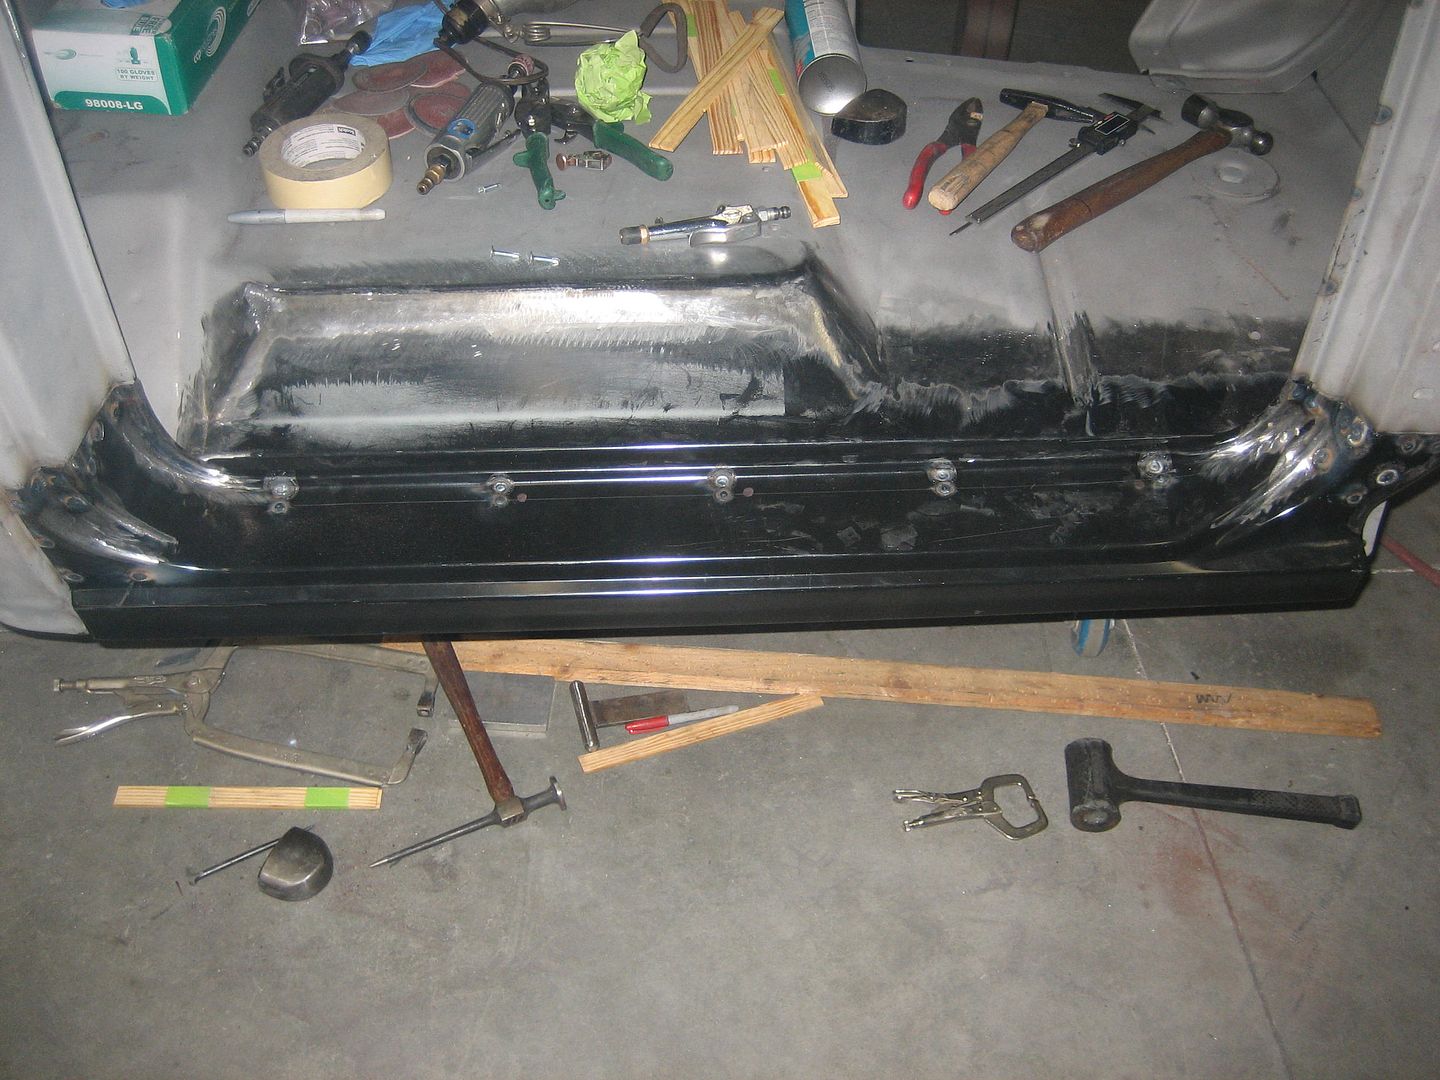 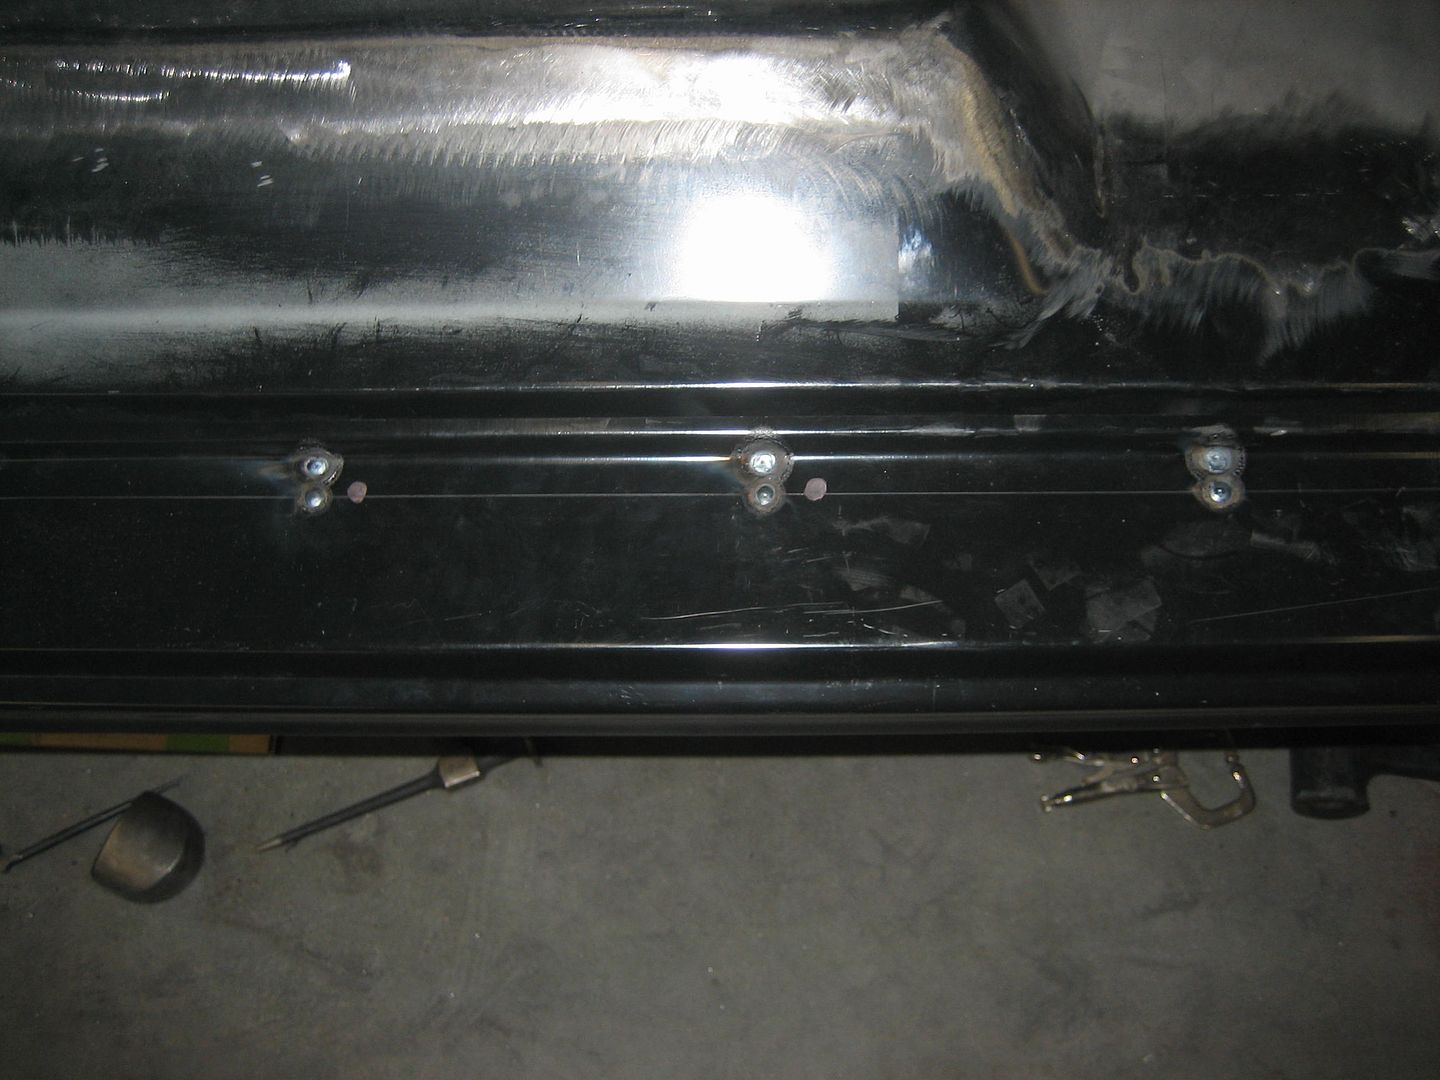 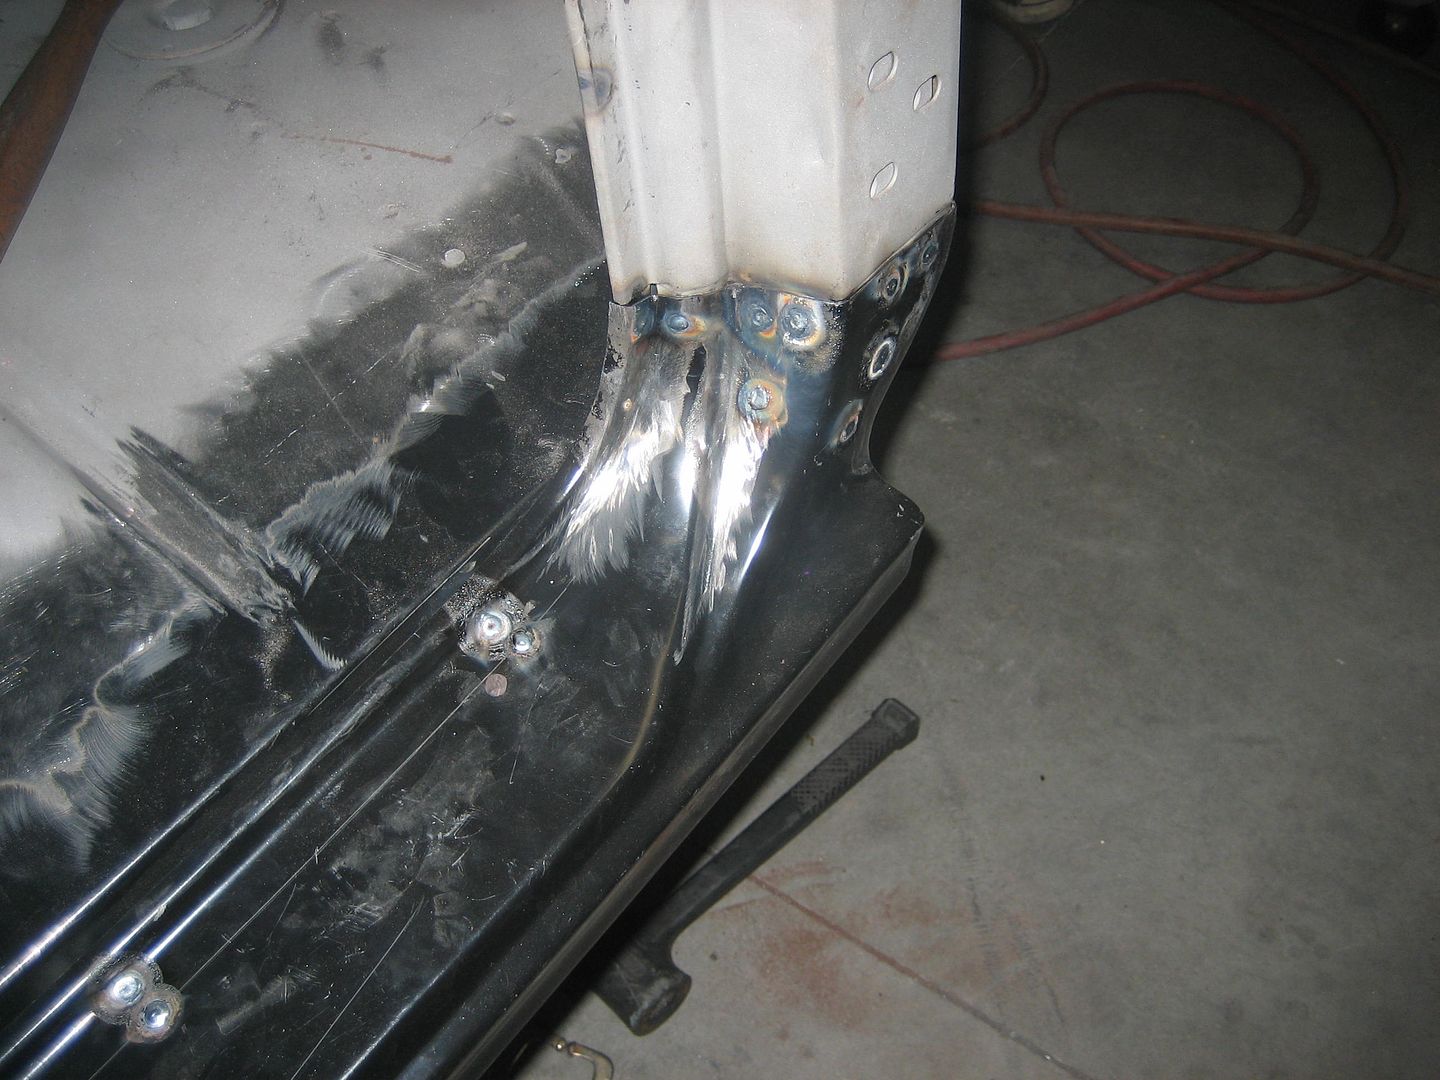
__________________
1932 Chevy Roadster Car and Pick-Up - http://67-72chevytrucks.com/vboard/s...d.php?t=465709 1966 K20 Factory 4X4 - http://67-72chevytrucks.com/vboard/s...d.php?t=455484 (Sold) 1972 K5 Blazer (Sold) - http://67-72chevytrucks.com/vboard/s...ad.php?t=87530 2007 TrailBlazer SS - http://67-72chevytrucks.com/vboard/s...34#post4706534 Last edited by LeftCoast32; 10-09-2011 at 10:35 AM. |
|
|
|
|
10-10-2011, 12:01 AM
|
#67 | |
|
Junk Yartist
Join Date: Jul 2009
Location: Greeley, CO
Posts: 2,203
|
Re: 1966 K20 Project
Quote:
Freakin' awesome work man!
__________________
-Jeremy YOU ONLY FAIL IF YOU STOP TRYING 70 Crew Cab Build Link 70 GMC Suburban 4X4 build thread 95 Yukon Daily Driver Rebuilding an NP205 |
|
|
|
|
|
10-10-2011, 01:39 AM
|
#68 |
|
Custom Builder
Join Date: Jun 2003
Location: Carlsbad, California
Posts: 908
|
Re: 1966 K20 Project
The welds done like this in TIG are very nice and easy to clean up. I am going to blend them till you cant tell them from factory spot welds. They could easily be blended so they are completely gone. I want them to look like the factory spot welds.
__________________
1932 Chevy Roadster Car and Pick-Up - http://67-72chevytrucks.com/vboard/s...d.php?t=465709 1966 K20 Factory 4X4 - http://67-72chevytrucks.com/vboard/s...d.php?t=455484 (Sold) 1972 K5 Blazer (Sold) - http://67-72chevytrucks.com/vboard/s...ad.php?t=87530 2007 TrailBlazer SS - http://67-72chevytrucks.com/vboard/s...34#post4706534 |
|
|
|
|
10-10-2011, 07:13 AM
|
#69 |
|
Registered User
Join Date: Oct 2011
Location: EUGENE
Posts: 20
|
Re: 1966 K20 Project
damnn, my first truck was a 66 1/2 ton 2wd. small window long box. 250 inilne6 with a 4sp granny gear. your build makes me regret selling it. u got a really good base for a solid truck there, mine was more rusted than that, and i got by with it. have fun and keep up the work!
|
|
|
|
|
10-10-2011, 07:25 PM
|
#70 | |
|
Custom Builder
Join Date: Jun 2003
Location: Carlsbad, California
Posts: 908
|
Re: 1966 K20 Project
Quote:
__________________
1932 Chevy Roadster Car and Pick-Up - http://67-72chevytrucks.com/vboard/s...d.php?t=465709 1966 K20 Factory 4X4 - http://67-72chevytrucks.com/vboard/s...d.php?t=455484 (Sold) 1972 K5 Blazer (Sold) - http://67-72chevytrucks.com/vboard/s...ad.php?t=87530 2007 TrailBlazer SS - http://67-72chevytrucks.com/vboard/s...34#post4706534 |
|
|
|
|
|
10-11-2011, 08:10 PM
|
#71 |
|
Custom Builder
Join Date: Jun 2003
Location: Carlsbad, California
Posts: 908
|
Re: 1966 K20 Project
Got a little more done on the Cab today.
The rockers are now fully welded in top and bottom. We blended the spot welds in the door opening. 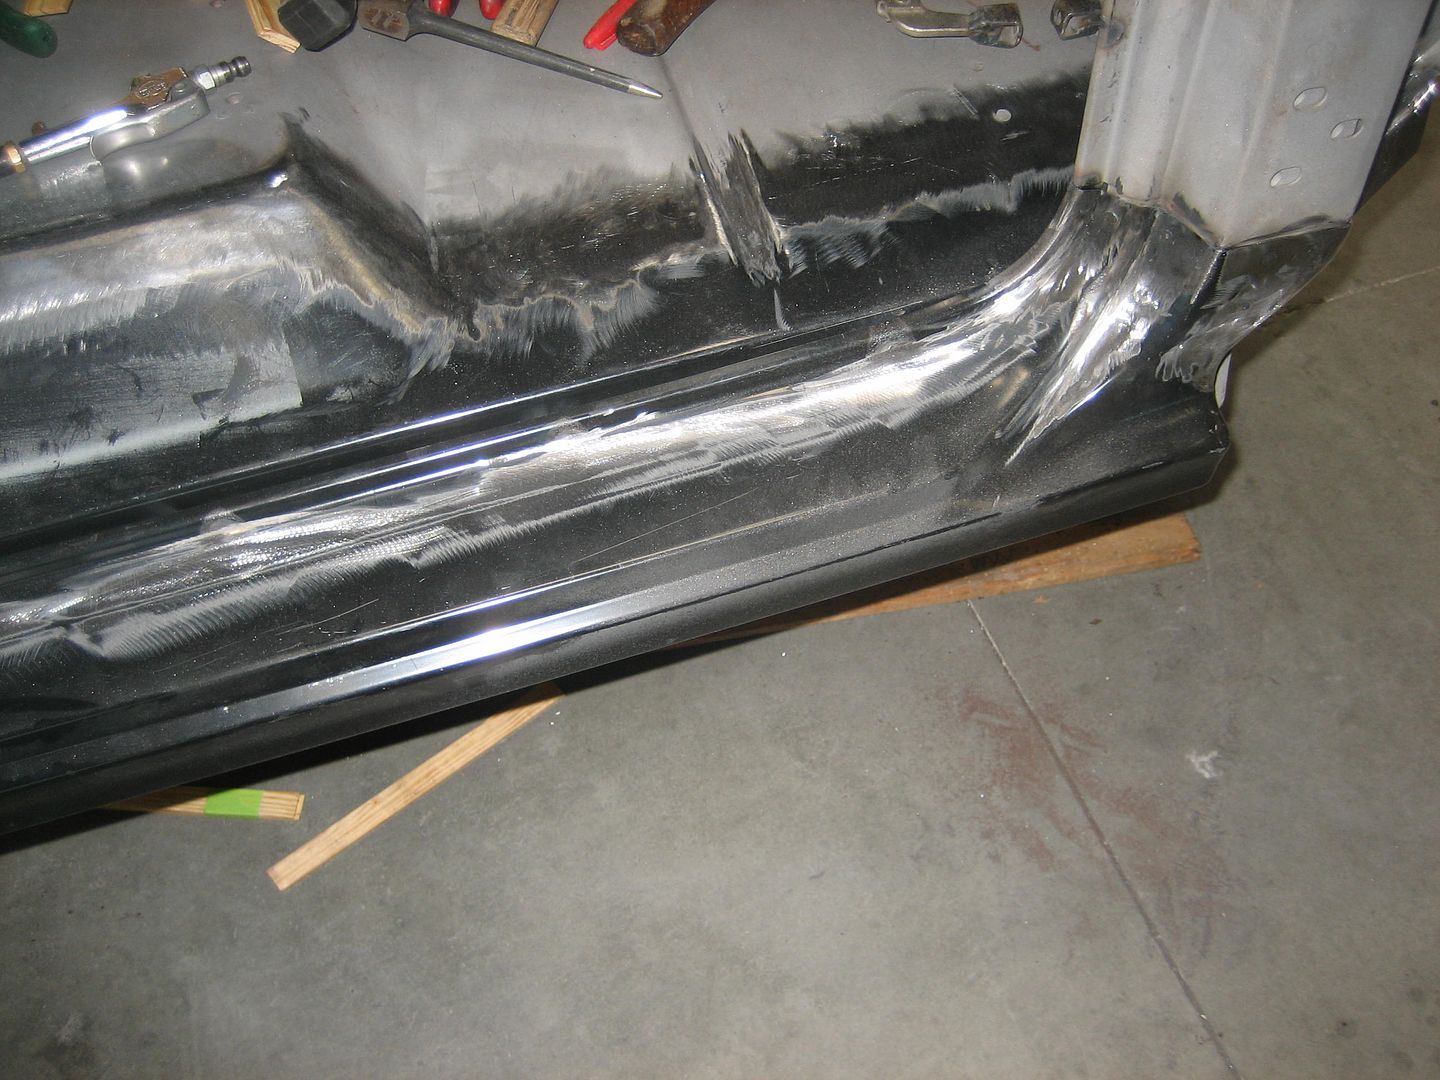  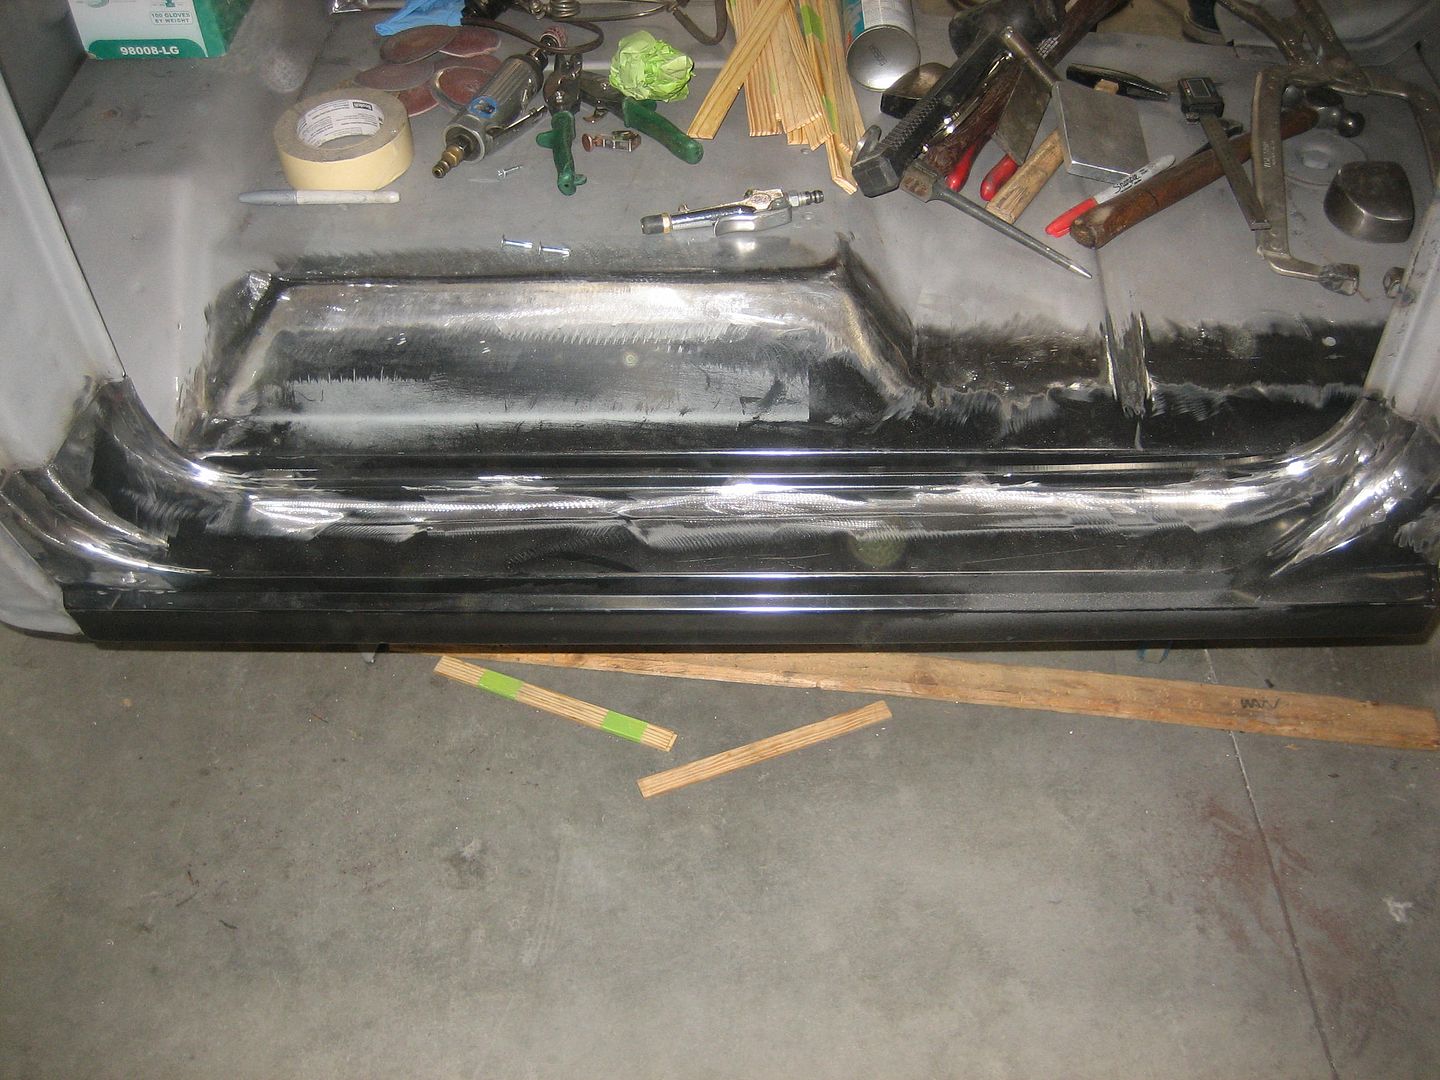   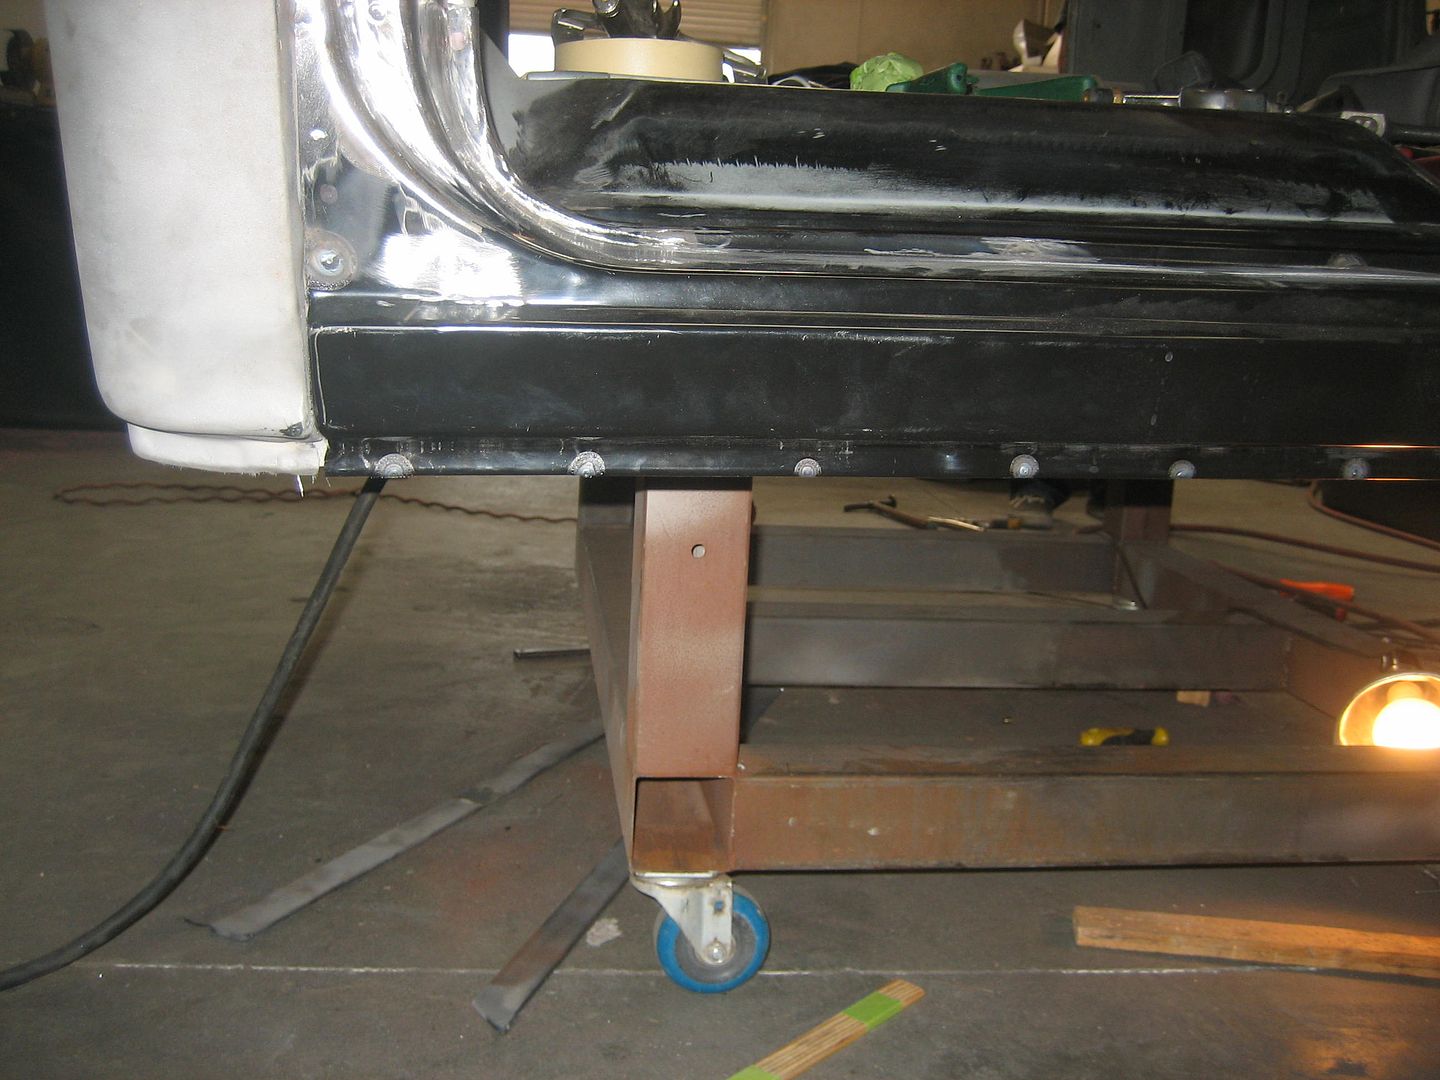
__________________
1932 Chevy Roadster Car and Pick-Up - http://67-72chevytrucks.com/vboard/s...d.php?t=465709 1966 K20 Factory 4X4 - http://67-72chevytrucks.com/vboard/s...d.php?t=455484 (Sold) 1972 K5 Blazer (Sold) - http://67-72chevytrucks.com/vboard/s...ad.php?t=87530 2007 TrailBlazer SS - http://67-72chevytrucks.com/vboard/s...34#post4706534 Last edited by LeftCoast32; 10-11-2011 at 08:17 PM. |
|
|
|
|
10-12-2011, 09:12 PM
|
#72 |
|
Custom Builder
Join Date: Jun 2003
Location: Carlsbad, California
Posts: 908
|
Re: 1966 K20 Project
We were able to get a few more hours on the Cab today.
Cab Corner is all welded and blended. We had a patch that was needed in the B-Pillar (Sail Panel). It is all welded in and blended. We patched the Gas Filler Hole in the cab. We took the cab off the stand so we could work on a few dents on the roof. We will be rolling it on its back to dress up all the welds on the bottom of the cab tomorrow. Everything is looking great at this point.  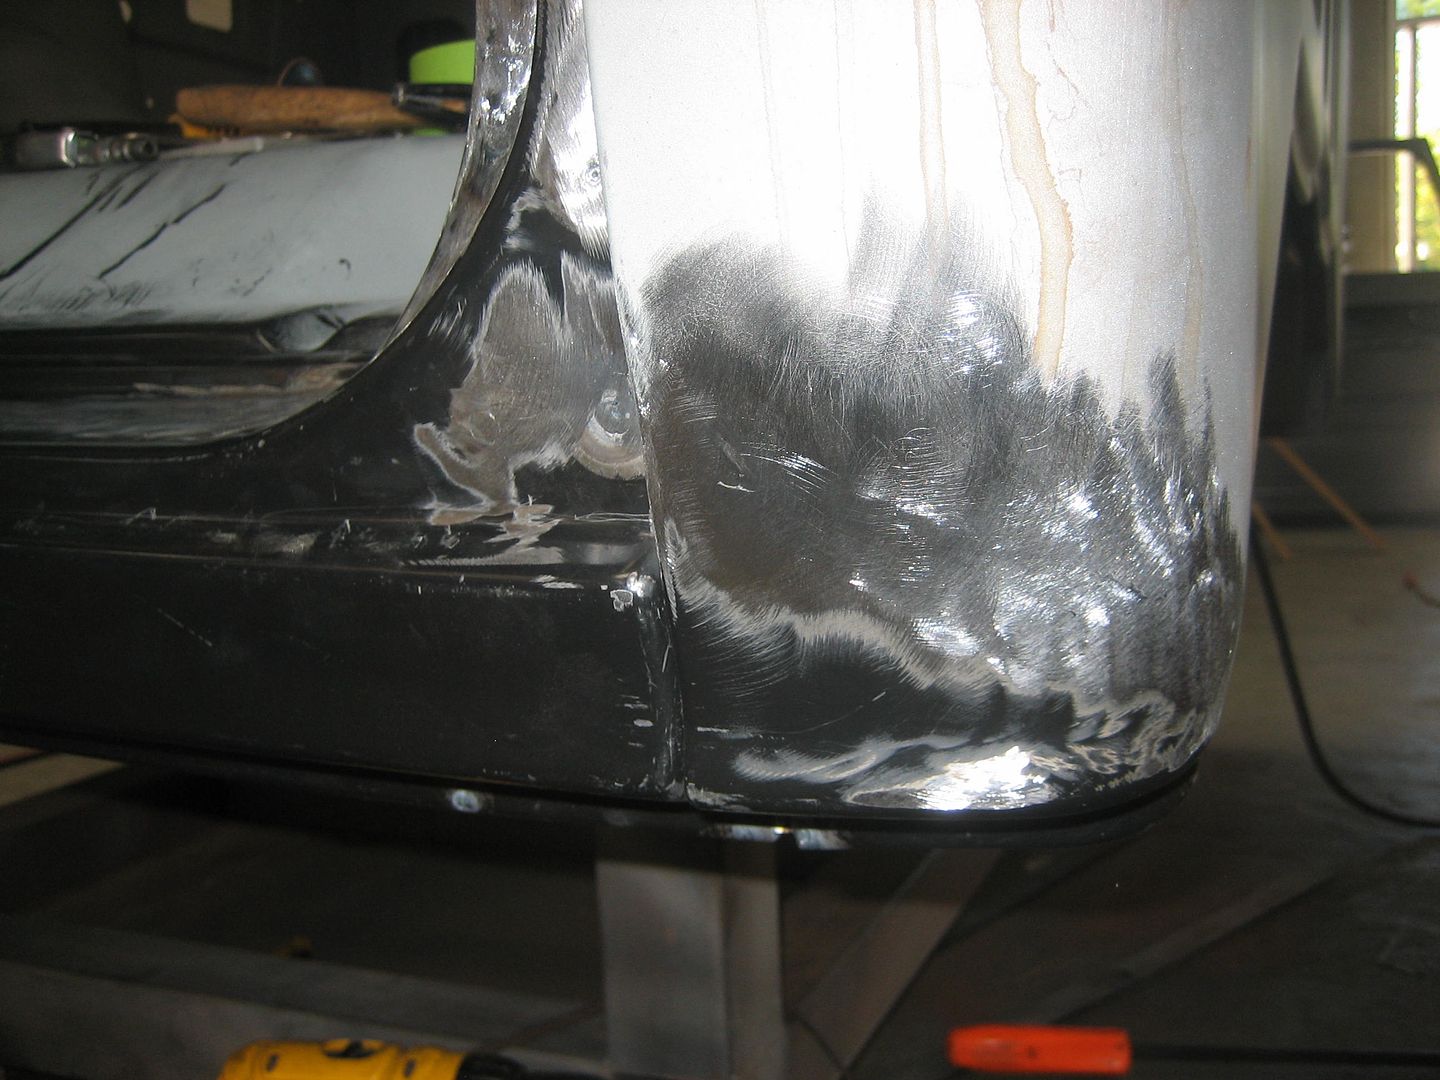 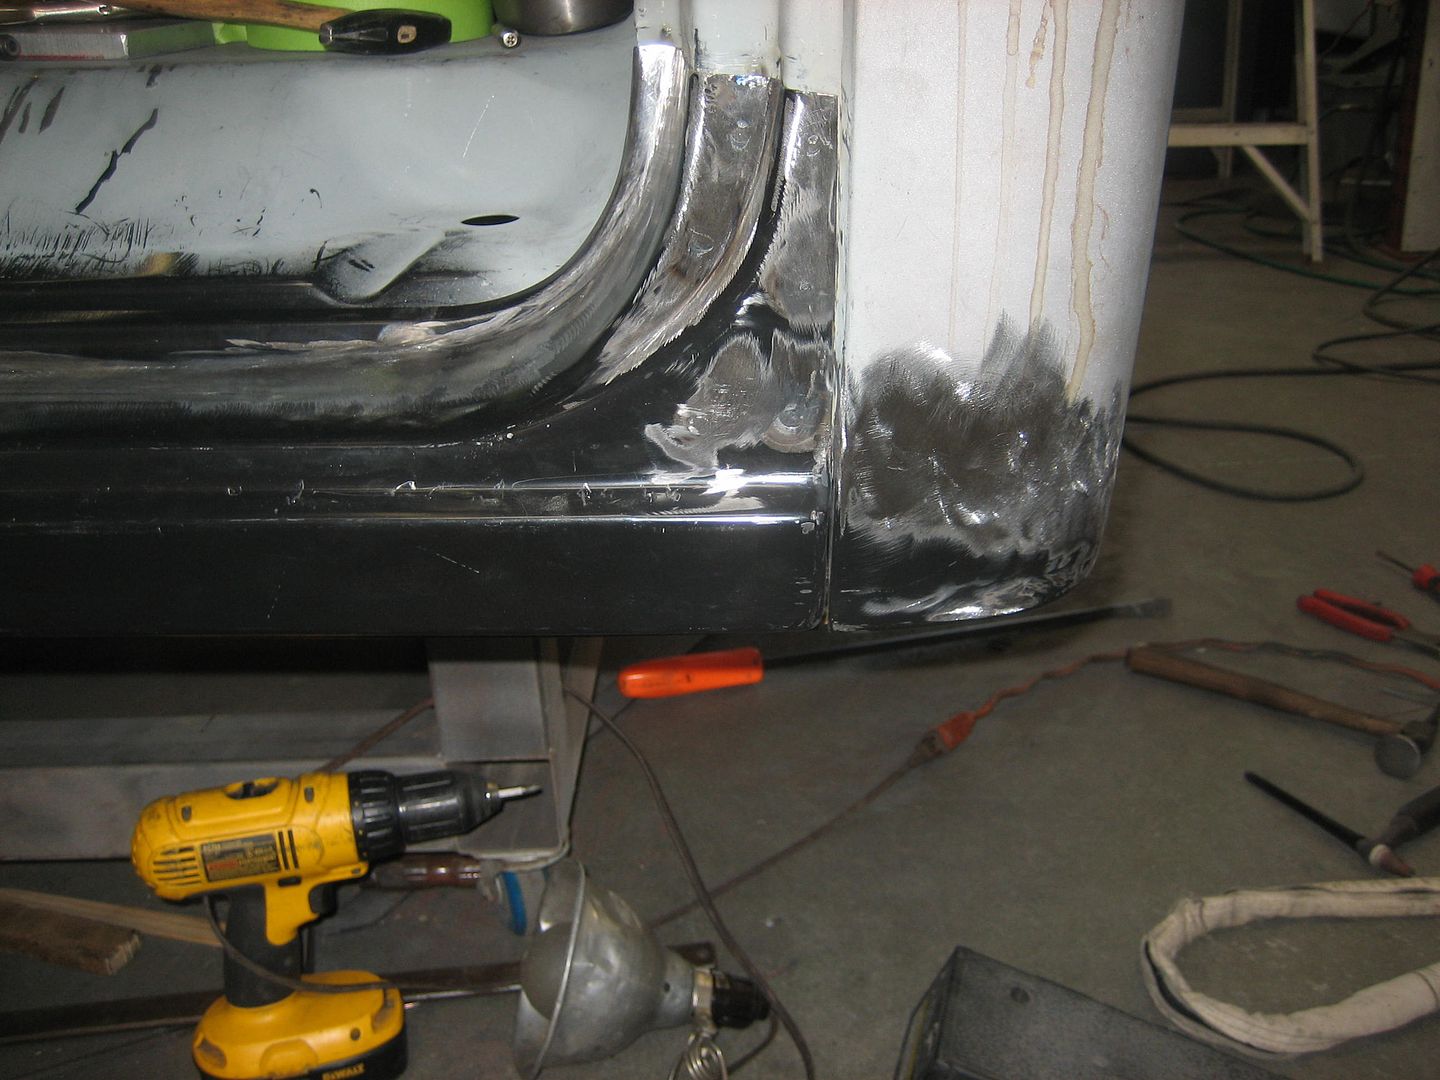 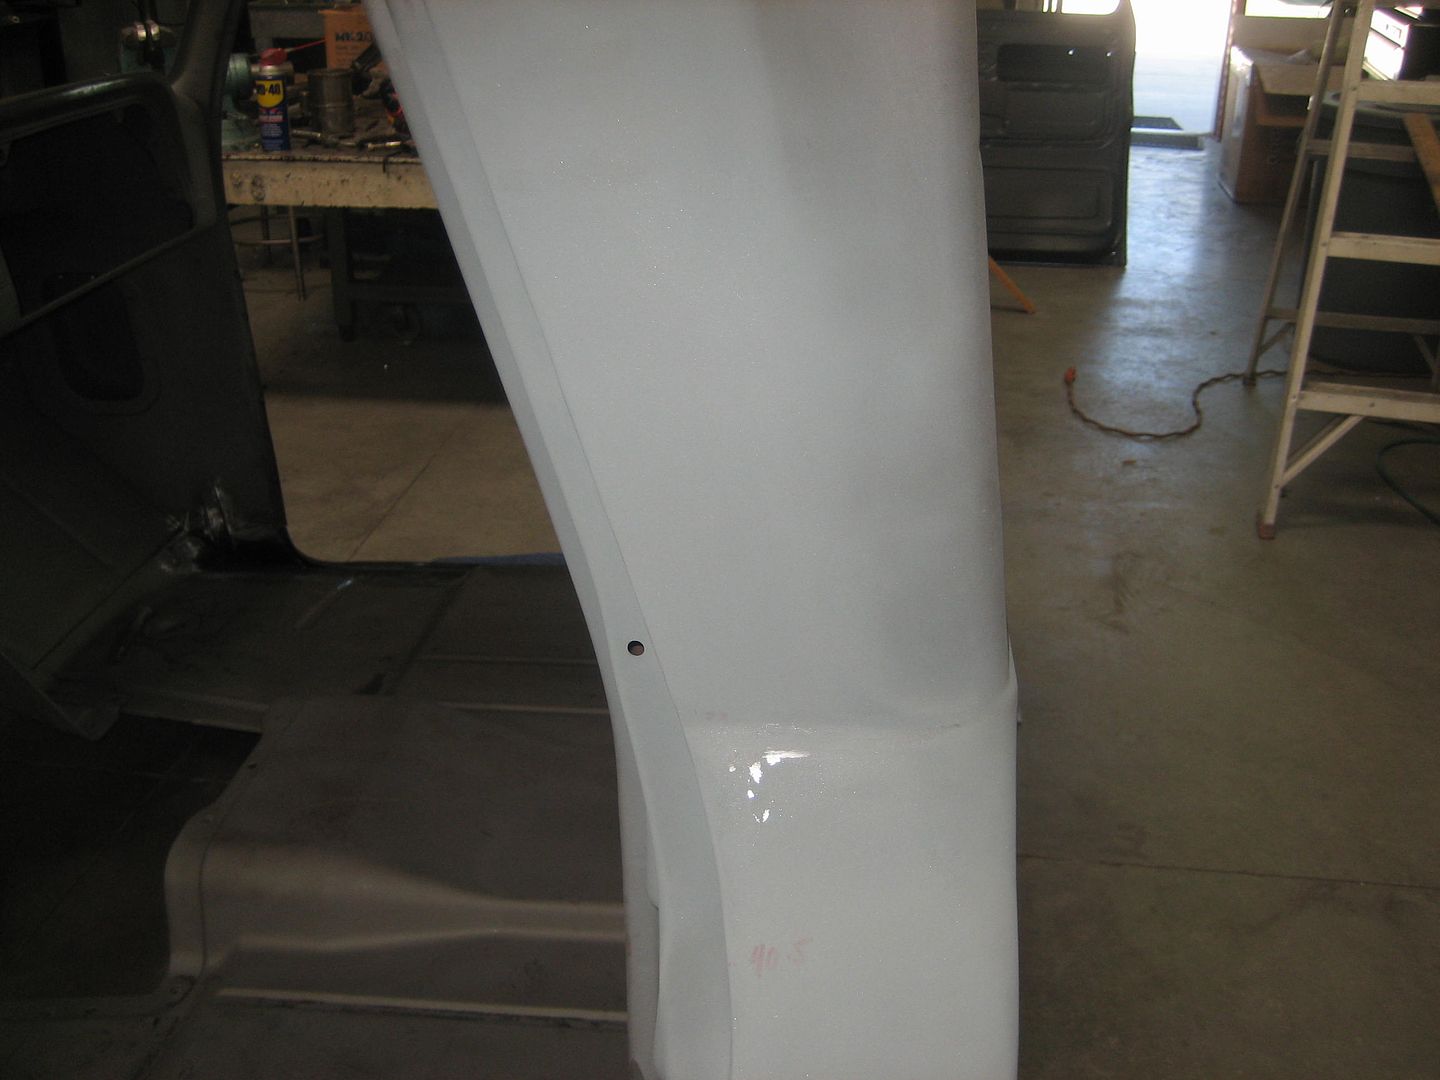 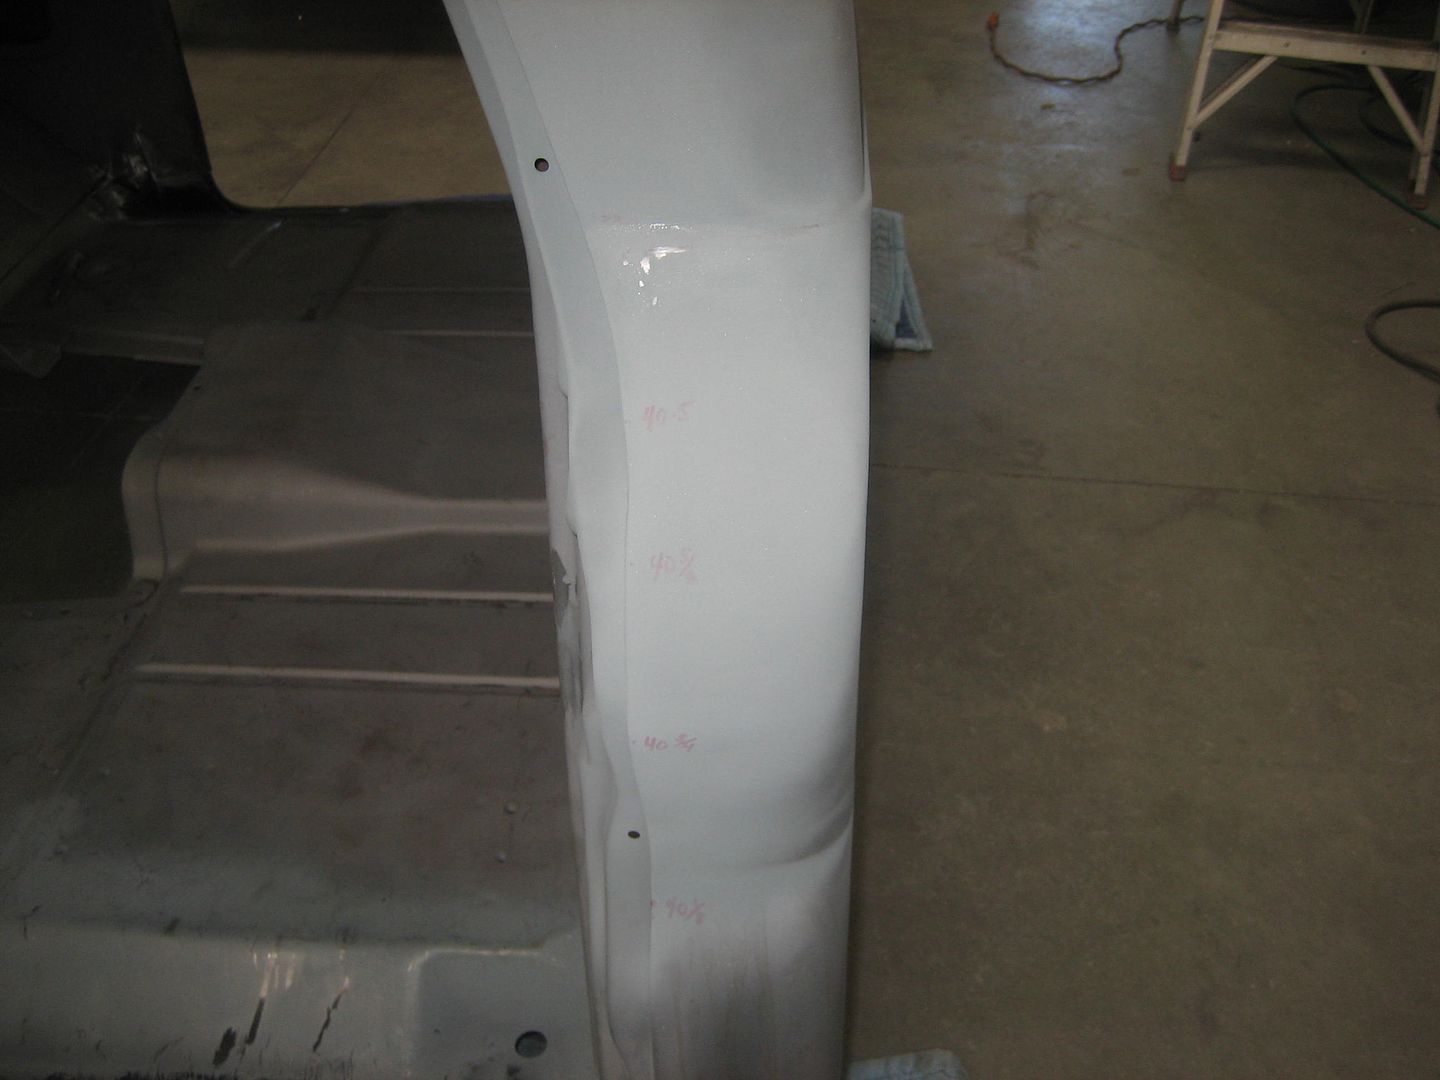 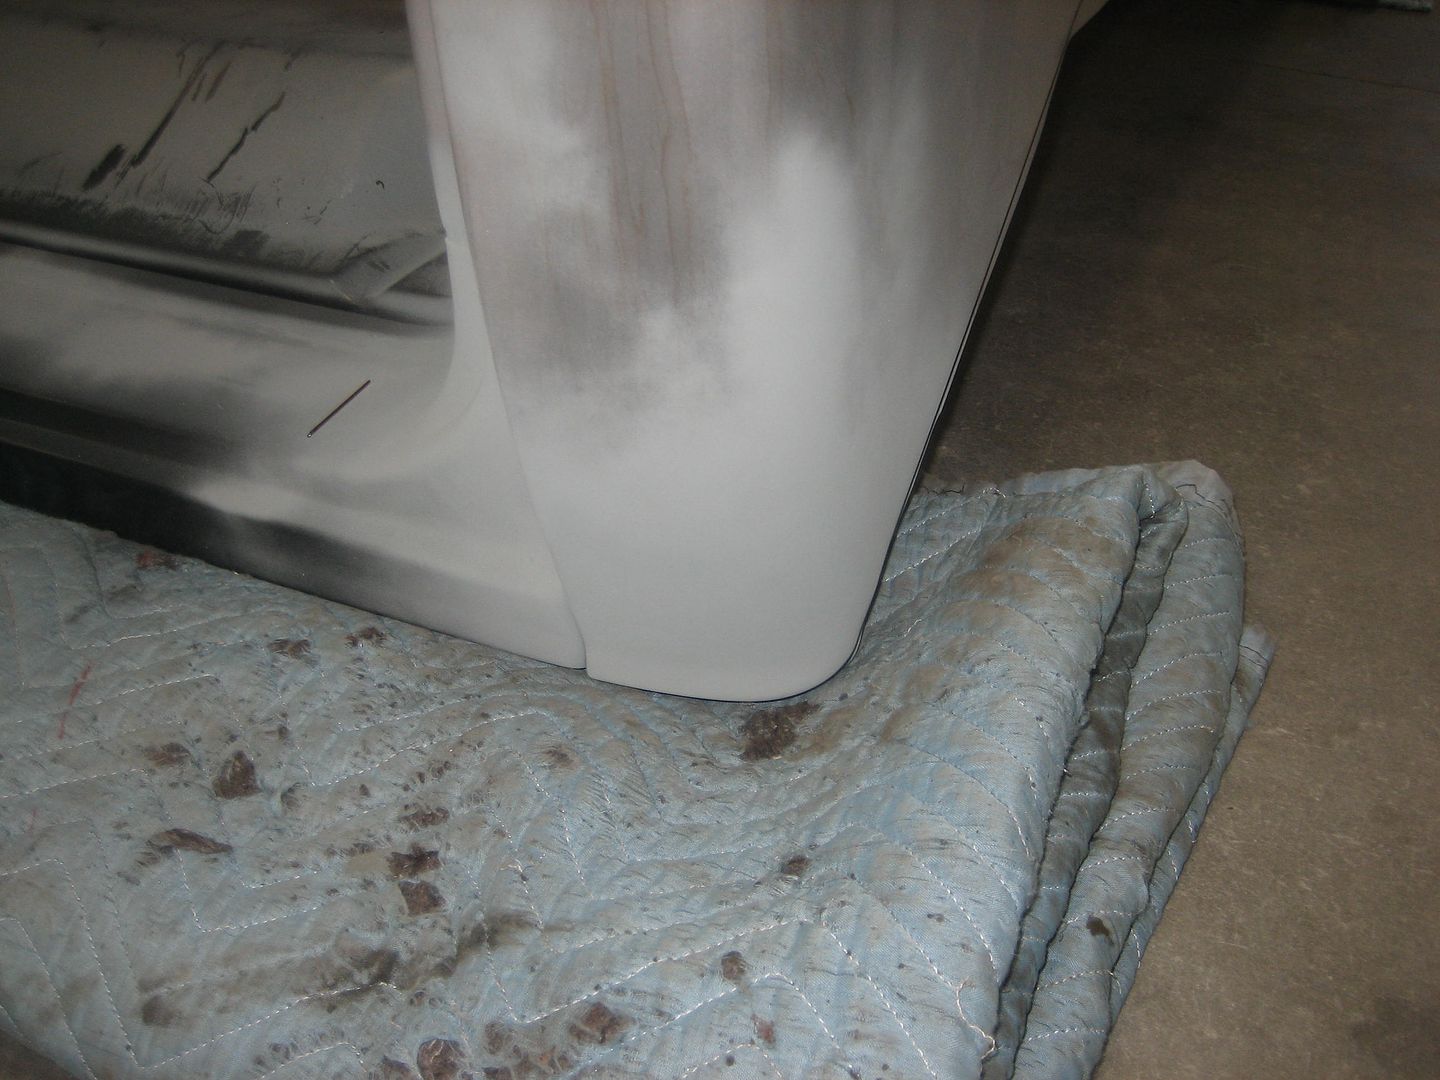
__________________
1932 Chevy Roadster Car and Pick-Up - http://67-72chevytrucks.com/vboard/s...d.php?t=465709 1966 K20 Factory 4X4 - http://67-72chevytrucks.com/vboard/s...d.php?t=455484 (Sold) 1972 K5 Blazer (Sold) - http://67-72chevytrucks.com/vboard/s...ad.php?t=87530 2007 TrailBlazer SS - http://67-72chevytrucks.com/vboard/s...34#post4706534 |
|
|
|
 |
| Bookmarks |
|
|


 Linear Mode

