
|
 02-23-2015, 06:00 PM
|
#151 |
|
Registered User
Join Date: Aug 2010
Location: Hoofddorp, the Netherlands
Posts: 582
|
Re: 1969 Custom/10 clean up
Through a Dutch importer I ordered some stuff from LMC Trucks today:
Paintable front bumper, because I want an all black face, no chrome  the signal switch which hopefully will solve my wanky blinker problem. and some more rear brake stuff, because I'm not as 'meticulous' as I should be. 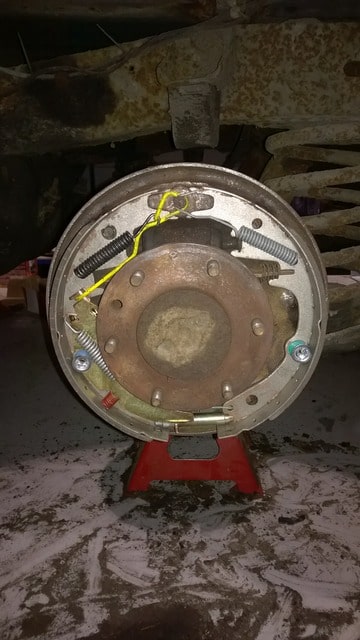 the rights brake shoes all went on without to much hassle, hence my suprise when I tried mounting the left side and I just couldn't get it right. first of all the left brake wheel cilinder appeared to be leaking, something I didn't notice before, but that's no biggy. I have restored my fair share of brake cilinders in my life. But then I noticed the park brake lever (the one in the drum with the cable attached) sat in a funny position... a simple tug at the cable revealed it was jammed stuck. so..in my LMC order are brake wheel cilinders and new park brake cables so apart from the backing plate, everything will be new.
__________________
Feedback is always welcome! projects: 1969 Chevy C10 1950 GMC 100 1958 Chevy C60 Viking ratrod |

|

|
|
02-27-2015, 11:37 AM
|
#152 |
|
Registered User
Join Date: Aug 2010
Location: Hoofddorp, the Netherlands
Posts: 582
|
Re: 1969 Custom/10 clean up
Yesterday I visited an acoustics shop, where they sell everything that has to do with sound deadening, house, boat, car you name it, they'll have it.
and ofcourse I couldn't leave empty handed, so I picked up 4 sq meters that'll be about 13 sq foot of Vibraflex for the floor 2 sq meters (6,5 sq foot) StP Gold for the doors, rear wall and fire wall. I just realized that might be a bit to little..but I'll find out as I'm installing it.   Hopefully I'll get to it this weekend, because now where having decent whether and I'm busy smoking 8 pounds of Livar Ribs..yummie!
__________________
Feedback is always welcome! projects: 1969 Chevy C10 1950 GMC 100 1958 Chevy C60 Viking ratrod |
|
|
|
|
02-27-2015, 06:24 PM
|
#153 |
|
Registered User
Join Date: Dec 2013
Location: Purmerend, Netherlands
Posts: 1,657
|
Re: 1969 Custom/10 clean up
Steve, do you have a link to this company?
I need some of that too in the near future....
__________________
Cheers!! Kees. 1959 Chevy Fleetside Longbed My build: http://67-72chevytrucks.com/vboard/s...d.php?t=643426 Kool Guyz CC Instagram: _King_Kustom_ |
|
|
|
|
03-01-2015, 12:46 PM
|
#154 | |
|
Registered User
Join Date: Aug 2010
Location: Hoofddorp, the Netherlands
Posts: 582
|
Re: 1969 Custom/10 clean up
Quote:
__________________
Feedback is always welcome! projects: 1969 Chevy C10 1950 GMC 100 1958 Chevy C60 Viking ratrod |
|
|
|
|
|
03-02-2015, 04:29 AM
|
#155 |
|
Registered User
Join Date: Dec 2013
Location: Purmerend, Netherlands
Posts: 1,657
|
Re: 1969 Custom/10 clean up
Thanks!!
Don't forget to mention if it works!!
__________________
Cheers!! Kees. 1959 Chevy Fleetside Longbed My build: http://67-72chevytrucks.com/vboard/s...d.php?t=643426 Kool Guyz CC Instagram: _King_Kustom_ |
|
|
|
|
03-07-2015, 08:41 PM
|
#156 | |
|
GEARHEAD
Join Date: Aug 2003
Location: MN
Posts: 6,107
|
Re: 1969 Custom/10 clean up
Quote:
Good luck with the brakes.
__________________
If no one knows what you're doing, they can't tell you you're doing it wrong HG's Dream Car Build - Shelby Cobra Kit Build your own adjustable track bar 71  Long Fleet C/10 Long Fleet C/10 72  Jimmy 4x4 (Junkyard Jimmy) Jimmy 4x4 (Junkyard Jimmy)HG's Plow Truck '78  K35 Dually K35 DuallyBigass Farm Truck HG's thread of miscellaneous stuff |
|
|
|
|
|
03-10-2015, 02:32 PM
|
#157 | |
|
Registered User
Join Date: Aug 2010
Location: Hoofddorp, the Netherlands
Posts: 582
|
Re: 1969 Custom/10 clean up
Quote:
__________________
Feedback is always welcome! projects: 1969 Chevy C10 1950 GMC 100 1958 Chevy C60 Viking ratrod |
|
|
|
|
|
04-07-2015, 06:16 PM
|
#158 |
|
Registered User
Join Date: Aug 2010
Location: Hoofddorp, the Netherlands
Posts: 582
|
Re: 1969 Custom/10 clean up
Sorry guys, I really suck in keeping this thread up to date...fulltime job with overtime, son, gym, squash, Slow cooking BBQ, friends, family..it all takes up time
Oh and I have to work on my truck sometimes! But let me get you back up to speed. I got the sound deadning in and it was an easy enough job, just use a paint stripper gun and a special roller. The vibraflex, once heated, was stretchable over humps and could be compressed into dents. the doors we filled on the inside with the StP Gold and that the glue on that is amazing. the doors were not that clean or smooth on the inside, but it sticks like hell, so I'm happy with the results. Next we desided to manufacture some doorpanels out of multiplex. they fit nicely, except for the hump where the arm rest gets bolted on. So the panel sits a bit curved if I were to bolt it down to the door. I could do with a good suggestion here Also the friend of mine in Riverside filled a suitcase with goodies which his visiting brother took back to Netherlands (Hope the dutch IRS isn't following this forum) so I got my rear brakes all ready! replaced the E-brake kabels and brake cylinders which were the last old parts. Bled the brakes using vacuum, which by the way is soooo much faster and saver then pumping the pedal. and now the truck should be rolling and braking Coming Friday evening we'll be going for a test run. Also got my new front bumper in, which we test fitted to get it aligned. now only left is painting it. got some other stuff in, like new motormounts, indicators and parklights..but those don't have priority right now. first get her ready for M.O.T. here the doorpanels, which need some work.  here what we want to use to bolt them down 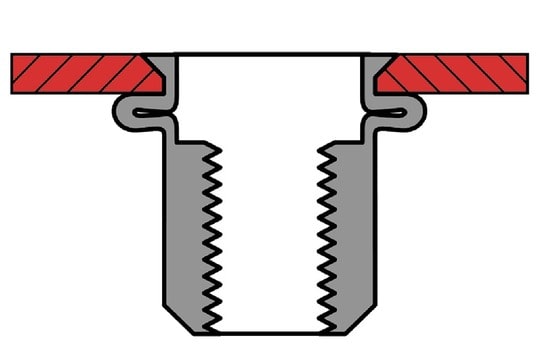 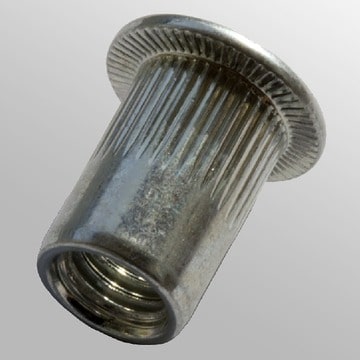 tools for the job 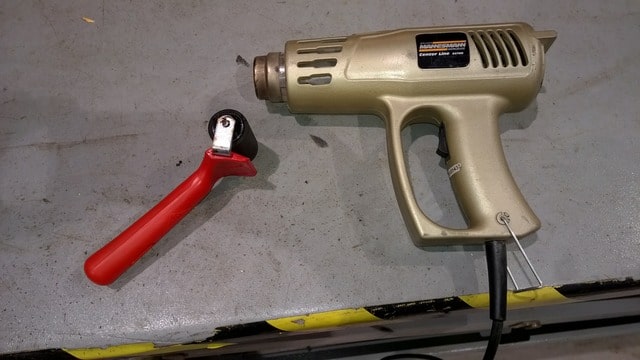 the floor sound deadning ande backpanel (which is the same stuff as in the doors) 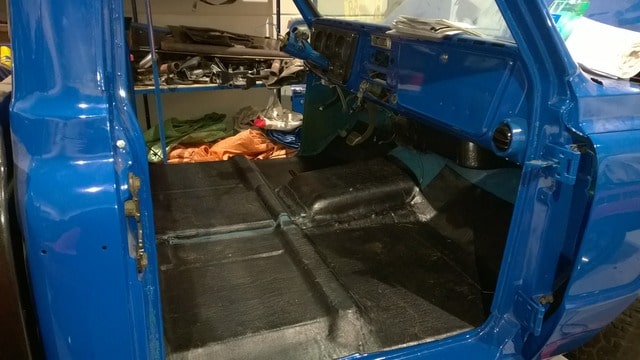 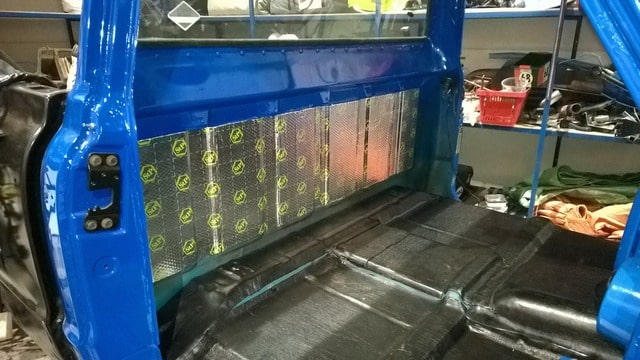 new e-brake cable and brake cylinders (yes both sides got new )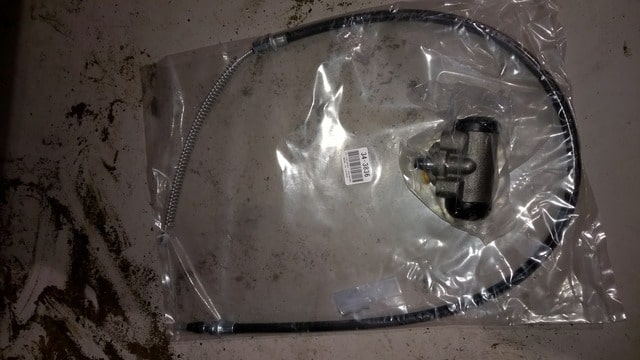 and my new front bumper 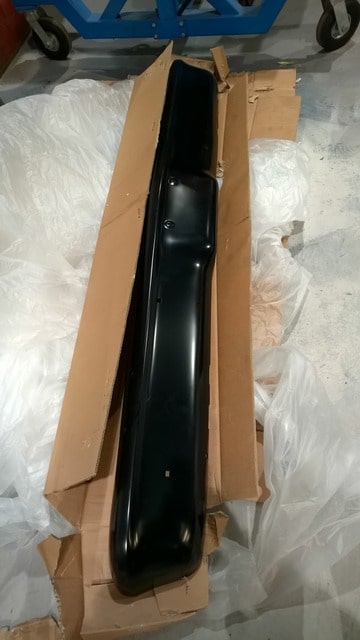
__________________
Feedback is always welcome! projects: 1969 Chevy C10 1950 GMC 100 1958 Chevy C60 Viking ratrod Last edited by Steve-W; 04-07-2015 at 06:40 PM. |
|
|
|
|
04-09-2015, 03:48 PM
|
#159 |
|
Registered User
Join Date: Dec 2013
Location: Purmerend, Netherlands
Posts: 1,657
|
Re: 1969 Custom/10 clean up
Nice new parts, Steve!
Are you ready to testdrive it yet, tomorrow? If so, succes!!!
__________________
Cheers!! Kees. 1959 Chevy Fleetside Longbed My build: http://67-72chevytrucks.com/vboard/s...d.php?t=643426 Kool Guyz CC Instagram: _King_Kustom_ |
|
|
|
|
04-10-2015, 11:58 AM
|
#160 |
|
GEARHEAD
Join Date: Aug 2003
Location: MN
Posts: 6,107
|
Re: 1969 Custom/10 clean up
If the door panel is hitting on the arm rest you should see a mark there when you remove it. Just chisel or use a router to remove some of the wood there so it sits back further. Could even cut all the way through and the arm rest will cover it.
I have used the thread-o-lets or riv-nuts on my truck. They work great. If you can put a bolt in them from the back side then set the door panel in place and tap it where it hits the end of the bolt you will know exactly where to drill the panel. Good luck on your test drive today.
__________________
If no one knows what you're doing, they can't tell you you're doing it wrong HG's Dream Car Build - Shelby Cobra Kit Build your own adjustable track bar 71 Long Fleet C/10 72 Jimmy 4x4 (Junkyard Jimmy)HG's Plow Truck '78 K35 DuallyBigass Farm Truck HG's thread of miscellaneous stuff |
|
|
|
|
04-10-2015, 01:00 PM
|
#161 | |
|
Registered User
Join Date: Aug 2010
Location: Hoofddorp, the Netherlands
Posts: 582
|
Re: 1969 Custom/10 clean up
Quote:
I'll be heading over to the garage in a hour, first picking up a mate who will help me out. we'll be filling the cooling system with water and the cleaning stuff to get rid of the muck and grub. then proper coolant. I'll be sure to film the first yards it drives Mostly I am curious about the brakes.
__________________
Feedback is always welcome! projects: 1969 Chevy C10 1950 GMC 100 1958 Chevy C60 Viking ratrod |
|
|
|
|
|
04-10-2015, 05:48 PM
|
#162 |
|
GEARHEAD
Join Date: Aug 2003
Location: MN
Posts: 6,107
|
Re: 1969 Custom/10 clean up
If you still need arm rests, let me know. I probably have some extras in the garage.
__________________
If no one knows what you're doing, they can't tell you you're doing it wrong HG's Dream Car Build - Shelby Cobra Kit Build your own adjustable track bar 71 Long Fleet C/10 72 Jimmy 4x4 (Junkyard Jimmy)HG's Plow Truck '78 K35 DuallyBigass Farm Truck HG's thread of miscellaneous stuff |
|
|
|
|
04-11-2015, 04:17 PM
|
#163 | |
|
Registered User
Join Date: Aug 2010
Location: Hoofddorp, the Netherlands
Posts: 582
|
Re: 1969 Custom/10 clean up
Quote:
I think the cheapest way of shipping would be US postal? at LMC a set only costs $60,- so if I would order it at a dutch importer, it would cost me in total (including freight) about $110,- So depending on what shape their in, color and shipping cost, yes I'm interested 
__________________
Feedback is always welcome! projects: 1969 Chevy C10 1950 GMC 100 1958 Chevy C60 Viking ratrod |
|
|
|
|
|
04-11-2015, 04:50 PM
|
#164 |
|
Registered User
Join Date: Aug 2010
Location: Hoofddorp, the Netherlands
Posts: 582
|
Re: 1969 Custom/10 clean up
So..last night was the night of the testdrive..
I watched a movie on Youtube how to pre adjust the rear brakes, so I did that, adjusted the E-brake, put the wheels on and put it on it's wheels for the first time in over 2 years.. filled the tranny fluid, checked the engine oil and filled the radiator with water and the cleaning stuff. ofcourse she fired right up, but from the first moment she started rolling I could tell the brakes weren't what I expected...but hey, it was the first yard, so maybe the brakes needed some adjusting, setting etc. down below there's the movie of the very first yards it drives, I actually took it out a second time and rode it around the block, going halfway the block backwards pumping the brakes so they would adjust..but the brakes suck bigtime! they are hardly any better then having non booster powered drums in front and the back brakes closed off (yes the PO did that to prevent it from leaking?...) So or the I got the plumbing back to front on the master cilinder, which I don't thing should make such a difference, or the booster isn't working, because I do have vacuum. any advice is highly appreciated here. second disturbing thing I noticed what the harmoning balancer wobbling around and making a clunking noice? I tried to move it with my bare hands, but it seems to be on firmly..so whats that noise and why the wobble. I'll make a movie of that to, so it's clear what I'm talking about. ok without further ado..here's the vid' of the test drive check out this movie! here's two pic's of how it looks now, second one is my 4,5 year old son testing the hood 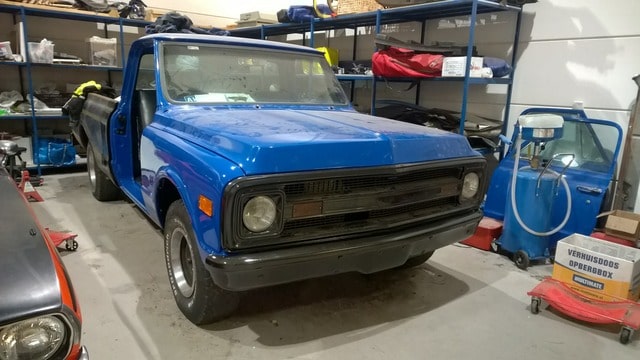 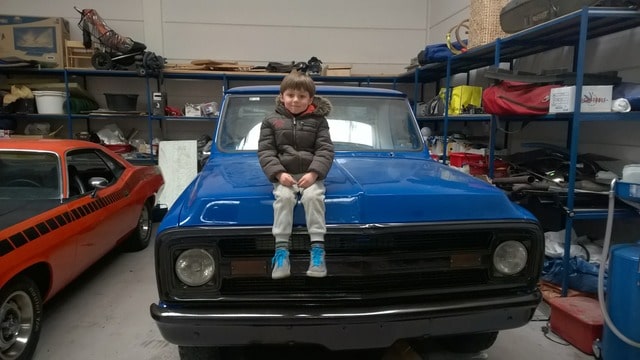
__________________
Feedback is always welcome! projects: 1969 Chevy C10 1950 GMC 100 1958 Chevy C60 Viking ratrod Last edited by Steve-W; 04-11-2015 at 05:13 PM. |
|
|
|
|
04-13-2015, 12:24 AM
|
#165 |
|
GEARHEAD
Join Date: Aug 2003
Location: MN
Posts: 6,107
|
Re: 1969 Custom/10 clean up
When I adjust the rear brakes I usually set them just below the drag point. Push the pedal and it grabs, release and it's not dragging on the shoes, but close. It's possible you have them reversed side to side, meaning the adjusters are on backwards. In any case, the front brakes should work well enough on their own. Some master cylinders are plumbed the opposite of what you think it should be. Normally the front brakes come off the forward most fitting and the rear off the back, but not always. Long idle trucks also can have problems with the pro portioning valve not working. I know you bled the brakes, but bleed them again. You used the vacuum method and if you didn't use the pedal method at all there could be air in the master cylinder, which should have been bled also.
It sounds great though. Good luck.
__________________
If no one knows what you're doing, they can't tell you you're doing it wrong HG's Dream Car Build - Shelby Cobra Kit Build your own adjustable track bar 71 Long Fleet C/10 72 Jimmy 4x4 (Junkyard Jimmy)HG's Plow Truck '78 K35 DuallyBigass Farm Truck HG's thread of miscellaneous stuff |
|
|
|
|
04-13-2015, 12:35 AM
|
#166 |
|
GEARHEAD
Join Date: Aug 2003
Location: MN
Posts: 6,107
|
Re: 1969 Custom/10 clean up
I've also heard of problems with new pro portioning valve not working at all. And I'm not sure if your mounting to the firewall and not set more level like they typically are matters or not. I don't think it matters, but maybe.
__________________
If no one knows what you're doing, they can't tell you you're doing it wrong HG's Dream Car Build - Shelby Cobra Kit Build your own adjustable track bar 71 Long Fleet C/10 72 Jimmy 4x4 (Junkyard Jimmy)HG's Plow Truck '78 K35 DuallyBigass Farm Truck HG's thread of miscellaneous stuff |
|
|
|
|
04-13-2015, 12:48 AM
|
#167 |
|
Registered User
Join Date: Mar 2015
Location: Washington State
Posts: 1,644
|
Re: 1969 Custom/10 clean up
nice job. where did you get the front bumper?
|
|
|
|
|
04-13-2015, 04:26 PM
|
#168 | ||
|
Registered User
Join Date: Aug 2010
Location: Hoofddorp, the Netherlands
Posts: 582
|
Re: 1969 Custom/10 clean up
Quote:
Quote:
first testdrive without the vacuum connected to the brake booster, just to see if it does anything, then reroute the plumbing, then take out proportioning valve..and if all that does't show the problem, I'll set her on fire and drink myself to sleep  @88Stanger, the front bumper came from LMCtruck partnumber 38-9495 $99,-
__________________
Feedback is always welcome! projects: 1969 Chevy C10 1950 GMC 100 1958 Chevy C60 Viking ratrod Last edited by Steve-W; 04-13-2015 at 04:39 PM. |
||
|
|
|
|
04-17-2015, 08:49 PM
|
#169 |
|
Registered User
Join Date: Aug 2010
Location: Hoofddorp, the Netherlands
Posts: 582
|
Re: 1969 Custom/10 clean up
Tonight I didn't have much time, because some colleagues and me where out driving go karts for charity! but on the way back I passed the garage and I just had to solve one ohter issue I had.
from LMC I bought the turn signal switch. but once installed, I would connect my battery and the horn starts blearing!! the problem is in the construction of the turn signal switch. I had to file of some metal of my brand new switch, but hey atleast it works. 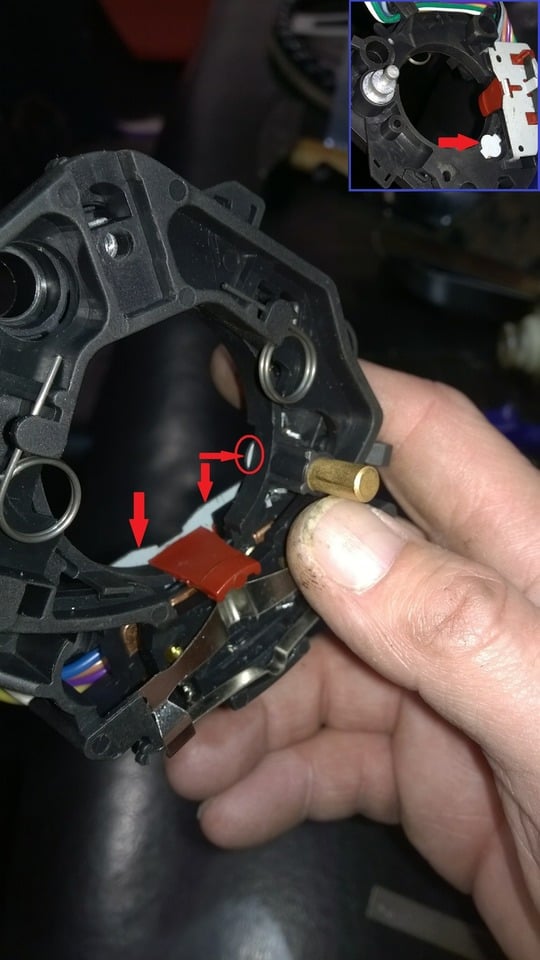 the circeled part is what connected to the top bearing switch support bracket thingy
__________________
Feedback is always welcome! projects: 1969 Chevy C10 1950 GMC 100 1958 Chevy C60 Viking ratrod |
|
|
|
|
04-19-2015, 05:05 PM
|
#170 |
|
Registered User
Join Date: Aug 2010
Location: Hoofddorp, the Netherlands
Posts: 582
|
Re: 1969 Custom/10 clean up
Another productive day yesterday, didn't get around the brake problem, but I had solved the problem I had with my turn signals.
the PO put in LED taillights and the left one had worked, but didn't since I put in the Easy wiring set. The turn signals also didn't work yet and when I pressed the brake, the brake light would turn off on the side which I selected with the turn signal. So starting at the back, I discovered that the left taillight connector had come loose some how, that was easy to fix. next I checked my ground cables, which looked alright, but I cleaned the metal underneeth just to make sure it was metal on metal and not metal on rust I then moved towards the front and re-read though my wiring set-up.. Shock and awe when I found out I connected up the wires in such a way the ground was completely missing  After fixing the left side, both front and back where working. tomorrow I'll get to the right side and hopefully the brake issue
__________________
Feedback is always welcome! projects: 1969 Chevy C10 1950 GMC 100 1958 Chevy C60 Viking ratrod |
|
|
|
|
04-20-2015, 05:48 PM
|
#171 |
|
Registered User
Join Date: Dec 2013
Location: Purmerend, Netherlands
Posts: 1,657
|
Re: 1969 Custom/10 clean up
And??
All lights are working now? Got into your brakes yet?
__________________
Cheers!! Kees. 1959 Chevy Fleetside Longbed My build: http://67-72chevytrucks.com/vboard/s...d.php?t=643426 Kool Guyz CC Instagram: _King_Kustom_ |
|
|
|
|
04-21-2015, 04:13 PM
|
#172 |
|
Registered User
Join Date: Aug 2010
Location: Hoofddorp, the Netherlands
Posts: 582
|
Re: 1969 Custom/10 clean up
Yup, all lights and blinkers are working fine now, so I changed the brake lines on the master brake cylinder back to front..but no improvement as far as I could tell. this tells me one atleast one thing:
It doesn't really matter how you hook up the front or rear brake lines. I did a bit of a sloppy job bleeding the brakes, so the pedal is a bit soft on the first press, but still I could tell the brakes didn't improve. One of my mates swears that it is because the brakes still have to be run in, but I know how new bakes feel and this is much worse another problem occured that my gearbox was out of oil.. I know it's leaky, but I got stuck after 20 yards on my test drive having lost the power to the rear  filled it up a bit and drove back to the garage. I think Ill bypass the brake balancer with the front brakes and see if that might solve something.
__________________
Feedback is always welcome! projects: 1969 Chevy C10 1950 GMC 100 1958 Chevy C60 Viking ratrod |
|
|
|
|
04-21-2015, 06:08 PM
|
#173 |
|
Registered User
Join Date: Dec 2013
Location: Purmerend, Netherlands
Posts: 1,657
|
Re: 1969 Custom/10 clean up
Maybe a dumm question, but are you using a residual valve(s) in your system?
That helps to hold a little pressure in your brakeline....
__________________
Cheers!! Kees. 1959 Chevy Fleetside Longbed My build: http://67-72chevytrucks.com/vboard/s...d.php?t=643426 Kool Guyz CC Instagram: _King_Kustom_ |
|
|
|
|
04-21-2015, 07:27 PM
|
#174 | |
|
Registered User
Join Date: Aug 2010
Location: Hoofddorp, the Netherlands
Posts: 582
|
Quote:
Posted via Mobile Device |
|
|
|
|
|
04-22-2015, 04:34 AM
|
#175 |
|
Registered User
Join Date: Dec 2013
Location: Purmerend, Netherlands
Posts: 1,657
|
Re: 1969 Custom/10 clean up
The benefit is that you have a bit of pressure in the brakeline and brakecilinders, which gives faster responce on your brakepedal.
You can get these valves in different pressure values. I had a '67 Volvo Amazon once with bad brakes, put in residual valves in the front and rear brakelines, and that made a huge different, just a thought...
__________________
Cheers!! Kees. 1959 Chevy Fleetside Longbed My build: http://67-72chevytrucks.com/vboard/s...d.php?t=643426 Kool Guyz CC Instagram: _King_Kustom_ |
|
|
|
 |
| Bookmarks |
| Tags |
| c10, europe, netherlands, rebuild, swapped |
|
|


 Linear Mode

