
|
 03-17-2008, 09:24 PM
|
#176 | |
|
Senior Member
Join Date: May 2004
Location: johnstown, NY
Posts: 2,393
|
Re: progress pics
Quote:
|
|

|

|
|
03-17-2008, 10:22 PM
|
#177 | |
|
Registered User
Join Date: Mar 2007
Location: West Virginia
Posts: 481
|
Re: progress pics
Quote:
Thanks for clearing that up for me I didnt know that.. I might look into it for my control arms and steering components
__________________
My Build Thread http://67-72chevytrucks.com/vboard/s...d.php?t=269019 Petitioning *No Regrets* MD/WV |
|
|
|
|
|
03-17-2008, 10:29 PM
|
#178 |
|
Senior Member
 Join Date: Aug 2006
Location: Atascadero, CA
Posts: 1,152
|
Re: progress pics
Man everything looks Great!!!!! Sweet Job!!!
Josh
__________________
(Project truck) 1970 C10 under complete transformation  My current build thread http://67-72chevytrucks.com/vboard/s...d.php?t=212871 Other project: C5 corvette swap into 70 c10 http://67-72chevytrucks.com/vboard/s...=1#post2413517 On Hold |
|
|
|
|
03-17-2008, 11:08 PM
|
#179 |
|
Registered User
Join Date: Oct 2007
Location: hopewell jct new york
Posts: 140
|
Re: progress pics
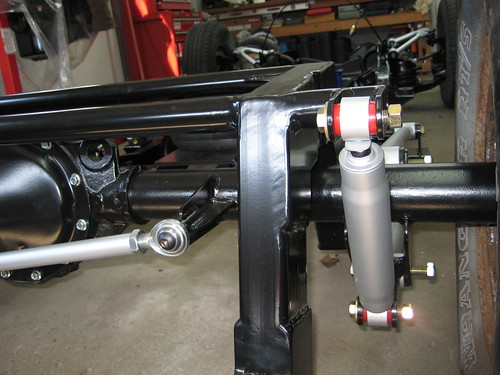
whats with the plates on the lower a arm nor more pocket
|
|
|
|
|
03-17-2008, 11:30 PM
|
#180 |
|
Senior Member
Join Date: May 2004
Location: johnstown, NY
Posts: 2,393
|
Re: progress pics
just trying the plate out. With the pocket in the a-arms I cut, my frame was laying on the ground. I decided I want the frame when layed out to not touch the ground (for safety and cosmetic purposes) so i'm hoping raising the lower bag with the plate will put my frame right where I want it.
On a side note, my other lower arms will be for sale if I decide to stay with my plated arms. PM me if interested. Also if anybody is interested in the lower plates, I want to have some made, but so far, havent got enough replies. Let me know if you want a pair. Check my other post for details. |
|
|
|
|
03-18-2008, 07:01 PM
|
#181 |
|
Senior Member
Join Date: May 2004
Location: johnstown, NY
Posts: 2,393
|
Re: progress pics
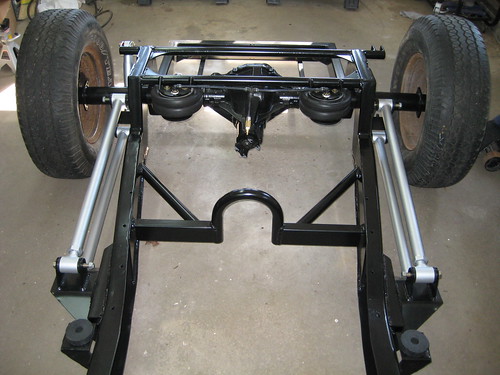
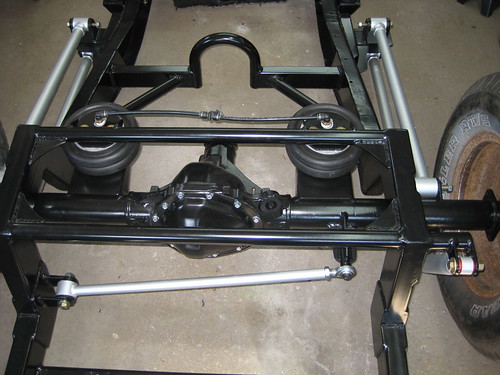
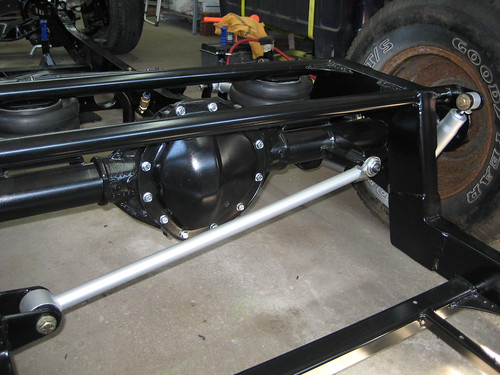
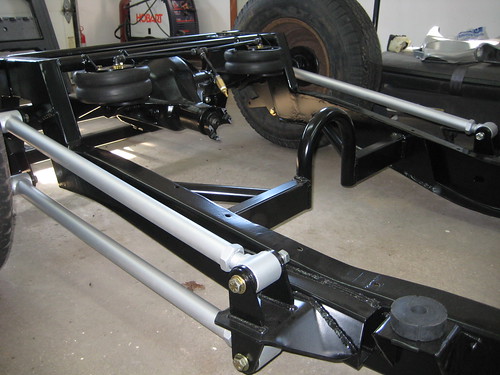
Heres some pics of the rear.
|
|
|
|
|
03-19-2008, 11:11 PM
|
#182 |
|
Registered User
Join Date: Jan 2006
Location: central indiana
Posts: 128
|
Re: progress pics
wow, looks like the wait has paid off.
|
|
|
|
|
03-20-2008, 02:20 AM
|
#183 |
|
Senior Member
Join Date: May 2004
Location: johnstown, NY
Posts: 2,393
|
Re: progress pics
Thanks man, yes it's getting there. Just picked up a 700r4 a couple hours ago, so the engine and trans will be in soon. Next hurdle is either running brake lines or doing the air plumbing. Any body have any reasons why one should be done before the other??
|
|
|
|
|
03-20-2008, 04:07 AM
|
#184 |
|
Registered User
Join Date: Mar 2007
Location: West Virginia
Posts: 481
|
Re: progress pics
Looks really good man.. how much side to side rearend travel to you get with the panhard bar?
__________________
My Build Thread http://67-72chevytrucks.com/vboard/s...d.php?t=269019 Petitioning *No Regrets* MD/WV |
|
|
|
|
03-20-2008, 09:00 AM
|
#185 | |
|
Senior Member
Join Date: Dec 2003
Location: Mesa,Az
Posts: 3,981
|
Re: progress pics
Quote:
__________________
www.PorterbuiltFabrication.com Phone: 480-297-2621 E-mail: sales@pbfab.com Find us on FaceBook under Porterbuilt Fabrication Specializing in Chassis and Suspension Components for your Classic Chevrolet Truck. We offer components from the following manufacturers: Porterbuilt Accuair Ridetech (Air Ride Technologies) Air Lift Wilwood Intro Unisteer ECE Gotta Show Air Lift Borgeson CPP Supporting this forum since 2003! |
|
|
|
|
|
03-25-2008, 03:57 AM
|
#186 |
|
Registered User
Join Date: Sep 2005
Location: Utica, NY
Posts: 315
|
Re: progress pics
lookin good
|
|
|
|
|
03-25-2008, 08:01 PM
|
#187 |
|
On the fast track to nowhere..
Join Date: May 2006
Location: Splendora, Texas
Posts: 5,316
|
Re: progress pics
Looks nice man.
__________________
-Mike Owen- Norwood, Houston, Cecilia, Jackson, Monroe and counting |
|
|
|
|
04-18-2008, 09:53 PM
|
#188 |
|
I'm just glad to be here!
Join Date: Jan 2008
Location: Longview, TX
Posts: 4,788
|
Re: progress pics
I like this project, looking good.
 I have one question, What is the vertical center to center distance for your rear 4 link bars? I know that you said they are about 30" long, but how far apart are they vertically? Anymore updates..??
__________________
Karl  1965 Chevy Stepside(Grandpa's Old Blue) and (July 2015 Shop Build!)(2020, the Saga Continues) http://67-72chevytrucks.com/vboard/s...d.php?t=372424 The LST Challenge: http://67-72chevytrucks.com/vboard/s...=1#post7812257 Korbin's 1st Square: "Sunburn" http://67-72chevytrucks.com/vboard/s...d.php?t=418618 1985 GMC Sierra: "White Trash", Korbin's 2nd now... http://67-72chevytrucks.com/vboard/s...d.php?t=632305 Henry - 1984 Chevrolet, Owen's 1st Square |
|
|
|
|
04-18-2008, 10:08 PM
|
#189 | ||
|
I'm just glad to be here!
Join Date: Jan 2008
Location: Longview, TX
Posts: 4,788
|
Re: progress pics
Quote:
Quote:
Looking at the pictures between these 2 posts, did you change the rear 4-link brackets? They look different. The fronts look the same, just flipped over. If you changed them, did you do it because the the reduced angle of the bars at ride height? Who's brackets did you use? Thanks.
__________________
Karl 1965 Chevy Stepside(Grandpa's Old Blue) and (July 2015 Shop Build!)(2020, the Saga Continues) http://67-72chevytrucks.com/vboard/s...d.php?t=372424 The LST Challenge: http://67-72chevytrucks.com/vboard/s...=1#post7812257 Korbin's 1st Square: "Sunburn" http://67-72chevytrucks.com/vboard/s...d.php?t=418618 1985 GMC Sierra: "White Trash", Korbin's 2nd now... http://67-72chevytrucks.com/vboard/s...d.php?t=632305 Henry - 1984 Chevrolet, Owen's 1st Square Last edited by aggie91; 04-18-2008 at 10:09 PM. Reason: added numbers |
||
|
|
|
|
04-19-2008, 02:04 AM
|
#190 | |
|
Senior Member
Join Date: May 2004
Location: johnstown, NY
Posts: 2,393
|
Re: progress pics
Quote:
I did change the brackets and your reasoning is correct: wanted to get the bars more parallel to the ground at ride height. I designed the shape of those brackets and had them cut on a CNC. josh |
|
|
|
|
|
06-02-2008, 04:44 AM
|
#191 |
|
Senior Member
Join Date: May 2004
Location: johnstown, NY
Posts: 2,393
|
Re: progress pics
Its been a while since I updated this, so here are a couple pics. I almost have the brake lines finished. I purchased straight stainless line from inline tube and bent everything myself. I started at the rear with a flex line from the axle to the frame.
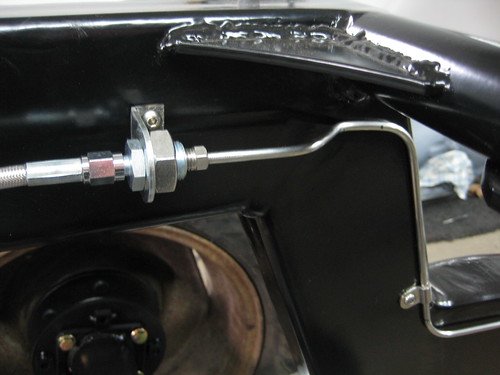 Up the frame rail. The tubing is held on by these nice little stainless clamps that came in the kit from Inline. 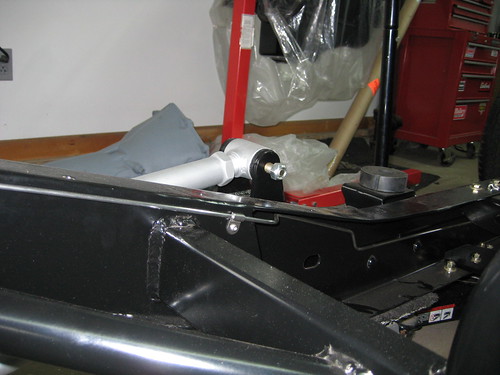 Here is where the rear and front lines meet. I decided to route the lines on the outside of the frame as they go up to the MC. 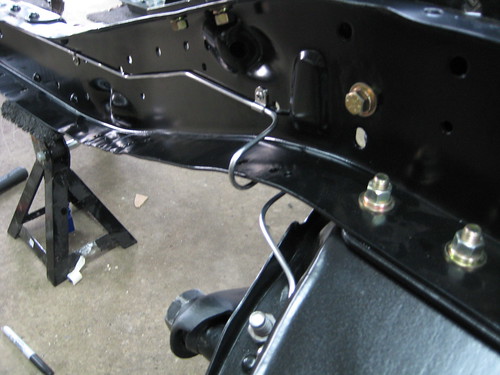 Heres a pic of the front crossmember line. This one took me FOREVER. This was my first time doing this, so I started my making a rough mockup with thick wire that was bendable my hand. Then I transfered that onto regular steel line. After I got that one perfect, I copied it with the stainless. 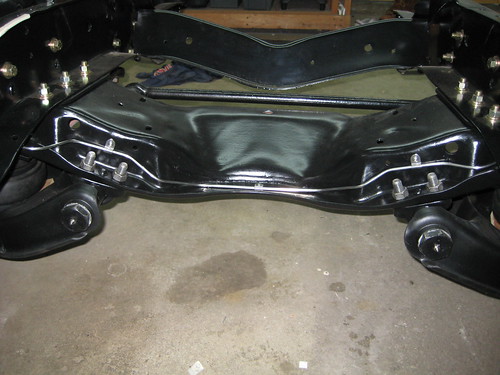 I also got the valves mounted. I was bound and determined to get them all in a neat line across this cross member. At first it didn't fit, so I had to find an all male tee to save some space. After tracking one down on the web, it fit. I drilled and tapped the crossmember to mount the valves. 16 holes! Use Loctite 545. Awesome stuff to work with. 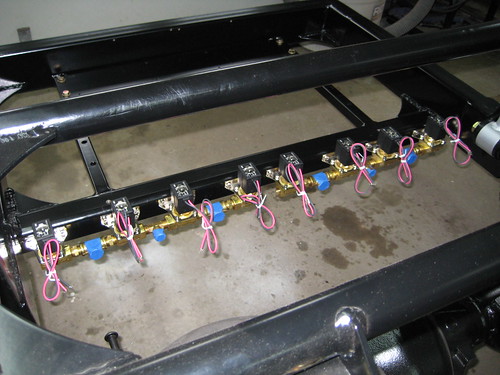 close-up: 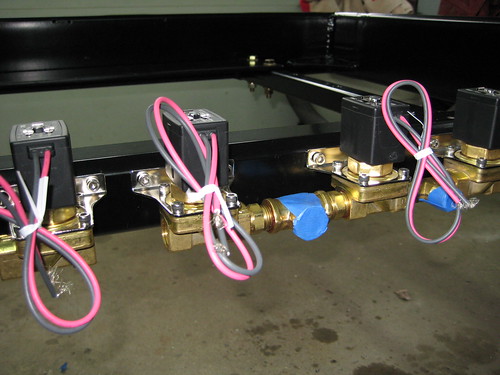 Here you can see my compressor mounting plate and the other end of the brake flex line: 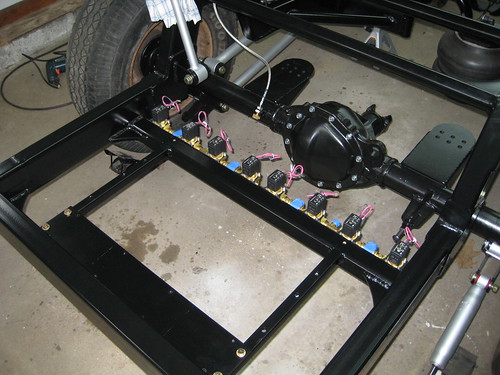 Compressors mounted: 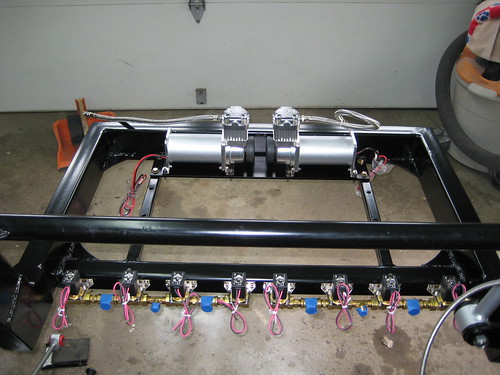 And two 5 gal slim and skinny's 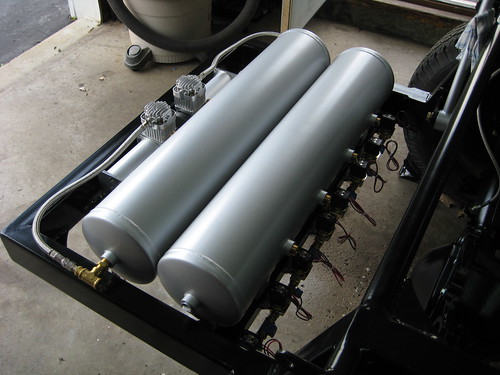 I still have to put clamps on those leader hoses. 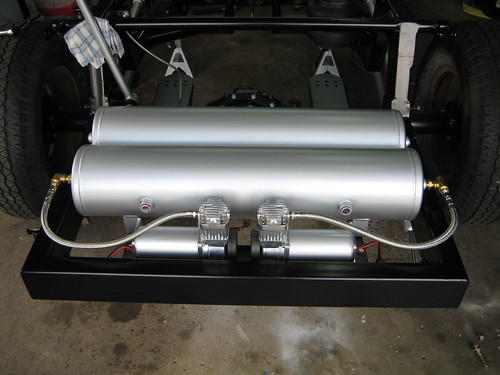 That's it for now. Time for some body work! Last edited by jlaird; 06-02-2008 at 04:50 AM. |
|
|
|
|
06-02-2008, 04:53 AM
|
#192 |
|
Registered User
Join Date: Feb 2007
Location: yuma arizona
Posts: 448
|
Re: progress pics
wow that looks awesome
|
|
|
|
|
06-02-2008, 05:04 AM
|
#193 |
|
One day...
Join Date: Apr 2008
Location: Tuttle, Ok
Posts: 9,240
|
Re: progress pics
Oh ya im diggin that
Very nice work man keep it up! |
|
|
|
|
06-02-2008, 06:22 AM
|
#194 |
|
Registered User
 Join Date: Aug 2005
Location: Hillsboro Oregon
Posts: 6,449
|
Re: progress pics
Very nice install!
|
|
|
|
|
06-02-2008, 06:53 AM
|
#195 |
|
On the fast track to nowhere..
Join Date: May 2006
Location: Splendora, Texas
Posts: 5,316
|
Re: progress pics
Looking good man. Nice and clean

__________________
-Mike Owen- Norwood, Houston, Cecilia, Jackson, Monroe and counting |
|
|
|
|
06-02-2008, 08:12 AM
|
#196 |
|
Registered User
Join Date: Mar 2007
Location: Ben Wheeler,Texas
Posts: 992
|
Re: progress pics
Work of art!
__________________
05 2500HD 6.0 excab 69 LWB-Gone but not forgotten! 68 Dodge Charger 383/727 69 Dodge Charger-440/4spd |
|
|
|
|
06-02-2008, 09:17 AM
|
#197 |
|
Registered User
Join Date: Mar 2007
Location: West Virginia
Posts: 481
|
Re: progress pics
Turned out great.. keep up the good work
__________________
My Build Thread http://67-72chevytrucks.com/vboard/s...d.php?t=269019 Petitioning *No Regrets* MD/WV |
|
|
|
|
06-02-2008, 08:23 PM
|
#198 |
|
Registered User
Join Date: Dec 2007
Location: PA
Posts: 326
|
Re: progress pics
WOW! You have some real attention to detail! Now that you have all that practice you can plumb my truck when you get tired of working on your own truck!

|
|
|
|
|
06-02-2008, 09:36 PM
|
#199 |
|
Senior Member
Join Date: May 2004
Location: johnstown, NY
Posts: 2,393
|
Re: progress pics
Thanks guys for all the compliments. Working on the plumbing has been kinda fun...change of pace from all the suspension work.
|
|
|
|
|
06-02-2008, 10:57 PM
|
#200 |
|
PROJECT 7DEUCE
Join Date: Dec 2002
Location: GRANTS PASS OR
Posts: 21,590
|
Re: progress pics
Man that is some clean instal work..
__________________
GO BIG GREEN GO DUCKSMEMBER #6377 72 k-5 daily driver 6'' lift 35'' 350-350-205 slowly getting rust free. Project "7DEUCE" check out my build http://67-72chevytrucks.com/vboard/s...d.php?t=267665 Tim Powell..R.I.P EastSideLowlife..... R.I.P.. |
|
|
|
 |
| Bookmarks |
|
|


 Linear Mode

