
|
 03-28-2012, 04:09 PM
|
#1201 | |
|
67cheby
 Join Date: Sep 2008
Location: siloam springs ar 72761
Posts: 17,890
|
Quote:
|
|

|

|
|
03-28-2012, 04:50 PM
|
#1202 | ||||
|
Registered User
 Join Date: Aug 2005
Location: Hillsboro Oregon
Posts: 6,449
|
Re: '66 Sunbeam Minx Project - F20C/6sp/4-link/Discs...
Quote:
 But I have demonstrated the ability to keep it simple before (once), with my 64. But I have demonstrated the ability to keep it simple before (once), with my 64.Quote:
Quote:
 Quote:

|
||||
|
|
|
|
03-28-2012, 07:41 PM
|
#1203 | |
|
Registered User
Join Date: Feb 2012
Location: Olympia, WA
Posts: 300
|
Re: '66 Sunbeam Minx Project - F20C/6sp/4-link/Discs...
Quote:
I recently bought a powder coating system and found a used stove for free. Looking forward to powder coating everything in sight! That's a solid-looking 68 Squareback you have there! I had a 67 Beetle that I loved. My neighbor across the street had a beautiful Notchback that I coveted. The Fastbacks were cool too. This 69 Corvair Monza--one of only 5000 built in the last year of the Corvair's 10 years of production--is awaiting my son's return. The plan is a father/son restoration then give it to him. It's a "little rough". A PO replaced the right quarter panel, skip sanded all over the place, leaving patches of bare metal, alternating with Bondo in all the little knicks and dents, and left several quarter-sized rust holes in it. And accidentally smashed the windshield. Interior is all original and intact, and it's complete except for a few brake parts. I love the sheet metal on these older cars. So easy to work! 
|
|
|
|
|
|
03-28-2012, 10:31 PM
|
#1204 |
|
Still plays with trucks
Join Date: Jul 2009
Location: Spokane, WA
Posts: 3,556
|
Re: '66 Sunbeam Minx Project - F20C/6sp/4-link/Discs...
Always liked the square backs. Great project for you two.
My six year old daughter asked me to buy her a car yesterday. The pace I go she might get a drivable car by the time she gets out of college.
__________________
miSSed opportunity - ground up creation of an AWD 1994 454 SS that never was http://67-72chevytrucks.com/vboard/s...d.php?t=795577 69 C10 shortbed stepside 400 small block - built like what a super sport truck could have been 69 K20 lwb TBI 350 4L60E NP208 14-bolt Dana-44 w/disc 68 Camaro SS / RS 500hp 439 inch roller cam big block 4L80E 79 Malibu TPI 350 4L60 w/ Z28 steering & sway bars |
|
|
|
|
03-29-2012, 01:23 AM
|
#1205 |
|
Registered User
Join Date: Jun 2010
Location: Vancouver Island BC
Posts: 652
|
Re: '66 Sunbeam Minx Project - F20C/6sp/4-link/Discs...
The VW got us all distracted, thanks for the exhaust lesson. Great article, lots to take in. I put Borlas on my truck, now I have to measure to see what my collector/muffler combo is. Who would think a muffler six feet from the collector would be considered an extension of the collector. Cheers
__________________

|
|
|
|
|
03-29-2012, 12:18 PM
|
#1206 |
|
Registered User
Join Date: Jul 2006
Location: the netherlands europe
Posts: 4,335
|
Re: '66 Sunbeam Minx Project - F20C/6sp/4-link/Discs...
maibe put these on there
 it looks like they done a lot of work to the car allready , just hope its still complete , buing the small parts can add up in a hurry
__________________
i got a job again and having fun at it too idea's for the trucks and the order of things to do are taking shape and get closer to being realized , a few more months and i be able to start building for real i complete 2 of the trucks intoo running fashion one custom and one basicly stock the thirth will be sacrificed for parts |
|
|
|
|
03-29-2012, 03:00 PM
|
#1207 | |||||||
|
Registered User
Join Date: Aug 2005
Location: Hillsboro Oregon
Posts: 6,449
|
Re: '66 Sunbeam Minx Project - F20C/6sp/4-link/Discs...
Quote:
 Quote:
 I love the notchbacks. In fact I have a saved search for them on CL and eBay I love the notchbacks. In fact I have a saved search for them on CL and eBay  The SB is very solid. The body is ready for sanding and paint; it's that straight. The only rust on the whole car is under the battery. Easy fix. The SB is very solid. The body is ready for sanding and paint; it's that straight. The only rust on the whole car is under the battery. Easy fix.Quote:
Quote:
This is gonna depend on his level of motivation. I told him I will only work on it when he does. So far so good.Quote:
Quote:
|
|||||||
|
|
|
|
03-30-2012, 01:23 AM
|
#1208 | |
|
Registered User
Join Date: Feb 2012
Location: Olympia, WA
Posts: 300
|
Re: '66 Sunbeam Minx Project - F20C/6sp/4-link/Discs...
Quote:
That's how I grind my welds, but my welds are very messy. Just have a wirefeed welder. Bake the part before powdercoating? I read that a convection oven is best. Do you use a convection oven? Is powdercoating primer necessary when the metal is sufficiently rough? Also read that some powdercoating paints are more porous than others. I got the MATTE BLACK from Harbor Freight. It was the only black they had. Not sure how good it is, but if it lasts 4-5 times as long as paint I'll be happy! |
|
|
|
|
|
03-30-2012, 10:51 AM
|
#1209 |
|
Registered User
Join Date: Jul 2006
Location: the netherlands europe
Posts: 4,335
|
Re: '66 Sunbeam Minx Project - F20C/6sp/4-link/Discs...
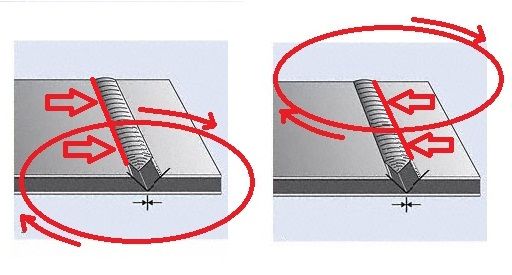
he means that when you want to hit the top of the circle going clockwize intoo the groove when you want to get extra penetration intoo the steel on the left side and the hit with the bottom of the circle going clockwize for the left side
if i get the gas for my welder im going to try it , nathan from porterbuild showed it to me this way too but i gues it takes practice to run realy nice welds the way he does them
__________________
i got a job again and having fun at it too idea's for the trucks and the order of things to do are taking shape and get closer to being realized , a few more months and i be able to start building for real i complete 2 of the trucks intoo running fashion one custom and one basicly stock the thirth will be sacrificed for parts |
|
|
|
|
03-30-2012, 01:43 PM
|
#1210 | ||
|
Registered User
Join Date: Aug 2005
Location: Hillsboro Oregon
Posts: 6,449
|
Re: '66 Sunbeam Minx Project - F20C/6sp/4-link/Discs...
Quote:
Quote:
|
||
|
|
|
|
03-30-2012, 02:50 PM
|
#1211 |
|
Registered User
Join Date: Jul 2006
Location: the netherlands europe
Posts: 4,335
|
Re: '66 Sunbeam Minx Project - F20C/6sp/4-link/Discs...

__________________
i got a job again and having fun at it too idea's for the trucks and the order of things to do are taking shape and get closer to being realized , a few more months and i be able to start building for real i complete 2 of the trucks intoo running fashion one custom and one basicly stock the thirth will be sacrificed for parts |
|
|
|
|
03-30-2012, 06:15 PM
|
#1212 | |
|
Registered User
Join Date: Dec 2008
Location: on a rock in the pacific
Posts: 554
|
Re: '66 Sunbeam Minx Project - F20C/6sp/4-link/Discs...
Quote:
the pre-baking the parts allows the metal to out gas. any impurities in the metal will move to the surface when the metal is heated. ESPECIALLY with aluminum. i find somewhere around 350-400 degrees for 15-20 min is normally sufficient. if there is any oil residue it will bake off. as for cleaning with alcohol after that's an extra step to ensure cleanliness. any bit of oil, even from your hands will affect the finished product. the primer step adds one more layer of protection. they sell good out gas killer primer powders out there. if you want your powder to go on smooth that's the best way to do it. also powder can be treated like paint afterwards. you can cut and buff it like you would a automotive finish. it all depends on how thick you lay it too. if your part is steel and you take it straight from the blaster, blow it off and right into the oven, most times you can get away with just using powder directly on it. aluminum if it's sat around for a while outside in the elements i would ALWAYS pre-bake. i've had some jobs that were nightmares. stripping powder off a part that out gassed is a PITA. like they say do it once do it right. if you wanna see some of what i've done check out my link in the sig.
__________________
63 4 door Chevy II - NOVACATION (Updated 08/23/09) 65 Morris minor Traveler 77 Chevy Longbed. 93 Corolla JDM 20V Swap Daily Driver (Updated 07/16/09) Powder coating Hawaii Domestic Violence Awareness Show 5/3/09  Hawaii Rod and Custom Show 4/18 Hawaii Rod and Custom Show 4/18
|
|
|
|
|
|
03-30-2012, 06:43 PM
|
#1213 | |
|
Registered User
Join Date: Dec 2008
Location: on a rock in the pacific
Posts: 554
|
Re: '66 Sunbeam Minx Project - F20C/6sp/4-link/Discs...
Quote:
if you're looking for other places to pick up powder from, i like colombia coatings, pendry powder coating, and i'm yet to order from rosey's powder coating.
__________________
63 4 door Chevy II - NOVACATION (Updated 08/23/09) 65 Morris minor Traveler 77 Chevy Longbed. 93 Corolla JDM 20V Swap Daily Driver (Updated 07/16/09) Powder coating Hawaii Domestic Violence Awareness Show 5/3/09 Hawaii Rod and Custom Show 4/18
Last edited by Jvsapp; 03-30-2012 at 06:54 PM. |
|
|
|
|
|
03-30-2012, 09:28 PM
|
#1214 |
|
Registered User
Join Date: Feb 2012
Location: Olympia, WA
Posts: 300
|
Re: '66 Sunbeam Minx Project - F20C/6sp/4-link/Discs...
Thanks for the power coating tips. More questions...
When you pre-bake a part, do you let it cool off before you apply powder? If you're going to use primer, do you first bake the part, then prime/bake, then top coat/bake, or just prime/bake, then top coat/bake? How important is convection when baking? I just have a regular stove. I saw a home-made convection oven a guy made from a large tube. |
|
|
|
|
03-30-2012, 09:42 PM
|
#1215 | |
|
Registered User
Join Date: Dec 2008
Location: on a rock in the pacific
Posts: 554
|
Re: '66 Sunbeam Minx Project - F20C/6sp/4-link/Discs...
Quote:
as for oven, if you look at the pics you can see i have a bike frame in mine. my oven is 4'x4'x8'. it's propane fired(even though they tell you not to use propane) and i can bake a part in less than 5 minutes. i can do a full set of wheels in 20 min as opposed to doing one wheel at a time, one side at a time in my old oven(conventional oven). as for convection it would be good because convection evenly displaces the heat around the oven, and i know i do have hotspots in my oven i'm looking for a decent fan that i can run to get the air current to evenly displace the heat. but for what it's worth with 180,000 BTU i can get the part up to 400 degrees in less than 2 minutes. for me time is $. and propane i $25 a tank. i can even do headers at 500 degrees which will be my next attempt. if i were to better insulate my oven i'm sure i can get it up to 700 degrees. if you need more info, shoot me a PM and i'll give you some tips and what i've experienced. i've been doing it on the side for 6 years now and i've learned a lot.
__________________
63 4 door Chevy II - NOVACATION (Updated 08/23/09) 65 Morris minor Traveler 77 Chevy Longbed. 93 Corolla JDM 20V Swap Daily Driver (Updated 07/16/09) Powder coating Hawaii Domestic Violence Awareness Show 5/3/09 Hawaii Rod and Custom Show 4/18
|
|
|
|
|
|
03-31-2012, 12:01 AM
|
#1216 | |
|
Registered User
Join Date: Jun 2010
Location: Vancouver Island BC
Posts: 652
|
Re: '66 Sunbeam Minx Project - F20C/6sp/4-link/Discs...
Quote:
__________________
|
|
|
|
|
|
03-31-2012, 12:28 AM
|
#1217 |
|
Registered User
Join Date: Feb 2012
Location: Olympia, WA
Posts: 300
|
Re: '66 Sunbeam Minx Project - F20C/6sp/4-link/Discs...
Yeah, FF, feel free to step in and post new photos! ;-}
Wow, didn't notice that the bike frame was in your oven. Should be able to add convection pretty easily with some 8-inch duct and a direct-drive fan with metal blade. I figure he duct just needs to be long enough to permit the inside air near the fan cool enough to not melt its windings or whatever. Oh, and put the fan at the bottom and the out-vent at the top, of course. When you do wheels, how much of the inner rim to you coat? One last question. After applying powder, you blow off the excess powder? Do you use compressed air (how many PSI), or ? Oh, and I assume you can reclaim any powder that falls off as long as it's still clean/pure, right? Thanks! |
|
|
|
|
03-31-2012, 02:10 AM
|
#1218 |
|
Registered User
Join Date: Aug 2005
Location: Hillsboro Oregon
Posts: 6,449
|
Re: '66 Sunbeam Minx Project - F20C/6sp/4-link/Discs...
No worries. This is good info. Thanks jvsapp. I need to build an oven...
No new pics to post right now. I've been working out if/how to adjust the trans xmember to allow for a decent sized resonator/term. box (more modifications). Also dropped off the hood for color matching and picked up some primer  Posted via Mobile Device |
|
|
|
|
03-31-2012, 02:48 AM
|
#1219 | |||
|
Registered User
Join Date: Dec 2008
Location: on a rock in the pacific
Posts: 554
|
Re: '66 Sunbeam Minx Project - F20C/6sp/4-link/Discs...
i thought i could get away with a simple post from my phone but i guess i had to whip out the laptop to reply to these
Quote:
http://www.columbiacoatings.com/category_s/38.htm essentially they are like a ceramic, but in a powder format instead of a liquid. they must go on and be cured at 500 degrees for one hour. most house hold ovens can't get up there unless you are using the broiler. columbia also has a ceramic coating for exhaust http://www.columbiacoatings.com/category_s/1051.htm i actually have white and the chrome look. i am yet to find time to try either one out, but i did get my oven up to 500 degrees when i used some of the high temp bronze on my friends calipers for his car. i found out that my burner will ice over the tank after about 25-30 minutes so when i do my headers to get a good cure on them i'll have to use 2 tanks with a dual line setup so i can cut one tank and fire the next tank while one deices. the ceramic is supposed to handle up to 1300 degrees once fully cured, where as the powder only will handle up to 1000 degrees. if you're not running too lean or running a turbo i'm sure 1000 degrees is plenty hot. but for peace of mind i'm going with ceramic when i do my headers for my nova. i like the throw back "white" aluminum coated header look from the late 70's early 80's. Quote:
the way i have my oven setup it's still a work in progress. the bottom 1.5 feet is where my rack rolls in and where the burner sits. i am planning to get some form of air mover, not really wanting to vent it much so i can keep the hot air inside. i may put a small 1" vent on the top somewhere like how most conventional ovens have. currently i have just the edges of the corrugated steel unsealed at the top as vents. it's not really that efficient, but i used a BTU converter to figure out how many BTU i needed to heat the space. http://www.heatershop.com/btu_calculator.htm my insulation isn't the greatest, it's more like a hot house or smoker where it's just the metal. if you were to touch it you would get burnt. i'm planning to use some DOW insulation(pink panther kind from lowes or HD) and lay it between another layer of metal when i get a chance. for taking off powder (like the raised letters) i actually use my finger. i wipe the powder off the letters making sure they stay clean. to blow it off it takes some skill. it can be done, but i'm not really doing that much percision. i've tried using tape to pull the powder off, but i keep coming back to a steady finger and wiping the powder off. columbia has this vacuum gun http://www.columbiacoatings.com/category_s/924.htm that's supposed to be able to suck off the powder. to me it looks like this blow gun i got from HF http://www.harborfreight.com/4-piece...set-68260.html i haven't tried to hook it up to my vacuum yet, but i'm sure it'll do the same thing. as for reclaiming powder, if you put down some plastic sheeting prior to spraying you could reclaim what you're not using, but in my case i factor the waste into the price of the job. the trade winds here are too strong to try and it's meager what i would reclaim. i can see companies like miller welding that do ALOT of powdercoating reclaiming what they don't use. but i'm a small time guy so it's not that much to me. besides 1lb of powder is only $10-20 and i can make $160 out of that one pound. for the overlap on the insides of the wheels it all depends on the job. i ask if they want the insides done too or not. most times i will only strip where the tire actually beads up against. maybe say 1" in and that's it. i will blow powder in that area as well, but anything that get's into the middle of the wheel(where the tire sits) is just there because i don't take it off. it's more like whatever statically clings to that area. i do the face and the backside of the wheel, unless someone specifically asks only for the face and doesn't care about the backside. it all determines what i'm charging because of the amount of powder i will be using. if they want the wheel say gloss black inside, backside and the face that will eat up a whole pound and 1/2 of powder for a 15" wheel. where as just the face maybe 1/2 lb total and faces and backside would be a full pound. Quote:
if you plan to i'll shoot you the burner i got off amazon. 180,000 BTU for $40. a few mods to redirect the flame and you'll be ready to cook. i've almost got it down to exactly where i need it to maintain 375-380 degrees on the part constantly. if i run it full open it will get up past 550 degrees. with better insulation, i will have to relearn the burner though.
__________________
63 4 door Chevy II - NOVACATION (Updated 08/23/09) 65 Morris minor Traveler 77 Chevy Longbed. 93 Corolla JDM 20V Swap Daily Driver (Updated 07/16/09) Powder coating Hawaii Domestic Violence Awareness Show 5/3/09 Hawaii Rod and Custom Show 4/18
Last edited by Jvsapp; 03-31-2012 at 03:03 AM. |
|||
|
|
|
|
03-31-2012, 04:26 AM
|
#1220 |
|
Registered User
Join Date: Feb 2012
Location: Olympia, WA
Posts: 300
|
Re: '66 Sunbeam Minx Project - F20C/6sp/4-link/Discs...
Good stuff! I guess you don't need to remove any powder if you are coating the entire piece (and don't apply way too much).
Wish I had access to free corrugated metal! That stuff's getting EXPENSIVE. Good point about not wanting to vent out all that hot air. Stove shops sell stove-top fans that use the heat from the stove to turn them. Not sure if it would move enough air. |
|
|
|
|
03-31-2012, 05:55 AM
|
#1221 |
|
Registered User
Join Date: Jul 2006
Location: the netherlands europe
Posts: 4,335
|
Re: '66 Sunbeam Minx Project - F20C/6sp/4-link/Discs...
allways figured that since they electrify the whole thing and the powder gets drawn to the piece depending on how mush is allready on it so metal under thin paint atract more than thick
__________________
i got a job again and having fun at it too idea's for the trucks and the order of things to do are taking shape and get closer to being realized , a few more months and i be able to start building for real i complete 2 of the trucks intoo running fashion one custom and one basicly stock the thirth will be sacrificed for parts |
|
|
|
|
03-31-2012, 07:42 PM
|
#1222 |
|
the pollock
Join Date: May 2008
Location: abilene, texas
Posts: 4,423
|
Re: '66 Sunbeam Minx Project - F20C/6sp/4-link/Discs...
im not seeing any progress here...
im dissapointed frizz!
__________________
Jack of ALL trades, Master of none.. (but one... procrastination) Army vet 02-08 RIP El Jay! Miss you brother! http://67-72chevytrucks.com/vboard/s...d.php?t=343538 http://67-72chevytrucks.com/vboard/s...d.php?t=386042 |
|
|
|
|
04-02-2012, 01:48 PM
|
#1223 |
|
English Chevy Owner
Join Date: May 2002
Location: Shropshire, UK/ Lot, France
Posts: 1,848
|
Re: '66 Sunbeam Minx Project - F20C/6sp/4-link/Discs...
Theres a nice squareback like that that one of the parents at my kids school uses as their daily, looks to be totally stockeither and older nicely patinated resto or a well looked after survivor, its in a deep marron with black steels witth chrome hubcaps.
__________________
Phil '67 C10 long fleet. 350/TH350, 4 bbl Carter, K&N, Dual exhaust, loads of stuff coming soon 2001 S10 Blazer Daily Driver, bone stock 4 door 4x4 with manual transmission |
|
|
|
|
04-06-2012, 02:57 PM
|
#1224 | ||
|
Registered User
Join Date: Aug 2005
Location: Hillsboro Oregon
Posts: 6,449
|
Re: '66 Sunbeam Minx Project - F20C/6sp/4-link/Discs...
Quote:
Quote:
On the Minx... Just finished three 12hr days and one 19hr day at work. I did manage to get some shop time in there though. Need to make some changes to accommodate the wave termination box: 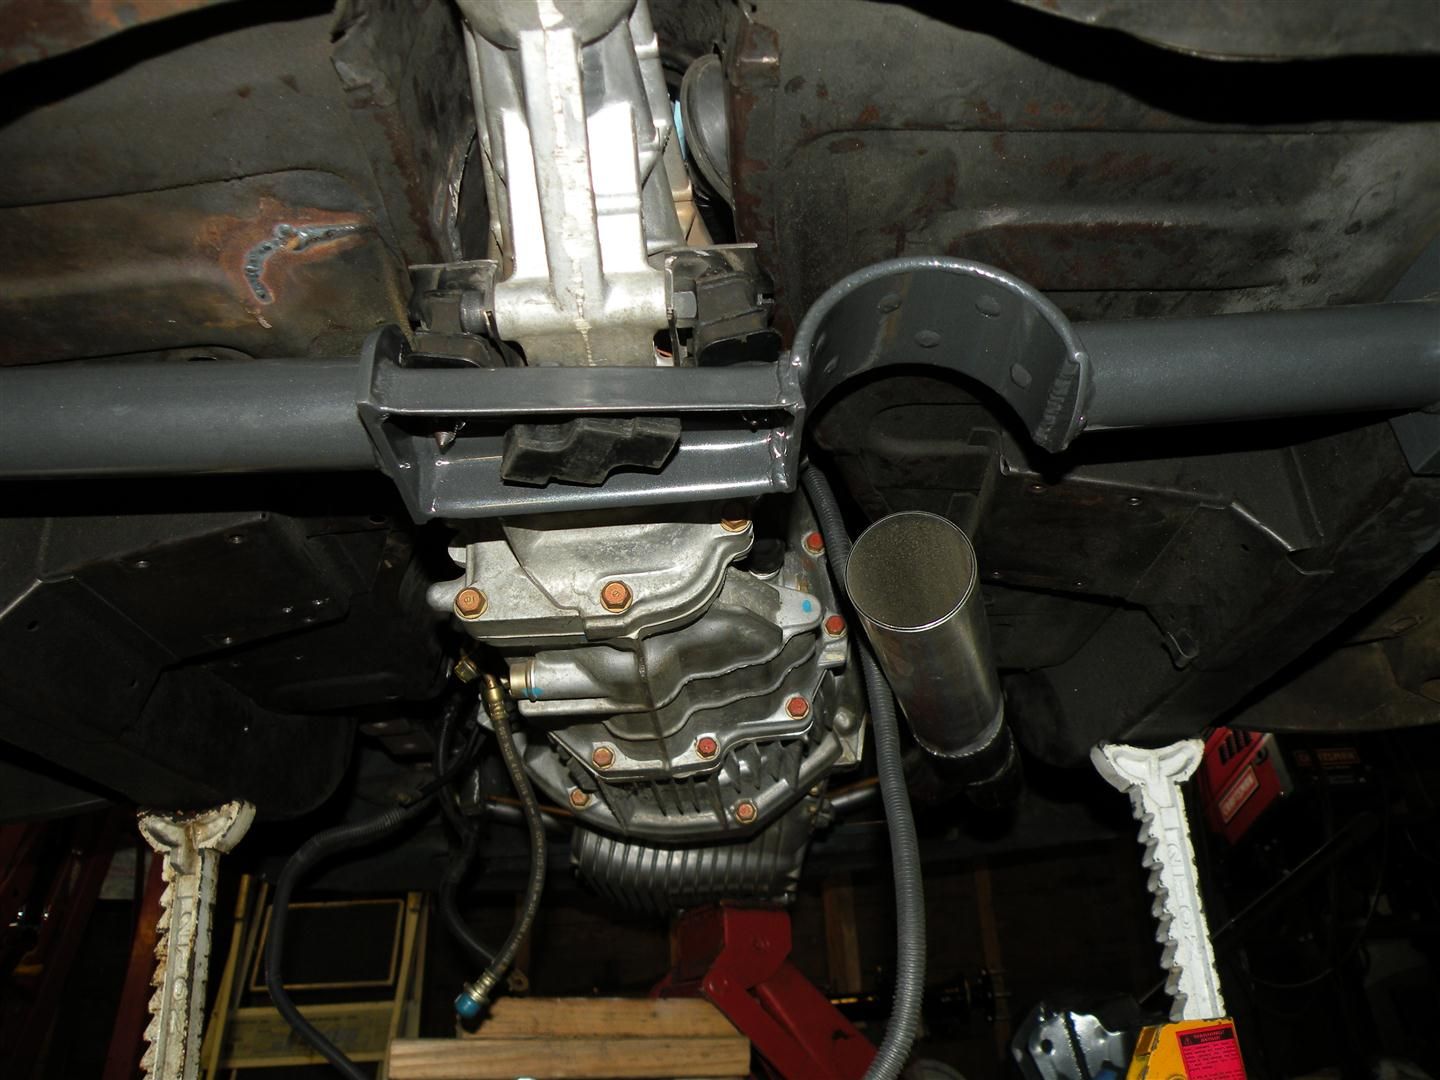 Muffler will tuck up under the rear seat pan: 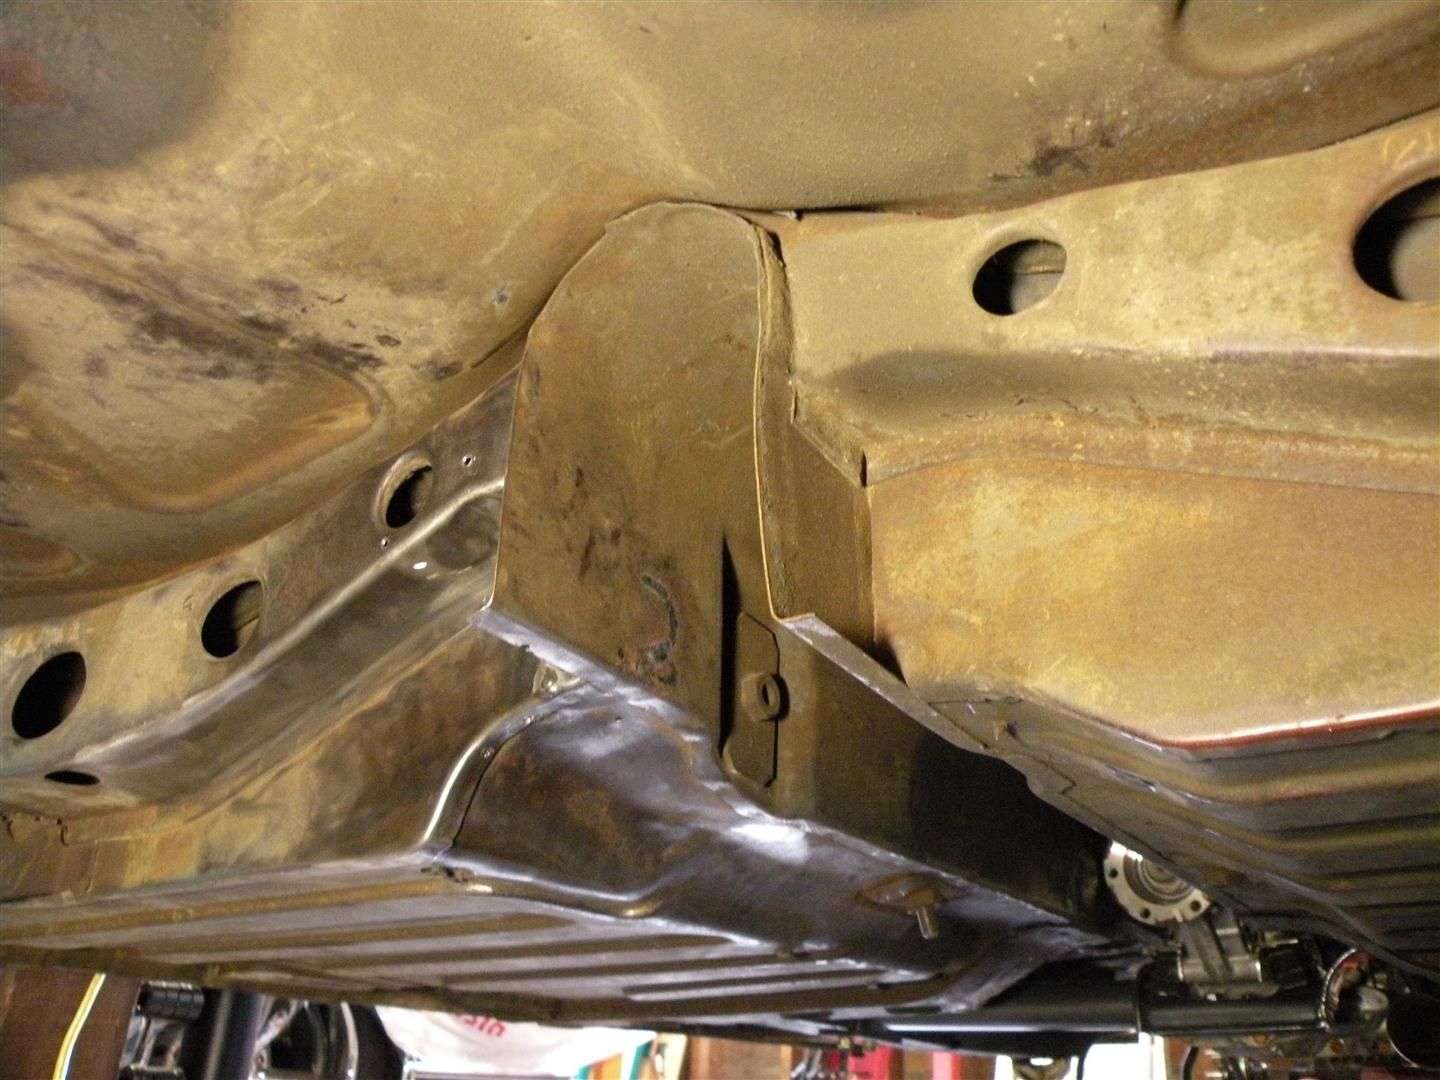 Floor pan/DS Tunnel will kick-up for the muffler inlet: 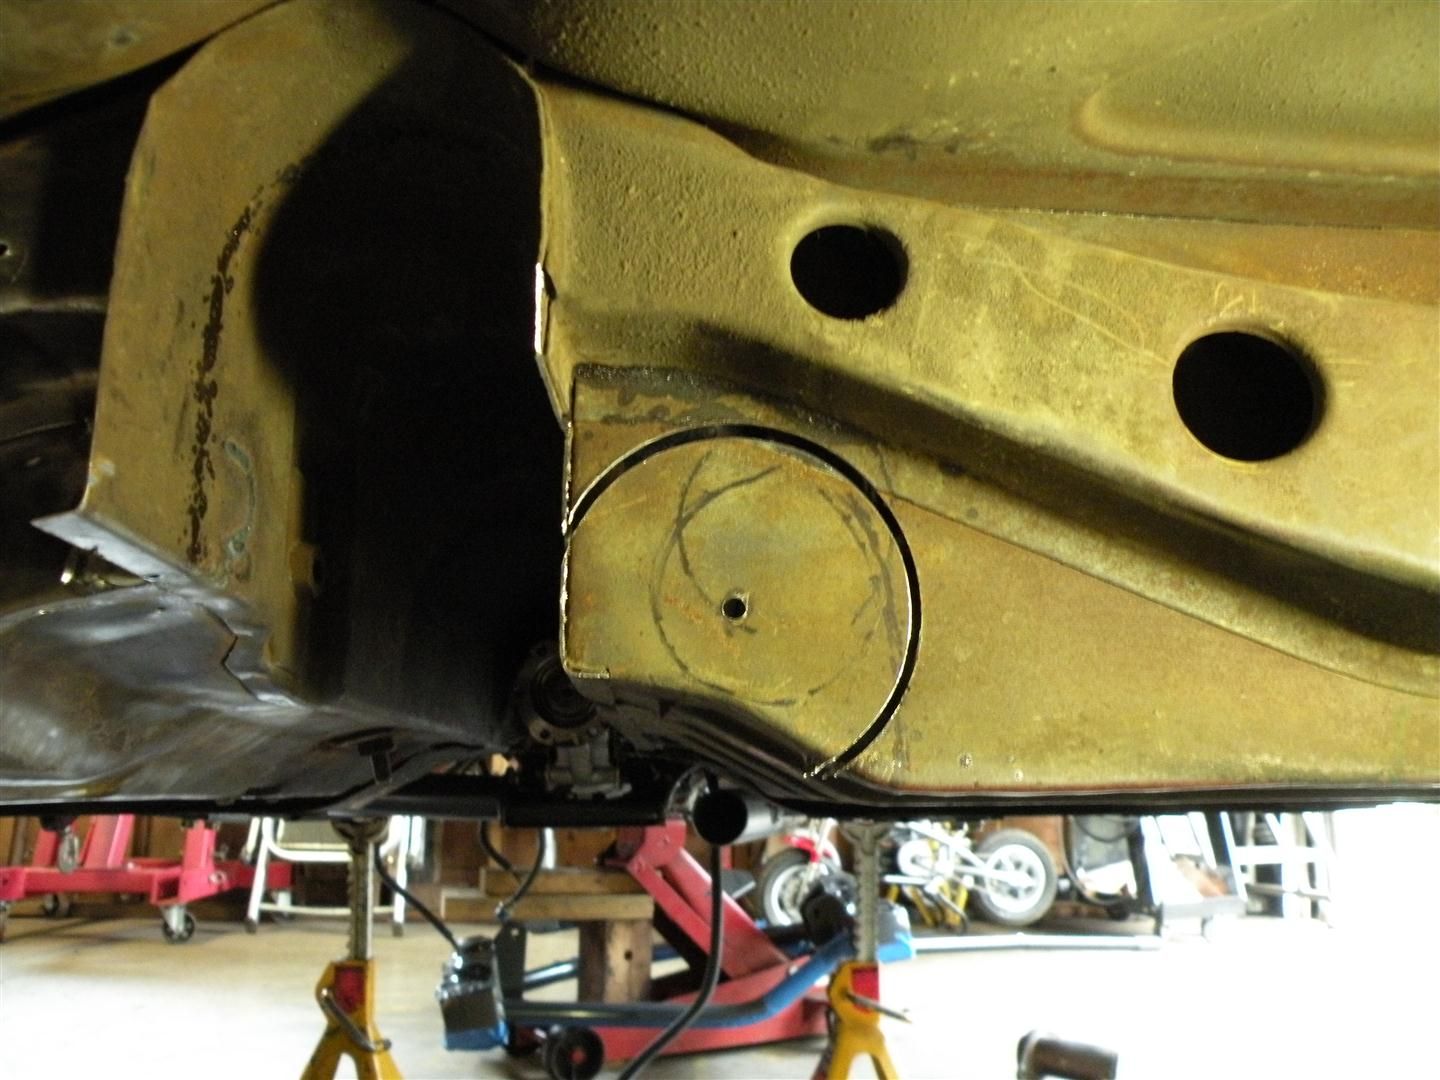 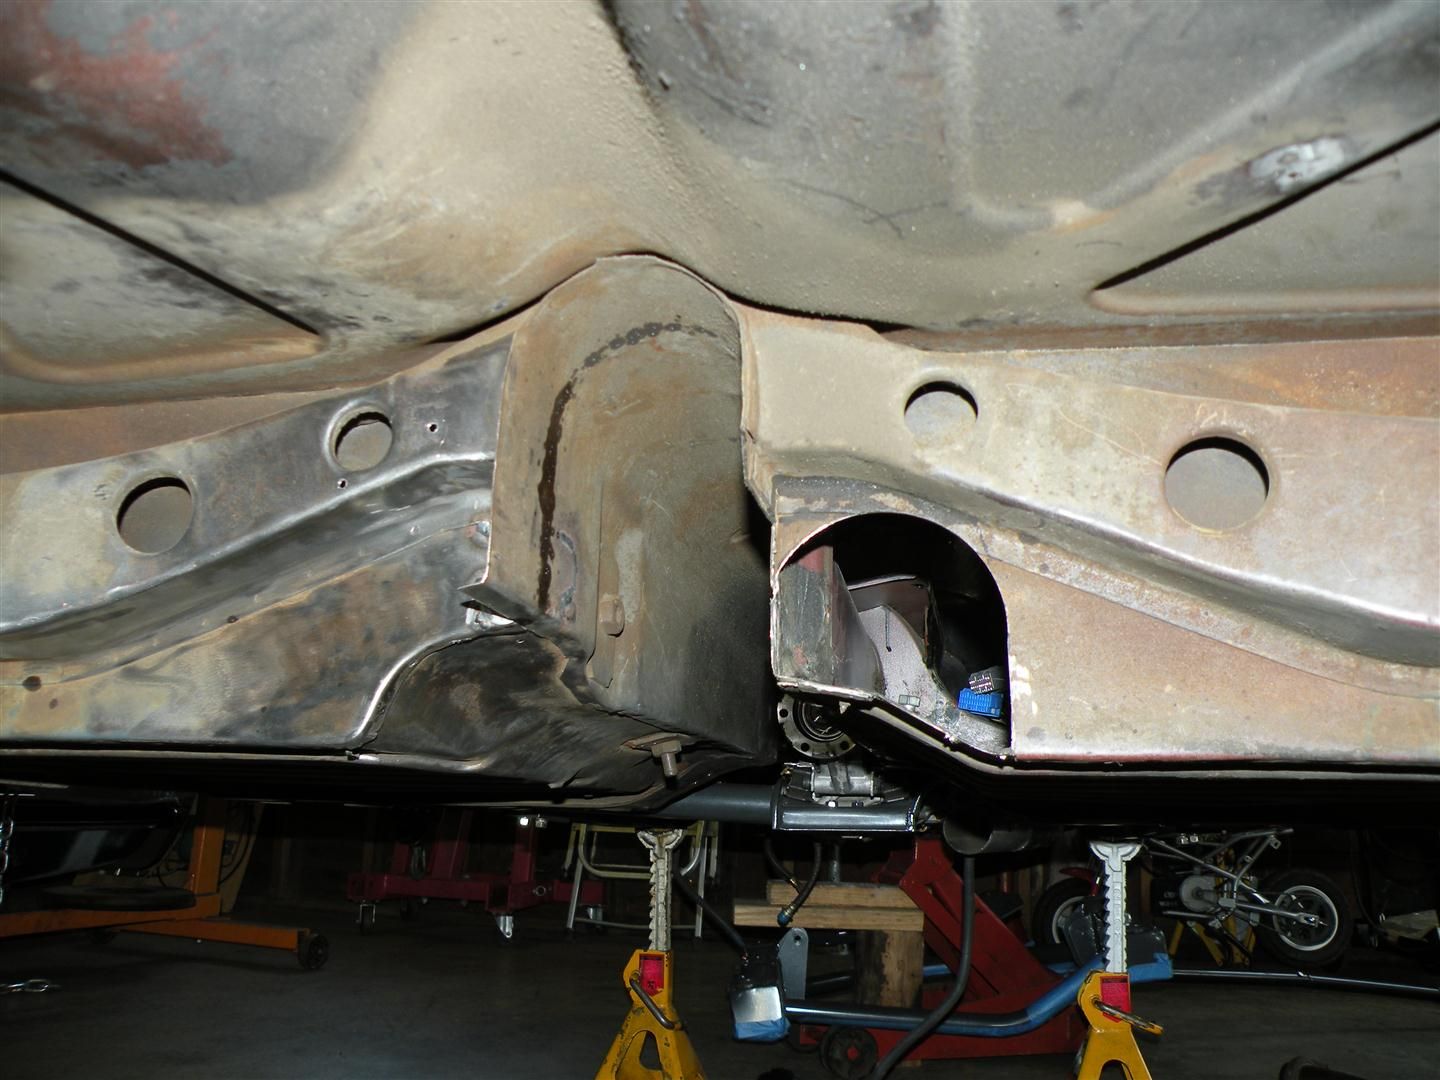 Started working the area and the panel that was removed to create the required shape: 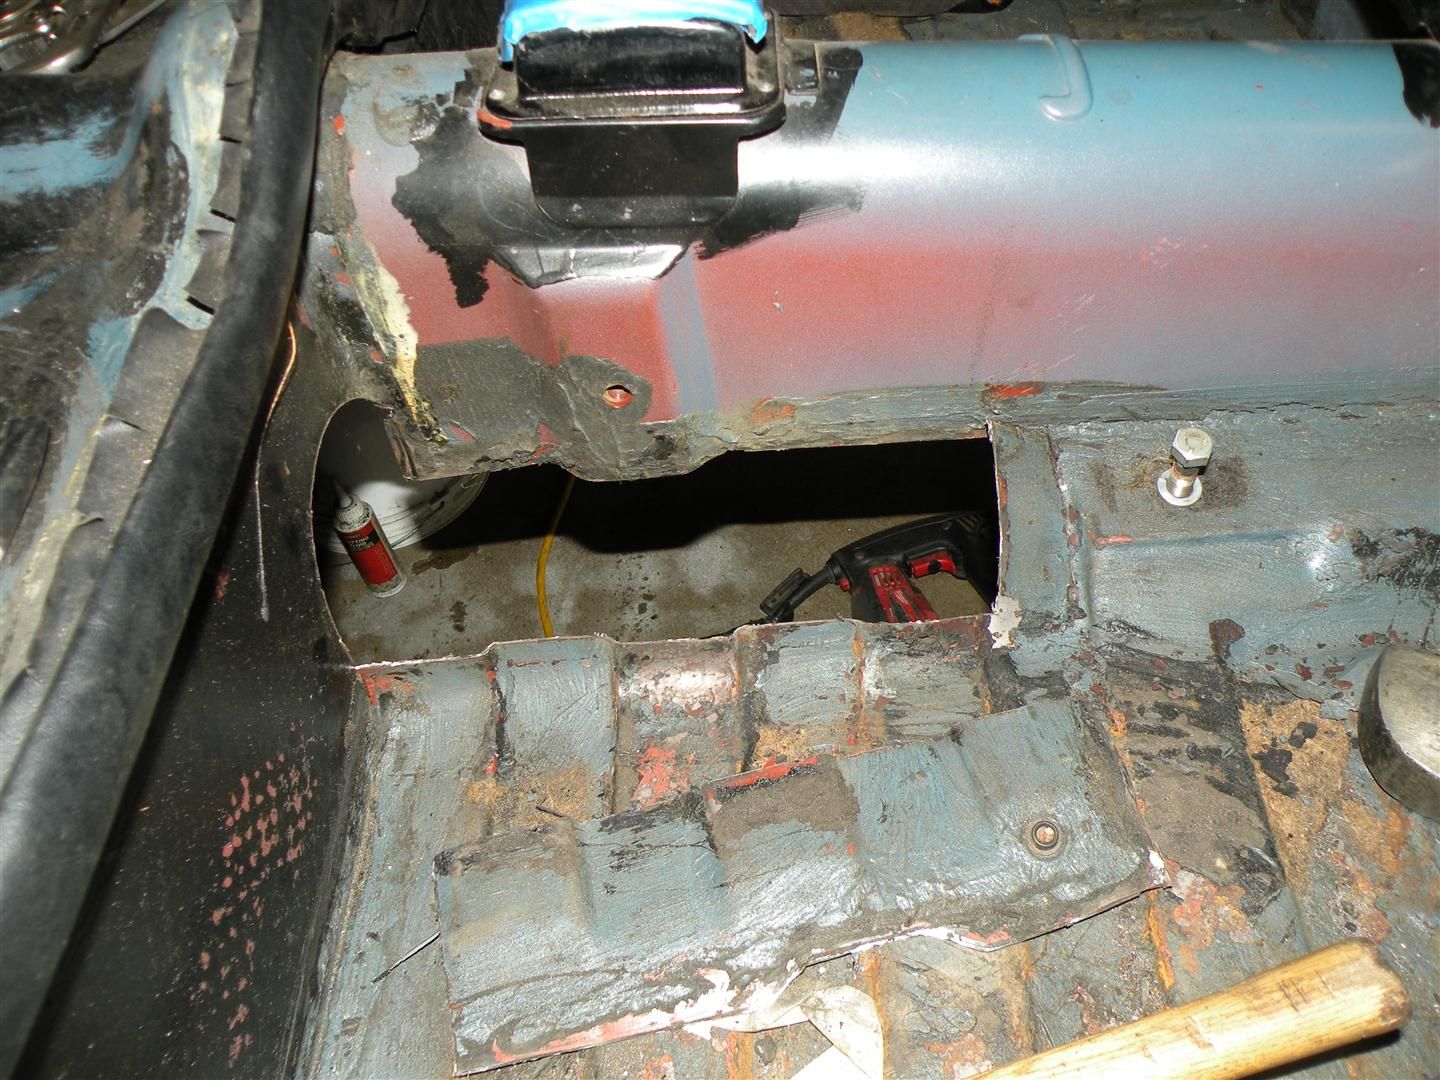 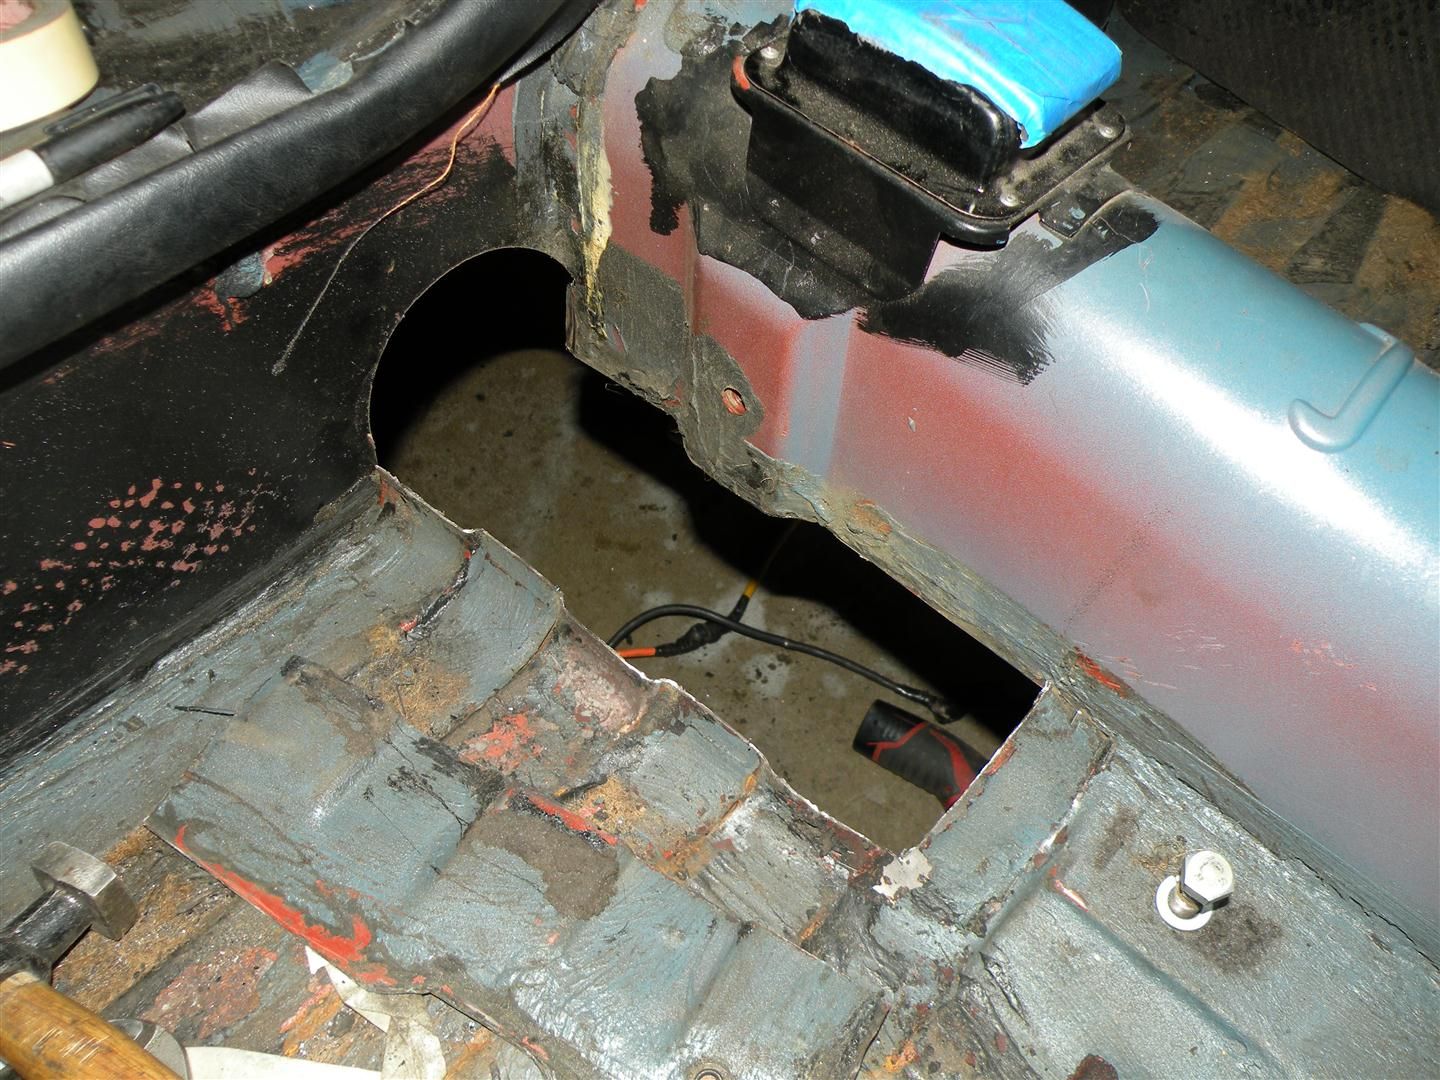
|
||
|
|
|
|
04-06-2012, 03:00 PM
|
#1225 |
|
Registered User
Join Date: Aug 2005
Location: Hillsboro Oregon
Posts: 6,449
|
Re: '66 Sunbeam Minx Project - F20C/6sp/4-link/Discs...
Also picked up my color matched paint and other supplies. Got some POR-20 to try out on the header too. Anyone use it?
|
|
|
|
 |
| Bookmarks |
|
|


 Linear Mode

