
|
 09-05-2012, 02:01 PM
|
#26 | |
|
Registered User
Join Date: Jan 2012
Location: Motown
Posts: 7,667
|
Re: 1957 Chevy truck re-rebuild
Quote:
thanks for posting a pic of the truck nice looking truck, good start for your project
__________________
cool, an ogre smiley  Ogre's 58 Truk build Ogre's 58 Truk buildhow to put your truck year and build thread into your signature shop air compressor timer |
|

|

|
|
09-05-2012, 10:33 PM
|
#27 |
|
Registered User
Join Date: Aug 2012
Location: Salem Mo
Posts: 647
|
Re: 1957 Chevy truck re-rebuild
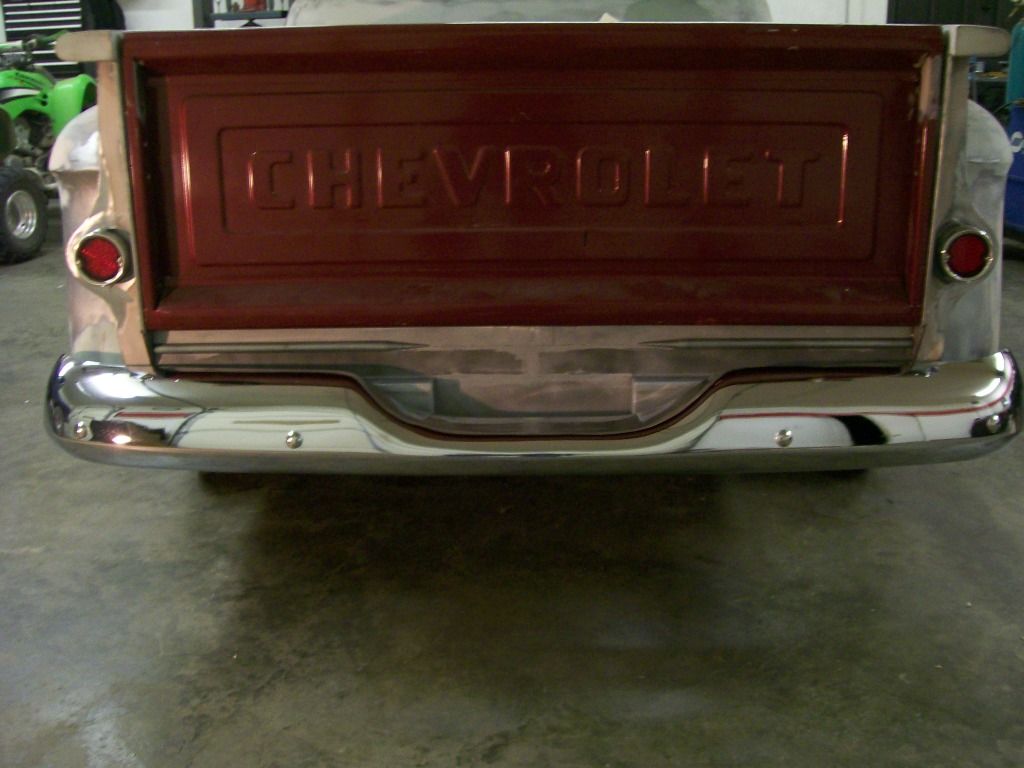
Well, now that I think about it, it was amost 2 years ago to the day I took this picture. I had just got the engine assembled to this point when I got the call that dad passed away.
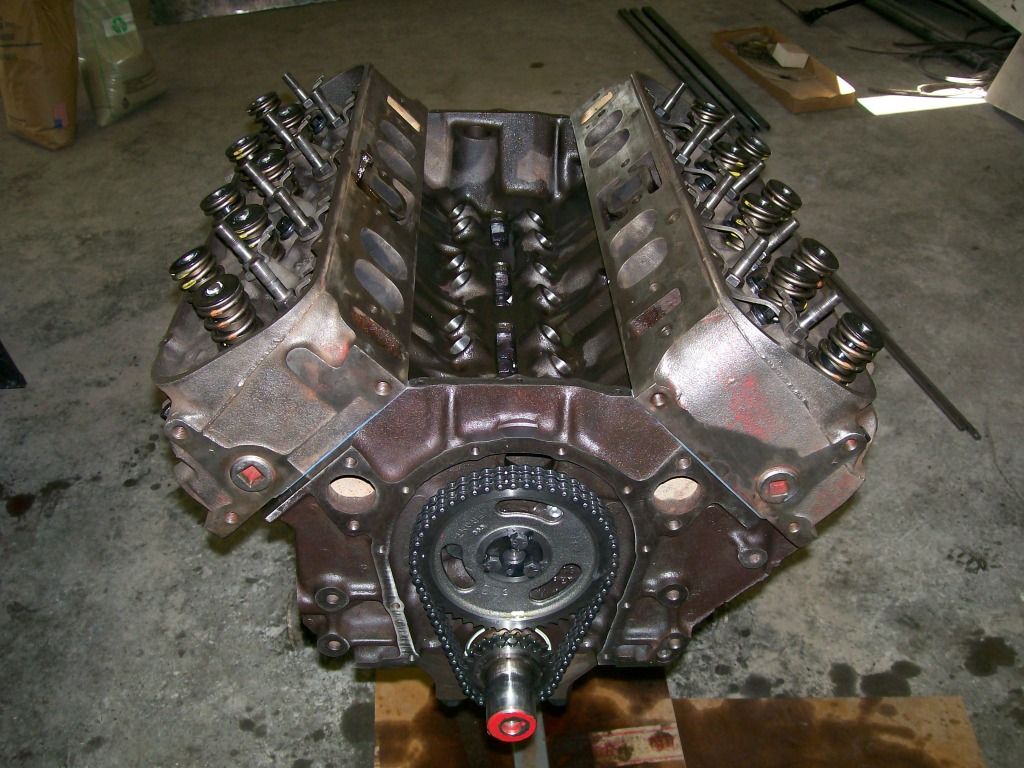 So the engine was 80 percent assembled, and much of the body work was smoothed. I lost my interest, my focus was gone. The truck sat for a year and a half. I had another truck that needed work so I worked on it and the 57 gathered dust. Other than the pictures of the redesigned taillights that I posted earlier, all the others are from 2 years ago. Now we're up do date, at least the last few months. This Chevy has become my only focus. Being single, I can do that without getting in trouble.  One issue I had was to go back to the original rear bumper, so I ordered one along with the original brackets. I mounted the bumper then stood back and scratched my head. Are you kidding me, that thing sits so far back it doesn't look like a part of the truck. Plus it's too low. 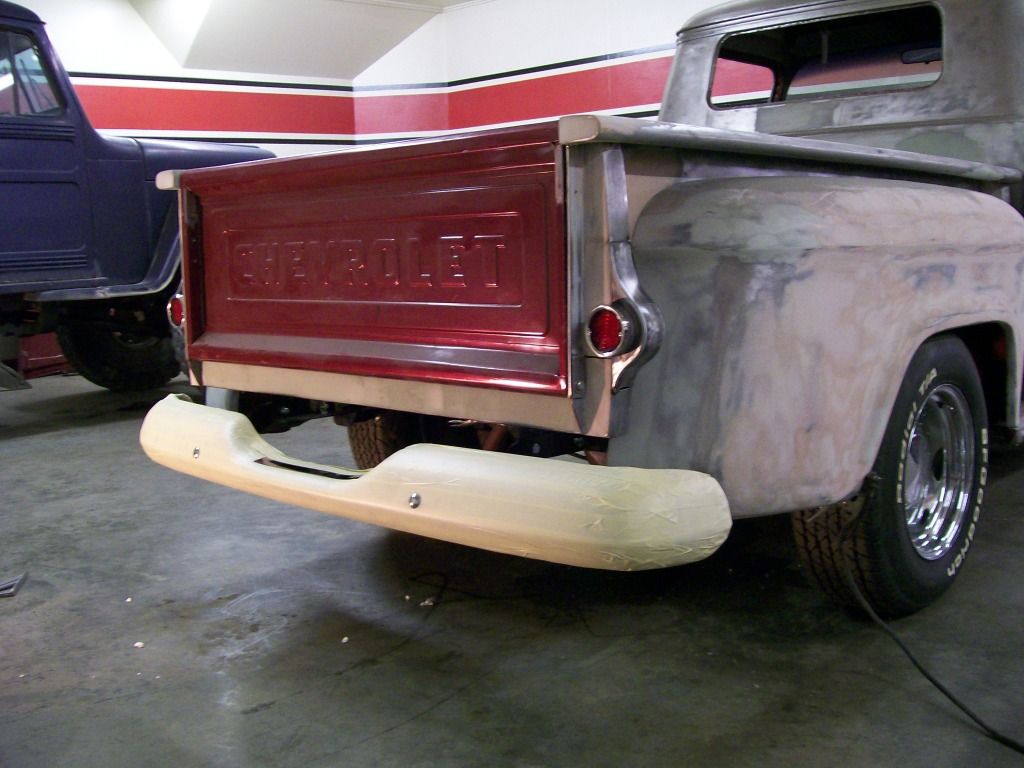 I removed a section out of the brackets, then realized I wanted to build the filler panel between the bed and the bumper. I needed about 3/8" space. Welding a bead on the bead I bridged the space to hold the bumper in place while I made the panel. Now it's time to get the brackets back together. 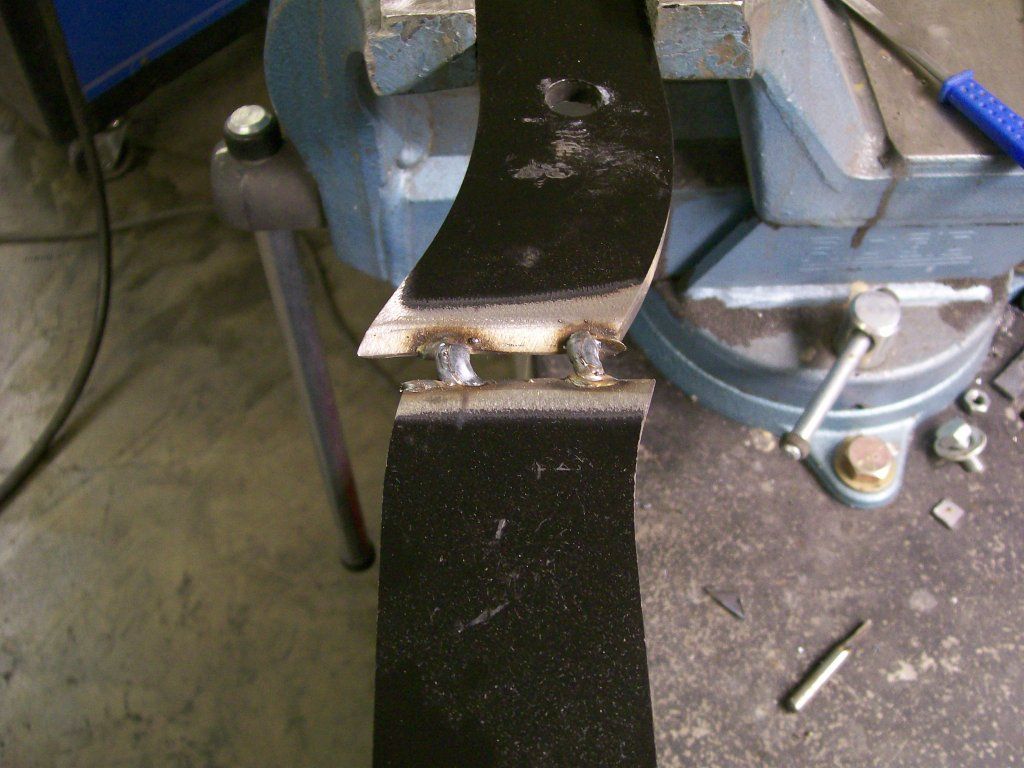 Once the gap has been filled. 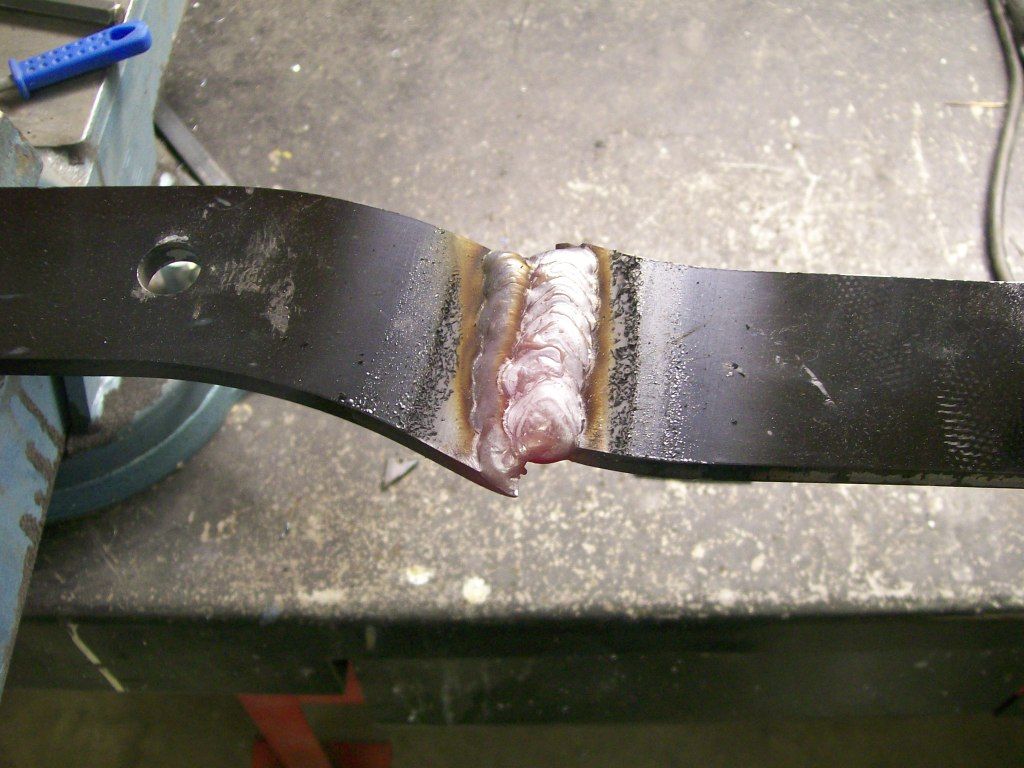 Time to get it looking original. 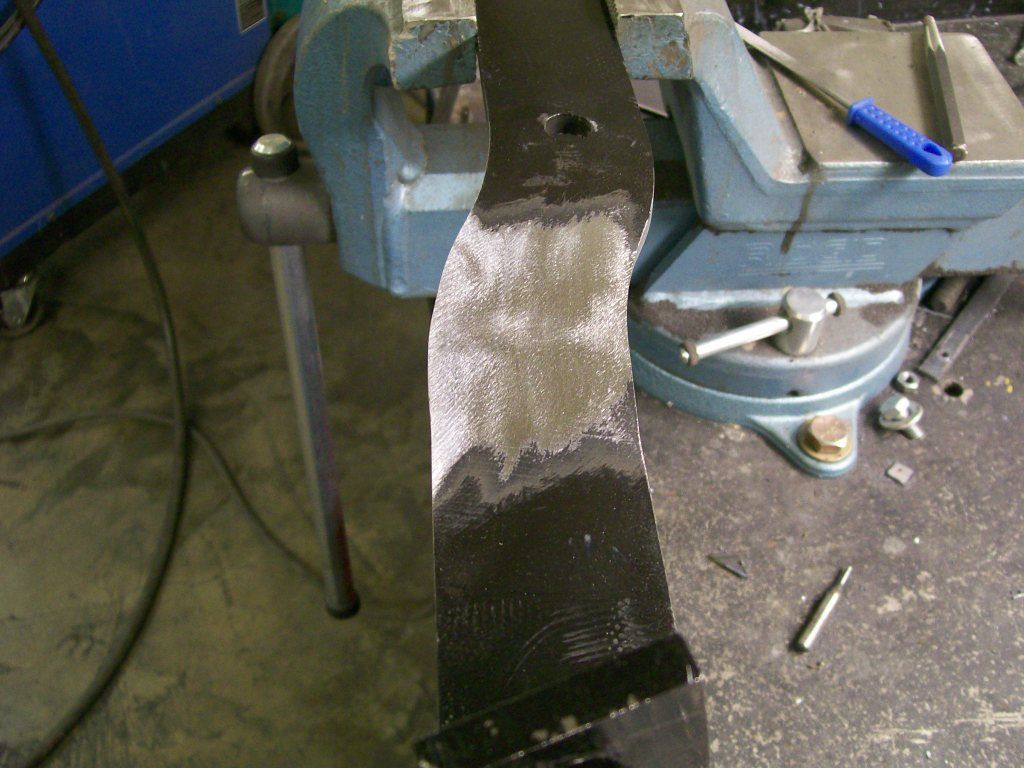 Looking good and the bumper is exactly where I want it to be. 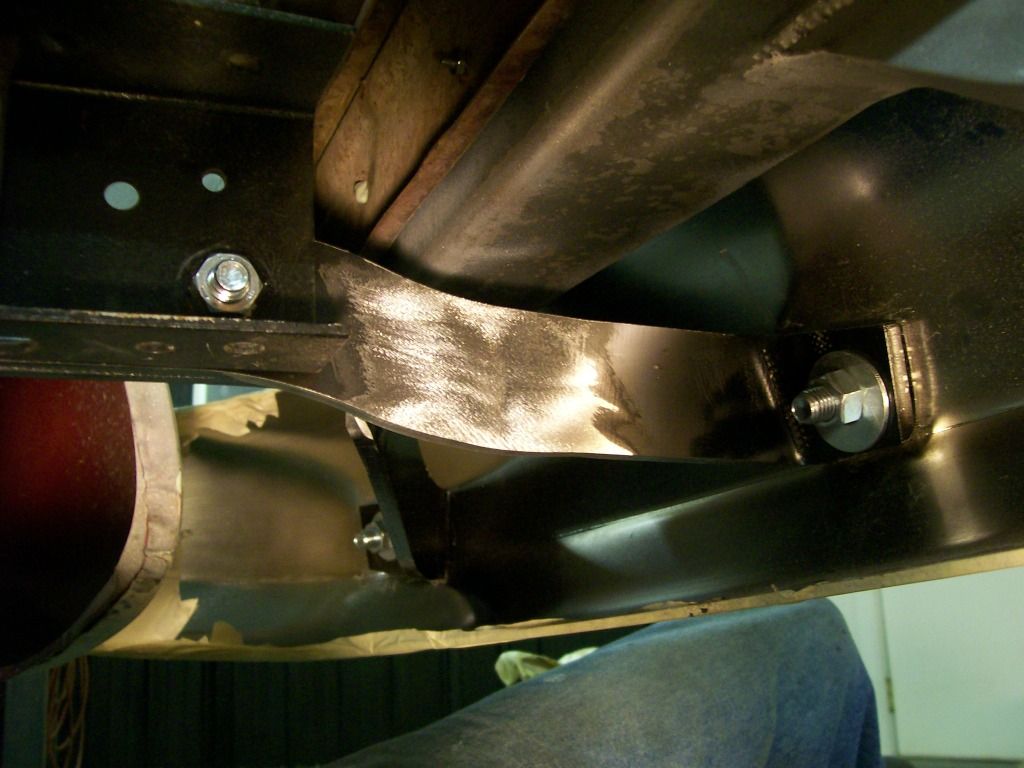 Same procedure for the ones that go to the sides. 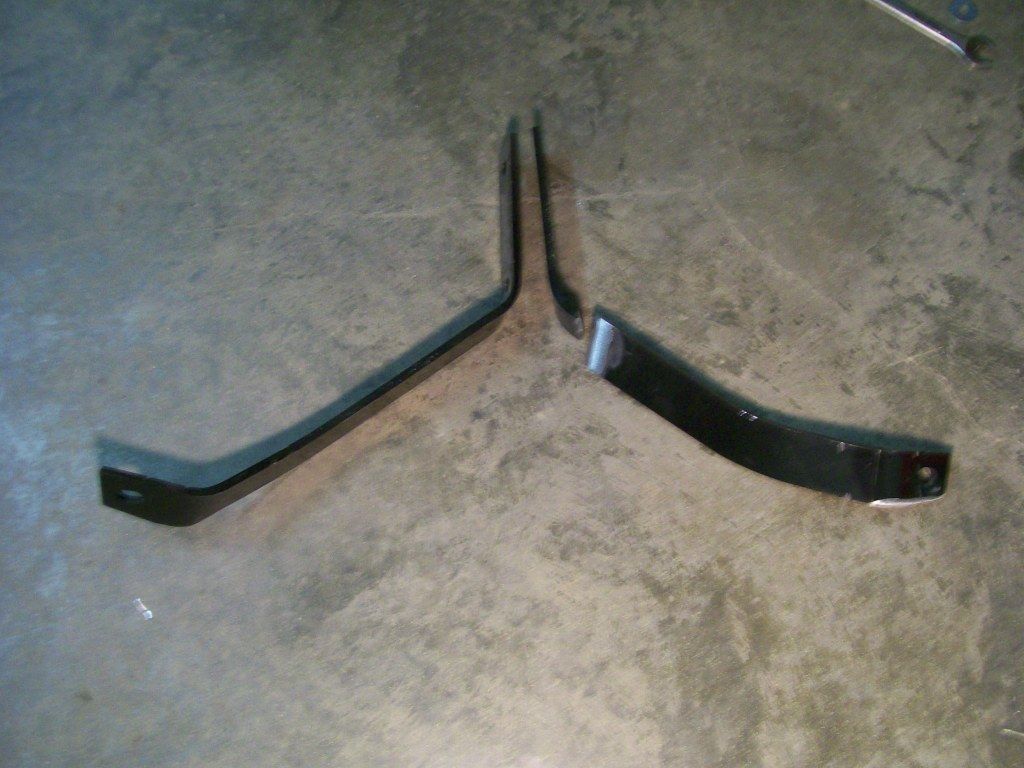 The welding and grinding is done. 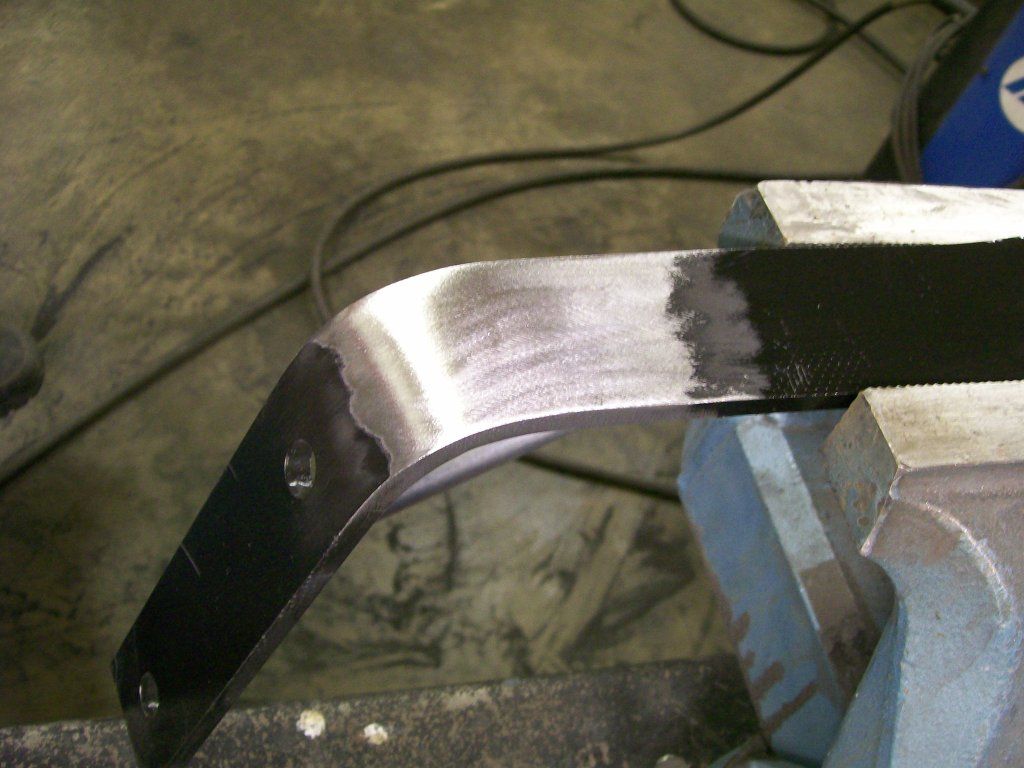
|
|
|
|
|
09-05-2012, 11:36 PM
|
#28 |
|
Registered User
Join Date: Sep 2009
Location: Albuquerque, NM
Posts: 540
|
Re: 1957 Chevy truck re-rebuild
You have some excellent welding skills and even better finishing skills. Looks great!
__________________
FAT MIKE My 59 http://67-72chevytrucks.com/vboard/s...d.php?t=400201 My 47 http://67-72chevytrucks.com/vboard/s...d.php?t=386848 |
|
|
|
|
09-06-2012, 12:43 AM
|
#29 |
|
Registered User
Join Date: Aug 2007
Location: Corona, California
Posts: 7,998
|
Re: 1957 Chevy truck re-rebuild
Looks real good.
Kim |
|
|
|
|
09-06-2012, 11:11 PM
|
#30 |
|
Registered User
Join Date: Aug 2012
Location: Salem Mo
Posts: 647
|
Re: 1957 Chevy truck re-rebuild
Still looking at the rear of the truck, I'm gonna bring a picture of the filler panel between the bumper and bed.
 Building the panel was one challenge. As I progressed I knew I had to mount it to the flat area just below the tailgate. I didn't want to just use bolts or screws to attach it to the bed. Looking at the picture above, you can see a couple spear like bars that come in from the sides. If I used bolts or screws, I would have an indentation in the panel where the screws are tight against the panel. I have a plan.....  Starting with a piece of 3/4" tube, I cut it in half length wise. Starting with a piece of 3/4" tube, I cut it in half length wise. 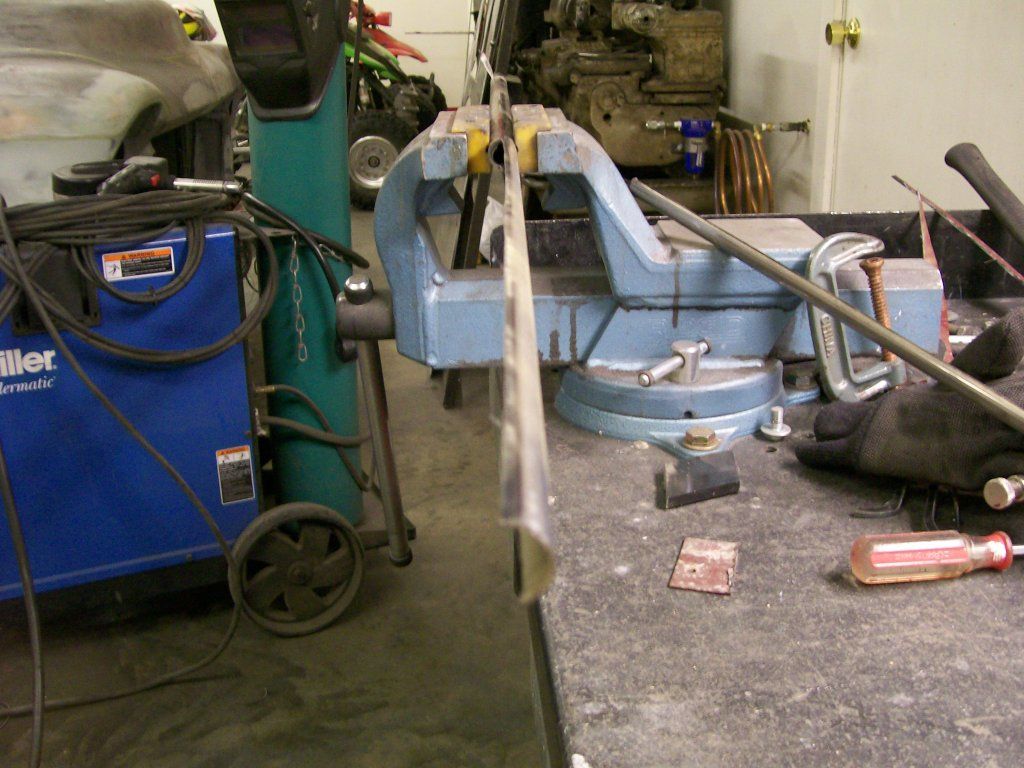 Using a cut off wheel on the 4 1/2" grinder, I cut 3" inward. 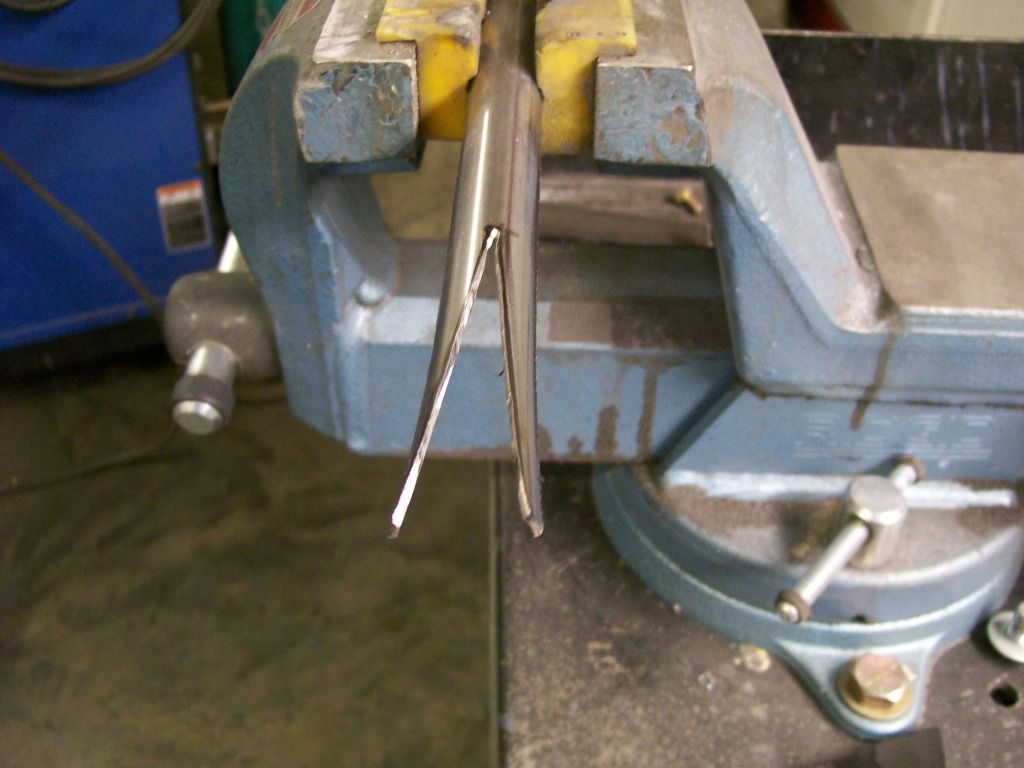 I put a small relief cut crossways at the end of the 3" cut. Then with a pair of pliars I sqeezed the ends together. 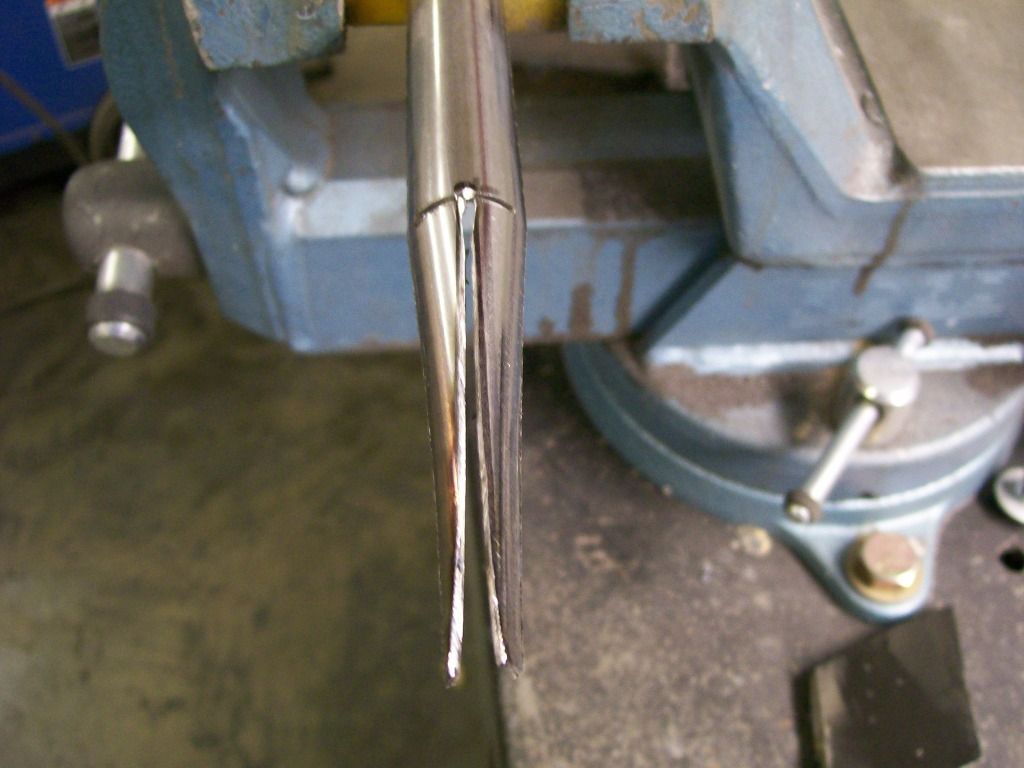 One together I stitch welded. 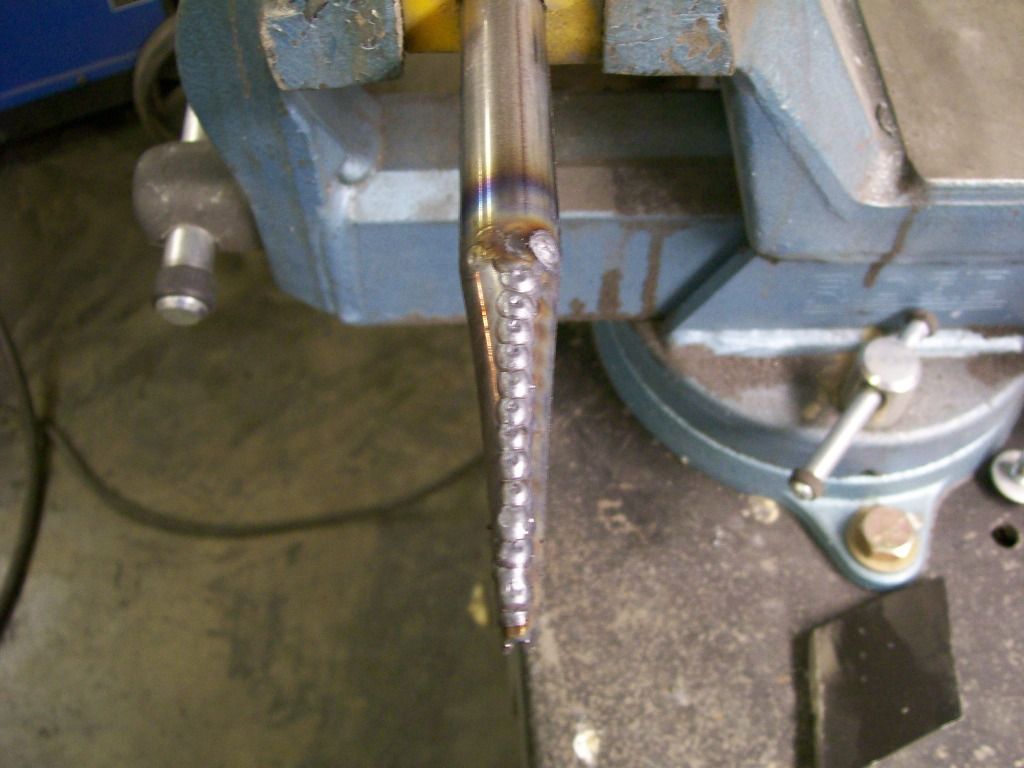 In the first picture above, you can see how after a little grinding I ended up with smooth spear ends. I made 6 of these tabs for mounting. I welded 3 these to the under side of each of the spears. Then drilled the panel and the bed flat to match the screws on the spears. Now just tighten the nuts on the back side. 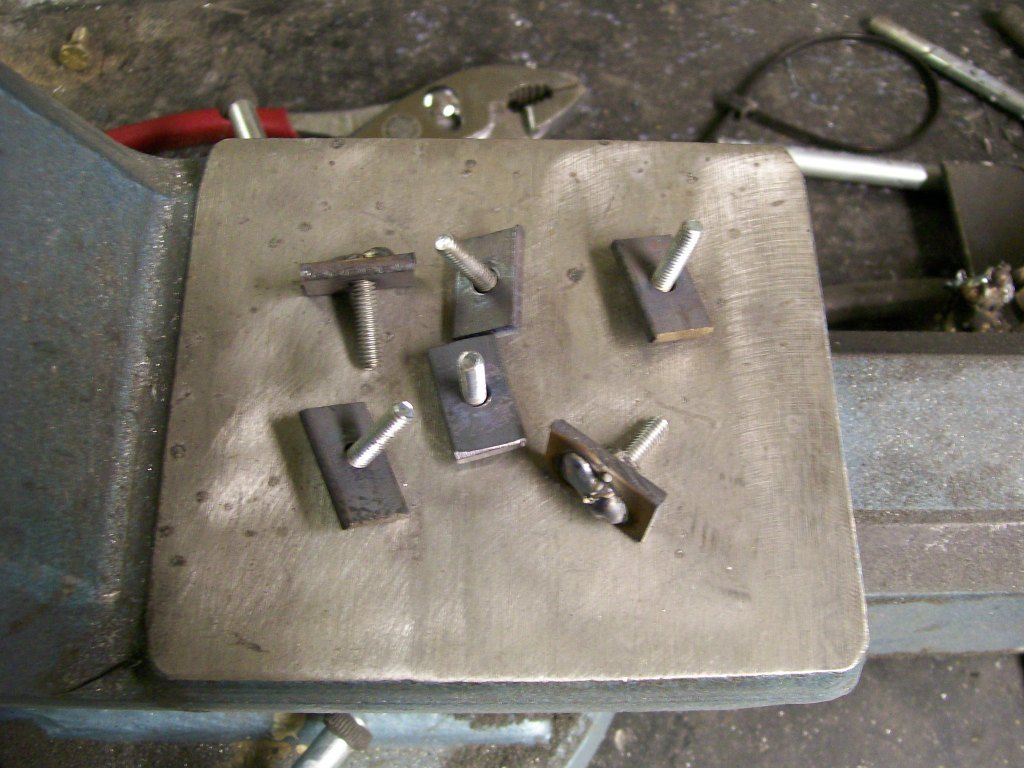 The nice thing about these mounting spears is the clamping force is distributed across a large area, now there is no bolt indentations. |
|
|
|
|
09-06-2012, 11:55 PM
|
#31 |
|
Registered User
Join Date: Jul 2011
Location: Auburn ca.
Posts: 2,886
|
Re: 1957 Chevy truck re-rebuild
Looks pretty cool There used to be a custom car show here once a year I really miss it!
|
|
|
|
|
09-07-2012, 12:10 AM
|
#32 |
|
Registered User
Join Date: Aug 2007
Location: Corona, California
Posts: 7,998
|
Re: 1957 Chevy truck re-rebuild
Very nice.
Kim |
|
|
|
|
09-08-2012, 12:29 AM
|
#33 |
|
Registered User
Join Date: Aug 2012
Location: Salem Mo
Posts: 647
|
Re: 1957 Chevy truck re-rebuild
Trying to cover the list of changes that Dad wanted, I remember he wanted "exhaust cut outs".
Ok. now we're stepping back into his teenage years, cut outs I thought, I was already concerned with how I'm gonna get the exhaust to fit since it looks like it's gonna run right into where I'd like the transmission crossmember to be. By time I was done, I fulfilled his request. I believe I went above and beyond what he would have expected. It started with the idea that I didn't want the tail pipes going out the back. Next, I don't like the sound of an 8 cylinder engine with the tailpipes coming out the sides of the vehicle. To me it sounds like 2 four cylinder engines since there is one bank of cylinders sounding from each side. Well, I did do the tailpipes out the sides, I ran them right through the steps. 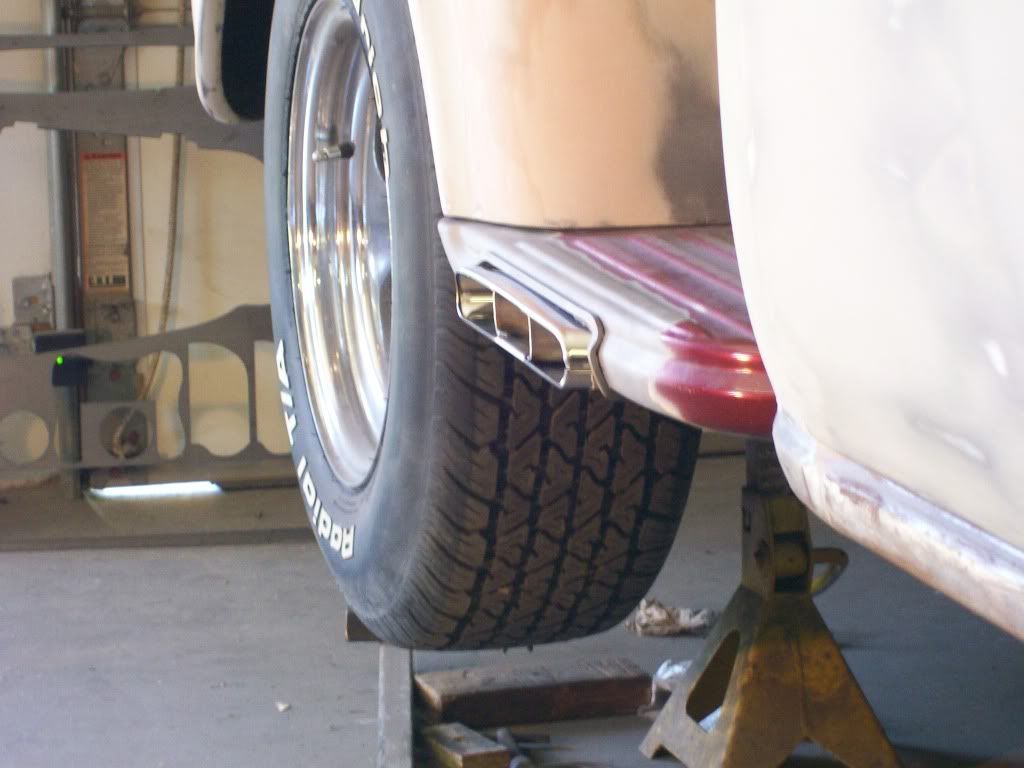 By time I finished the exhaust, wow, what a project. I solved the cut out issues, I have no pipes out the back and I took care of the 4 cylinder sound. 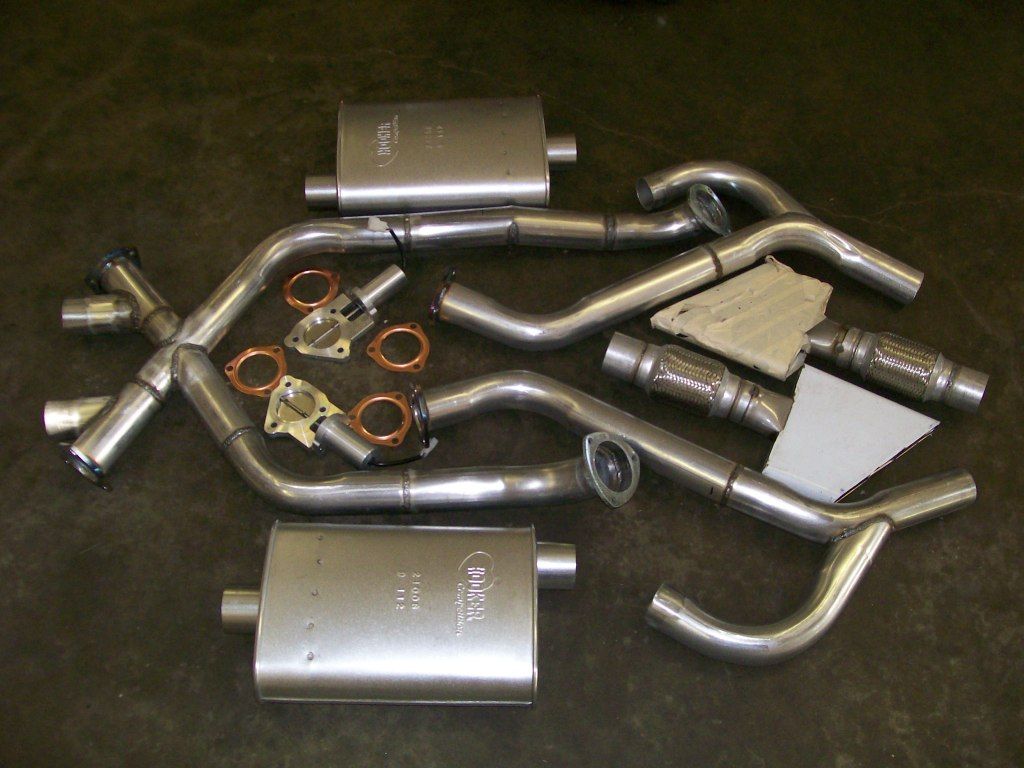
|
|
|
|
|
09-08-2012, 01:30 AM
|
#34 |
|
Registered User
Join Date: Aug 2007
Location: Corona, California
Posts: 7,998
|
Re: 1957 Chevy truck re-rebuild
That should do the trick. Very nice.
Kim |
|
|
|
|
09-08-2012, 01:34 PM
|
#35 |
|
Registered User
Join Date: Nov 2011
Location: Langley, BC
Posts: 702
|
Re: 1957 Chevy truck re-rebuild
I'm liking this build. Good work!
__________________
56 Chevy PU http://67-72chevytrucks.com/vboard/s...d.php?t=531955 Question: Know how to sell your truck for $50,000? Answer: Spend $100,000 building it. |
|
|
|
|
09-08-2012, 02:18 PM
|
#36 | |
|
Registered User
Join Date: May 2012
Location: zaandam netherlands
Posts: 240
|
Re: 1957 Chevy truck re-rebuild
Quote:
i like them Sander, |
|
|
|
|
|
09-08-2012, 03:08 PM
|
#37 |
|
Registered User
Join Date: Jul 2012
Location: indy
Posts: 55
|
Re: 1957 Chevy truck re-rebuild
what are the butterflies for?
|
|
|
|
|
09-08-2012, 06:27 PM
|
#38 |
|
Registered User
Join Date: Aug 2012
Location: Salem Mo
Posts: 647
|
Re: 1957 Chevy truck re-rebuild
Ohhh, I've started the truck, I've tested the exhaust, I'm so excited to drive it, maybe soon.
seanery, The butterflies are what makes the exhaust totally unique. In the old days, guys would run and exhaust to the mufflers, along the way, before the mufflers they would have a "Y" pipe. This extra outlet had a cap over it that was held in place with a couple of bolts. These are called cut outs. Once they got to the race track they would unbolt the caps and now the exhaust had a free flowing outlet. These were call "cut outs", the exhaust cut out before the mufflers. 63split, I found the exhaust tips in the Jegs catalog. I was very pleased with the design and how they were made. Everybody else, thanks for checking in. The encouragement is always appreciated. seanery, with these next pictures, you'll be able to follow the flow of the exhaust. I replaced the idea of using the old style of removing bolts to open the exhaust. Jegs has these electric powered butterflies that opens the exhaust cut outs by pushing a button. Also, instead of dumping the exhaust out under the truck, I made a bypass pipe that routes the cut out exhaust around the muffer and reconnects to the side outlets.  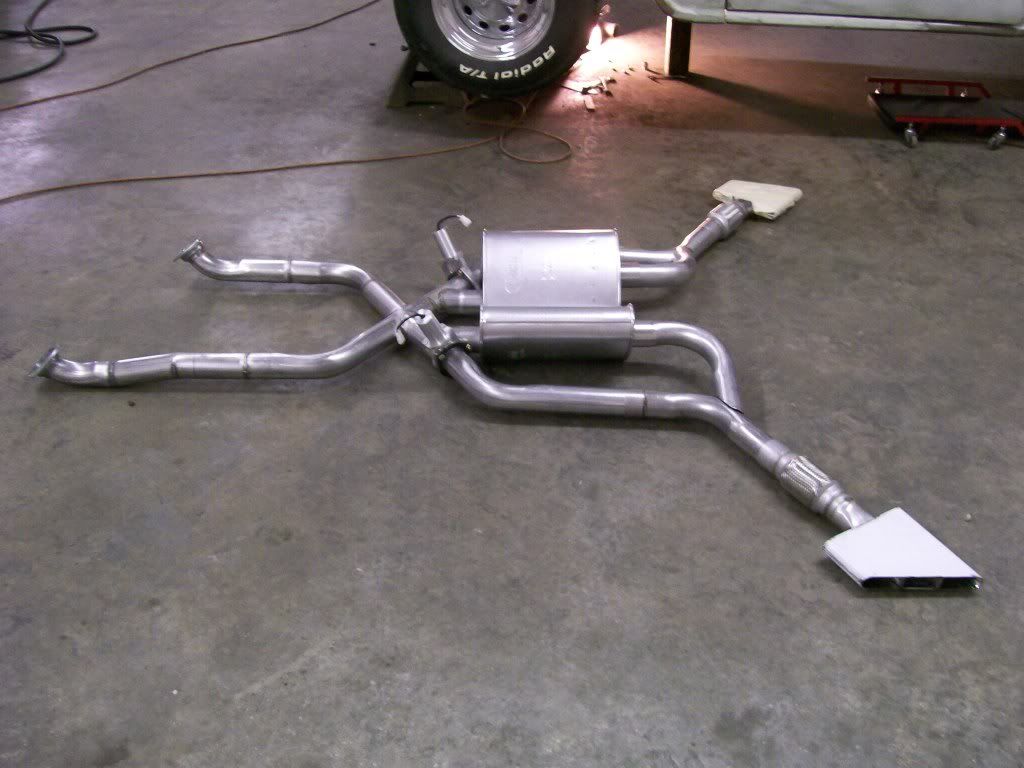 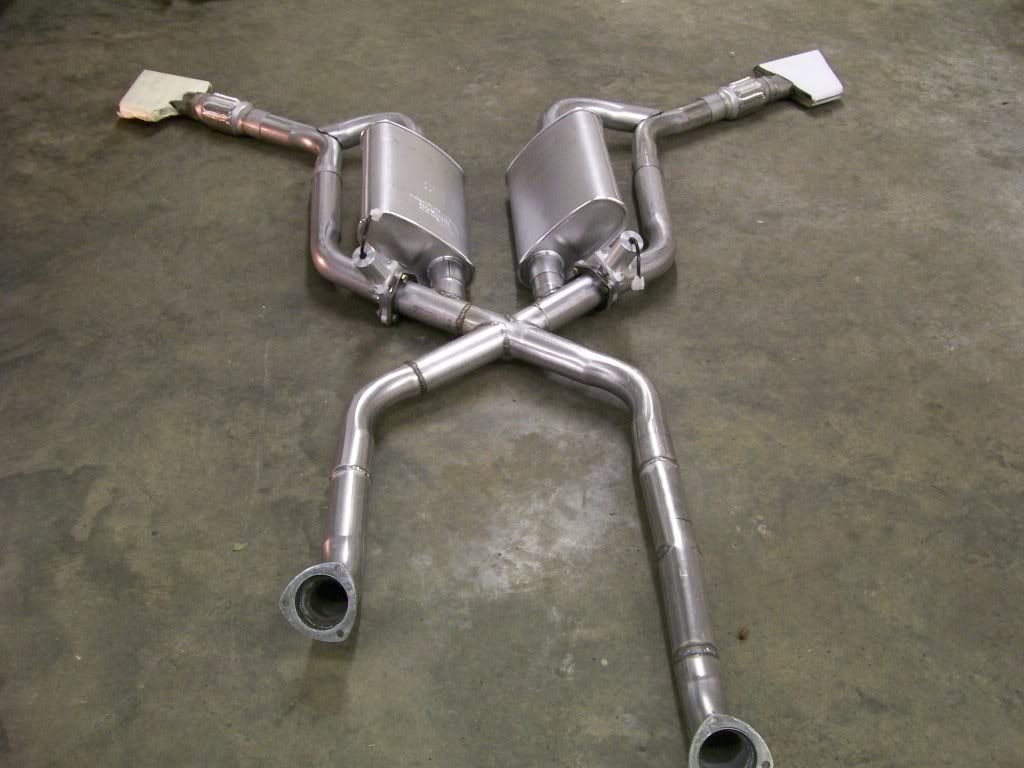 Due to the amount of space under these trucks I was able to fit this all together. With a car I'd be cramped to get this to fit. |
|
|
|
|
09-08-2012, 07:17 PM
|
#39 |
|
Registered User
Join Date: May 2012
Location: zaandam netherlands
Posts: 240
|
Re: 1957 Chevy truck re-rebuild
thank you for the tip ! on the tips
 nicely done on the total setup with the cutouts i will use this one as an example on mine thanks Sander, |
|
|
|
|
09-08-2012, 11:09 PM
|
#40 |
|
Registered User
Join Date: Jul 2012
Location: indy
Posts: 55
|
Re: 1957 Chevy truck re-rebuild
very nicely done!
|
|
|
|
|
09-08-2012, 11:38 PM
|
#41 |
|
Registered User
Join Date: Aug 2007
Location: Corona, California
Posts: 7,998
|
Re: 1957 Chevy truck re-rebuild
I like the exhaust.
Kim |
|
|
|
|
09-09-2012, 09:02 AM
|
#42 |
|
A320 Pilot/USAF Retired
Join Date: Mar 2009
Location: Charleston, SC
Posts: 2,622
|
Re: 1957 Chevy truck re-rebuild
Nice work!
__________________
JJ My 1957 build: http://67-72chevytrucks.com/vboard/s...d.php?t=334552 http://www.trifive.com/forums/showthread.php?t=22037 Instagram - Chuckdriver57 |
|
|
|
|
09-09-2012, 09:45 AM
|
#43 |
|
Registered User
Join Date: Oct 2009
Location: Broken Arrow, OK
Posts: 1,218
|
Re: 1957 Chevy truck re-rebuild
Liking the truck alot so far. All those little details make the difference.
__________________
56 GMC BUILD THREAD: http://67-72chevytrucks.com/vboard/s...d.php?t=368649 69 long bed Chevy turned 67 gmc jimmy roadster: https://67-72chevytrucks.com/vboard/...d.php?t=851167 |
|
|
|
|
09-10-2012, 12:59 AM
|
#44 |
|
Registered User
Join Date: Aug 2012
Location: Salem Mo
Posts: 647
|
Re: 1957 Chevy truck re-rebuild
OKGMC4, you are so correct. Everything I touch I try to think of what and how I can make some small change that will add a personal touch.
Building that exhaust was an exhausting experience. I started with a set of shorty headers by patriot exhaust. I didn't use the full length headers because I didn't want the headers to dictate how the exhaust was going to fit under the truck. I also had to build my own crossmember, at the time I figured I'd be trying to fit the exhaust up and over the crossmember. By looking at the last set of pictures you'll see no humps or drops to avoid hitting the crossmember. I had a choice, build the crossmember first, then route the exhaust around it, or build the exhaust first, then build the crossmember around it. I chose to build the crossmember over the exhaust. 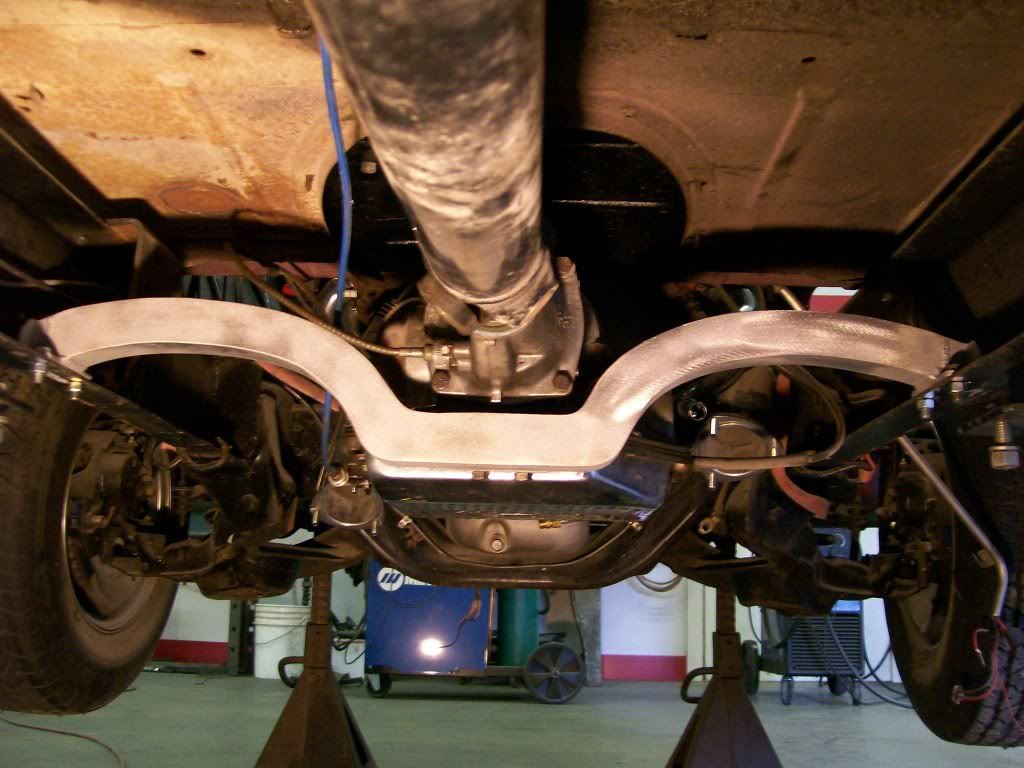 I figured there is performance lost when there are more bends put into the exhaust vs having the bends in the crossmember, which will have no effect on the performance. Next, the total exhaust can removed just by on bolting it and dropping it down. Next, the "X" in the exhaust is back far enough that the transmission can be removed with out touching the exhaust. Yes, I laid under the truck for a couple hours getting this figured out. I hope no one minds, but I have many pics of the process loaded so I'll show some of the work getting this all put together. Originally I was going to do a simple dual exhaust, then I thought about the side outlets, then I was going to do an "H"pipe. Then I didn't want to do all the fish mouth cuts to fit the pipes together. All I can say is, don't let time be the deciding factor in how much of yourself you put into a project. In the end it'll be worth it. What I smile on your face when you describe to people all you did to it later. I decided on the "x" pipe. 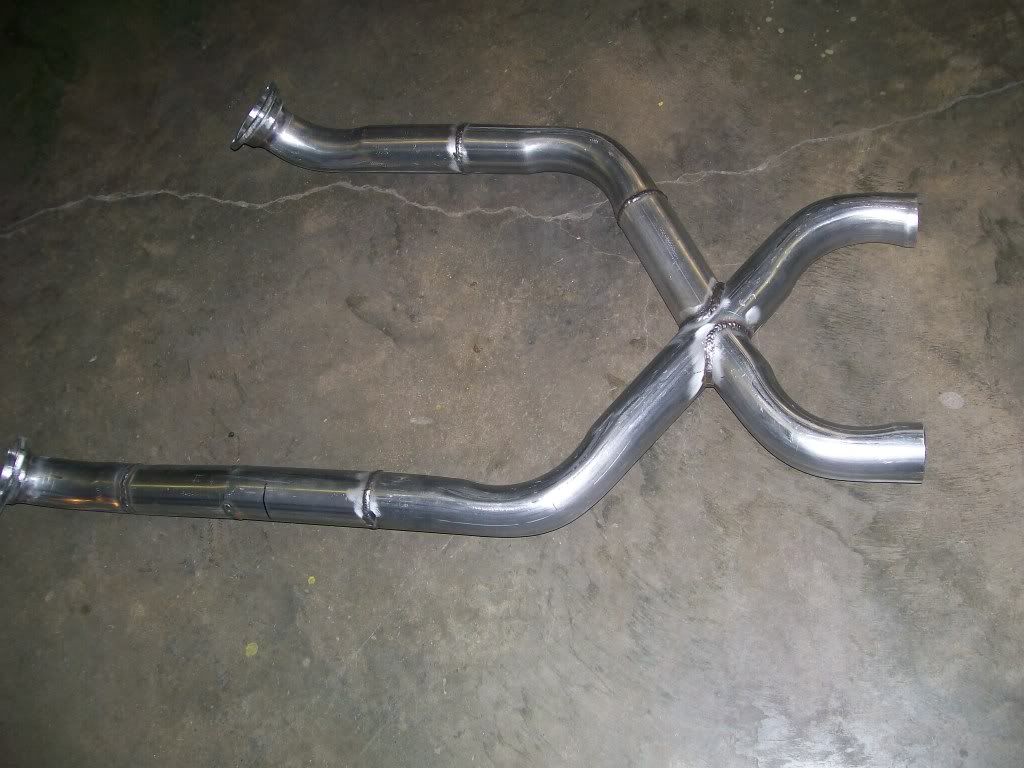 This would have been simple, just slide on a couple mufflers and run the tailpipes, or even the side pipes from here. 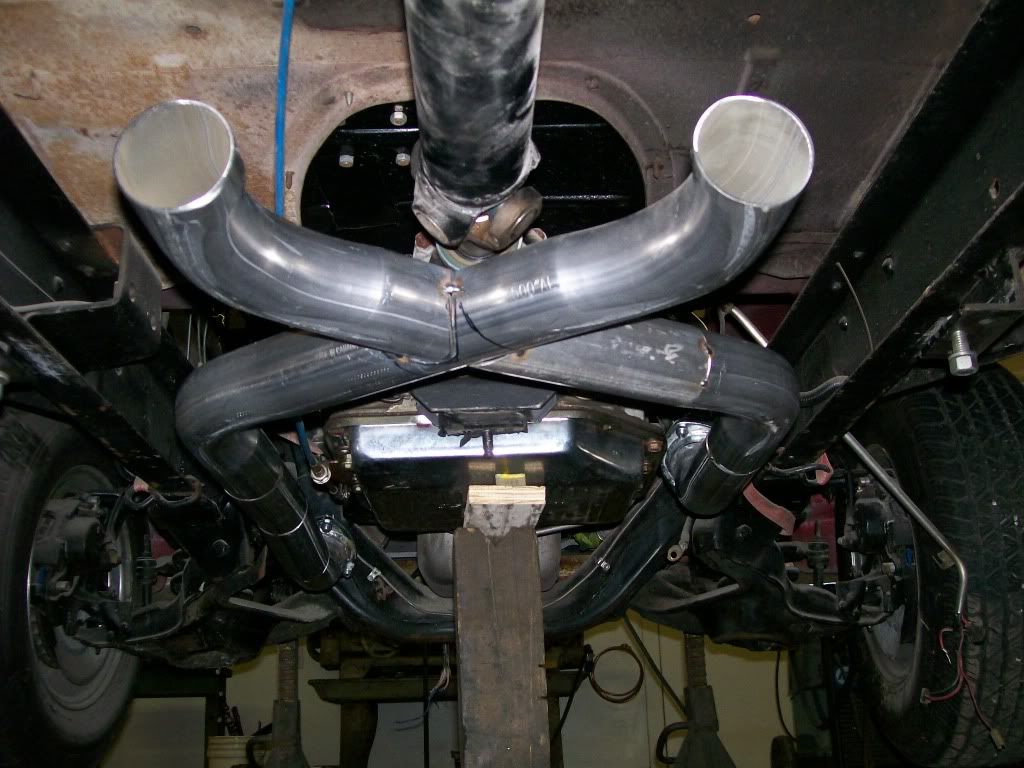 The headers didn't match at their outlets. So once I fabed up the collectors the drivers side was about an inch lower. I found it easier to cut a couple small wedges out of the pipe and pull the pipe back together. I can check the fit and remove more from the wedge if needed. Plus, the pipe is still together, I have some flexibility to get it at the perfect angle before I commit to the weld. 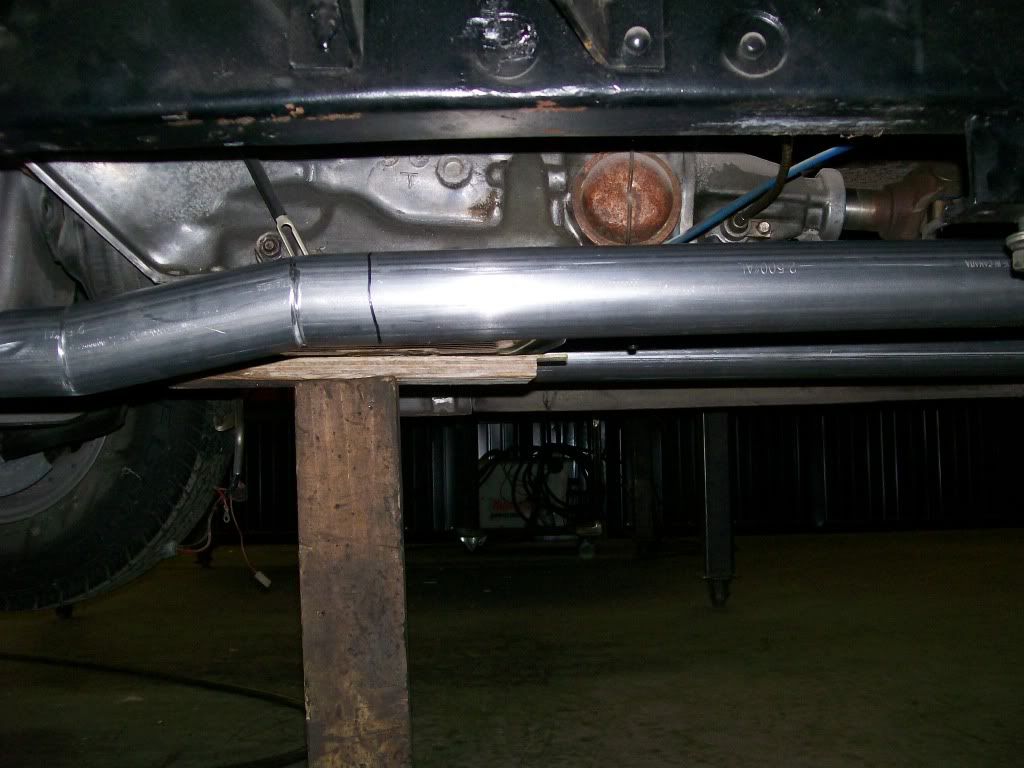 I wanted the same height for the passenger side and the drivers side, if they were off, the "x" would look lopsided. Working my way through building the "x". I know they have preformed "x"s available. I just have issues with being restricted to the prefitted angles of bought pieces sometimes. 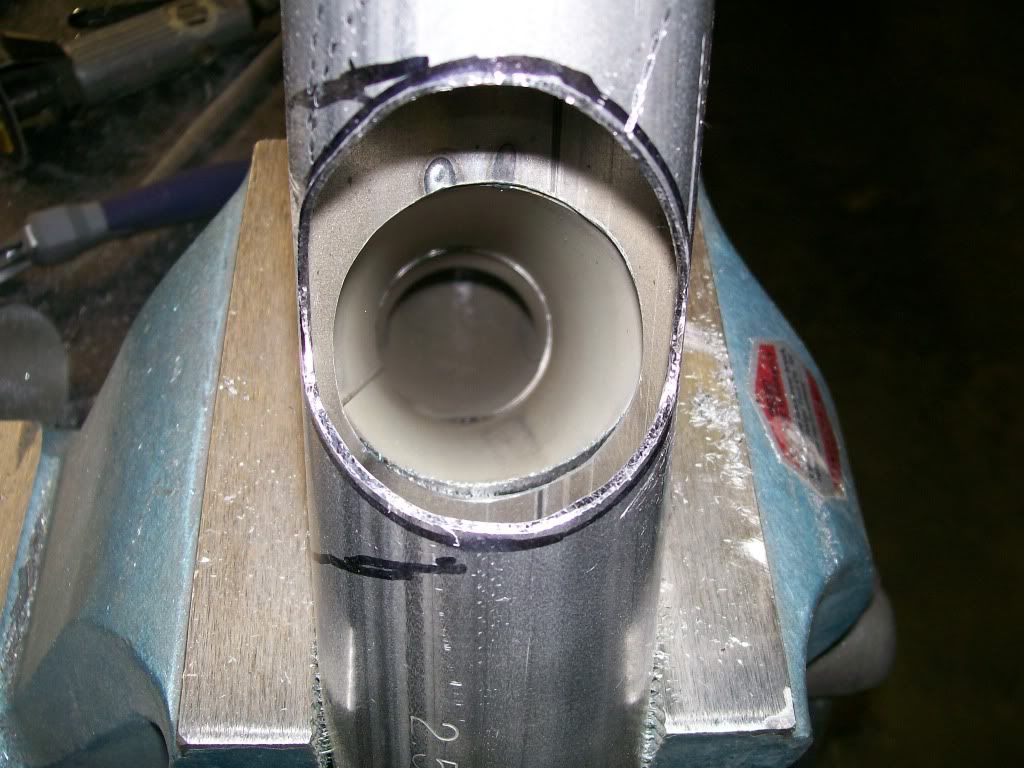 I can't believe this is going to work out ok. LOL.... 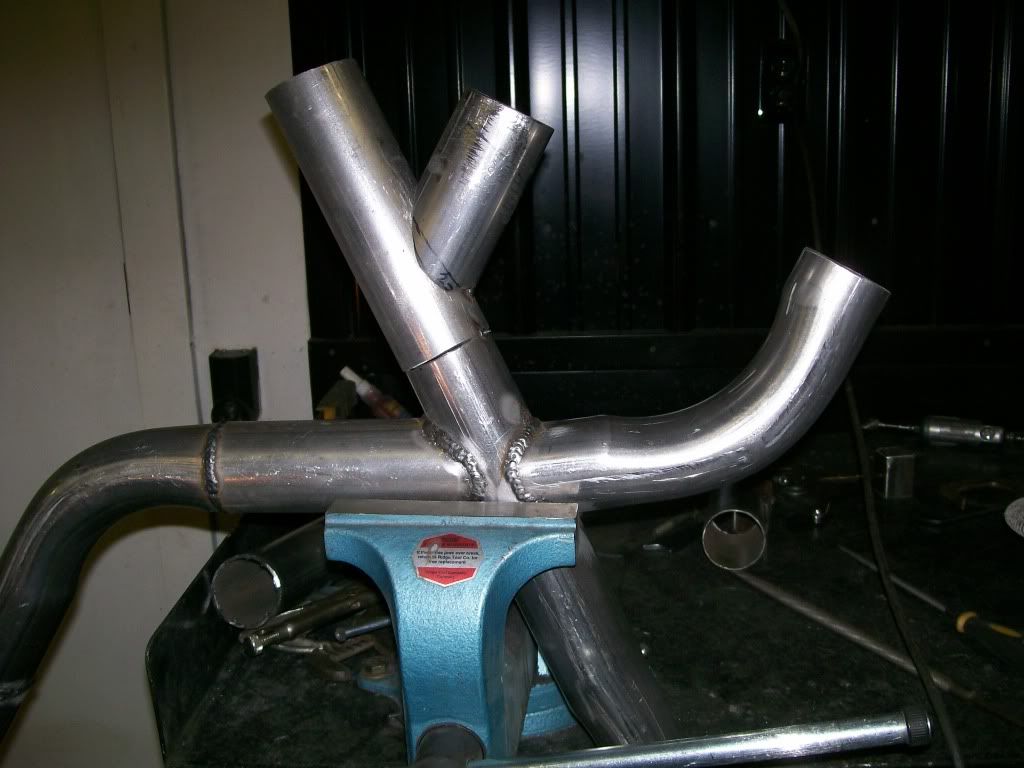 I need a flange on both sides of each of the cut out valves. I used the gasket and scanned it on the computer and had the Torchmate cut the flanges. I however do the bolthole drilling by hand. A plasma torch is not precise enough to cut the small boltholes. 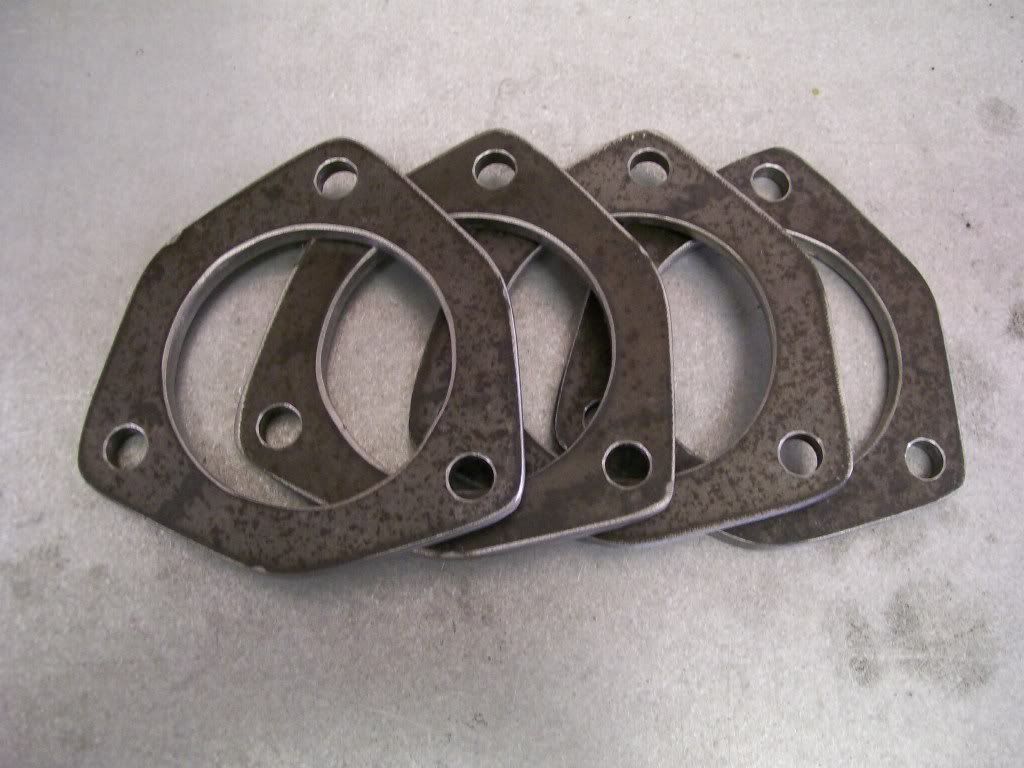 I had four flanges to drill. I drilled one flange to the exact dimensions. I then slid all four flanges together on a piece of pipe, then tack welded them all together. Then removed the pipe. Now with the drill press I can use the one that has the exact holes as my guide to drill all flanges that will be in perfect alignment with the bolt holes and the inside hole as well. 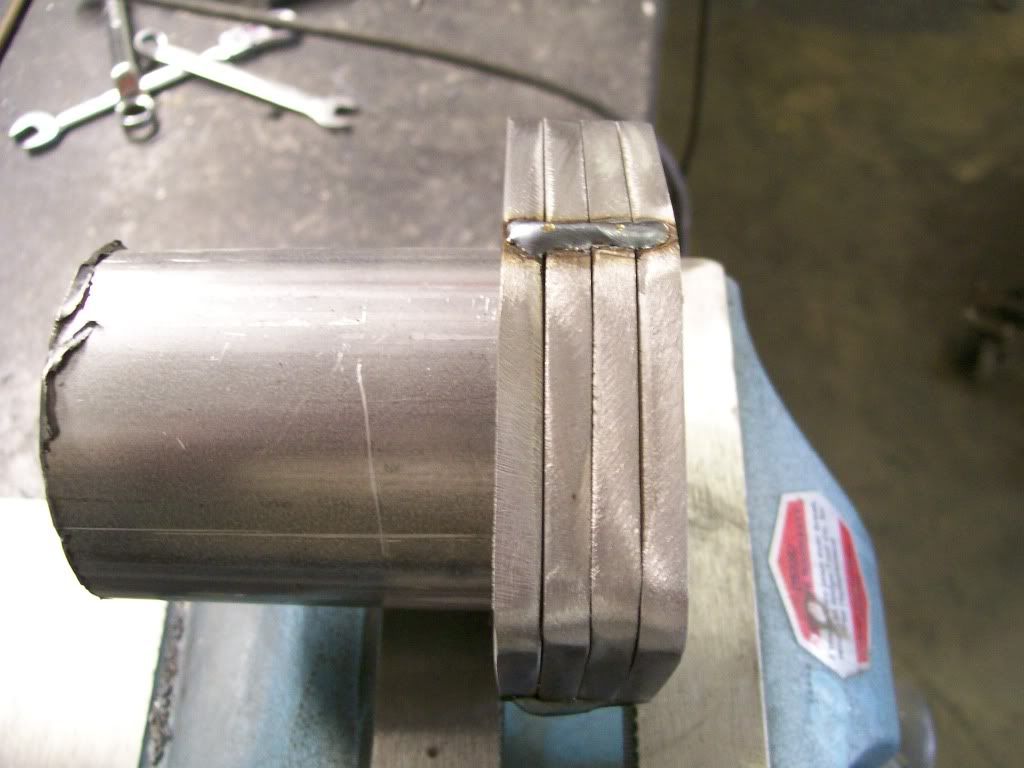 I'll continue the exhaust later, here is a teaser of how the cross member started. 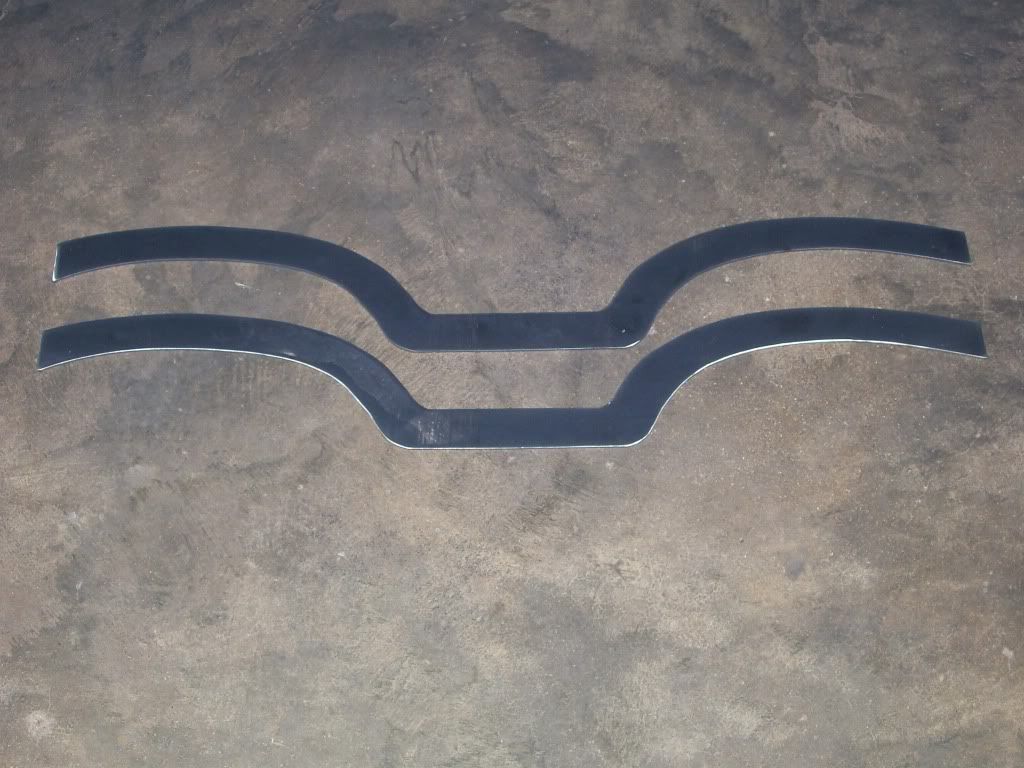
|
|
|
|
|
09-10-2012, 10:31 AM
|
#45 |
|
Registered User
Join Date: Aug 2007
Location: Corona, California
Posts: 7,998
|
Re: 1957 Chevy truck re-rebuild
Very nice work Jim.
Kim |
|
|
|
|
09-11-2012, 11:21 PM
|
#46 | |
|
Registered User
Join Date: Aug 2012
Location: Salem Mo
Posts: 647
|
Re: 1957 Chevy truck re-rebuild
Quote:
Thank you Kim. One concern I had when building the exhaust was the movement between the engine and the bed steps. I needed a way to allow flexing so the welds wouldn't be stressed. Thumbing through the Jegs catalog I found exactly what I was looking for. They are stainless steel with a braided covering over flex tubing within, exactly what I was looking for. 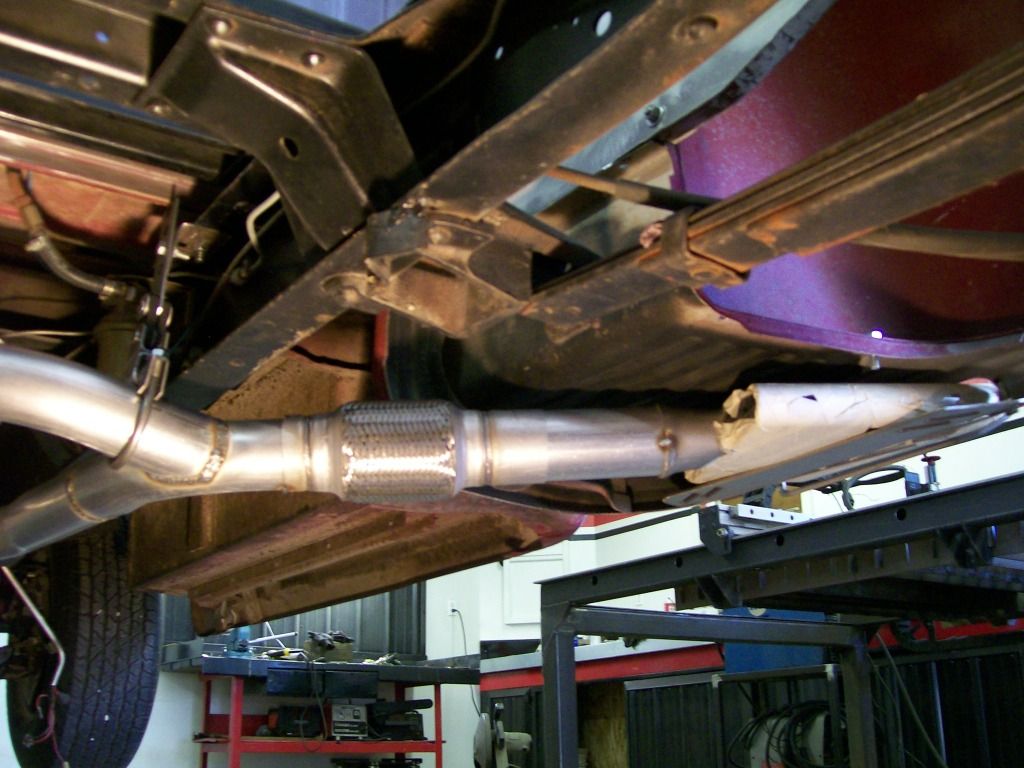 Once the exhaust took it's course I had to get the crossmember made. After taking measurements with the exhaust in place I cut the sides as in the last set of pictures. I used some tubing that was the same with that I wanted the crossmember to be when done. Then clamped the two sides together using these tube spacers. Before clamping as this stage, be sure the two sides are aligned as perfect as possible. 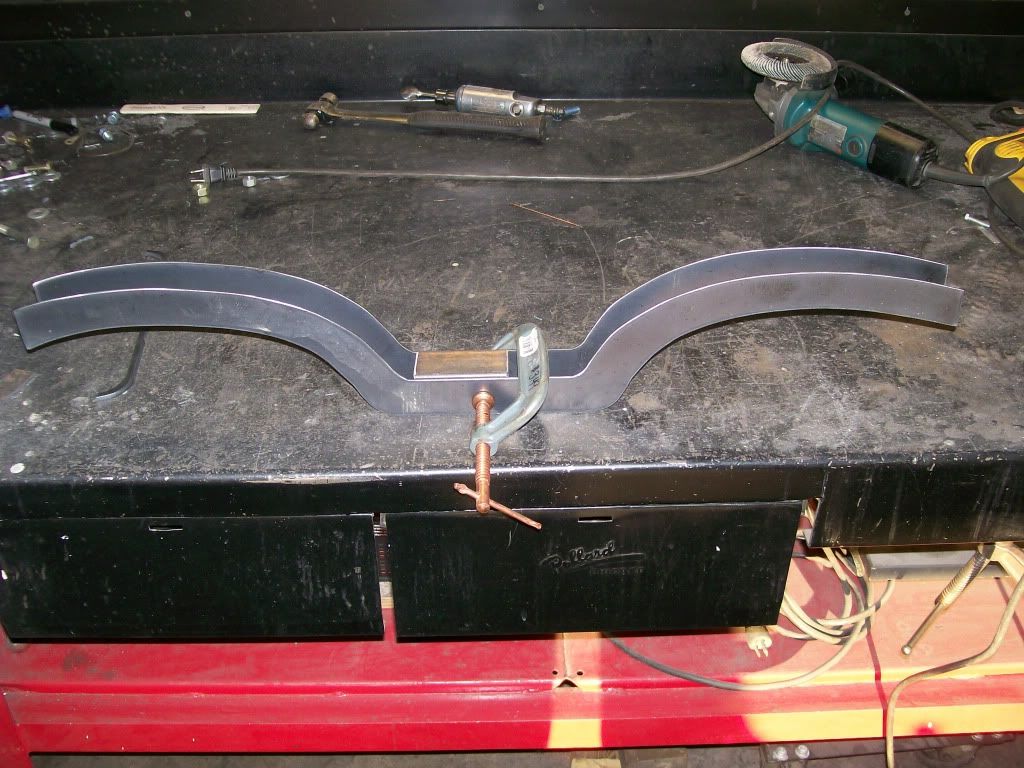 Once the clamping is done, I cut the top and bottom plates to match the width and length of space I have to cover. Now it's a matter of getting the top and bottom to follow the contour. 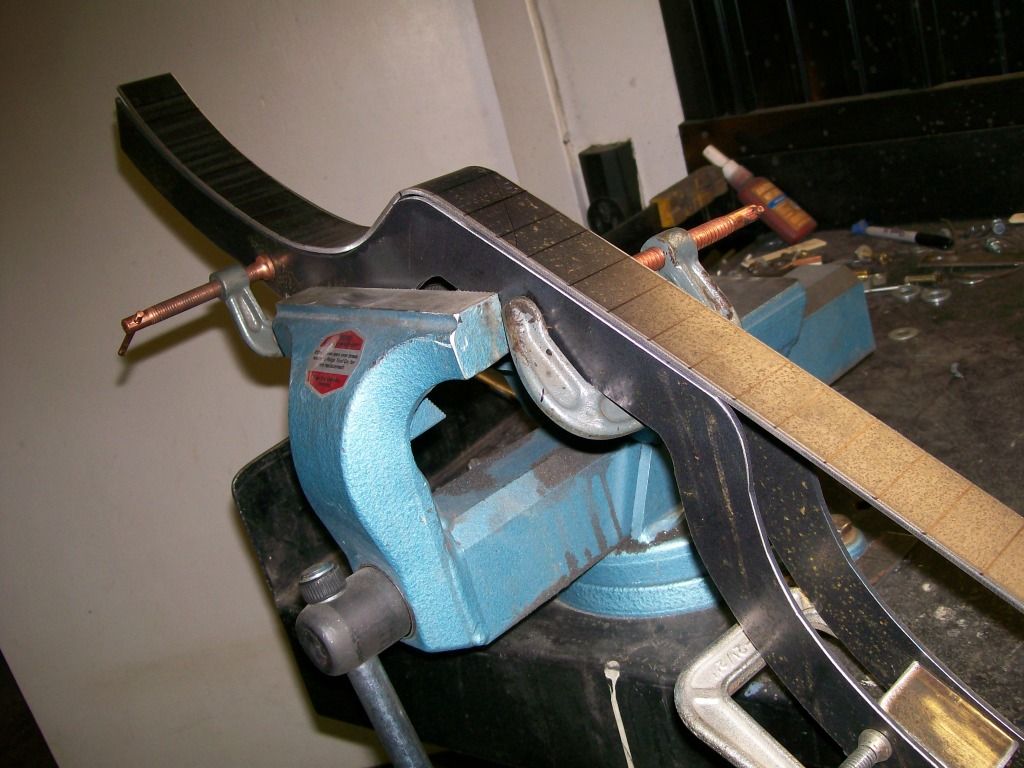 I did not want to use heat or a hammer. I used the press and slowly shaped the plates. The black sharpie markings on the plate gives me a reference to the exact 90 degree, now as I press shape the plate I know it's not going to start going off center. I have just a couple small areas to refine, but coming along quite fine. 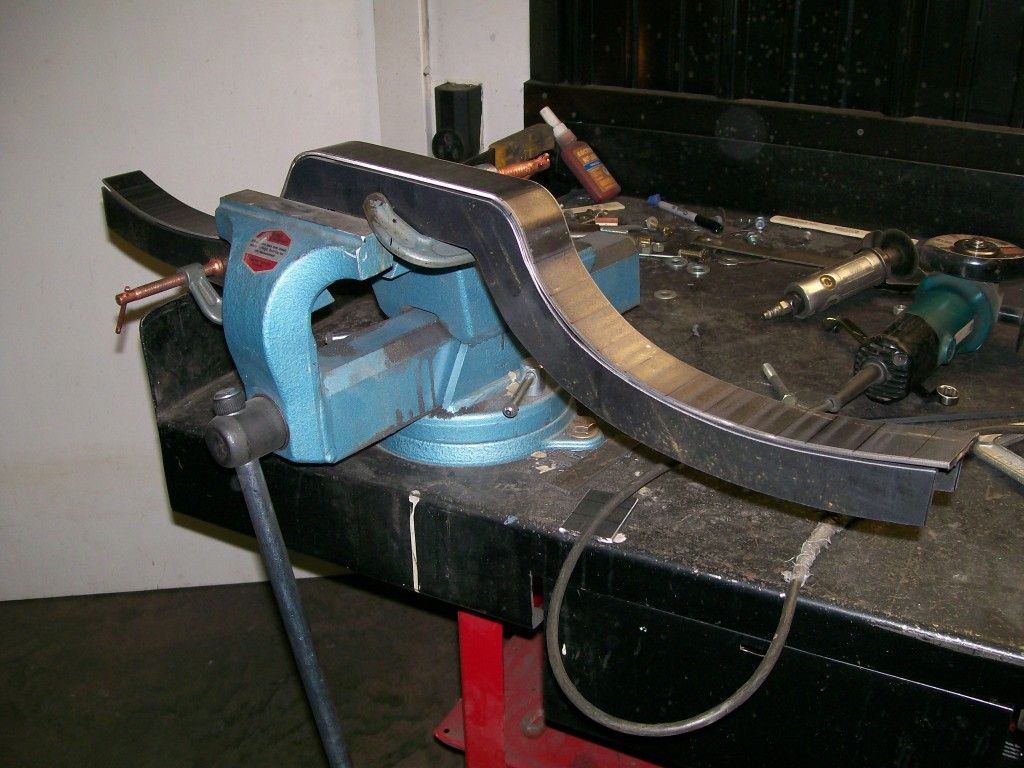 One plate done, one to go.
Last edited by Stepside Jim; 09-11-2012 at 11:26 PM. |
|
|
|
|
|
09-12-2012, 12:17 AM
|
#47 |
|
Registered User
Join Date: Aug 2007
Location: Corona, California
Posts: 7,998
|
Re: 1957 Chevy truck re-rebuild
Very slick way to make the cross member.
Kim |
|
|
|
|
09-12-2012, 01:09 PM
|
#48 |
|
Registered User
Join Date: Jan 2012
Location: Motown
Posts: 7,667
|
Re: 1957 Chevy truck re-rebuild
nice work on that x-member
__________________
cool, an ogre smiley Ogre's 58 Truk buildhow to put your truck year and build thread into your signature shop air compressor timer |
|
|
|
|
09-13-2012, 11:42 PM
|
#49 |
|
Registered User
Join Date: Aug 2012
Location: Salem Mo
Posts: 647
|
Re: 1957 Chevy truck re-rebuild
Earlier I mentioned the idea of either having the exhaust route around the crossmember or having the crossmember route around the exhaust. I went for option 2, crossmember around the exhaust.
One picture of the center where the crossmember drops between the pipes and under the transmission. 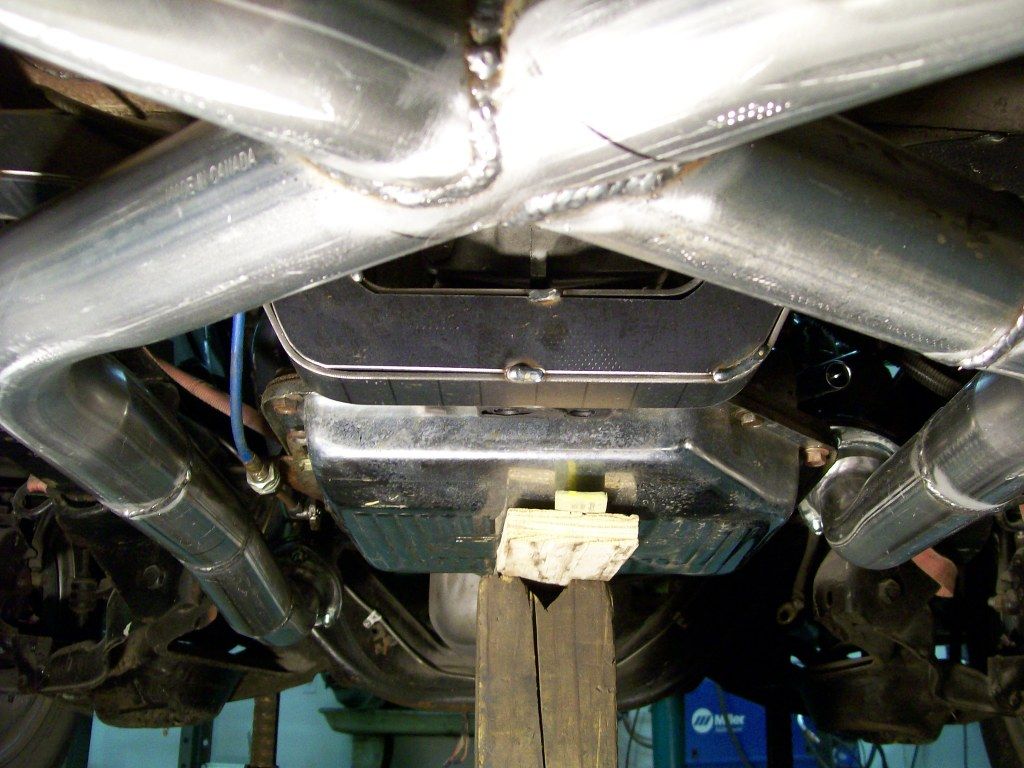 Passenger side. 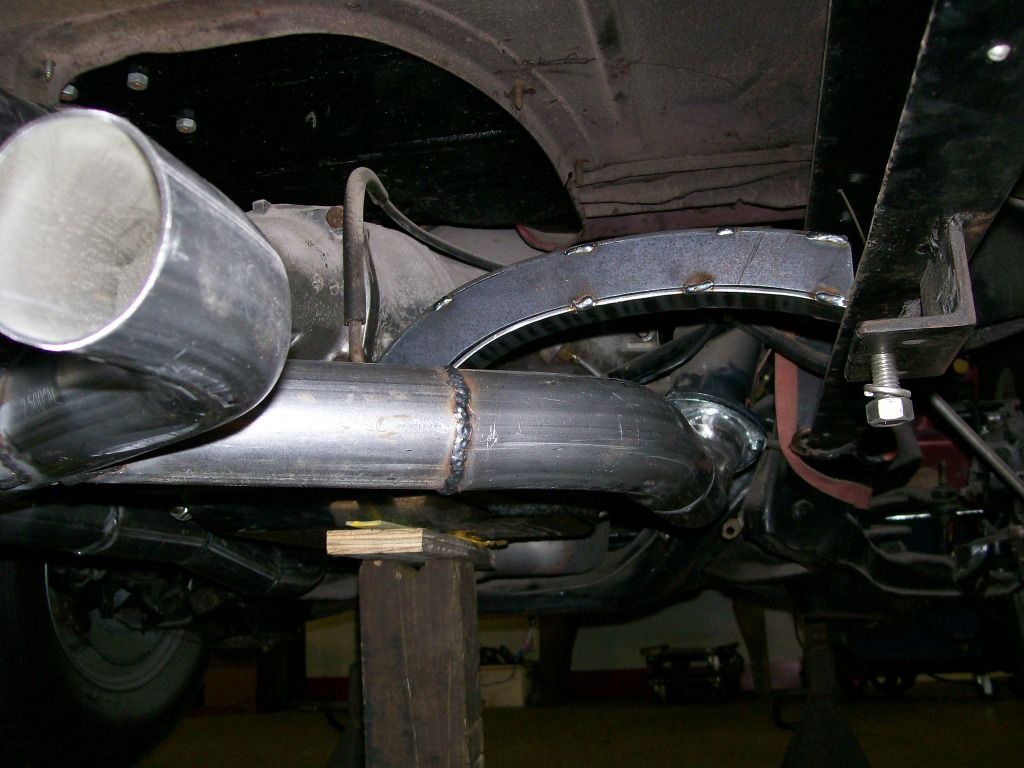 Drivers side. 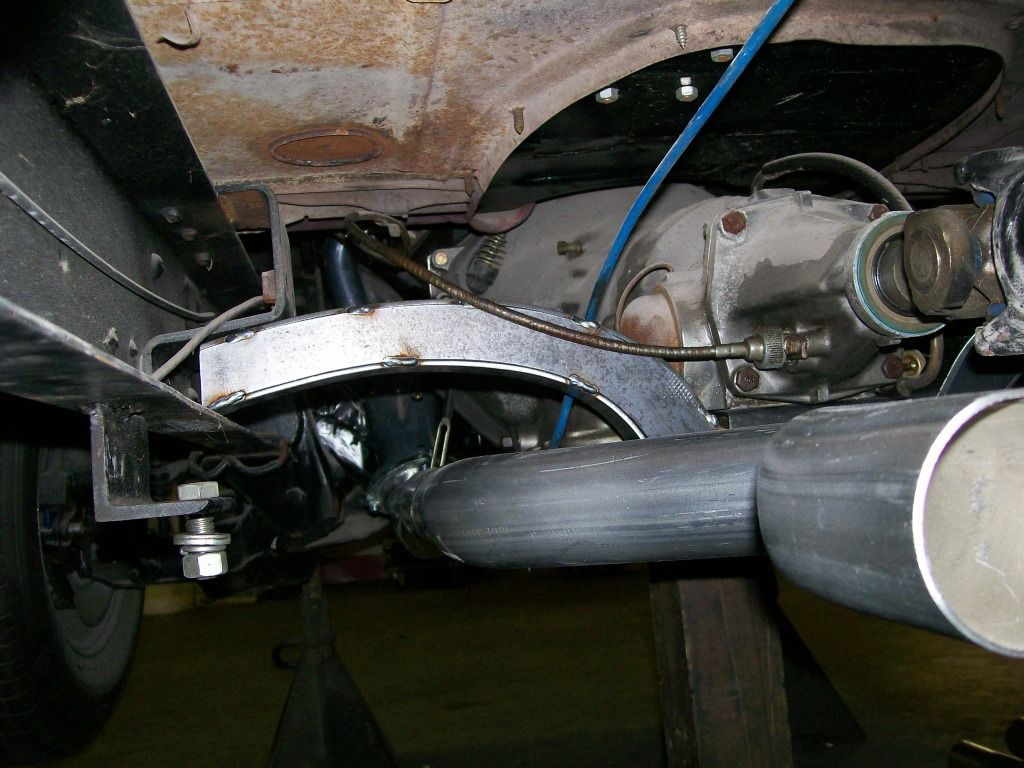 I'm very happy with the fit of the crossmember. Next I have to fabricate the mounting tabs on both the frame mounts and the transmission mount. |
|
|
|
|
09-13-2012, 11:56 PM
|
#50 |
|
Registered User
Join Date: Aug 2007
Location: Corona, California
Posts: 7,998
|
Re: 1957 Chevy truck re-rebuild
Looking real nice.
Kim |
|
|
|
 |
| Bookmarks |
|
|


 Linear Mode

