
|
 05-25-2013, 02:12 PM
|
#76 |
|
Registered User
Join Date: Sep 2011
Location: Nevada City, CA
Posts: 908
|
Re: Project: Over My Head
Progress has been made.
[IMG]  [/IMG] [/IMG]This is the CPP (bought through Speedway Motors) steering kit & '86 C10 "metric" steering box installed. I put "metric" in quotes because the mounting bolts & output shaft are still SAE threads, even if the hydraulic lines are metric. 4 7/16 coarse thread bolts mount it to the frame & not too surprisingly, the 1957 pitman arm retainer nut fits just fine on the '86 box. Now that I re-read the instructions, though, they DO mention that more than 3.5" back spacing will rub the box. Darn. Limits my wheel choices, or my steering radius. I want to run 15x7 or 15x8" rims and 30x9.50 tires on this truck. The rims I want are only available in 4.0" back space, which won't quite fit. I guess I could run a 1" wheel adapter, or adjust the steering stops to prevent tire chunking. I haven't welded the box's top mount to the frame yet, so it' not too late to move the box forward if I need to, though I don't see much room to do so. Also - it's oriented as CPP instructs and still seems that the tie rod on the drag link binds a little bit going through it's arc. So, still some bugs to work out but hey, I have a steering box, drag link, steering arms, kingpins & tie rods. Even have hubs & rotors. Performance Online is still giving me the blow-off, the bastards, so I'll wind up modifying their poorly-fitting brackets so I can mount calipers and move on with life. And, let's see. In other news, I passed my A1 (Engine Repair) and A6 (Electrical / Electronic Systems) exams so I'm now A1, A6, A4 & A5 certified. This means lots more free time - and with summer keeping the lights on later, I just might get this thing on the ground & rolling some time soon. Up next: Column, intermediate shaft & finishing the brake plumbing. |

|

|
|
05-25-2013, 04:51 PM
|
#77 |
|
Registered User
Join Date: Aug 2007
Location: Corona, California
Posts: 7,998
|
Re: Project: Over My Head
looks good.
Congrats on the tests. Kim |
|
|
|
|
06-05-2013, 09:58 PM
|
#78 |
|
Registered User
Join Date: Sep 2011
Location: Nevada City, CA
Posts: 908
|
Re: Project: Over My Head
Bits and pieces.
I scored a '71 van column with shifter & intact harness for $138, shipped. Rad. The catch? It comes with a rag joint on the end. For the misalignment I'm running from column to box, that wasn't going to work. It appeared to be welded on (rust, actually) & so I cut it off with the grinder. I THEN find out that on a '71 Van column, the rag joint is pressed onto a 3/4-30 or 3/4-36 spined end of the shaft. Damn. Could have ordered a different U-joint and just knocked the rag joint off, had i known. Or I could have ordered a 3/4dd (intermediate shaft) by 3/4 round (cut-off column) u joint. Oh well - not the first mistake nor the last that I'm making building this truck - and as it turns out, totally fixable with the grinder. Love that thing. So I used the intermediate shaft as a template... [IMG]  [/IMG] [/IMG]Made a 3/4 DD end [IMG]  And put the U-joint on there [IMG]  [/IMG] [/IMG]Not super exciting to you all, I imagine, but I'm happy with the day's progress. Once I got the holes drilled into the column for the U joint lock studs I went out to the truck to test fit. Noticed three things right off. 1st, the 1970s van column is wider than the original. I can either get a new drop, run the existing drop without the rubber grommet, or modify the drop to take the new column. For now, I'll stick with #1. 2nd, the intermediate shaft is too long. I'll need to take maybe 2" off of the inner portion so I can mate box and column. Easy enough - I'll sawzall that tomorrow, I think. 3rd, the '57's column floor plate won't fit over the shift lever and, presumably, won't fit around the '71 column. So, I don't know what I'm going to do about that but it probably involves the die grinder, possibly the sawzall and welder as well. Unless there is an easy way I'm unaware of to get the floor plate onto the column...? 4th - with the Vortec engines, stock headers wind up darned close to the column if not on top of it. To the point where I might have to cut the column's inner shaft & grind another set of flats on it to get my wheel position correct. Other solutions: block huggers, steering wheel with less dish, lower engine position (which brings up other problems) in the frame... etc. So, lessons learned: buy the big items first & the small connecting tissues afterwards. And don't be afraid of flying sparks, because buying new parts every time you stumble is hella expensive / annoying. |
|
|
|
|
06-05-2013, 10:51 PM
|
#79 |
|
Registered User
Join Date: Aug 2007
Location: Corona, California
Posts: 7,998
|
Re: Project: Over My Head
Necessity is the Mother of invention.
Nice fix. Kim |
|
|
|
|
06-08-2013, 10:53 AM
|
#80 |
|
Registered User
Join Date: Dec 2011
Location: Southern Oklahoma
Posts: 181
|
Re: Project: Over My Head
Necessity? All this time, I thought poverty was. LOL
|
|
|
|
|
06-08-2013, 12:36 PM
|
#81 |
|
Registered User
Join Date: Jan 2012
Location: Motown
Posts: 7,667
|
Re: Project: Over My Head
if necessity is the mother of invention, poverty is the mother of necessity - plato
 same thing either way same thing either way
__________________
cool, an ogre smiley Ogre's 58 Truk buildhow to put your truck year and build thread into your signature shop air compressor timer |
|
|
|
|
06-08-2013, 04:15 PM
|
#82 |
|
Registered User
Join Date: Aug 2007
Location: Corona, California
Posts: 7,998
|
Re: Project: Over My Head
Poverty is the Mother of do it yourself.
Kim |
|
|
|
|
06-08-2013, 04:41 PM
|
#83 | |
|
Registered User
Join Date: Jul 2011
Location: Auburn ca.
Posts: 2,886
|
Re: Project: Over My Head
Quote:
|
|
|
|
|
|
06-10-2013, 08:46 PM
|
#84 |
|
Registered User
Join Date: Sep 2011
Location: Nevada City, CA
Posts: 908
|
Re: Project: Over My Head
Well, I pulled the same trick twice more.
As it turns out, the angle on the intermediate shaft was too sharp - it bound up the joint. So I trimmed the column's inner shaft, ground more flats. Same problem. Trim some more, grind some more - there's maybe 2.5" of inner shaft going past the lower bearing now - and now it all works. Turn the wheel, move the tires. No binding. Also learned that if the shaft goes too far into the joint, it will hit & cause binding. So, basically, everything has to be goldilocks. Yay! Column is a little high in the cab, but I think a flat / low dish wheel will get everything squared away. If not, I've gotten really good at modifying the steering column. |
|
|
|
|
07-11-2013, 03:30 PM
|
#85 |
|
Registered User
Join Date: Sep 2011
Location: Nevada City, CA
Posts: 908
|
Re: Project: Over My Head
Pics & details coming soon. Things have been getting busy!
I got laid off on Wednesday but it was so darned amicable, the ex-boss gave me a month to move out of the shop. Talked to the fiance, she says "It sucked towing it last time. Think we can get it driving in time? You can borrow my credit card". To her, I said "Wow! I'll try. I think it's doable." To God, I said "Thank you!" So far, I've gotten the radiator to the shop for re-coring & inlet / outlet replacement so it all matches the LS. The driveshaft has been totally rebuilt & even painted, then reinstalled. 4L60E yoke, new U-joints, replaced slip yoke on the rear section, new center support bearing. It could maybe have been cheaper going to the junkyard with a tape measure, but when I figure in the time involved, new joints regardless, a new yoke - it seemed worth it to let the pro do the job. Brakes are fully hooked up & master is bled. Waiting on an assistant to bleed the rest. PS return lines are plumbed from HB to the T between box & pump. Help has been found for the rest of the PS high pressure lines. Couldn't find anything at all that worked off the shelf; but I know a guy who knows a guy who can crimp lines. We'll see how that goes. Expecting a big box from Speedway, too. Body wiring harness, gauges, etc. |
|
|
|
|
07-11-2013, 05:48 PM
|
#86 |
|
Registered User
Join Date: Aug 2007
Location: Corona, California
Posts: 7,998
|
Re: Project: Over My Head
Sorry about the job.
Good luck with finding a new one. Fiance sounds like a great girl. Kim |
|
|
|
|
07-11-2013, 10:10 PM
|
#87 |
|
Registered User
Join Date: Sep 2011
Location: Nevada City, CA
Posts: 908
|
Re: Project: Over My Head
 You can see that it's getting pretty close for the exhaust. I suspect it will have to run under the frame & out alongside it. I was thinking about side dumps but would like to run an H pipe if I can find the space. This is assuming I don't wind up needing to go with block huggers regardless. On a side note - there is something definitely wrong with the brake system. I'd bled the master cylinder a couple days ago, today I find the reservoir empty and a stain on the asphalt. It must have been the first of the flares I did. I knew it didn't look right but foolishly thought "it will be fine..." I wish I could see where it dripped from, but I'll just re-do that flare & see what happens when I refill the reservoir. Aaand... Yep, the driveshaft is installed.  PS return lines plumbed. I'd have like to have done it with shrink-wrap type clamps or something cleaner looking, and still may, but for now the worm gears were handy. After this pic was taken I mocked up the pressure lines, and will get a picture of that once it's all crimped together. I suspect I'll need to trim the inner fender (a lot) to clear the steering & the PS lines. I've got three lines running from front to back + the box to reservoir return. At least I ran fuel on the other side of the frame... |
|
|
|
|
07-12-2013, 11:15 AM
|
#88 |
|
Registered User
 Join Date: Oct 2007
Location: pittston,PA
Posts: 1,183
|
Re: Project: Over My Head
how did the column fit. you didn't post any pics.
__________________
There is nothing you can't fix with a BFH or a FIRE WRENCH. 1997 chevy k1500 ext cab z71 (daily driver) sold 1996 chevy k1500 reg cab 4x4(daily driver)totaled 2008jeep patriot (wife's daily driver 2008 chevy 1500 ext cab 4x4 sold 2011 chevy 1500 crew cab ltz (daily driver) 1996 chevy 1500 reg cab 4x4 project sold 2006 pontiac grand prix gxp (daily work commuter) |
|
|
|
|
07-12-2013, 11:42 AM
|
#89 |
|
Registered User
Join Date: Jun 2006
Location: Idaho
Posts: 8,800
|
Re: Project: Over My Head
A good exhaust guy will be able to thread it up in the frame. I told my guy I did not want anything hanging below the crossmember and it tucked up as high in the frame as possible to avoid getting hung up on brush, log, rocks etc. And he had the transfer case and under floor MC and booster to deal with.
__________________
1959 Chevy Short Fleetside w/ 74 4WD drive train (current project) OrrieG Build Thread 1964 Chevelle Malibu w/ 355-350TH (daily driver) Helpful AD and TF Manual Site Old Car Manual Project |
|
|
|
|
07-12-2013, 04:40 PM
|
#90 |
|
Registered User
Join Date: Sep 2011
Location: Nevada City, CA
Posts: 908
|
Re: Project: Over My Head
I got the radiator back today. The old 2 row core was pretty blocked up, the inlet was in the wrong place, both inlet & outlet were the wrong size, the drain plug was missing & it had no cap. $550 (tax included) later it's a 4 row high efficiency (more tubes & more fins per 6") with the right inlets & outlets for an LS swap, it has a new drain cock & radiator cap, and a fresh coat of black paint to boot. I could have saved a little money (a very little) by getting an off the shelf unit with trans cooler built in. I would then have to run radiator hoses in a more complex series of bends, reduce them to the right sizes, and still save room for my air cleaner. I decided to spend a few extra bucks and make life easy. Plus, I'm glad to give Felipe (the radiator guy) the work instead of somebody in Taiwan. In this pic, you can see the 10ga house wire I'm using to mock up the lines.
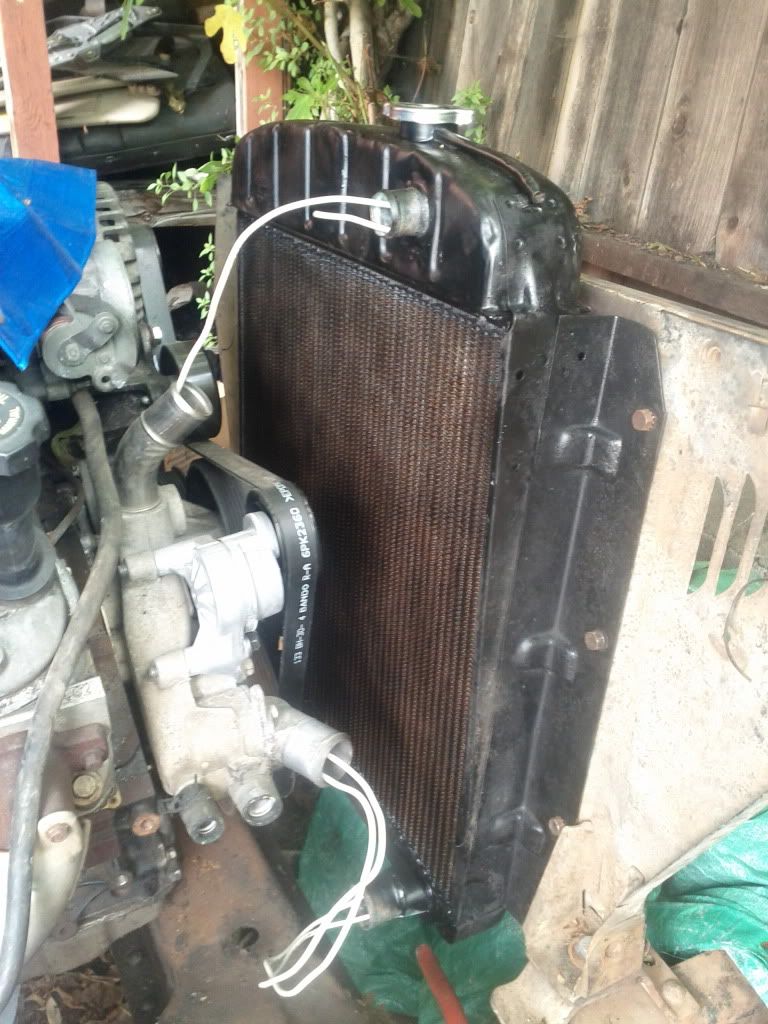 And the clearance to the motor: 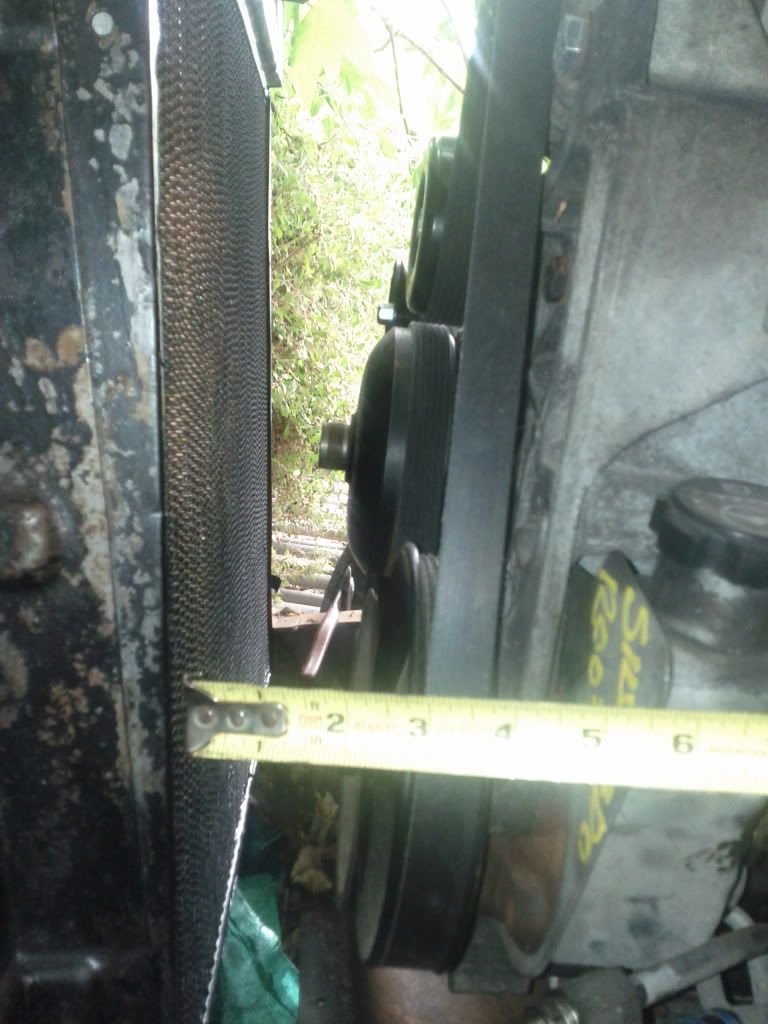 This is the 70s Van column in place. The lower mount is a modified stock lower mount, though it needs some more love. The lower section of the column can move a good 1/2" , which creates slop & is generally sketchy. So I'll figure something out there before I call it "done". I might tack on a piece of angle iron & use an exhaust clamp, welding the stamped part of the exhaust clamp to the angle & drilling a couple holes through the angle, so I can use the U-bolt to secure the column. Add some mounts to the cab & call it done. Or I can spend the $30 on a lower mount & quit being a cheapass. We'll see. Anyway, here's the column. 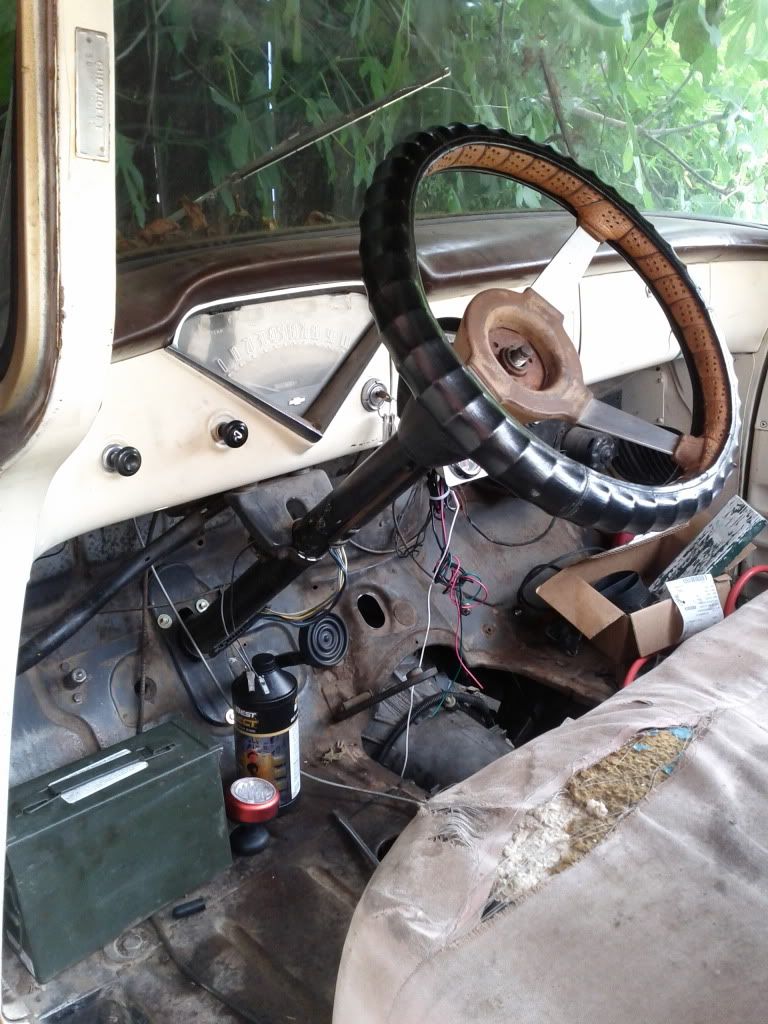 And here's another shot of the new driveshaft & how the undercarriage is shaping up. Not nearly as bad as what OrrieG's exhaust guy had to deal with  Note the spaghetti hanging around - I've got plans on how to clean that up. Fuel lines, fluid transfer pump lines (using it to fill brake fluid reservoir), wiring harness, handbrake cable, etc. A mess. Note the spaghetti hanging around - I've got plans on how to clean that up. Fuel lines, fluid transfer pump lines (using it to fill brake fluid reservoir), wiring harness, handbrake cable, etc. A mess. 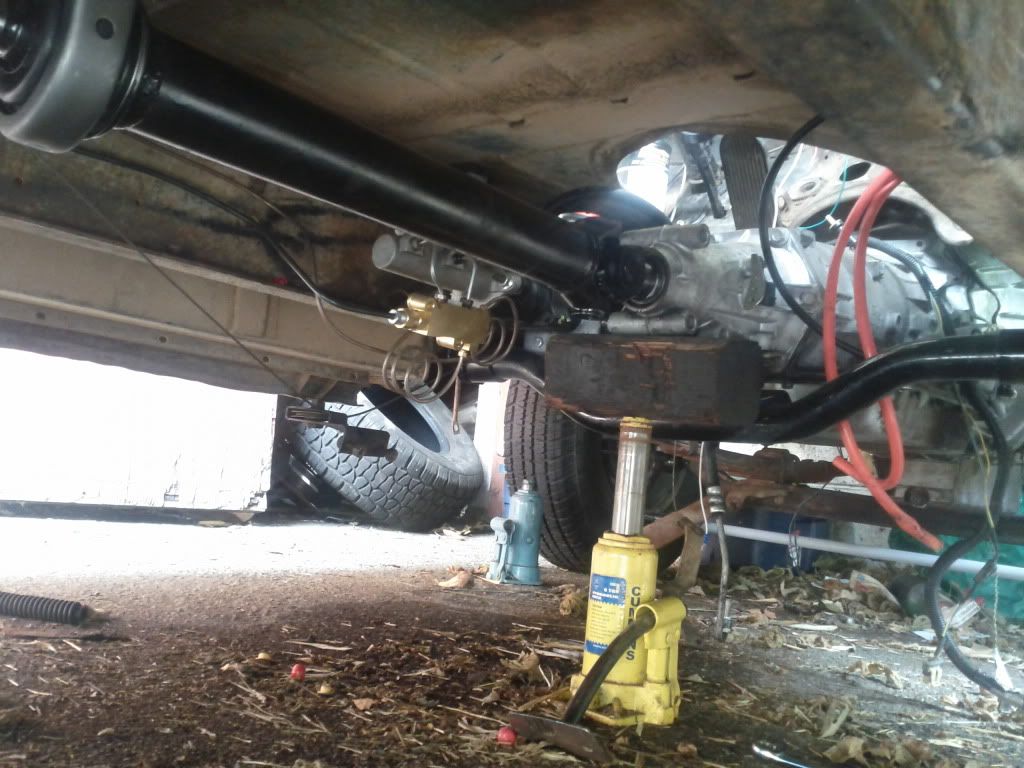
|
|
|
|
|
07-12-2013, 05:26 PM
|
#91 |
|
Registered User
Join Date: Aug 2007
Location: Corona, California
Posts: 7,998
|
Re: Project: Over My Head
Radiator looks good.
You'll get there with the rest of it. Kim |
|
|
|
|
07-12-2013, 05:28 PM
|
#92 |
|
Registered User
Join Date: Sep 2011
Location: Nevada City, CA
Posts: 908
|
Re: Project: Over My Head
Thanks Kim.
I'm trying to get it driving by August 9. I still can't really tell if that's a bit ambitious or not. Being laid off I have plenty of time - it's just waiting on parts that slows me down. Want to do radiator hoses? need the radiator, first. Wait a few days, mock it up, find the parts, order them, wait a few more days... |
|
|
|
|
07-15-2013, 01:01 AM
|
#93 |
|
Registered User
Join Date: Jan 2011
Location: Redmond, OR
Posts: 754
|
Re: Project: Over My Head
I did similar mock-up for putting a 289 in my 1950 F1 with a Chevy conversion radiator. Used coat hangers for general shape, then went to O'Reilly's and spent some quality time at their back wall matching the correct inlet, outlet, and shape.
Also used a 79 Ford van column (cut 8" out of it) so I had tilt, AT shifter, and no column key switch. Seems like we are following similar paths on different make trucks. Keep up the good work and sorry to hear about the job. At least you have something to focus your energy on.
__________________
68 Chev C20- son has it now 83 K20 - bought from son 70 C20 - in progress |
|
|
|
|
07-15-2013, 06:16 PM
|
#94 |
|
Registered User
Join Date: Sep 2011
Location: Nevada City, CA
Posts: 908
|
Re: Project: Over My Head
Dmack - that's funny stuff. Seems we all reinvent the wheel at one point or another.
Today, I got the cooling system plumbed and the lower column mount finished. 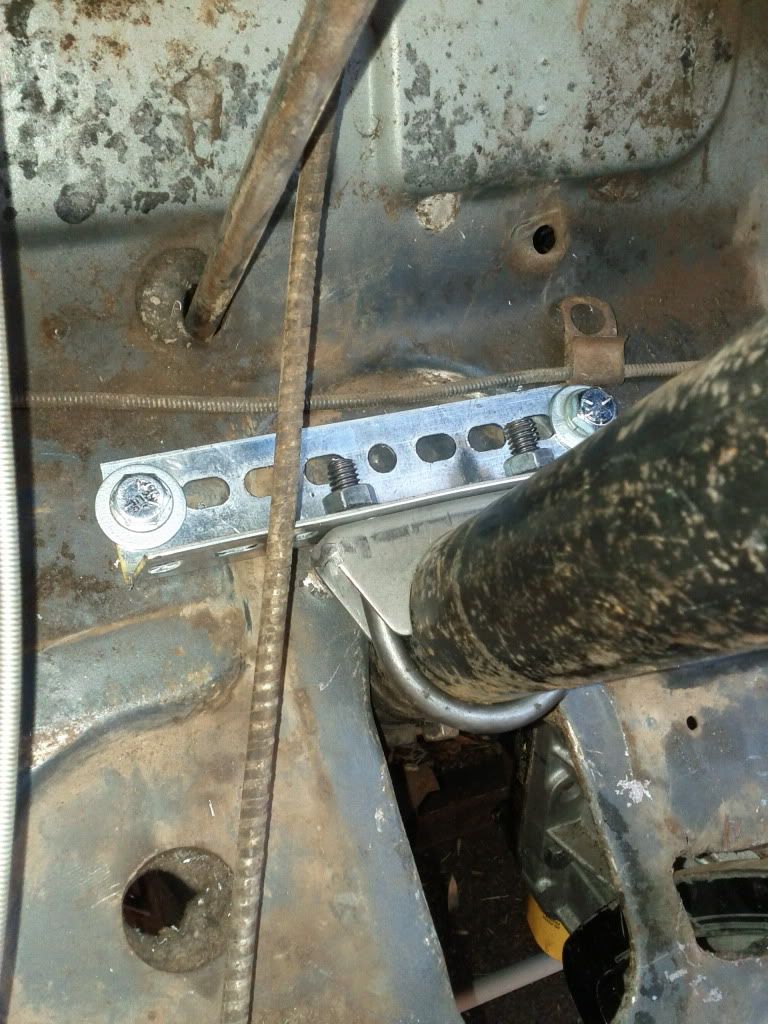 I opted for the perforated angle for two reasons: first, it was available closer to the length I needed. Second, though it doesn't look as good it was definitely easier. Once the carpet is over it & I add some paint I don't think it will get thought about much. Combined with a 1 7/8" exhaust clamp, 2x 3/8" bolts with lock washers & flat washers & 2 3/8 lock nuts I've got about $10 into my lower column mount, about 15 minutes time, and it's more solid than anything I could find cheaper than $75. So I'm happy with that one. Here's the upper radiator hose. 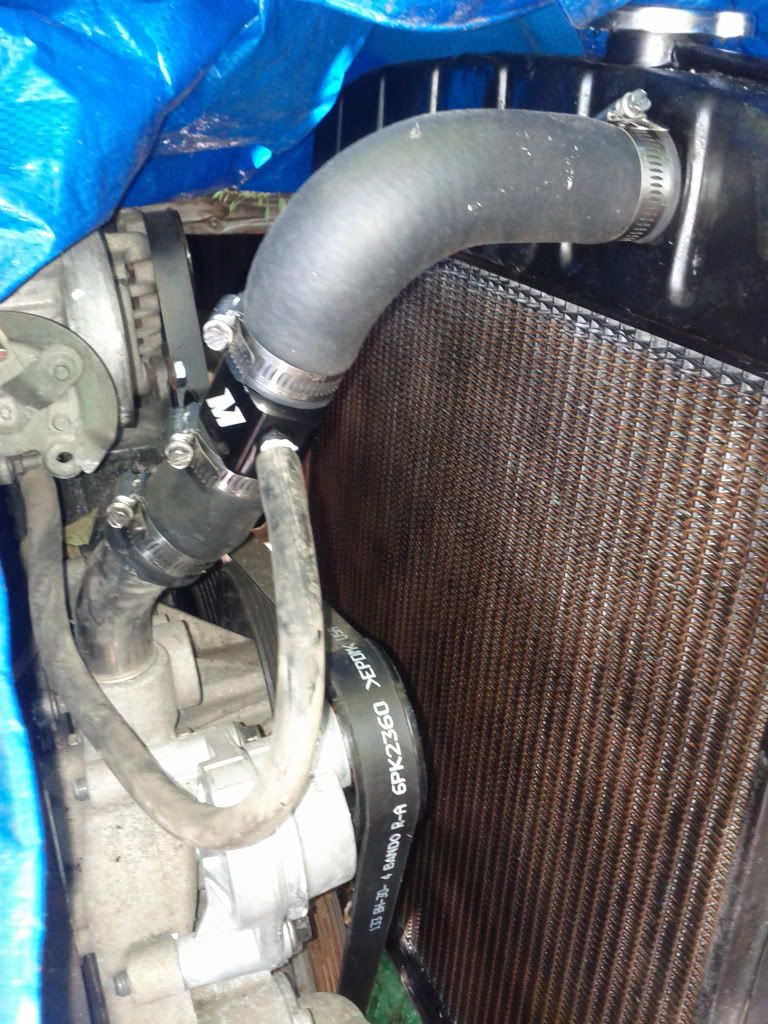 I made it from a Mishimoto 32mm (1.25") sensor adapter + the upper hose off a 2002 Camaro w/ LS1. Pretty sure that was the hose, anyway. If you look around on Summit, you can find all sorts of OEM hoses by deleting "universal" parts as an option & playing with the other filters. So, including clamps & the mishimoto fitting, I've got $30 or so in the upper radiator hose. Could have been done cheaper if I'd thought to have the radiator shop put a steam nipple in the radiator, but I didn't. Maybe next time. This is the lower hose... 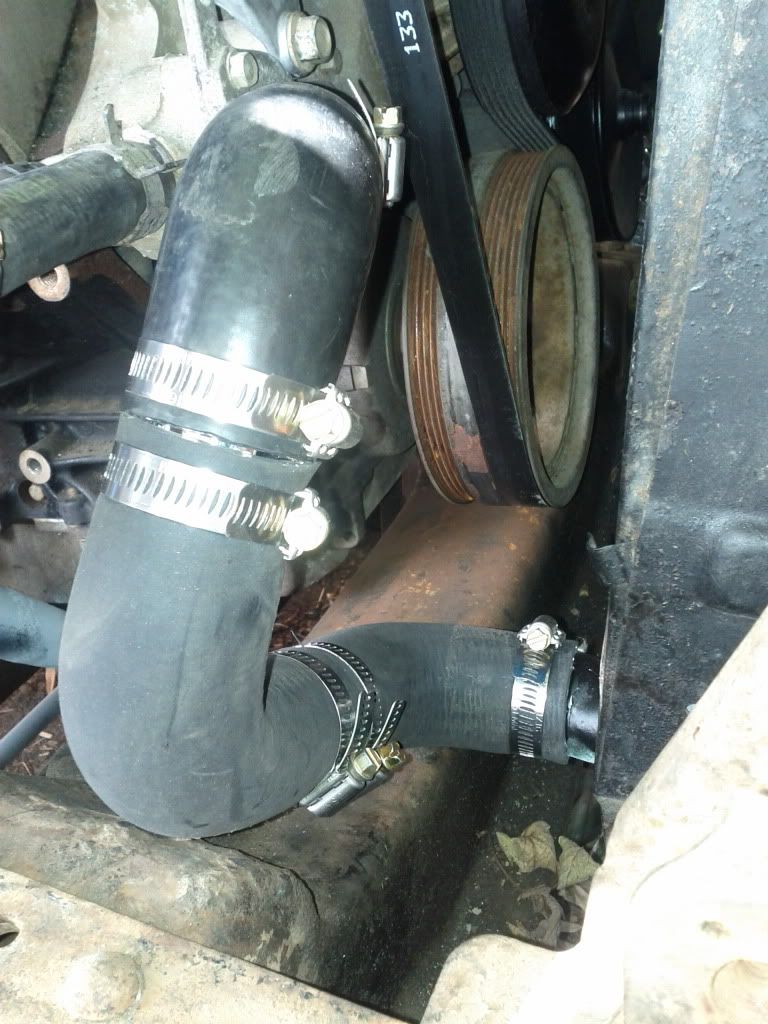 I used 3x 90 degree bends in 1.5", with 2x 3" pieces of 1.5" pipe splicing them together. I used cheap-as-dirt & frankly kind of crappy pipe from the hardware store. Speedway Motors sells nice aluminum pieces at $20 (with shipping) per copy. The hardware store sells nicer copper pieces for 6.50 apiece. I bought one crappy 6" piece for $6 and cut it in half. We'll see how it works. All in, the lower hose cost $30 as well. Doing it again, I'd buy the nicer copper hose couplers at the hardware store + 3x the hoses I got from Summit (7 apiece) + heat shrink type radiator hose clamp to make the middle connections look nicer. If this one leaks, I may well wind up doing it again - so there is yet hope for a nice-looking hose
|
|
|
|
|
07-15-2013, 07:02 PM
|
#95 |
|
Registered User
Join Date: Aug 2007
Location: Corona, California
Posts: 7,998
|
Re: Project: Over My Head
Looks like you're doing a good job and keeping it low buck.
Kim |
|
|
|
|
07-15-2013, 07:42 PM
|
#96 |
|
Registered User
Join Date: Sep 2011
Location: Nevada City, CA
Posts: 908
|
Re: Project: Over My Head
Thanks.
I figure that being 29, I've got another 40 years that I hope to be tinkering with this truck. As long as it's safe, I'll deal with ugly & when I have more experience to draw on I'll do things nicely. incidentally, I just read through your build (again?) Kim - and it looks like great stuff all the way through. Not your first trip to the rodeo, is it? |
|
|
|
|
07-15-2013, 10:21 PM
|
#97 | |
|
Registered User
Join Date: Aug 2007
Location: Corona, California
Posts: 7,998
|
Re: Project: Over My Head
Quote:
This is the first time I've done this extensive a build though. Kim |
|
|
|
|
|
07-15-2013, 11:52 PM
|
#98 |
|
Registered User
Join Date: Jan 2011
Location: Redmond, OR
Posts: 754
|
Re: Project: Over My Head
I like you solution for the lower steering mount. Looks like I may steal some of your design for mine. Hope you don't mind it crossing over into a F*rd.
Keep up the progress.
__________________
68 Chev C20- son has it now 83 K20 - bought from son 70 C20 - in progress |
|
|
|
|
07-16-2013, 10:32 AM
|
#99 |
|
Registered User
Join Date: Sep 2011
Location: Nevada City, CA
Posts: 908
|
Re: Project: Over My Head
Don't mind at all. First car I bought for myself was a 1986 Ford F-150, single cab short bed 2wd. Had a 302 in it. I was 19, I think. Till then I'd been cruising around in the family Dodge Caravan that my mom got sick of driving. Tried to move across country with that truck but in my ignorance, I didn't realize the fan clutch was bad. It would over heat any time you brought it off the highway - the fan wouldn't move enough air at idle. Anyway, somewhere outside of Kingdom City Missouri, the whole engine compartment started puking white smoke & it wouldn't run properly if at all. Haven't had a Ford since.
It's taken about ten years but I'm starting to warm up to them again. |
|
|
|
|
07-17-2013, 09:17 PM
|
#100 |
|
Registered User
Join Date: Sep 2011
Location: Nevada City, CA
Posts: 908
|
Re: Project: Over My Head
OK. So. 4L60E cooler ports are 1/4 NPS (not NPT) x quick connect. To do it again, I might just stick with quick connects. However, I've found:
No such thing as a 1/4 NPS x 3/8" barb fitting. So you have to find something else. I came across 1/4 nps male x 1/4 nps male couplers here and 1/4 nps female x 3/8 barbs fittings here Shipping, at both sites, is pretty expensive. If I hadn't mistakenly bought the NPS female / barb fittings first, I'd have skipped the 1/4 male by 1/4 male and gone with Summit, which sells these -6AN to 1/4NPS fittings. Add on a -6 barb and you're home - just add hoses. In retrospect, that's what I shoulda done - instead, I'm out maybe 10-15 extra bucks. As much as 20. Oh, well. In other news, and I'll get pics up tomorrow, I - *Got started on my shift linkage, using parts from Midwest Controls (recommended) *Assembled my gauge cluster, using Omega Kustoms gauges & a Speedway gauge plate *Found that the accelerator pedal I ordered won't work for me *Opened the box on my body wiring harness, decided to leave it for another day and *Decided that a 110 vac, flux-core welder is in my future. |
|
|
|
 |
| Bookmarks |
|
|


 Linear Mode

