
|
 09-11-2009, 07:34 PM
|
#201 |
|
VA72C10
 Join Date: Mar 2008
Location: Midlothian, VA
Posts: 25,269
|
Re: Junkyard Jimmy Super Low Buck Build Thread
Top came out great....the mounts...not so much....lol
__________________
Looking for a 67-72 swb or blazer project in or around VA. 
|

|

|
|
09-12-2009, 10:34 PM
|
#202 |
|
GEARHEAD
Join Date: Aug 2003
Location: MN
Posts: 6,107
|
Re: Junkyard Jimmy Super Low Buck Build Thread
It was a long day, got some things done, got other things started. I should have called Mike Rowe and told him to come by today.
(Big guy voice) Tonight, on a special episode of Dirty Jobs, Mike takes on a day of Dirty Hobbies. (Mike Rowe) Today, I'm spending some time with another Mike on a special episode for dirty hobbies. Now Mike spends his work days as a boiler inspector, and we could have an entire episode on just that. But nope, we're here in Mikes driveway working on this hunk'o $^#*&. You see, Mikes on a mission to take this rattle trap from a junker to the road. (HG) OK Mike, what I need you to do is lay down here under the rear bumper. See those wires running across there? OK, take 'em out. Yeah, watch for that stuff falling into your eyes, no don't rub it, that makes it worse. Well sure you can slide out a bit, but then the sun will be blinding you. Just don't work with your mouth open, rust is not for internal use. (Mike Rowe) Hey Mike, this harness doesn't look so hot, and niether do these light assemblies. (HG) Well lets go out to the junkyard then. (At the junkyard) See that truck in the 6 foot high burr bushes? That's where we're going. See the yard owner recently cleared a path to the front of the truck. But the parts we need are on the back. So just climb up on the front fender there, with your bucket of tools, then avoid the large burr bush in the engine compartment, climb over the cab, and walk along the bed rail avoiding all the loose body parts in the bed, and jump down into the weeds and stomp 'em flat. Quit your whining, those burrs will pull right off when we get back to the car. What's that, a truck frame is resting against the rear corner of the bed. Awe, you can work around that. Now just climb back over the way you came or else you'll be one giant burr yourself. Don't forget the bucket of tools and the tail lights, definitely need those. (back at the car) see, those burrs come right off, and stick else where. You're not getting in the car 'til there gone though. (Driveway) OK, now I need you to pull that old exhaust pipe out of there. Oops, forgot to remind you not to work with your mouth open under there... No don't rub your eyes. You better just come back out of there and get some eye wash.... Well, that was the first couple hours of my day. What I got done was a cheap refurbish of the tail light wire harness. Heres what I started with: 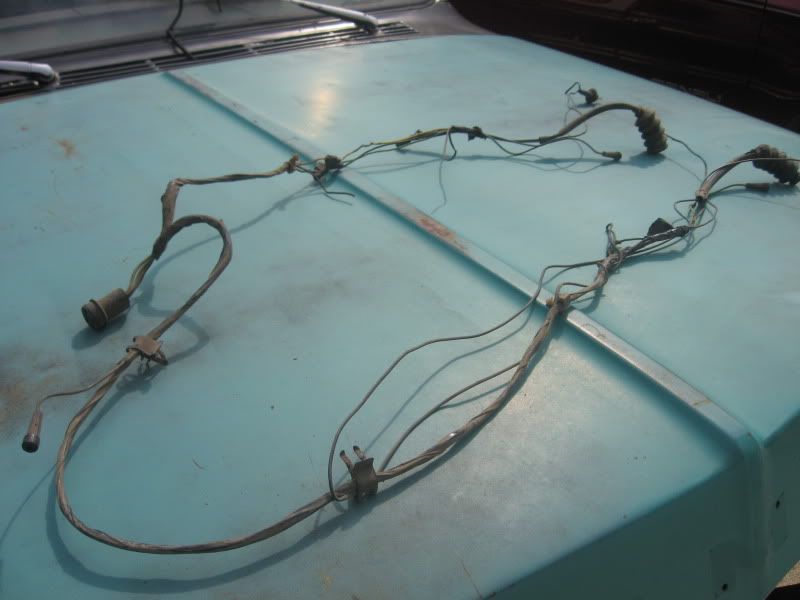 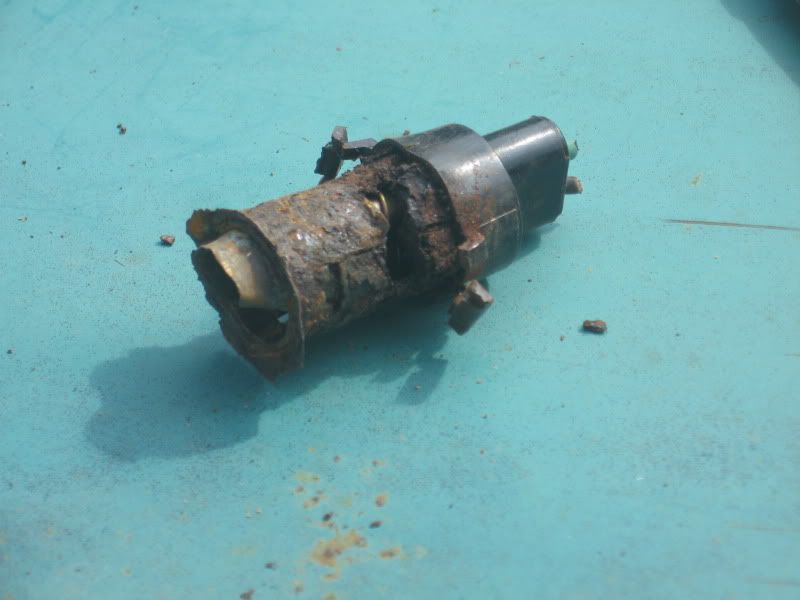 I clipped out some bare wires where some trailer wiring was put in, put newer bulb holders in the brake lights, put on some new ground wires, cleaned up a couple broken wires and tested it all out. I got that put back in, then attempted to repair the rusted out area behing the tail lights. 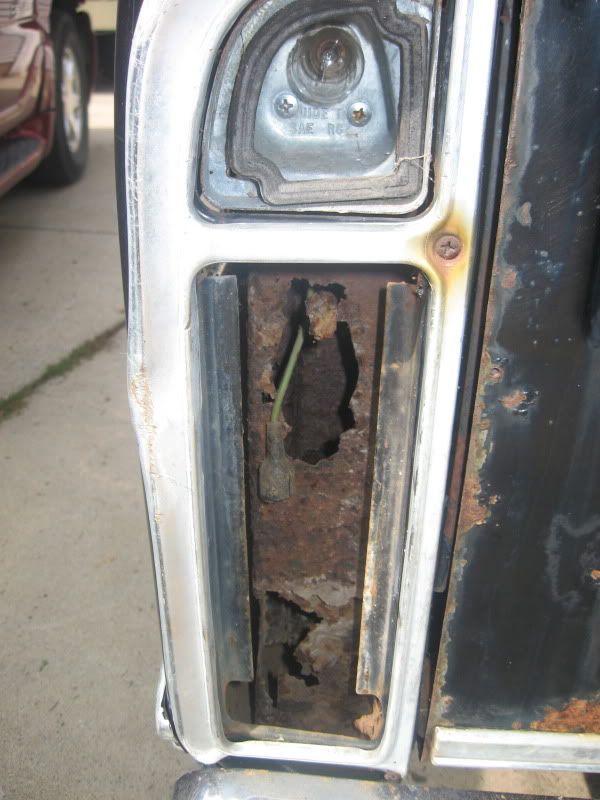 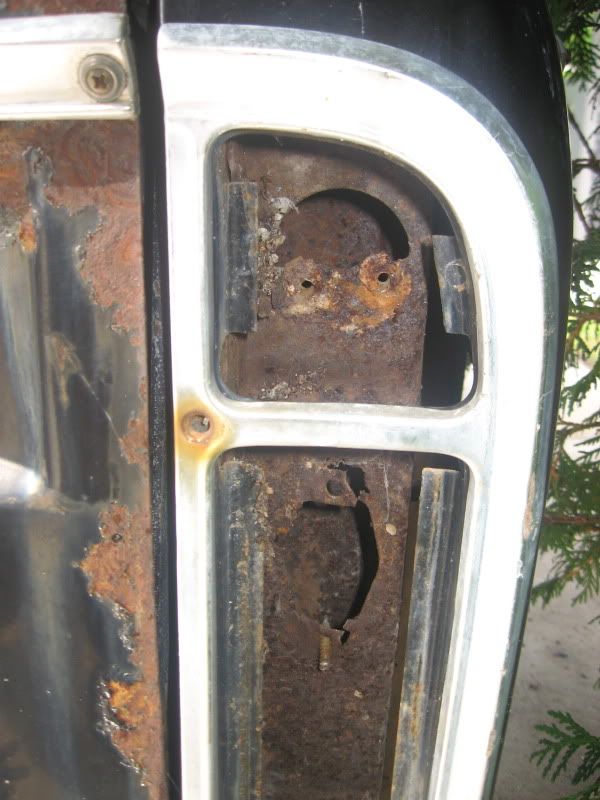 There was nothing to bolt the tail lights too there. So I made some plates and used some body adhesive to hold them in. 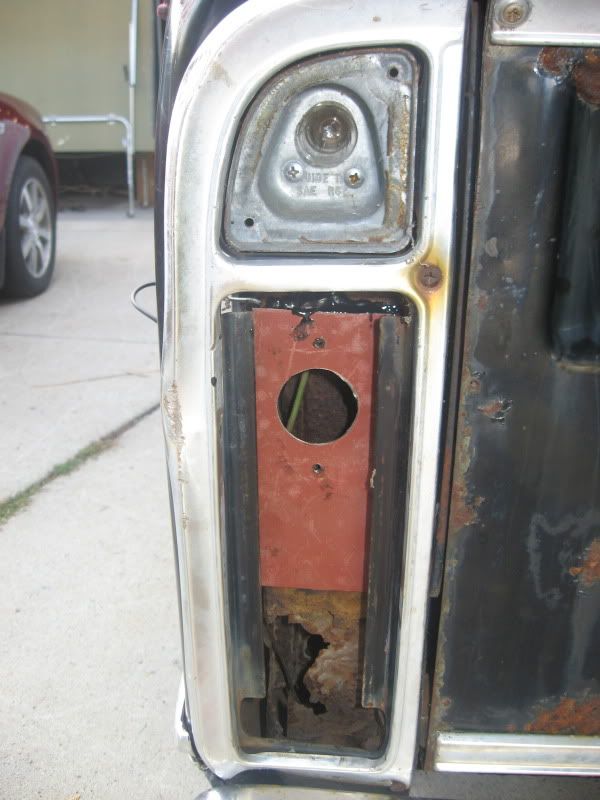 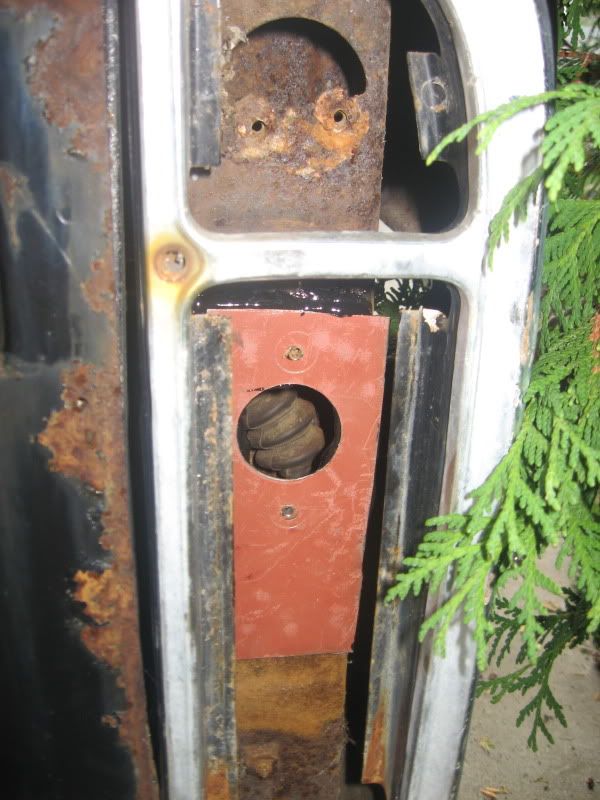 That's just some scrap from my C-10 floor. It was kinda tricky though, because the plates wanted to slide down. So I put the plate in, then quickly put the tail light in and got a screw started as the hole slid down to the right spot. I didn't tighten the screws much though so I could push the plate against the rusted area. Once it cured I could remove the tail lights and they were rock solid. Not a bad repair if I say so myself. I had to let that set, so I started putting in the headers. I got the driver side in. That rear bolt was a total pain in the A55. 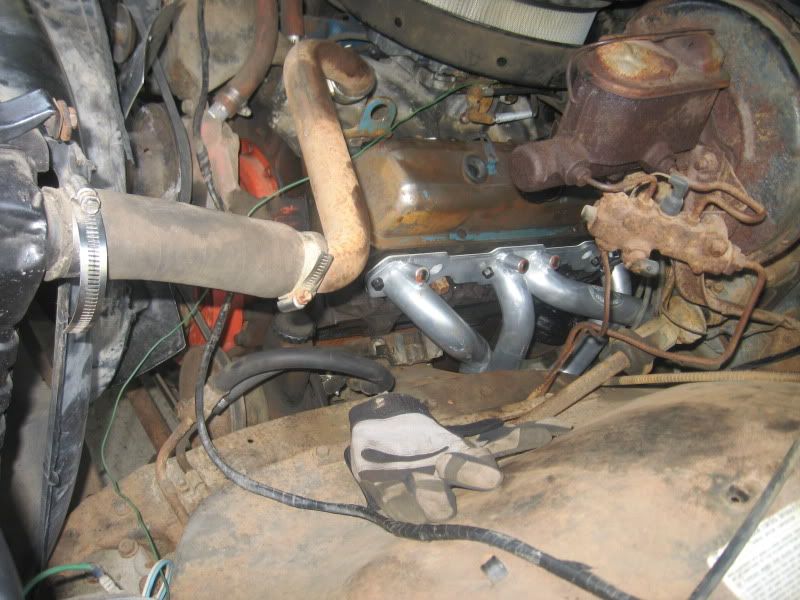 What was left of the old exhaust. 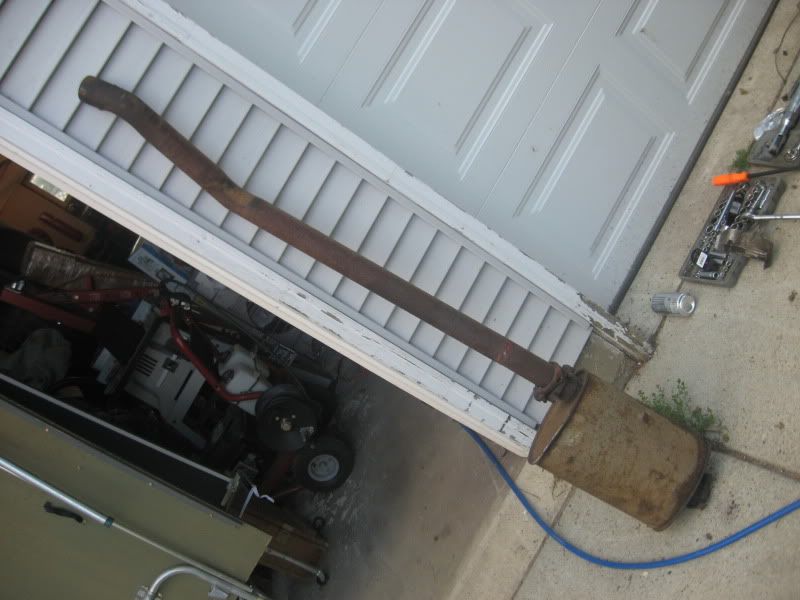 I got the passenger side manifold out, but the starter has to come out too for the header to slide in and I got hungry, tired and will get back to it later. And here's a tip for tool shoppers at NAPA. I needed a socket universal joint ot knuckle. The napa brand was like $18. The Evercraft was like $5 and has a warrantee also. I got a set of 1/4, 3/8 & 1/2 for less than the cost of one napa brand. edit: forgot to mention the lights cost me $25, kinda high, but they are close and I don't have to pay for shipping. So the total is at $678.
__________________
If no one knows what you're doing, they can't tell you you're doing it wrong HG's Dream Car Build - Shelby Cobra Kit Build your own adjustable track bar 71  Long Fleet C/10 Long Fleet C/10 72  Jimmy 4x4 (Junkyard Jimmy) Jimmy 4x4 (Junkyard Jimmy)HG's Plow Truck '78  K35 Dually K35 DuallyBigass Farm Truck HG's thread of miscellaneous stuff Last edited by hgs_notes; 09-12-2009 at 10:46 PM. |
|
|
|
|
09-13-2009, 01:57 PM
|
#203 |
|
Registered User
Join Date: Mar 2004
Location: Sacramento, CA
Posts: 1,084
|
Re: Junkyard Jimmy Super Low Buck Build Thread
LOL
Great post!
__________________
'71 Jimmy, 350, SM465, NP205, 2in Tuff Country lift, 33s on rallies, TBI, softtop and hardtop"If life was fair you'd be able to afford one of each and a garage large enough to house them all." |
|
|
|
|
09-13-2009, 04:05 PM
|
#204 |
|
Registered User
 Join Date: Jan 2007
Location: Columbus, Ohio
Posts: 4,338
|
Re: Junkyard Jimmy Super Low Buck Build Thread
Wow - those mounts are pretty crappy - sorry to see that. Also - nice fix on the taillight panels.
I looked at the pix wondering what you were going to do to resolve that - and you came through with a pretty good plan for a fix. Nice work! |
|
|
|
|
09-13-2009, 04:10 PM
|
#205 | ||
|
GEARHEAD
Join Date: Aug 2003
Location: MN
Posts: 6,107
|
Re: Junkyard Jimmy Super Low Buck Build Thread
Quote:
Quote:
__________________
If no one knows what you're doing, they can't tell you you're doing it wrong HG's Dream Car Build - Shelby Cobra Kit Build your own adjustable track bar 71 Long Fleet C/10 72 Jimmy 4x4 (Junkyard Jimmy)HG's Plow Truck '78 K35 DuallyBigass Farm Truck HG's thread of miscellaneous stuff |
||
|
|
|
|
09-13-2009, 04:16 PM
|
#206 |
|
VA72C10
Join Date: Mar 2008
Location: Midlothian, VA
Posts: 25,269
|
Re: Junkyard Jimmy Super Low Buck Build Thread
love the post...nice ingenuity on the fix
__________________
Looking for a 67-72 swb or blazer project in or around VA.
|
|
|
|
|
09-16-2009, 07:10 PM
|
#207 |
|
GEARHEAD
Join Date: Aug 2003
Location: MN
Posts: 6,107
|
Re: Junkyard Jimmy Super Low Buck Build Thread
Still working on lights. Headlights work, tail lights work, rear side markers work, front parking lights work. What doesn't work yet is the turn signals (flashers do work) and the front side markers. They have me flumoxed (is that a real word). I have a post on the main board requesting help with this.
I'll have to check the license plate light and reverse later also. Here are the tail lights al painted up nice with new ground wires. 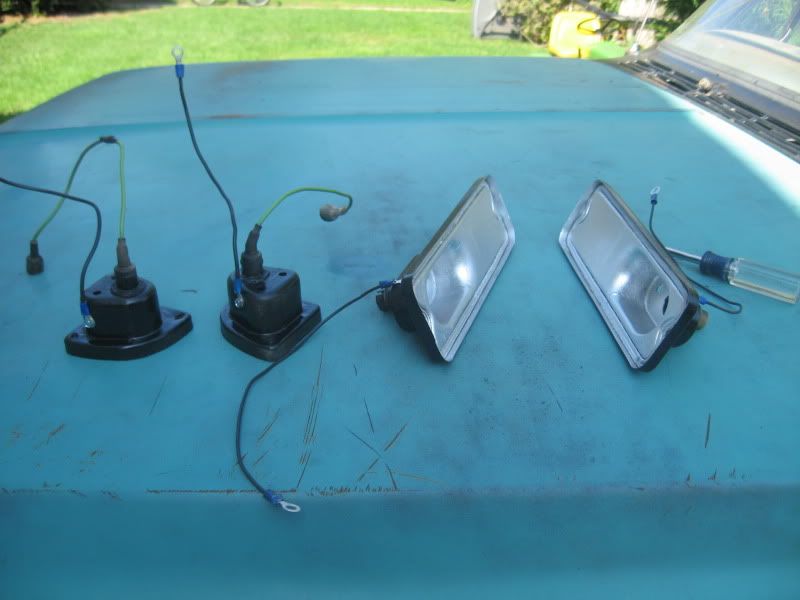 heres a couple tail lights working, the pass side may need more work, it cuts out cause the bulb holder is a bit loose. 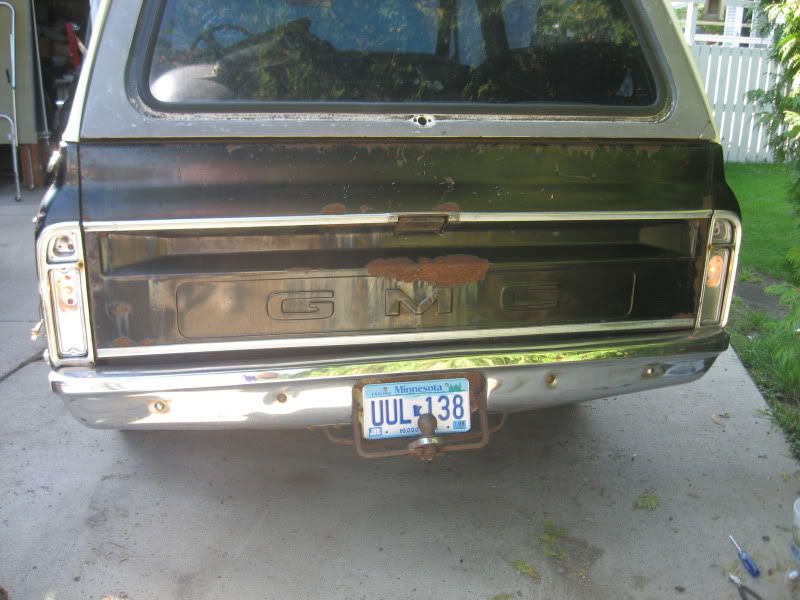 And this was the under dash curtesy light I took out. I don't think it was a stocker for this particular vehicle. Anyone got pics of what is supposed to be under there? 
__________________
If no one knows what you're doing, they can't tell you you're doing it wrong HG's Dream Car Build - Shelby Cobra Kit Build your own adjustable track bar 71 Long Fleet C/10 72 Jimmy 4x4 (Junkyard Jimmy)HG's Plow Truck '78 K35 DuallyBigass Farm Truck HG's thread of miscellaneous stuff Last edited by hgs_notes; 09-16-2009 at 07:11 PM. |
|
|
|
|
09-16-2009, 10:23 PM
|
#208 |
|
GEARHEAD
Join Date: Aug 2003
Location: MN
Posts: 6,107
|
Re: Junkyard Jimmy Super Low Buck Build Thread
Just got some info that should help clear up a couple more light issues. I'll try it tomorrow and post the results.
I found a car for my daughter. Driving down a highway I hadn't been on for a while. 93 Tempo, 125k, very good condition for it's age, decent tires, good stereo, previous owner seems to have taken good care of it. The daughter likes it, loves the color and can buy it herself in cash. I'm making him an offer for it in the morning. He's asking $800, but said he'd take less, just wants it gone. It'll be more dependable than the jimmy, and doesn't need any repairs at the moment. 
__________________
If no one knows what you're doing, they can't tell you you're doing it wrong HG's Dream Car Build - Shelby Cobra Kit Build your own adjustable track bar 71 Long Fleet C/10 72 Jimmy 4x4 (Junkyard Jimmy)HG's Plow Truck '78 K35 DuallyBigass Farm Truck HG's thread of miscellaneous stuff |
|
|
|
|
09-17-2009, 09:04 PM
|
#209 |
|
GEARHEAD
Join Date: Aug 2003
Location: MN
Posts: 6,107
|
Re: Junkyard Jimmy Super Low Buck Build Thread
Got my daughter the car for $700 and she paid for it herself and so far she loves it.
Back to the Jimmy. I learned last night that the front parking signal lights are the ground source for the side marker lights. So I mounted those up, put in new bulbs and tried it out and shazam! they work! Whens the last time you heard someone use Shazam! in a sentence? And yes, it must have an exclamation point after it in all cases. The only important driving light that is not working is the left rear blinker/brake light. That circuit is dead for the moment. I'll pull the bulb and do a voltage test to see if it's the bulb or bulb holder this weekend, and if not, just start tracing it up the line 'til I find the problem. I need to get the dash and dome lights working too, but that's not really important yet. I did get a new junction block mounted to the fender by the battery too. Before there was just a nut and bolt holding the wires together with black tape wrapped around it. I have to re-tape some harness, but overall, it's coming along swimmingly. Swimmingly, there's another good old word. I'm a freakin' thesaurus tonight. Once the lights are all working, I'm going to finish putting in the headers and exhaust. Well, the headers for sure, the exhaust I'm hoping will bolt up ok, but I won't know til I try it. The only other priority with the engine/tranny after that is getting the correct tranny (thinkin' with your) dipstick (Jimmy) and the kickdown cable in and adjusted. I think those two items can wait 'til after the brakes are working though. I'm not even sure where to start on those.
__________________
If no one knows what you're doing, they can't tell you you're doing it wrong HG's Dream Car Build - Shelby Cobra Kit Build your own adjustable track bar 71 Long Fleet C/10 72 Jimmy 4x4 (Junkyard Jimmy)HG's Plow Truck '78 K35 DuallyBigass Farm Truck HG's thread of miscellaneous stuff |
|
|
|
|
09-18-2009, 03:52 AM
|
#210 |
|
Registered User
Join Date: Jun 2007
Location: Saskatoon, Saskatchewan,:
Posts: 2,901
|
Re: Junkyard Jimmy Super Low Buck Build Thread
wow, no wonder why those lights no work, rusty!!!! i have never seen that much rust there before, coming along it is.
__________________
James 1968 GMC "HAVOC" 1986 GMC "Frank" J.J.R.H. Design & Consulting My 68`Rebuild "HAVOC": http://67-72chevytrucks.com/vboard/s...d.php?t=316300 A 58' chev build thread: http://www.67-72chevytrucks.com/vboa...d.php?t=311238 1969 Camaro Pro Touring http://67-72chevytrucks.com/vboard/s...61#post3513361 Swiss Cheese: http://67-72chevytrucks.com/vboard/s...d.php?t=384390 Adjustable Trailing Arm How-To: http://67-72chevytrucks.com/vboard/s...d.php?t=321100 1968 Ford Farm Truck: http://67-72chevytrucks.com/vboard/s...=1#post6555587 |
|
|
|
|
09-19-2009, 07:39 PM
|
#211 |
|
GEARHEAD
Join Date: Aug 2003
Location: MN
Posts: 6,107
|
Re: Junkyard Jimmy Super Low Buck Build Thread
You have no idea how nice it is to be able to make regular updates. When I injured my arm back in July, and had to stop most of everything I love to do to relieve stress, it just plain sucked. My arm still is not 100%, but I can use it and there is very little discomfort, as long as I take it easy on that side.
Anyway, update for today. Checked out the left rear blinker and turns out to be just a poor connection between the tail light harness and the one that comes back from the firewall. So all the main driving lights are working. I just need to find some screws for the tail light lenses. Got the pass side header in, re-wrapped most of the front light harness, re-routed the starter wires to keep them from burning up, tightened some loose crossmember bolts, and took it for a ride around the block. Open headers  OMG that thing is a beast. The floor is pretty open and the header outlet is right there. It's like being in a resonance chamber. BTW, I love the headers. They were supposed to be for my C-10, but hit the crossmember on that because these are for 4x4's only. There is a bunch of clearnace on both sides. They tuck up in the frame rail. The only thing I had to do extra was take out the shift rod from the column to linkage and make a slight bend in it. 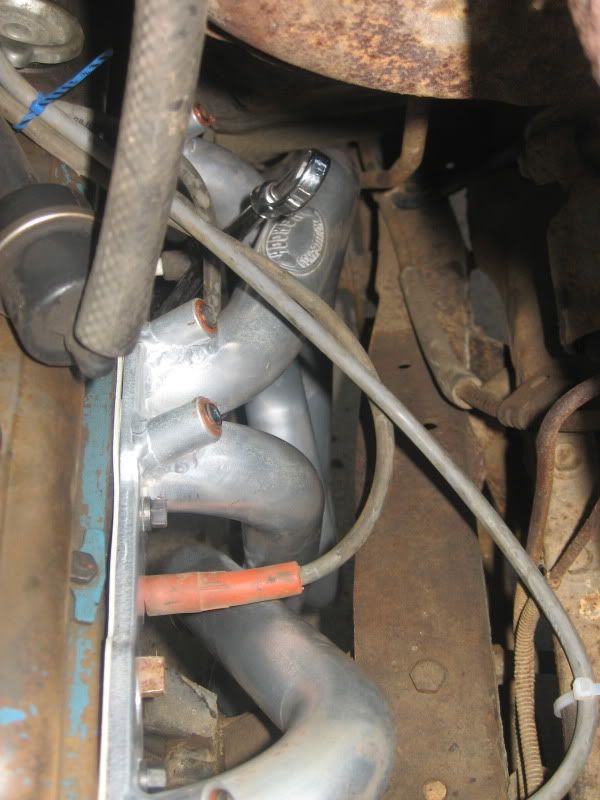 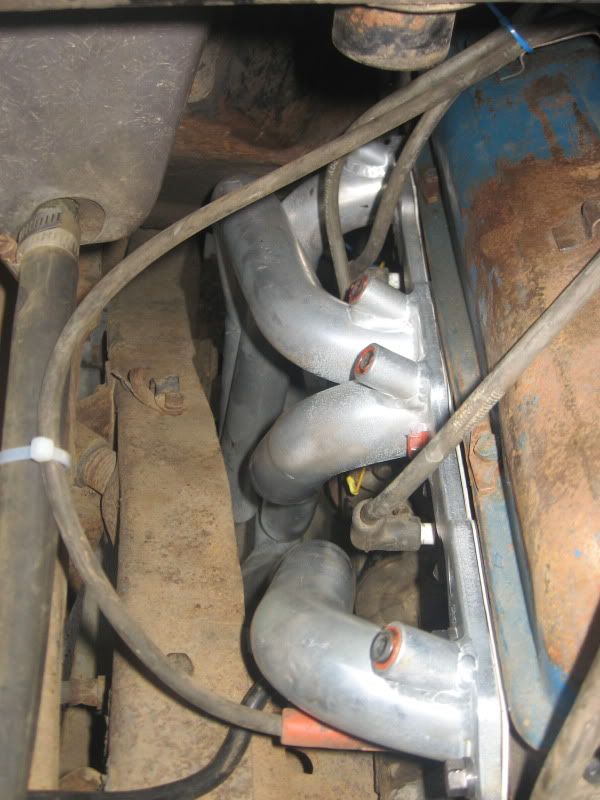 You can see the rod there now after the bend, before it rubbed the header. 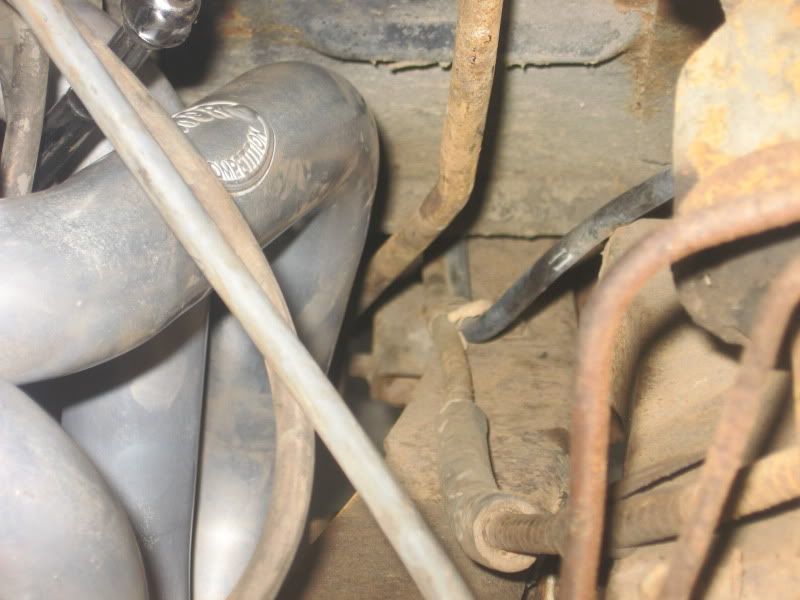 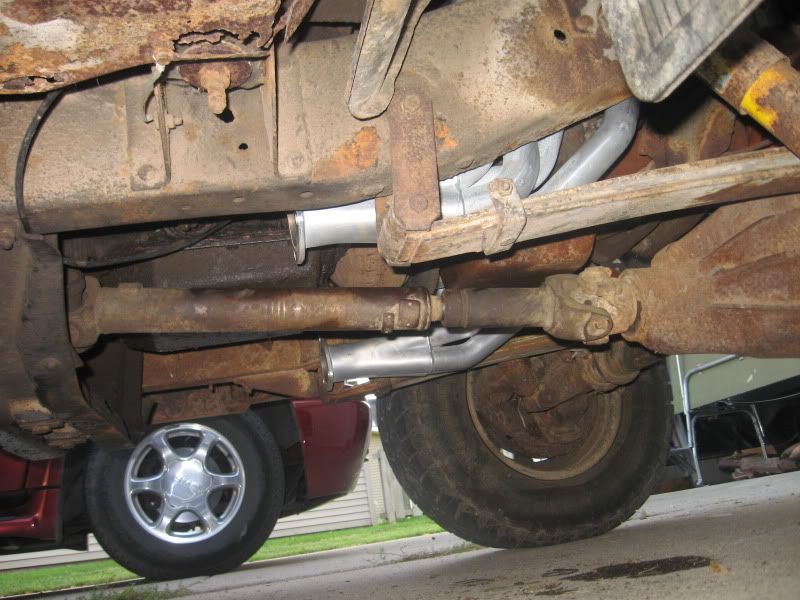 The only odd thing with them is that one outlet is shorter than the other. This picture was taken pretty much perpendicular to the frame. You can see how high they sit up, and the offset. 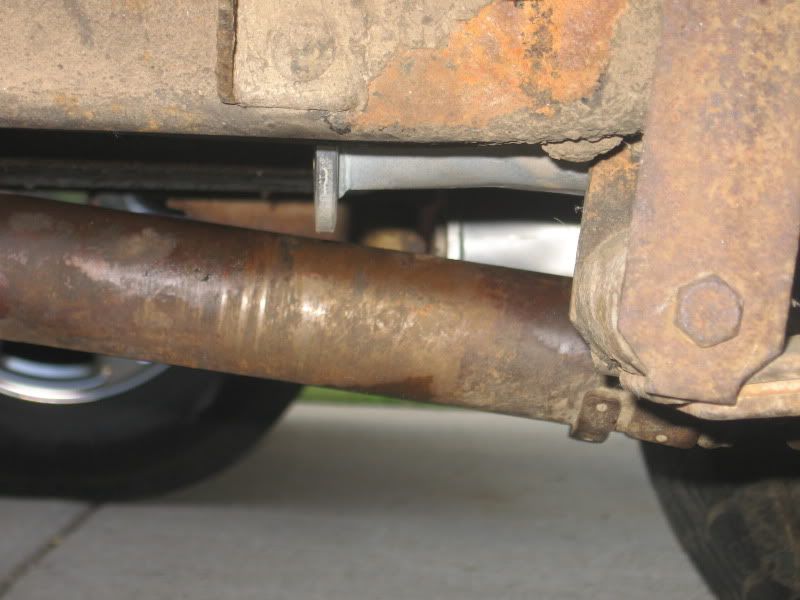 The only money I spent this week on it was for bulbs, about $15. So the total is now $693. I'm not sure what I'll do next, brakes or exhaust. I'm kinda tired of laying under it and washing the grit out of my eyes. There are a couple things on the tranny I'd like to take care of that might be easier without the exhaust pipes there. And the brakes are seriously bad. I think I just talked myself into a brake job. 
__________________
If no one knows what you're doing, they can't tell you you're doing it wrong HG's Dream Car Build - Shelby Cobra Kit Build your own adjustable track bar 71 Long Fleet C/10 72 Jimmy 4x4 (Junkyard Jimmy)HG's Plow Truck '78 K35 DuallyBigass Farm Truck HG's thread of miscellaneous stuff |
|
|
|
|
09-19-2009, 07:54 PM
|
#212 |
|
GEARHEAD
Join Date: Aug 2003
Location: MN
Posts: 6,107
|
Re: Junkyard Jimmy Super Low Buck Build Thread
These are the headers I bought. A screaming deal. Ceramic coated, heavy flanges, full tube length, delivered for about $125.
The seller is Holley Performance, and it is old stock items. They don't have any listed right now, but I've seen them since I bought these. http://cgi.ebay.com/ebaymotors/ws/eB...7452&viewitem=
__________________
If no one knows what you're doing, they can't tell you you're doing it wrong HG's Dream Car Build - Shelby Cobra Kit Build your own adjustable track bar 71 Long Fleet C/10 72 Jimmy 4x4 (Junkyard Jimmy)HG's Plow Truck '78 K35 DuallyBigass Farm Truck HG's thread of miscellaneous stuff |
|
|
|
|
09-19-2009, 07:58 PM
|
#213 |
|
Senior Member
Join Date: Nov 2003
Location: Brookings, SD
Posts: 10,497
|
Re: Junkyard Jimmy Super Low Buck Build Thread
Looking good Mike. How long until you think you will be driving it regularly?
__________________
Some people are like slinkies, they aren't good for anything, but you can't help but smile when you see one tumble down the stairs. |
|
|
|
|
09-19-2009, 08:53 PM
|
#214 | |
|
GEARHEAD
Join Date: Aug 2003
Location: MN
Posts: 6,107
|
Re: Junkyard Jimmy Super Low Buck Build Thread
Quote:
To answer your question, somewhere between next summer and never  Here's the status of the apparatus. IF I get the brakes working properly, and the exhaust in, and the tranny kickdown cable, and dipstick all done this fall, THEN next spring I might be able to do some of the sheetmetal work and beat it around during the summer and beyond. At a minimum, the windshield has to be replaced and the floor pans replaced. In order to do the windshield, the frame should be replaced (I just happen to have a couple), which means the top will need to be lifted off, which will remove support for the firewall. So, in my own head I'm thinking about body mounts first. Then maybe some bracing under the bed where the cross braces rusted away. Then I have a fair set of used torsion boxes that should be installed, but I'll need to do cab supports too. Then I can do the floor pans, brace the door opening, take off the top, fix the windshield frame and put in a windshield. Now at that point, the rest of the rust repair could probably wait. I have better doors and a driver side fender. Still looking for a pass side fender. The back half is seriously rotted though. If I decided to drive it topless next year, I'll be putting a support across from bed rail to bed rail, to keep the sides from falling out (not kidding). The tailgate is already hard to open because of spread. My daughter has a car now, so there is no impending use for it. My son, who has since claimed the jimmy as his, is still a couple years away from driving. He has been helping me out now and then on my projects and likes them. I'm somewhat confident that this will be his later on. And by that time, this may be a pretty decent ride.
__________________
If no one knows what you're doing, they can't tell you you're doing it wrong HG's Dream Car Build - Shelby Cobra Kit Build your own adjustable track bar 71 Long Fleet C/10 72 Jimmy 4x4 (Junkyard Jimmy)HG's Plow Truck '78 K35 DuallyBigass Farm Truck HG's thread of miscellaneous stuff Last edited by hgs_notes; 09-19-2009 at 08:56 PM. |
|
|
|
|
|
09-19-2009, 11:01 PM
|
#215 |
|
VA72C10
Join Date: Mar 2008
Location: Midlothian, VA
Posts: 25,269
|
Re: Junkyard Jimmy Super Low Buck Build Thread
Headers look good. Glad to hear you're getting to work on it. My truck sat almost untouched for 15 months while I compiled parts and waited on a guy to do the welding. Now that I found someone for that my project has started moving and I get to go over there often to work on it. It's fun to be making progress. Wish I only had $693 in mine though
__________________
Looking for a 67-72 swb or blazer project in or around VA.
|
|
|
|
|
09-20-2009, 12:15 AM
|
#216 | |
|
GEARHEAD
Join Date: Aug 2003
Location: MN
Posts: 6,107
|
Re: Junkyard Jimmy Super Low Buck Build Thread
Quote:
I will end up spending some money on it though. Gaskets and seals, brake parts, some replacement sheetmetal, etc. No matter what you do, these old rigs will nickel and dime you to bankruptcy if you let them.
__________________
If no one knows what you're doing, they can't tell you you're doing it wrong HG's Dream Car Build - Shelby Cobra Kit Build your own adjustable track bar 71 Long Fleet C/10 72 Jimmy 4x4 (Junkyard Jimmy)HG's Plow Truck '78 K35 DuallyBigass Farm Truck HG's thread of miscellaneous stuff |
|
|
|
|
|
09-20-2009, 02:09 AM
|
#217 |
|
Registered User
Join Date: Dec 2005
Location: The land of fruits and nuts
Posts: 193
|
Re: Junkyard Jimmy Super Low Buck Build Thread
Hey Mike~
Frequent board-lurker here. Just wanted to say nice work on the truck here; looks like its going to be a lot of fun. and I hear you about the stress relieving aspect of working on these old trucks. Anyway, keep up the good work!
__________________
Have mercy, I'm recovering from my 4x4 addiction. 
|
|
|
|
|
09-23-2009, 11:22 AM
|
#218 | |
|
GEARHEAD
Join Date: Aug 2003
Location: MN
Posts: 6,107
|
Re: Junkyard Jimmy Super Low Buck Build Thread
Quote:
I've been taking a few minutes here and there looking at brake things. The rear resorvoir of the master cylinder was empty, but I did not add fluid because I'm going to check the lines and cylinders first. Does no good to pour fluid to the ground. I found a test procedure online here http://www.autoshop101.com/ (check the tech articles link) and found that the booster is functioning, but has some leakage issues, maybe related to a check valve or according to a mechanic friend of mine, just lack of use. Very good info on that site though. Then last night I jacked up the front axle and tested the function of the front brakes. They grab and release like they are supposed to. I'll pull the wheels and check the condition of the pads and rotors later on. With all the work I've been doing underneath this thing, I wish I would have used the pressure washer under there also. I think I might still do that, then blow it off with the air hose. I'm getting tired of wiping my eyes out all the time.
__________________
If no one knows what you're doing, they can't tell you you're doing it wrong HG's Dream Car Build - Shelby Cobra Kit Build your own adjustable track bar 71 Long Fleet C/10 72 Jimmy 4x4 (Junkyard Jimmy)HG's Plow Truck '78 K35 DuallyBigass Farm Truck HG's thread of miscellaneous stuff Last edited by hgs_notes; 09-23-2009 at 11:23 AM. |
|
|
|
|
|
09-23-2009, 03:29 PM
|
#219 |
|
GEARHEAD
Join Date: Aug 2003
Location: MN
Posts: 6,107
|
Re: Junkyard Jimmy Super Low Buck Build Thread
Rear brakes are nonexistent with the hydraulic side, and very weak with the emergency brake. Will take a closer look later.
__________________
If no one knows what you're doing, they can't tell you you're doing it wrong HG's Dream Car Build - Shelby Cobra Kit Build your own adjustable track bar 71 Long Fleet C/10 72 Jimmy 4x4 (Junkyard Jimmy)HG's Plow Truck '78 K35 DuallyBigass Farm Truck HG's thread of miscellaneous stuff |
|
|
|
|
09-23-2009, 11:42 PM
|
#220 | |
|
Not a bad nut after all..
Join Date: Dec 2000
Location: ND
Posts: 1,755
|
Re: Junkyard Jimmy Super Low Buck Build Thread
Quote:
Also check to see if your outer axle seals are leaking while you have the rear brake drums off as this indicates scored axles and bad outer wheel bearings.
__________________
'05 Chevy 2500HD 4x4 '72 GMC LWB 4x2 driver '72 Chevy LWB 4x4 plow truck '71 Blazer 4x4 driver '70 GMC LWB trailer |
|
|
|
|
|
09-24-2009, 07:50 AM
|
#221 | |
|
GEARHEAD
Join Date: Aug 2003
Location: MN
Posts: 6,107
|
Re: Junkyard Jimmy Super Low Buck Build Thread
Quote:
__________________
If no one knows what you're doing, they can't tell you you're doing it wrong HG's Dream Car Build - Shelby Cobra Kit Build your own adjustable track bar 71 Long Fleet C/10 72 Jimmy 4x4 (Junkyard Jimmy)HG's Plow Truck '78 K35 DuallyBigass Farm Truck HG's thread of miscellaneous stuff |
|
|
|
|
|
09-25-2009, 10:47 AM
|
#222 |
|
GEARHEAD
Join Date: Aug 2003
Location: MN
Posts: 6,107
|
Re: Junkyard Jimmy Super Low Buck Build Thread
Last night I was able to start the brake inspection. I say start because the rear drums are stuck to the axle hubs. HARD. I tried heating the drum and cooling the hub, then bang with a hammer. No luck. It's been getting sprayed with PB blaster since yesterday. I'll try again later. The drums are shot though. They were rusted as bad as any I've ever seen. They both cracked in places while trying to bang them off. So, I'll be looking for drums. The fronts don't look too bad. I think the pass side rotor and pads had been replaced not long before it was parked. The driver side pads are wore, but not down to metal yet, which is good. The rotor has uneven wear. One side more than the other.
Anyone know where to look on the rotor to find the minimum thickness stamp? I couldn't find it. I might have some brake pads in the garage somewhere for it. I bought some brake lines from someone on the board that should be on the way. I figure on replacing all the rear lines, rear cylinders, shoes, tension springs, and drums. I'm undecided on the booster/master cylinder. I may not have a choice, but I'm not at the point yet to know that. Seriously though, on the rotor thickness, where is it, what is it if you have access to a brake spec book, etc.?
__________________
If no one knows what you're doing, they can't tell you you're doing it wrong HG's Dream Car Build - Shelby Cobra Kit Build your own adjustable track bar 71 Long Fleet C/10 72 Jimmy 4x4 (Junkyard Jimmy)HG's Plow Truck '78 K35 DuallyBigass Farm Truck HG's thread of miscellaneous stuff |
|
|
|
|
09-25-2009, 05:58 PM
|
#223 |
|
GEARHEAD
Join Date: Aug 2003
Location: MN
Posts: 6,107
|
Re: Junkyard Jimmy Super Low Buck Build Thread
Didn't get much of an assist here today, but I figured it out. I found one of my spare rotors out in the garage, from the green Jimmy and found the thickness stamping. You gotta wonder about these manufacturers sometimes. The stamping or actually, casting number is on the back side. So you would have to take the rotor off to find the info. Anyway, mine are ok. They wouldn't be hurt by a resurface to clean them up, but there is no grooving or major defects in them, and the thick ness is good. So on the front, I'll replace the driver side pads and clean 'em up a bit.
The rear brakes, not so good. I finally beat the drums off. I found that if you use a persuasive hit with a rather large hammer on the outer edge, it helps break 'em loose. Once they popped loose, no problem. Inside was not pretty. The passenger side had a rodent nest in it. The drums were toast, even before I busted them up a bit with my persuasive hammering. The cylinders are both rusted. The driver side looked as if it was stored in water off and on over the past several years. I got them tore apart now, except for the cylinders, which are soaking in PB blaster on the brake line fitting. Hopefully they come apart ok, the lines are dirty, but don't look severely rusted. Time to start searching for parts.
__________________
If no one knows what you're doing, they can't tell you you're doing it wrong HG's Dream Car Build - Shelby Cobra Kit Build your own adjustable track bar 71 Long Fleet C/10 72 Jimmy 4x4 (Junkyard Jimmy)HG's Plow Truck '78 K35 DuallyBigass Farm Truck HG's thread of miscellaneous stuff |
|
|
|
|
09-27-2009, 12:02 AM
|
#224 |
|
GEARHEAD
Join Date: Aug 2003
Location: MN
Posts: 6,107
|
Re: Junkyard Jimmy Super Low Buck Build Thread
Only worked on it for about 10-15 minutes today. Got the drivers side cylinder off, along with about 1" of the brake line. The fitting was previously rounded off, so a visegrips was about the only option. Twisting the line made no difference cause it would need to be replaced anyway. The pass side is still a bit of a problem. The line came off, it twisted a little, but I don't think it kinked anywhere. Got one wheel cylinder bolt out, the other was so corroded that the hex is too round for even a 6 point socket. I'll try the visegrips and if that doesn't work I'll just grind or cut it off.
Bought some used lines from JUSBLAZ here. They should be here this coming week. Been price comparing the various parts stores and online for wheel cylinders, shoes, hardware and drums. Everything but the drums are cheap enough, but new drums are spendy items. I thought I found a good deal on ebay, but they were an older style and I'm not sure they would work. I've been told that 69 and older are different, and they do have a different part #, but I don't know what's different. They are both 11" x 2" and 6 lug. If someone knows, please respond here. I'll be checking the yards this next week. I know where a few of these are sitting, just need to get prices. By next weekend I'll have the brakes back together, then I'll take a deeper look at the master cylinder. I should see if I can find the procedure to rebuild it. And the booster check valve is only like $9, so I might try that as well. I haven't posted any pics in a while because it's just been a slow brake job, but I took some tonight that look alright. I think it looks like it's going to launch here. 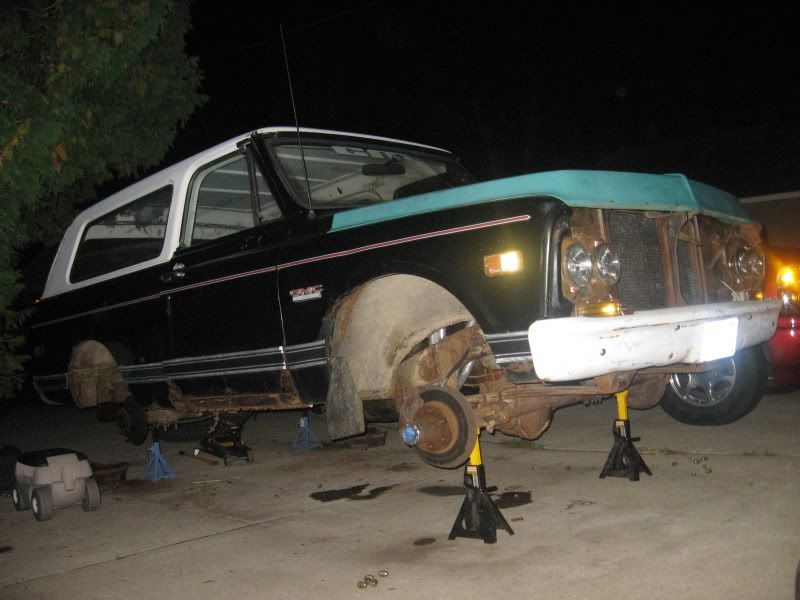 Driver side front, wore, but not shot. Just needs pads. 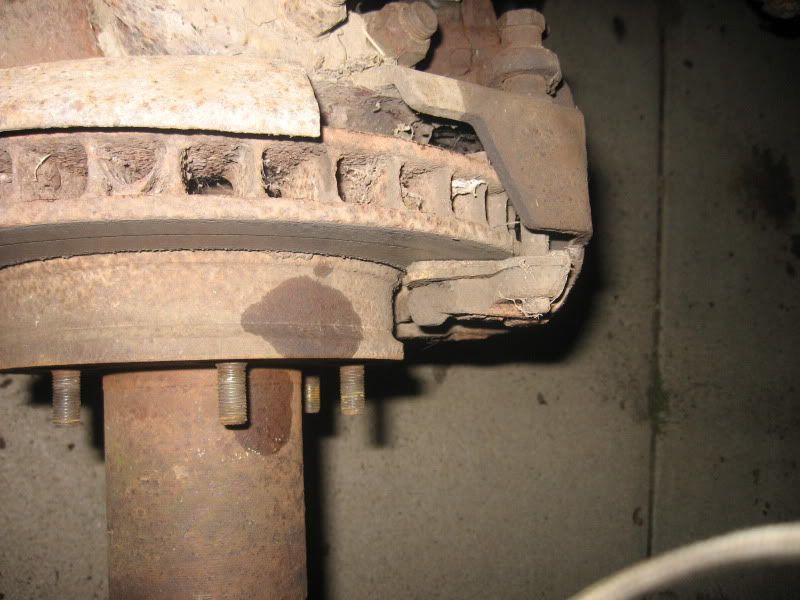 Front pass side, looks pretty good really. 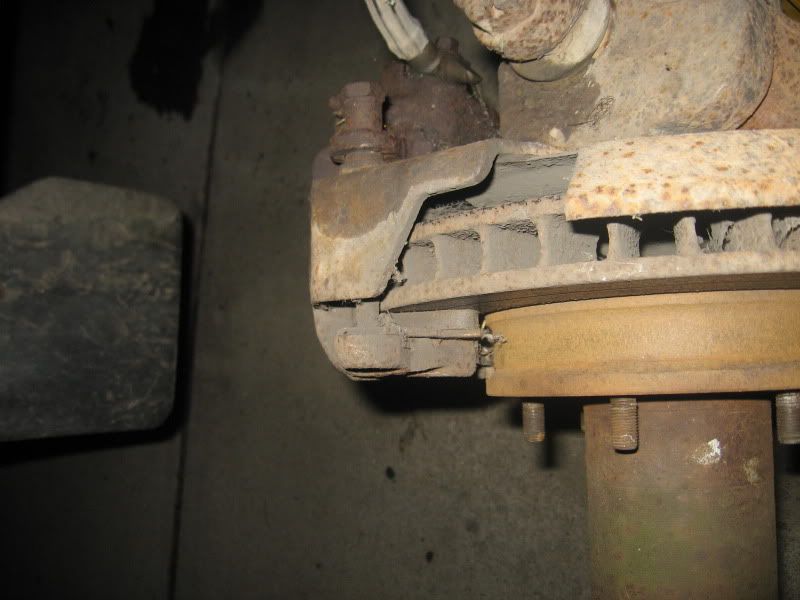 Driver side rear dismantled. A bit rusty. The e-brake cable end looked ok. I should try and lubricate it and see if it'll loosen up more. 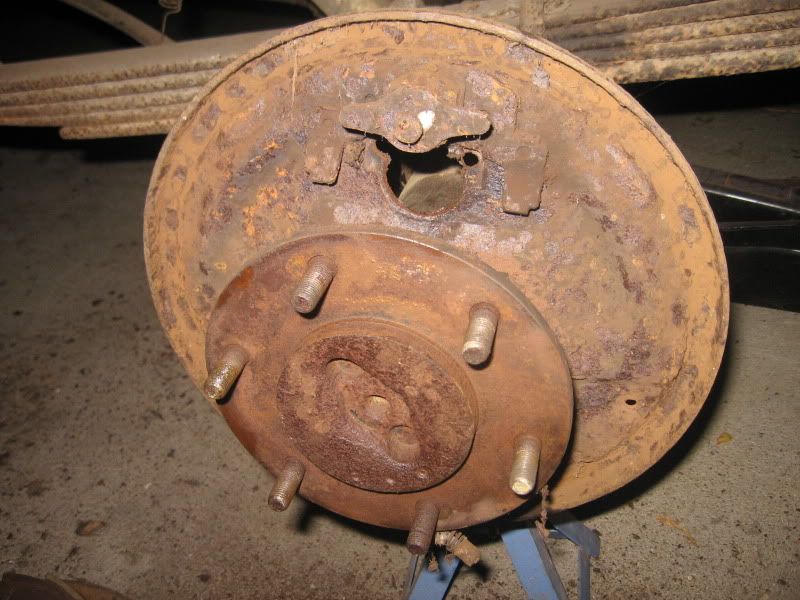 Pile of rust and dirt from the same corner. 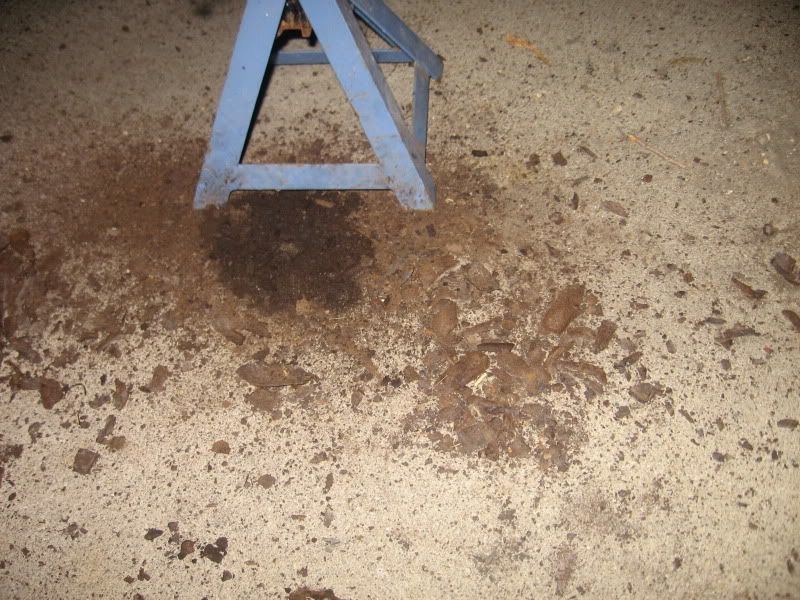 Rear pass side. Stuck wheel cylinder still in place and pile of rust and dirt, etc. 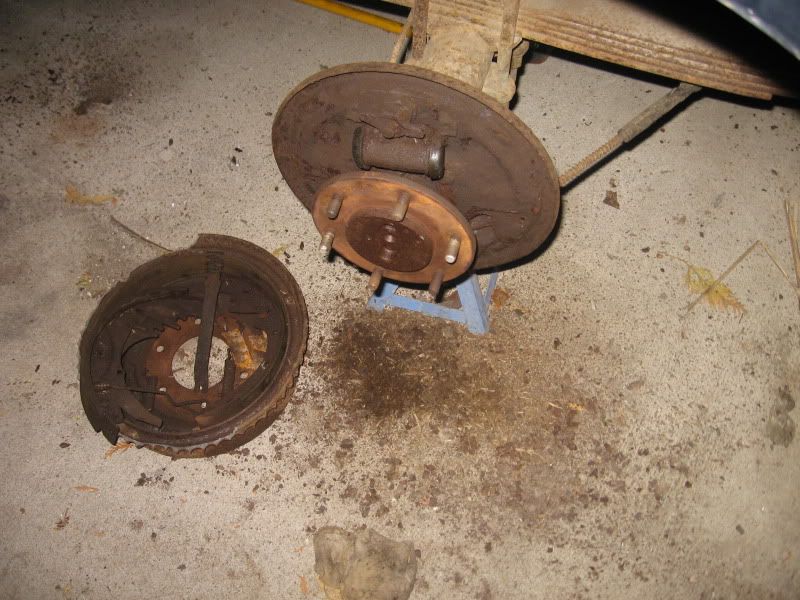
__________________
If no one knows what you're doing, they can't tell you you're doing it wrong HG's Dream Car Build - Shelby Cobra Kit Build your own adjustable track bar 71 Long Fleet C/10 72 Jimmy 4x4 (Junkyard Jimmy)HG's Plow Truck '78 K35 DuallyBigass Farm Truck HG's thread of miscellaneous stuff |
|
|
|
|
09-27-2009, 08:29 AM
|
#225 | |
|
Not a bad nut after all..
Join Date: Dec 2000
Location: ND
Posts: 1,755
|
Re: Junkyard Jimmy Super Low Buck Build Thread
Quote:
__________________
'05 Chevy 2500HD 4x4 '72 GMC LWB 4x2 driver '72 Chevy LWB 4x4 plow truck '71 Blazer 4x4 driver '70 GMC LWB trailer |
|
|
|
|
 |
| Bookmarks |
|
|


 Linear Mode

