
|
 01-09-2011, 09:42 PM
|
#2776 |
|
Daring to be Different
Join Date: Aug 2008
Location: Hesperia, Ca
Posts: 4,499
|
Re: Project Vitamin C-10
Maybe contact Painless, or Ron Francis Wiring. See if they can make a plug in harness for for only the dash. Just an idea.

__________________
Dennis Check out my 65/73 Cheap Build Thread. http://www.67-72chevytrucks.com/vboa...d.php?t=327644 KUSTOM RIDES FACE BOOK PAGE: https://www.facebook.com/groups/291198124258863/ 1965 C-10 Short Bed 350/700r4 2012 Silverado 1500 Crew Cab 2016 Honda Accord w/ 18" rims 2007 Honda Goldwing Trike w/ NAVI 2001 Yamaha Roadstar Indian look alike "Life's journey is not to arrive at the grave safely in a well preserved body, but rather to skid in sideways, totally worn out, shouting "...WOW!...what an amazing ride!" Live Life Passionately!!! [/COLOR]  I AM WE TODD IT, I AM SOFA KING WE TODD IT Last edited by Strodder; 01-09-2011 at 09:44 PM. |

|

|
|
01-09-2011, 09:59 PM
|
#2777 |
|
1 thing at a time is progress.
Join Date: Jun 2007
Location: Ball Ground GA
Posts: 5,511
|
Re: Project Vitamin C-10
I found out the name and number on the sockets "Universal 5/8 Snap-in Miniature Base Light Socket 8524".
 There are numerous places for the weatherpack connectors, just have to decide where to order from. Along with that there are so many different ones to choose from here is a link that discribes all types. Anybody have a favorite one they use? Does anyone have a cheat sheet as far as what gauge wire to run in the different circuits? Example pics. (I will be getting a complete kit with seals and terminals.)  
__________________
Alan
Philippians 2:14-16 |
|
|
|
|
01-09-2011, 10:32 PM
|
#2778 |
|
Daring to be Different
Join Date: Aug 2008
Location: Hesperia, Ca
Posts: 4,499
|
Re: Project Vitamin C-10
__________________
Dennis Check out my 65/73 Cheap Build Thread. http://www.67-72chevytrucks.com/vboa...d.php?t=327644 KUSTOM RIDES FACE BOOK PAGE: https://www.facebook.com/groups/291198124258863/ 1965 C-10 Short Bed 350/700r4 2012 Silverado 1500 Crew Cab 2016 Honda Accord w/ 18" rims 2007 Honda Goldwing Trike w/ NAVI 2001 Yamaha Roadstar Indian look alike "Life's journey is not to arrive at the grave safely in a well preserved body, but rather to skid in sideways, totally worn out, shouting "...WOW!...what an amazing ride!" Live Life Passionately!!! [/COLOR] I AM WE TODD IT, I AM SOFA KING WE TODD IT |
|
|
|
|
01-09-2011, 11:29 PM
|
#2779 |
|
Member of the longbed union.
Join Date: Feb 2009
Location: Killeen, Tx
Posts: 2,158
|
Re: Project Vitamin C-10
Alan check out www.wiringproducts.com You might find something there you cant live without.
If I was to get a painless wiring harness again I wouldn't buy the one that's made direct for our trucks. It's overpriced and you still have to put all the eletrical ends on it. Yes it's easier since the wires are already ran to where they need to go, But to save $200 on a harness and spend maybe 2 hours more on it is worth it.
__________________
Paul 88 GMC Crew Cab dually, 454/T400 64 LWB 400 HP 350/350T Bagged, under construction! Sold most of it! 92 S10 Iron Duke 5 speed, 5/7 drop for now. soon to be bagged. Sold http://67-72chevytrucks.com/vboard/s...59#post4637759 |
|
|
|
|
01-10-2011, 12:52 AM
|
#2780 |
|
SSN 706
Join Date: Mar 2009
Location: Pocatello Idaho
Posts: 3,821
|
Re: Project Vitamin C-10
I glad I have you to follow.

|
|
|
|
|
01-10-2011, 12:42 PM
|
#2781 | |
|
Daring to be Different
Join Date: Aug 2008
Location: Hesperia, Ca
Posts: 4,499
|
Re: Project Vitamin C-10
Quote:

__________________
Dennis Check out my 65/73 Cheap Build Thread. http://www.67-72chevytrucks.com/vboa...d.php?t=327644 KUSTOM RIDES FACE BOOK PAGE: https://www.facebook.com/groups/291198124258863/ 1965 C-10 Short Bed 350/700r4 2012 Silverado 1500 Crew Cab 2016 Honda Accord w/ 18" rims 2007 Honda Goldwing Trike w/ NAVI 2001 Yamaha Roadstar Indian look alike "Life's journey is not to arrive at the grave safely in a well preserved body, but rather to skid in sideways, totally worn out, shouting "...WOW!...what an amazing ride!" Live Life Passionately!!! [/COLOR] I AM WE TODD IT, I AM SOFA KING WE TODD IT |
|
|
|
|
|
01-10-2011, 02:51 PM
|
#2782 |
|
Registered User
Join Date: Apr 2009
Location: The Hill Country of Texas
Posts: 64
|
Alan,
O'Reilly has both one & two wire gauge light kits: part # GA50 (1 wire) by BWD & # 3211 (2 wire) by Auto Meter. You might check-out the Classic LED stuff at: www.uapac.com Enjoy watching you work...... Danny
__________________
 HAPPINESS IS A COLD BEER, A SATELLITE DISH & QUALITY TIME WITH MY DOG....! HAPPINESS IS A COLD BEER, A SATELLITE DISH & QUALITY TIME WITH MY DOG....!
|
|
|
|
|
01-11-2011, 08:49 PM
|
#2783 | ||||
|
1 thing at a time is progress.
Join Date: Jun 2007
Location: Ball Ground GA
Posts: 5,511
|
Re: Project Vitamin C-10
Quote:
Quote:
Quote:
 At least you can learn from my mistakes and make yours better. At least you can learn from my mistakes and make yours better.Quote:
We had 5" of snow here. Now it has turned to ice. Atlanta has been shut down for 2 days now. School is out again tomorrow as well.  I pulled out my Highway 22 kit to see what is in it as far as guage connections go. I pulled out the instructions and their diagram is almost identical to mine. I have to make a couple changes since the turn indictors and high beam are in the speedo. I'll have to add some QD's for the seperate pods. My far left gauge has oil/gen/e brake idiot lights. Next is the temp gauge. Then the speedo. Fuel gauge and then clock.
__________________
Alan
Philippians 2:14-16 |
||||
|
|
|
|
01-11-2011, 09:07 PM
|
#2784 |
|
Daring to be Different
Join Date: Aug 2008
Location: Hesperia, Ca
Posts: 4,499
|
Re: Project Vitamin C-10
Kewl!!
__________________
Dennis Check out my 65/73 Cheap Build Thread. http://www.67-72chevytrucks.com/vboa...d.php?t=327644 KUSTOM RIDES FACE BOOK PAGE: https://www.facebook.com/groups/291198124258863/ 1965 C-10 Short Bed 350/700r4 2012 Silverado 1500 Crew Cab 2016 Honda Accord w/ 18" rims 2007 Honda Goldwing Trike w/ NAVI 2001 Yamaha Roadstar Indian look alike "Life's journey is not to arrive at the grave safely in a well preserved body, but rather to skid in sideways, totally worn out, shouting "...WOW!...what an amazing ride!" Live Life Passionately!!! [/COLOR] I AM WE TODD IT, I AM SOFA KING WE TODD IT |
|
|
|
|
01-11-2011, 09:21 PM
|
#2785 |
|
1 thing at a time is progress.
Join Date: Jun 2007
Location: Ball Ground GA
Posts: 5,511
|
Re: Project Vitamin C-10
Since I'm not an electrical guru, I have a question. The black ground wire coming out of the #9 QD doesn't tie to anything. It shows ground points at the gauges but not physically tied to them. What do I do here. I'm thinking just ground it to the dash frame. The gauges are grounded thru the mounts from GM. Suggestions......
__________________
Alan
Philippians 2:14-16 Last edited by Alan's Classic; 01-11-2011 at 09:23 PM. |
|
|
|
|
01-11-2011, 10:30 PM
|
#2786 | |
|
Registered User
Join Date: Apr 2009
Location: Dawson, Ga
Posts: 481
|
Re: Project Vitamin C-10
Quote:
|
|
|
|
|
|
01-11-2011, 10:31 PM
|
#2787 |
|
Daring to be Different
Join Date: Aug 2008
Location: Hesperia, Ca
Posts: 4,499
|
Re: Project Vitamin C-10
I need to see the whole diagram. Remember that where ever you put that ground it has to be screwed to a non painted surface.
__________________
Dennis Check out my 65/73 Cheap Build Thread. http://www.67-72chevytrucks.com/vboa...d.php?t=327644 KUSTOM RIDES FACE BOOK PAGE: https://www.facebook.com/groups/291198124258863/ 1965 C-10 Short Bed 350/700r4 2012 Silverado 1500 Crew Cab 2016 Honda Accord w/ 18" rims 2007 Honda Goldwing Trike w/ NAVI 2001 Yamaha Roadstar Indian look alike "Life's journey is not to arrive at the grave safely in a well preserved body, but rather to skid in sideways, totally worn out, shouting "...WOW!...what an amazing ride!" Live Life Passionately!!! [/COLOR] I AM WE TODD IT, I AM SOFA KING WE TODD IT |
|
|
|
|
01-11-2011, 10:32 PM
|
#2788 |
|
I'm just glad to be here!
Join Date: Jan 2008
Location: Longview, TX
Posts: 4,788
|
Re: Project Vitamin C-10
The black wire coming out of #9 shows to be grounded at each gauge. Where does the black line go to the right of the gauges in the picture? You cut off that side...
__________________
Karl 1965 Chevy Stepside(Grandpa's Old Blue) and (July 2015 Shop Build!)(2020, the Saga Continues) http://67-72chevytrucks.com/vboard/s...d.php?t=372424 The LST Challenge: http://67-72chevytrucks.com/vboard/s...=1#post7812257 Korbin's 1st Square: "Sunburn" http://67-72chevytrucks.com/vboard/s...d.php?t=418618 1985 GMC Sierra: "White Trash", Korbin's 2nd now... http://67-72chevytrucks.com/vboard/s...d.php?t=632305 Henry - 1984 Chevrolet, Owen's 1st Square |
|
|
|
|
01-11-2011, 10:37 PM
|
#2789 | |
|
1 thing at a time is progress.
Join Date: Jun 2007
Location: Ball Ground GA
Posts: 5,511
|
Re: Project Vitamin C-10
Quote:
Posted via Mobile Device
__________________
Alan
Philippians 2:14-16 |
|
|
|
|
|
01-11-2011, 11:26 PM
|
#2790 |
|
Daring to be Different
Join Date: Aug 2008
Location: Hesperia, Ca
Posts: 4,499
|
Re: Project Vitamin C-10
Does this help?

__________________
Dennis Check out my 65/73 Cheap Build Thread. http://www.67-72chevytrucks.com/vboa...d.php?t=327644 KUSTOM RIDES FACE BOOK PAGE: https://www.facebook.com/groups/291198124258863/ 1965 C-10 Short Bed 350/700r4 2012 Silverado 1500 Crew Cab 2016 Honda Accord w/ 18" rims 2007 Honda Goldwing Trike w/ NAVI 2001 Yamaha Roadstar Indian look alike "Life's journey is not to arrive at the grave safely in a well preserved body, but rather to skid in sideways, totally worn out, shouting "...WOW!...what an amazing ride!" Live Life Passionately!!! [/COLOR] I AM WE TODD IT, I AM SOFA KING WE TODD IT |
|
|
|
|
01-12-2011, 01:07 PM
|
#2791 |
|
Registered User
Join Date: Apr 2009
Location: The Hill Country of Texas
Posts: 64
|
Re: Project Vitamin C-10
Alan,
My guess, (without physically looking at gauge cluster), would be that with the ground ending at the tach, the tach is mounted in the clusted making contact with 'bare' metal as will all of the other gauges when also mounted. Attaching the ground wire to the dash frame will accomplish the same completed ground circuit. IMO you're more of a 'Lectro Guru' than you thought. As long as the negative post on the battery is attached to the vehicle's frame, the body is making a good metal to metal contact to the frame and the dash has a metal contact to the body the circuit is complete. I have seen 18 wheelers run several thousand mile before experiencing computor module malfunctions due to painted ground terminals. Like Strodder said... 
__________________
HAPPINESS IS A COLD BEER, A SATELLITE DISH & QUALITY TIME WITH MY DOG....!
|
|
|
|
|
01-12-2011, 01:12 PM
|
#2792 |
|
Registered User
Join Date: Jan 2011
Location: Bakersfield, CA
Posts: 13
|
Re: Project Vitamin C-10
Hi. Just joined the forum the other day and read every post in this thread. Three days later, I'm done. Truck is awesome. I just got my first one last weekend. It is a 60 short step. But it was free and almost no rust besides cab floor and door. Rockers look good. Hope to get the kind of detail you have into mine. As far as connectors go, we use those weather packs all the time here at work. No real problems as far as i know. Thanks for the step by step your whole way through this biuld. Keep it up.
- Chris |
|
|
|
|
01-12-2011, 02:11 PM
|
#2793 | |||
|
1 thing at a time is progress.
Join Date: Jun 2007
Location: Ball Ground GA
Posts: 5,511
|
Re: Project Vitamin C-10
Quote:
Quote:
Quote:
Looking at the diagram that Strodder posted I'm confused. The tan wires that come from Gen/Oil idiot lights and the temp and fuel gauge all tie together and run to the resistance wire on the coil. I'm confused....... The american wire kit has a real oil press and volt meter. I will be running idiot lights for the Gen/oil. I would like to run a gauge, but I'm trying to keep the original look of the impala dash. Trying to figure out how I need to modify the new harness to make this happen. The tan wire to the coil is really confusing me. Now that I think about it could it be a power feed????? The tan wire like I said before ties into several gauges. for instance the oil pressure idiot light has 2 wires. One is tan and the other is a dark blue that goes to the sending unit on the impala harness. It has to get it's power from some where and it wouldn't be getting it from the sending unit. So to me that means it's getting it's power from the coil. The light will come on when key is turned on because the sending unit is making contact. Once the engine is started the oil pressure breaks continuity in the sending unit which in turn turns the light out. Am I thinking right?? If that is true then how does the gen light work? It ties to the tan wire to the coil and also ties to the gen. That would equal 2 positives.  Where would I connect the wire on the alt? Where would I connect the wire on the alt? Just a few of the many questions to come.
__________________
Alan
Philippians 2:14-16 |
|||
|
|
|
|
01-12-2011, 03:24 PM
|
#2794 |
|
SSN 706
Join Date: Mar 2009
Location: Pocatello Idaho
Posts: 3,821
|
Re: Project Vitamin C-10
I think I'll be happy if I get my key ignition switch to work.
|
|
|
|
|
01-12-2011, 03:34 PM
|
#2795 |
|
Registered User
Join Date: Apr 2009
Location: The Hill Country of Texas
Posts: 64
|
Re: Project Vitamin C-10
Hey Alan,
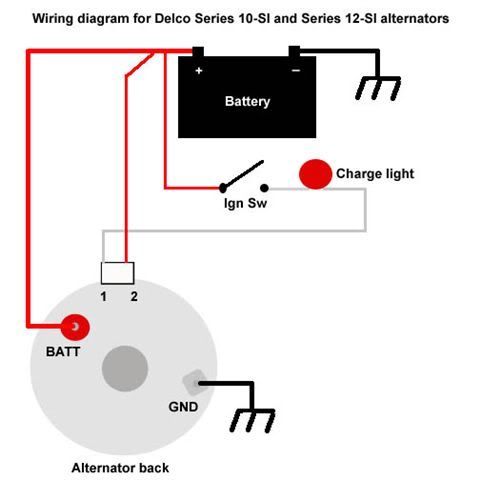
When the key is turned on the alternator warning lamp current flows from the power source at the coil through the warning lamp, through the resisters, transistors and field coil of the alternator, then to ground causing the lamp to illuminate. Once the alternator is at full output, voltage from the diode trio, also applied to terminal 1, equals the battery voltage. So, with 12 volts on both sides the of the lamp there is no path to ground and the light goes out. Danny
__________________
HAPPINESS IS A COLD BEER, A SATELLITE DISH & QUALITY TIME WITH MY DOG....!
|
|
|
|
|
01-12-2011, 03:43 PM
|
#2796 |
|
SSN 706
Join Date: Mar 2009
Location: Pocatello Idaho
Posts: 3,821
|
Re: Project Vitamin C-10
Damn, it sounds good to me. I think he knows he electrial.
|
|
|
|
|
01-12-2011, 05:02 PM
|
#2797 | |
|
Daring to be Different
Join Date: Aug 2008
Location: Hesperia, Ca
Posts: 4,499
|
Re: Project Vitamin C-10
Quote:

__________________
Dennis Check out my 65/73 Cheap Build Thread. http://www.67-72chevytrucks.com/vboa...d.php?t=327644 KUSTOM RIDES FACE BOOK PAGE: https://www.facebook.com/groups/291198124258863/ 1965 C-10 Short Bed 350/700r4 2012 Silverado 1500 Crew Cab 2016 Honda Accord w/ 18" rims 2007 Honda Goldwing Trike w/ NAVI 2001 Yamaha Roadstar Indian look alike "Life's journey is not to arrive at the grave safely in a well preserved body, but rather to skid in sideways, totally worn out, shouting "...WOW!...what an amazing ride!" Live Life Passionately!!! [/COLOR] I AM WE TODD IT, I AM SOFA KING WE TODD IT |
|
|
|
|
|
01-12-2011, 05:20 PM
|
#2798 |
|
Registered User
Join Date: Apr 2009
Location: The Hill Country of Texas
Posts: 64
|
Re: Project Vitamin C-10
A picture says a thousand words:
__________________
HAPPINESS IS A COLD BEER, A SATELLITE DISH & QUALITY TIME WITH MY DOG....!
|
|
|
|
|
01-12-2011, 05:22 PM
|
#2799 | ||
|
1 thing at a time is progress.
Join Date: Jun 2007
Location: Ball Ground GA
Posts: 5,511
|
Re: Project Vitamin C-10
Quote:
Quote:
 Been working on drawing my own schematic for my application. This is pod #1 housing the Gen/Oil and ebrake idiot lights and temp gauge. The QD's will be added to the American wire harness so I can disconnect the individual pods. Am I on the right track?
__________________
Alan
Philippians 2:14-16 |
||
|
|
|
|
01-12-2011, 05:26 PM
|
#2800 | |
|
1 thing at a time is progress.
Join Date: Jun 2007
Location: Ball Ground GA
Posts: 5,511
|
Re: Project Vitamin C-10
Quote:
__________________
Alan
Philippians 2:14-16 |
|
|
|
|
 |
| Bookmarks |
| Tags |
| 1959, 1960, 1964, 1965, 1966, c10, hugger, impala, orange |
|
|


 "Click it"


 Linear Mode

