
|
 10-03-2010, 03:23 PM
|
#1 |
|
Registered User
Join Date: Dec 2009
Location: Humble, TX
Posts: 184
|
Project "FatBoy"
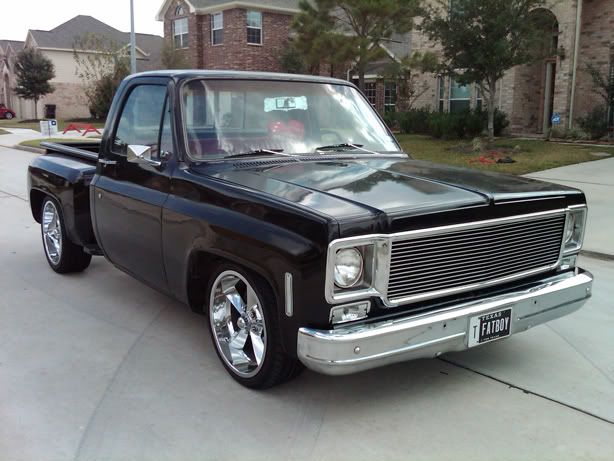
I've finally decided to post up my build. For those of you who haven't seen it, here it is. I've got a 1980 C10 Stepper which I purchased from a nephew in Ft. Worth, TX. It's got a 250 L6 automatic and is 2WD. I didn't get off to a good start with it. As I was towing it home, I tore up transmission on my 2003 Yukon (doh!). I actually purchased it for $1,500, but my wife says it cost me $2,900 because of the $1,400 for the transmission rebuild (note to self, adjust selective hearing module). It had just recently had a "paint job" done on it....which I'm not too fond of but atleast they got rid of most of the rust. The only rust I've really seen on the whole body is on some parts of the floorpan and front fender wells. Anyhow, on to the pics:
|

|

|
|
10-03-2010, 03:30 PM
|
#2 |
|
Registered User
Join Date: Dec 2009
Location: Humble, TX
Posts: 184
|
Re: Project "FatBoy"
The first thing I did was tore out all the suspension up front, installed new urethane bushings up front, DJM 3" drop spindles, 2" drop coils, and a flip kit out back.
|
|
|
|
|
10-03-2010, 03:41 PM
|
#3 |
|
Registered User
Join Date: Dec 2009
Location: Humble, TX
Posts: 184
|
Re: Project "FatBoy"
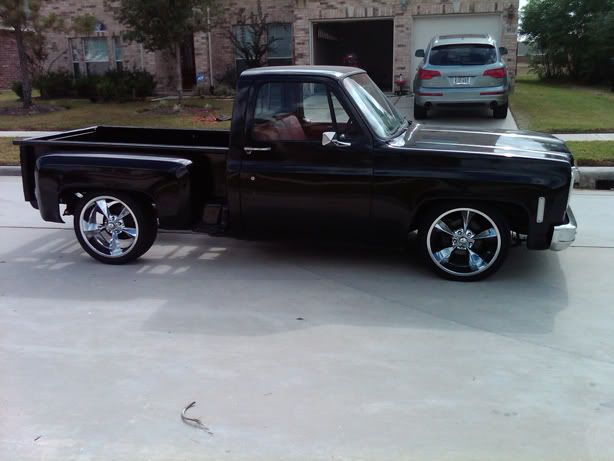
I also adjusted the backside of the truck by removing the chains and replacing them with Mar K hidden tailgate arms and some of their hidden latches. I also removed the stock taillights and the rear bumper and replaced it with a smooth roll-pan and some custom taillights and reverse lights. Then, I added a third brake light license frame. I also added some 1 1/2" spacers in the rear, since I didn't like how far in the wheels were (that's what I get for getting 8.5X20" wheels).
|
|
|
|
|
10-03-2010, 03:44 PM
|
#4 |
|
Registered User
Join Date: Dec 2009
Location: Humble, TX
Posts: 184
|
Re: Project "FatBoy"
I had noticed the body leaning to the passenger side in the front, so I realized I needed to change out the body mounts. I get a set of urethane mounts and get them all put in place.
|
|
|
|
|
10-03-2010, 04:01 PM
|
#5 |
|
Registered User
Join Date: Dec 2009
Location: Humble, TX
Posts: 184
|
Re: Project "FatBoy"
Now I'm on to the front end. I'm going to be replacing my 80 (rectangular light) front end with a 73-79 round eye front end. I ordered everything I needed for that project and should be getting it all in early next week. In the meantime, I started removing all the parts which will be replaced and hit it all up with some fresh paint. I also cleaned up the bumper quite a bit, leveled it out, and buffed it. Here are some pics of the before and after....now only if the parts would hurry up and get here!!!
|
|
|
|
|
10-03-2010, 04:09 PM
|
#6 |
|
Registered User
Join Date: May 2007
Location: Alabama
Posts: 241
|
Re: Project "FatBoy"
Good looking truck. Have you had any problems running the wheel spacers?
__________________
88 Chevy C1500, step side, LS swap. 98 Crew Cab Dually, tow rig. 03 Dodge Neon. ECTA Ohio Mile record holder. |
|
|
|
|
10-03-2010, 04:12 PM
|
#7 | |
|
Registered User
Join Date: Dec 2009
Location: Humble, TX
Posts: 184
|
Re: Project "FatBoy"
Quote:
|
|
|
|
|
|
10-03-2010, 04:16 PM
|
#8 | |
|
Registered User
Join Date: May 2007
Location: Alabama
Posts: 241
|
Re: Project "FatBoy"
Quote:
I've never had the spacer break, just the lug studs breaking. Having your own wheel pass you is a weird sensation.
__________________
88 Chevy C1500, step side, LS swap. 98 Crew Cab Dually, tow rig. 03 Dodge Neon. ECTA Ohio Mile record holder. |
|
|
|
|
|
10-03-2010, 04:20 PM
|
#9 | |
|
Registered User
Join Date: Dec 2009
Location: Humble, TX
Posts: 184
|
Re: Project "FatBoy"
Quote:
 Yeah, that's what I meant....my fault. It's a 1 1/2" adapter. I hated how the rear wheels sat so far into the wheel well, so I ordered up some adapters to push them out 1 1/2". I don't drive it too far, though. I work about a mile from my house, so I haven't really driven it on the highway. Yeah, that's what I meant....my fault. It's a 1 1/2" adapter. I hated how the rear wheels sat so far into the wheel well, so I ordered up some adapters to push them out 1 1/2". I don't drive it too far, though. I work about a mile from my house, so I haven't really driven it on the highway.
|
|
|
|
|
|
10-03-2010, 04:36 PM
|
#10 |
|
Registered User
Join Date: Dec 2009
Location: Humble, TX
Posts: 184
|
Re: Project "FatBoy"
Right now I'm having a couple of issues that I'm dealing with. First of all, it appears I have some frame damage up front on the passenger side. It's not off by much, but enough to make my front passenger wheel sit in about an inch more than the driver side. Also the passenger side core support bushing does not line up properly. Here is what I'm talking about:
|
|
|
|
|
10-03-2010, 04:42 PM
|
#11 |
|
Registered User
Join Date: Dec 2009
Location: Humble, TX
Posts: 184
|
Re: Project "FatBoy"
The next thing I'm having an issue with is the back of my truck. For some reason the passenger side of the bed is sitting about an inch higher than the driver side. I measured from the floor to the frame just behind the cab and both sides measure up. For some reason at the very back it's off. I'm assuming it's probably either more frame damage or maybe even the rear suspension. I'm planning on getting the frame re-aligned in a few weeks and then I can start ruling things out. I'd hate to do this, but worst case I may just put a 1" lowering shackle on the driver side and 2" on the passenger side since I still plan on going a little lower in the back. Like I said, I'd really hate to do that, but I'm just not sure what else it could be.
Finally, another issue I'm having is the wiring behind the dash. I've seen someone else post something similar, but when I turn the lights on my gas gauge marks empty. When I turn the lights off, it goes back to normal. I'm sure it's probably a grounding issue, but it's not a huge issue for me right now since I don't really drive it at night yet. |
|
|
|
|
10-03-2010, 04:47 PM
|
#12 |
|
Registered User
Join Date: May 2009
Location: Sparks, NV
Posts: 913
|
Re: Project "FatBoy"
uhh the lower cab mount bushing is up side down haha
great looking truck by the way!
__________________
Greg 1974 GMC 1/2 Ton SWB Fleetside L33 5.3/4l65e .................__
............._____l __\__ ..............l_(O)_ l___(O)] Last edited by GMC Guy; 10-03-2010 at 04:47 PM. |
|
|
|
|
10-03-2010, 04:50 PM
|
#13 | |
|
Registered User
Join Date: May 2009
Location: Sparks, NV
Posts: 913
|
Re: Project "FatBoy"
Quote:
__________________
Greg 1974 GMC 1/2 Ton SWB Fleetside L33 5.3/4l65e .................__
............._____l __\__ ..............l_(O)_ l___(O)] |
|
|
|
|
|
10-03-2010, 05:00 PM
|
#14 | |
|
Registered User
Join Date: Dec 2009
Location: Humble, TX
Posts: 184
|
Re: Project "FatBoy"
Quote:
I was going based off of the instructions on this site: http://www.73-87.com/7387garage/exte...b_bushings.htm but I noticed it wasn't the same type of bushings. Question though...does it really make a difference if it goes that way or the other way? Worst case I can go up under there and slide them off and put them back on. Atleast I won't have to jack up the truck for that. |
|
|
|
|
|
10-03-2010, 05:05 PM
|
#15 |
|
Registered User
Join Date: May 2009
Location: Sparks, NV
Posts: 913
|
Re: Project "FatBoy"
i don't think it really matters, but i used those same bushings on mine, and i installed them like the originals i pulled off. it would be easy to flip it around though if you wanted
__________________
Greg 1974 GMC 1/2 Ton SWB Fleetside L33 5.3/4l65e .................__
............._____l __\__ ..............l_(O)_ l___(O)] |
|
|
|
|
10-14-2010, 05:20 PM
|
#16 |
|
Registered User
Join Date: Dec 2009
Location: Humble, TX
Posts: 184
|
Re: Project "FatBoy"
Ok, I still haven't switched my lower body bushings around, but I was able to finish up my front end swap. Here is the before and after:
Before:  After:  I still need to tighten things up and order a new set of headlight bucket springs. My current ones are all bent up and they don't seem to be keeping the headlights steady. My next project is going to be getting the frame re-aligned, front-end alignment, and bringing the rear down another 2". I'll get the drop done this weekend and will be taking the truck to the shop early next week for the frame and front-end re-alignment. And after all that is done, it's off to get my inspection to finally be able to drive this thing on the streets! More updates to come!
__________________
Fernando Project "FATBOY" build thread The key to happiness is having dreams. The key to success is making your dreams come true. |
|
|
|
|
10-14-2010, 05:27 PM
|
#17 |
|
Registered User
Join Date: Jan 2010
Location: haysville,kansas
Posts: 524
|
Re: Project "FatBoy"
Looks great!!
|
|
|
|
|
10-14-2010, 05:51 PM
|
#18 | |
|
Registered User
Join Date: Dec 2009
Location: Humble, TX
Posts: 184
|
Re: Project "FatBoy"
Quote:
__________________
Fernando Project "FATBOY" build thread The key to happiness is having dreams. The key to success is making your dreams come true. |
|
|
|
|
|
10-14-2010, 07:20 PM
|
#19 |
|
Registered User
Join Date: Sep 2009
Location: ottawa,canada
Posts: 4,550
|
Re: Project "FatBoy"
Man I like those early style front ends.....think I might do a swap someday!
Last edited by mooseknuckles; 10-14-2010 at 07:20 PM. |
|
|
|
|
10-14-2010, 08:21 PM
|
#20 |
|
Registered User
Join Date: May 2009
Location: Sparks, NV
Posts: 913
|
Re: Project "FatBoy"
wow that looks awesome
 where did you order the grille from?
__________________
Greg 1974 GMC 1/2 Ton SWB Fleetside L33 5.3/4l65e .................__
............._____l __\__ ..............l_(O)_ l___(O)] |
|
|
|
|
10-14-2010, 08:58 PM
|
#21 | ||
|
Registered User
Join Date: Dec 2009
Location: Humble, TX
Posts: 184
|
Re: Project "FatBoy"
Quote:
Quote:
Here is what the bracket looks like: 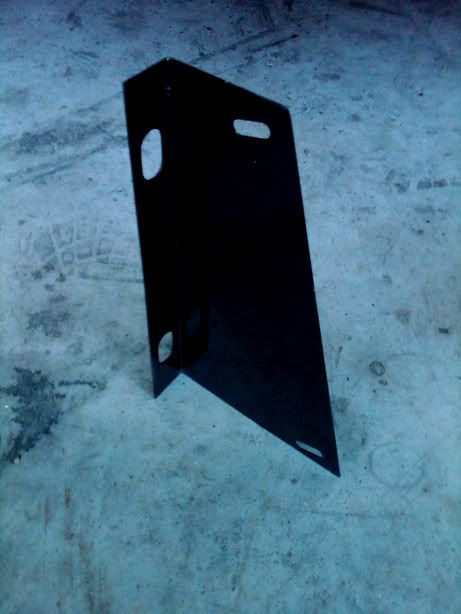 Here is where it bolts to on the core support: 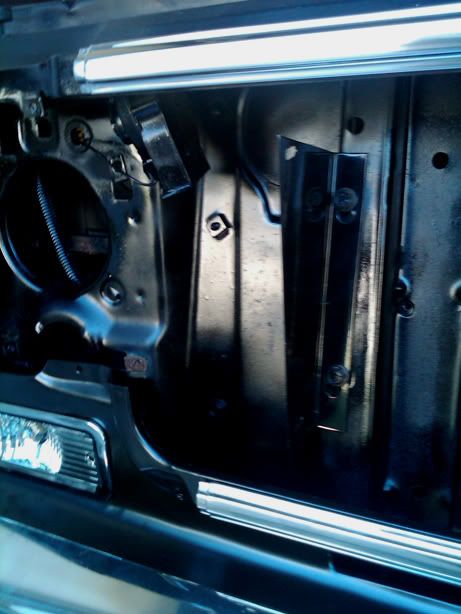 I thought I was going to have an issue with the hood release, but your fingers fit right through the grill without any problems and just pops right back into shape when you pull them out.
__________________
Fernando Project "FATBOY" build thread The key to happiness is having dreams. The key to success is making your dreams come true. |
||
|
|
|
|
10-14-2010, 09:13 PM
|
#22 |
|
Registered User
Join Date: Dec 2009
Location: Humble, TX
Posts: 184
|
Re: Project "FatBoy"
Another change I made over the weekend was putting in a tilt column:
Previous column: 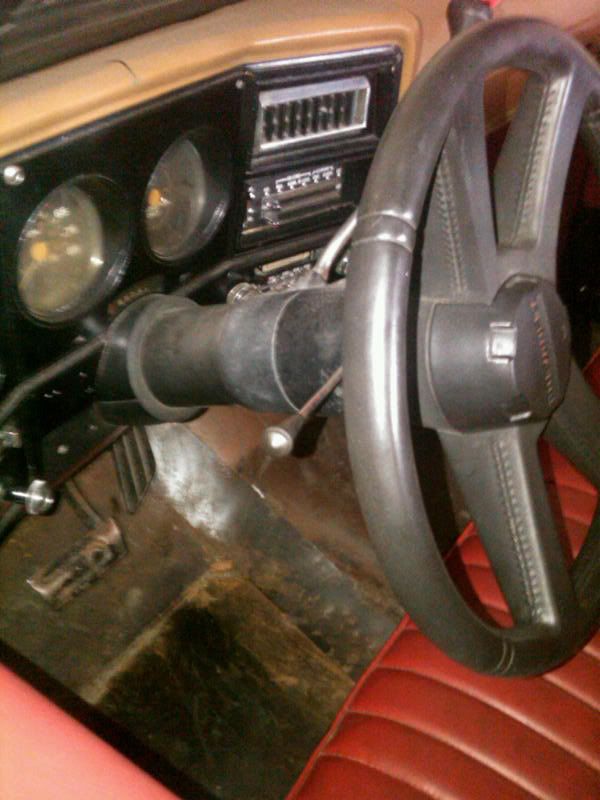 New tilt column: 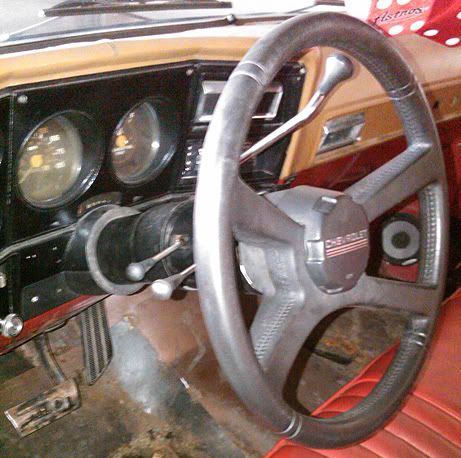 It wasn't as hard as I thought it was going to be and took about 2 1/2 hours. If you want to change out the steering wheel, I highly recommend a steering wheel puller. You can rent it from Autozone or just buy one for like $16.99. The new column didn't come with it's keys, so I had to change out the key lock cylinder. For that you definitely need a lock plate puller, otherwise you're gonna be there for a while getting that clip out that holds the plate in place. The puller was only like $14 from Autozone, too.
__________________
Fernando Project "FATBOY" build thread The key to happiness is having dreams. The key to success is making your dreams come true. |
|
|
|
|
10-26-2010, 11:51 AM
|
#23 |
|
Registered User
Join Date: Dec 2009
Location: Humble, TX
Posts: 184
|
Re: Project "FatBoy"
This past weekend I lowered the rear another 2" and buttoned up the front end right. My headlight adjustment screws were broken so the driver side headlight was not set properly. I finally got all the parts I needed to get everything nice and tight and the front end is FINALLY finished 100%. I also added some clear corner markers up front and removed the trim around the side and back of the cab just under the window. Here are some pics of the progress:
   During the rear lowering, I removed the bump stop bracket above the axle and hit it all up with some paint to get rid of all the rust I had. I'm still not done with the paint, but I'll post up pics of that after I'm all done and drill in the new bump stops for the rear. I was going to do a c-notch, but I don't think it's low enough to warrant that....yet. I still have plenty of clearance to this point. I think I'll eventually install some bags on it, so at some point in time I'll need to do that. I also tried to start some of the shaving, however the welding machine I bought is currently not working. I'm going to have to take it in to get it serviced, but I'm in no rush for that anyway. I still need to buy a new battery, so I will stop having issues with starting it up every time. I'm hoping to get that done in the next two weeks. Updates to come!
__________________
Fernando Project "FATBOY" build thread The key to happiness is having dreams. The key to success is making your dreams come true. |
|
|
|
|
10-26-2010, 03:14 PM
|
#24 |
|
Registered User
Join Date: Sep 2008
Location: Bailey, NC
Posts: 2,462
|
Re: Project "FatBoy"
It's looking really good. The older front end looks awesome.
__________________
Jeramy '84 GMC project truck '85 Chevy 4X4 SOLD '07 Chevy Trailblazer SS 5th Annual SHPHC Car/Truck Show Pics http://67-72chevytrucks.com/vboard/s...d.php?t=543605 UPDATED PICS! CHECK 'EM OUT |
|
|
|
|
10-26-2010, 03:18 PM
|
#25 |
|
Formerly- 1972SuperCheyenne
 Join Date: Oct 2008
Location: Wake Forest NC
Posts: 5,782
|
Re: Project "FatBoy"
Thats SICK! I love it!!!
__________________
--Josh My Build Thread:http://67-72chevytrucks.com/vboard/s...d.php?t=799218 A good crossthread is better than Loctite any day. Life is not about what you have, but who you have to share it with. |
|
|
|
 |
| Bookmarks |
|
|


 Linear Mode

