
|
Register or Log In To remove these advertisements. |
|
|
|
|||||||
 |
|
|
Thread Tools | Display Modes |
 04-19-2011, 05:22 PM
|
#1 |
|
Getcha Pull
Join Date: Nov 2010
Location: MD
Posts: 691
|
Shrinking A Fuel Gauge
Thought I'd try and take a oil pressure gauge, and turn it into a fuel gauge...
Parts Needed 1x Fuel Gauge 1x Oil Pressure Gauge (Or gauge of your choice...) 2x 1/8" Rivets Tools Needed 1x Can of Brake Cleaner 1x Cotton Rag 1x Rivet Gun 1x 1/16" Drill Bit 1x 1/8" Drill Bit 1x 3/8" Drill Bit 1x Drill... 2x Jewelers Screw Driver First thing I did was take a square and made sure the marks on both gauges matched. As far as I can tell, they do. Next I set the needle of the fuel gauge at 1/2 tank and used the two screw drivers to gently pull the needle off. Making sure not to move the needle from the 1/2 position. After this I repeated this process on the oil pressure gauge. 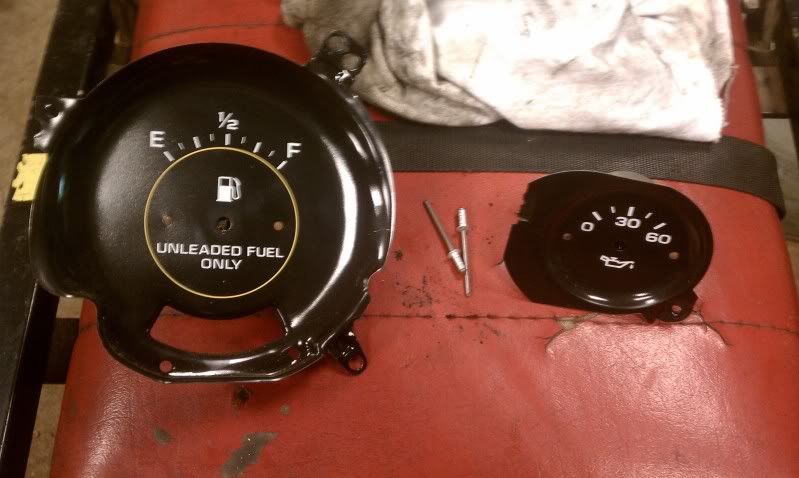 Next I took the fuel gauge and laid it face down on a cloth. Using the 1/16" drill bit I drill out the old rivets. Then using the 1/8" drill bit I enlarged the holes on the mechanism it self. Followed by the 3/8" drill bit to "bump" the holes to knock off the burs. Fuel Gauge mechanism (left) next to the oil pressure gauge (right). 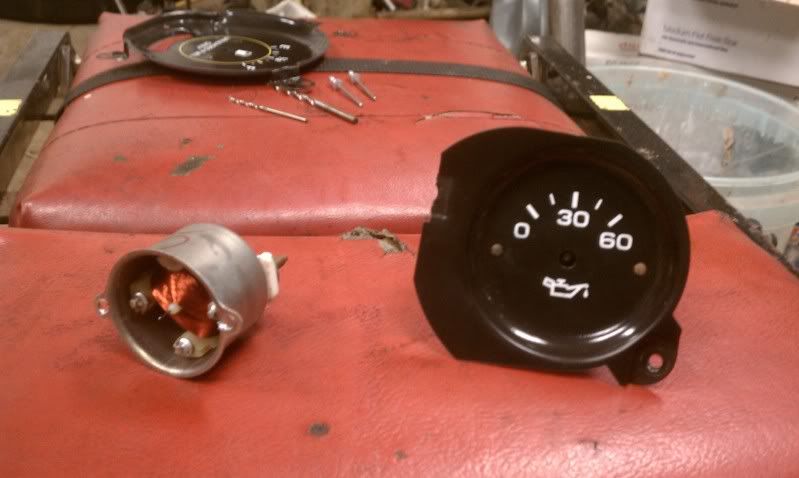 Repeated the last step on the oil pressure gauge, but instead of enlarging the holes on the mechanism, I enlarged the holes on the gauge face. 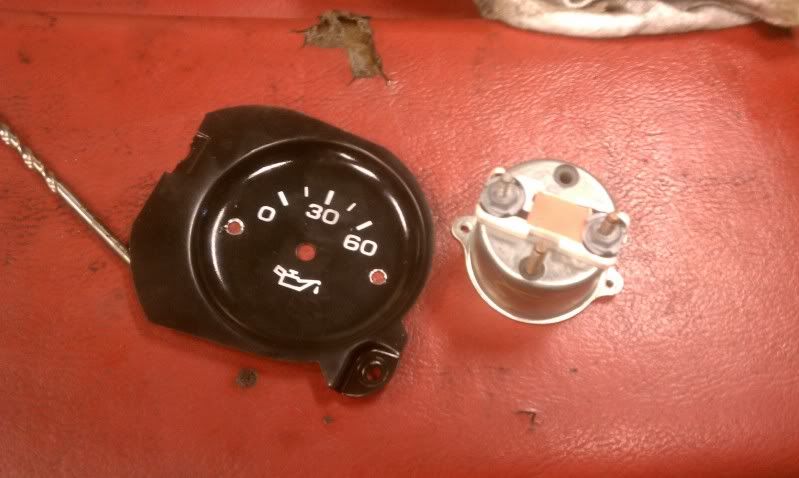 Taking the fuel gauge mechanism, and the oil pressure gauge face I stuck the rivets through and tightened both the rivets to make sure it is lined up right. The "popped" the rivets. 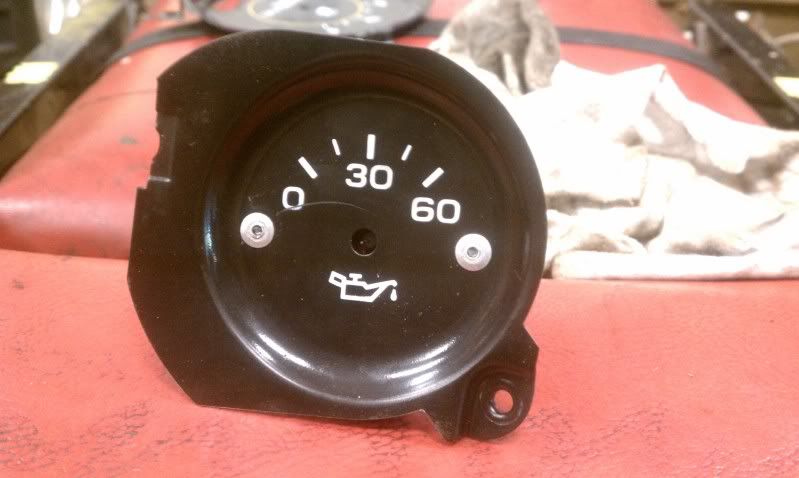 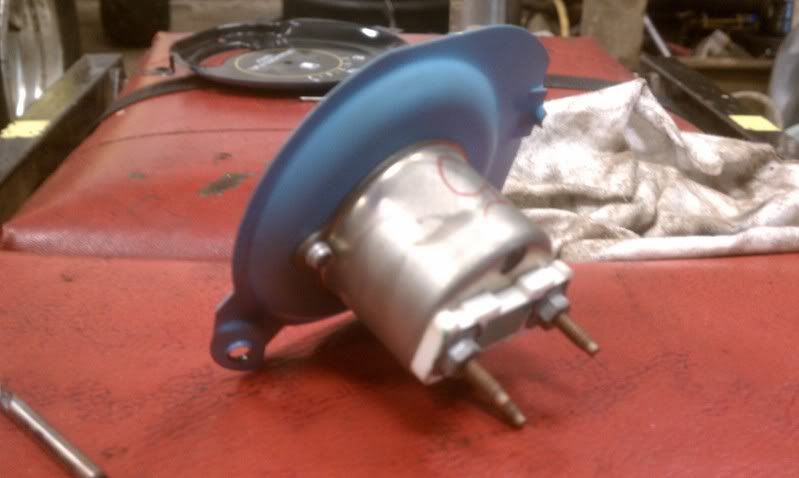 Now because oil pressure reading aren't going to look right I took some brake cleaner, and a rag to rub the numbers off. At this point you could use water slide decals, or whatever you prefer to add proper fuel level marks. 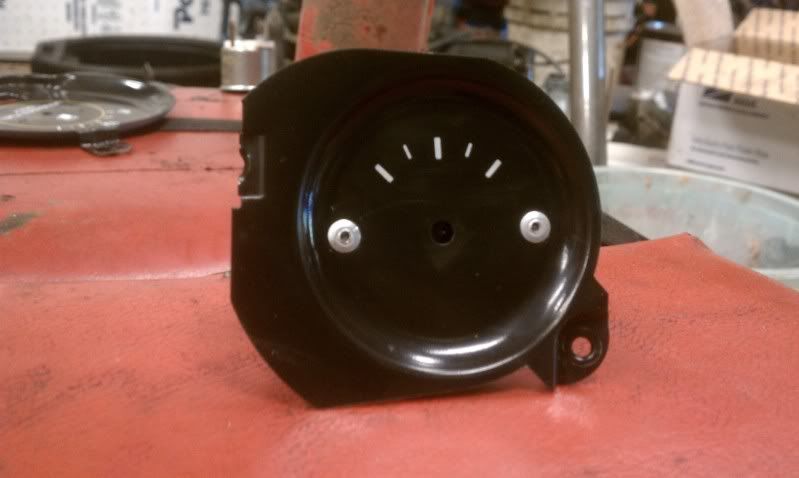 And finally add the needle from the oil pressure gauge. Making sure to set it at 1/2 liked you pulled the old needle off.  That is the easy part, now I gotta figure out what to do for a tach...
__________________
'81 K10 454/SM465 '86 S10 Blazer '95 H-D Softail '96 Integra |

|

|
|
04-19-2011, 08:06 PM
|
#2 |
|
Registered User
Join Date: Dec 2006
Location: Yakima, WA
Posts: 325
|
Re: Shrinking A Fuel Gauge
Nice job! but an awful lot of work, you could of just bought the small fuel gauge for a tach dash. LOL
God Bless, Terry |
|
|
|
|
04-19-2011, 08:28 PM
|
#3 | |
|
Getcha Pull
Join Date: Nov 2010
Location: MD
Posts: 691
|
Re: Shrinking A Fuel Gauge
Quote:
__________________
'81 K10 454/SM465 '86 S10 Blazer '95 H-D Softail '96 Integra |
|
|
|
|
|
04-19-2011, 08:40 PM
|
#4 |
|
Registered User
Join Date: Dec 2010
Location: louisville ohio
Posts: 375
|
Re: Shrinking A Fuel Gauge
Great Idea , Looks good too and its thrifty
__________________
my build 77 gmc shortbed big block, http://67-72chevytrucks.com/vboard/s...d.php?t=438237 |
|
|
|
|
04-19-2011, 08:52 PM
|
#5 | |
|
Registered User
Join Date: Mar 2011
Location: Joplin, MO
Posts: 161
|
Re: Shrinking A Fuel Gauge
Quote:
NICE WORK!
__________________
Jeremy I have done so much, for so long, with so little, I can do anything with nothing! 1984 GMC Sierra Classic-1/2 ton-SWB (R.I.P.) 1986 GMC Suburban 3/4 ton 4x4 2014 GMC Sierra LTZ Z-71 Crew SWB |
|
|
|
|
|
04-19-2011, 09:01 PM
|
#6 |
|
Registered User
Join Date: Mar 2011
Location: Joplin, MO
Posts: 161
|
Re: Shrinking A Fuel Gauge
Did you just wipe away the 0, 30 & 60 and leave the original lines in place? Or did you wipe it all away and put new lines back on it?
__________________
Jeremy I have done so much, for so long, with so little, I can do anything with nothing! 1984 GMC Sierra Classic-1/2 ton-SWB (R.I.P.) 1986 GMC Suburban 3/4 ton 4x4 2014 GMC Sierra LTZ Z-71 Crew SWB |
|
|
|
|
04-19-2011, 09:22 PM
|
#7 | |
|
Getcha Pull
Join Date: Nov 2010
Location: MD
Posts: 691
|
Re: Shrinking A Fuel Gauge
Quote:
 ). With a combination of my eye ball, and a square to try and see if the marks are in the same place. As far as I can tell, they are. ). With a combination of my eye ball, and a square to try and see if the marks are in the same place. As far as I can tell, they are. Thanks for the kind words, guys! 
__________________
'81 K10 454/SM465 '86 S10 Blazer '95 H-D Softail '96 Integra |
|
|
|
|
|
04-23-2011, 06:54 AM
|
#8 | |
|
Moderator
 Join Date: Oct 2008
Location: Wentworth, NH
Posts: 4,916
|
Re: Shrinking A Fuel Gauge
Quote:
)The white blocks on the gauge studs are resistors wired in parallel with the needle coil. You could probably swap the ballast resistors on the back of the gauge to re-purpose the unit. Nice to know that brake cleaner takes off the lettering. Last edited by hatzie; 04-23-2011 at 07:11 AM. |
|
|
|
|
|
04-23-2011, 07:24 AM
|
#9 |
|
78K & 79C Jimmys
Join Date: Nov 2009
Location: Ottawa Ont CANADA
Posts: 7,901
|
Re: Shrinking A Fuel Gauge
looks good a little dab of paint or marker might hide those rivits
__________________
John 1978 GMCJimmy4X4-350/203 1979 GMCJimmy4X2-305/350 |
|
|
|
|
04-23-2011, 08:16 AM
|
#10 |
|
GM Parts Guy
Join Date: Jan 2011
Location: Attleboro MA
Posts: 375
|
Re: Shrinking A Fuel Gauge
I really like that idea! I may have to try it withg a couple of old clusters
I have laying around!
__________________
1975 Chevrolet C-10 Custom Deluxe (DD/WIP) 1989 Chevrolet C1500 reg cab stepside (Winter Truck) 1977 Harley Davidson XLH 1000 (Summer Cruiser) |
|
|
|
|
04-23-2011, 08:50 AM
|
#11 |
|
Registered User
 Join Date: May 2005
Location: Tallahassee Fl
Posts: 773
|
Re: Shrinking A Fuel Gauge
Any Idead where to find matching decals?? Looks great
|
|
|
|
|
04-23-2011, 11:30 PM
|
#12 | |||
|
Getcha Pull
Join Date: Nov 2010
Location: MD
Posts: 691
|
Re: Shrinking A Fuel Gauge
Quote:
Yep. I could actually get it to rub off with pressing my finger on it, but that would be very time consuming... brake cleaner, and a rag did the job perfect. Didn't touch the black finish... Quote:
Quote:
I also have pondered using LED's to mark the gauge. Green for full, amber for half, and red for empty. A set of those for all the gauges would be the bees knees. http://cgi.ebay.com/ebaymotors/1980-...item53e00876df
__________________
'81 K10 454/SM465 '86 S10 Blazer '95 H-D Softail '96 Integra |
|||
|
|
|
|
04-24-2011, 09:51 AM
|
#13 | |
|
Moderator
Join Date: Oct 2008
Location: Wentworth, NH
Posts: 4,916
|
Re: Shrinking A Fuel Gauge
Quote:
|
|
|
|
|
|
08-01-2015, 09:22 PM
|
#14 |
|
Registered User
Join Date: Aug 2011
Location: Bethel Acres, OK
Posts: 119
|
Re: Shrinking A Fuel Gauge
I just wanted to at that I have done this simply by swapping the resistors one the back as Hatzie said and I works great. In fact it works without even swapping the resistors. In fact all of the ballast resistors that I have are ~90 ohms.
|
|
|
|
|
08-02-2015, 12:08 PM
|
#15 |
|
Registered User
Join Date: Apr 2012
Location: Chatt Tn
Posts: 961
|
Re: Shrinking A Fuel Gauge
I have a gauge out of a van dash I am going to put in the clock position.
__________________
88 military v30 crewcab shortbed 5.9 cummins, nv4500, 205 86 k30, 89 diesel burb, 76 gmc pathfinder 71 longbed 5.3 4l80 http://67-72chevytrucks.com/vboard/s...d.php?t=522535 |
|
|
|
|
08-05-2015, 01:28 AM
|
#16 |
|
Registered User
Join Date: Jan 2009
Location: Calgary, AB
Posts: 1,181
|
Re: Shrinking A Fuel Gauge
This is a rather ingenious idea as you could technically do this and have a fuel gauge for both tanks as well as either have a water temp and oil pressure or some other gauge. Or just use one gauge and the still have 3 criticals and a hole for perhaps a tach.
Hmm you have just given me an idea for a gauge layout. |
|
|
|
|
08-08-2015, 10:22 AM
|
#17 |
|
Registered User
Join Date: Aug 2011
Location: Arlington Texas
Posts: 56
|
Re: Shrinking A Fuel Gauge
There are inexpensive kits (less than $20) that allow you to print your own waterslide decals. It could be used to print whatever you wanted the gauge to say. They are used a lot in model building, most hobby shops sell them.
|
|
|
|
|
08-09-2015, 12:11 PM
|
#18 |
|
Moderator
Join Date: Oct 2008
Location: Wentworth, NH
Posts: 4,916
|
Re: Shrinking A Fuel Gauge
2 small fuel tank gauges and omit the volt gauge...
Or a C40-60 tach/fuel gauge and a small fuel gauge.
__________________
1959 M35A2 LDT465-1D SOLD 1967 Dodge W200 B383, NP420/NP201 SOLD 1969 Dodge Polara 500 B383, A833 SOLD 1972 Ford F250 FE390, NP435/NP205 SOLD 1976 Chevy K20, 6.5L, NV4500/NP208 SOLD 1986 M1008 CUCV SOLD 2000 GMC C2500, TD6.5L, NV4500 2005 Chevy Silverado LS 2500HD 6.0L 4L80E/NP263 2009 Impala SS LS4 V8 RTFM... GM Parts Books, GM Schematics, GM service manuals, and GM training materials...
And please let us know if and how your repairs were successful. |
|
|
|
|
| Bookmarks |
|
|


 Linear Mode

