
|
 11-04-2011, 04:39 PM
|
#1 |
|
Registered User
Join Date: Nov 2010
Location: Carlsbad, CA
Posts: 1,584
|
Universal Joint R&R
UNIVERSAL JOINT R&R (1 OF 6)
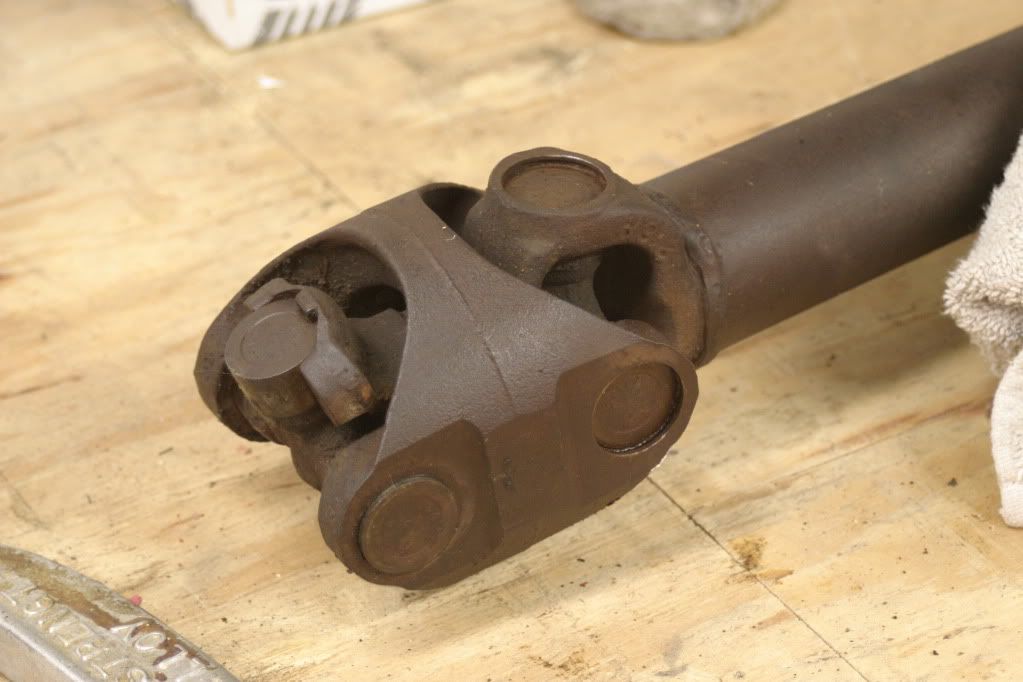
In my Project thread, I posted a blurb on the work I did on my driveshaft. A few people have asked me for more detail than I provided in that thread. In this thread, I explain my step-by-step approach for removing and installing a universal joint (UJ) in a yoke using common tools and a hydraulic press. I assume that the driveshaft has already been removed. The driveshaft will need to be securely supported but I do not discuss that here. There are three basic parts to deal with when removing and installing a UJ. 1. Lock rings: retain the UJ assembly in the yoke. 2. Trunnion: The X-shaped piece that provides the main structure. The cylindrical machined surfaces of the trunnion act as in inner race for the needle bearings. The flat ends act as thrust bearing surfaces against the end caps. 3. Bearings: Also called end caps or bearing caps. They are either pressed into a yoke and retained by lock rings or secured on a flange by U-bolts. They act as outer bearing races for the needle bearings and thrust bearing surfaces for the end faces of the trunnion. In this narrative, opposite ends of an assembled UJ are pressed into a yoke and held in place by lock rings. To illustrate, I used a yoke assembly and UJ from a half shaft of a 60-something independent rear suspension Corvette that appeared not to have been touched since it left the factory. First, clean off all the grease and dirt using whatever solvent or soap you prefer (the cleaner, the better). Next, remove the lock rings. A pair of needle nose pliers works OK but they may be difficult to keep a good grip on the lock ring. If there are any burrs or deformations on the perimeter of the yoke bore outside the bearings, now is a good time to remove them so they won’t interfere with the bearing as it is pressed out. An appropriate size grinding wheel installed on a Dremel tool works well. I first try to press out the bearings with a large C-clamp and a socket. For my truck, a 6" C-clamp is a good size to use. To determine the socket size to use you need to know what UJ you are dealing with. I have a C20 so I’m dealing with two sizes of UJ. The UJs at the transmission and carrier bearing are both Series 1310. The UJ at the differential is a larger Series 1350. The bearing OD of a Series 1310 is 1.062 inches so I use a 1 1/8" socket. The bearing OD of a Series 1350 is 1.188 inches so I use a 1 ¼" socket. In this narrative I am working with a Series 1350. This site has some good basic UJ info. http://www.driveshaftspecialist.com/...D%20Guide.html
__________________
- Jim - My Daily Driver is a 1969 Chevrolet Custom/20 Fleetside 350/TH400/Eaton H052 4.10 and its Project thread is here http://67-72chevytrucks.com/vboard/s...d.php?t=456911 Last edited by bollybib; 02-27-2012 at 10:51 PM. |

|

|
|
11-04-2011, 04:47 PM
|
#2 |
|
Registered User
Join Date: Nov 2010
Location: Carlsbad, CA
Posts: 1,584
|
Re: Universal Joint R&R
UNIVERSAL JOINT R&R (2 OF 6)
Snug up the clamp and socket on the UJ and slowly apply force to one bearing by pressing with the clamp screw. If you are lucky, the clamp/socket combo will work as long as the bearing/yoke contact surfaces are not too corroded (which usually isnt the case) or the UJ is small. If the clamp begins to distort, this method wont work. Back off and try the next step. Applying heat and a good penetrating fluid may help. The next thing I try is a stout bench vise instead of a C-clamp, but that often isnt enough, either. Ive broken at least one vise doing this, so dont force things. In the picture below, Ive placed two thick washers against one bearing and then screwed down the vice in an attempt to break the bearings loose from their bores. It did not work. If the bearings still havent budged, you can take the driveshaft to a shop and have them pressed out. Ive done this a few times in the past. Better still, if you have your own press, do it yourself. A press is the best tool to use, especially for UJs that havent been touched for decades. I recently purchased a press of my own and after I used it a few times, I wondered why I hadnt got one years ago. If you plan on doing most of the work on your truck yourself, a press is indispensable. Place the UJ in the press with two thick washers on the upper bearing as you did in the vice and then press. They will break free at last ! Then, place a suitably sized socket against the upper bearing and the larger one below. The lower bearing should slide into the socket as it emerges. Press as far as the trunnion allows, but once again, dont force anything.
__________________
- Jim - My Daily Driver is a 1969 Chevrolet Custom/20 Fleetside 350/TH400/Eaton H052 4.10 and its Project thread is here http://67-72chevytrucks.com/vboard/s...d.php?t=456911 |
|
|
|
|
11-04-2011, 04:54 PM
|
#3 |
|
Registered User
Join Date: Nov 2010
Location: Carlsbad, CA
Posts: 1,584
|
Re: Universal Joint R&R
UNIVERSAL JOINT R&R (3 OF 6)
The UJ should look like this now. Then, with a large pair of pliers, twist the exposed bearing and work it out of the bore. Air may be trapped inside the bearing, slightly resisting the extraction. Expect needle bearings to fall out. Then, place the assembly in the press again, this time pressing against the trunnion. Press it as far as it will go. Now you can remove the trunnion. Remove the remaining bearing with your pliers as before.
__________________
- Jim - My Daily Driver is a 1969 Chevrolet Custom/20 Fleetside 350/TH400/Eaton H052 4.10 and its Project thread is here http://67-72chevytrucks.com/vboard/s...d.php?t=456911 |
|
|
|
|
11-04-2011, 05:06 PM
|
#4 |
|
Registered User
Join Date: Nov 2010
Location: Carlsbad, CA
Posts: 1,584
|
Re: Universal Joint R&R
UNIVERSAL JOINT R&R (4 OF 6)
Now that it's apart, you should have something that looks like this. Here is what the yoke bores looked like just after removal of the UJ. With all that crud jammed in there, you can see why the bearings didn’t break free with the clamp or vise, even with heat and penetrant. Clean the interior surfaces of the yoke thoroughly. For the bore, I use Scothbrite pads or abrasive paper 220 grit or smoother. You don’t want to use anything that will severely score the bore. A wire brush attachment on a Dremel gets inside the lock ring annulus. Use what you have, just get it clean and don't abuse it. Inspect the interior surfaces for damage and remove any burrs, scratches, deformations, or other impediments to insertion of the new bearings and lock rings. A Dremel tool with suitable grinding attachments works well. Files do, too. The bore should feel smooth to the touch. Do the same for the lock ring annulus and test with a new lock ring. Everything should be clean and smooth but don’t go crazy and remove a lot of material. You'll end up with loose, ill-fitting bearings. Now you should have something that looks like this.
__________________
- Jim - My Daily Driver is a 1969 Chevrolet Custom/20 Fleetside 350/TH400/Eaton H052 4.10 and its Project thread is here http://67-72chevytrucks.com/vboard/s...d.php?t=456911 Last edited by bollybib; 11-04-2011 at 08:38 PM. |
|
|
|
|
11-04-2011, 05:09 PM
|
#5 |
|
*** That's interesting ***
Join Date: Oct 2008
Location: Pittsburgh, PA
Posts: 2,772
|
Re: Universal Joint R&R

__________________
Tom  Chevy by day... 1969 Chevy C30 Rollback Tow Truck -- 383 stroker, 4L80E 2011 Chevy Caprice PPV 9C3 6.0L 1995 Chevy Caprice 9C1 1994 Chevy Caprice 9C1 #3 1995 Chevy Caprice Wagon #2 1995 Chevy Impala SS Mopar by night... 1969 Dodge Charger 1972 Chrysler Newport 2dr Hardtop (27K miles) Plus others... |
|
|
|
|
11-04-2011, 05:12 PM
|
#6 |
|
Registered User
Join Date: Nov 2010
Location: Carlsbad, CA
Posts: 1,584
|
Re: Universal Joint R&R
UNIVERSAL JOINT R&R (5 OF 6)
Carefully remove one bearing from your new UJ and partially press it into the yoke. You can use the clamp/socket combo now since everything is clean and smooth. Be careful not to displace or lose needle bearings. Pay attention to the alignment of the bearing in the bore, you don’t want to force in a cocked bearing. You should be able to feel the alignment by the position of the clamp and the insertion resistance of the bearing. I didn’t have a new UJ available for this demonstration, so I cleaned up the old one and used it for the reinstall pics. Carefully insert the new trunnion into the bearing. It is very easy to displace needle bearings while doing this. Spongy resistance may be felt due to trapped air. Press the bearing and trunnion so that the bearing cap is slightly past the lock ring annulus. Install a new lock ring. The lock ring should look like this when fully engaged in the annulus.
__________________
- Jim - My Daily Driver is a 1969 Chevrolet Custom/20 Fleetside 350/TH400/Eaton H052 4.10 and its Project thread is here http://67-72chevytrucks.com/vboard/s...d.php?t=456911 Last edited by bollybib; 11-04-2011 at 08:06 PM. |
|
|
|
|
11-04-2011, 05:18 PM
|
#7 |
|
Registered User
Join Date: Nov 2010
Location: Carlsbad, CA
Posts: 1,584
|
Re: Universal Joint R&R
UNIVERSAL JOINT R&R (6 OF 6)
Press against the exposed trunnion face until the bearing is flush with the lock ring you just installed. Make sure the clamp face is super clean so you dont introduce debris. Dont force it. If the lock ring tangs are no longer flat against the bearing, youve gone to far. Press the second bearing in so that it is just shy of the end of the trunnion. Then guide the trunnion into the bearing. The trunnion should not fall out of the opposite bearing. This step is tricky for the novice and requires a bit of "feel". Needle bearings are easily displaced. If it isnt going well, walk away and do something else for a while. Carefully press in the bearing so the lock ring will engage, but no farther. Install the lock ring. Check to see that the assembly rotates freely by rocking the UJ back and forth. You should not feel any binding. If the bearings are pressed in too tightly, they can bind against the ends of the trunnions and feel stiff. It is possible that under load, the bearings will self-adjust in their bores, but I prefer to know that they were rotating freely before I reinstall the drive shaft. Thats it. The procedure is fairly simple. I seldom do this work, so I usually make a lot of mistakes and end up removing and installing the UJ a few times until everything looks and feels right. If you keep everything immaculately clean and havent forced anything, removing and installing a few times shouldnt cause any problems. The key is to think about what you are doing, go slowly, and dont lose patience. It looks like a simple job, but there are numerous pitfalls along the way. I hope this helps other once-in-a-while UJ installers like me. Please feel free to critique my procedure. Anything that helps the next guy is fine with me.
__________________
- Jim - My Daily Driver is a 1969 Chevrolet Custom/20 Fleetside 350/TH400/Eaton H052 4.10 and its Project thread is here http://67-72chevytrucks.com/vboard/s...d.php?t=456911 |
|
|
|
|
11-04-2011, 07:00 PM
|
#8 |
|
*** That's interesting ***
Join Date: Oct 2008
Location: Pittsburgh, PA
Posts: 2,772
|
Re: Universal Joint R&R
Great post! Thanks!
__________________
Tom Chevy by day... 1969 Chevy C30 Rollback Tow Truck -- 383 stroker, 4L80E 2011 Chevy Caprice PPV 9C3 6.0L 1995 Chevy Caprice 9C1 1994 Chevy Caprice 9C1 #3 1995 Chevy Caprice Wagon #2 1995 Chevy Impala SS Mopar by night... 1969 Dodge Charger 1972 Chrysler Newport 2dr Hardtop (27K miles) Plus others... |
|
|
|
|
11-04-2011, 07:24 PM
|
#9 |
|
Active Member
 Join Date: Jul 2007
Location: Centrally located between Houston, Austin and Waco. BCS area.
Posts: 7,947
|
Re: Universal Joint R&R
Good job.. We have a lot of young people that have never done this before. It's a lot easier to learn how to do the work with a photo step by step procedure.
|
|
|
|
|
11-04-2011, 08:29 PM
|
#10 | ||
|
Registered User
Join Date: Nov 2010
Location: Carlsbad, CA
Posts: 1,584
|
Re: Universal Joint R&R
Quote:
Quote:
__________________
- Jim - My Daily Driver is a 1969 Chevrolet Custom/20 Fleetside 350/TH400/Eaton H052 4.10 and its Project thread is here http://67-72chevytrucks.com/vboard/s...d.php?t=456911 |
||
|
|
|
|
02-11-2012, 04:55 PM
|
#11 |
|
Registered User
Join Date: Jul 2010
Location: Wilmington, DE
Posts: 639
|
Re: Universal Joint R&R
EXCELLENT tutorial Jim. Thank you. Just got my UJs apart! Do you happen to know what color the driveshafts were from the factory? Cast grey maybe?
|
|
|
|
|
02-11-2012, 06:24 PM
|
#12 |
|
Registered User
Join Date: Jul 2010
Location: Wilmington, DE
Posts: 639
|
Re: Universal Joint R&R
Havin a heck of a time getting this one apart. Any pointers?…
|
|
|
|
|
02-11-2012, 08:03 PM
|
#13 |
|
Active Member
Join Date: Jul 2007
Location: Centrally located between Houston, Austin and Waco. BCS area.
Posts: 7,947
|
Re: Universal Joint R&R
Almost look like they're welded on?
If they're just press fitted take it in to a driveline or machine shop. Sometimes it ain't worth the effort if they're really stuck and the cost to remove them may surprise you. Cost me $12.50 a few years back. |
|
|
|
|
02-11-2012, 10:14 PM
|
#14 | |
|
Registered User
Join Date: Jul 2010
Location: Wilmington, DE
Posts: 639
|
Re: Universal Joint R&R
I'm just talking about the U joints. There are 2 of them in this unit and it looks like a jigsaw puzzle, like you have to remove them in a certain order to get them all to come out. But I can't figure it out.
Quote:
|
|
|
|
|
|
02-11-2012, 10:32 PM
|
#15 |
|
Senior Member
 Join Date: Sep 2005
Location: Lewisville, Nc
Posts: 10,217
|
Re: Universal Joint R&R
great thread i love the harbor freight press as seeing i have the same one at work lol
__________________
David fuller Ase Certified Mechanic Click here to help support our board!! 1971 Chevy c-10 under going a 4.8l LSx swap Build Thread http://67-72chevytrucks.com/vboard/s...d.php?t=421305 2007 Honda Accord my daily 145kmiles 2002 Honda Accord 4 door With 330k(sisters car) 2005 toyota Avalon 228k( brothers car) 2002 Sububran 5.3 245k 2000 Tahoe 5.3l 378 General manager for Marco's Carwash & lube |
|
|
|
|
02-12-2012, 12:26 AM
|
#16 |
|
Registered User
Join Date: Jul 2011
Location: Des Moines, Iowa
Posts: 3,016
|
Re: Universal Joint R&R
Great write-up Jim! My UJ's have grease zerks.
__________________
project: "my happy mess" |
|
|
|
|
02-12-2012, 12:49 AM
|
#17 | |
|
~Rest In Peace~
Join Date: May 2005
Location: CALIFORNIA NOR CAL
Posts: 9,707
|
Re: Universal Joint R&R
Quote:
__________________
is it fast ? it has a lighting bolt donut? B___H please, I can remove 90% of your so called "beauty" with a kleenex |
|
|
|
|
|
02-12-2012, 09:36 AM
|
#18 | |
|
Registered User
Join Date: Jul 2010
Location: Wilmington, DE
Posts: 639
|
Re: Universal Joint R&R
Does anyone know what this extension is on the end of my drive shaft and how to get the U joints out of it?
Quote:
|
|
|
|
|
|
02-12-2012, 10:09 AM
|
#19 | |
|
Active Member
Join Date: Jul 2007
Location: Centrally located between Houston, Austin and Waco. BCS area.
Posts: 7,947
|
Re: Universal Joint R&R
Quote:
Here's instructions on disassembly I found: http://www.thedieselstop.com/faq/949...j/stj51007.htm Last edited by 68gmsee; 02-12-2012 at 10:15 AM. Reason: added info: |
|
|
|
|
|
02-24-2012, 11:04 AM
|
#20 | |
|
Registered User
Join Date: Nov 2010
Location: Carlsbad, CA
Posts: 1,584
|
Re: Universal Joint R&R
Quote:
__________________
- Jim - My Daily Driver is a 1969 Chevrolet Custom/20 Fleetside 350/TH400/Eaton H052 4.10 and its Project thread is here http://67-72chevytrucks.com/vboard/s...d.php?t=456911 |
|
|
|
|
|
02-24-2012, 11:06 AM
|
#21 | |
|
Registered User
Join Date: Jul 2010
Location: Wilmington, DE
Posts: 639
|
Re: Universal Joint R&R
I was finally able to get mine apart. Seems there's no 'trick' to getting them apart. Just patience.
Quote:
|
|
|
|
|
|
02-24-2012, 10:37 PM
|
#22 | |
|
Registered User
Join Date: Nov 2010
Location: Carlsbad, CA
Posts: 1,584
|
Re: Universal Joint R&R
Quote:
__________________
- Jim - My Daily Driver is a 1969 Chevrolet Custom/20 Fleetside 350/TH400/Eaton H052 4.10 and its Project thread is here http://67-72chevytrucks.com/vboard/s...d.php?t=456911 |
|
|
|
|
 |
| Bookmarks |
|
|


 Linear Mode

