
|
 09-14-2012, 12:19 AM
|
#51 |
|
Registered User
 Join Date: May 2011
Location: Murrieta, Ca
Posts: 70
|
Re: 1957 Chevy truck re-rebuild
I know I'm a little late to say this but I love your tail light setup you made
Posted via Mobile Device
__________________
55 gmc longbed stepside project http://67-72chevytrucks.com/vboard/s...28#post4708828 |

|

|
|
09-14-2012, 12:12 PM
|
#52 |
|
56 - autocross
Join Date: Apr 2010
Location: Camarillo, Ca
Posts: 1,121
|
Re: 1957 Chevy truck re-rebuild
The taillight set up is great. Have been looking for a good solution, and that might be it. Can we get a copy of the shape of the pieces? Do you have any pics and build of the rear bumper fill panel? Did you alter the bumper at all? Also, dont really understand the boltless rear system that hold the whole thing together.
Beautiful Fab work. Cant believe that I have not seen it until now. I want a torchmate. |
|
|
|
|
09-14-2012, 01:30 PM
|
#53 |
|
Registered User
Join Date: Aug 2012
Location: Salem Mo
Posts: 647
|
Re: 1957 Chevy truck re-rebuild
The last two posts on the taillights, Thanks guys. I'm relatively new to working on these old Chevy trucks and to build something I haven't seen before gets me a little nervous. Having posts that like the ideas always helps fuel the passion to keep going.
hotrod1, I can perhaps go one better on the taillight sheet metal... I still have the patterns for the 3 main sections of the housings, not including the circular part I made from 3 inch exhaust pipe. For a reasonable price, I can cut the sections on the torchmate and ship them to you. You would have to shape the outer flat to match the outer curve of the housing then weld it all together. Everything in the picture below for both sides, not including the round tubes. 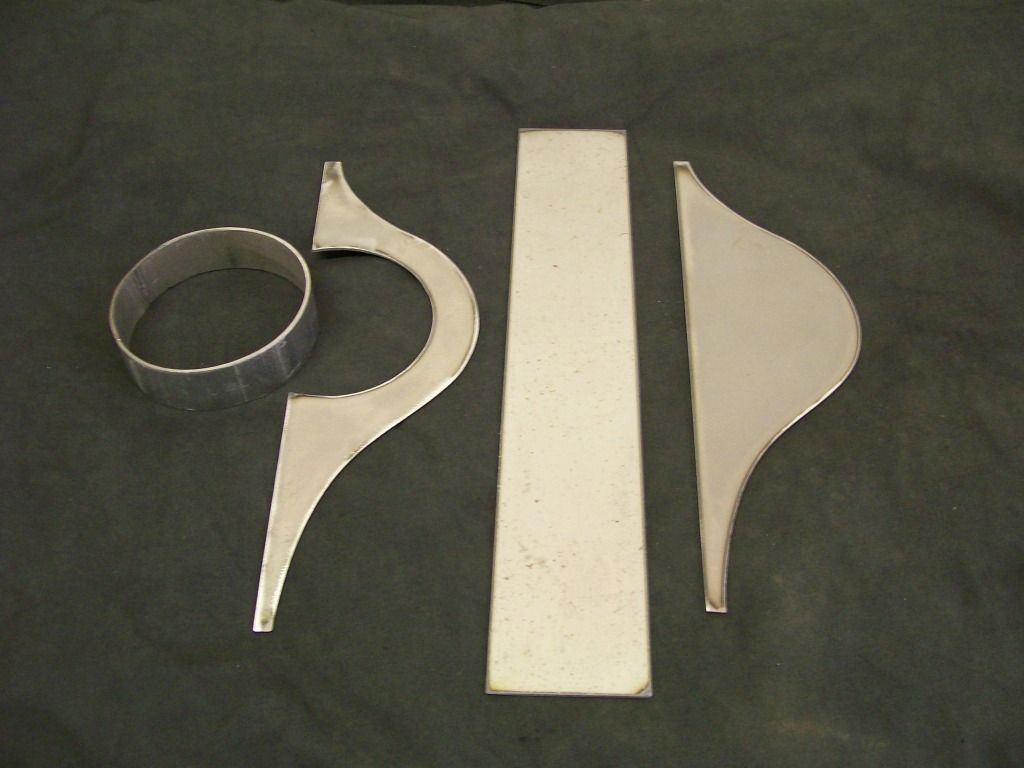 I also loaded the pics of making the eyebrows. I mentioned before, the main was cut from 4" exhaust pipe, it worked great, the near perfect curve is already there. I cut a small flange that would give me a flat flange to run a couple screws through to mount the eyebrow. 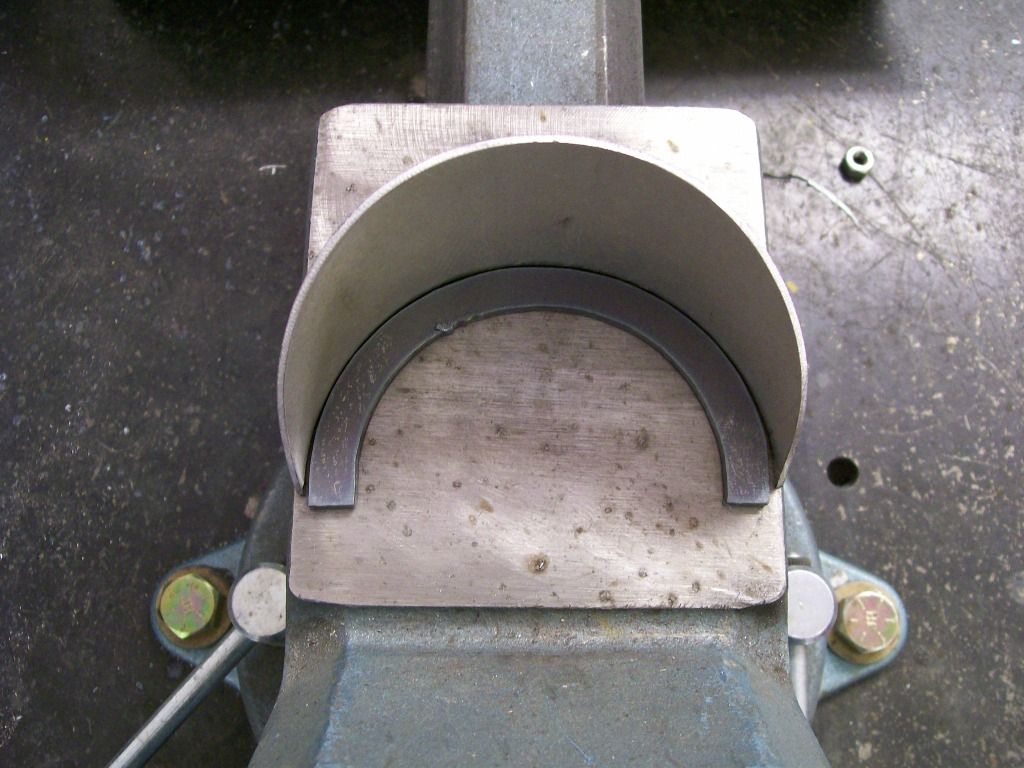 I welded the flange onto the eyebrow. I stitch welded, I didn't want to heat or burn through to the inside where I screw heads would be mating up to the flange. 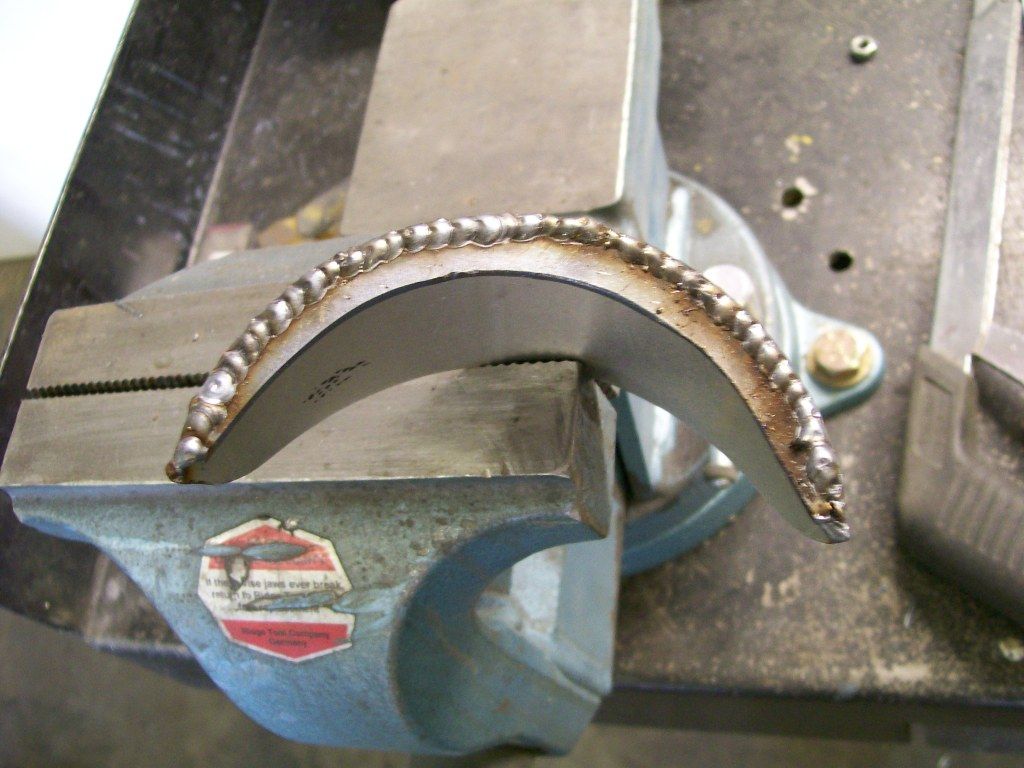 The 4 1/2" grinder with the 40 grit flap disc is my go to tool anymore, so agressive yet so fine at the same time. 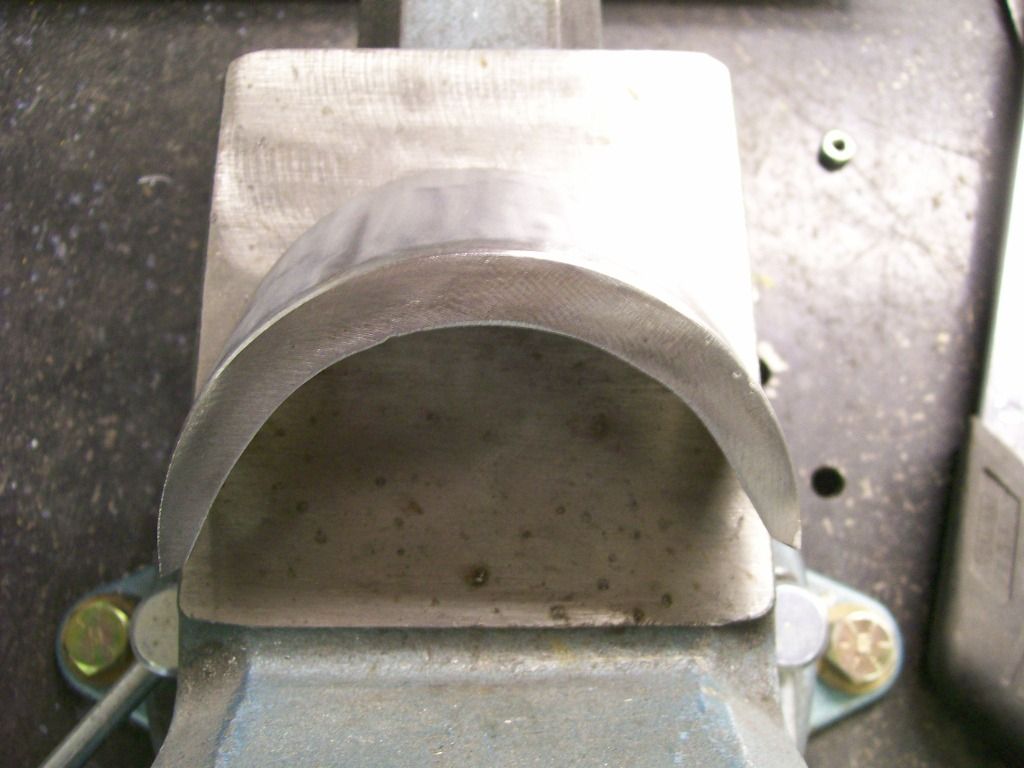 Perfectly clean on the under side of the weld. 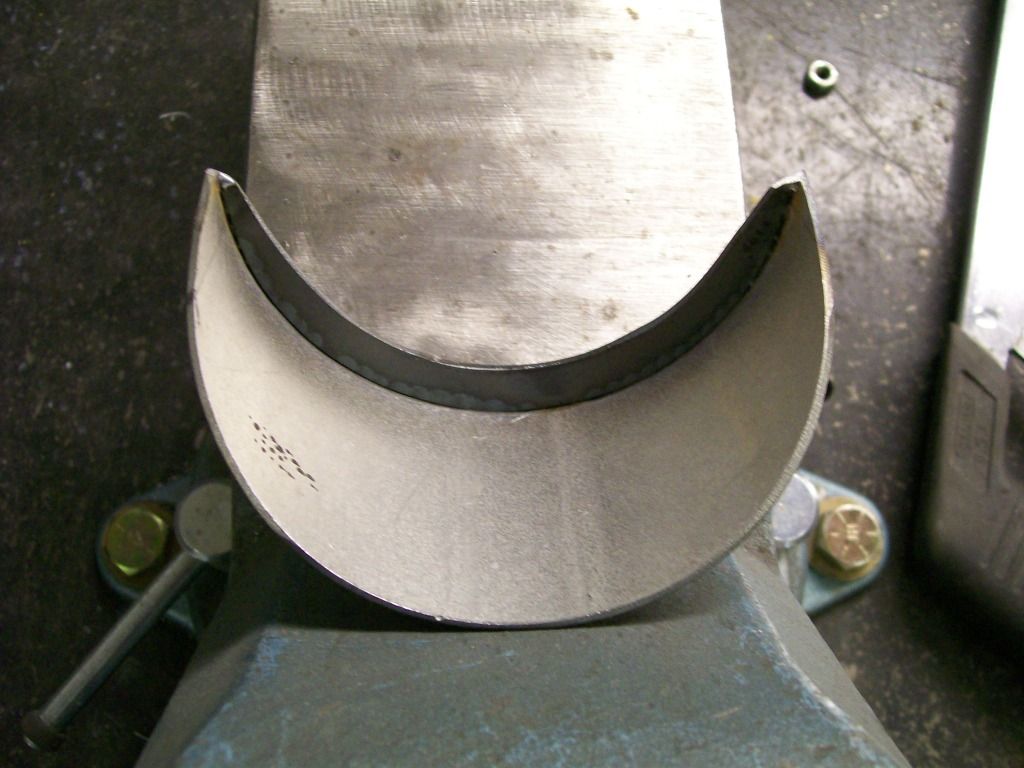 An idea of how it holds to the bed. Simply remove the two screws that hold the taillight in place, remove the tailight, now hold a nut on the backside and tighten the eyebrows with a scredriver. 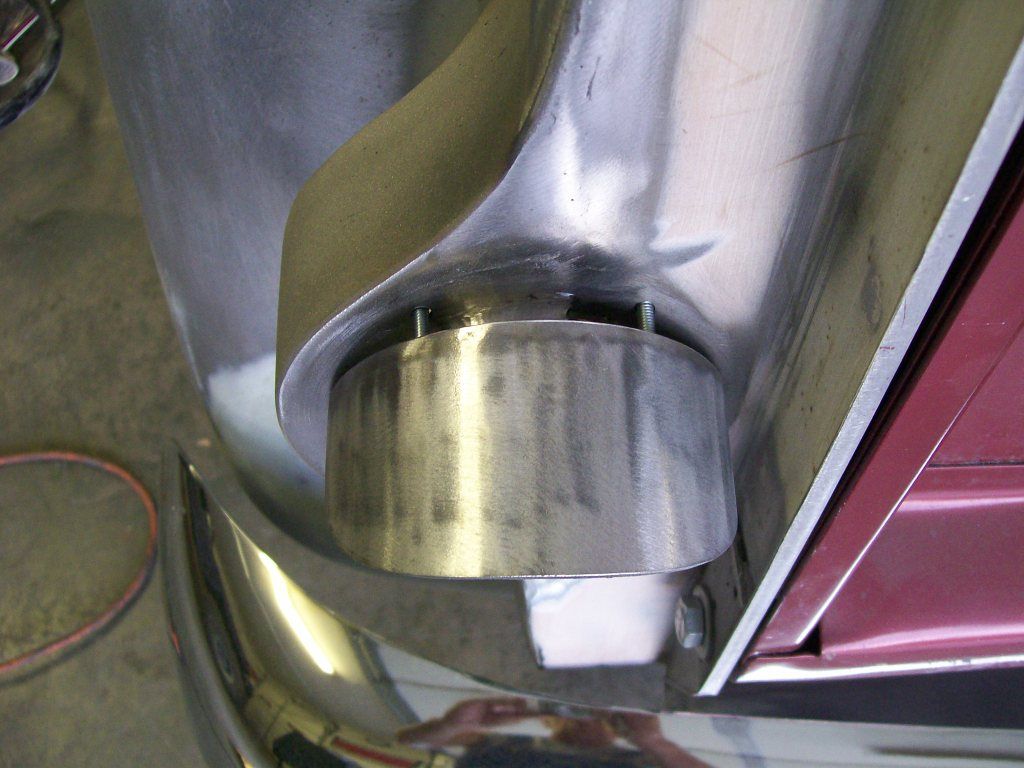 I need to load more pics, hope this helps so far. |
|
|
|
|
09-14-2012, 02:31 PM
|
#54 |
|
Registered User
Join Date: Jun 2006
Location: Idaho
Posts: 8,800
|
Re: 1957 Chevy truck re-rebuild
Inspiring fabrication on the exhaust and taillights, keep the photos and detailed descriptions coming.
__________________
1959 Chevy Short Fleetside w/ 74 4WD drive train (current project) OrrieG Build Thread 1964 Chevelle Malibu w/ 355-350TH (daily driver) Helpful AD and TF Manual Site Old Car Manual Project |
|
|
|
|
09-14-2012, 06:09 PM
|
#55 |
|
Registered User
Join Date: Aug 2007
Location: Corona, California
Posts: 7,998
|
Re: 1957 Chevy truck re-rebuild
For being new at these old trucks you sure do have some great ideas and skill that we all can appreciate and draw inspiration from.
Kim |
|
|
|
|
09-15-2012, 12:40 PM
|
#56 | |
|
56 - autocross
Join Date: Apr 2010
Location: Camarillo, Ca
Posts: 1,121
|
Re: 1957 Chevy truck re-rebuild
Quote:
Stepside Jim: Thanks for that generous offer. I appreciate it. I am still looking at other options but will let you know. How did you get rid of the bolts that hold the rear cross member (underneath the tailgate) to the side of the fenders? I am also curious about your roll pan. Looks great. |
|
|
|
|
|
09-15-2012, 07:05 PM
|
#57 | |
|
Registered User
Join Date: Aug 2012
Location: Salem Mo
Posts: 647
|
Re: 1957 Chevy truck re-rebuild
Quote:
Oh yeah, I remember those bolt holes. There were the ones for the taillight brackets and the ones that held the bed together, and I think a couple others also. Let's just say the bed isn't coming apart very easy now. With all the bolts removed, I simply welded all the holes shut while at the same time welding everything together.  I'll get the pictures for the roll pan up soon. It started with a piece of 16 guage sheet metal with a 90 degree bend. The pictures will be well detailed once I get them posted. |
|
|
|
|
|
09-15-2012, 08:40 PM
|
#58 |
|
Registered User
Join Date: Mar 2012
Location: Vail AZ.
Posts: 104
|
Re: 1957 Chevy truck re-rebuild
Awesome workmanship, do keep the photos coming your doing a great job.
|
|
|
|
|
09-15-2012, 10:24 PM
|
#59 |
|
Registered User
Join Date: Aug 2012
Location: Salem Mo
Posts: 647
|
Re: 1957 Chevy truck re-rebuild
Before I get to the roll pan, I'm going to finish the transmission crossmember.
Once I shaped the top and bottom plates to match the side plates I fully welded all four plates together. Then carefully grinding with the 4 1/2" grinder I cleaned the welds to where the whole crossmember looks like one tube bent to this shape. 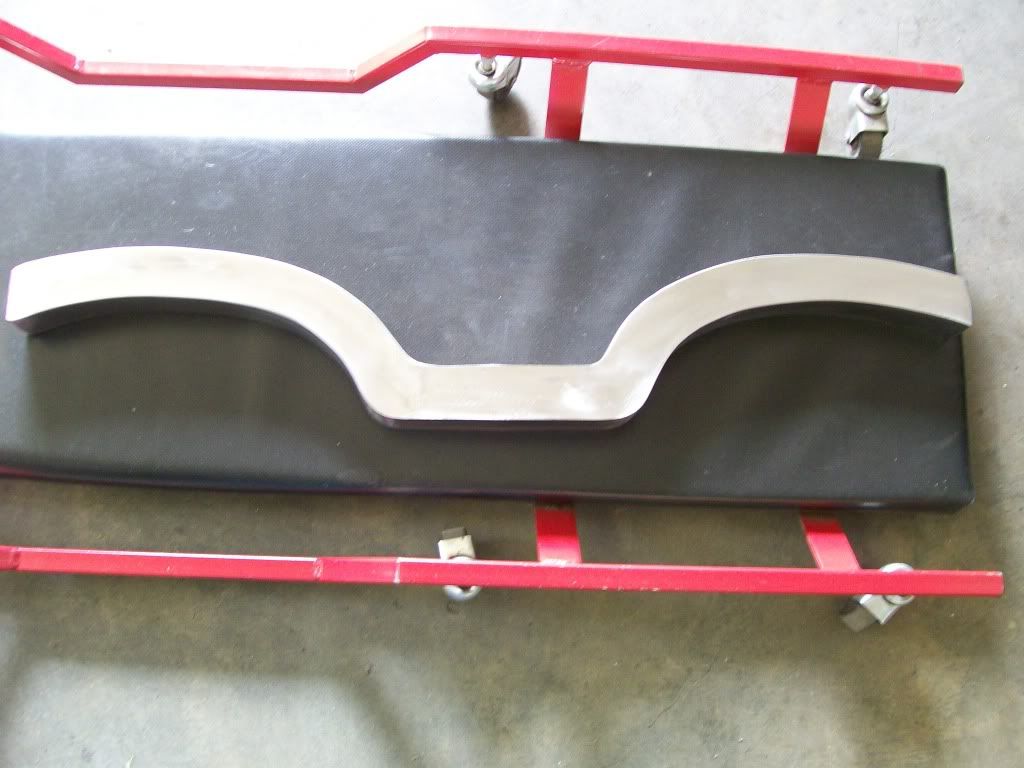 Once I was pleased with the main structure I just had to create the mounting pads on the ends and the center mount tab for the transmission. One thing I won't do without is a sandblaster. It is more than just a way to clean rust. Often times after welding and grinding there is the grinding marks to deal with. I like the sandblasting because it removes the markings from the grinding and now the surface consistancy is pleasing to the eye. 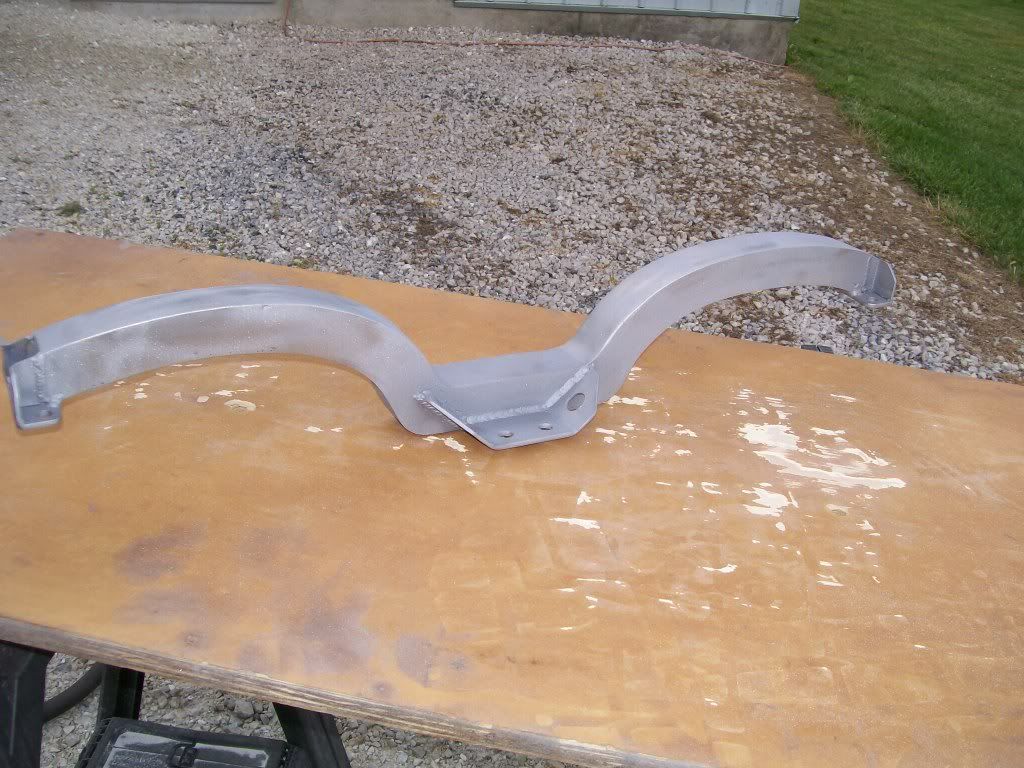 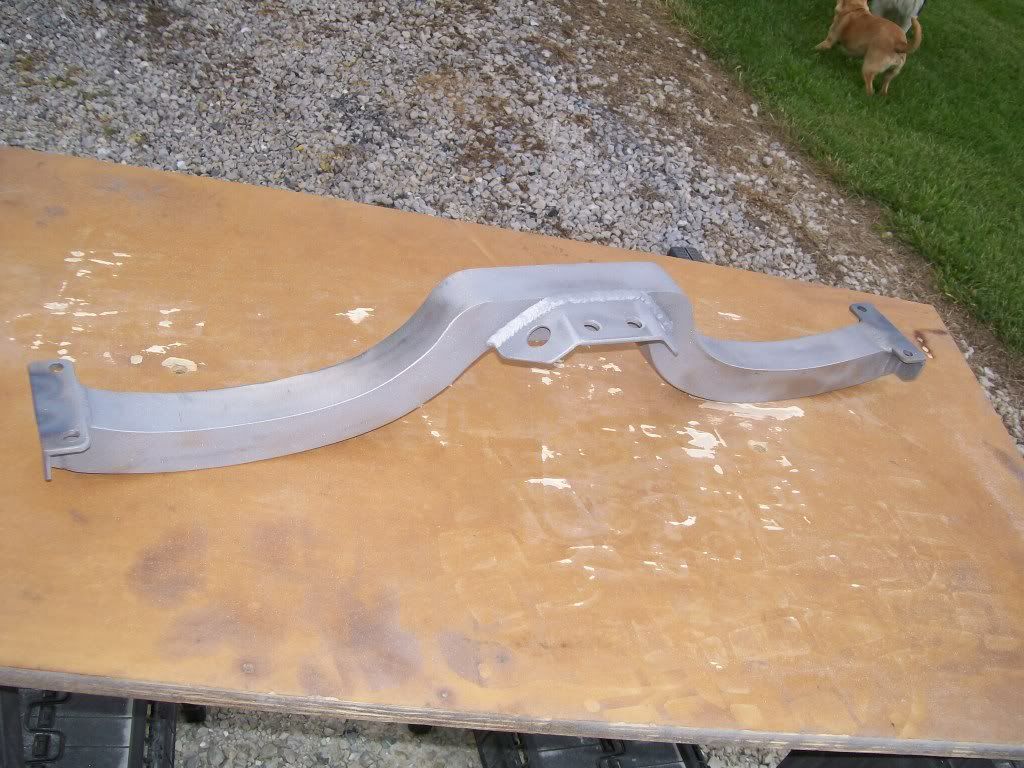 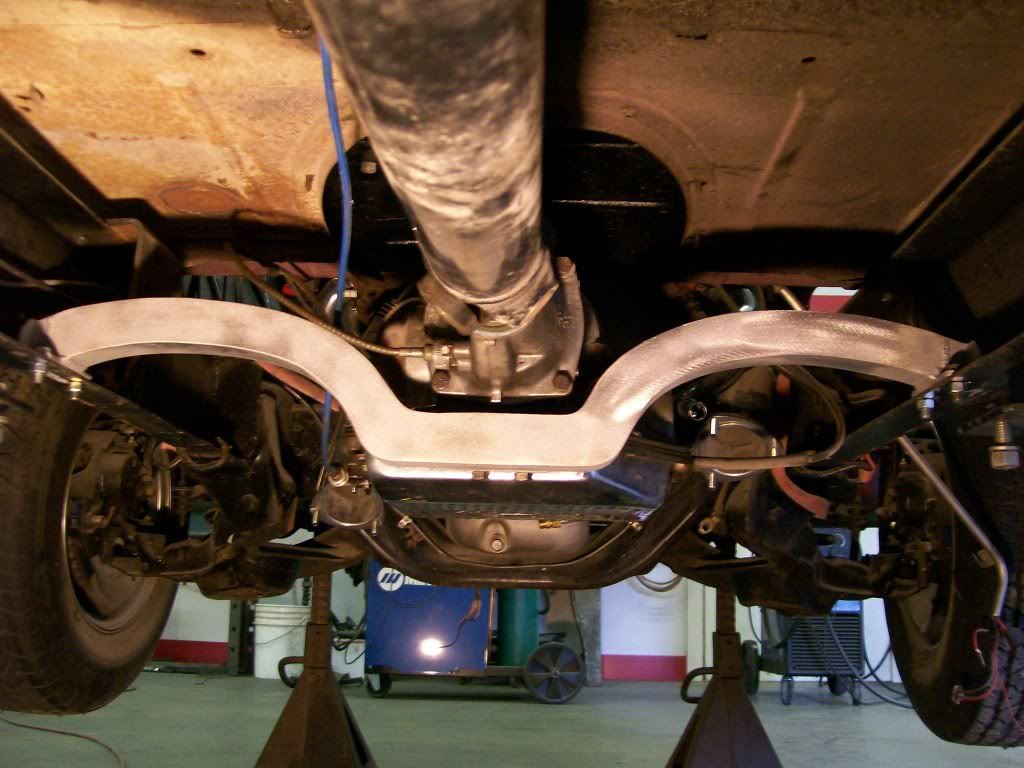 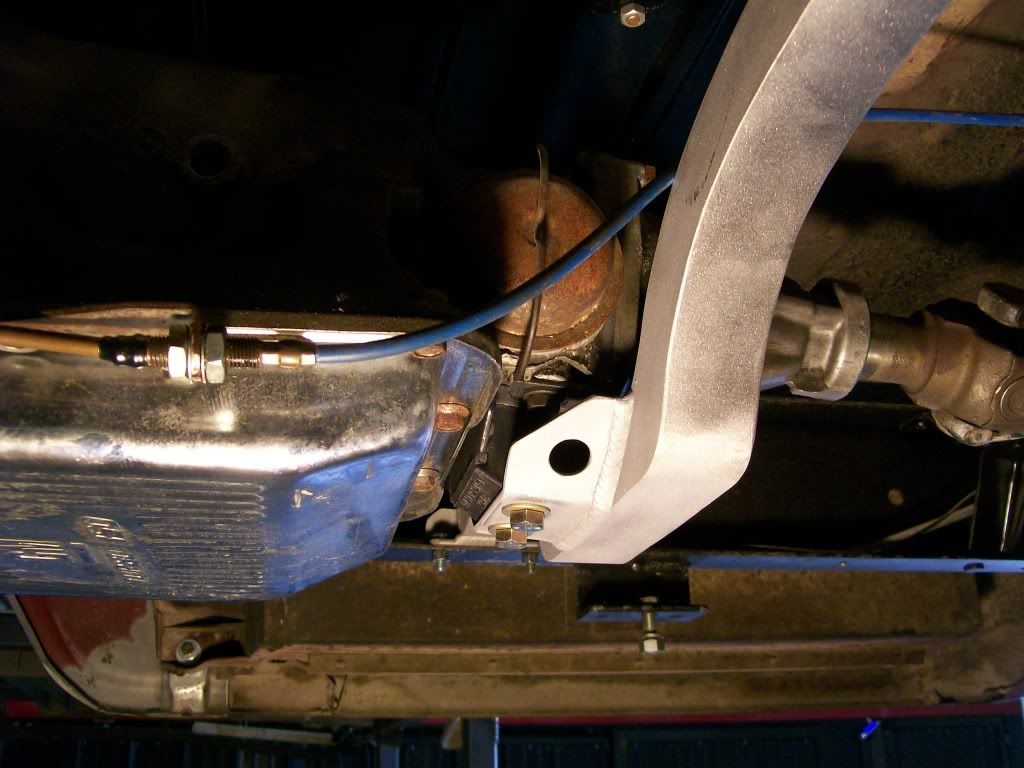 The sandblasting also leaves a good surface for most primers and coatings. |
|
|
|
|
09-16-2012, 12:03 AM
|
#60 |
|
Registered User
Join Date: Aug 2007
Location: Corona, California
Posts: 7,998
|
Re: 1957 Chevy truck re-rebuild
Real nice work.
Kim |
|
|
|
|
09-17-2012, 10:00 AM
|
#61 |
|
Registered User
Join Date: Aug 2012
Location: Salem Mo
Posts: 647
|
Re: 1957 Chevy truck re-rebuild
Earlier I went through the shortening and raising the rear bumper brackets. One thing I really like about bringing the rear bumper forward is that now the rear bumper pretty well matches the way front bumper comes around and overlaps the side fenders.
This was something that the other bumper did that was on here before but it was from a different/newer vehicle. The original front has a rounded look to it, and one that was on it had a square look to it. It just didn't match. Before I started working on this truck I never paid attention to the original fit of the rear bumper and I never noticed there wasn't a filler panel to fill the open area between the bumper and the bed. Time to fill the gap.... Once I got the bumper where I wanted it I grabbed a piece of bent 16 guage sheet metal I had left over. My original intention was to use this as a mock up, then have another one bent that will replace the experiments that I will do while building the filler panel. I ended up using this piece although I had to do some axtra welding, at least I don't have to start all over making another piece. Here's the gap. 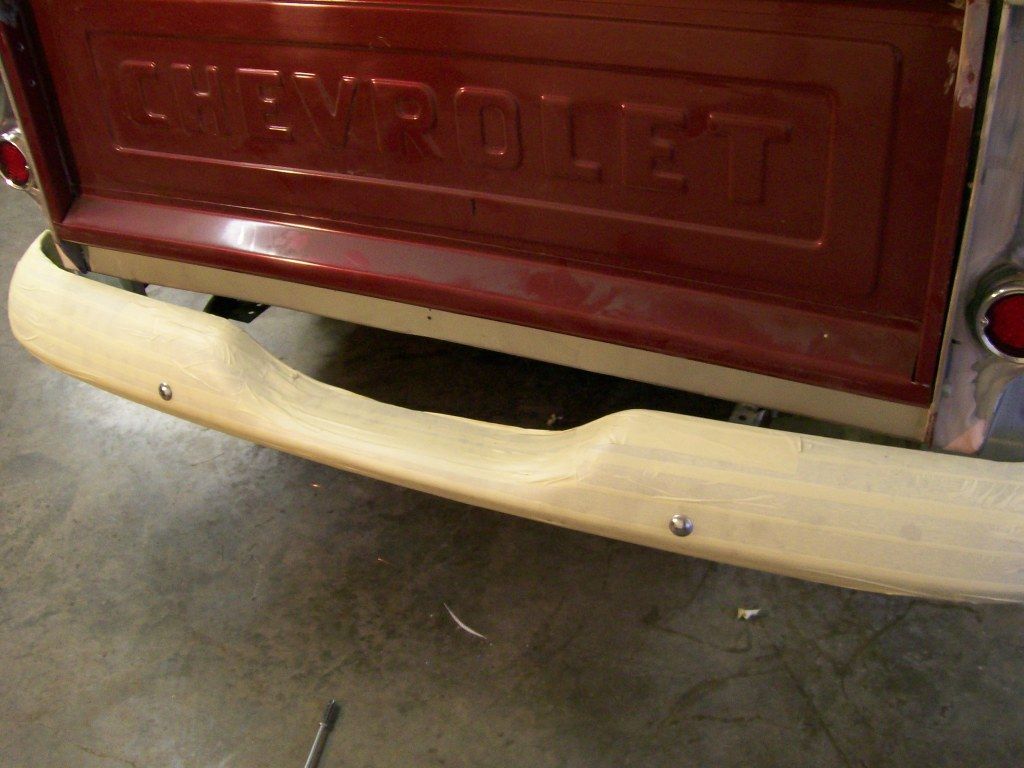 Starting with the old panel, and a piece of sheet metal. I had to get the flow of the drop in the bumper. 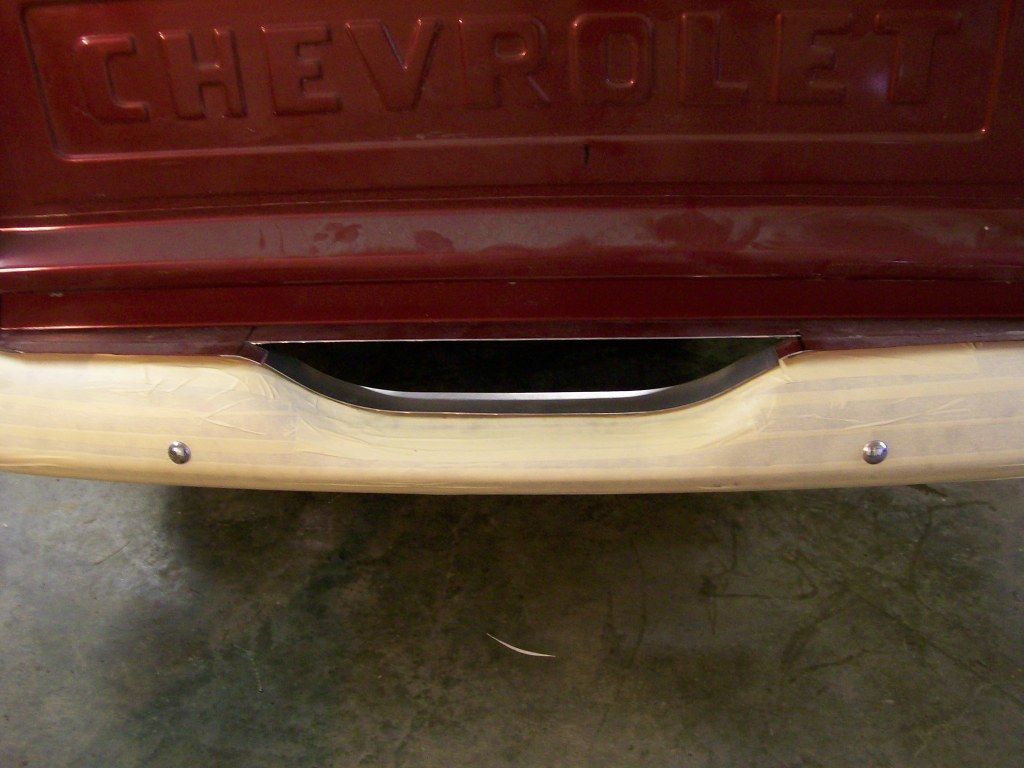 Now to attach the two. Using the triangle I'm assured the new piece is aligned with the rest of the panel. If this isn't squared up, the rest of this is not going to line up later. 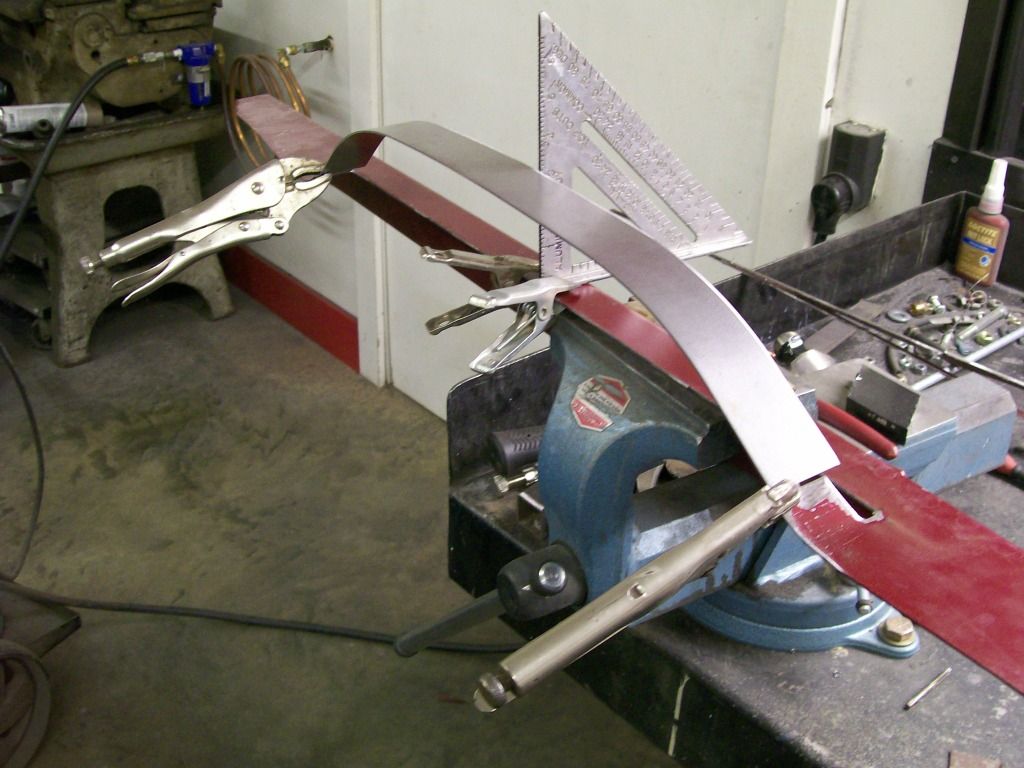 With this next picture you can see the need to keep the alignment when welding this together. The two side wedges would not be straight up and down and would be visible later. 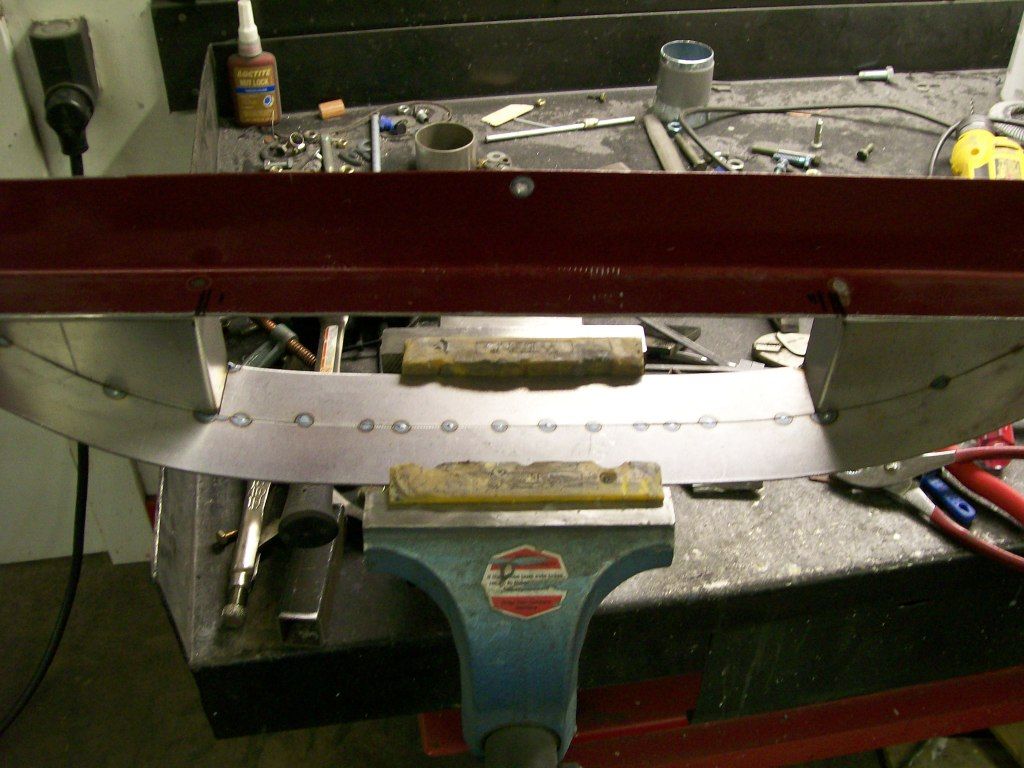 Now to enclose the open area. 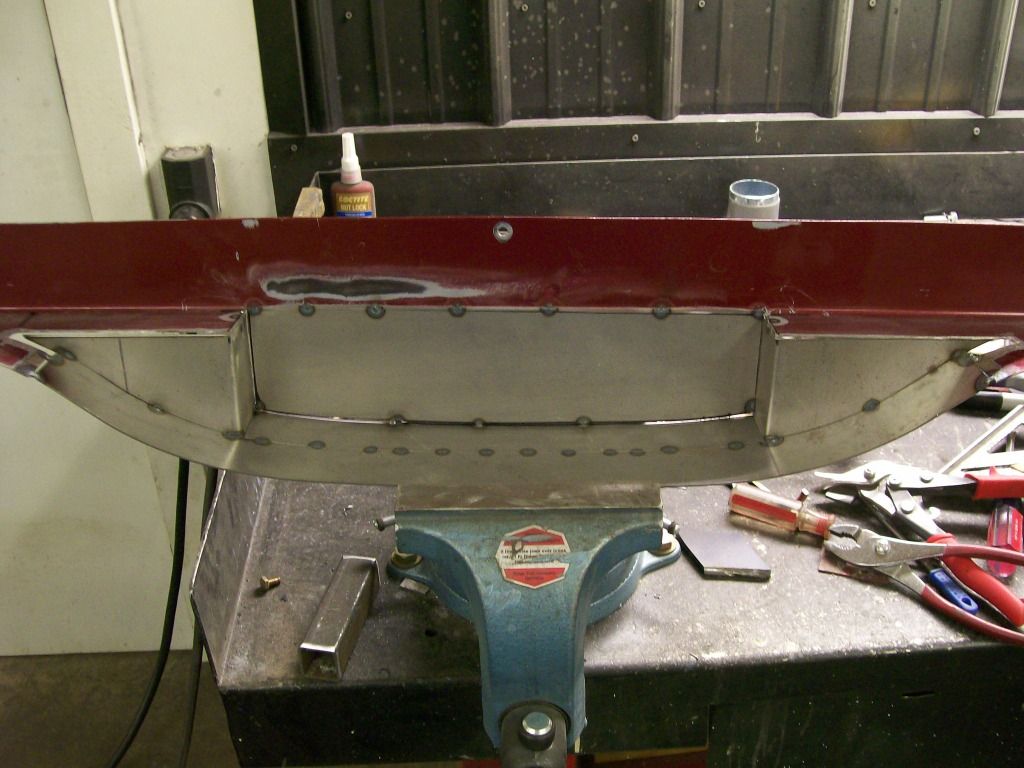 More to folllow. |
|
|
|
|
09-17-2012, 02:27 PM
|
#62 |
|
Registered User
Join Date: Jan 2012
Location: Motown
Posts: 7,670
|
Re: 1957 Chevy truck re-rebuild
nice work
__________________
cool, an ogre smiley  Ogre's 58 Truk build Ogre's 58 Truk buildhow to put your truck year and build thread into your signature shop air compressor timer |
|
|
|
|
09-17-2012, 02:34 PM
|
#63 |
|
Registered User
Join Date: Aug 2012
Location: Salem Mo
Posts: 647
|
Re: 1957 Chevy truck re-rebuild
I got more pictures loaded, dial-up.........
When I mentioned starting with a new piece, you can see why. I had to add material to get the coverage I needed which added to the welding and grinding. All in all, I'm happy with how it's coming along. 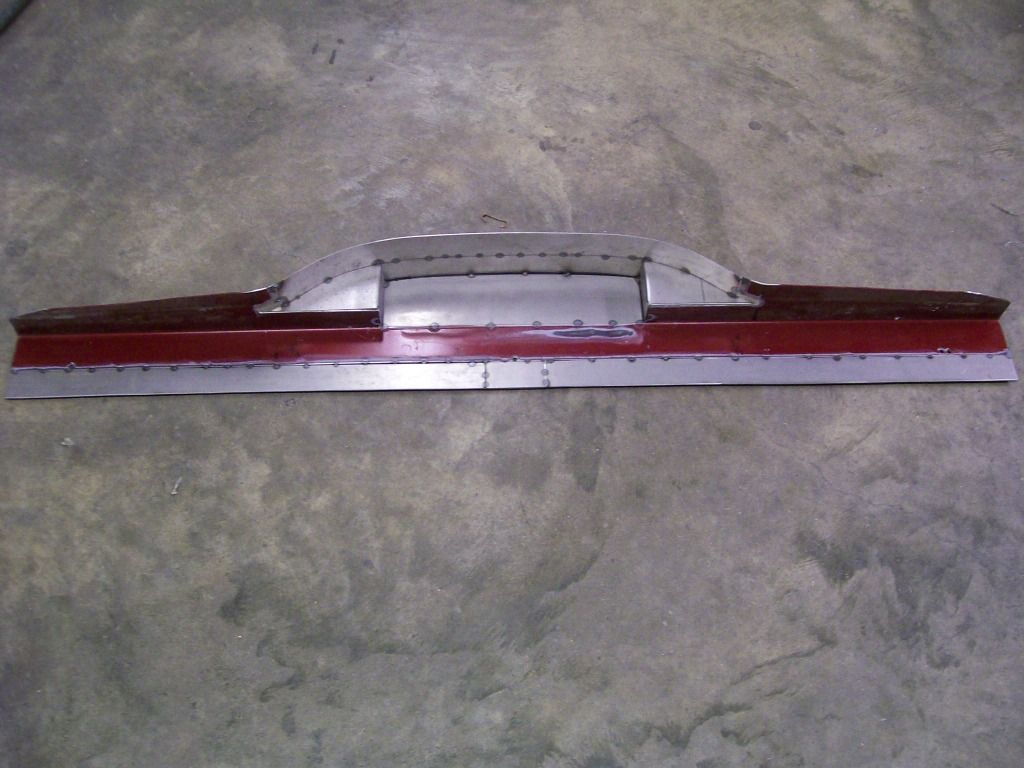 Welding sheet metal can be an ugly chore, but it must be done. 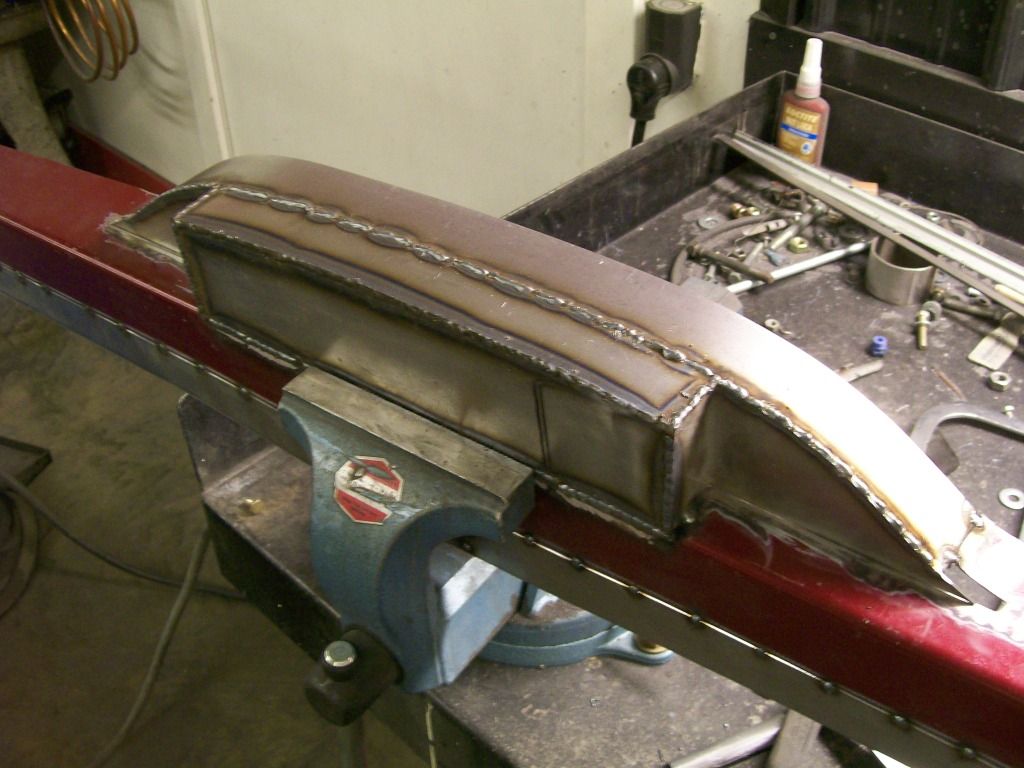 After some of the grinding. 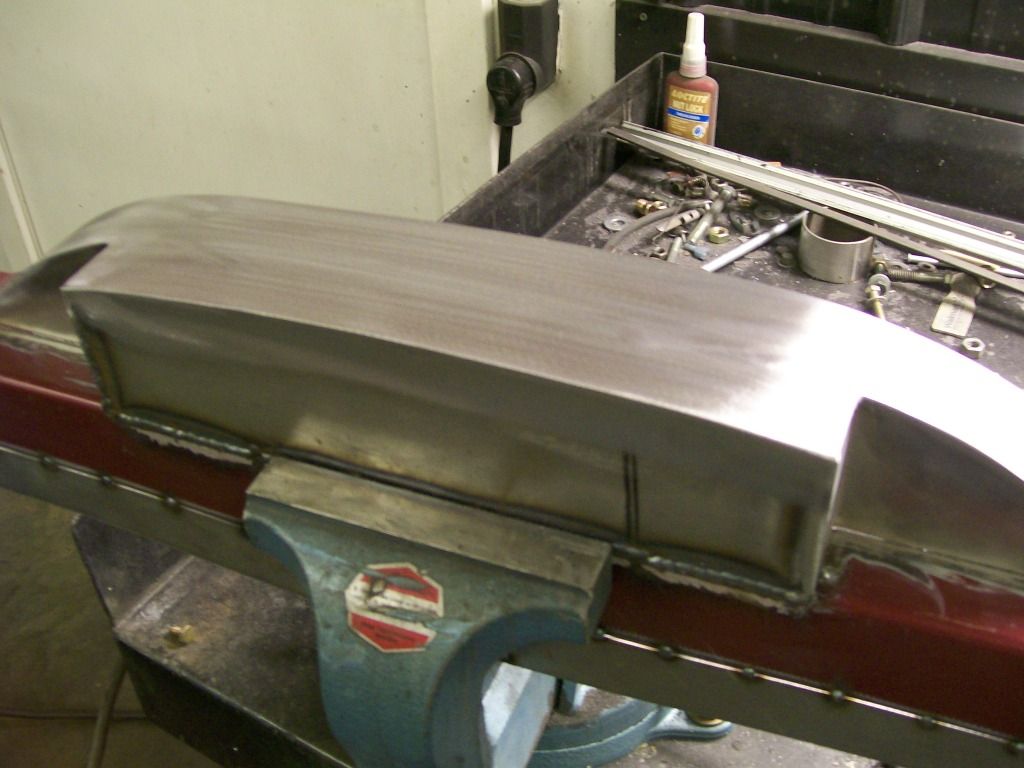 Another picture of a different angle of the back end. 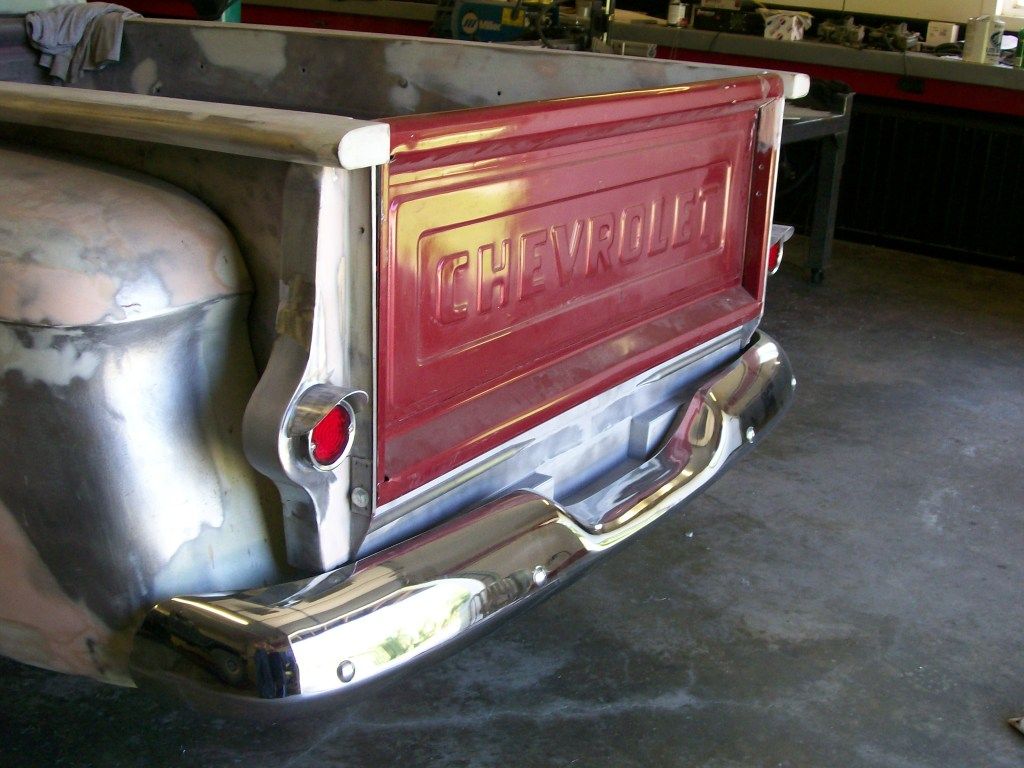 As for the mounting strips, this is one of the 3/4" tubes I cut and used them as mounting hardware for the filler panel. It needs to be cleaned up, but this should show how it works. I just had to drill holes to match the screws in this mounting spear. 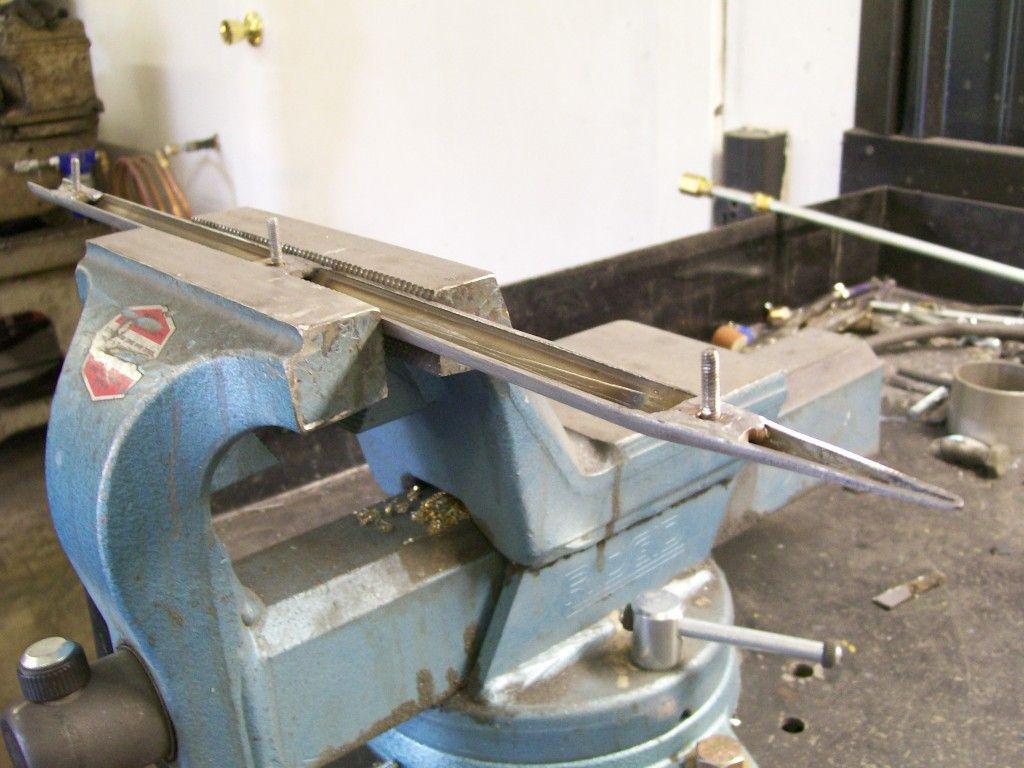 A view from below. I also noticed once mounted, the panel was not stable on the bottom so I made a support to hold it steady. One thing I've learned over the years is the problem of fatigue, anything that is allowed to vibrate will sooner or later start to fracture welds. Looking into the bed channel, you can see the screws from the mounting spear coming through. 
|
|
|
|
|
09-17-2012, 02:50 PM
|
#64 |
|
56 - autocross
Join Date: Apr 2010
Location: Camarillo, Ca
Posts: 1,121
|
Re: 1957 Chevy truck re-rebuild
Wow! I think your attention to detail is great. You have described it and have taken pictures that make it clear and very understandable. It looks great! Thanks again for sharing, as it is very inspiring.
By the way, how did you get those tubes cut so even and straight down the middle? |
|
|
|
|
09-17-2012, 03:11 PM
|
#65 | |
|
Registered User
Join Date: Aug 2012
Location: Salem Mo
Posts: 647
|
Re: 1957 Chevy truck re-rebuild
Quote:
I drew a straight line and followed it with a thin cut off wheel on the 4 1/2" grinder. It seems no matter what I do anymore, my 4 1/2" grinder is always by my side. I was stubborn with my old 7" grinder, but once I changed to the 4 1/2" with either the cut off wheel or a flap disc, the detail of my work increased. |
|
|
|
|
|
09-18-2012, 07:00 PM
|
#66 |
|
Registered User
Join Date: Aug 2012
Location: Salem Mo
Posts: 647
|
Re: 1957 Chevy truck re-rebuild
Back in the 80's when this truck was worked on, the side fender emblems and the hood emblem were removed and the holes were welded shut.
SInce I'm trying to build somewhat of a sleeper project, I have no problem having the side fender and the hood emblems back in place. I've looked at the replacement emblems in the catalogs, for some reason they didn't fit my bulid. Not physically but the theme I'm going for. I've had an idea of making my own but didn't know exactly where I wanted to head with the idea. I knew I wanted to be around 18" long and about 2 1/2" high, similar to the originals. Now what design? How do I fill this space? What material do I use? ect, ect. I focused on a big oval shape, now what to fill the oval with? Then I thought the engine size, 396 would look great. I sat at the computer for hours then I had an idea. This first idea was going to be 3 layers. A base, an oval design then the 396. 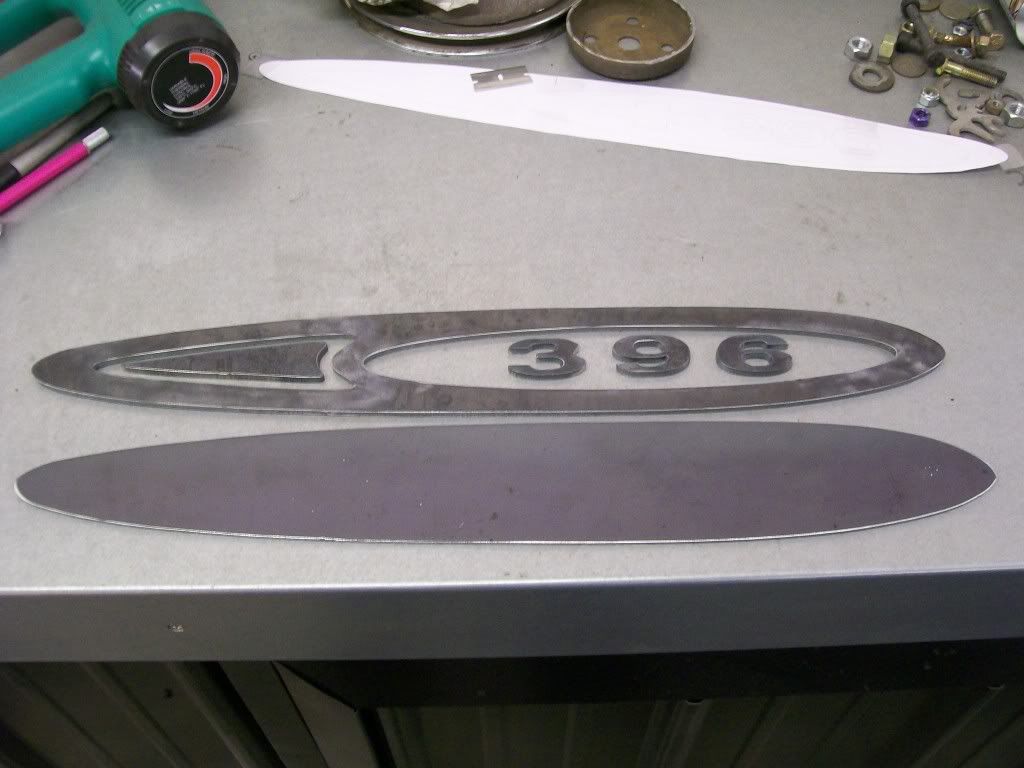 The oval design and the numerals would be tack welded from the backside to the base. Similar to how this picture looks assembled. 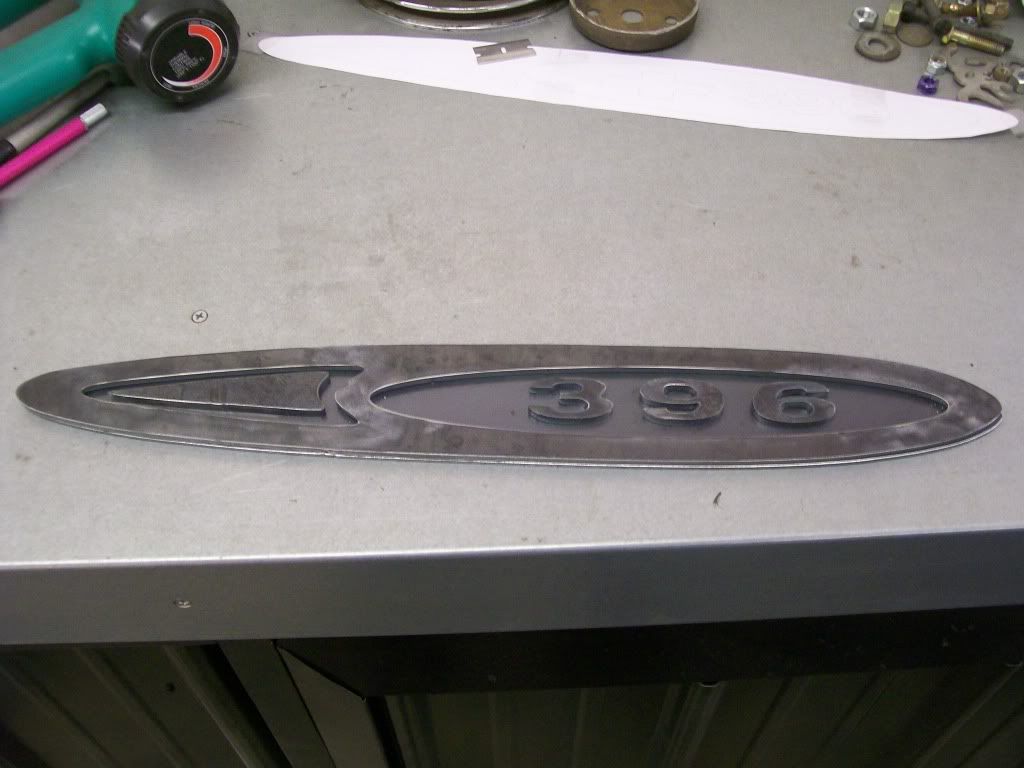 Although this fills the need I still have issues. It is made of plain steel, I'd have to have it chromed. What a pain it would be to arrange all the pieces then weld them. Anyway, it just got complicated. Life lesson.... this is the point to where many would throw in the towel. Every project we build is going to have these road blocks, it is how we handle these road blocks that determine what we will end up with when done. Back to the drawing board for me. I need something that will be one cut, no welding, no layers. I settled on stainless steel, I stayed away up to this point because I could polish the top but I had no way of polishing the inner crevises. Then I let my brother know about it and he metioned electro-polishing stainless. Yes, this I will try. I redesigned the emblem. I have the oval, I have the 396 I have the 18" long plus I used the idea of an arrow to support the numbers to rest of the emblem. I like the arrow since the original word back in '57 was apache, I figured the arrow would ok. Here it is, the passenger side, not polished yet. 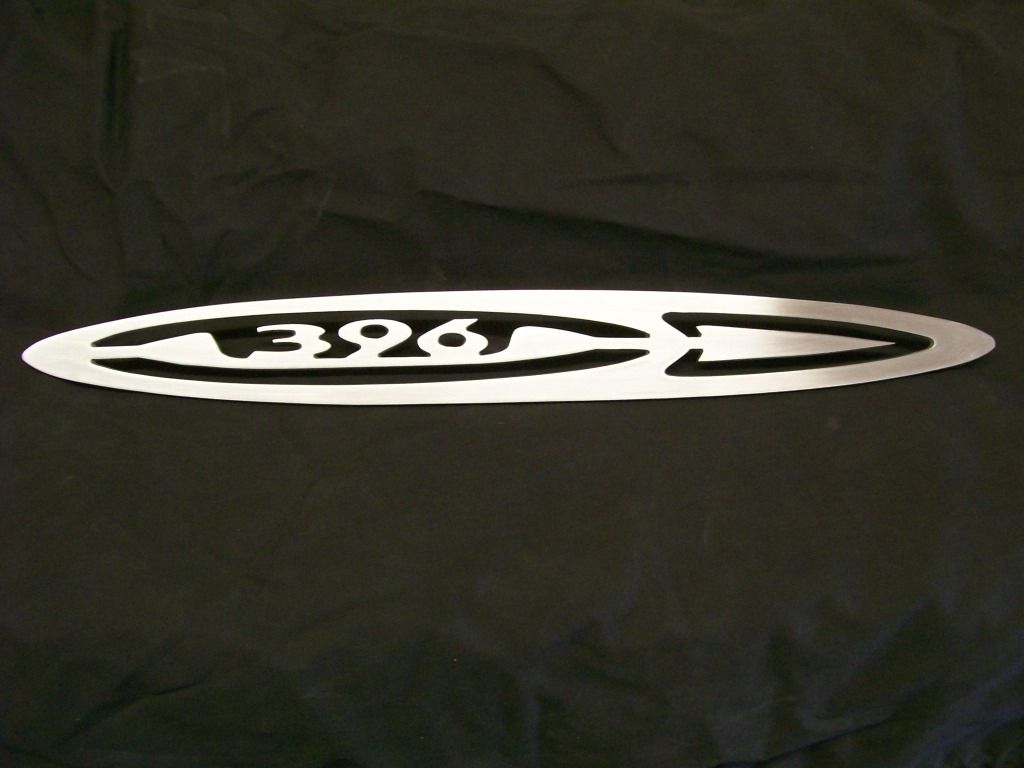 I wasn't sure how this was going to turn out, otherwise I would have welded the mounting screws before I did the cleaning to this point. 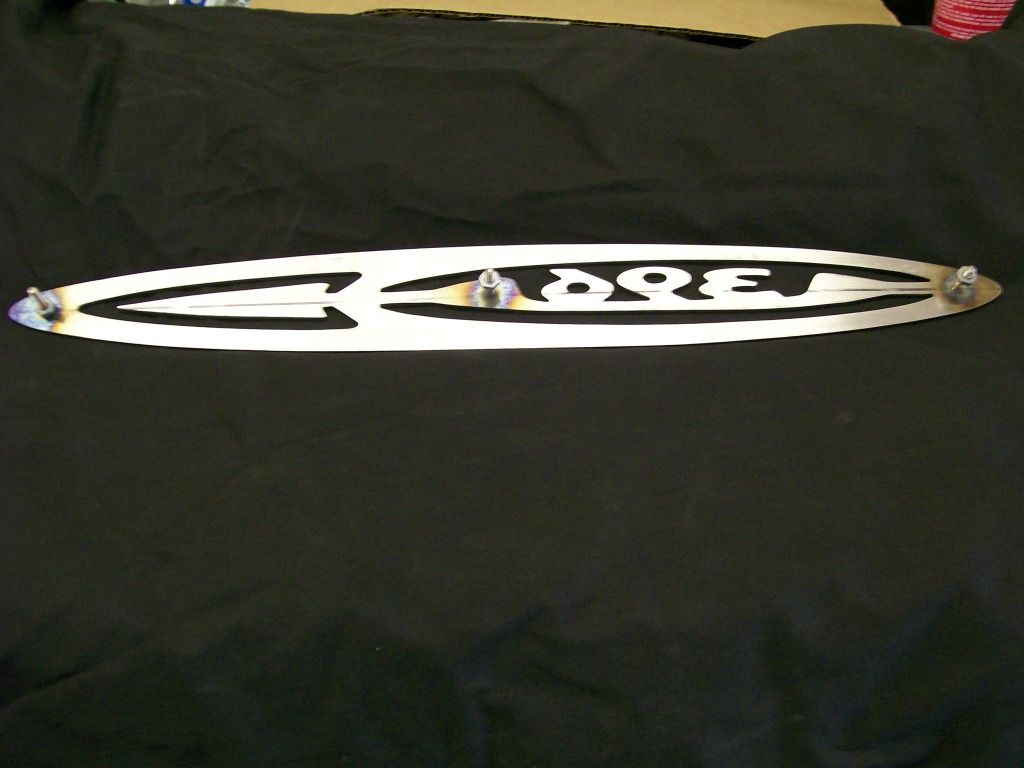 I then sent it off for the electro polishing. The electro polishing did great in all the crevices. I could have spent a little more time getting rid of some of the fine surface scratches on the top facing before electro polishing, under some lighting I could see fine scratches, I took 2000 grit paper to the top surface only then buffed and hand polished. I'm happy but I might want to go with a thicker material. The main point is, I broke down a barrier and expanded my abilities. I laid it on the front fender of a Willys truck to give some idea if the size of the emblem. 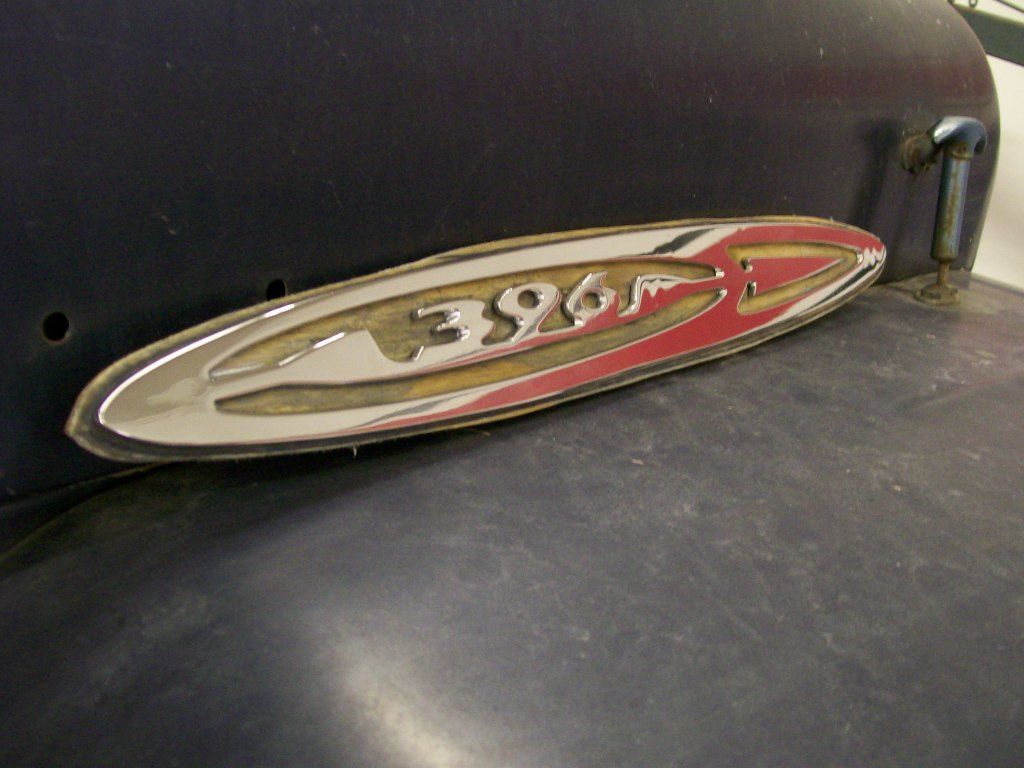 After this last picture I block sanded the emblem and repolished to get a near perfect surface. The joy is not being restricted to only buying polished cosmetics for my builds anymore. Last edited by Stepside Jim; 09-18-2012 at 07:06 PM. |
|
|
|
|
09-18-2012, 08:25 PM
|
#67 |
|
Registered User
Join Date: Aug 2007
Location: Corona, California
Posts: 7,998
|
Re: 1957 Chevy truck re-rebuild
That came out real nice.
What did you use to cut it out? Kim |
|
|
|
|
09-18-2012, 10:26 PM
|
#68 |
|
Registered User
Join Date: Nov 2011
Location: Victorville, CA
Posts: 469
|
Re: 1957 Chevy truck re-rebuild
Those look really good.
Posted via Mobile Device |
|
|
|
|
09-19-2012, 06:04 AM
|
#69 |
|
Registered User
Join Date: Aug 2012
Location: Salem Mo
Posts: 647
|
Re: 1957 Chevy truck re-rebuild
Thanks Blue57.
Kim57, the cut is made by a plasma cutter. It's not as fine a cut as I'd like, meaning it has a burnt edge that does require some manual labor getting it clean looking as in the pictures. Especially stainless seems to have the dirtiest edges vs cutting aluminum or regular steel. But it does get you close enough to build stuff like these emblems. I keep using the term Torchmate, for an idea of what the Torchmate does, for those not familiar, it is a computer controlled unit that replaces your hand and guides the plasma cutter by a design you program into a lap top computer. For me, someone who knew nothing about computer aided design, it took months of determination to figure out how to design something like this emblem. Once I got it figured out, I use it very frequently now. Most everything I built starts with a shape made from construction paper, then to the scanner to the computer, then to the cutting table. Or as with the emblem, I had had to use individual design features and create the numbers and shapes then assemble them all on the computer as one cut design. There are other cnc cutters like the Torchmate now, the choices have grown in the last couple years. Still the same idea of a computer controlled plasma wand. For an idea of mine, you can see the hand held wand clamped to a fixture that is operated by a couple electric moters that operate the movement of the fixture. The computer operates the movement and it controls the turning on and off of the cutter also. 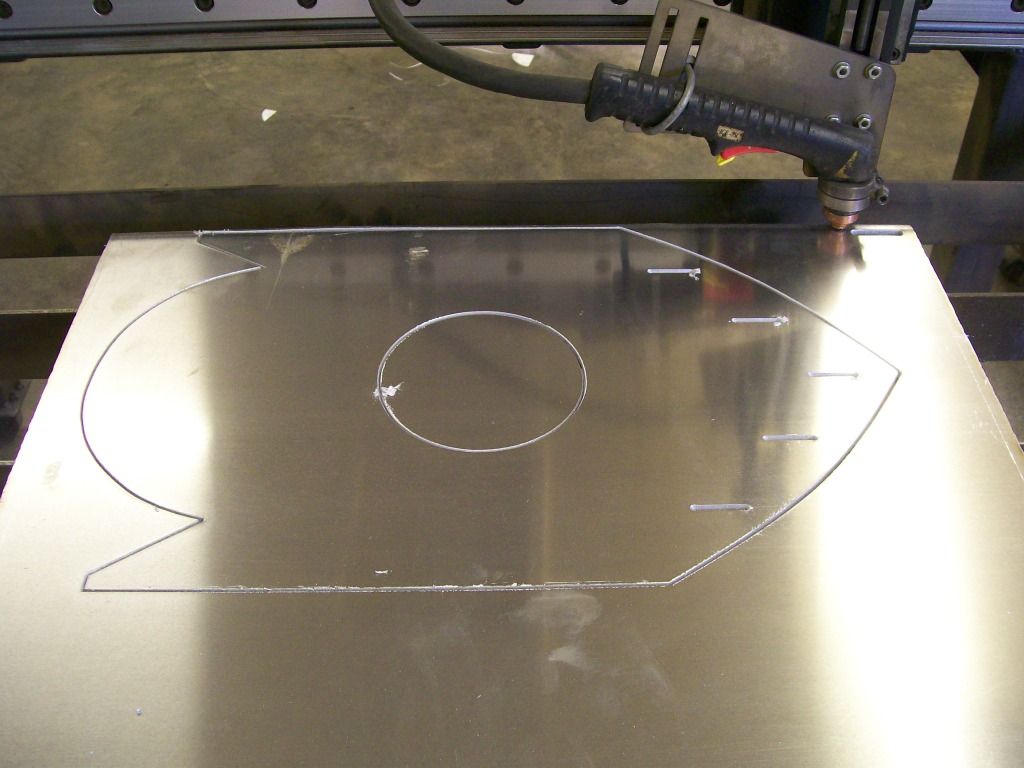 Me, the programmer decide the path, the speed of the cut to match the thickness of the material and which cut will be made when. For instance, you wouldn't want to cut the outer diameter of this plate in the next picture first, then the inner cuts. Always cut the inners first, otherwise the outer piece cut could fall away before making the inner cuts. Kim, you probably are familiar with most of this, I just wanted to cover it for those who may not be familiar with these units.
|
|
|
|
|
09-19-2012, 10:16 AM
|
#70 |
|
Registered User
Join Date: Nov 2011
Location: Langley, BC
Posts: 702
|
Re: 1957 Chevy truck re-rebuild
Looks good. I saw a Torchmate demonstration about 3 months ago at a local tool store. It was the 2'X2' unit and it worked well. Problem is they wanted $6000.00 for it up here. It looks like you're running it with a Miller plasma cutter. If so, what model? I have a 675 extreme and if I ever have a weak moment I may just buy a Torchmate. I was thinking maybe I could earn some extra cash making custom parts for people to offset the cost a bit.
__________________
56 Chevy PU http://67-72chevytrucks.com/vboard/s...d.php?t=531955 Question: Know how to sell your truck for $50,000? Answer: Spend $100,000 building it. |
|
|
|
|
09-19-2012, 10:29 AM
|
#71 |
|
Registered User
Join Date: Aug 2007
Location: Corona, California
Posts: 7,998
|
Re: 1957 Chevy truck re-rebuild
That's pretty cool. Wish I had one in my garage.
Kim |
|
|
|
|
09-19-2012, 12:25 PM
|
#72 |
|
Registered User
Join Date: Sep 2009
Location: Monroe,Iowa
Posts: 4,370
|
Re: 1957 Chevy truck re-rebuild
All I can say is "WOW" your attetion to detail is #1
it's the little things that stand out and will need to be pointed out to the unknowing! |
|
|
|
|
09-19-2012, 01:51 PM
|
#73 |
|
Registered User
Join Date: Aug 2012
Location: Salem Mo
Posts: 647
|
Re: 1957 Chevy truck re-rebuild
Chevette, I'm impressed you can tell it's a Miller just by the picture,
it's a Spectrum 2050. Yes they are expensive, no I am not rich by no means. The Torchmate came to me by means that I didn't have to pay for it. As a matter of fact, it was technology I was afraid of, I accually denied accepting it for a while. What I have learned over the last couple years is God will put you in a uncomfortable situation to grow you and improve you. Once I accepted the uncomfort of having to learn how to use this equipment my abilities grew at the same time. Once my abilities grew, then my desire to always do my best grew. Indian113, you hit it on the head. I have a couple of items to post yet. It is a great pleasure to create items that you have to convince people that it's an original piece made at home. |
|
|
|
|
09-19-2012, 02:29 PM
|
#74 | |
|
56 - autocross
Join Date: Apr 2010
Location: Camarillo, Ca
Posts: 1,121
|
Re: 1957 Chevy truck re-rebuild
Quote:
By the way GOD, I am not wishing for ANYTHING different. You have to make sure that you are specific when u ask for something as you might get something else. |
|
|
|
|
|
09-19-2012, 02:47 PM
|
#75 | |
|
Registered User
Join Date: Nov 2011
Location: Langley, BC
Posts: 702
|
Re: 1957 Chevy truck re-rebuild
Quote:
__________________
56 Chevy PU http://67-72chevytrucks.com/vboard/s...d.php?t=531955 Question: Know how to sell your truck for $50,000? Answer: Spend $100,000 building it. |
|
|
|
|
 |
| Bookmarks |
|
|


 Linear Mode

