
|
 07-22-2008, 06:45 PM
|
#126 |
|
Registered User
Join Date: Dec 2007
Location: Johnson City TN
Posts: 570
|
Re: Ackattack's Pro touring restoration thread
i think those wheels are a good choice.. there very similar to my 20's on my 68..
__________________
My build thread--http://67-72chevytrucks.com/vboard/s...d.php?t=300333 |

|

|
|
07-23-2008, 01:19 PM
|
#127 |
|
Registered User
Join Date: Oct 2006
Location: Oshkosh, WI
Posts: 101
|
Re: Ackattack's Pro touring restoration thread
I'm interested in what you did to the core support if you have any pictures.
Nice project so far! |
|
|
|
|
08-11-2008, 12:43 AM
|
#128 | |
|
Senior Member
Join Date: Aug 2002
Location: Valley Center KS
Posts: 3,525
|
Re: Ackattack's Pro touring restoration thread
Quote:
Been busy with a deck project....but I finally got some time to work on the truck a little. I guess first, yesterday I made the trip over to Olympia for the 67-72 chevy truck board meeting that Classic Heartbeat put on. While I was there I got some parts from various people. Got a good driver side door, passenger b pillar patch, passenger lower rear fender extension thing, a set of wheel wells, and a 1 piece window kit. So today I continued on my tubbing the wheel wells, since I got the set of wheel wells. First I cut the wheel well in half and bolted them in place. 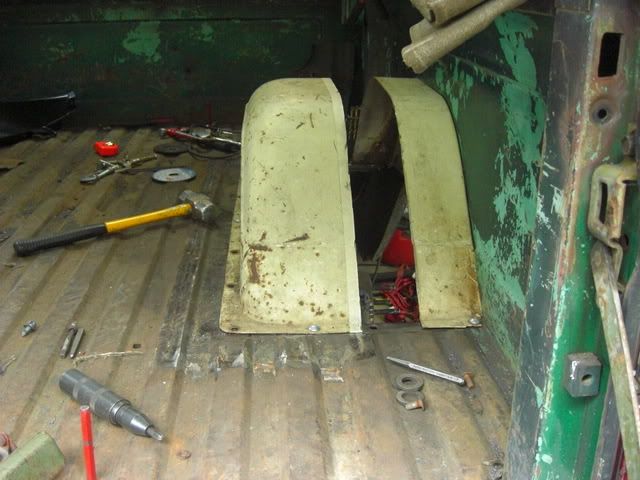 Then I took my old wheel well and figured out what section of it I'd need to use, and cut that out. Then I slid it in place, and marked and cut it to fit in between the two halves of the "new" wheel well. Then started welding in the mid section. It was mis-aligned ever so slightly, so I had to make a few relief cuts to the everything to line up the way I wanted it to. 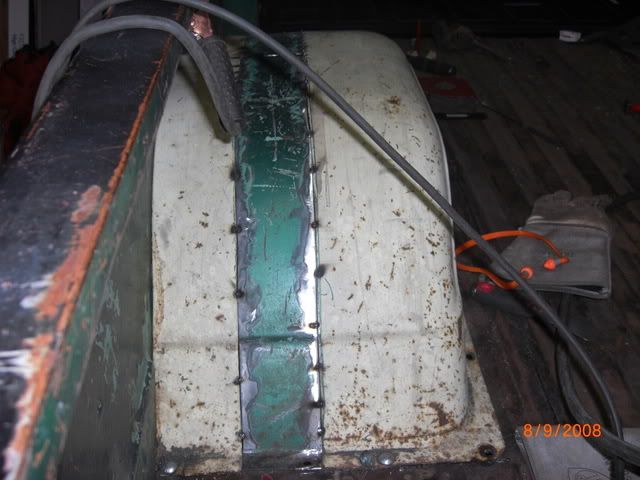 Then I took out it out so I can finish up the welding (another day). I snapped a pic next to the stock one just for comparison. 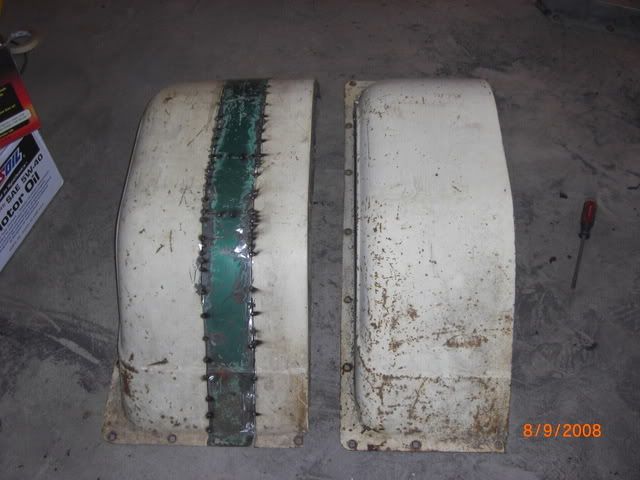
|
|
|
|
|
|
08-14-2008, 12:51 AM
|
#129 |
|
Senior Member
Join Date: Aug 2002
Location: Valley Center KS
Posts: 3,525
|
Re: Ackattack's Pro touring restoration thread
A little more progress: I got the passenger side inner rocker/floor sheet metal tacked into place. I must be getting better cause this went in pretty darn fast and lines up real nice. So since it went in so fast I also had time to get the lower b-pillar patch tacked into place. Based on how much this inner rocker/floor extension covers, I don't think I'm going to replace the floor sheet metal. All the through rust was removed, so the rest of the floor is just surface rust. I'd rather keep as much original metal as possible. I'll just clean up the surface rust and the POR15 it.
Good news: I got a phone call from the company I ordered my wheels from, and they've gotten them from the manufacturer. But, I'm doubting the tires I really want are available yet, so I'm just going to have them send me the wheels now, and I'll get the tires once they become available or find a different option. More orders have been place. I ordered an Old Air A/C setup. I saved a little money off of the usual "kit" since I already have a compressor and condensor. I may have a little trouble getting all the lines made up; or it won't be a simple bolt in affair anyways. I also got a set of longer u-bolts so I can get the nuts on  Also ordered some little knick knack parts that should be here in a few days....stuff like tailgate handle/rod clips and screws, stainless steel carraige bolts for the bed, radiator rubber pads and upper brackets, and a few other things. I talked to a sales lady from Checkmate Tonneau cover about getting one of their covers. I have to do some measurements first, then i can order it. |
|
|
|
|
08-22-2008, 10:17 AM
|
#130 |
|
Senior Member
Join Date: Aug 2002
Location: Valley Center KS
Posts: 3,525
|
Re: Ackattack's Pro touring restoration thread
I've gotten a little time this week to work on the truck, and I've made decent progress. I got the front cab support in place, the kick panel and inner rocker/floor in place, as well as the lower b-pillar. I also have the rear cab support cut to the right size and ready to weld in. So after that's put in, I'll just have the lower A-pillar, outer rocker, and cab corner.
Good news from the brown Santa! I got my wheels yesterday! Of course I mounted them up. Sorry, no pics, my internet at home is down  The back wheels really fill the wheel well. However, with the tires on, I don't think I'll have the clearance to have the bags dumped unless I mod the wheel well of the fenders too (as some have pointed out). The back wheels really fill the wheel well. However, with the tires on, I don't think I'll have the clearance to have the bags dumped unless I mod the wheel well of the fenders too (as some have pointed out).On the front, I was thinking, and getting concerned that I went with too little backspacing (4.25), but with no fenders or wheel wells (or tires) I can't tell at this point. I may also have to mod those fenders as well. On thing I will have to do. get longer wheel studs. The mounting flanges on these wheels is pretty thick, so I'm only getting a few thread engagements. I'm kinda thinking that if I really have to, I can have the mounting surface machined down to give me some additional backspacing (maybe 1/4"...so I don't even know if it would be worth it) I guess we'll see when I get the fenders on. I'm kinda debating on whether to put stock brakes on it for now, or continue to wait for the Kore3 big brake kit that is supposed to be coming out. |
|
|
|
|
08-22-2008, 12:00 PM
|
#131 | |
|
Registered User
Join Date: Apr 2001
Location: DALLAS,TX
Posts: 21,910
|
Re: Ackattack's Pro touring restoration thread
Quote:
__________________
67SWB-B.B.RetroRod 64SWB-Recycle 89CCDually-Driver/Tow Truck 99CCSWB Driver All Fleetsides @rattlecankustoms in IG Building a small, high rpm engine with the perfect bore, stroke and rod ratio is very impressive. It's like a highly skilled Morrocan sword fighter with a Damascus Steel Scimitar..... Cubic inches is like Indiana Jones with a cheap pistol. |
|
|
|
|
|
08-22-2008, 02:14 PM
|
#132 | |
|
Senior Member
Join Date: Aug 2002
Location: Valley Center KS
Posts: 3,525
|
Re: Ackattack's Pro touring restoration thread
Quote:
|
|
|
|
|
|
08-22-2008, 07:29 PM
|
#133 |
|
Senior Member
Join Date: Aug 2002
Location: Valley Center KS
Posts: 3,525
|
Re: Ackattack's Pro touring restoration thread
So here are the pics!
front wheels  rear wheels: 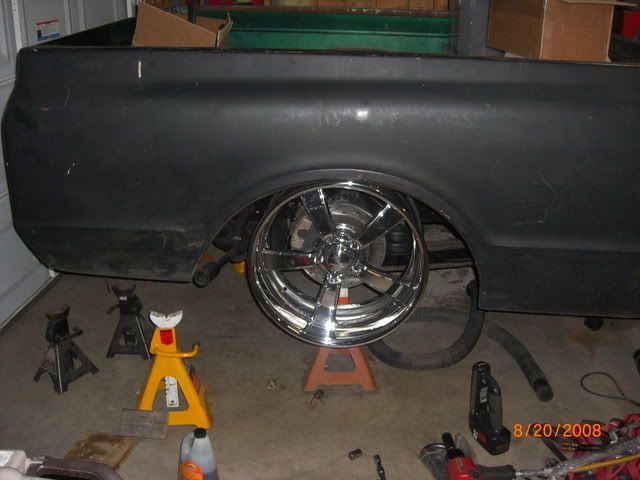 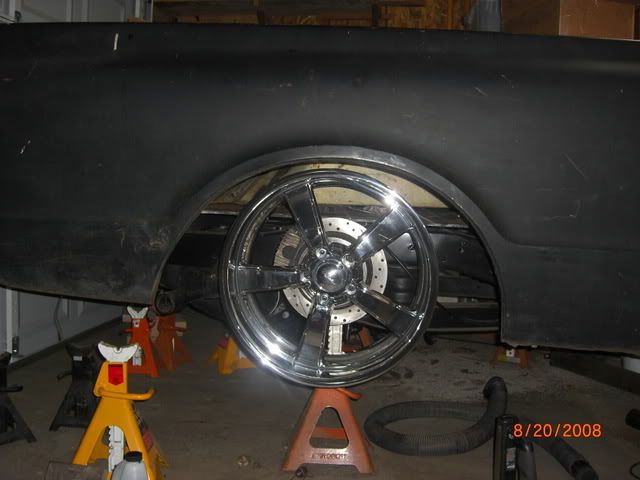 This shows how close the wheel lip is to the inner fender  And the lip 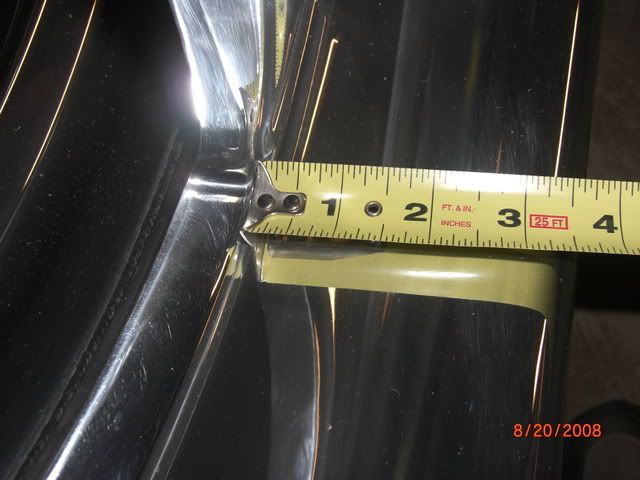 And here are some repair pictures: 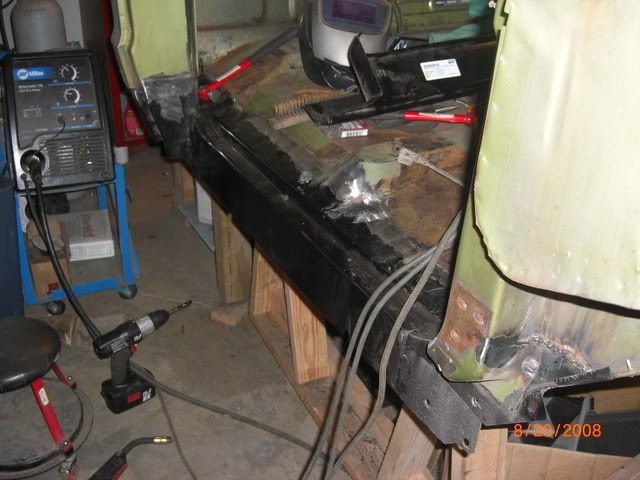 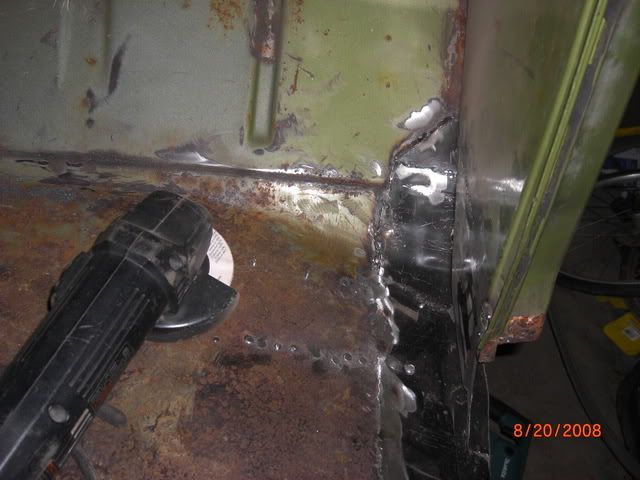 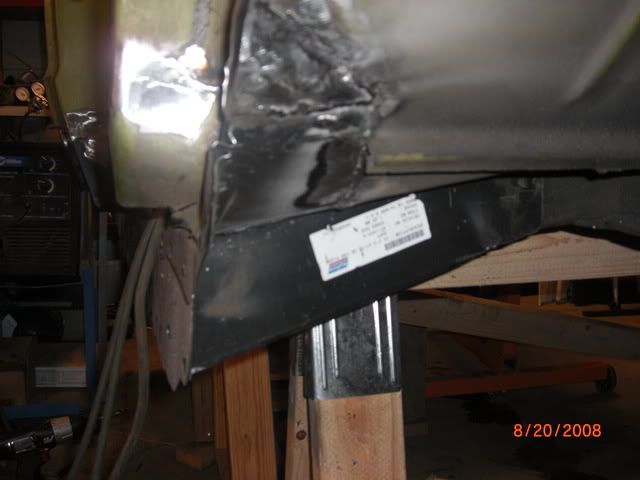
|
|
|
|
|
08-22-2008, 07:31 PM
|
#134 |
|
Senior Member
Join Date: Aug 2002
Location: Valley Center KS
Posts: 3,525
|
Re: Ackattack's Pro touring restoration thread
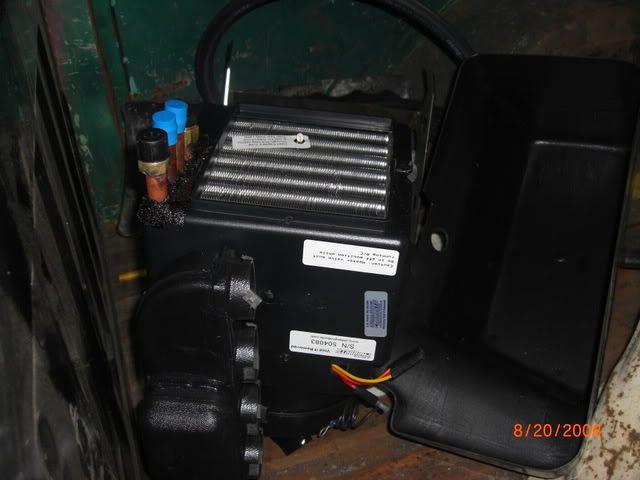
Oh, and my a/c unit!
|
|
|
|
|
08-22-2008, 09:07 PM
|
#135 |
|
Senior Member
Join Date: Nov 2005
Location: AL
Posts: 2,519
|
Re: Ackattack's Pro touring restoration thread
Did you move the rearend back to center the wheel in the well? Looks like you did and I like dem wheels....!!!!
|
|
|
|
|
08-31-2008, 12:38 PM
|
#136 | |
|
Senior Member
Join Date: Aug 2002
Location: Valley Center KS
Posts: 3,525
|
Re: Ackattack's Pro touring restoration thread
Quote:
I put in many hours this week working on rust repair. I kinda fubared the cab corner at first, so then I tried to fix it. It turned out ok, and hopefully the body shop will be able to fix it. The rocker took some work to get it lined up the way I wanted it, but now it fits great with the door. I'm going to flip the cab up on it's back to finish welding on the cab supports, as well as clean all the oil (lots of it) and undercoating off of there. 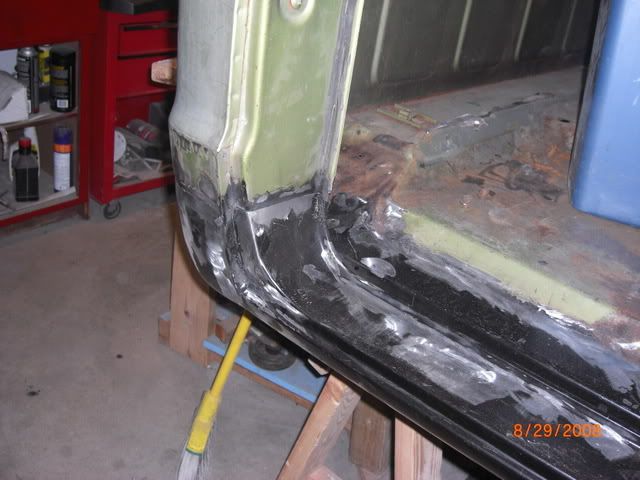 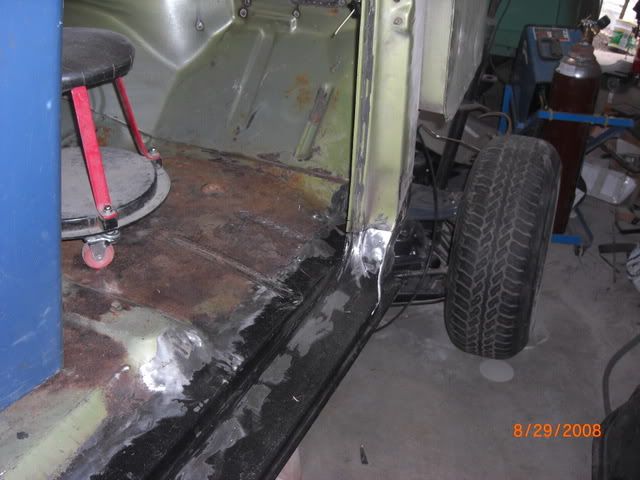  My tires finally arrived! So I got the tires mounted up and put them on to see how the clearance is.  here is the driver's side tire. it fits without tubing, but I'm sure around corners it would rub  fully aired out there is literally just a small gap between the tires and the piece between the inner and outer fenders. Initially the drivers side hit and the passenger side had a little more room, so I centered up the rear with the panhard bar.  . .I also got started on tubbing the drivers side....it pretty much looks like the passenger side, so I didn't get any pics. |
|
|
|
|
|
09-24-2008, 01:00 AM
|
#137 |
|
Senior Member
Join Date: Aug 2002
Location: Valley Center KS
Posts: 3,525
|
Re: Ackattack's Pro touring restoration thread
So I've been putting in a lot of time on the truck lately, but the progress has been slow
(or at least it seems to me)I got all of the rust repair done on the cab, so that's a big hurdle. I had a friend over and we tipped the cab onto it's back so that made finish welding up the outer supports a little easier. I also removed most of the under coating and oil. What a pain. Then I've pretty much got the firewall shaved. 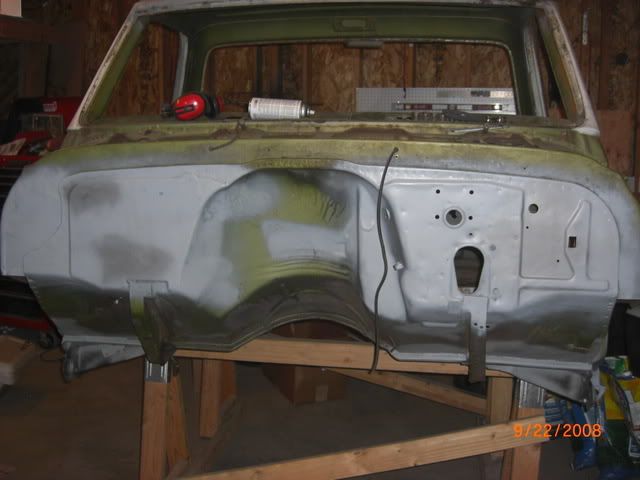 I realized tonight that I filled in the two holes for the ebrake (going with the foot operated one), so I re-drilled the holes for that. 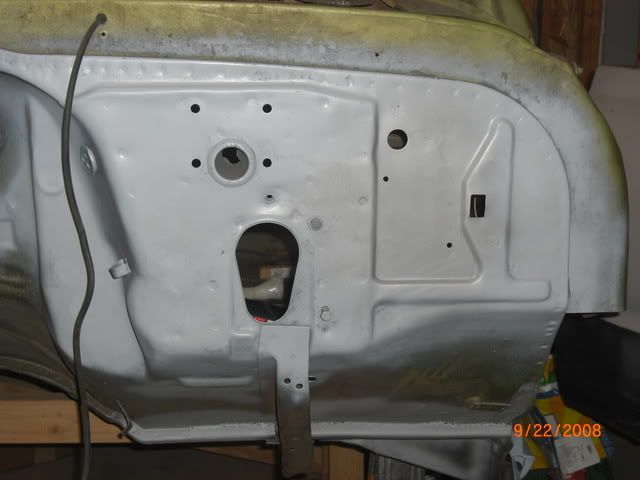 I also got some work done on the bed. The tubbing is essentially complete. I also got a new header panel put in. There are a few more cariage bolts to put in and tighten down then all I have left is to make the gas filler. 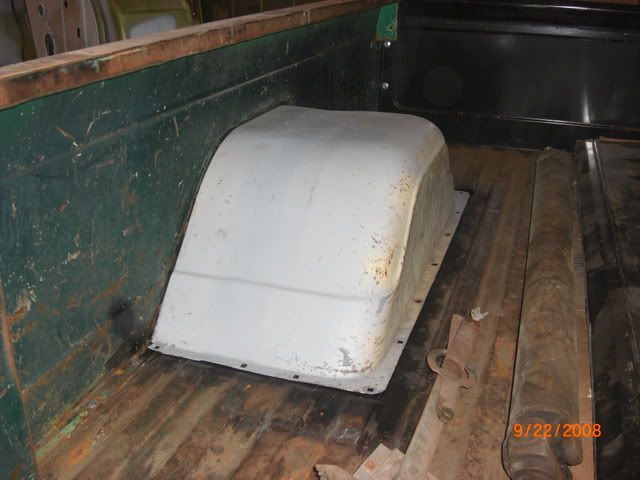 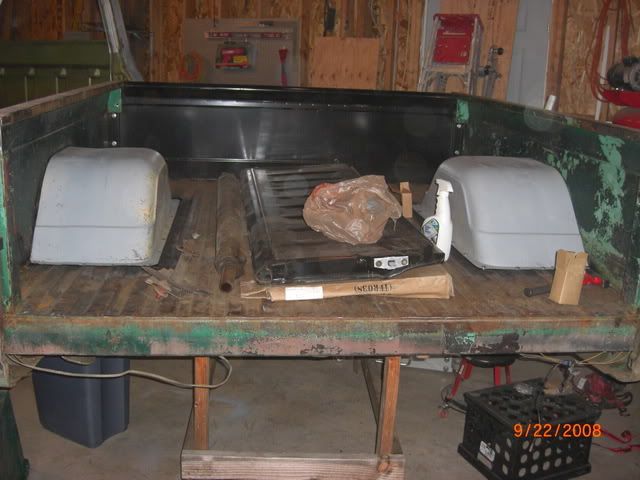 Before the bed goes back on the frame I'm going to finish up some things. I'm going to flush and pressure test the fuel lines, put in the rear end breather, and install the exhaust. Last night I sand blasted the core support. As mentioned earlier, I pulled this one from a GMC at the salvage yard and modified it to work for my chevy....hopefully it works out as planned. Here's the way it came out: 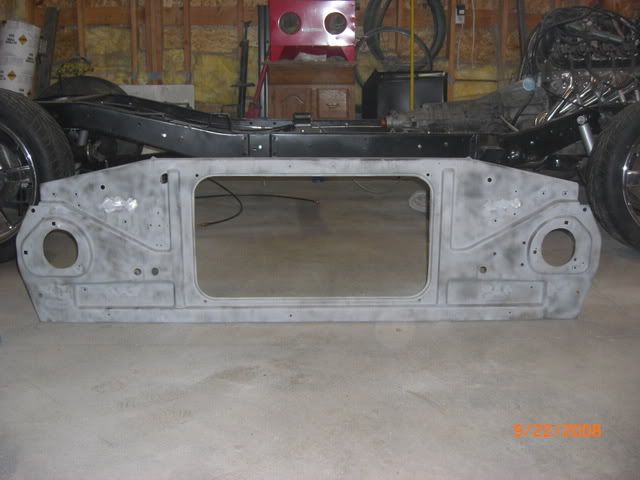 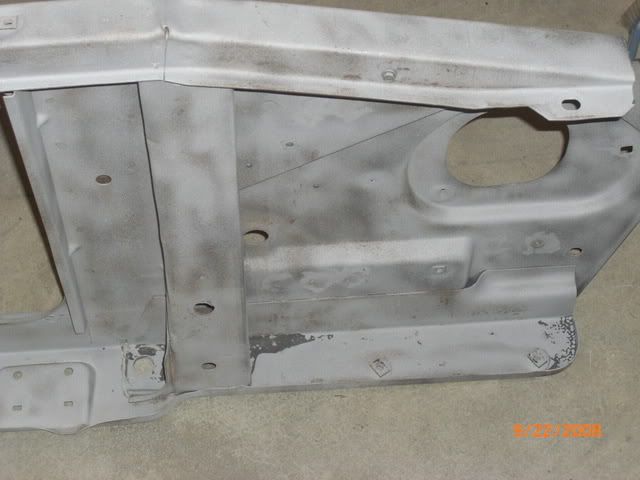 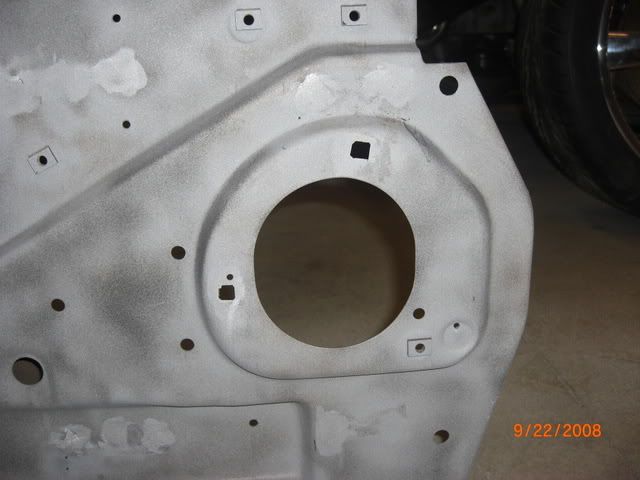 I was planning on painting it tonight with POR 15, but the POS spray gun I got from harbor freight broke when I tried to put an air fitting on it. I started looking at how to mount up the A/C unit, so that if I need to do any firewall modifications or welding to it, it will be done before paint. It looks like my best option is going to be to make a metal frame that will attach to the inside of the firewall. I didn't have any small metal to start on that. So to put the cab on, I want to get the exhaust installed and a few other things buttoned up. |
|
|
|
|
09-24-2008, 01:01 AM
|
#138 |
|
Senior Member
Join Date: Aug 2002
Location: Valley Center KS
Posts: 3,525
|
Re: Ackattack's Pro touring restoration thread
update cont.
The exhaust will be here tommorrow, so I'll start on that. I ordered a 2 1/2" Pypes brand kit. It has an X-pipe in it. I'm planning on dumping it before the axle. I also ordered some more parts: headlights with the turn signals in them, oxygen sensors, brake pads for the front and rear (Hawk HPS), dual pistion aluminum calipers (howe brand), drilled and slotted rotors, longer wheel studs for the front, and some ARP torque converter bolts. I also figured out that I need to order some parking brake hardware....I lost a couple pieces somewhere along the line Oh, I also made a trip to the salvage yard and got a 1-1/4" front swaybar and a window regulator. I need to get some swaybar bushings so that I can install both the front and rear swaybars (camaro rear bar). So here's how she sits now  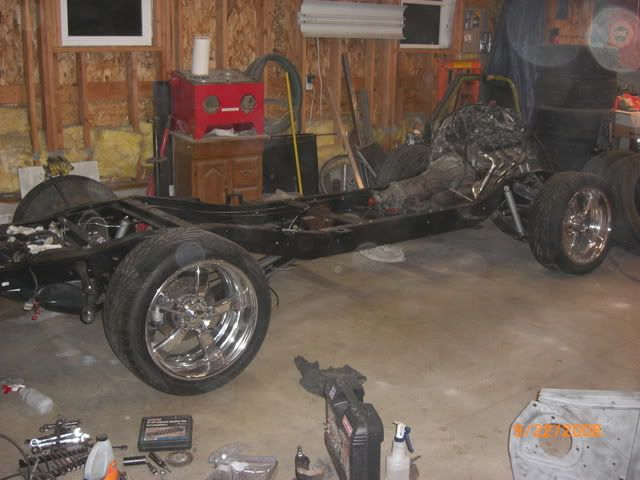  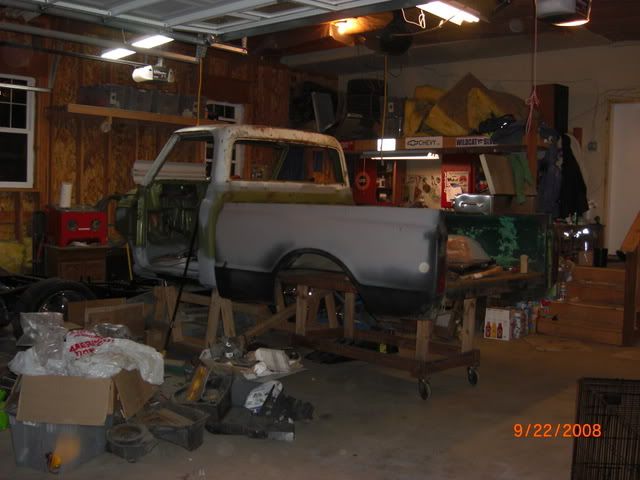 Hopefully it will start coming together real soon. |
|
|
|
|
09-24-2008, 01:06 AM
|
#139 |
|
Senior Member
Join Date: Aug 2002
Location: Valley Center KS
Posts: 3,525
|
Re: Ackattack's Pro touring restoration thread
Oh, I also forgot, I pulled out my wiring harness and did a test fit. I drilled a few holes that it will mount to on the firewall and filled where the factory harness goes through. The wires up to the engine and front lights will go through to hole you can see on the firewall. The remaining wires that go to the tailligts will go though another hole that is kinda hidden by the cab frame support things.
|
|
|
|
|
09-24-2008, 04:15 AM
|
#140 |
|
Registered User
 Join Date: Aug 2005
Location: Hillsboro Oregon
Posts: 6,449
|
Re: Ackattack's Pro touring restoration thread
Lookin real good man. You've come a long way!
|
|
|
|
|
09-28-2008, 09:52 PM
|
#141 |
|
Senior Member
Join Date: Aug 2002
Location: Valley Center KS
Posts: 3,525
|
Re: Ackattack's Pro touring restoration thread
Getting a little more work done over the week and weekend.
I'll start with the brakes. I got the summit drilled and slotted rotors. I took them out of the box and immediatly started modifying them I pressed out the studs that came with them and pressed in longer studs, since my wheels have thick flanges. I used ARP part number 100-7703 and they fit perfectly. I'm also using Hawk HPS pads. Made a stop at the parts store, and got new caliper pins, bearings, and seals. Put them all together. So the Howe calipers physically fit, however there are two issues to overcome. First is the brake line fitting on the back of them is NPT I believe, so I'll have to get a fitting adapter to plug in my brake line. Next I need some larger bushings, cause the pin holes in the calipers is bigger than stock....shouldn't be a big deal. 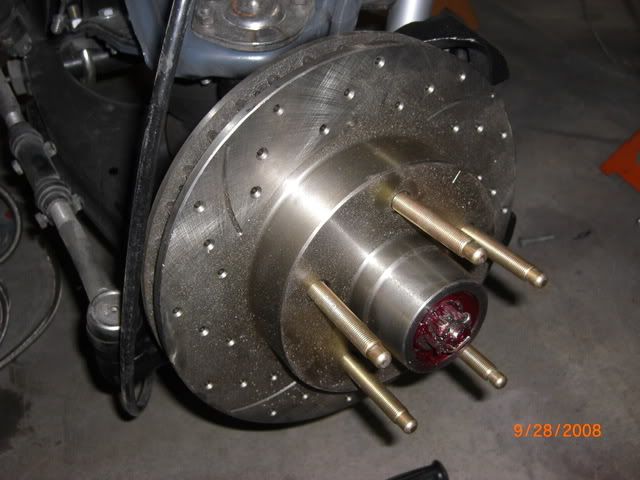 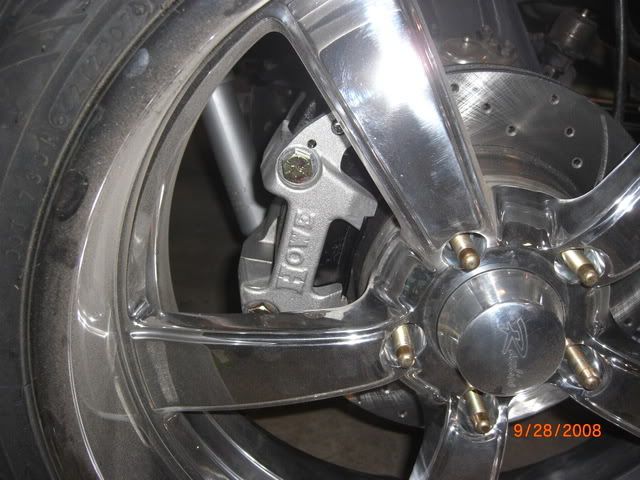 Next I've also been working on the exhaust. Like I said earlier, I got a kit from Pypes. It's stainless steel. I got the race mufflers, which there sight claims they're the quietest and flow the best. Basically looked like turbo mufflers to me. I also used Flowmaster ball-flange collectors. They aren't stainless though, but I used them on my corvette, and have had 0 issues with leaks. 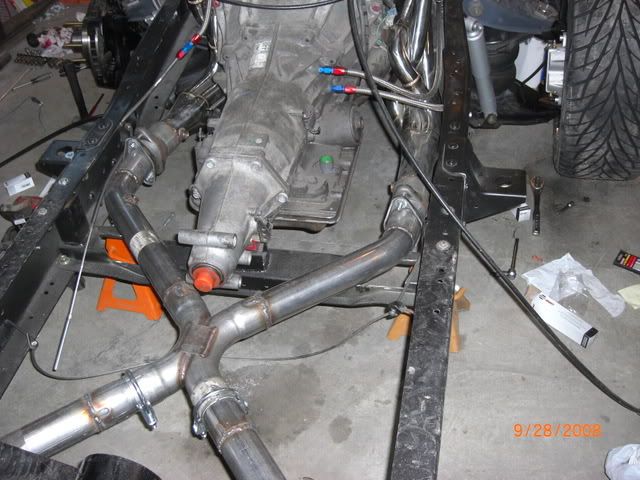 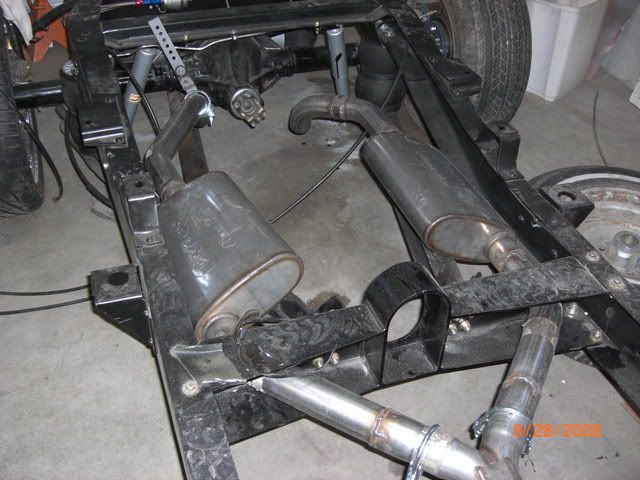 As you can see it passes through the ECE cross member I also got the core support painted. 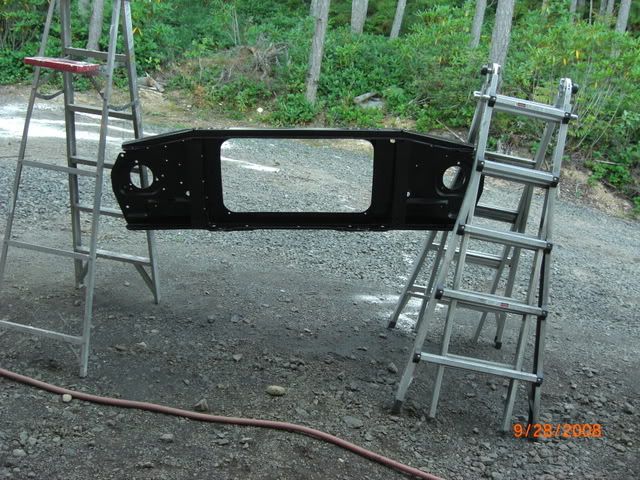 I also ordered a shaved fiberglass cowl. I saw another members and got the info for it. I got the one to allow for wipers (hey, I live in washington )I have some hardware in the mail, then I'll be able to start bolting in the core support. |
|
|
|
|
10-09-2008, 12:58 AM
|
#142 |
|
Senior Member
Join Date: Aug 2002
Location: Valley Center KS
Posts: 3,525
|
Re: Ackattack's Pro touring restoration thread
So I've continuing work trying to get some things buttoned up.
The goal I'm working towards is getting the body on. But in order to do that, I want to try to get things buttoned up underneath, since I have easy access to stuff right now. I went to go pressure test and flush the fuel system. I found a wiring diagram from a T/A that I got the tank from. I used a battery charger to power it. Well nothing happened, accept a loud buzzing noise. So I started taking stuff apart, and it seems as though the fuel pump is siezed up. There is rust around the top of it. It was sitting outside for awhile before I took possession. But luckily some of the f-body guys I know on LS1tech came to the rescue with a stock fuel pump (I'm just paying shipping on it). So hopefully that will be taken care of. I got the rear sway bar installed as well as the rear brake lines finished up. 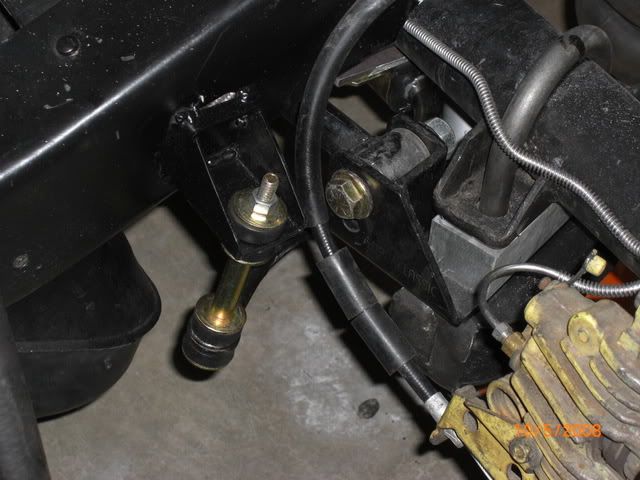 The bed is all put together and ready to go back on just as soon as I get the fuel pump figured out. Oh, I also installed the driveshaft. This driveshaft came with the truck. I was suprised that it was the right length. I did have to buy a hybrid u-joint since I installed a 1350 series pinion yoke. I'll upgrade the driveshaft later when I make upgrades to the engine and tranny, but for now this will get me moving. I got the core support mounted, along with the radiator and electric fans. The radiator that I got is supposed to be a replacement for the stock one, but it's aluminum with plastic side tanks, so a lot like the new ones. It fit pretty good, but it must be about 1/2" too tall, cause when I went to mount it, the top brackets where severally angled. I put a couple of washers in each side and it secured it. It doesn't look the best, but I'll probably get some sort of cover for it anyways. I also got new rubber supports and top brackets. I attached the fans (out of an f-body too) to the radiator by drilling a few small holes in the aluminum of the radiator. Seems to fit well. 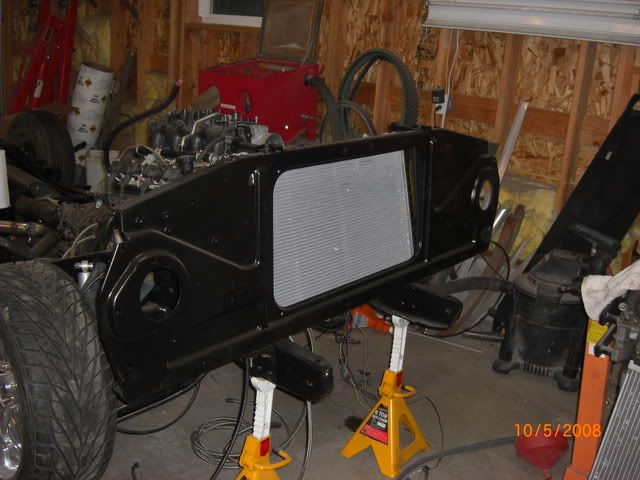 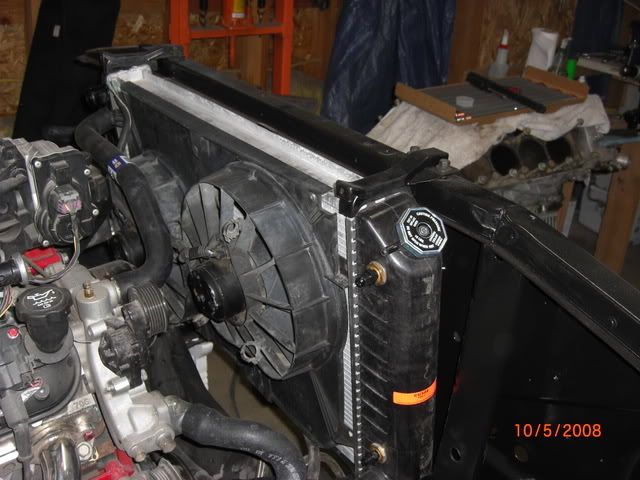 I was planing on using a condenser from an F-body too, but when I tried to install it, it just wasn't going to work, so I ordered a new stock style condenser from Old Air. Should be here in a few days. Then I can install it, as well as the external tranny cooler. I spent a few hours working on mounting the under dash A/C unit. It's meant to be mounted through the firewall in place of the stock heater box. Well since my firewall is shaved, that wasn't going to work. It comes with some flimsy brackets that I suppose you could use, but the whole unit moved around and I didn't like that. So I made a bracket to mount the unit to. The big difficulty is that it has to attach to the inside of the firewall with no bolts going though the firewall, yet I have to be able to get to the bolts on the back of the A/C unit. So here is what I came up with: 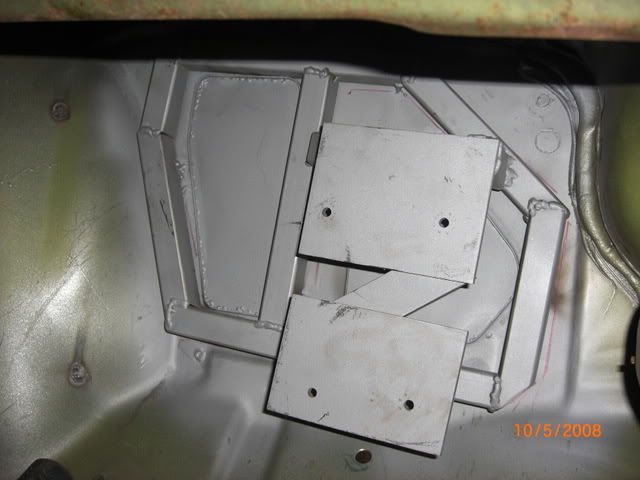 Once I had it built, I trace it out on the firewall, drilled several holes, tacked it to the firewall, then went on the outside and filled in the holes, attaching the bracket good and solid.Here's what it looks like mounted up: 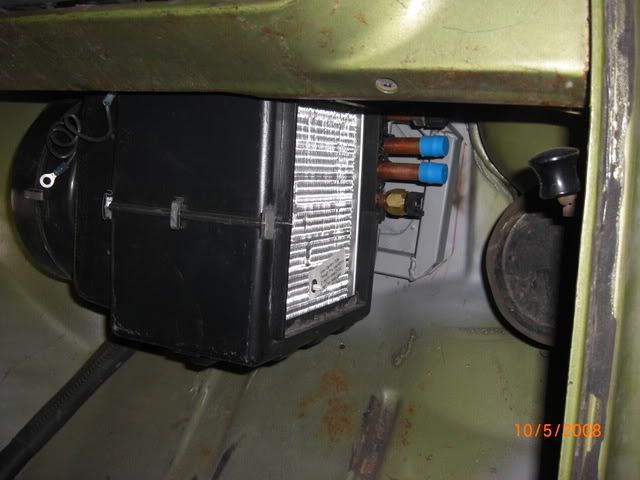 I also have been working on installing the one piece window kit from Brothers. I had to make a run to the salvage yard to get a few parts that I though I had...but apparently didn't. Then I started to sand blast the parts, but I ran out of sand....so that's still in progress. I also test fitted my seats. I forgot pictures of that, but they went in well, and they're positioned pretty good. The center jump seat's back is pretty close to vertical, but I don't expect many people to sit in that seat. The seats are out of a 2001ish Tahoe if I remember correctly. And now for the big news: I installed the cab. This is a big milestone, since it hasn't had a cab on it since I started on this thing. I made up a lifting device and used my cherry picker. Worked pretty good. 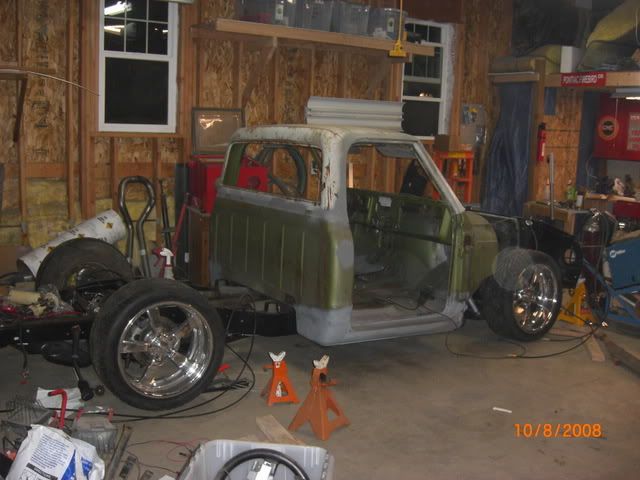 During the install I ran into some issues. First, the tranny was hitting the tunnel. I don't think other genIII swaps had this issue. But since I made my own mounts and modified my tranny crossmember that is probably why. I know my tranny sits up a little high so that I don't have clearance issues with the driveshaft when it's aired out and it solved my header clearance issue too. So I'll either install a high hump cover, or make a cover out of sheet metal. No biggie. 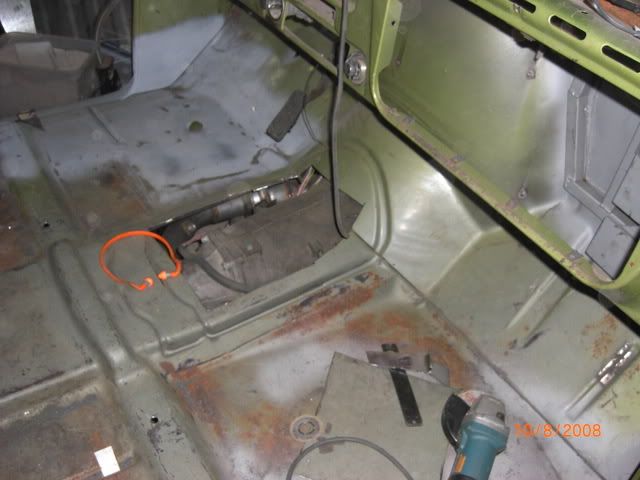 The next issues is the back of the cab is actually sitting on the mufflers, not the cab mounts. I'm hoping to be able to loosen the clamps and rotate the mufflers slightly to gain the clearance I need....otherwise I'll probably have to cut them off and redo something.....might be easy, might be painful. 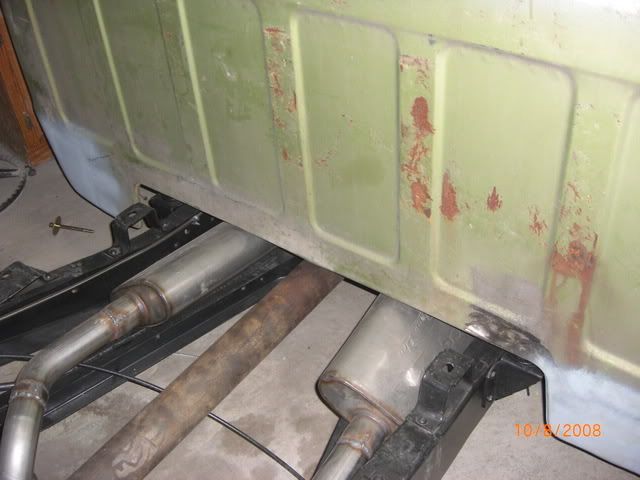
|
|
|
|
|
10-09-2008, 01:00 AM
|
#143 |
|
Senior Member
Join Date: Aug 2002
Location: Valley Center KS
Posts: 3,525
|
Re: Ackattack's Pro touring restoration thread
Here are a few more pictures....because I can
2x6 clearance 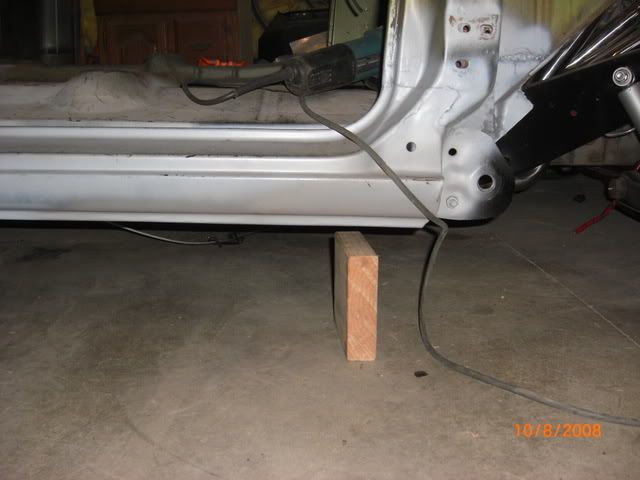 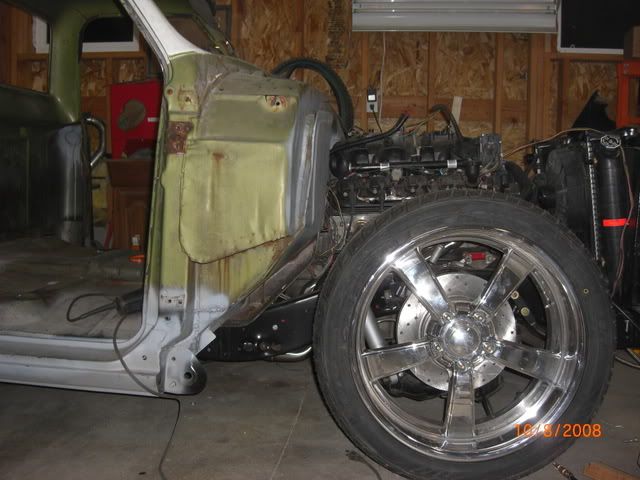 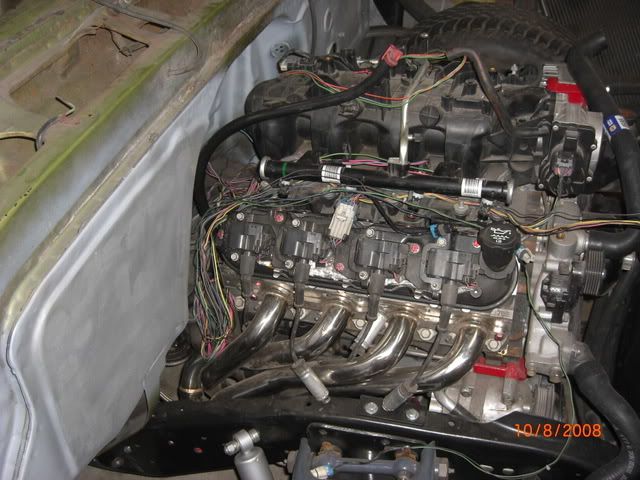 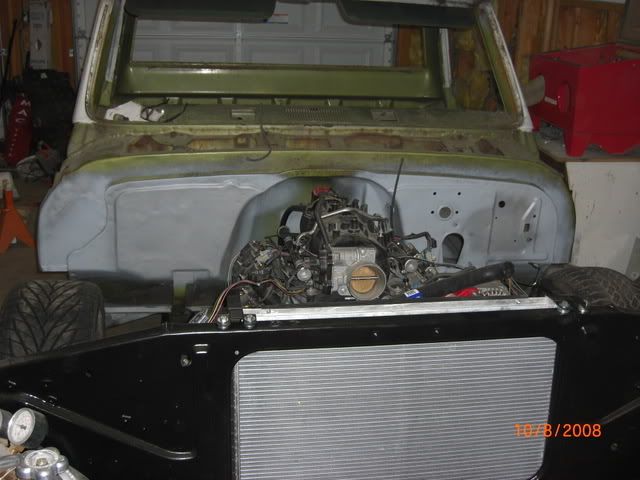
|
|
|
|
|
10-09-2008, 01:04 AM
|
#144 |
|
Senior Member
Join Date: Aug 2002
Location: Valley Center KS
Posts: 3,525
|
Re: Ackattack's Pro touring restoration thread
Oh, I've been messing with the wiring, seperating and organizing it so that I can mount the computer where I want it.
I also got some 2 gauge wire to wire up the battery that will be located in the back passenger corner of the bed along with a cut off switch (NHRA rules). The caliper pins should be here this week, so I'll get the calipers installed. I'm also working on ordering up some power steering lines and getting some radiator hoses. Slowly but surely it's coming along. Oh yes, now that I got the cab on, I can mount the inner fenders and then cut holes in the cab for the a/c and heater lines to go through. I can also see what kind of clearance (or lack of clearance) I have with the front wheels. |
|
|
|
|
10-09-2008, 01:47 AM
|
#145 |
|
Registered User
Join Date: Aug 2005
Location: Hillsboro Oregon
Posts: 6,449
|
Re: Ackattack's Pro touring restoration thread
I don't know how you got that X in there without hanging below the frame or interfering with the drive shaft. Are you sure you are gonna get full lift without it touching? What dia are your pipes? Maybe when I get my dropmember installed and the engine/tranny are raised I will have room.
|
|
|
|
|
10-09-2008, 11:20 AM
|
#146 | |
|
Senior Member
Join Date: Aug 2002
Location: Valley Center KS
Posts: 3,525
|
Re: Ackattack's Pro touring restoration thread
Quote:
The clearance going through the crossmember is also tight. One of my concerns is when I'm driving, the engine movement may make the exhaust move enough that it hits. If that's the case I might end up with some flex joint type connectors. I guess we'll see.
|
|
|
|
|
|
10-11-2008, 01:17 PM
|
#147 | |
|
Eat My Rust
Join Date: Jan 2007
Location: Cypress, Texas
Posts: 3,362
|
Re: Ackattack's Pro touring restoration thread
Quote:
 Looking awesome though so far, and can't wait to see the pay off |
|
|
|
|
|
10-14-2008, 12:02 AM
|
#148 |
|
Senior Member
Join Date: Aug 2002
Location: Valley Center KS
Posts: 3,525
|
Re: Ackattack's Pro touring restoration thread
So I wanted to get a lot of progress made this weekend, but things didn't go as well as expected. I guess I did get a lot done, but it wasn't necessarily forward.
As I showed the other day, the back of the cab was sitting on the mufflers. Well I removed the exaust, and what do you know, the cab was then sitting on the driveshaft and the transmission. F*^%! Not a major catastophy, but this set me back quite a bit. I needed to lower the tailshaft of the transmission about an inch (making it sit about 1" higher than the stock trans crossmember is. Well this also caused my headers to pretty much be right at the crossmember. There wasn't any way of hacking up the stocker to allow the exhaust to pass through, so I made a new one. I got it installed before pics (I'll get some later) but it allows for the exhaust to pass under it, and puts the tranny in the correct position. Remember the issue I had way back when I first got the headers and tranny with the headers hitting the drivers side lower control arm. Well by lowering the tranny back down, the headers is really close to it now. Hopefully the engine movement doesn't cause that to hit too. So I was also going to work on modifying the exhaust too, but I ran out of welding gas again. I have a plan though....hope it works. I got my "new" fuel pump in the mail. I got it all installed and flushed all the lines. When I hooked up the lines to the fuel rail to pressure test it, one of the hard line AN fittings is leaking. I fubared the brass "seal" inside of it when I made the joint...so I have to order another one. I did manage to get the rear diff filled. Before I did that I made a breather fitting. When I sand blasted the rearend I removed and lost whatever fitting went into the breather hole to connect a tube to. So I got a 1/8" NPT to barb fitting and drilled and tapped the hole so I can connect a hose to it. I also got my radiator hoses figured out. Installed the front brake calipers. Of course on of the brake lines apparently has the wrong size of fitting on it, cause one of the braided SS hoses fits one line, the other doesn't. I also did some sandblasting and spray painting to protect the pieces. Basically I did all of the pieces that go inside the door (window regulator and channels and door latches). Then I put on the inner fenders. The reason I did this what to see where I have room for my HVAC bulkhead fitting (of course I didn't have the hole saw to actually install the fitting....) It also allowed me to see what kind of clearance I have with the front wheels. Basically at full dump, the wheel wells are sitting on the tire, but the tire is inside the fender! Since I had the inner fender on, I went ahead and threw on the door and the front fender. 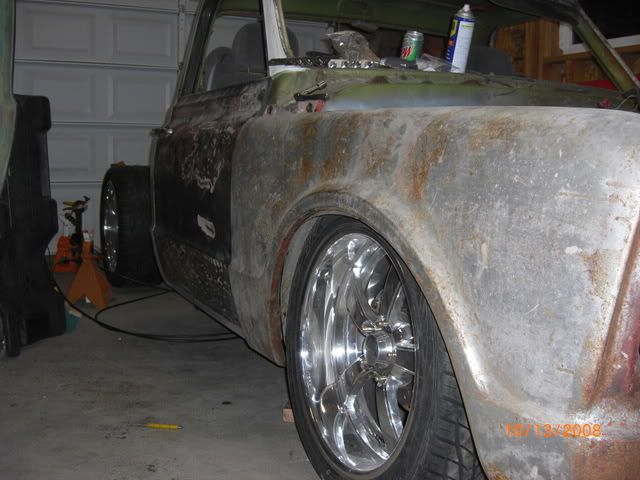 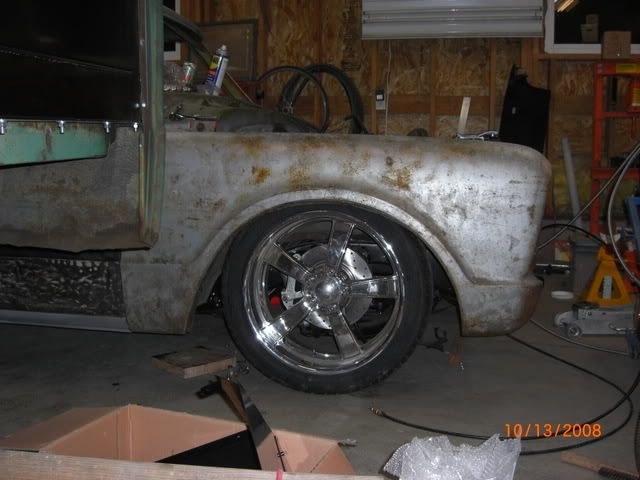 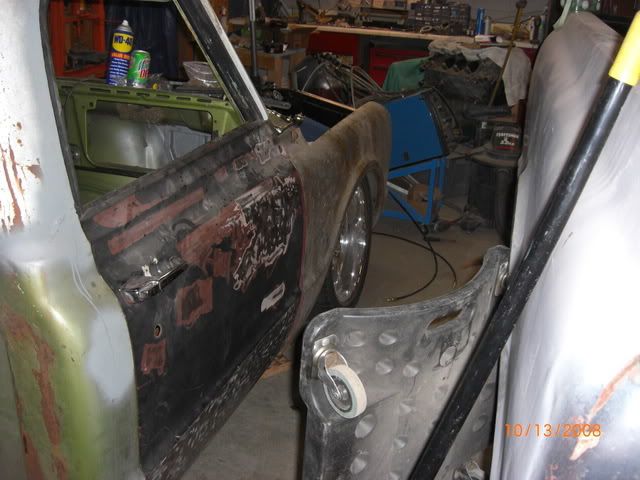 I also installed my new cold air intake (got it off ebay) 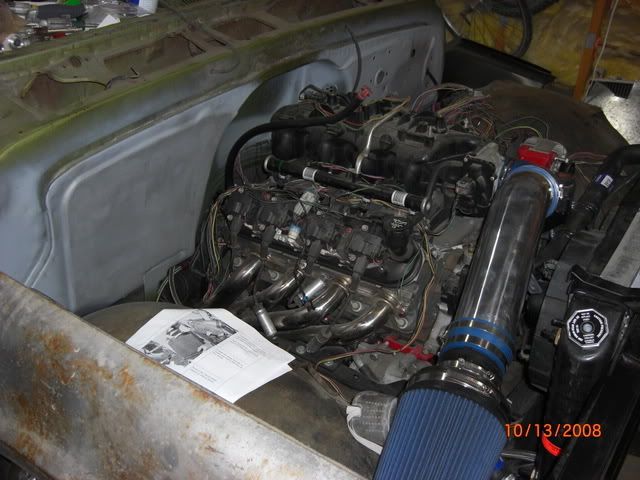 And here are the seats I'm using....not bolted in, but you get the idea. 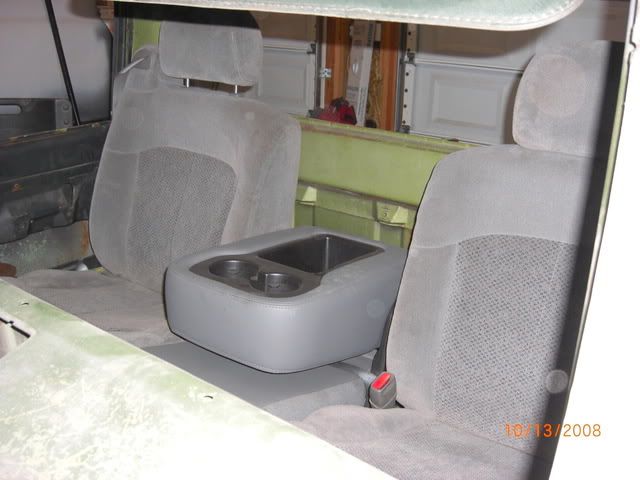 I also started greasing the front end suspension and steering, but rant through a whole tube of grease, so I had to go get more. |
|
|
|
|
10-15-2008, 12:49 AM
|
#149 |
|
Senior Member
Join Date: Aug 2002
Location: Valley Center KS
Posts: 3,525
|
Re: Ackattack's Pro touring restoration thread
Quick update:
I got the exhaust all tacked back together. Unfortunatly it I couldn't get it to fit through the cross member, so now it hangs below, so that will be my low point. I'll still have a few inches when aired out, so it shouldn't be a problem. I'll have to finish welding it up tomorrow night. I also got my shaved fiberglass cowl. Looks nice, though it doesn't seem to fit the best. might have to enlarge some holes....but I didn't spend a lot of time messing with it. Basically just set it on fiddled with it for 2 min, and moved on. |
|
|
|
|
10-15-2008, 01:32 AM
|
#150 |
|
Senior Member
 Join Date: Aug 2006
Location: Atascadero, CA
Posts: 1,152
|
Re: Ackattack's Pro touring restoration thread
DAMN!!! Your getting so much done!! Looking good!! Keep up the great work
Josh
__________________
(Project truck) 1970 C10 under complete transformation My current build thread http://67-72chevytrucks.com/vboard/s...d.php?t=212871 Other project: C5 corvette swap into 70 c10 http://67-72chevytrucks.com/vboard/s...=1#post2413517 On Hold |
|
|
|
 |
| Bookmarks |
|
|


 Linear Mode

