
|
|
|
 05-02-2011, 07:22 PM
|
#1 |
|
Registered User
Join Date: Mar 2010
Location: Sin City, Nevada
Posts: 152
|
Re: Mulk's 8-Lugger
Here's the hinges.
After getting the Hinges into the body, I tied them together with a section of 1x1 tubing to keep them aligned, and tacked everything into place. I had to make the pockets for the door. The ones with the kit were too shallow. So I used some 2x4 box tube I had around, and fabbed them up. Once I got thos tacked into place, and made sure everything was still aligned, i also tied those together with a section of 1x1 angle iron. The door is solid, with no "sag" whatsoever, and stays put when closed. Once I figure out interior, I deal with covering that lower door pocket.
__________________
Eric '68 C20 Suburban, Bagged with Suicide 3rd Door, and Loaded with a 396 - Under Construction http://67-72chevytrucks.com/vboard/s...d.php?t=403690 |

|

|
|
04-23-2011, 11:23 AM
|
#2 |
|
Registered User
Join Date: Mar 2010
Location: Sin City, Nevada
Posts: 152
|
Re: Mulk's 8-Lugger
Thanks for all the pos feedback. I'll get more photos up prob tomorrow, depending on what my wife has planned for me. And I'll get those tire sizes when I get home from work.
Posted via Mobile Device
__________________
Eric '68 C20 Suburban, Bagged with Suicide 3rd Door, and Loaded with a 396 - Under Construction http://67-72chevytrucks.com/vboard/s...d.php?t=403690 |
|
|
|
|
05-02-2011, 08:03 PM
|
#3 |
|
Registered User
Join Date: Oct 2010
Location: CALI
Posts: 107
|
Re: Mulk's 8-Lugger
ohhhh ... 8 lug and 396 ..... easy with the pedal... Nice ride
|
|
|
|
|
05-10-2011, 01:38 PM
|
#4 |
|
Registered User
Join Date: Mar 2010
Location: Sin City, Nevada
Posts: 152
|
Re: Mulk's 8-Lugger
Well I finally got some free time to work on the handle move for the suicide conversion, and I took a few photos along the way....
I decided it would be easiest to just cut-out the old handle section, flip it, and move it to the other end of the door. I didn't like my first line 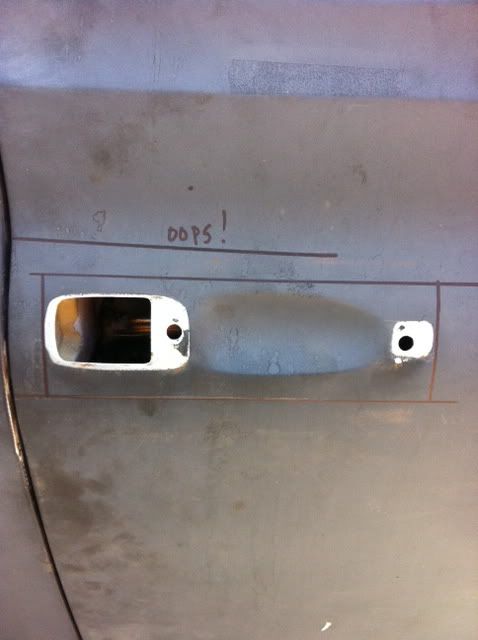 Here's the new patch section, ready to be tacked into place 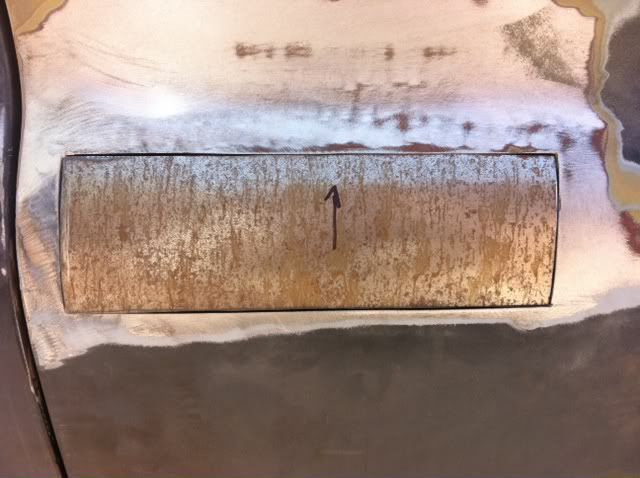 I bought a drivers side handle, and knowing I wouldn't be able to use the push-button to open (due to the window), I modified the handle to flush-mount. 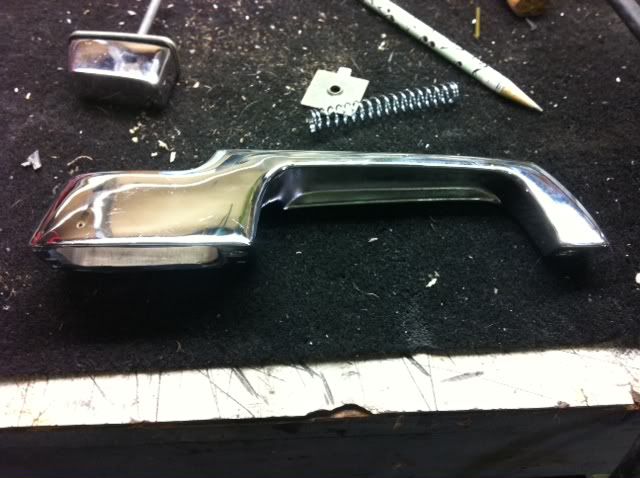 AFTER cutting the old section out, I realized the hole to attach the handle weren't level. So my bright idea of flipping the section went out the window. I decided it would be easier to cut-out the recessed section, and just drill new mounting holes. The third hole is for the push-button plunger to clear. I shortened the spring and plunger, and used the body as a spring stop, so the button still goes in/out. 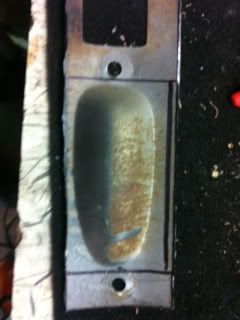 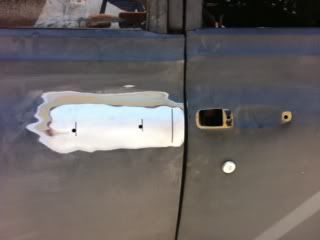 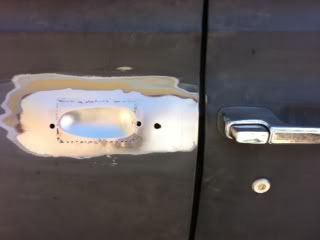 I did a couple skim-coats of body filler, some primer, and blocked it down to where I'm happy for now. Then shot some guide-coat, and attatched the handle. 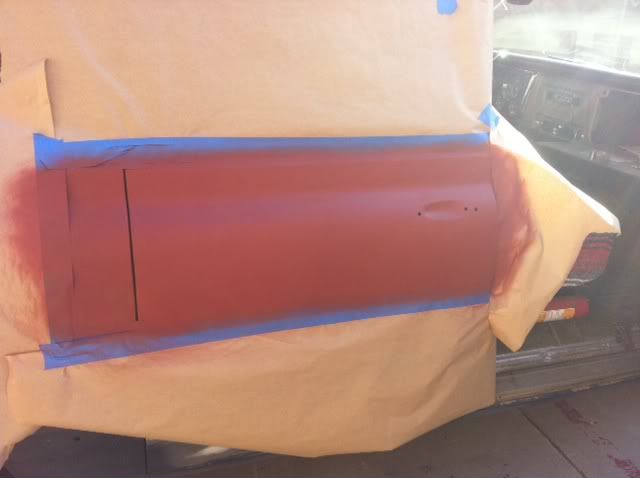  I'm very pleased with the look. I'll finish when I'm done with the build, and get ready for paint.
__________________
Eric '68 C20 Suburban, Bagged with Suicide 3rd Door, and Loaded with a 396 - Under Construction http://67-72chevytrucks.com/vboard/s...d.php?t=403690 |
|
|
|
|
05-26-2011, 11:58 PM
|
#5 |
|
Registered User
Join Date: Mar 2010
Location: Sin City, Nevada
Posts: 152
|
Re: Mulk's 8-Lugger
It's funny how these projects just snowball from one part to the next...
I collected everything i needed to get started on 'bagging this beast, and realized I better address the low hanging exhaust. So I ordered a set of Sanderson BBC Shorties... Quality pieces. I couldn't afford the ceramic, so I just sprayed and baked with some header paint. 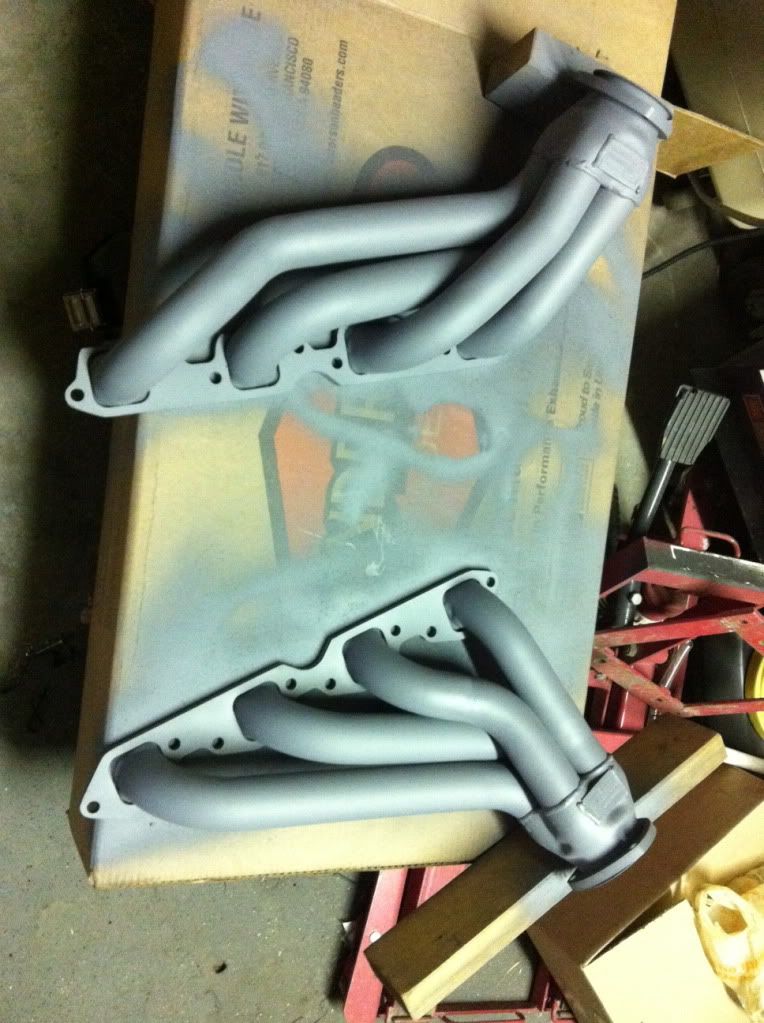 I then removed the inner fenders so I could start the suspension work, and noticed how truely nasty the whole engine and compartment looked. So I started removing and cleaning old parts. Which lead to a new water pump, 110amp alternator, Mickey Thompson finned valve covers, lots of elbow grease, some paint, blah blah blah... Not all on in this shot, but looking good 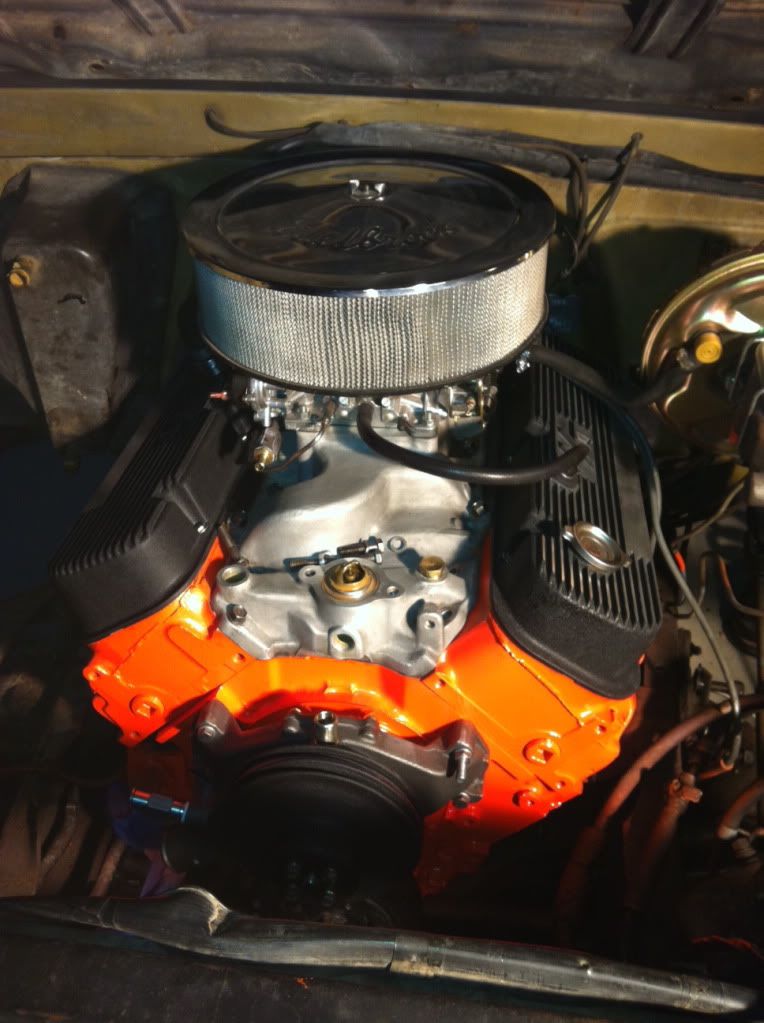 Needless to say, I haven't really made much progress on the suspension. But I can say I very happy with the way the old 8 Lugger is cleaning up!
__________________
Eric '68 C20 Suburban, Bagged with Suicide 3rd Door, and Loaded with a 396 - Under Construction http://67-72chevytrucks.com/vboard/s...d.php?t=403690 |
|
|
|
|
05-27-2011, 12:33 AM
|
#6 |
|
Registered User
Join Date: Feb 2011
Location: Vegas
Posts: 71
|
Re: Mulk's 8-Lugger
Looking great Mulk!
__________________
Scott S 54 Chevy Pick-Up 71 Chevy Suburban 76 FJ40 LandCruiser - 454, TH350, NP205, Ford 9" 98 Dodge Ram 2500 4X4 Cummins |
|
|
|
|
05-27-2011, 12:38 AM
|
#7 |
|
Registered User
Join Date: Mar 2010
Location: a t w a t e r cali 95301
Posts: 10,713
|
Re: Mulk's 8-Lugger
looks great i love the orange wheels!
|
|
|
|
|
05-27-2011, 12:52 AM
|
#8 |
|
Registered User
Join Date: Feb 2009
Location: Southern Oregon
Posts: 1,352
|
Re: Mulk's 8-Lugger
Nice work. Very cool build!
|
|
|
|
|
05-29-2011, 01:10 PM
|
#9 |
|
Registered User
Join Date: Jan 2001
Location: Queen Creek, Arizona
Posts: 1,626
|
Re: Mulk's 8-Lugger
Dude, you so totally rock! Love the truck-hope to see it someday ... hmm trip to Vegas?
__________________
Dave aka "Wild" Current truck "Ida Mae" 71 K5 Blazer Former Trucks "Loretta" 71 Longbed (AZ) "Tanya" 69 Stepside (AZ) "Ferdinand" 71 Longhorn (SD) "Patches" 67 Panel (IA/ KY) "Rosita" 68 C30 (KY) Instagram @Wildforwheels @k5_klub @c10university Profile pic provided by Jeff Sundance |
|
|
|
|
05-31-2011, 09:00 PM
|
#10 |
|
Senior Member
 Join Date: Feb 2010
Location: bennington, vt
Posts: 1,609
|
Re: Mulk's 8-Lugger
looks great!
__________________
my build threads, 68 pro touring, auto cross c10 (mid life crisis) http://67-72chevytrucks.com/vboard/s...d.php?t=464109 website http://www.sauersgarage.com/ |
|
|
|
|
06-01-2011, 12:00 AM
|
#11 |
|
Registered User
Join Date: Mar 2010
Location: Sin City, Nevada
Posts: 152
|
Re: Mulk's 8-Lugger
Thanks everyone for the support and kind words...
Today was one of those days. Didn't really get any thing I started finished. Frustrating to say the least. I blew apart the front suspension, cleaned and painted a few of the parts. I then started mocking-up the 'bags, and didn't like the lower mounts. They take up too much space, and the 'bag rubbed when it was compressed. I'm just gonna build some cups tomorrow after work. So I moved on to mounting to headers. Drivers side.... No problem. Went together with ease. Passenger side was a different story. I'm gonna have to clearance the frame, and a small "wing" portion of the trans housing on the 400. Wasn't in the mood for that..... Moved-on to installing new alternator, and of course, nothing lines-up. So now I'll need to massage the brackets so the belts are aligned. So.... It wasn't a perfect day. But any day spent wrenchin' in the garage, beats a day at work. And on the positive side... I'm half-way done with three projects Posted via Mobile Device Posted via Mobile Device
__________________
Eric '68 C20 Suburban, Bagged with Suicide 3rd Door, and Loaded with a 396 - Under Construction http://67-72chevytrucks.com/vboard/s...d.php?t=403690 |
|
|
|
|
06-08-2011, 09:08 PM
|
#12 |
|
Registered User
Join Date: Mar 2010
Location: Sin City, Nevada
Posts: 152
|
Re: Mulk's 8-Lugger
I got a little more accomplished over the past week, but it was in between family being in town for my daughters big "Pre-China Tour" orchestra performance.
More parts keep arriving daily, so it's hard to keep focussed on what needs to get done. But I was able to get the front pretty much squared away to my liking. I never planned to lay frame, just wanted to get closer to the earth. So I'm happy with the front, and I'm about to get everything bolted into place. I decided against the lower mounting "plates" and made some cups to fill the lower spring pocket. Unfortunately I didn't take photo prior to mock-up, but I'll post some when I take everything back apart. Oh yeah. My wheels showed-up. Keeping this beast 8 Lug has allowed me to take this in a whole new territory, venturing into the off-road world..... 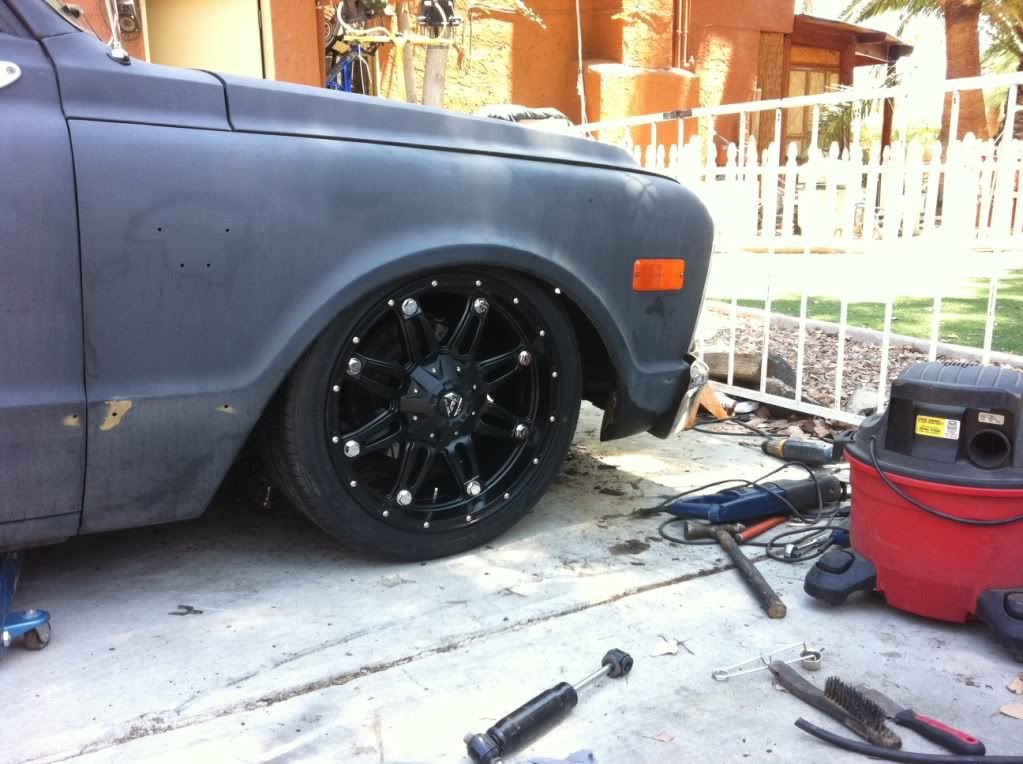 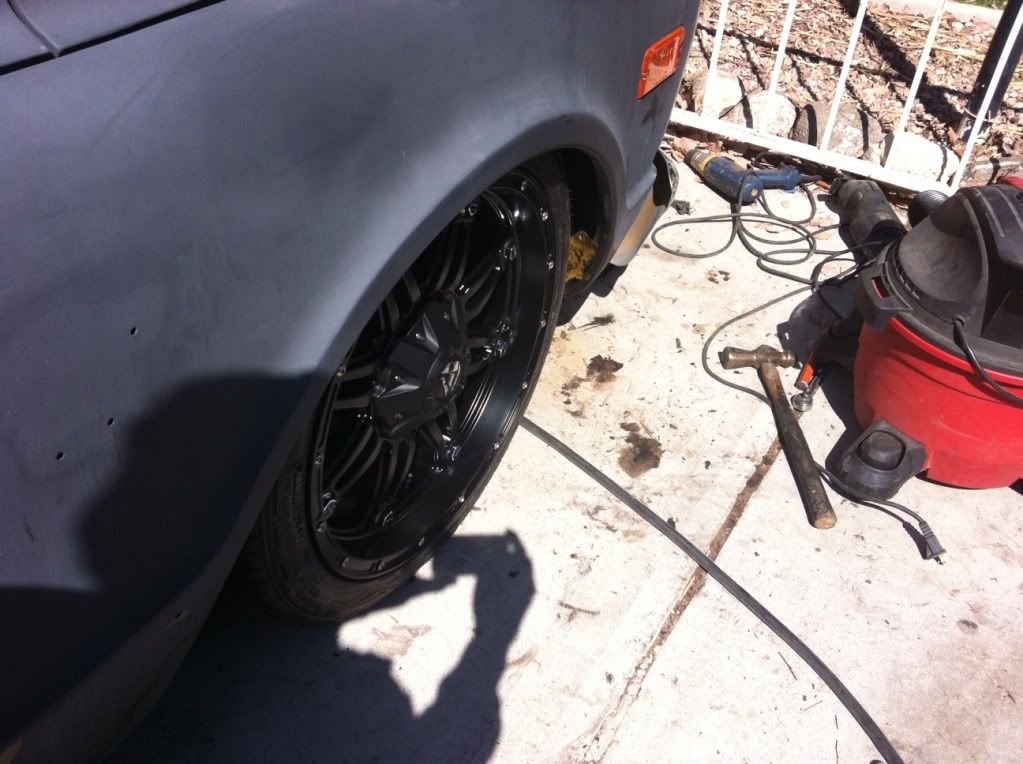 Fronts are 20x8.5 and rears are 22x9.5 I was also able to get the new radiator and flex-a-lite fans installed. I had to narrow the radiator mounts, but it went in like a charm... 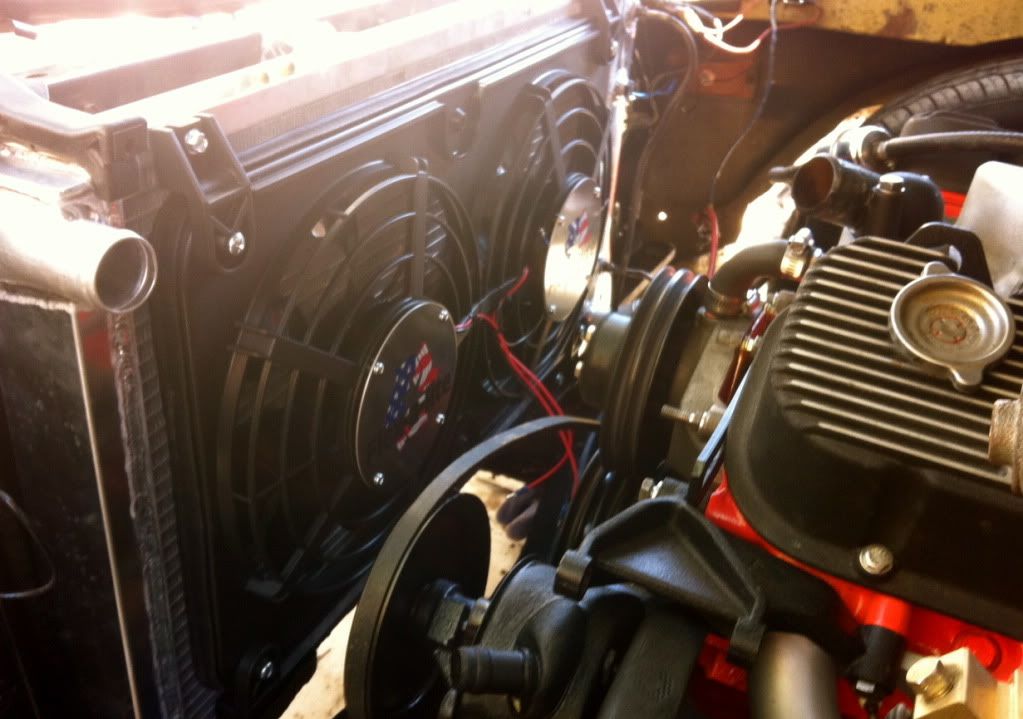 Slowly but surely, one piece at a time, and it'll get there
__________________
Eric '68 C20 Suburban, Bagged with Suicide 3rd Door, and Loaded with a 396 - Under Construction http://67-72chevytrucks.com/vboard/s...d.php?t=403690 |
|
|
|
|
06-08-2011, 10:13 PM
|
#13 |
|
What?
Join Date: Jun 2007
Location: Southern California
Posts: 7,617
|
Re: Mulk's 8-Lugger
 Awesome! Awesome!
__________________
Chris 1968 K20 Suburban 1972 K10 LWB PU |
|
|
|
|
06-10-2011, 02:53 AM
|
#14 |
|
Registered User
Join Date: Mar 2010
Location: a t w a t e r cali 95301
Posts: 10,713
|
Re: Mulk's 8-Lugger
ww looks cool! i like the new wheels and the steelies about the same... and i really like the steelies!
|
|
|
|
|
11-26-2011, 06:02 AM
|
#15 | |
|
Registered User
Join Date: Feb 2010
Location: Eastvale, CA
Posts: 82
|
Re: Mulk's 8-Lugger
Quote:
I was wondering if you could share the back spacing on these rims? Fronts are 20x8.5 = rears are 22x9.5 = I don't have a Suburban but am planning to keep my C-20 8 Lug as well and get it low. Not sure if I will go aftermarket rims but would like to check out my options. I think I am starting with a 5/5 static drop and eventually bags too. Thanks, Jerry |
|
|
|
|
|
07-22-2011, 08:27 PM
|
#16 |
|
Registered User
Join Date: Mar 2010
Location: Sin City, Nevada
Posts: 152
|
Re: Mulk's 8-Lugger
No major changes over that passed couple weeks.... I was forced to enjoy 10 days in a beach house on the Florida Gulf Coast
 But I just had to post this photo to get me motivated to work on it in this Vegas heat... 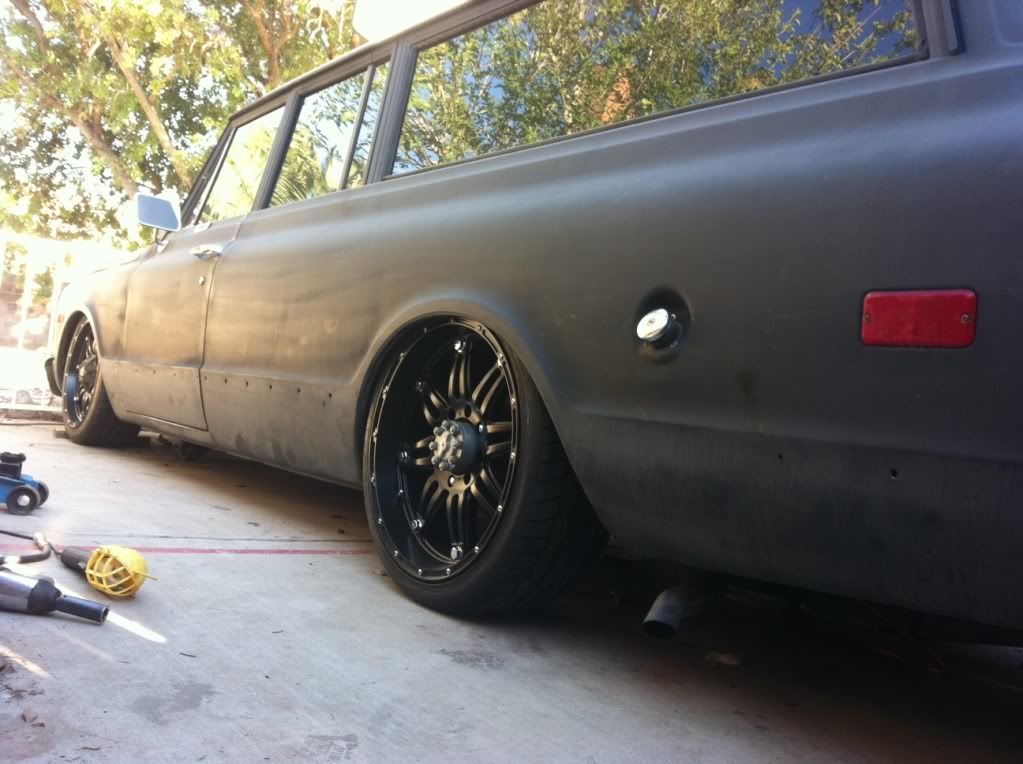
__________________
Eric '68 C20 Suburban, Bagged with Suicide 3rd Door, and Loaded with a 396 - Under Construction http://67-72chevytrucks.com/vboard/s...d.php?t=403690 |
|
|
|
|
07-22-2011, 11:21 PM
|
#17 |
|
Registered User
Join Date: Mar 2011
Location: Chesapeake, VA
Posts: 578
|
Re: Mulk's 8-Lugger
I love those wheels!
__________________
My 72 Suburban Build - http://67-72chevytrucks.com/vboard/s...d.php?t=454019 79 Volvo Turbo LS Build - http://67-72chevytrucks.com/vboard/s...d.php?t=594252 Buggy Bed for son - http://67-72chevytrucks.com/vboard/s...d.php?t=657350 |
|
|
|
|
07-24-2011, 11:44 PM
|
#18 |
|
Registered User
Join Date: Mar 2010
Location: Sin City, Nevada
Posts: 152
|
Re: Mulk's 8-Lugger
A few month back I was reading the "Camaro Tach Upgrade" in the electrical section, and decided to order one. So I found my self on eBay, bought a tach for $19, with no real idea when or if I'd ever tackle to upgrade.
Well in case you didn't know, it's HOT in Vegas this time of year. Plus, I just got a bunch more tattoo work done on my back, and didn't feel the need to climb under the Burb today. But I did see that tach laying on the bench, and decided today was a perfect day to experiment, and here's my story...... After clearing a spot on the dining room table (right under a/c vent), I layed out my arsenal of small tools, and blew apart the cluster. To clean off the paint paint line on lense of the center opening where the tach will find its new home, I soaked the area with mineral spirits. Once the bond was losened, I used a plastic spoon (high tech) to remove paint without scraatching the lense. 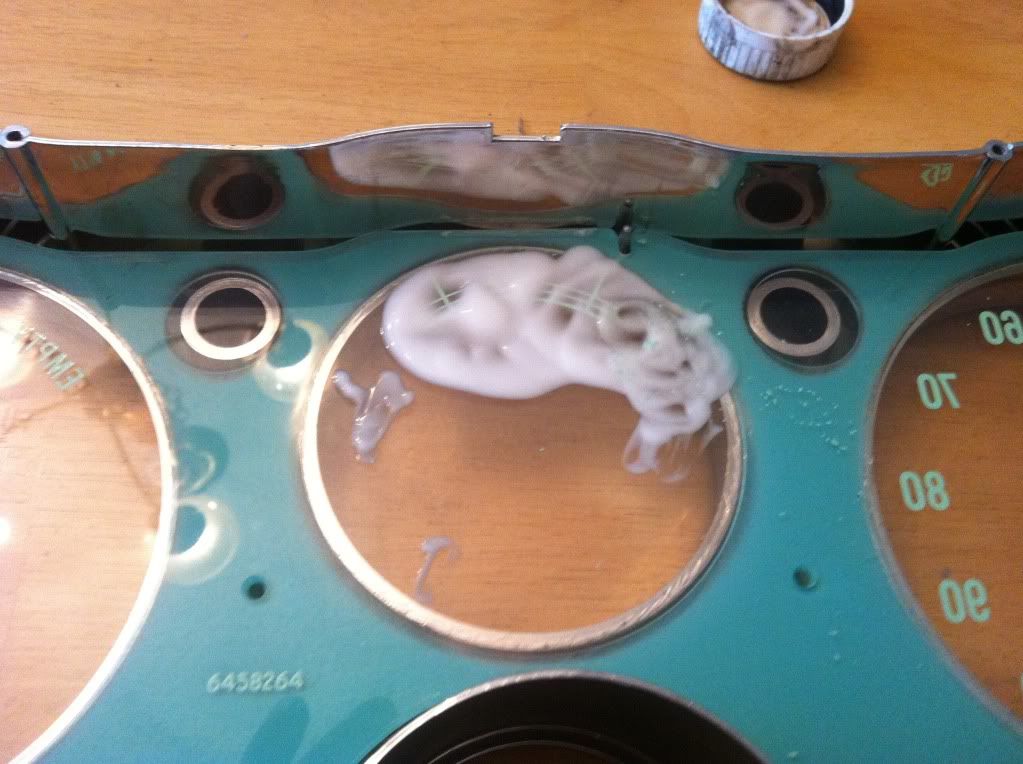 I then cut the opening in the black bezel, with a set of tin-snips, just being careful to follow the bevelled lip chevy had already provided. The edge is hidden, so those little teeth marks aren't an issue. 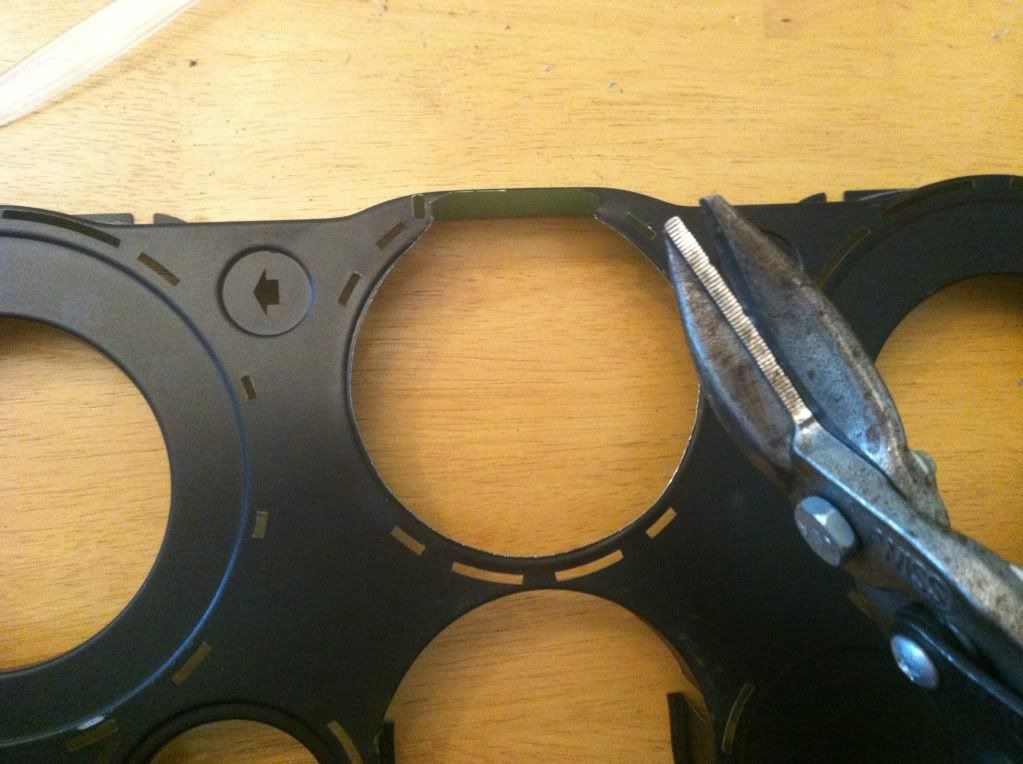 I layed the bezel section back in place, and trimmed the upper and lower edge of the tach face so it would fit in place without any issues. Not pretty, but then again, it's not gonna be visible.  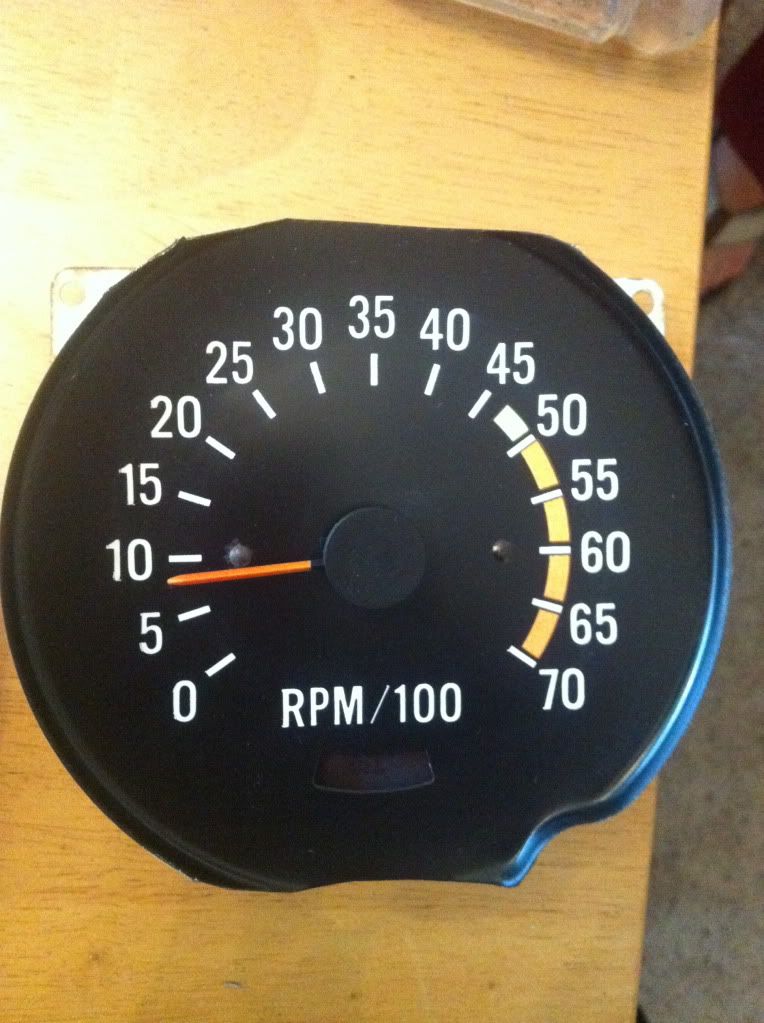 To be continued......
__________________
Eric '68 C20 Suburban, Bagged with Suicide 3rd Door, and Loaded with a 396 - Under Construction http://67-72chevytrucks.com/vboard/s...d.php?t=403690 |
|
|
|
|
07-25-2011, 12:07 AM
|
#19 |
|
Registered User
Join Date: Mar 2010
Location: Sin City, Nevada
Posts: 152
|
Re: Mulk's 8-Lugger
Continuing.....
I got the tach positioned, marked the placement, and used some flashing tape to hold it in place. That stuff sticks to everything, and isn't affected by the heat... In case you missed the portion.... It gets hot here. I also taped the red "oil" light lense in place just to fill the void (looks official from front). I rotated these shots before I attached them, but...... 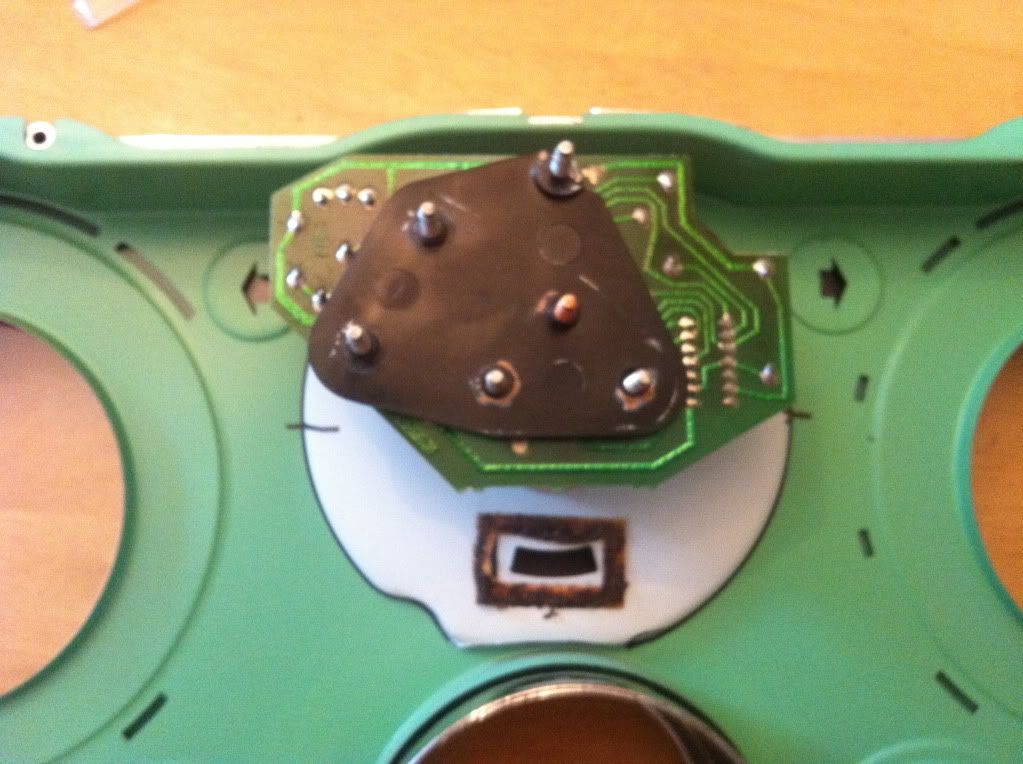 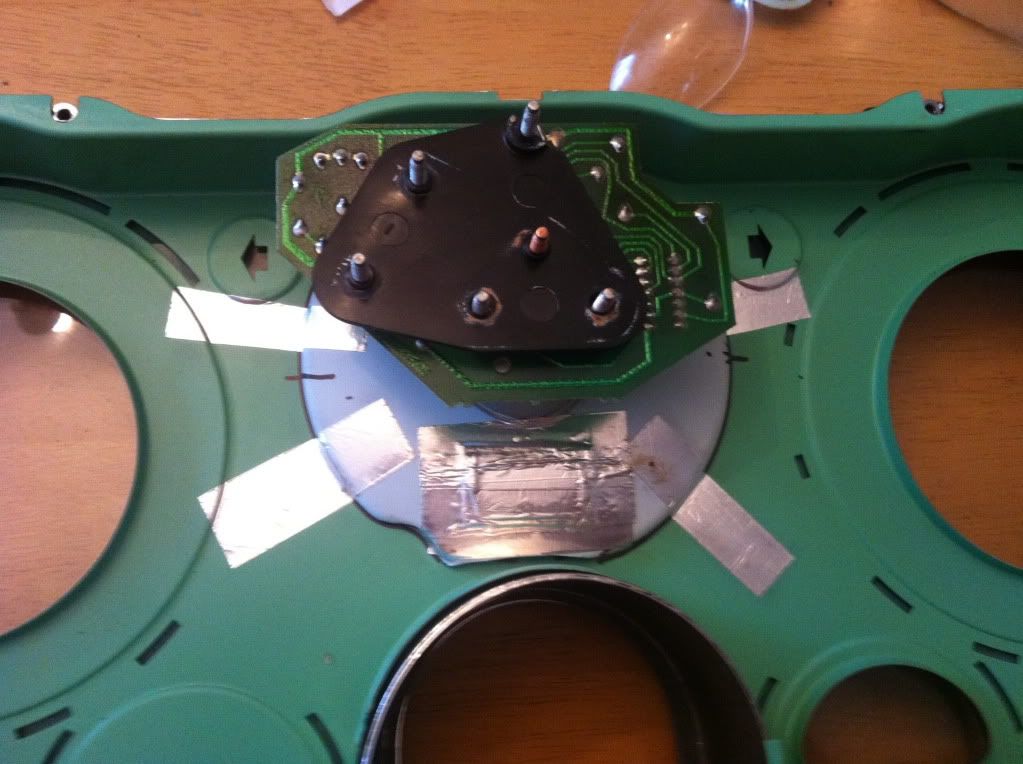 Now here's where I went in my own direction from the instruction in the electrical section. I didn't feel like taking the tach apart, and moving the circuit board. I just opened-up a hole in the backing plate. 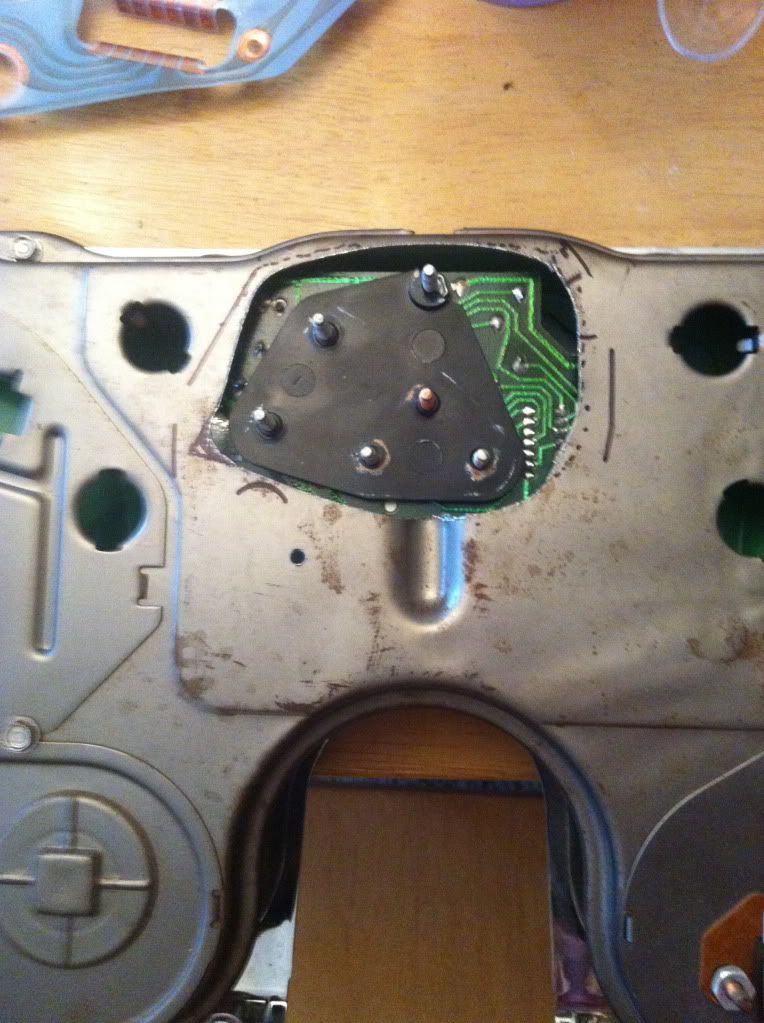 I then used the backing plate that came with the tach, cut it to size, and used to to fill the hole, and support the tach  Two sheet metal screws hold everything nicely in place. 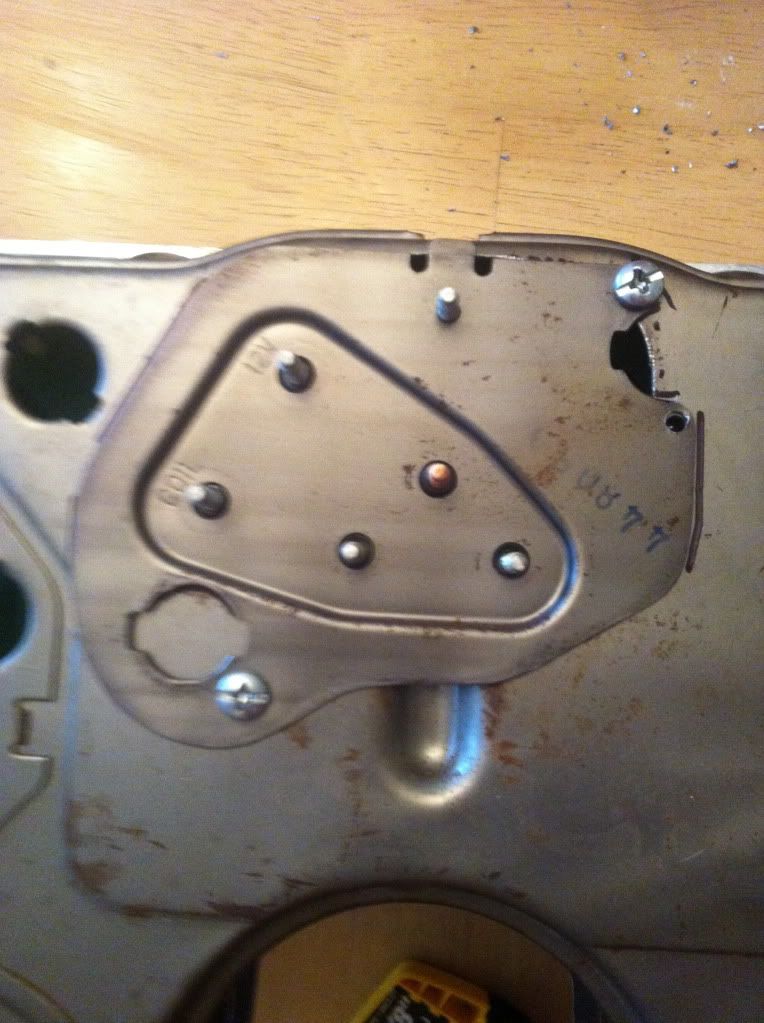 I know. Now how is the dash circuit sheet gonna clear those posts? A few simple relief-cuts with the razor blade, and problem solved.  ^^^^Anybody catch those two turn-signal light tubes sitting on the whole assembled cluster ^^^^ Ya.... Me niether  Well here's the finished product... Not to bad. I just hope I got a working tach off of eBay 
__________________
Eric '68 C20 Suburban, Bagged with Suicide 3rd Door, and Loaded with a 396 - Under Construction http://67-72chevytrucks.com/vboard/s...d.php?t=403690 |
|
|
|
|
07-25-2011, 12:09 AM
|
#20 |
|
Registered User
Join Date: Mar 2010
Location: Sin City, Nevada
Posts: 152
|
Re: Mulk's 8-Lugger
Now that I'm done..... What does this wire conect to? It was just floating when I pulled the cluster.
__________________
Eric '68 C20 Suburban, Bagged with Suicide 3rd Door, and Loaded with a 396 - Under Construction http://67-72chevytrucks.com/vboard/s...d.php?t=403690 |
|
|
|
|
07-25-2011, 03:33 AM
|
#21 |
|
Registered User
Join Date: Mar 2010
Location: a t w a t e r cali 95301
Posts: 10,713
|
Re: Mulk's 8-Lugger
i dont know about the wire but the burb looks awesome the gauges look great and after all that work some nice comedy
 thats funny i remember when i did that one time lol it really sucks! thats funny i remember when i did that one time lol it really sucks!
|
|
|
|
|
07-25-2011, 06:00 AM
|
#22 | |
|
Collector of Projects
Join Date: Apr 2003
Location: Las Vegas
Posts: 3,106
|
Re: Mulk's 8-Lugger
Quote:
|
|
|
|
|
|
07-25-2011, 09:49 AM
|
#23 |
|
Registered User
Join Date: Mar 2010
Location: Sin City, Nevada
Posts: 152
|
Re: Mulk's 8-Lugger
Thanks guys, I appreciate you checking-out my build, and the help and encouragement along the way.
Rich - the fiber optic idea makes sence. It had a Flaming River column in it when I got it (weird custom mod to do, with nothing else really changed) and it has it's own light source Rick - glad you enjoyed the comedy. My life is a swirl of sarcasm, so I like sharing my mishaps and adventures along the way. Also, I think I'm gonna run the trim, and use the body-clips to hold it all on. The trim is in decent shape, other than a few holes prom where the prior owner screwed the trim back on. I think I'm gonna scotch bright all of it, and go with a stainless look Posted via Mobile Device Posted via Mobile Device
__________________
Eric '68 C20 Suburban, Bagged with Suicide 3rd Door, and Loaded with a 396 - Under Construction http://67-72chevytrucks.com/vboard/s...d.php?t=403690 |
|
|
|
|
07-25-2011, 04:46 AM
|
#24 |
|
Account Suspended
Join Date: Mar 2007
Location: san bernardino ca. everywhere
Posts: 3,938
|
Re: Mulk's 8-Lugger
super sick, i plan on running an off road style wheel on mine as well, it will be the black kmc rockstars
|
|
|
|
|
08-02-2011, 03:47 PM
|
#25 |
|
Registered User
Join Date: Mar 2010
Location: Sin City, Nevada
Posts: 152
|
Re: Mulk's 8-Lugger
Was looking forward to 2 solid days of working on the 8-Lugger. Yesterday was pretty productive until I found a blown oil seal on the right rear hub. Not a huge setback. Was still able to clearance crossmember and floor, for the pumpkin.
Figured I'd start today by getting the seal, and finishing-up that side of the axle...... Well here I am, my second trip to Napa (since I provided wrong part number) waiting for correct seal to make it's treck across the Vegas valley. Temp is rising, and motivation is dropping. But I won't be deterred. Rear bags WILL be finalized before I quit today! Posted via Mobile Device
__________________
Eric '68 C20 Suburban, Bagged with Suicide 3rd Door, and Loaded with a 396 - Under Construction http://67-72chevytrucks.com/vboard/s...d.php?t=403690 |
|
|
|
 |
| Bookmarks |
|
|


 Hybrid Mode
