
|
 09-18-2011, 08:14 PM
|
#351 |
|
Registered User
Join Date: Jul 2009
Location: Minneapolis
Posts: 97
|
Re: Project "49 No Buck$"
Ooops.... You asked for time.
They took me about an hour and a half to do. Total cost was the lights plus $2 in LED's Most of the time was in separating the lens from the housing. Using an exacto knife (They're glued with a flexible adhesive) and being careful not to break the glass. |

|

|
|
09-18-2011, 08:29 PM
|
#352 |
|
Registered User
Join Date: Sep 2005
Location: Glendale Arizona
Posts: 1,188
|
Re: Project "49 No Buck$"
Here is a good link for LED's and even has candle power
http://www.superbrightleds.com/cgi-b...specs%2F67.htm |
|
|
|
|
09-19-2011, 04:11 PM
|
#353 |
|
Registered User
Join Date: Nov 2008
Location: So. Cal.
Posts: 452
|
Re: Project "49 No Buck$"
Yo Rude, thanks for the link! If I ever see something I like with the taillights, I'll post it! Had a good weekend with the truck. Saturday was the maiden voyage of "No Bucks"! Alex and myself took it for a little 2 mile cruise just to see how it finally came together. Was pretty uneventful and almost surreal cruising it around the neighborhood! Spent the rest of the weekend working on the interior and stereo stuff. It's slowly coming together!
__________________
It's all about the stance, baby! http://67-72chevytrucks.com/vboard/s...d.php?t=320546 |
|
|
|
|
09-19-2011, 04:15 PM
|
#354 |
|
Registered User
Join Date: Jul 2009
Location: Minneapolis
Posts: 97
|
Re: Project "49 No Buck$"
Awesome! Love the truck man! Great job!
Always good to hear of a Maiden Voyage with no issues!!!!!!!!!!!!!!!!!!! |
|
|
|
|
09-19-2011, 11:05 PM
|
#355 |
|
Registered User
 Join Date: Mar 2010
Location: Piper, KS
Posts: 683
|
Re: Project "49 No Buck$"
You make cheap look priceless. Nice work just read the whole thread. Very cool.
|
|
|
|
|
09-20-2011, 01:08 AM
|
#356 |
|
Registered User
Join Date: Jun 2006
Location: Idaho
Posts: 8,800
|
Re: Project "49 No Buck$"
Good to hear its on the road. I'm firing my engine next weekend. Did you get the photos of the trim??
__________________
1959 Chevy Short Fleetside w/ 74 4WD drive train (current project) OrrieG Build Thread 1964 Chevelle Malibu w/ 355-350TH (daily driver) Helpful AD and TF Manual Site Old Car Manual Project |
|
|
|
|
09-27-2011, 02:36 PM
|
#357 | |
|
Registered User
Join Date: Sep 2011
Location: Texas
Posts: 44
|
Re: Project "49 No Buck$"
Quote:
Now that you have the truck on the road how has this worked out? Thanks, |
|
|
|
|
|
09-27-2011, 03:05 PM
|
#358 |
|
Registered User
Join Date: Aug 2011
Location: Kingsport, TN
Posts: 36
|
Re: Project "49 No Buck$"
Just too cool, great idea; may have to borrow it myself when the time comes.
|
|
|
|
|
09-27-2011, 04:31 PM
|
#359 |
|
Registered User
Join Date: Nov 2008
Location: So. Cal.
Posts: 452
|
Re: Project "49 No Buck$"
Its not on the road yet but its getting closer! Lots of detail stuff now! Trying to finish up all the interior stuff and then I'm driving it!
Posted via Mobile Device
__________________
It's all about the stance, baby! http://67-72chevytrucks.com/vboard/s...d.php?t=320546 |
|
|
|
|
10-03-2011, 12:29 PM
|
#360 |
|
Registered User
Join Date: Nov 2008
Location: So. Cal.
Posts: 452
|
Re: Project "49 No Buck$"
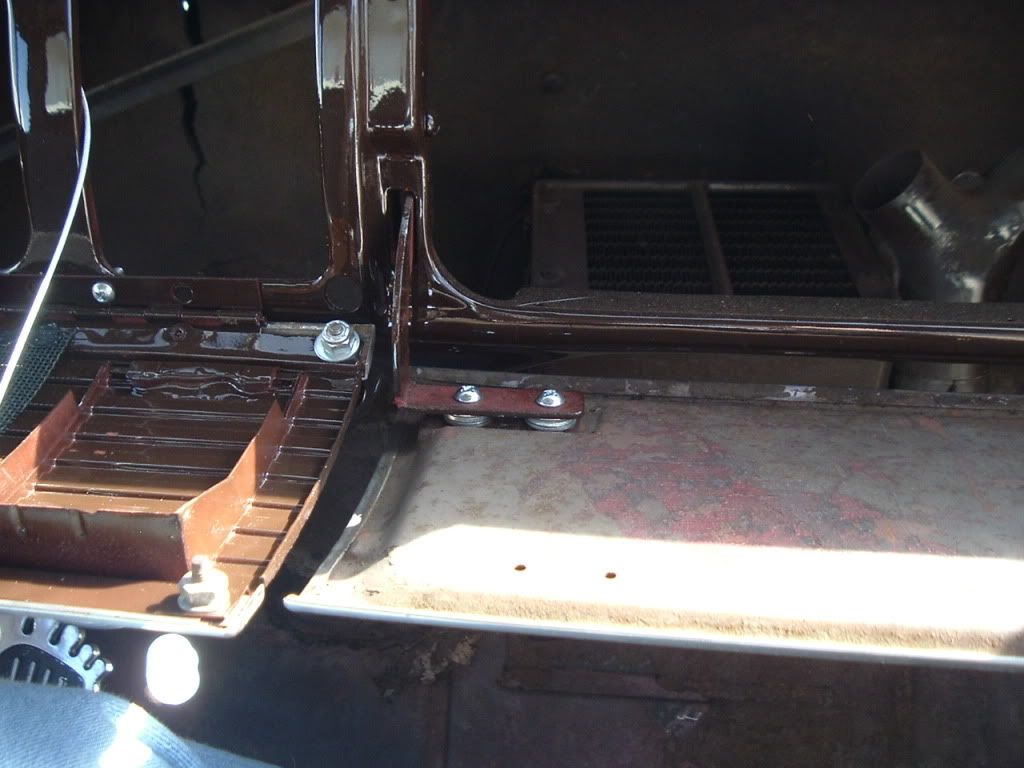
Wow, what a great weekend! Fixed a couple more little issues and got to put another 5 miles or so on the truck and helped Alex get a bunch of stuff done on his truck! It's too fun cruising this thing around! I'm still working on the interior and stereo stuff, so it's not a driver just yet. I was trying to figure out how to run my speaker wire without it pinching the wires as the door closes. I saw a friends truck and the kit they used but me being the cheap-ass did the same thing with very little money. Went to the hardware store and picked up a (1) Screendoor spring 16"x9/16" (2) 7/8" plastic hole plugs and a couple of rubber grommets.
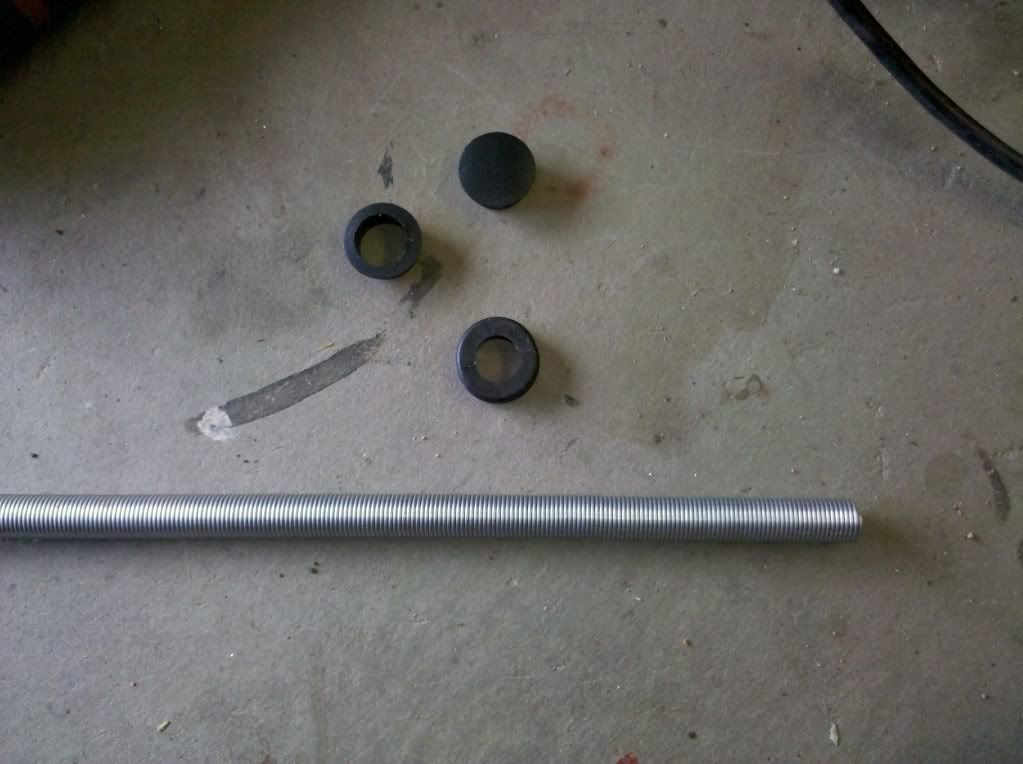 You'll notice I took my die grinder and made a hole in the plastic plug, this is where the spring will slide through. I cut the spring in half so I have an 8" chunk for each side. I should have taken more pics, so I'll have to explain. I drilled a hole in the door jamb about 3" up from the lower hinge hole 3/4" from the inside edge of the door. After taking the die grinder to open the hole up to fit the plastic plug, I got inside the truck, closed the door and reached through the access hole to use my sharpie and trace the hole I drilled onto the door jamb. Now the holes line up. I took my plastic plug that I'd drilled out You'll notice I took my die grinder and made a hole in the plastic plug, this is where the spring will slide through. I cut the spring in half so I have an 8" chunk for each side. I should have taken more pics, so I'll have to explain. I drilled a hole in the door jamb about 3" up from the lower hinge hole 3/4" from the inside edge of the door. After taking the die grinder to open the hole up to fit the plastic plug, I got inside the truck, closed the door and reached through the access hole to use my sharpie and trace the hole I drilled onto the door jamb. Now the holes line up. I took my plastic plug that I'd drilled out 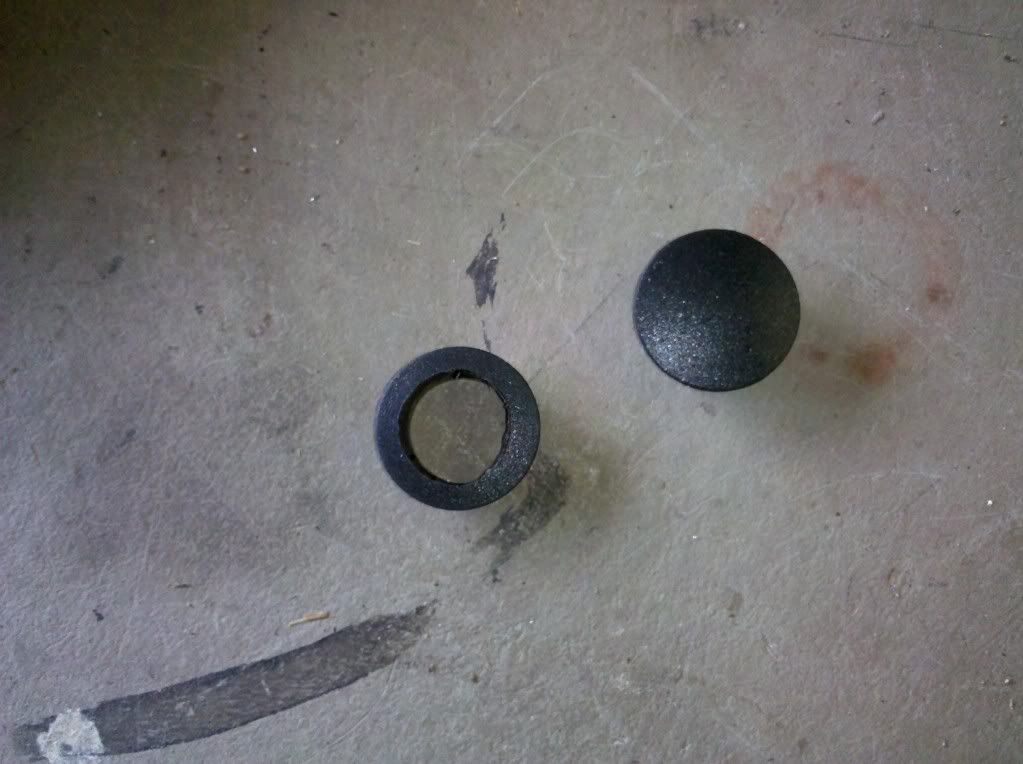 so the spring slides smoothly through it and glued it to the door hole. I then finished opening up the door jamp hole to fit the rubber grommet that has a 9/16" ID (same size as the spring diameter) and installed the grommet. I wrapped a couple turns of electrical tape around the first 2" of spring so it would fit snug into the the grommet and put the other end of the spring into the door. When you close the door the spring stays tight in the jamb, so the spring slides smoothly through it and glued it to the door hole. I then finished opening up the door jamp hole to fit the rubber grommet that has a 9/16" ID (same size as the spring diameter) and installed the grommet. I wrapped a couple turns of electrical tape around the first 2" of spring so it would fit snug into the the grommet and put the other end of the spring into the door. When you close the door the spring stays tight in the jamb, 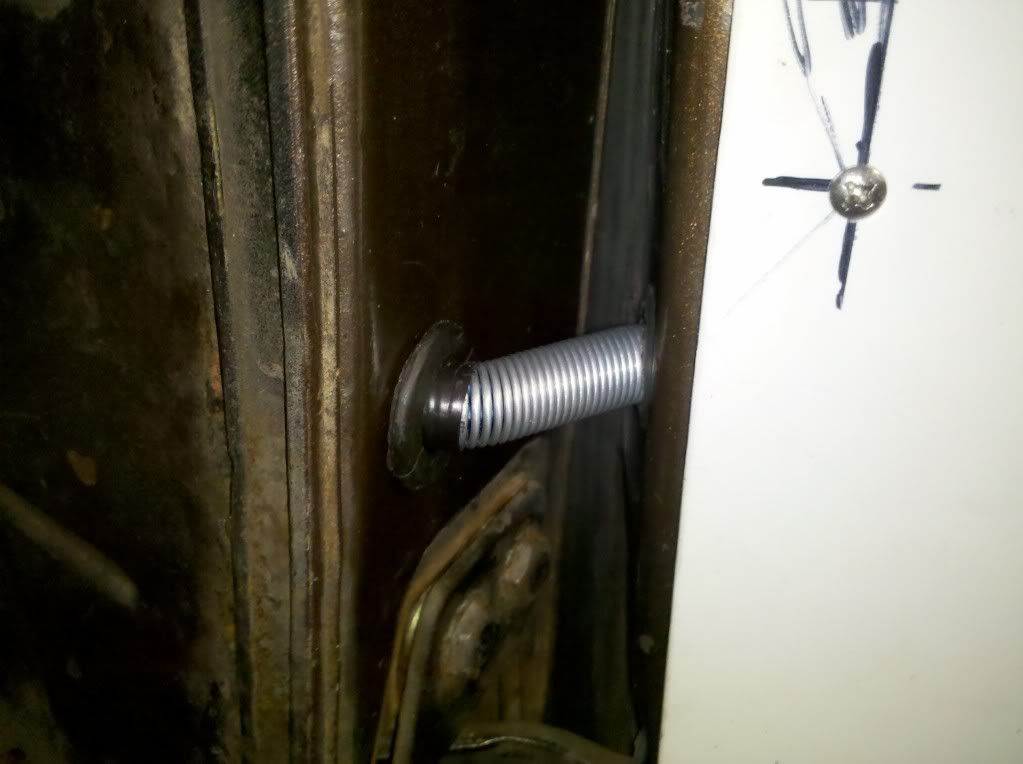 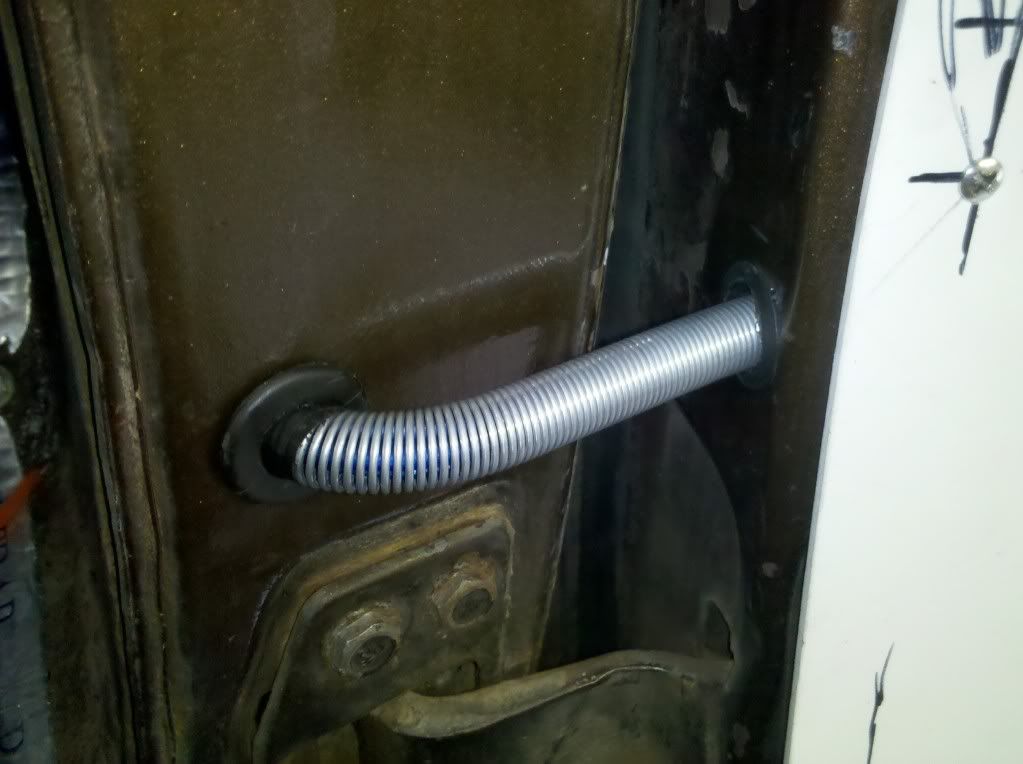 but glides smoothly into the door so the wires don't pinch! Less than $10 in the whole deal and it works great. I actually trimmed the tape so you couldn't see it and put a little dab of weatherstrip adhesive on the grommet and spring so it wont go anywhere. Here's how it works and I'm sorry about the compressor noise! but glides smoothly into the door so the wires don't pinch! Less than $10 in the whole deal and it works great. I actually trimmed the tape so you couldn't see it and put a little dab of weatherstrip adhesive on the grommet and spring so it wont go anywhere. Here's how it works and I'm sorry about the compressor noise!
__________________
It's all about the stance, baby! http://67-72chevytrucks.com/vboard/s...d.php?t=320546 Last edited by kustombrad; 10-03-2011 at 12:35 PM. |
|
|
|
|
10-03-2011, 07:55 PM
|
#361 |
|
A320 Pilot/USAF Retired
Join Date: Mar 2009
Location: Charleston, SC
Posts: 2,622
|
Re: Project "49 No Buck$"
To COOL!
__________________
JJ My 1957 build: http://67-72chevytrucks.com/vboard/s...d.php?t=334552 http://www.trifive.com/forums/showthread.php?t=22037 Instagram - Chuckdriver57 |
|
|
|
|
10-04-2011, 09:18 AM
|
#362 |
|
Registered User
Join Date: Jun 2010
Location: Vancouver Island BC
Posts: 652
|
Re: Project "49 No Buck$"
Yup wicked ingenuity.
|
|
|
|
|
10-04-2011, 11:12 AM
|
#363 |
|
Registered User
Join Date: Aug 2007
Location: Corona, California
Posts: 7,998
|
Re: Project "49 No Buck$"
Very slick mod.
Kim |
|
|
|
|
10-04-2011, 11:27 AM
|
#364 | |
|
Registered User
Join Date: Aug 2011
Location: Kingsport, TN
Posts: 36
|
Re: Project "49 No Buck$"
Quote:
 bummerrrrrrrr bummerrrrrrrr
|
|
|
|
|
|
10-05-2011, 01:45 PM
|
#365 |
|
Registered User
Join Date: Mar 2005
Location: apple valley, ca
Posts: 2,670
|
Re: Project "49 No Buck$"
If you like that mod, just wait until you see what he's done lately to the rest of the interior. You guys are going to flip.
That's all I'm going to say for now................
__________________
Check out my latest endeavor: https://roundsixpod.com My build threads: '55 Chevy: http://67-72chevytrucks.com/vboard/s...d.php?t=247512 '64 C-20: http://67-72chevytrucks.com/vboard/s...d.php?t=446527 |
|
|
|
|
10-05-2011, 10:58 PM
|
#366 | |
|
Senior Member
  Join Date: Nov 2008
Location: Glendora, CA
Posts: 6,331
|
Re: Project "49 No Buck$"
Quote:

|
|
|
|
|
|
10-06-2011, 12:56 AM
|
#367 |
|
Registered User
Join Date: Jun 2006
Location: Idaho
Posts: 8,800
|
Re: Project "49 No Buck$"
OK, I got the mini trampoline ready, lets go Brad......
__________________
1959 Chevy Short Fleetside w/ 74 4WD drive train (current project) OrrieG Build Thread 1964 Chevelle Malibu w/ 355-350TH (daily driver) Helpful AD and TF Manual Site Old Car Manual Project |
|
|
|
|
10-13-2011, 11:09 AM
|
#368 |
|
Registered User
Join Date: Nov 2008
Location: So. Cal.
Posts: 452
|
Re: Project "49 No Buck$"
Here's another little no money deal I just finished. I installed my new/old distributor and coil after yanking out the HEI. I couldn't find the plug wire looms I was looking for, so I whipped up something to get me by until I find what I want. I took some 1/4" washers, welded them together and then flattened the weld with a sledge hammer
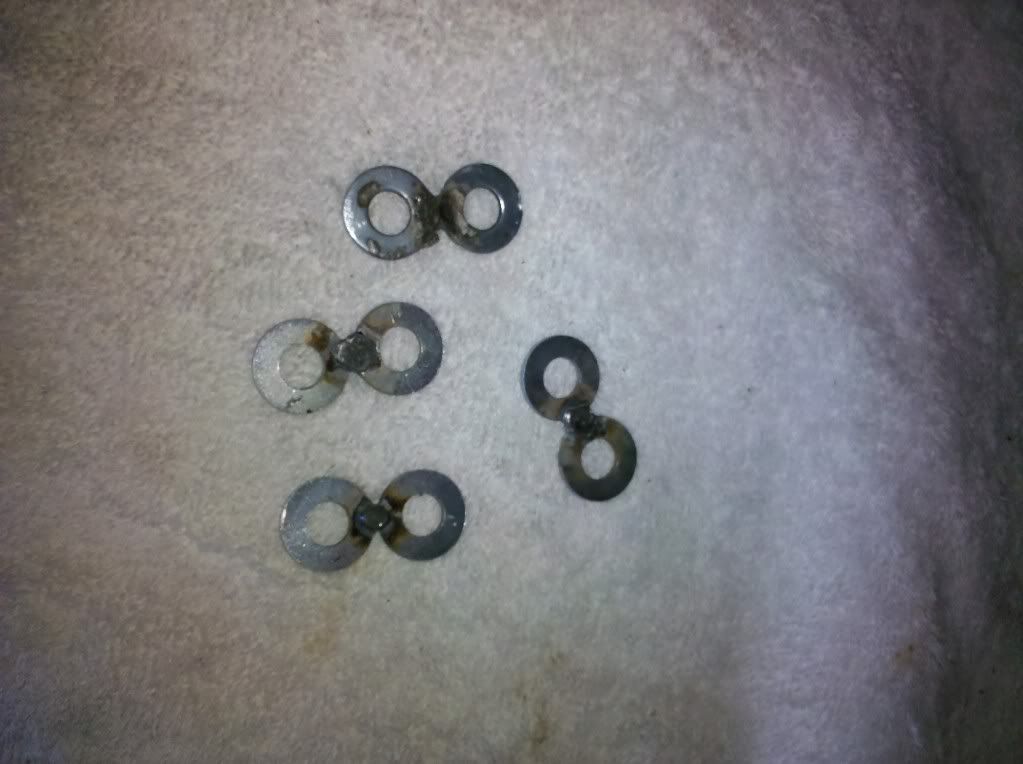 . After painting them black I installed them on the bottom 2 bolts of the valve covers. I routed my wiring before cutting the wires to fit and seperated them with black zip-ties. I cut a couple small chunks of 3/8" fuel line, split it and put the wires inside before zipping them to the washers bolted to the covers . After painting them black I installed them on the bottom 2 bolts of the valve covers. I routed my wiring before cutting the wires to fit and seperated them with black zip-ties. I cut a couple small chunks of 3/8" fuel line, split it and put the wires inside before zipping them to the washers bolted to the covers 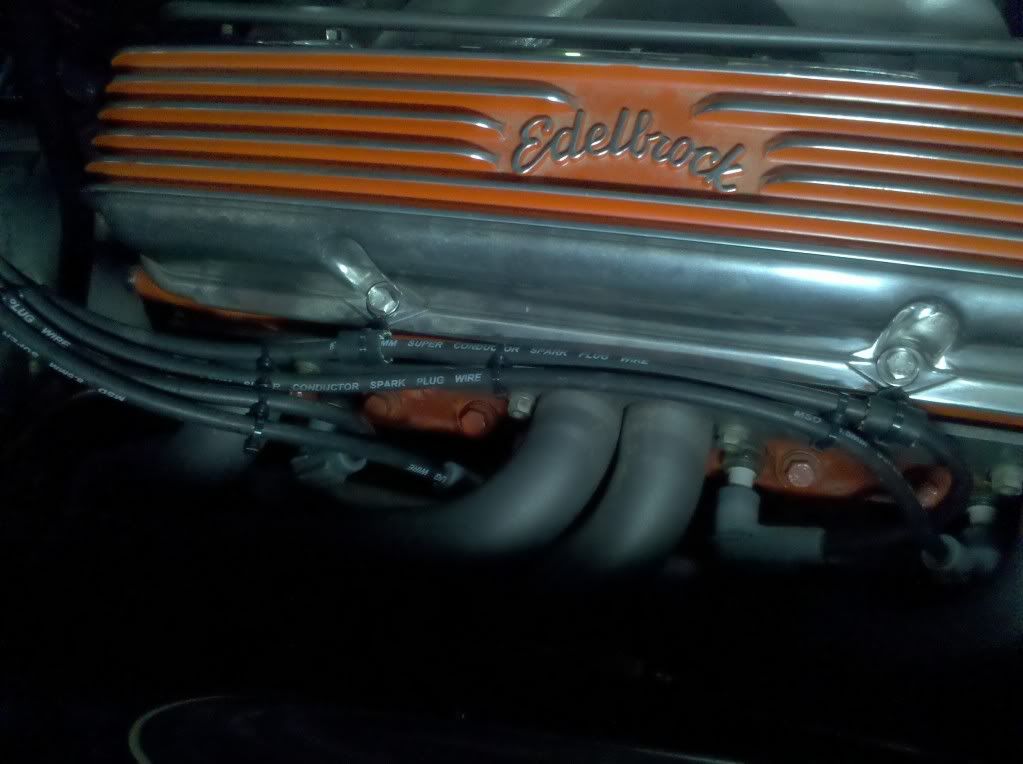  It's very simple and pretty much free! It's very simple and pretty much free!
__________________
It's all about the stance, baby! http://67-72chevytrucks.com/vboard/s...d.php?t=320546 |
|
|
|
|
10-13-2011, 12:25 PM
|
#369 |
|
Registered User
Join Date: Aug 2011
Location: Kingsport, TN
Posts: 36
|
Re: Project "49 No Buck$"
Very clean look, me I'd leave them. Simple. old school look and NO BLING!
__________________
We lust for what we want, weep for what we need... |
|
|
|
|
10-13-2011, 12:25 PM
|
#370 |
|
Registered User
Join Date: Aug 2011
Location: Kingsport, TN
Posts: 36
|
Re: Project "49 No Buck$"
Very clean look, me I'd leave them. Simple. old school look (if we'd had zip ties back then) and NO BLING!
__________________
We lust for what we want, weep for what we need... |
|
|
|
|
10-24-2011, 01:44 PM
|
#371 |
|
Registered User
Join Date: Nov 2008
Location: So. Cal.
Posts: 452
|
Re: Project "49 No Buck$"
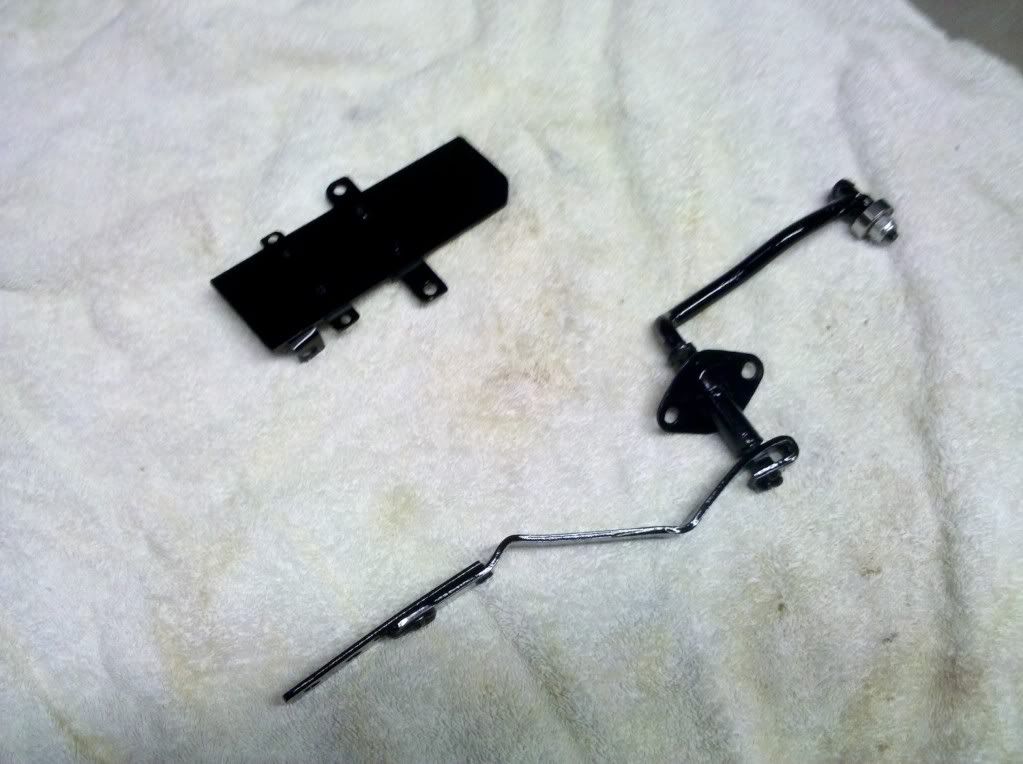
More little tricks! Here's how I setup the heater control; I used a choke cable and a water control valve from a motorhome that I scored at Pick and Plunder! When the knob is pushed in, the water flow is shut off (no heat)
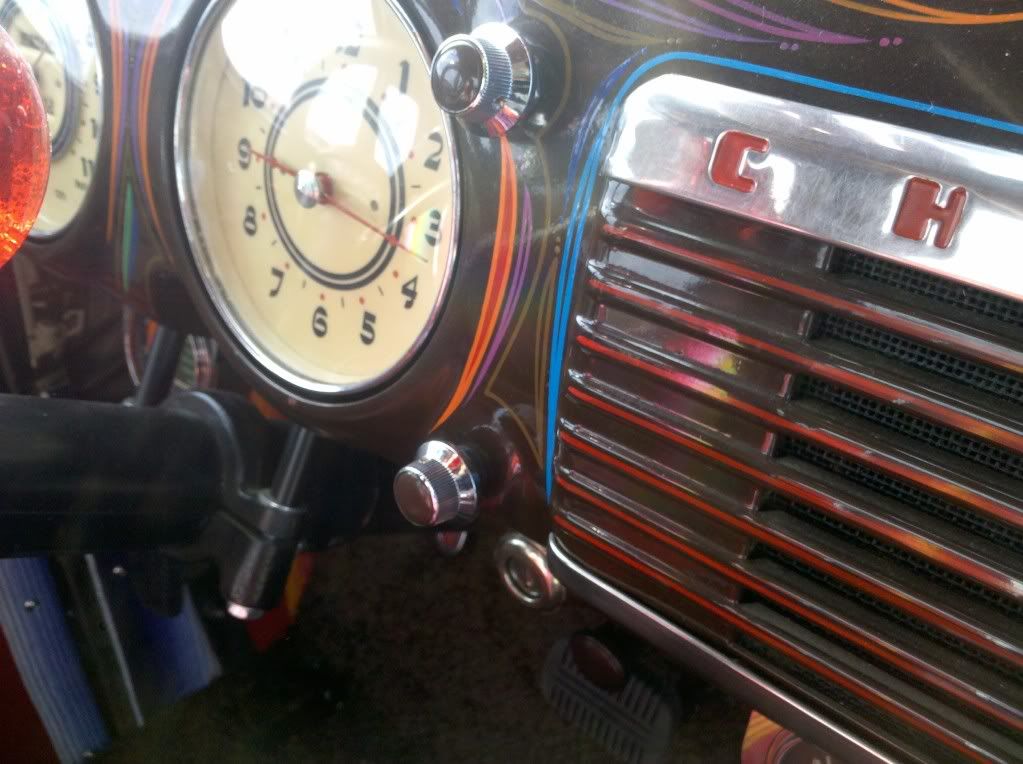 and it's opened when pulled out and it's opened when pulled out 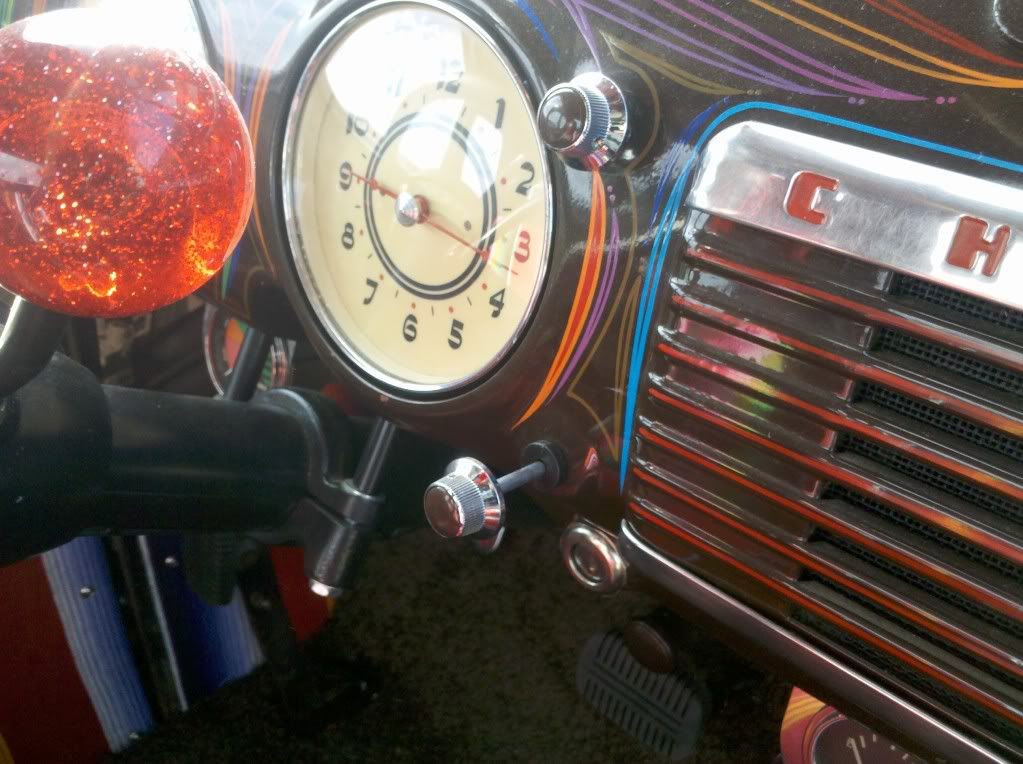 Notice I avoided the normal and used tophat style guitar knobs for the dash stuff! Here's the valve on the heater hose Notice I avoided the normal and used tophat style guitar knobs for the dash stuff! Here's the valve on the heater hose 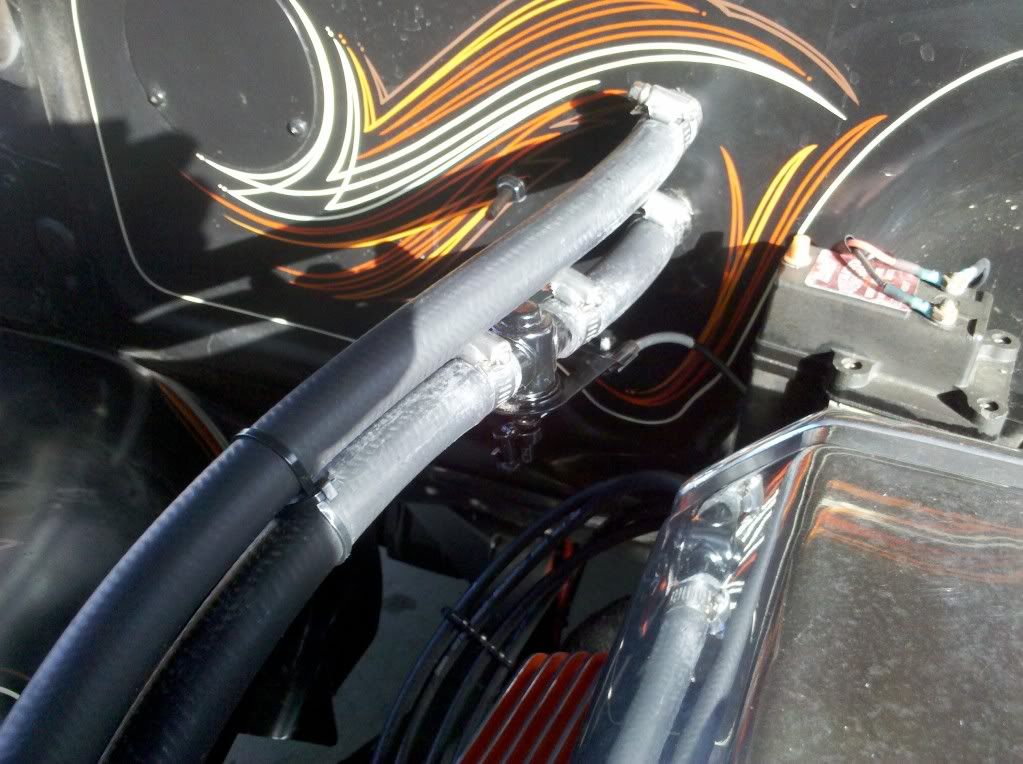
__________________
It's all about the stance, baby! http://67-72chevytrucks.com/vboard/s...d.php?t=320546 |
|
|
|
|
10-24-2011, 01:55 PM
|
#372 |
|
Registered User
Join Date: Nov 2008
Location: So. Cal.
Posts: 452
|
Re: Project "49 No Buck$"
Here's my throttle pedal idea that works really well. The truck had a linkage from an early-mid 60's Chevy truck, so I decided to go with it. By design the rod rubs on the back of the pedal, it works but could be way smoother. I took a flat chunk of 16 gauge sheetmetal and fastened in to the back of my Cal Custom "Foot" pedal for both the "hinge" and pressure point of the pedal.
 I then proceded to weld a bolt at a 90 degree angle from the rod in order to use a skateboard wheel bearing, so it would roll easily on the flat piece of sheet and not drag I then proceded to weld a bolt at a 90 degree angle from the rod in order to use a skateboard wheel bearing, so it would roll easily on the flat piece of sheet and not drag 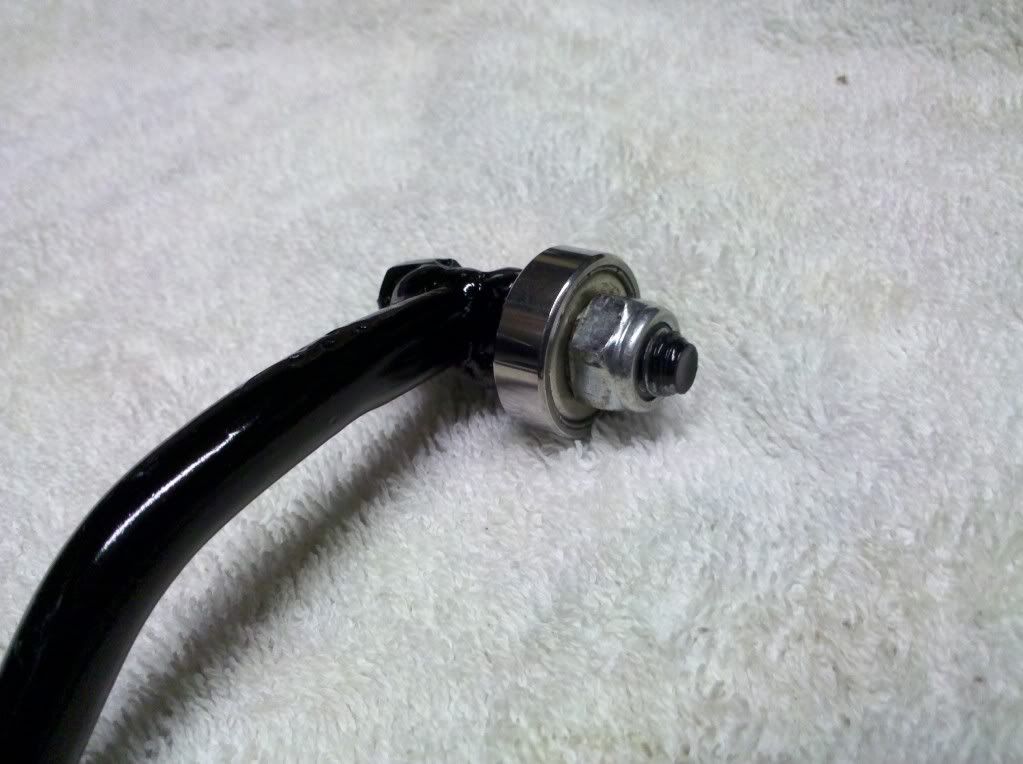 I works awesome and is smooth as butter!! I works awesome and is smooth as butter!!
__________________
It's all about the stance, baby! http://67-72chevytrucks.com/vboard/s...d.php?t=320546 |
|
|
|
|
10-24-2011, 02:03 PM
|
#373 |
|
Senior Member
Join Date: Nov 2008
Location: Glendora, CA
Posts: 6,331
|
Re: Project "49 No Buck$"
You ARE the Master of Mickey Mouse - but I mean it in the most complimentary and an EXCELLENT way! The more I see of your truck, the more I like it.
|
|
|
|
|
10-24-2011, 02:37 PM
|
#374 |
|
Registered User
Join Date: Aug 2007
Location: Corona, California
Posts: 7,998
|
Re: Project "49 No Buck$"
Very cool stuff.
Kim |
|
|
|
|
10-24-2011, 03:21 PM
|
#375 |
|
Registered User
Join Date: Aug 2011
Location: Kingsport, TN
Posts: 36
|
Re: Project "49 No Buck$"
Dude, you are too much! great work
__________________
We lust for what we want, weep for what we need... |
|
|
|
 |
| Bookmarks |
|
|


 Linear Mode

