
|
 09-20-2009, 02:47 PM
|
#26 |
|
Registered User
Join Date: Feb 2001
Location: Wetumpka, Al, U.S.
Posts: 8,891
|
Re: Project No-buck!
keep up the good work.
__________________
Kevin Special Thanks to All who have helped on the TRUCK! My Pass Time Show http://s129.photobucket.com/albums/p...Chapter1-0.mp4 So Far my best Times are: Motor only: 6.44 1/8 @ 104.13 10.39 1/4 @ 125.83 Nitrous Times: 5.785 1/8 @ 118.65 with a 1.336 60ft 9.168 1/4 @ 142.58 with a 250 shot dead out of the hole! |

|

|
|
09-28-2009, 07:52 AM
|
#27 |
|
VA72C10
 Join Date: Mar 2008
Location: Midlothian, VA
Posts: 25,269
|
Re: Project No-buck!
Nice progress, you're blowing right through this build.
__________________
Looking for a 67-72 swb or blazer project in or around VA. 
|
|
|
|
|
09-28-2009, 10:22 AM
|
#28 |
|
Senior Member
Join Date: Aug 2002
Location: Valley Center KS
Posts: 3,525
|
Re: Project No-buck!
I got a little more work done this week. I got all of the wood cut to the proper size, all of the metal strips cut to size and holes drilled.
I started installing the wood. I added an additional support. Basically it appeared that there is not a support between the wheel wells, so I added one. It makes the floor deflect A LOT LESS. I started bolting everything down, but it's kinda difficult to do by yourself  So I need to finish bolting the strips down, then drill the holes for the bolts that actually bolt the bed to the truck. So I need to finish bolting the strips down, then drill the holes for the bolts that actually bolt the bed to the truck.I also got the brakes all squared away after my failed attempt at adding power brakes. Basically the power MC was leaking, so I just put the manual MC back in. I had to get 2 new short brake lines since I kinda bent up the old ones in the process of trying to install power brakes. Oh, I got a replacement battery for FREE  Returned the one it came with to wally world, cause it was bad. Returned the one it came with to wally world, cause it was bad.Then I installed a different sending unit. The original one was leaking. The tube that actually goes through the metal "disk" that you can see was seperated and was leaking real bad. Luckily I had an extra one. After that I added a middle set of seat belts, and replaced half of the drivers seat belt....should be safer now. Finally I put the bench seat back in. No pics  I'll get some when I finish up the bed floor. I'll get some when I finish up the bed floor.
|
|
|
|
|
09-28-2009, 10:49 AM
|
#29 |
|
Under Construction
Join Date: Oct 2007
Location: Midlothian,TX (DFW)
Posts: 4,555
|
Re: Project No-buck!
great progress.
__________________
Heath subscribe to the board here: http://67-72chevytrucks.com/vboard/payments.php http://67-72chevytrucks.com/vboard/s...d.php?t=157669 FAQ how to's 1956 Chevy Apache 1967 C10 SWB FleetSide (under construction) 1969 K10 SWB FleetSide (Future Build) 1972 C10 SWB Stepside (Future Build) 56 chevy truck : http://www.cardomain.com/ride/2955823/1 67 truck build: http://www.67-72chevytrucks.com/vboard/showthread.php?t=281357/1 69 k10: http://67-72chevytrucks.com/vboard/s...d.php?t=389470 |
|
|
|
|
10-04-2009, 03:59 PM
|
#30 |
|
Senior Member
Join Date: Aug 2002
Location: Valley Center KS
Posts: 3,525
|
Re: Project No-buck!
Got the bed floor all together:
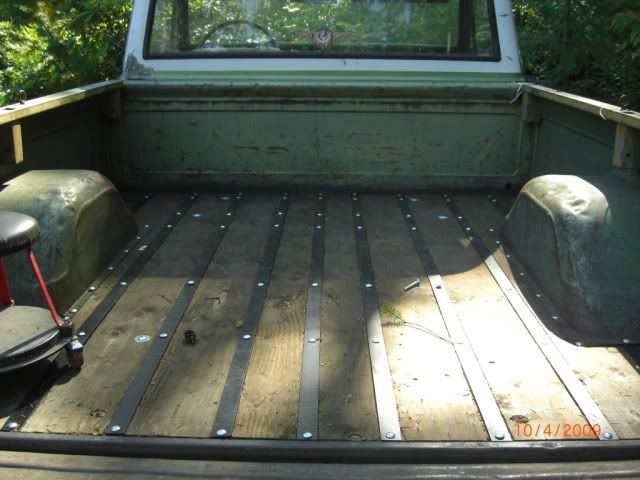 And then I threw on some sheet metal. "new" door and fender are courtesy of Livrat, Thanks A LOT! 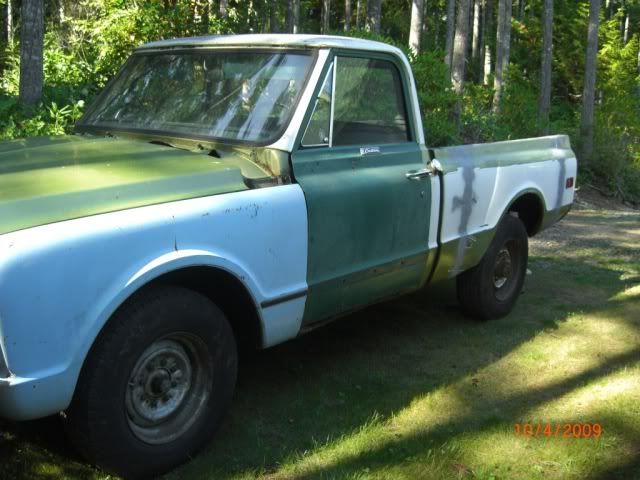 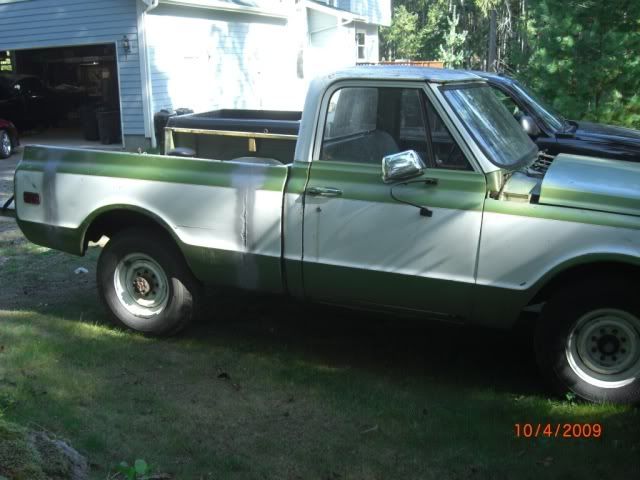 I have some additional bolts to put in for the sheet metal, install the cowl, and a few other little things. Then I also need to finish up welding the inside of the bed. |
|
|
|
|
10-04-2009, 11:33 PM
|
#31 |
|
Registered User
Join Date: Jun 2007
Location: Saskatoon, Saskatchewan,:
Posts: 2,901
|
Re: Project No-buck!
Hey, now that thing is really starting to come together and look like some thing, great job so far.
__________________
James 1968 GMC "HAVOC" 1986 GMC "Frank" J.J.R.H. Design & Consulting My 68`Rebuild "HAVOC": http://67-72chevytrucks.com/vboard/s...d.php?t=316300 A 58' chev build thread: http://www.67-72chevytrucks.com/vboa...d.php?t=311238 1969 Camaro Pro Touring http://67-72chevytrucks.com/vboard/s...61#post3513361 Swiss Cheese: http://67-72chevytrucks.com/vboard/s...d.php?t=384390 Adjustable Trailing Arm How-To: http://67-72chevytrucks.com/vboard/s...d.php?t=321100 1968 Ford Farm Truck: http://67-72chevytrucks.com/vboard/s...=1#post6555587 |
|
|
|
|
10-07-2009, 12:41 PM
|
#32 |
|
Watch out for your cornhole !
 Join Date: Jun 2003
Location: Azle, Texas
Posts: 14,162
|
Re: Project No-buck!
You said this is project "no buck" and that your heater levers are broken. I'm a no buck kind of guy so here's what I do in that situation. Flat strap steel and some work...
Cut to shape and drill the pivot pin hole... 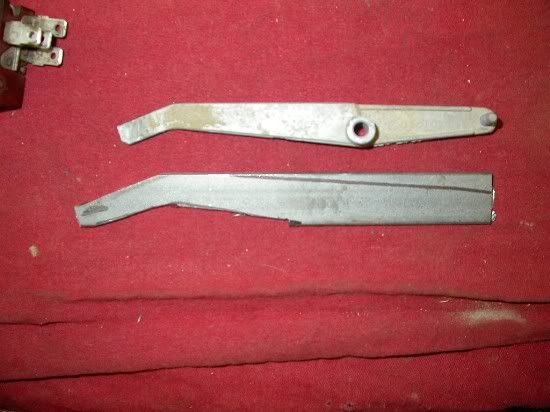 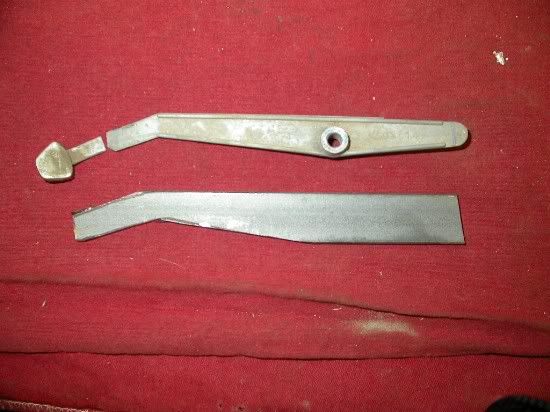 The center one is the hard one since it has the trough for the switch arm. You have to weld a bit and grind it out. Still, no big deal... 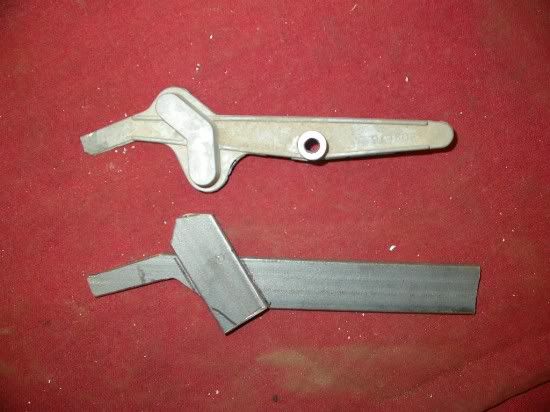 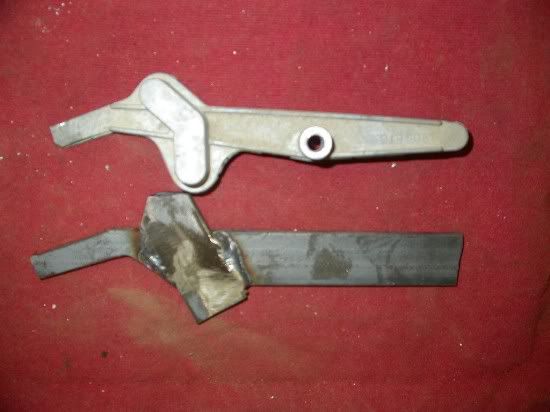 Use a tiny bolt and jam nut to act as the cable pin. Use countersunk screws and nuts to replace any of the broken faceplate brads.  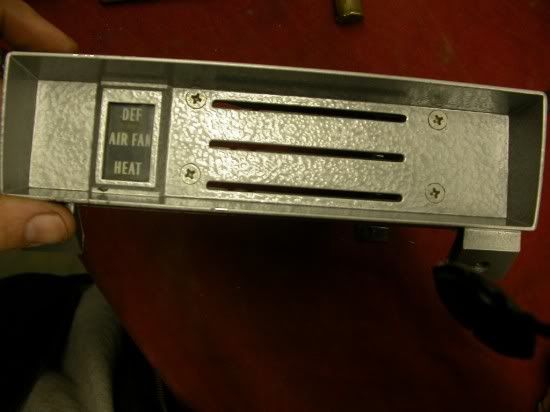 They will last forever if you build them this way.
__________________
I'm on the Instagram- @Gearhead_Kevin Last edited by Tx Firefighter; 10-07-2009 at 12:44 PM. |
|
|
|
|
10-08-2009, 11:20 AM
|
#33 | |
|
Senior Member
Join Date: Aug 2002
Location: Valley Center KS
Posts: 3,525
|
Re: Project No-buck!
Quote:
Thanks for the idea though. |
|
|
|
|
|
02-23-2010, 05:23 AM
|
#34 |
|
Registered User
Join Date: Feb 2004
Location: lynchburg ohio
Posts: 736
|
Re: Project No-buck!
Did yu sale this truck or is there any new progress?
|
|
|
|
|
06-01-2010, 01:17 AM
|
#35 |
|
Senior Member
Join Date: Aug 2002
Location: Valley Center KS
Posts: 3,525
|
Re: Project No-buck!
CHAPTER 2:
No buck is still around. I've had it for sale for awhile, been using it to for dump runs, and home depot runs. I had 40 cases of slate tile in it, as well as 50 sheets of drywall in it (2700lbs of drywall). So it's been nice having a 3/4 ton. While driving it around, it started sputtering and running poorly. I initially thought it was the ignition. I rebuilt the distributor (new pickup coil, rotor, cap, coil) still ran poorly. Replaced the fuel filter, with a see through filter. It wasn't filling up when running, so I replace the fuel pump. That helped a little, but it was still running poorly. Finally I rebuilt the carb, and now its running great. My idea right now is to go back to the salvage yard and get a 68 chevy front clip/bumper and paint it flat black, possibly convert to 5 lug 1/2 ton running gear, and drop it down a few inches. I was thinking of talking to the salvage yard about putting their logo/phone number on the doors as a "shop truck" in exchange for the parts....so we'll see how that goes. Kinda think that would be cool, but they probably won't go for it, but it doesn't hurt to ask. I know you all love pictures as much as me, but I didn't have time to get any after I got it power washed. I'll get some up soon.
__________________
Project Bruiser: 68 Pro-Touring C-10 5.3L / 4L60E Project Ironhide: 97 GMC Crew Cab 4x4 Cummins SOLD: '69 GMC 1/2T SWB TBI'd: Project No Buck Assembly Manual Index Sign up Thread!!! Factory Service Manual Index Last edited by Ackattack; 08-29-2012 at 11:20 AM. |
|
|
|
|
06-02-2010, 01:23 AM
|
#36 |
|
Senior Member
Join Date: Aug 2002
Location: Valley Center KS
Posts: 3,525
|
Re: Project No-buck!
I guess that's why they invented plasma cutters
__________________
Project Bruiser: 68 Pro-Touring C-10 5.3L / 4L60E Project Ironhide: 97 GMC Crew Cab 4x4 Cummins SOLD: '69 GMC 1/2T SWB TBI'd: Project No Buck Assembly Manual Index Sign up Thread!!! Factory Service Manual Index Last edited by Ackattack; 08-29-2012 at 11:21 AM. |
|
|
|
|
06-03-2010, 12:11 PM
|
#37 |
|
Senior Member
Join Date: Aug 2002
Location: Valley Center KS
Posts: 3,525
|
Re: Project No-buck!
The drivers side rocker, a small portion of the floor, small portion of kick panel, and front cab support will get replaced.
On the passenger side, it looks like all that will need to be replaced is the front cab support.
__________________
Project Bruiser: 68 Pro-Touring C-10 5.3L / 4L60E Project Ironhide: 97 GMC Crew Cab 4x4 Cummins SOLD: '69 GMC 1/2T SWB TBI'd: Project No Buck Assembly Manual Index Sign up Thread!!! Factory Service Manual Index Last edited by Ackattack; 08-29-2012 at 11:22 AM. |
|
|
|
|
06-13-2010, 09:30 AM
|
#38 |
|
GEARHEAD
Join Date: Aug 2003
Location: MN
Posts: 6,111
|
Re: Project No-buck!
I like the build. Instead of swapping to 5 lug though, maybe check out the available 8 lug wheels. With the popularity of the new big diesels there are a lot to choose from. Keeps your cost down and you still get the hauling capabilities of the 3/4 ton.
__________________
If no one knows what you're doing, they can't tell you you're doing it wrong HG's Dream Car Build - Shelby Cobra Kit Build your own adjustable track bar 71  Long Fleet C/10 Long Fleet C/10 72  Jimmy 4x4 (Junkyard Jimmy) Jimmy 4x4 (Junkyard Jimmy)HG's Plow Truck '78  K35 Dually K35 DuallyBigass Farm Truck HG's thread of miscellaneous stuff |
|
|
|
|
06-13-2010, 10:45 AM
|
#39 |
|
Still Learning
Join Date: Jul 2009
Location: Central Oklahoma
Posts: 10,108
|
Re: Project No-buck!
Looks like a great score finding the cab. I'm actually glad you didn't sell it, so we can watch you through this builde too.
|
|
|
|
|
06-16-2010, 10:51 AM
|
#40 |
|
Senior Member
Join Date: Aug 2002
Location: Valley Center KS
Posts: 3,525
|
Re: Project No-buck!
Another update,
I went to the salvage yard last weekend to see what parts I wanted, see how much they cost, and see if they'd give them to me if I put their logo on my door. No go on the sponsorship So I found most of the parts I wanted except for a coil spring 5 lug axle. They also wanted $300 for a 73+ front suspension. I didn't get anything while I was there due to lack of time, but I'll be back for some parts. After them telling me price of the suspension, I started scouring craigslist for a 71 or 71 1/2 ton. I ended up getting a 72 suburban for the suspension.  It doesn't have an engine it it, so I think the front will set pretty low, and the rear is as you see. It will be a few weeks until I start swapping suspension parts. I pulled the windsheild, cleaned out the drip rails, and started repairing the minor rust holes around the windshiled frame. I hope to have the repairs done in a few days, my new windshield gasket here, and all prepped (seam sealer, drip rail filled, etc) so I can have the new windshield installed ASAP. While I have the windshield out, I'll start painting the cab so I don't have a tape line or paint on the gasekt. |
|
|
|
|
09-09-2010, 01:19 AM
|
#41 |
|
Senior Member
Join Date: Aug 2002
Location: Valley Center KS
Posts: 3,525
|
Re: Project No-buck!
Another update
No pictures yet, but I did get the front suspension pulled out of the old suburban, power washed, oven cleaner treated, and then power washed again. I'll hit it with some rattle can black before it goes in. I also got a 67-68 hood, 67-68 chevy grill, chevy tailgate, and a 68 right fender from the salvage yard. I've been working away on straightening and painting them. My left side fender is a 67, so I got some filler plates to fill in the side markers too. I should have paint on the hood and grill by this weekend. The fender is a few days away. I popped out the windshield and cleaned out the seam sealer and drip rail sealer, re-applied, painted and then had the windsheild put back in. So hopefully it will be awhile before any water starts getting back in again. So I decided to paint the grill inserts off white to give it a little more contrast with the red. I'll also paint the "CHEVROLET" on the tail gate with the same color. So maybe next weekend, I'll pull the truck into the garage, pull off the current front clip, pull the engine, and pull the front suspension. Swap in the 1/2 ton suspension. I'll go ahead and clean up the front frame rails while I'm in there too. While I have the engine out I'm going to swap out intake manifold gaskets and oil pan gaskets just to stop leaks. Might also see about the rear main seal while I got it out. Then I'll clean up the engine and give it a fresh coat of paint. While I have it off, I may just replace the stock intake manifold with an aluminum one. I also thought of a door logo. Since I can't really think of a shop name to put on it, I'm gonna paint a bullseye on the door with "your logo here". Thought this would be kinda fun.
__________________
Project Bruiser: 68 Pro-Touring C-10 5.3L / 4L60E Project Ironhide: 97 GMC Crew Cab 4x4 Cummins SOLD: '69 GMC 1/2T SWB TBI'd: Project No Buck Assembly Manual Index Sign up Thread!!! Factory Service Manual Index Last edited by Ackattack; 08-29-2012 at 11:23 AM. |
|
|
|
|
09-09-2010, 10:23 AM
|
#42 |
|
This guy has got to be stopped
Join Date: Jul 2010
Location: Frankenstein, MO
Posts: 138
|
Re: Project No-buck!
I got no love for the burbs, but thing looked too nice to part out... How much did you have to give for it? Sad to see those 8 lugs go, but the 5 lugs give you more options and resale value... Looks good... keep us posted!
__________________
J P Evers 1970 4x4 LWB project: http://67-72chevytrucks.com/vboard/s...d.php?t=415134 |
|
|
|
|
09-09-2010, 11:14 AM
|
#43 |
|
Senior Member
Join Date: Aug 2002
Location: Valley Center KS
Posts: 3,525
|
Re: Project No-buck!
$800 for the burb, the outer sheet metal is rusted out from about the trim down.
|
|
|
|
|
09-09-2010, 11:18 AM
|
#44 |
|
Still Learning
Join Date: Jul 2009
Location: Central Oklahoma
Posts: 10,108
|
Re: Project No-buck!
We are definetly going to need some pictures of all that progress. Cool score on the burb! It will be going to good use.
|
|
|
|
|
09-09-2010, 12:20 PM
|
#45 |
|
Registered User
Join Date: Feb 2009
Location: Wausau, WI
Posts: 975
|
Re: Project No-buck!
isnt that one of those rare three door suburbans i wouldnt part that old girl out... hahahah
__________________
Smoking Tires Since 1992 1969 c10 AKA SIN 1985 SSWB TRAZER (super short wheel base) |
|
|
|
|
09-09-2010, 06:00 PM
|
#46 |
|
State of Confusion!
 Join Date: Jul 2002
Location: Gulfport, MS USA
Posts: 46,669
|
Re: Project No-buck!
Looking forward to the pictures. Love watching your builds.
__________________
Bill 1970 Chevy Custom/10 LWB Fleetside 2010 Toyota Tacoma PreRunner SR5 Double Cab - DD Member of Louisiana Classic Truck Club (LCTC) Bill's Gallery Life isn't tied with a bow, but it's still a gift. Live simply. Love generously. Care deeply. Speak kindly. Leave the rest to God! |
|
|
|
|
09-09-2010, 06:21 PM
|
#47 |
|
Registered User
Join Date: Jul 2010
Location: PNW (Washington)
Posts: 75
|
Re: Project No-buck!
Great build thread so far, and we're in the same lil city! that's pretty wild.. lookin forward to seein this truck on the road.
|
|
|
|
|
10-21-2010, 12:15 PM
|
#48 |
|
Senior Member
Join Date: Aug 2002
Location: Valley Center KS
Posts: 3,525
|
Re: Project No-buck!
The conversion has started.
I pulled then front sheet metal and the engine. Then I removed the 3/4 ton front suspension and got the 1/2 ton front suspension bolted in place (just a few bolts to hold it in place for now. I tore down the engine to clean it up. It was a leaky, greasy pig of a motor and I was expecting the worse when I pulled it appart. To my delight the cylinder walls and pistons look great. There is no ridge a carbon build up at the top of the cylinders, so it seems as though it was recently rebuilt. However, whoever assembled it wasn't too good with gaskets. There is RTV everywhere, and obviosly lots of leaks. I cleaned up the block and intake manifold last night. I'll drop the oil pan to due further inspections. I bought a gasket kit and will be replacing the rear main seal and oil pan gasket (one piece pan gasket) and the rest of the gaskets and give it a nice clean looking paint job. The I pulled out the rear end / suspension. The bolts holding on the leaf springs were a real booger. I ended up cutting the rear bolts and removing the rivets that hold the front hanger to the frame to get the rear out. I also got the 1/2 ton rearend out of the suburban and got it power washed. I removed the trailing arm hangers, panhard bar hanger, and the coil spring reinforcing plates. I love rivets!!!! I would have started bolting the 1/2 ton rearend into place, but I need some bolts to do it. Stopping by the bolt store on my way home tonight. The 1/2 ton front suspension has "Western" drop spindles on it and the rear springs are marked 4HD, which I take it to be a heavy duty 4" drop spring. So the truck should have a nice stance when I get it put together. |
|
|
|
|
11-03-2010, 02:58 AM
|
#49 |
|
Senior Member
Join Date: Aug 2002
Location: Valley Center KS
Posts: 3,525
|
Re: Project No-buck!
Finally: an update with pictures!
I got the engine all cleaned up and put back together....they look so pretty on an engine stand! 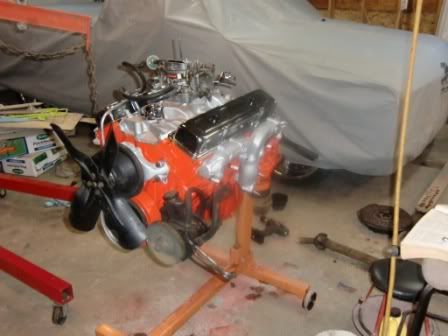 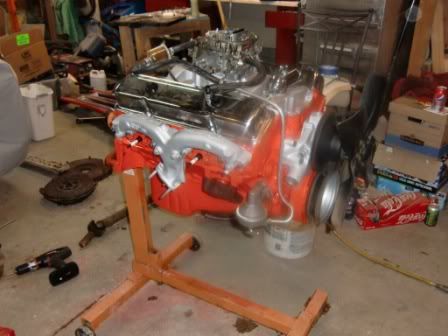 Then my awesome wife helped me stab it in. 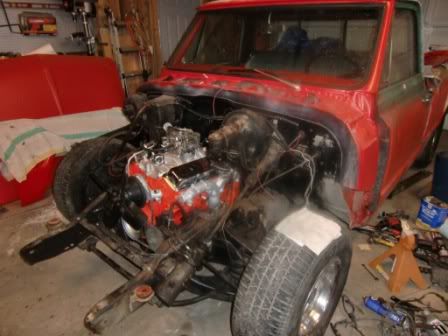 Notice the 5 lugs 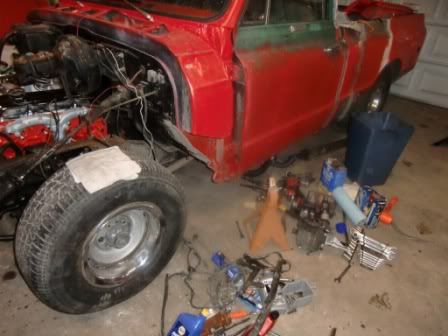 Here is the christmas color theme for now 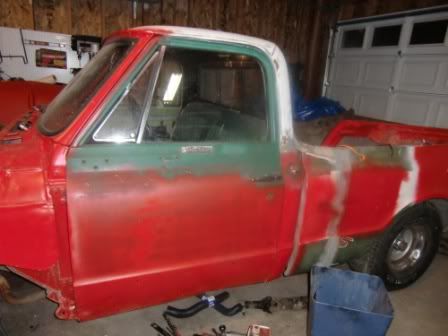 Here is the grill that is ready to go on  And here is the hood and fender that are ready to go on.  I have a few things to do before the front sheet metal goes on. Hook up all of the engine and finish bolting it in mainly. Then I will pull the bed off to paint the back of the cab as well as put in the coil spring suspension crossmember that the shocks mount too and the the spring reinforcement plates. Luckily it seems that the drive shaft that was used with the dana 60 should work with the 12 bolt. I had to get a conversion ujoint. Initially I thought the rearend used a 1310 u-joint, but it turns out that it uses a 1330 ujoint as I am now assuming this originally came from the same vehicle that the front suspension came from (73+). So I have to install that and a parking brake cable. Then finally I'll hook up the rear brake hose. |
|
|
|
|
11-03-2010, 07:11 PM
|
#50 |
|
Grandpa in the rustmobile...
Join Date: Nov 2008
Location: Spokane WA/Viola TN
Posts: 11,422
|
Re: Project No-buck!
dude you are awesome! How do you get so much done!
__________________
John Goose-1968 C10 355,9.32-1CR, Vortec Heads ,262 voodoo, 3.73:1 3OTT (HS ride/beater/farm truck) http://67-72chevytrucks.com/vboard/s...d.php?t=317684 Grams 53-1953 Chevrolet Belair http://67-72chevytrucks.com/vboard/s...=1#post4327784 1969 Chevy C10 Shortbed 4.5/6?" Frame off resto http://67-72chevytrucks.com/vboard/s...d.php?t=548136 1999 Toyota Tacoma 4x4 |
|
|
|
 |
| Bookmarks |
|
|


 Linear Mode

