
|
Register or Log In To remove these advertisements. |
|
|
|
|||||||
 |
|
|
Thread Tools | Display Modes |
 01-09-2013, 01:45 PM
|
#1 |
|
Registered User
Join Date: May 2011
Location: Anderson SC
Posts: 3,868
|
How To Restore and Detail an Original Gauge Cluster
After restoring a couple gauge clusters I had a request for a "how-to" post to show the process and products I use. The cluster I'll be restoring is from a '66 parts truck, and I'll be adding a tach and air gauge. The block off plates are missing, which is okay since they'll be replaced by the tach/air gauges.
This is the starting point. The lens will need to be replaced since it's scratched and the lettering is faded, and one of the harness wires is cut.   I took these pictures to have a reference for reassembly. This way I know that all of the wiring goes back exactly where it should without guessing.    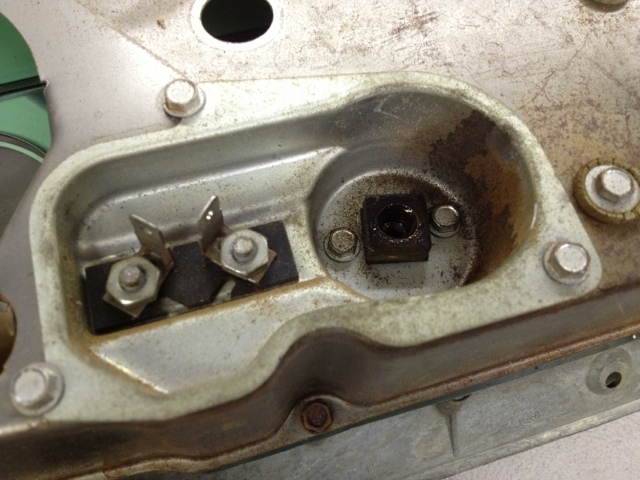 This is one of my finished clusters. 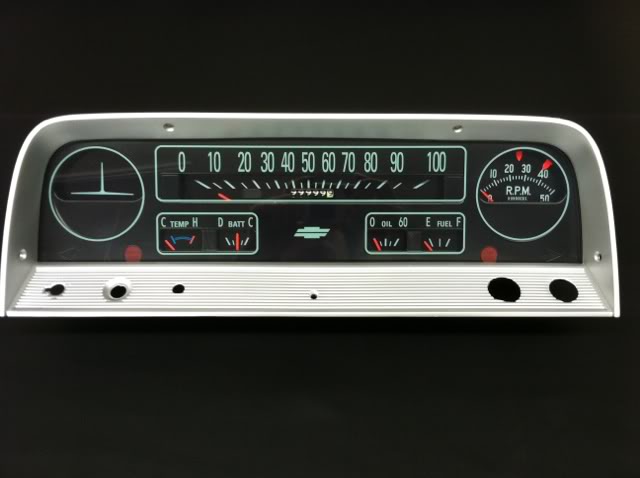
__________________
Project Goldilocks '66 C10 Short Fleet BBW Build '65 C10 Highly Detailed Stock Restoration Thread '78 Camaro Targa Roof Build '55 International Metal/Body/Paint Work '66 F100 Full Rotisserie Restoration '40 Packard 120 Convertible Coupe Restoration How To Restore and Detail an Original Gauge Cluster How To Detail Sand Body Panels, Edges, Corners, Etc |

|

|
|
01-09-2013, 01:54 PM
|
#2 |
|
Registered User
Join Date: May 2011
Location: Anderson SC
Posts: 3,868
|
Re: How To Restore and Detail an Original Gauge Cluster
To disassemble the cluster, remove the screws that hold the individual gauge mounts and pull the units out.
 There are 7 screws around the outside edge of the cluster, they hold the bezel, intermediate plate, and lens together.  There are three screws that mount the speedometer, remove them and keep the rubber grommets- they're not reproduced.  Note that there are rubber cushions around the edge of the lens that will need to be reinstalled to prevent rattles. 
__________________
Project Goldilocks '66 C10 Short Fleet BBW Build '65 C10 Highly Detailed Stock Restoration Thread '78 Camaro Targa Roof Build '55 International Metal/Body/Paint Work '66 F100 Full Rotisserie Restoration '40 Packard 120 Convertible Coupe Restoration How To Restore and Detail an Original Gauge Cluster How To Detail Sand Body Panels, Edges, Corners, Etc |
|
|
|
|
01-09-2013, 02:05 PM
|
#3 |
|
Registered User
Join Date: May 2011
Location: Anderson SC
Posts: 3,868
|
Re: How To Restore and Detail an Original Gauge Cluster
To restore the housing, I use 80 grit glass beads to strip the old clear coat from the outside and the green paint from the inside. After all the old paint is off, I change out the glass beads in the cabinet to new beads and lightly blast over the outside for an even, polished finish. The outside will be cleared only, so don't let the housing scrape against the inside of the blast cabinet- any marks will be visible. Don't touch the housing with bare hands or it will rust under the clear coat.
  Clean the housing with compressed air only, then spray a couple coats of satin clear. I like Krylon satin clear.  After the outside is completely dried, mask it off and spray the inside green. I use Krylon Satin Jade.    
__________________
Project Goldilocks '66 C10 Short Fleet BBW Build '65 C10 Highly Detailed Stock Restoration Thread '78 Camaro Targa Roof Build '55 International Metal/Body/Paint Work '66 F100 Full Rotisserie Restoration '40 Packard 120 Convertible Coupe Restoration How To Restore and Detail an Original Gauge Cluster How To Detail Sand Body Panels, Edges, Corners, Etc |
|
|
|
|
01-09-2013, 02:13 PM
|
#4 |
|
Registered User
Join Date: May 2011
Location: Anderson SC
Posts: 3,868
|
Re: How To Restore and Detail an Original Gauge Cluster
For the bezel, I smooth the rough edges with a DA sander then bead blast it and prime it with Rustoleum high build. On some clusters the center bottom mounting hole area is warped and needs to be straightened.
  Guide coat the primer and wetsand with 500-600 grit until all the guide coat is gone. Use a grey scuff pad to smooth the primer in the ridges.  I use SparVar S120 Silver paint. Silver is correct for 1966 bezels. This is what it will look like with smoothed edges after priming and painting. The original edges are very rough from the casting process.  64-65 bezels were painted satin black. 
__________________
Project Goldilocks '66 C10 Short Fleet BBW Build '65 C10 Highly Detailed Stock Restoration Thread '78 Camaro Targa Roof Build '55 International Metal/Body/Paint Work '66 F100 Full Rotisserie Restoration '40 Packard 120 Convertible Coupe Restoration How To Restore and Detail an Original Gauge Cluster How To Detail Sand Body Panels, Edges, Corners, Etc |
|
|
|
|
01-09-2013, 02:18 PM
|
#5 |
|
Registered User
Join Date: May 2011
Location: Anderson SC
Posts: 3,868
|
Re: How To Restore and Detail an Original Gauge Cluster
To restore the individual gauges, remove the screws and nuts that mount the gauges onto the gauge mount.
 Remove one at a time so you can keep up with which parts go with which gauge.   Put the screws/terminals back on the gauge so they don't get lost.   With the gauges loose, clean the faces and needles with a light solvent like 3M Adhesive Cleaner.  I use a pinstriping brush and Florescent Red model car paint to repaint the needles. The color match is very close. It usually takes two coats depending on how faded the needles are. No need to mask the gauge faces since I'll use decals to cover the original painted faces.   I use decals made by Jason Wilson at Greenback Decals. They're a 100% copy of the original gauge faces and include the optional tach, vac, or air gauge decals. He also includes both 64/65 and '66 style water temp decals so you can correctly restore either style gauge. Here's his website. http://parklane410.wix.com/home  To apply the decals, lightly wetsand the gauge face with 1000-2000 grit to remove any roughness or embedded dirt/dust. On the speedometer you'll need to bend up the tabs that hold the "bright" indicator filter and remove it.   Clean the face and spray it with glass cleaner so the decal can be positioned.  Apply the decal and use a soft rag as a squeegee out air bubbles and excess glass cleaner.  Once it's dried cut X's in the odometer and bright lights indicator openings and fold the decal over to uncover the opening.   On the small gauges, you'll have to cut a slot to clear the needle.  Ready to install in the cluster.  The decal on the air gauge (and probably a vac gauge too) will have to be punched for the needle stem and stop pin, and slit to fit around the needle's stem.  Clean all the hardware and terminals with a wire brush.  And reassemble the gauges onto the blasted and painted gauge mounts. 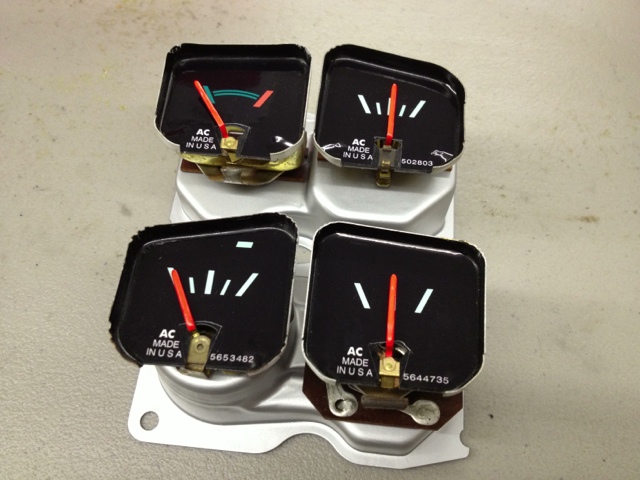 The gauge mounts bolt back in the main housing.  (Aftermarket tach, wiring is different than stock)  To reset the odometer, take the speedo face off by removing the two screws at the bottom of the face, and the inner silver colored plate will come off too.   Remove the brass clip.  Slide the odometer roll all the way to the left.  And pull the roll out sideways. 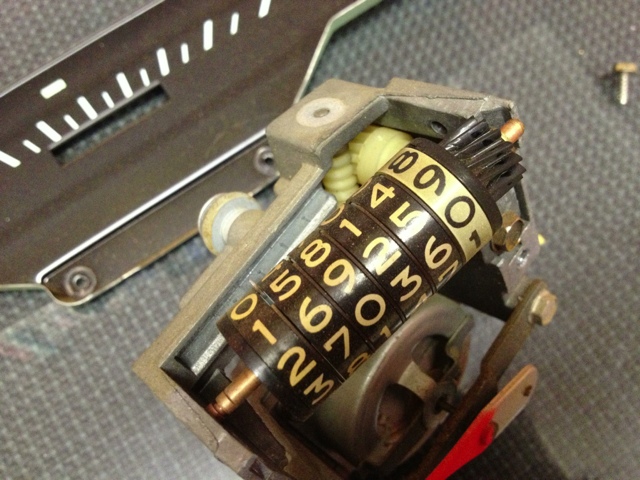 There are metal "legs" that fit in a channel in the speedo housing, hold the first (left) leg and rotate the second wheel around until the "9" is facing up. Work your way down, holding the next leg over until all the wheels have 9 facing up. It's easy slip and let a digit roll over one too many so it may take a few tries. With all the digits and legs aligned you can apply the decals to each of the wheels then put it back together.  Put the face back on the speedometer, put the rubber pad on the back, and install the speedometer in the housing using the three longer screws that have rubber bushings.   That finishes the gauge restoration. 
__________________
Project Goldilocks '66 C10 Short Fleet BBW Build '65 C10 Highly Detailed Stock Restoration Thread '78 Camaro Targa Roof Build '55 International Metal/Body/Paint Work '66 F100 Full Rotisserie Restoration '40 Packard 120 Convertible Coupe Restoration How To Restore and Detail an Original Gauge Cluster How To Detail Sand Body Panels, Edges, Corners, Etc |
|
|
|
|
01-09-2013, 02:19 PM
|
#6 |
|
Registered User
Join Date: May 2011
Location: Anderson SC
Posts: 3,868
|
Re: How To Restore and Detail an Original Gauge Cluster
The intermediate plate needs to be painted. Sometimes they're in good enough shape that you can just clean and scuff them with a gray scuff pad, but this one had paint that was flaking so I had to strip the whole thing.
I used a scuff pad and lacquer thinner to strip it (wear gloves!). You can't blast these since they're very thin aluminum and will warp badly.  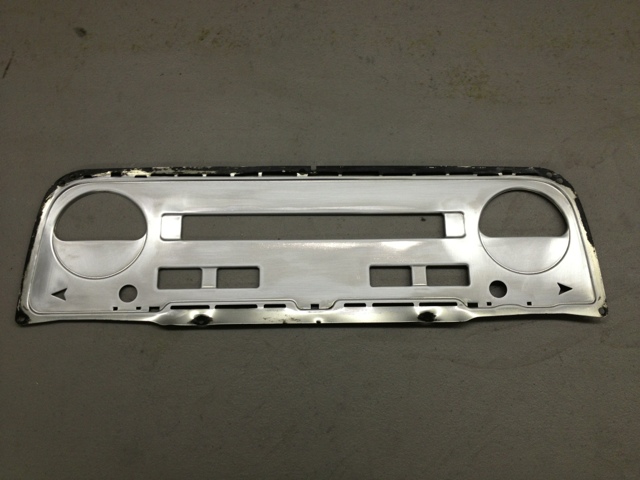 I use Krylon Satin Black after cleaning with prep solvent and wiping over with a tack rag.  The turn signal lenses can be lightly sanded with 600-800 grit and sprayed with satin clear to restore the faces if they have scratches or are chalky. 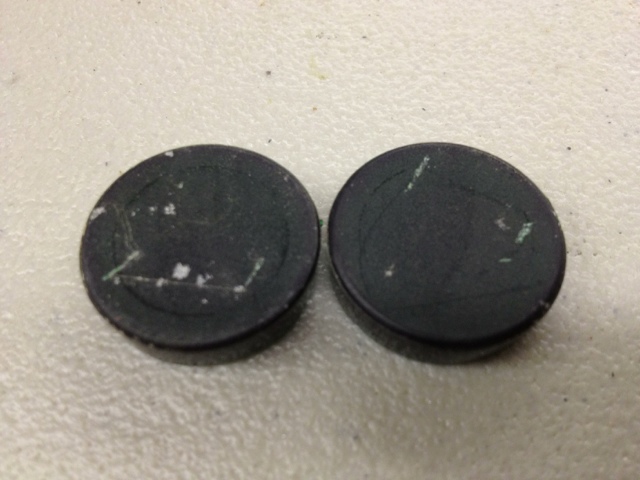 I had a pair that are in near perfect shape so I didn't have to fix the original pair.  On warning light models, the lenses can be made from sheets of translucent plastic from a arts/craft store like Hobby Lobby or Michael's. You'll have to stack a few layers together to make them dark enough, and lightly wetsand the top layer with 1500-2000 grit to knock the shine off and make them dull like the original lenses.  You can use the same translucent plastic for the "TAND'M LOCK" and "OVER SPEED" lenses. I made decals using Avery translucent adhesive backed printable sheets, with the font printed in reverse to apply to the inside of the decal as the factory did. 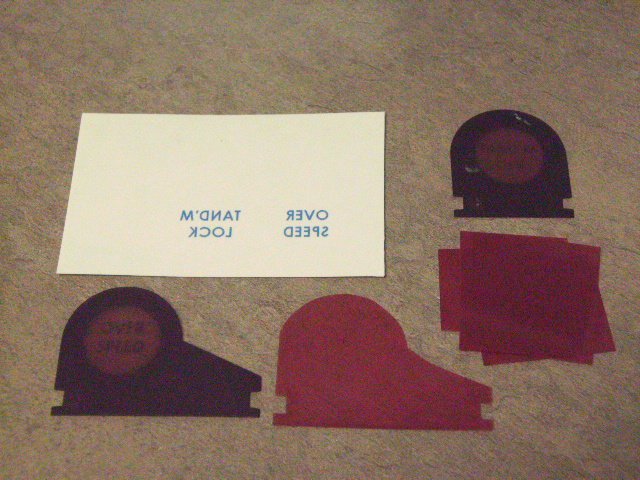  Installed on the intermediate plate, bend the tabs open to get the old lenses out and trim the new peices to match before installing them.  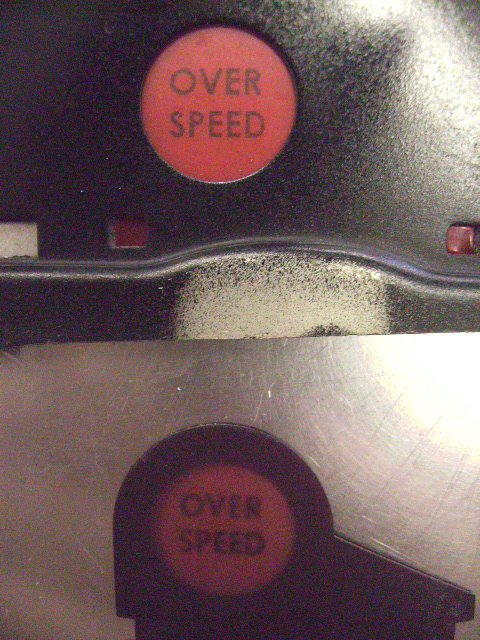
__________________
Project Goldilocks '66 C10 Short Fleet BBW Build '65 C10 Highly Detailed Stock Restoration Thread '78 Camaro Targa Roof Build '55 International Metal/Body/Paint Work '66 F100 Full Rotisserie Restoration '40 Packard 120 Convertible Coupe Restoration How To Restore and Detail an Original Gauge Cluster How To Detail Sand Body Panels, Edges, Corners, Etc |
|
|
|
|
01-09-2013, 02:20 PM
|
#7 |
|
Registered User
Join Date: May 2011
Location: Anderson SC
Posts: 3,868
|
Re: How To Restore and Detail an Original Gauge Cluster
To clean and detail the wiring harness I like to remove the wrapping and clean the connectors and wires with 3M Adhesive Cleaner. That removes all the grime and stains and makes the new electrical tape stick better.
Before cleaning:  Make note of the way the factory tied the end of the wrap and also how they wrapped the tape around the clip.   Sometimes there will be cuts or modifications that will need to be fixed. I have a spare bulb holder from another junk harness to take care of this. A crimp-on butt connector can be used to fix cuts like this.   Wrap removed, wires and connectors cleaned.  After cleaning, rewrap the wiring with electrical tape, starting at the end away from the harness plugs. To make the knot at the end, clean the adhesive off the last few inches so the knot won't stick to itself.   Some harnesses had cloth friction tape instead of electrical tape. I like this better than electrical tape since it has more of a vintage/classic look. It goes on the same way as electrical tape does, except you can't remove the adhesive for the knot. Use glass cleaner as a lubricant when tying the knot.    For the final detailing, I like to use Duragloss on the wires and connectors to bring out the color and add a slight sheen. It isn't alcohol based so it won't dry out the material. 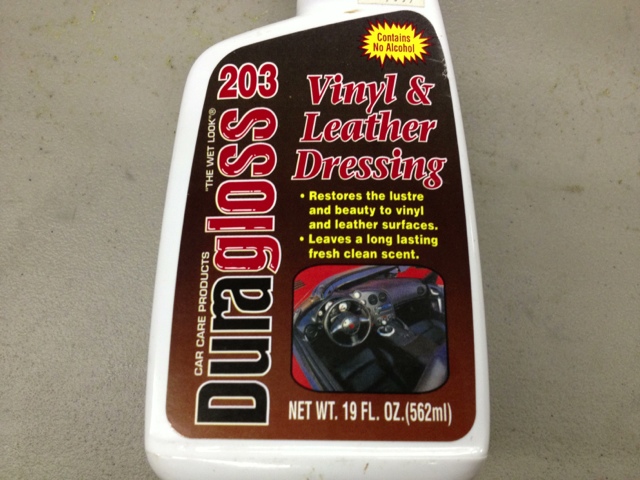  If you have any other wiring you can also wrap it for a more detailed look. There were three wires for the aftermarket tachometer so I braided them first to make them easier to wrap. I tied one end to mimick the factory wrapping style. I'm just a little OCD if you haven't noticed by now.    To clean the bulb holders take 0000 steel wool and Nevr-Dull wadding and mix them together. The steel wool will cut the oxidation off without scratching the plating much better than polish alone will.   Before and after. Ready to install back on the cluster with new bulbs.
__________________
Project Goldilocks '66 C10 Short Fleet BBW Build '65 C10 Highly Detailed Stock Restoration Thread '78 Camaro Targa Roof Build '55 International Metal/Body/Paint Work '66 F100 Full Rotisserie Restoration '40 Packard 120 Convertible Coupe Restoration How To Restore and Detail an Original Gauge Cluster How To Detail Sand Body Panels, Edges, Corners, Etc |
|
|
|
|
07-09-2013, 09:46 AM
|
#8 |
|
Artist
 Join Date: Jan 2010
Location: Rockwell NC
Posts: 422
|
Re: How To Restore and Detail an Original Gauge Cluster
Amazing! How much time did this take?
__________________
66 Chevy C10 283ci~cough~ SBW Fleet Buttercup '66 |
|
|
|
|
07-09-2013, 03:51 PM
|
#9 |
|
Registered User
Join Date: May 2011
Location: Anderson SC
Posts: 3,868
|
Re: How To Restore and Detail an Original Gauge Cluster
Thanks Kasey, I didn't keep up with it but probably around 16-18 hours. That's with having the tandem lock/over speed decals already printed and ready to apply. Took awhile to get those figured out the first time around!
__________________
Project Goldilocks '66 C10 Short Fleet BBW Build '65 C10 Highly Detailed Stock Restoration Thread '78 Camaro Targa Roof Build '55 International Metal/Body/Paint Work '66 F100 Full Rotisserie Restoration '40 Packard 120 Convertible Coupe Restoration How To Restore and Detail an Original Gauge Cluster How To Detail Sand Body Panels, Edges, Corners, Etc |
|
|
|
|
07-09-2013, 04:45 PM
|
#10 |
|
It's alsways something.....
Join Date: Nov 2008
Location: Douglasville GA
Posts: 1,171
|
Re: How To Restore and Detail an Original Gauge Cluster
That's very nice work. I enjoyed reading about the process; thanks for sharing.
__________________
1968 RS Camaro 'Vert Matching number 327 and M21 Muncie 1968 C10 Black with red interior and orig paint. 5.3 / 4l60e,3:73 POSI 17" Torq Thrusts 1968 CST 514 Red with black interior. Buddy Buckets, Factory A/C, PS, PB- 20" AR custom shop TT, 5.3 and 4l60e |
|
|
|
|
03-05-2014, 10:08 AM
|
#11 |
|
Registered User
Join Date: Jan 2014
Location: stigler ok
Posts: 55
|
Re: How To Restore and Detail an Original Gauge Cluster
Wow
__________________
Tim 
|
|
|
|
|
03-06-2014, 12:23 PM
|
#12 |
|
Registered User
Join Date: Jan 2011
Location: Delaware and Long Island, New York
Posts: 3,450
|
Re: How To Restore and Detail an Original Gauge Cluster
Looks awesome!!!,Very impressed. What a perfect indoor winter project.
|
|
|
|
|
03-20-2014, 03:20 PM
|
#13 |
|
Registered User
Join Date: Mar 2014
Location: College Station, TX
Posts: 213
|
Re: How To Restore and Detail an Original Gauge Cluster
That is very impressive. Nice job.
__________________
63 SWB Stepside --Current Project http://67-72chevytrucks.com/vboard/s...d.php?t=836390 66 SWB Fleetside (Stacy) 350ci/Th400 --Gone http://67-72chevytrucks.com/vboard/s...45#post6595745 67 LWB Fleetside (Annabel)350ci/SM420. 7 Year Restoration --R.I.P. http://67-72chevytrucks.com/vboard/s...d.php?t=633867 |
|
|
|
|
04-05-2014, 06:52 AM
|
#14 |
|
Registered User
Join Date: Apr 2014
Location: Fate, Texas ( About 35 miles east of Dallas)
Posts: 318
|
Re: How To Restore and Detail an Original Gauge Cluster
Great post. Thanks for sharing. It looked great, probably better than original.
|
|
|
|
|
05-13-2014, 03:48 PM
|
#15 |
|
Registered User
Join Date: Apr 2013
Location: Houston,TX.....Hometown of San Jose Cali
Posts: 361
|
Re: How To Restore and Detail an Original Gauge Cluster
now i want to do this to my 60-63, 64-66 and my 2 gmc 63 gauges
__________________
63 big window lwb bagged and shaved |
|
|
|
|
06-22-2014, 11:14 PM
|
#16 |
|
Registered User
Join Date: Jun 2014
Location: corona ca
Posts: 5
|
Re: How To Restore and Detail an Original Gauge Cluster
looks great!
|
|
|
|
|
08-24-2014, 08:12 AM
|
#17 |
|
Senior Member
 Join Date: Apr 2013
Location: Houston,Tx
Posts: 738
|
Re: How To Restore and Detail an Original Gauge Cluster
great work...this motivates me to do my guages... thanks
__________________
1966 C10 "Mary" 1972 C10 Cheyenne "Betty" https://67-72chevytrucks.com/vboard/...d.php?t=847364 1976 C35 Sierra Grande "Mr. Harvey" 1979 C10 Silverado "The BIG TEN" https://67-72chevytrucks.com/vboard/...d.php?t=841339 1982 C10 Silverado "Lucy" C10 Club Texas -HMIC |
|
|
|
|
09-11-2014, 11:01 AM
|
#18 | |
|
Registered User
Join Date: Jan 2010
Location: Roanoke, Tx.
Posts: 1,561
|
Re: How To Restore and Detail an Original Gauge Cluster
Quote:
|
|
|
|
|
|
09-11-2014, 11:29 PM
|
#19 |
|
Registered User
Join Date: May 2011
Location: Anderson SC
Posts: 3,868
|
Re: How To Restore and Detail an Original Gauge Cluster
Green was the factory color for the inside, no other reason than that. I personally don't like bright gauge cluster lights, too bright and your eyes will adjust to the brightness of your gauges instead of your headlights at night. I usually have mine dimmed down just enough to see where the needles are so that the headlights are the brighter of the two and my eyes don't have to strain over the glare of bright gauges.
__________________
Project Goldilocks '66 C10 Short Fleet BBW Build '65 C10 Highly Detailed Stock Restoration Thread '78 Camaro Targa Roof Build '55 International Metal/Body/Paint Work '66 F100 Full Rotisserie Restoration '40 Packard 120 Convertible Coupe Restoration How To Restore and Detail an Original Gauge Cluster How To Detail Sand Body Panels, Edges, Corners, Etc |
|
|
|
|
09-12-2014, 07:50 AM
|
#20 | |
|
Registered User
Join Date: Jan 2010
Location: Roanoke, Tx.
Posts: 1,561
|
Re: How To Restore and Detail an Original Gauge Cluster
Quote:
|
|
|
|
|
|
10-23-2014, 05:21 PM
|
#21 |
|
Registered User
Join Date: Jun 2014
Location: Glendora CA -> Tampa FL
Posts: 587
|
Re: How To Restore and Detail an Original Gauge Cluster
Do you have a new source for the Greenback decals? His site has gone dark or they are no longer selling through that website.
__________________
1966 C10 Short Fleetside 1988 Sportster, 2008 Street Glide Ken's 1966 C10 build "Red Ale" Follow on Instgram: @cv_performance https://instagram.com/cv_performance Harley Performance Parts: CV Performance (Harley related) Enjoying the ride! |
|
|
|
|
10-23-2014, 05:47 PM
|
#22 | |
|
Registered User
Join Date: May 2011
Location: Anderson SC
Posts: 3,868
|
Re: How To Restore and Detail an Original Gauge Cluster
Quote:
Try LMC, they have been selling his decals.
__________________
Project Goldilocks '66 C10 Short Fleet BBW Build '65 C10 Highly Detailed Stock Restoration Thread '78 Camaro Targa Roof Build '55 International Metal/Body/Paint Work '66 F100 Full Rotisserie Restoration '40 Packard 120 Convertible Coupe Restoration How To Restore and Detail an Original Gauge Cluster How To Detail Sand Body Panels, Edges, Corners, Etc |
|
|
|
|
|
10-25-2014, 10:21 PM
|
#23 | |
|
Cluster King
Join Date: Nov 2012
Location: Junction City, OR
Posts: 5,263
|
Re: How To Restore and Detail an Original Gauge Cluster
Quote:
I have been trying to contact Jason for a while. I hope all is well with him. I appreciate the information for LMC. I use Jason's decals a lot and glad there is still a source to buy them. Take care, Tom
__________________
Contact me on all of your gauge cluster needs. I specialize in restoration, repair and parts sales for 67-72 Chevy and GMC trucks. email me at tbonegarris@yahoo.com I am also a dealer for Counterpart for gauge cluster parts only. Also see my facebook page, CG&C |
|
|
|
|
|
11-19-2014, 04:31 AM
|
#24 |
|
Registered User
Join Date: Dec 2012
Location: Rochester, KENT
Posts: 10,480
|
Re: How To Restore and Detail an Original Gauge Cluster
What an amazing resource.
I am about to start restoring my spare cluster as the one fitted when I bought the truck, was butchered. 18 hours for a practiced hand....... Looks like I have a few nights booked in the garage. 
__________________
MY BUILD LINK: http://67-72chevytrucks.com/vboard/s...585901]Redneck Express - 1966 C10 Short Fleetside MY USA ROADTRIPS http://forum.retro-rides.org/thread/...2018-humdinger IF YOU CAN'T FIX IT WITH A HAMMER, YOU'VE GOT AN ELECTRICAL PROBLEM MATE. |
|
|
|
|
11-19-2014, 02:32 PM
|
#25 |
|
Registered User
Join Date: Oct 2014
Location: a beer can ..
Posts: 924
|
Re: How To Restore and Detail an Original Gauge Cluster
neat informative thread .... thanks
__________________
dont want to hear excuses, i want to hear solution(s) |
|
|
|
|
| Bookmarks |
|
|


 Linear Mode

