
|
Register or Log In To remove these advertisements. |
|
|
|
|||||||
 |
|
|
Thread Tools | Display Modes |
 11-08-2008, 06:21 PM
|
#26 | |
|
Registered User
Join Date: May 2006
Location: Philadelphia, Pa. 19454
Posts: 9,443
|
Re: HOW TO: One piece floor pan install
Quote:
Here's some pics 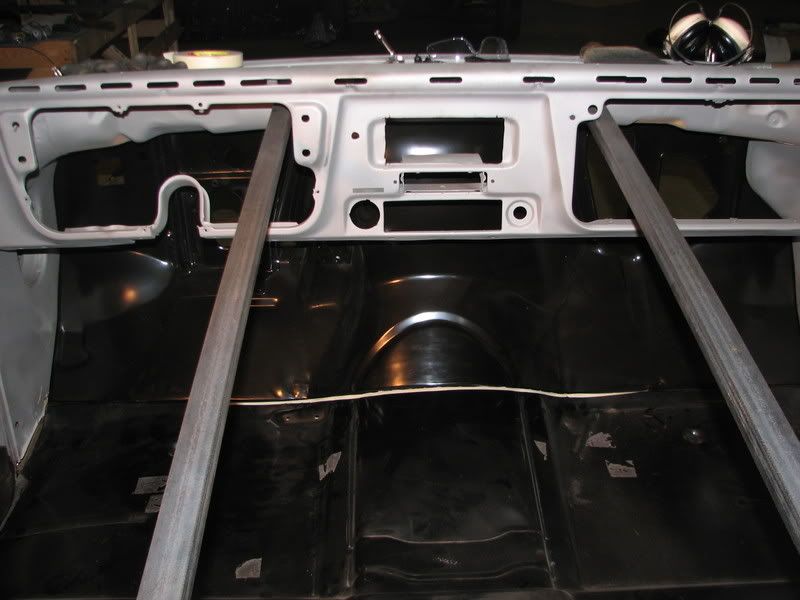 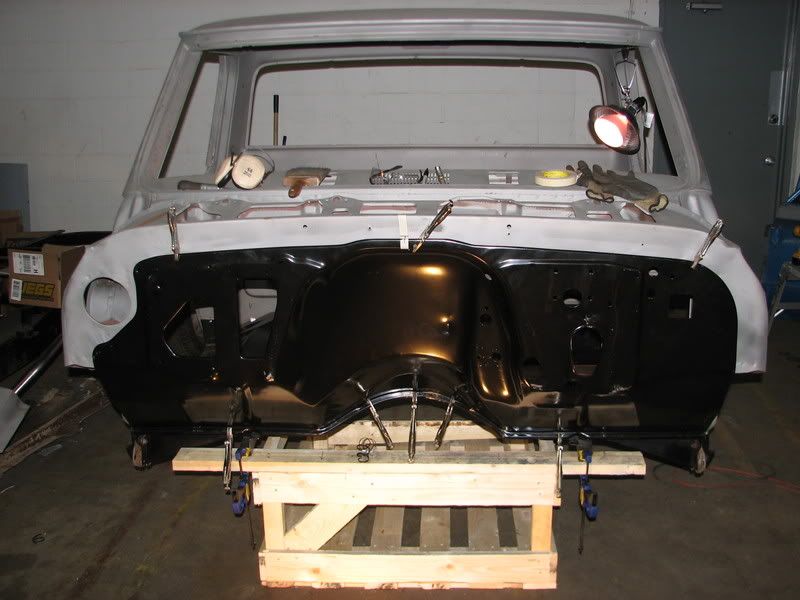
__________________
Semper Fi...Uncle Sam, you da man All parts offered to help are free, unless otherwise noted Dont try this stuff in my build thread, unless you have 55 years of mechanical OTJ training SAFETY FIRST AS usual, off topic They say your mind goes second, can't remember the first Jim Last edited by jaros44sr; 11-08-2008 at 07:04 PM. |
|

|

|
|
11-08-2008, 10:52 PM
|
#27 |
|
Senior Member
Join Date: May 2004
Location: johnstown, NY
Posts: 2,393
|
Re: HOW TO: One piece floor pan install
jaros44sr, do you think I should weld the floor in when the cab is resting on its floor or could I do it when the cab is on its back like in my pics, or doesn't it matter?
And WOW, your gap was way worse than mine. I can't believe you closed that up! Nice job. I also can't believe that that gap even existed in the first place being both the floor and the firewall are both new replacements from the same manufacturer. Last edited by jlaird; 11-08-2008 at 10:54 PM. |
|
|
|
|
11-08-2008, 11:55 PM
|
#28 | |
|
Registered User
Join Date: May 2006
Location: Philadelphia, Pa. 19454
Posts: 9,443
|
Re: HOW TO: One piece floor pan install
Quote:
I don't think it really matters which way the cab is laying, you can move it around to get at all the welds I'll keep watchin'
__________________
Semper Fi...Uncle Sam, you da man All parts offered to help are free, unless otherwise noted Dont try this stuff in my build thread, unless you have 55 years of mechanical OTJ training SAFETY FIRST AS usual, off topic They say your mind goes second, can't remember the first Jim Last edited by jaros44sr; 11-08-2008 at 11:58 PM. |
|
|
|
|
|
11-09-2008, 10:23 AM
|
#29 |
|
Senior Member
Join Date: May 2004
Location: johnstown, NY
Posts: 2,393
|
Re: HOW TO: One piece floor pan install
Overall, I really like this one-piece floor, I just needed a small amount of tweaking at the firewall flange. For some reason, the last couple of inches of the flange angled down which didn't match my firewall flange which is completely straight across. Instead of forcing it into place(it wouldnt of fit as nice), I made a pie cut and will put a little patch in. No biggie. Here are before and after pics and the area at the firewall it should match up to, then installed and tacked.
before:  after:  installed:  tacked:  here are the areas to be welded cleaned and sprayed with weld thru.  I also put the cab on the floor to insure it was on a solid, flex-free surface. 
|
|
|
|
|
11-09-2008, 10:24 AM
|
#30 |
|
Senior Member
Join Date: May 2004
Location: johnstown, NY
Posts: 2,393
|
Re: HOW TO: One piece floor pan install
and here is the MONEY SHOT!

|
|
|
|
|
11-09-2008, 10:36 AM
|
#31 |
|
Registered User
 Join Date: May 2007
Location: dallas ga
Posts: 1,503
|
Re: HOW TO: One piece floor pan install
I am about to do this install how would you rate this on a scal of one to ten and since i will have to do a pillars and b pillars would it be better to do those first so i would have a way to bolt the cab in for the fit at fire wall. Any tips would be appreciated. BTW this is a great thread love the pics
|
|
|
|
|
11-09-2008, 11:03 AM
|
#32 | |
|
Registered User
Join Date: May 2006
Location: Philadelphia, Pa. 19454
Posts: 9,443
|
Re: HOW TO: One piece floor pan install
Quote:
Rob, it would be hard to gauge your talents, but I think it is far easier then trying to fit up a bunch of patch panels...either way on your a and b post patches, but having the floor in place may make it easier...jmho
__________________
Semper Fi...Uncle Sam, you da man All parts offered to help are free, unless otherwise noted Dont try this stuff in my build thread, unless you have 55 years of mechanical OTJ training SAFETY FIRST AS usual, off topic They say your mind goes second, can't remember the first Jim Last edited by jaros44sr; 11-09-2008 at 11:12 AM. |
|
|
|
|
|
11-09-2008, 11:22 AM
|
#33 |
|
Registered User
Join Date: Jul 2006
Location: Central PA
Posts: 12,201
|
Re: HOW TO: One piece floor pan install
I am doing my pillars last, but I still had part of the A-pillar in place to insure proper alignment. I haven't done any other patches but found that this install was pretty straight forward. You need some welding skill but not that much (i'm proof!).
1. Take a lot of measurements and don't get in a hurry... 2. Have the room to prop your cab on it's back without doing any extra damage.. 3. Put in a lot of support to insure that things line up in the end
__________________
The Garage: 1968 K-10 SWB - "Project Money Pit" 1996 Z-71 - "huntin rig" 1969 C-10 LWB (SOLD) "Project flip that truck or else" 1993 Passport, F@rd 1-ton (SOLD)"Project Cousin Eddie" My Garage Build "The 1,000 footer" Last edited by msgross; 11-09-2008 at 11:23 AM. |
|
|
|
|
11-09-2008, 02:42 PM
|
#34 |
|
Registered User
Join Date: Jul 2006
Location: Central PA
Posts: 12,201
|
Re: HOW TO: One piece floor pan install
looks good, I just got home from work and could see the pics, I don't remember my outer edge being hard to fit, one side was gone in the firewall so just made the patch to fit that curve...
__________________
The Garage: 1968 K-10 SWB - "Project Money Pit" 1996 Z-71 - "huntin rig" 1969 C-10 LWB (SOLD) "Project flip that truck or else" 1993 Passport, F@rd 1-ton (SOLD)"Project Cousin Eddie" My Garage Build "The 1,000 footer" |
|
|
|
|
11-11-2008, 07:20 PM
|
#35 |
|
Registered User
Join Date: Aug 2002
Location: MASTIC BEACH, long island, ny
Posts: 362
|
Re: HOW TO: One piece floor pan install
WoW!!!! Just plain WOW. Please keep us posted, as I'm from NY, too. Does anybody know if anyone make a panel to replace the cowl?? I looked under my dash, and saw stars/swisscheese. With what I don't see for a good replacement cab up here, I might try to fix mine.
Mike
__________________
MIKE '67 C/10 2WD LWB '89 MERCURY GRAND MARQUIS LS COUNTRY TILL THE DAY I DIE 
|
|
|
|
|
01-14-2009, 01:23 PM
|
#36 |
|
Registered User
Join Date: Jun 2007
Location: Madison, AL
Posts: 140
|
Do you have to remove the cab to do this or is it possible to do it while still sitting on the frame? Sorry, but I'm a newbie at this bodywork stuff, so be gentle with the comments.
|
|
|
|
|
01-14-2009, 04:09 PM
|
#37 | |
|
Registered User
Join Date: Mar 2007
Location: Ben Wheeler,Texas
Posts: 992
|
Re: HOW TO: One piece floor pan install
Quote:
Yes, if doing the entire floor pan you would need to remove the cab from the frame.
__________________
05 2500HD 6.0 excab 69 LWB-Gone but not forgotten! 68 Dodge Charger 383/727 69 Dodge Charger-440/4spd |
|
|
|
|
|
01-14-2009, 04:38 PM
|
#38 |
|
Registered User
Join Date: Nov 2001
Location: Concord, NC
Posts: 2,489
|
Re: HOW TO: One piece floor pan install
Here is one I'm doing for a member here. Its getting a firewall too.
|
|
|
|
|
01-14-2009, 07:21 PM
|
#39 |
|
Registered User
Join Date: Mar 2008
Location: Waukee, Iowa
Posts: 1,608
|
Re: HOW TO: One piece floor pan install
Ooooh, more pics and details of what you're doing to the "scalped" cab, please.
__________________
build threads: 86 Suburban 88 Jeep 6.0 swap 49 Chevy truck 54 Chevy wagon 86 Suburban lowered 4/6 54 Chevy wagon 49 Chevy/s10 mix 88 Jeep Wrangler rockcrawler |
|
|
|
|
01-14-2009, 07:25 PM
|
#40 |
|
Registered User
Join Date: May 2007
Location: dallas ga
Posts: 1,503
|
Re: HOW TO: One piece floor pan install
check out project cod fish to get the details
|
|
|
|
|
01-14-2009, 08:32 PM
|
#41 | |
|
Registered User
Join Date: Jul 2006
Location: Central PA
Posts: 12,201
|
Re: HOW TO: One piece floor pan install
Quote:
__________________
The Garage: 1968 K-10 SWB - "Project Money Pit" 1996 Z-71 - "huntin rig" 1969 C-10 LWB (SOLD) "Project flip that truck or else" 1993 Passport, F@rd 1-ton (SOLD)"Project Cousin Eddie" My Garage Build "The 1,000 footer" |
|
|
|
|
|
01-14-2009, 08:52 PM
|
#42 |
|
Registered User
Join Date: May 2007
Location: dallas ga
Posts: 1,503
|
Re: HOW TO: One piece floor pan install
We are going to do away with the vents this area will be flat with no boxes keep posted to the project for further details
|
|
|
|
|
01-25-2009, 05:23 PM
|
#43 | |
|
My Mistress the Sea
Join Date: Feb 2005
Location: Bradenton, FL.
Posts: 412
|
Re: HOW TO: One piece floor pan install
Quote:
__________________
,,,they'd look alot better as beer cans... '71 K20 350/350 Rusty but trusty... gone '70 C20... gone '88 K1500... gone '90 C1500... gone '91 C2500... gone '95 C3500 6.5L Dually love this one!... |
|
|
|
|
|
01-25-2009, 10:58 PM
|
#44 |
|
Senior Member
Join Date: Jul 2007
Location: Clarksville TN 37043
Posts: 8,702
|
Re: HOW TO: One piece floor pan install
nice work. a lot of people need to see how this done
__________________
Chuck 68  swb Fleetside build ''Choncho'' swb Fleetside build ''Choncho'' http://67-72chevytrucks.com/vboard/s...d.php?t=374892 My trailer redo http://67-72chevytrucks.com/vboard/s...69#post5893869 Chuy my 59 bug http://67-72chevytrucks.com/vboard/s...d.php?t=653798 Putnam 87 GMC Shop truck http://67-72chevytrucks.com/vboard/s...d.php?t=707687 |
|
|
|
|
01-26-2009, 09:02 AM
|
#45 |
|
Registered User
Join Date: Mar 2008
Location: Danville, VA
Posts: 122
|
Re: HOW TO: One piece floor pan install
This is useful. should be put in FAQ area.
|
|
|
|
|
07-07-2014, 10:57 AM
|
#46 |
|
Registered User
Join Date: Aug 2011
Location: new york, ny
Posts: 1,063
|
Re: HOW TO: One piece floor pan install
I realize it's been a few years since anyone has commented on this post, however it has inspired me to replace the floor pan in my cab. I am almost finished bracing it, and would appreciate anyone's opinion on whether it is braced enough.
I have done everything except the final door bracing. I want to have the access to the inside before I finish it. I also added some cross beams to attach the lower bracings together. I'll post an updated pic later, but here is the link to the last page of my thread where you can see the initial bracing pics in the final post. Thanks! http://67-72chevytrucks.com/vboard/s...=502964&page=8
__________________
___________________________________________ Darien 1971 C10 LWB http://67-72chevytrucks.com/vboard/s...d.php?t=502964 |
|
|
|
|
07-07-2014, 05:06 PM
|
#47 |
|
Senior Member
Join Date: May 2004
Location: johnstown, NY
Posts: 2,393
|
Re: HOW TO: One piece floor pan install
I think you need a cross or diagonal brace someplace (one that goes from driver side to passenger side.) After that, you should be good. There is only so much wiggle room you will have anyway once you get the floor in there.
|
|
|
|
|
07-07-2014, 05:24 PM
|
#48 | |
|
Registered User
Join Date: Aug 2011
Location: new york, ny
Posts: 1,063
|
Re: HOW TO: One piece floor pan install
Quote:
I appreciate the feedback and help. Thanks!
__________________
___________________________________________ Darien 1971 C10 LWB http://67-72chevytrucks.com/vboard/s...d.php?t=502964 |
|
|
|
|
|
07-07-2014, 08:43 PM
|
#49 |
|
Registered User
Join Date: Aug 2011
Location: new york, ny
Posts: 1,063
|
Re: HOW TO: One piece floor pan install
Okay, I think I am done with the braces. Please check out the last post in my thread and let me know what you think. Thanks!
http://67-72chevytrucks.com/vboard/s...=502964&page=8
__________________
___________________________________________ Darien 1971 C10 LWB http://67-72chevytrucks.com/vboard/s...d.php?t=502964 |
|
|
|
|
07-08-2014, 05:01 PM
|
#50 |
|
Registered User
Join Date: Sep 2009
Location: ottawa,canada
Posts: 4,550
|
Re: HOW TO: One piece floor pan install
glad someone brought this thread back. I'll be going this route as well, my rockers, cab corners, and cab mount area is shot! this seems way easier than piecing it all together the old school way.
__________________
my build threads '86 C10 http://67-72chevytrucks.com/vboard/s...d.php?t=415628 '67 C10 http://67-72chevytrucks.com/vboard/s...d.php?t=635078 '63 GMC http://67-72chevytrucks.com/vboard/s...d.php?t=674682 |
|
|
|
|
| Bookmarks |
|
|


 Linear Mode

