
|
 06-12-2013, 01:05 PM
|
#201 |
|
Registered User
Join Date: Oct 2009
Location: canton ga
Posts: 12,728
|
Re: '55 International Metal/Body/Paint Work
Nice work and I love the El Camino ,are you on Team Chevelle/El Camino ?
|

|

|
|
06-13-2013, 08:52 AM
|
#202 | ||
|
Registered User
Join Date: May 2011
Location: Anderson SC
Posts: 3,868
|
Re: '55 International Metal/Body/Paint Work
Quote:
Quote:
__________________
Project Goldilocks '66 C10 Short Fleet BBW Build '65 C10 Highly Detailed Stock Restoration Thread '78 Camaro Targa Roof Build '55 International Metal/Body/Paint Work '66 F100 Full Rotisserie Restoration '40 Packard 120 Convertible Coupe Restoration How To Restore and Detail an Original Gauge Cluster How To Detail Sand Body Panels, Edges, Corners, Etc |
||
|
|
|
|
06-27-2013, 03:02 PM
|
#203 |
|
Registered User
Join Date: May 2011
Location: Anderson SC
Posts: 3,868
|
Re: '55 International Metal/Body/Paint Work
Right side is seam sealed, bodywork is done, and just sprayed three coats of Slick Sand.
  
__________________
Project Goldilocks '66 C10 Short Fleet BBW Build '65 C10 Highly Detailed Stock Restoration Thread '78 Camaro Targa Roof Build '55 International Metal/Body/Paint Work '66 F100 Full Rotisserie Restoration '40 Packard 120 Convertible Coupe Restoration How To Restore and Detail an Original Gauge Cluster How To Detail Sand Body Panels, Edges, Corners, Etc |
|
|
|
|
06-28-2013, 08:57 PM
|
#204 |
|
Registered User
 Join Date: May 2007
Location: Deale Md
Posts: 4,663
|
Re: '55 International Metal/Body/Paint Work
When I retire I plan on moving to Anderson so I can watch you restore what ever I have at the time, assume work as always.
__________________
James 63 GMC V6 4speed carryall 65 chevy swb bbw V8 auto 68 K20 327/4 speed, buddy buckets 2002 GMC CC Dually Duramax 64 GMC lwb 3/4 V6 4speed SOLD 66 GMC swb bbw buddy buckets SOLD IG duallyjams The only thing that stays the same is constant change! |
|
|
|
|
06-28-2013, 11:52 PM
|
#205 |
|
Registered User
Join Date: Jun 2013
Location: Somewhere
Posts: 3,052
|
Re: '55 International Metal/Body/Paint Work
Could you share some of the seemingly secrets of patching while not ruining the part?
You show great before and after pics but what about the dirty middle parts? Just removing old bits can take hours. Forming new parts even more. Welding is an art. Finally, removing proud weld bits and not original metal is beyond art. Please... show the dirty parts after the rust but before the DA makes it all look pretty... |
|
|
|
|
06-29-2013, 12:00 AM
|
#206 |
|
Registered User
Join Date: Jun 2013
Location: Somewhere
Posts: 3,052
|
Re: '55 International Metal/Body/Paint Work
Then, what about planishing to unshrink after welding? Do or don't?
If do, what about when you can't, such as a front fender at the lower rear ? Sorry... |
|
|
|
|
06-29-2013, 07:06 PM
|
#207 | ||
|
Registered User
Join Date: May 2011
Location: Anderson SC
Posts: 3,868
|
Re: '55 International Metal/Body/Paint Work
Quote:
Quote:
Appreciate the questions! We are going to be replacing the floors/kick panels/inner rockers in a '66 F100 in the next few weeks and I'll try to get some of those details on camera and post them in that build thread. The link is in my signature. For stretching the metal back out after welding, I only weld one tack at a time so the "heat affected zone" is relatively small, so there is minimal distortion to begin with. In areas with access to both sides, the "hammer on dolly" method can be used to stretch the weld area and remove the distortion. On areas that can't be reached, the stud gun can be used to pull up low spots. My metal finishing is nowhere near perfect and it requires a light skim coat of filler most of the time; I'm not able to go straight to high build primer over epoxy without a skim coat yet. Maybe one day with more practice and better tools! I'm still using a Harbor Freight (Hazard Fraught  ) hammer/dolly set... Need to pick up a set of Martin's soon. ) hammer/dolly set... Need to pick up a set of Martin's soon.
__________________
Project Goldilocks '66 C10 Short Fleet BBW Build '65 C10 Highly Detailed Stock Restoration Thread '78 Camaro Targa Roof Build '55 International Metal/Body/Paint Work '66 F100 Full Rotisserie Restoration '40 Packard 120 Convertible Coupe Restoration How To Restore and Detail an Original Gauge Cluster How To Detail Sand Body Panels, Edges, Corners, Etc |
||
|
|
|
|
06-29-2013, 07:07 PM
|
#208 | |
|
Registered User
Join Date: May 2011
Location: Anderson SC
Posts: 3,868
|
Re: '55 International Metal/Body/Paint Work
Quote:
__________________
Project Goldilocks '66 C10 Short Fleet BBW Build '65 C10 Highly Detailed Stock Restoration Thread '78 Camaro Targa Roof Build '55 International Metal/Body/Paint Work '66 F100 Full Rotisserie Restoration '40 Packard 120 Convertible Coupe Restoration How To Restore and Detail an Original Gauge Cluster How To Detail Sand Body Panels, Edges, Corners, Etc |
|
|
|
|
|
07-02-2013, 07:31 AM
|
#209 |
|
PROJECT 7DEUCE
Join Date: Dec 2002
Location: GRANTS PASS OR
Posts: 21,590
|
Re: '55 International Metal/Body/Paint Work
Great work...
__________________
GO BIG GREEN  GO DUCKS GO DUCKSMEMBER #6377 72 k-5 daily driver 6'' lift 35'' 350-350-205 slowly getting rust free. Project "7DEUCE" check out my build http://67-72chevytrucks.com/vboard/s...d.php?t=267665 Tim Powell..R.I.P EastSideLowlife..... R.I.P.. |
|
|
|
|
07-09-2013, 02:29 PM
|
#210 | |
|
Registered User
Join Date: May 2011
Location: Anderson SC
Posts: 3,868
|
Re: '55 International Metal/Body/Paint Work
Quote:
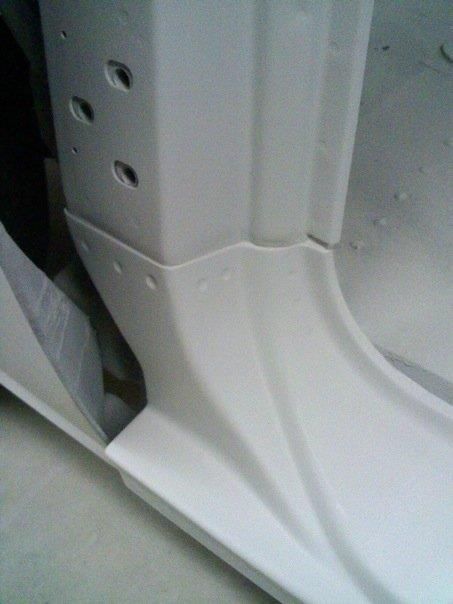
Thanks!! Bodywork is finished on the right side and it's in tinted K93. Some details of sanding the Slick Sand. Sanded the flat areas first, which showed the shape of the corners.  Outside looks good, inside against the flat area needs more shaping. That's what Slick Sand and guide coat is for!  The front corner panel had a flat area stamped in it, so I used guidecoat to keep the edges sharp when blocking. Blocked the flat area first, shot more guidecoat, then blocked the sides- using the block to the rounded sided into the flat area so the edges of the flat spot are even.   The rear corner panel flange didn't have large/visible spot welds like the top rail flange and front corner flange had, so I faked some by making dimples with a 1/2" carbide burr. This way all of the flanges match.  Dimples added.  Bodywork finished, blocked with 80 and 180.  Shot with three coats of K93.  Checking the reflection while its wet.   Corners came out great after more sanding/guidecoating of the Slick Sand to finalize the shape.    Shot of the fake spot weld indentions.  Crisp edges on the corner panel. 
__________________
Project Goldilocks '66 C10 Short Fleet BBW Build '65 C10 Highly Detailed Stock Restoration Thread '78 Camaro Targa Roof Build '55 International Metal/Body/Paint Work '66 F100 Full Rotisserie Restoration '40 Packard 120 Convertible Coupe Restoration How To Restore and Detail an Original Gauge Cluster How To Detail Sand Body Panels, Edges, Corners, Etc |
|
|
|
|
|
07-09-2013, 06:35 PM
|
#211 |
|
Registered User
Join Date: Oct 2009
Location: canton ga
Posts: 12,728
|
Re: '55 International Metal/Body/Paint Work
WOW ,that looks great .
|
|
|
|
|
07-09-2013, 06:37 PM
|
#212 |
|
Registered User
Join Date: Apr 2012
Location: Beaver, Pa.
Posts: 197
|
Re: '55 International Metal/Body/Paint Work
Very nice! Details like this really show up in the finished product.
|
|
|
|
|
07-16-2013, 04:27 PM
|
#213 | ||
|
Registered User
Join Date: May 2011
Location: Anderson SC
Posts: 3,868
|
Re: '55 International Metal/Body/Paint Work
Quote:
Quote:
I straightened the top rail and shot it and the fenderwell with epoxy to finish up the passenger side.   Started on the driver side bed, straightening the metal out so I can start the bodywork.   This area was warped pretty bad from the kink in the top rail and not having the doubling plate that the passenger side had. It was bowed in around 3/16" of an inch in the center. This is a shot of the initial shrinking before straightening the dents with a hammer/dolly. The shrinking disc is amazing at evenly shrinking large areas! I've quit using the acetylene torch for shrinking, this works much better and faster.  After more hammer/dolly work and pulling down the high/warped spots with the shrinking disc. It's nice being able to get inside the bed to heat shrink the high spots on the inside (lows from the outside). I did probably 90% of the straightening with the shrinking disc, only used the hammer/dolly on the individual dents. The disc took care of the overall shape. 
__________________
Project Goldilocks '66 C10 Short Fleet BBW Build '65 C10 Highly Detailed Stock Restoration Thread '78 Camaro Targa Roof Build '55 International Metal/Body/Paint Work '66 F100 Full Rotisserie Restoration '40 Packard 120 Convertible Coupe Restoration How To Restore and Detail an Original Gauge Cluster How To Detail Sand Body Panels, Edges, Corners, Etc |
||
|
|
|
|
07-17-2013, 04:01 PM
|
#214 |
|
Registered User
Join Date: Feb 2010
Location: Hartselle, Al.
Posts: 466
|
Re: '55 International Metal/Body/Paint Work
Can you elaborate on the shrinking disk?
Thanks, Steven
__________________
Life is and will ever remain an equation incapable of solution, but it contains certain known factors. - Nikola Tesla Matt. 6:27 "Who of you by worrying can add a single hour to his life? http://www.67-72chevytrucks.com/vboa...=507266&page=2 |
|
|
|
|
07-17-2013, 06:19 PM
|
#215 |
|
Registered User
Join Date: May 2011
Location: Anderson SC
Posts: 3,868
|
Re: '55 International Metal/Body/Paint Work
Sure, the disc is an older Sunchaser shrinking disc on a 15 amp/8500 rpm Bosch grinder. You'd want to wear earplugs and make sure all your fingers and toes are out of the way when you hit the switch, it's a pretty scary tool at first! :shock: You hammer/dolly all your dents out, hold the disc over the high spots to heat them, then quickly cool the spot with a wet rag. The disc only heats the area it contacts so it doesn't overheat the surrounding metal like using a torch does. Check out some videos on youtube of them in action, I tried to record a video but the memory on the camera was too full.
__________________
Project Goldilocks '66 C10 Short Fleet BBW Build '65 C10 Highly Detailed Stock Restoration Thread '78 Camaro Targa Roof Build '55 International Metal/Body/Paint Work '66 F100 Full Rotisserie Restoration '40 Packard 120 Convertible Coupe Restoration How To Restore and Detail an Original Gauge Cluster How To Detail Sand Body Panels, Edges, Corners, Etc |
|
|
|
|
07-18-2013, 12:33 PM
|
#216 |
|
Registered User
Join Date: Feb 2010
Location: Hartselle, Al.
Posts: 466
|
Re: '55 International Metal/Body/Paint Work
cool thanks!
__________________
Life is and will ever remain an equation incapable of solution, but it contains certain known factors. - Nikola Tesla Matt. 6:27 "Who of you by worrying can add a single hour to his life? http://www.67-72chevytrucks.com/vboa...=507266&page=2 |
|
|
|
|
07-19-2013, 11:02 AM
|
#217 |
|
Registered User
Join Date: Mar 2005
Location: apple valley, ca
Posts: 2,670
|
Re: '55 International Metal/Body/Paint Work
Those shrinking discs work great, and yeah, they are noisy! Just make sure you inspect it closely before you use it each time. Over time, they can start to crack, and they can come apart when they wear out.
I was really skeptical when I first saw them, and I watched a live demonstration when Sunchaser used to sell them at the Pomona swapmeet. They had an old '30s Plymouth front fender, and they bashed a giant dent in it, and after about 3 minutes of hammer and dolly work and about 3 minutes with the shrinker, it was gone. I was sold! I bought one right on the spot.
__________________
Check out my latest endeavor: https://roundsixpod.com My build threads: '55 Chevy: http://67-72chevytrucks.com/vboard/s...d.php?t=247512 '64 C-20: http://67-72chevytrucks.com/vboard/s...d.php?t=446527 |
|
|
|
|
07-29-2013, 02:19 PM
|
#218 | |
|
Registered User
Join Date: May 2011
Location: Anderson SC
Posts: 3,868
|
Re: '55 International Metal/Body/Paint Work
Quote:
Danny Wickett of Hot Rod Construction told us about them and gave us an older disc to try out... I'm hooked! Btw, look him up, he has some amazing builds, especially the "Lomad"! http://www.hotrodconstruction.com  
__________________
Project Goldilocks '66 C10 Short Fleet BBW Build '65 C10 Highly Detailed Stock Restoration Thread '78 Camaro Targa Roof Build '55 International Metal/Body/Paint Work '66 F100 Full Rotisserie Restoration '40 Packard 120 Convertible Coupe Restoration How To Restore and Detail an Original Gauge Cluster How To Detail Sand Body Panels, Edges, Corners, Etc |
|
|
|
|
|
07-29-2013, 02:27 PM
|
#219 |
|
Registered User
Join Date: May 2011
Location: Anderson SC
Posts: 3,868
|
Re: '55 International Metal/Body/Paint Work
The rough bodywork on the rear 2/3's of the bedside if done and in Slick Sand, ready to block flat. The front corner was giving me fits (bottom edge was folded inward under the wrap around corner) but I worked out most of that this morning. I found a sealer to use on the large gaps under the bed floor- Fusor 121 Flexible Foam. It expands 10X the size of what's dispensed and cures with a waterproof shell around it. It is open cell inside though, which I found out once I started trimming the excess back... Not crazy about that but it's too late to change it. I can shoot undercoating on it to seal it back up underneath, and the topside will have Line-X bedliner over it so it should be fine.
 The gap underneath, 3/8" tall.  I'll run a bead of regular seam sealer over this since the foam will support it.  After applying the Fusor foam... it makes a mess!  
__________________
Project Goldilocks '66 C10 Short Fleet BBW Build '65 C10 Highly Detailed Stock Restoration Thread '78 Camaro Targa Roof Build '55 International Metal/Body/Paint Work '66 F100 Full Rotisserie Restoration '40 Packard 120 Convertible Coupe Restoration How To Restore and Detail an Original Gauge Cluster How To Detail Sand Body Panels, Edges, Corners, Etc |
|
|
|
|
07-29-2013, 06:16 PM
|
#220 |
|
Registered User
Join Date: May 2007
Location: Deale Md
Posts: 4,663
|
Re: '55 International Metal/Body/Paint Work
Now that looks like something that I would do with the sealer, but your end result I'm sure will be way better then what I would do.
__________________
James 63 GMC V6 4speed carryall 65 chevy swb bbw V8 auto 68 K20 327/4 speed, buddy buckets 2002 GMC CC Dually Duramax 64 GMC lwb 3/4 V6 4speed SOLD 66 GMC swb bbw buddy buckets SOLD IG duallyjams The only thing that stays the same is constant change! |
|
|
|
|
08-06-2013, 08:43 PM
|
#221 | |
|
Registered User
Join Date: May 2011
Location: Anderson SC
Posts: 3,868
|
Re: '55 International Metal/Body/Paint Work
Quote:
__________________
Project Goldilocks '66 C10 Short Fleet BBW Build '65 C10 Highly Detailed Stock Restoration Thread '78 Camaro Targa Roof Build '55 International Metal/Body/Paint Work '66 F100 Full Rotisserie Restoration '40 Packard 120 Convertible Coupe Restoration How To Restore and Detail an Original Gauge Cluster How To Detail Sand Body Panels, Edges, Corners, Etc |
|
|
|
|
|
08-06-2013, 09:11 PM
|
#222 |
|
Registered User
Join Date: May 2011
Location: Anderson SC
Posts: 3,868
|
Re: '55 International Metal/Body/Paint Work
More detail sanding on the left bedside.
  Added fake spot welds where the original ones didn't show.   Using guide coat to make sure the radius around the raised edge is even all around.   After re-guidecoating and sanding the flat area with 180. This shows how far and how evenly the radius extends into the flat area.  Front shot with Slick Sand. I'll have the left side in K93 this week and start prepping the inside of the bed for Line-X. Won't be long before I spray paint!  
__________________
Project Goldilocks '66 C10 Short Fleet BBW Build '65 C10 Highly Detailed Stock Restoration Thread '78 Camaro Targa Roof Build '55 International Metal/Body/Paint Work '66 F100 Full Rotisserie Restoration '40 Packard 120 Convertible Coupe Restoration How To Restore and Detail an Original Gauge Cluster How To Detail Sand Body Panels, Edges, Corners, Etc |
|
|
|
|
08-07-2013, 07:43 PM
|
#223 |
|
Registered User
Join Date: May 2011
Location: Anderson SC
Posts: 3,868
|
Re: '55 International Metal/Body/Paint Work
Had some help on the International today, we hired a new guy to do bodywork this week. He's done restoration work before so he's a great fit at the shop. We knocked out prepping the right inner bedside for epoxy/Line-X today after lunch. We'll do the other side and shoot epoxy Friday.

__________________
Project Goldilocks '66 C10 Short Fleet BBW Build '65 C10 Highly Detailed Stock Restoration Thread '78 Camaro Targa Roof Build '55 International Metal/Body/Paint Work '66 F100 Full Rotisserie Restoration '40 Packard 120 Convertible Coupe Restoration How To Restore and Detail an Original Gauge Cluster How To Detail Sand Body Panels, Edges, Corners, Etc |
|
|
|
|
08-07-2013, 08:29 PM
|
#224 |
|
Registered User
Join Date: Jan 2013
Location: Leonardtown, MD
Posts: 1,633
|
Re: '55 International Metal/Body/Paint Work
How are you forming the "spot welds" ?
__________________
Robert |
|
|
|
|
08-07-2013, 09:49 PM
|
#225 | |
|
Registered User
Join Date: May 2011
Location: Anderson SC
Posts: 3,868
|
Re: '55 International Metal/Body/Paint Work
Quote:
 Posted via Mobile Device
__________________
Project Goldilocks '66 C10 Short Fleet BBW Build '65 C10 Highly Detailed Stock Restoration Thread '78 Camaro Targa Roof Build '55 International Metal/Body/Paint Work '66 F100 Full Rotisserie Restoration '40 Packard 120 Convertible Coupe Restoration How To Restore and Detail an Original Gauge Cluster How To Detail Sand Body Panels, Edges, Corners, Etc |
|
|
|
|
 |
| Bookmarks |
|
|


 Linear Mode

