
|
Register or Log In To remove these advertisements. |
|
|
|
|||||||
 |
|
|
Thread Tools | Display Modes |
 03-24-2016, 01:28 PM
|
#1 |
|
Registered User
Join Date: Mar 2015
Location: Morada, CA --- (Near Lodi)
Posts: 1,443
|
Ah the joys of electrical wiring....
Ah electrical wiring.... its a 'calling' thats for sure!
 and not one that many car builders look forward to. With all the PRE-MADE wire harness kits that are available today for the home hobby builder.... almost anybody can be an 'electrician' for a day or 5 or 10! - and not one that many car builders look forward to. With all the PRE-MADE wire harness kits that are available today for the home hobby builder.... almost anybody can be an 'electrician' for a day or 5 or 10! -  Making a real nice clean harness takes a bit of work even when using a kit. If you want to build them out of reels of wires it will cost you dearly. The kits are typically much more economical way to do it. Either way the key to a beautiful, trouble-free and functional harness is using a layout board instead of doing it right on the vehicle. Wire coming off reels wants to roll back up and will always be curved if you dont 'train' it to go straight. Thats where the board and nails and "corridors" come into play. Start with a 4x8 sheet of 1/2" plywood. Prep it for your AREA OF WIRING; - front harness, rear harness, cab harness, engine harness, dash harness.... whatever you will be working on. You can build multiple harness' on 1 board on both sides. 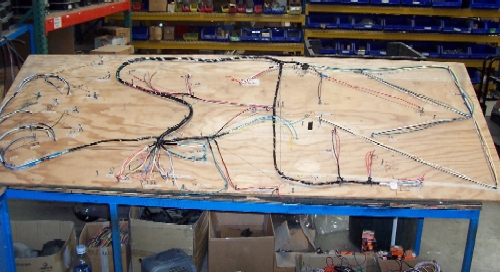 Its pretty basic; take basic measurements of where each wire goes - point A to point B... where everything has to start and end up within the area of the board. Lay it out with pencil on the plywood (like a schematic drawing). Then install #8, #16 nails (taller for more wires in that area) as needed at all the corners where the wire loom will make turns in any direction. Every termination point gets a nail and acts like a separator if using a terminal block(s). Then just string the wires 1 at a time like string art to their final point of termination away from the distribution center. DOnt put any terminals or connectors on until after it is placed on the vehicle. That way the finished "LOOM" will fit thru the firewall holes and grommets easiest.  Other items to use: Panduit Wire chase:  These can be used for the "corridors" where long straight bundling is needed. They are avail in many different widths, sizes. Push pins are great way to loop wire ends.  Once all the board work is completed and you have checked every circuit for continuity (Light test) then you can tape wrap it, wire tye it, plastic or fiber loom wrap it or use whatever you decide to finish it with and its all done. Before you remove it from the board, take a Sharpie and trace the entire loom and all the connector points and mark them, in case it has to come back for a 'rework'. Install into the vehicle (where it belongs), run all the wires out to their final termination points and then MOUNT THE HARNESS into place first. Then do the terminals and connector installations once everything is where it is suppose to be finished at. This makes for the cleanest looking and well planned out harness under a hood or anyplace on a vehicle so there are no wires hanging out and extra lengths sticking out of a connector once its mounted. Wiring and plumbing is where all the true efforts in a build is shown when a 'show judge' is looking at stuff or anybody else for that matter. Make your work count! Enjoy and good luck.....!
__________________
My Build: 57 Chevy Pro-Street |

|

|
|
03-24-2016, 01:42 PM
|
#2 |
|
Registered User
Join Date: Jul 2007
Location: Toppenish, WA
Posts: 15,379
|
Re: Ah the joys of electrical wiring....
Nice but I'd think the majority of us including myself are better off to just spend the money for a decent wiring kit that has all the wires and circuits we need and follow the instructions.
Years ago I spent days wiring my T bucket from scratch where If a simple kit had been available at the time (1974) it would have taken a couple of hours. That was one of the simplest wiring setups you will see as it had no accessories not even a radio but running each wire to where it needed to go an planning each step took a lot of time that could have been spent doing other tasks on the car. I'd think for the majority of the guys on here the actual time you get to spend in the garage working on the truck every week is somewhat limited and the many extra hours involved to make that setup and then decide where every wire needed to go and make sure you had every wire you needed could be better spent. For a builder with unlimited build time at his/her disposal it is possibly worth the bragging rights to do it though.
__________________
Founding member of the too many projects, too little time and money club. My ongoing truck projects: 48 Chev 3100 that will run a 292 Six. 71 GMC 2500 that is getting a Cad 500 transplant. 77 C 30 dualie, 454, 4 speed with a 10 foot flatbed and hoist. It does the heavy work and hauls the projects around. |
|
|
|
|
03-24-2016, 02:05 PM
|
#3 |
|
Registered User
Join Date: Mar 2015
Location: Morada, CA --- (Near Lodi)
Posts: 1,443
|
Re: Ah the joys of electrical wiring....
Im not saying to do it from scratch! (unless you are doing production cabling), but to do the HARNESS KITS on a board makes them cleaner and EASIER to complete then just thrashing them thru the truck and doing it one way and then changing it and going another way.....
Then they have problems in the end because they dont test it before they just connect the JUICE to run it. Ive REPAIRED so many home hobby builder wire harness BURN JOBS because people dont take the time to do it right.... the first time. Im just offering some FREE advice to try to help people do things right, If you or the 'majority' dont have time for that... well its your truck! Last I heard 'hobby builders' dont have deadlines.... so any time spent on your hobby is suppose to be fullfilling!
__________________
My Build: 57 Chevy Pro-Street |
|
|
|
|
03-24-2016, 02:18 PM
|
#4 |
|
Registered User
 Join Date: Sep 2015
Location: Sioux Falls, South Dakota
Posts: 702
|
Re: Ah the joys of electrical wiring....
Nice write up good idea on the board use will definitely be seeing my harness on on before long
__________________
"Orange Crush" |
|
|
|
|
03-24-2016, 02:29 PM
|
#5 |
|
Registered User
Join Date: Sep 2005
Location: Glendale Arizona
Posts: 1,188
|
Re: Ah the joys of electrical wiring....
Good job on loom jig that is how air plane harness are made!
__________________
http://67-72chevytrucks.com/vboard/s...d.php?t=436442 |
|
|
|
|
03-24-2016, 02:36 PM
|
#6 |
|
Simple? What's simple?
Join Date: Apr 2007
Location: Southeast CT
Posts: 1,472
|
Re: Ah the joys of electrical wiring....
I will say this about that, being several months into a wiring intense layout ... this would be super helpful!
I've done mine entirely on the truck, but using some of the tips you mentioned. I built a "skeletal" harness on the truck, running a couple of wires to each of the major areas so I knew the layout and shape, and then pulled it off and laid it out on the bench to lay the rest of the wiring in. Just for reference, I have 60 different circuits passing through the firewall 
__________________
CURRENT '50 GMC 100 shortbed Gen IV 4.8 LS - 4L65E (Secret truck, Shhh!!!) Build '63 Buick Wildcat Coupe 401ci Nailhead (Very much in pieces) Photos '66 Impala SS convertible 327-QJet-glide (4 speed swap one of these days...) Photos '69 CST/10 4x4 SWB Stepper 350 2bbl - NV4500/NP241C (Broken Truck!) '72 Sierra Grande 2WD LWB fleetside 350-TH350 Refresh '99 K2500 Silverado RCLB 5.7 Vortec - NV4500/NP241C (Daily) '99 K2500 Suburban 7.4 Vortec - NV4500/NP246 (still working out the bugs) SOLD '71 Custom/10 2WD LWB fleetside - '72 GMC K/3500 Dually (Sold to redryder) |
|
|
|
|
03-24-2016, 03:45 PM
|
#7 |
|
Registered User
Join Date: Nov 2014
Location: Newtown, CT
Posts: 177
|
Re: Ah the joys of electrical wiring....
very very good advice. Sometimes it's the common sense things (such as the board with nails to lay everything out on) are overlooked. I personally enjoy wiring projects and have made my own harnesses or repaired entire harnesses for old cub cadet tractors, plow setups, and partial harnesses for cars/trucks. I regularly do what JJorgensen mentioned where I run a single wire as my reference wire to get length, then complete the harness that way. However, I have always done my harnesses loose and not tacked to a board. I'll definitely try the board approach next time, as I can clearly see the benefits of that over what I've been doing.
|
|
|
|
|
03-24-2016, 05:34 PM
|
#8 | |
|
Senior Member
 Join Date: May 2007
Location: Doodah Kansas
Posts: 7,755
|
Re: Ah the joys of electrical wiring....
Quote:
I did aircraft electrical mods at a service center before I went back to school and that picture just triggered an anxiety attack. I remember ringing out (continuity testing) 70-80 pin cannon plugs. 
__________________
the mass of men live lives of quiet desperation if there is a problem, I can have it. new project WAYNE http://67-72chevytrucks.com/vboard/s...d.php?t=844393 |
|
|
|
|
|
03-24-2016, 05:43 PM
|
#9 |
|
Registered User
Join Date: Jun 2006
Location: Idaho
Posts: 8,800
|
Re: Ah the joys of electrical wiring....
I put two narrow sheets about the same length (16') as the truck and enlarged and cut up the wiring diagrams in the instructions in the locations to match the truck. Then put the fuse box at the dash, and ran the other four runs (rear, front, engine and dash) to check length and move as required. zip tied them together. ran the wires and looms, then terminated to right length.
__________________
1959 Chevy Short Fleetside w/ 74 4WD drive train (current project) OrrieG Build Thread 1964 Chevelle Malibu w/ 355-350TH (daily driver) Helpful AD and TF Manual Site Old Car Manual Project |
|
|
|
|
03-24-2016, 11:22 PM
|
#10 |
|
Registered User
Join Date: Aug 2012
Location: West Side of the valley, CA
Posts: 878
|
Re: Ah the joys of electrical wiring....
I remember watching a "How It's Made-Dreamcars" a while back and they used the same methodology...cool!
|
|
|
|
|
03-24-2016, 11:43 PM
|
#11 | |
|
Registered User
Join Date: Mar 2016
Location: Yakima Washington
Posts: 122
|
Re: Ah the joys of electrical wiring....
Quote:
Nice write up. The Electrical code book has one rule before all the mundane crude: quality workmanship! Thank you for explaining that rule with out mentioning the code book.
__________________
1960 SWB Pops If you won't support our troops then stand in front of them! |
|
|
|
|
|
03-25-2016, 12:06 PM
|
#12 |
|
Registered User
Join Date: Mar 2015
Location: Morada, CA --- (Near Lodi)
Posts: 1,443
|
Re: Ah the joys of electrical wiring....
The boards can be made to be "ERGOnomical" too!!!! unlike laying on your back underneath the dashboard for 8 hrs a day!
Pull up a chair and get a cold one while you work!  My early experiences in electrical wiring came from working in the cable harness refurb division of Memorex corp. And with Atari and National Semiconductor doing PC board assembly and test. So much of my work was done in a production atmosphere where time was of the essence and QUALITY was #1. Then becoming a QA/QC inspector early on made my work ethic in quality unquestionable for everything I do. maybe too much at times! I frustate myself over the littlest things ....
__________________
My Build: 57 Chevy Pro-Street Last edited by ptc; 03-25-2016 at 12:13 PM. |
|
|
|
|
03-25-2016, 12:28 PM
|
#13 |
|
Senior Member
Join Date: Jul 2012
Location: Oblong, Illinois
Posts: 7,017
|
Re: Ah the joys of electrical wiring....
Great explanations ptc! I wouldn't be good as a quality inspector....
|
|
|
|
|
03-25-2016, 01:42 PM
|
#14 |
|
Registered User
Join Date: Jun 2006
Location: Idaho
Posts: 8,800
|
Re: Ah the joys of electrical wiring....
My method was inspired by a show on how Ralley cars are built, they showed a large car size board to design the system. One interesting comment was all the connections were crimped, not soldered. Their experience was the vibration associated with racing quickly broke the solder connections. I bought a good commercial crimping tool for mine.
__________________
1959 Chevy Short Fleetside w/ 74 4WD drive train (current project) OrrieG Build Thread 1964 Chevelle Malibu w/ 355-350TH (daily driver) Helpful AD and TF Manual Site Old Car Manual Project |
|
|
|
|
03-26-2016, 06:39 PM
|
#15 | |
|
Simple? What's simple?
Join Date: Apr 2007
Location: Southeast CT
Posts: 1,472
|
Re: Ah the joys of electrical wiring....
Quote:
__________________
CURRENT '50 GMC 100 shortbed Gen IV 4.8 LS - 4L65E (Secret truck, Shhh!!!) Build '63 Buick Wildcat Coupe 401ci Nailhead (Very much in pieces) Photos '66 Impala SS convertible 327-QJet-glide (4 speed swap one of these days...) Photos '69 CST/10 4x4 SWB Stepper 350 2bbl - NV4500/NP241C (Broken Truck!) '72 Sierra Grande 2WD LWB fleetside 350-TH350 Refresh '99 K2500 Silverado RCLB 5.7 Vortec - NV4500/NP241C (Daily) '99 K2500 Suburban 7.4 Vortec - NV4500/NP246 (still working out the bugs) SOLD '71 Custom/10 2WD LWB fleetside - '72 GMC K/3500 Dually (Sold to redryder) |
|
|
|
|
|
03-29-2016, 01:41 AM
|
#16 |
|
Registered User
Join Date: Oct 2014
Location: Kitchener, Ontario, Canada
Posts: 3,254
|
Re: Ah the joys of electrical wiring....
Nice write up ptc. I really thought about buying a universal truck kit for mine but I was going so custom I would use very little of the kit so I did my own. I got the idea from someone on here about using a back panel. That way I could mount most of the items out of the truck. Then I mounted wire hold downs where the wires where going and looped a zip tie to pull the wires through. I pulled most of the wires and left them hanging where they would get terminated. What took the most time for me was figuring where I wanted everything like switches or gauges. Also I used the solder or crimp and heat shrink method. So far I figure I have over 100hrs in just wiring my truck, but I'm almost done and I'm happy with it.
Wire box at rear
__________________
http://67-72chevytrucks.com/vboard/s...d.php?t=648459 https://67-72chevytrucks.com/vboard/...d.php?t=769441 1951 MG TD 1967 Jeep CJ5 1.9L TDI 33X13.5X15 Mud Grapplers. 1952 GMC 9700 p/u 7.3L diesel on air, dually |
|
|
|
|
03-29-2016, 01:27 PM
|
#17 |
|
Registered User
Join Date: Mar 2015
Location: Morada, CA --- (Near Lodi)
Posts: 1,443
|
Re: Ah the joys of electrical wiring....
Building on a backplane is the best idea ever. That's how we build all panels in enclosures and PLC panels. That way you can just unplug the harness' and remove the "hardware" as a complete assembly. Great job on your build, it looks totally professional!
__________________
My Build: 57 Chevy Pro-Street |
|
|
|
|
| Bookmarks |
|
|


 Linear Mode

