
|
 09-16-2008, 05:44 AM
|
#151 |
|
1961 crewcab
Join Date: Dec 2007
Location: missoula, mt
Posts: 6,164
|
Re: My 1965 build thread
haha.. just do as Mr Miagi say "wax on-wax off!"
nice addition alan, I think a post like this will help some. this is where the cost of your paint job starts taking off. lots of labor in sanding. look forward to more tips and pointers. |

|

|
|
09-16-2008, 06:47 AM
|
#152 | |
|
1 thing at a time is progress.
Join Date: Jun 2007
Location: Ball Ground GA
Posts: 5,511
|
Re: My 1965 build thread
Quote:
Thanks for the feedback. You do want to go in a criss cross pattern as much as possible with steady pressure. Let the sand paper do the work. Choosing the right block is pretty important. Take my door for example, you wouldn't want to use a 6" block on a big area like that. Remember lots of patience (sp).
__________________
Alan
Philippians 2:14-16 |
|
|
|
|
|
09-16-2008, 08:39 AM
|
#153 |
|
Registered User
Join Date: Dec 2007
Location: Palmer, Alaska
Posts: 13,821
|
Re: My 1965 build thread
good info, thanks
__________________
 CHEVY ONLY CHEVY ONLY
|
|
|
|
|
09-16-2008, 11:07 PM
|
#154 |
|
1 thing at a time is progress.
Join Date: Jun 2007
Location: Ball Ground GA
Posts: 5,511
|
Re: My 1965 build thread
Here is the paint scheme I'm thinking about. I changed the color to hugger orange, it used to be white. The stripes and wheels are like a charcoal grey.
I'm thinking Orange all over including the inside the cab and engine bay. The charcoal will be on the top, inside the side trim, wheels, frame and highlights on the impala dash. All of the bolt on pieces on the frame will be a gloss black.
__________________
Alan
Philippians 2:14-16 |
|
|
|
|
09-17-2008, 01:12 PM
|
#155 | |
|
I'm just glad to be here!
Join Date: Jan 2008
Location: Longview, TX
Posts: 4,788
|
Re: My 1965 build thread
Quote:
Keep the tips and tricks coming...
__________________
Karl 1965 Chevy Stepside(Grandpa's Old Blue) and (July 2015 Shop Build!)(2020, the Saga Continues) http://67-72chevytrucks.com/vboard/s...d.php?t=372424 The LST Challenge: http://67-72chevytrucks.com/vboard/s...=1#post7812257 Korbin's 1st Square: "Sunburn" http://67-72chevytrucks.com/vboard/s...d.php?t=418618 1985 GMC Sierra: "White Trash", Korbin's 2nd now... http://67-72chevytrucks.com/vboard/s...d.php?t=632305 Henry - 1984 Chevrolet, Owen's 1st Square |
|
|
|
|
|
09-17-2008, 08:43 PM
|
#156 |
|
Registered User
 Join Date: Apr 2007
Location: Jane,Missouri
Posts: 844
|
That will look cool Alan
 color combo cant wait see it! color combo cant wait see it!
|
|
|
|
|
09-18-2008, 10:25 PM
|
#157 | |
|
1 thing at a time is progress.
Join Date: Jun 2007
Location: Ball Ground GA
Posts: 5,511
|
Re: My 1965 build thread
Quote:
__________________
Alan
Philippians 2:14-16 |
|
|
|
|
|
09-18-2008, 10:42 PM
|
#158 |
|
1 thing at a time is progress.
Join Date: Jun 2007
Location: Ball Ground GA
Posts: 5,511
|
Re: My 1965 build thread
I've been trying to figure out how to write text in between my pix, and have not been successful at it.
Here is a link to my body work pics and tips http://picasaweb.google.com/mx5miata...ickUpBodyWork# Pic-1 Here is 2 kinds of filler that I have. The rage xtreme is an excellent filler but it is $35-40/gal. It is like thick syrup. The Xgrip is about $10/gal it is alot thicker and harder to spread and has alot of voids. The crust is gummier that the xtreme so it clogs paper more than the other. Pic-2 This a new primer that I have not used yet. It is made by PPG and have heard good things about it. It's the cheapest of the PPG line. Pic-3 I skimmed the entire lower section of the door. It's easier to block the entire panel flat than it is too block several areas and make them transition into each other. Pic-4 Knocked the crust off with a 8" orbital mudhog with 80 grit. It works fast, just let it float over the filler. It will do a pretty good job of leveling. Pic-5 Black rattle can spray paint dusted over the filler for a guide coat. Ready to block with a long file board with 80.
__________________
Alan
Philippians 2:14-16 |
|
|
|
|
09-19-2008, 07:08 PM
|
#159 | |
|
I'm just glad to be here!
Join Date: Jan 2008
Location: Longview, TX
Posts: 4,788
|
Re: My 1965 build thread
Quote:
Next time try this. After you instert the pic, put the cursor at the end of the link. Hit enter so that you go to the next line, type in your text, at the end of the text hit enter again. Insert link for next pic. and so on....
__________________
Karl 1965 Chevy Stepside(Grandpa's Old Blue) and (July 2015 Shop Build!)(2020, the Saga Continues) http://67-72chevytrucks.com/vboard/s...d.php?t=372424 The LST Challenge: http://67-72chevytrucks.com/vboard/s...=1#post7812257 Korbin's 1st Square: "Sunburn" http://67-72chevytrucks.com/vboard/s...d.php?t=418618 1985 GMC Sierra: "White Trash", Korbin's 2nd now... http://67-72chevytrucks.com/vboard/s...d.php?t=632305 Henry - 1984 Chevrolet, Owen's 1st Square |
|
|
|
|
|
09-19-2008, 10:23 PM
|
#160 | |
|
1 thing at a time is progress.
Join Date: Jun 2007
Location: Ball Ground GA
Posts: 5,511
|
Re: My 1965 build thread
Quote:
__________________
Alan
Philippians 2:14-16 |
|
|
|
|
|
09-25-2008, 11:56 PM
|
#161 |
|
1 thing at a time is progress.
Join Date: Jun 2007
Location: Ball Ground GA
Posts: 5,511
|
Re: My 1965 build thread
I was out goofing off last weekend. I got invited to go deep sea fishing with the guys in Destin Florida. I'm the one squating on the right.
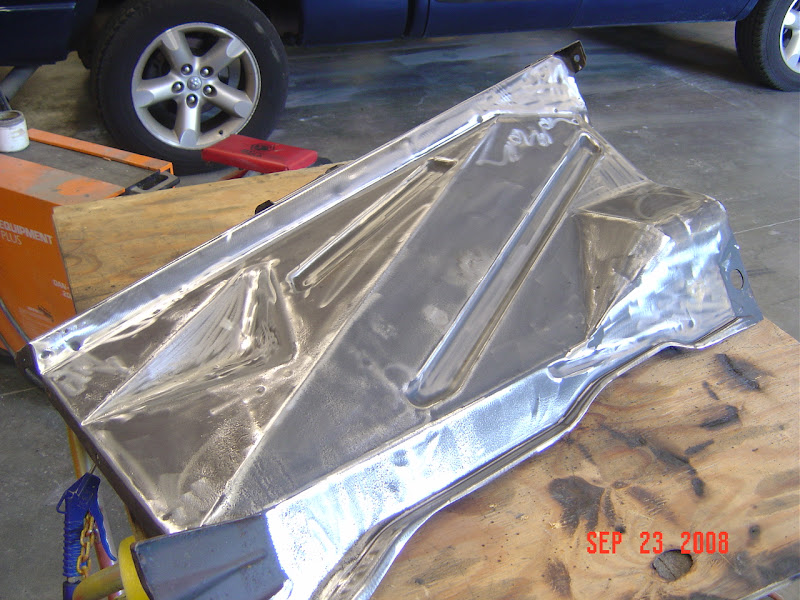
http://picasaweb.google.com/mx5miata...63725781171122 I'm still having trouble inserting a pic with text in between. Here is what I set up...I took the brackets off the beginning and the end so it will show up as a text so you can see what I put. IMG]http://picasaweb.google.com/mx5miatanut/2008FishingTrip#5248263725781171122[/IMG And this is what shows up the big red X  Today I got some priming done on the cab, door and frame. Next I will be seam sealing and start to work on the dash transformation. The last image is one of the inner fenders. I've about got them slicked up and ready for primer.
__________________
Alan
Philippians 2:14-16 |
|
|
|
|
09-26-2008, 01:01 AM
|
#162 | |
|
3DrDwn--the 'burb not the band
Join Date: Jan 2007
Location: missoula, mt
Posts: 598
|
Re: My 1965 build thread
Quote:
by double checking and removing or pasting over that extra http://www. my images replaced the dreaded red x. not sure if that's whats holding you up but I fought with it more than once. Josh
__________________
Slo and Lo that is the tempo. '72 burb build page here: http://67-72chevytrucks.com/vboard/s...d.php?t=259256 '89 GMC Dually crew build page coming soon. 88 4x4 crew DDduallys past/present pics here: http://67-72chevytrucks.com/vboard/s...46#post4001246 89 1 ton Dually rear flip kit install here: http://67-72chevytrucks.com/vboard/s...d.php?t=354327 |
|
|
|
|
|
09-26-2008, 09:49 AM
|
#163 |
|
Registered User
Join Date: Dec 2007
Location: Palmer, Alaska
Posts: 13,821
|
Re: My 1965 build thread
here is one of your pics
 that link you posted above is a link to your entire album i just clicked on one of your pics to make it bigger in picasa then right click it and copy image location, then click on the little picture button that looks like a pic of a mountain and paste the copied text in the window that pops up...make sense? or you should be able to just put the img tags around it  yeah that works too..... so here is the text of the sunset pic without the first and last brackets img]http://lh6.ggpht.com/mx5miatanut/SNWGPpYKKSI/AAAAAAAACJ0/RTtserFFRJI/s512/DSC07651.JPG[/img
__________________
CHEVY ONLY
Last edited by joe231; 09-26-2008 at 09:58 AM. |
|
|
|
|
09-26-2008, 10:42 AM
|
#164 |
|
Registered User
Join Date: Sep 2008
Location: Newport, North Carolina
Posts: 616
|
Re: My 1965 build thread
This thread freakin motivates me! Haha, I love looking at these pictres, seeing this truck done right, it's great! Keep the pics and updates coming. As soon as I joined this site and saw this thread, I started ordering parts to finish up my floors.
|
|
|
|
|
09-26-2008, 11:53 AM
|
#165 |
|
1 thing at a time is progress.
Join Date: Jun 2007
Location: Ball Ground GA
Posts: 5,511
|
Re: My 1965 build thread
 Thanks Joe and everyone else. I got it. 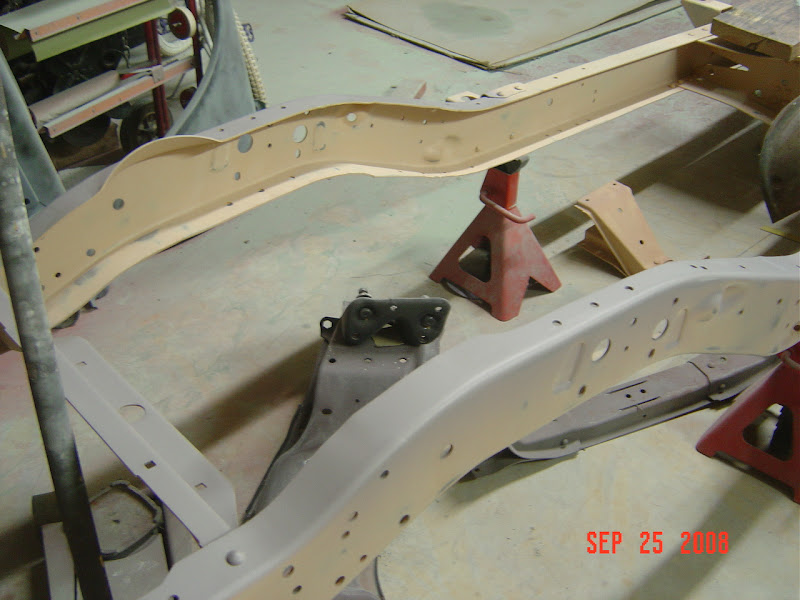 I'm liking this. I have to go to the properties of the pic I want to show and copy and paste the data from there. If I right click on the pic that I want to embed and copy it, it won't let me paste it when I click on the insert image icon (with mountains). Thanks Again
__________________
Alan
Philippians 2:14-16 |
|
|
|
|
09-26-2008, 11:40 PM
|
#166 |
|
1 thing at a time is progress.
Join Date: Jun 2007
Location: Ball Ground GA
Posts: 5,511
|
Re: My 1965 build thread
I got some seam sealing done tonight. This pic shows the primer sanded with 320 alittle past where the sealer will be so it will have something to bite too.
 Taped off and ready to seal. 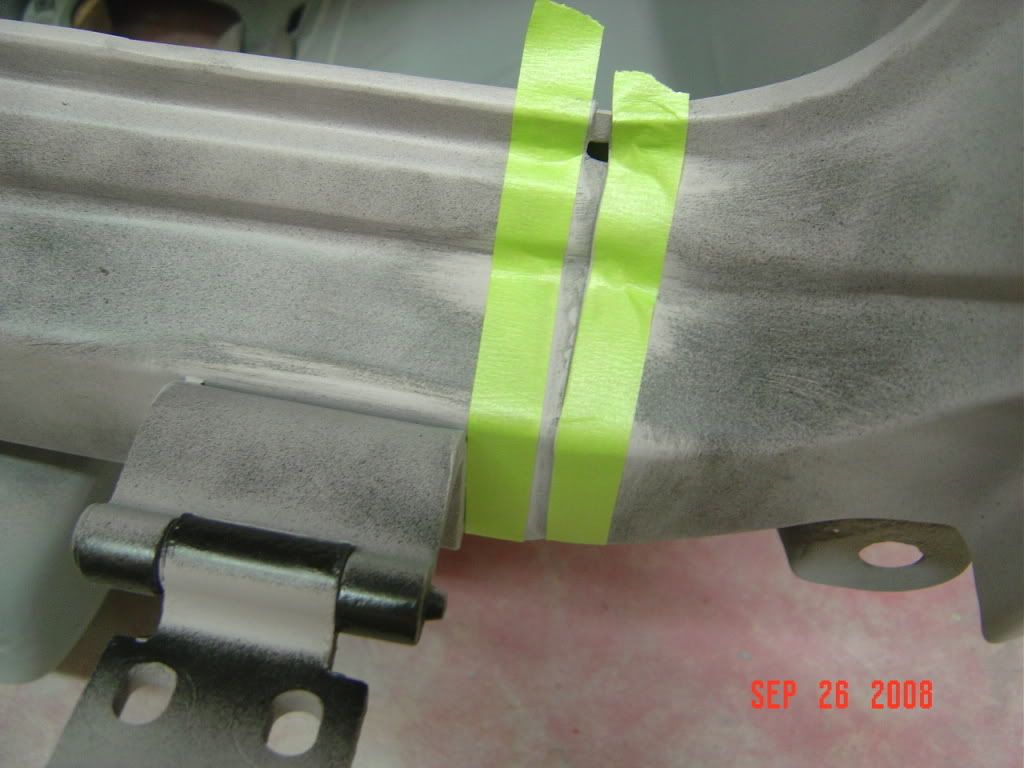 Bottom of the cab sealed. 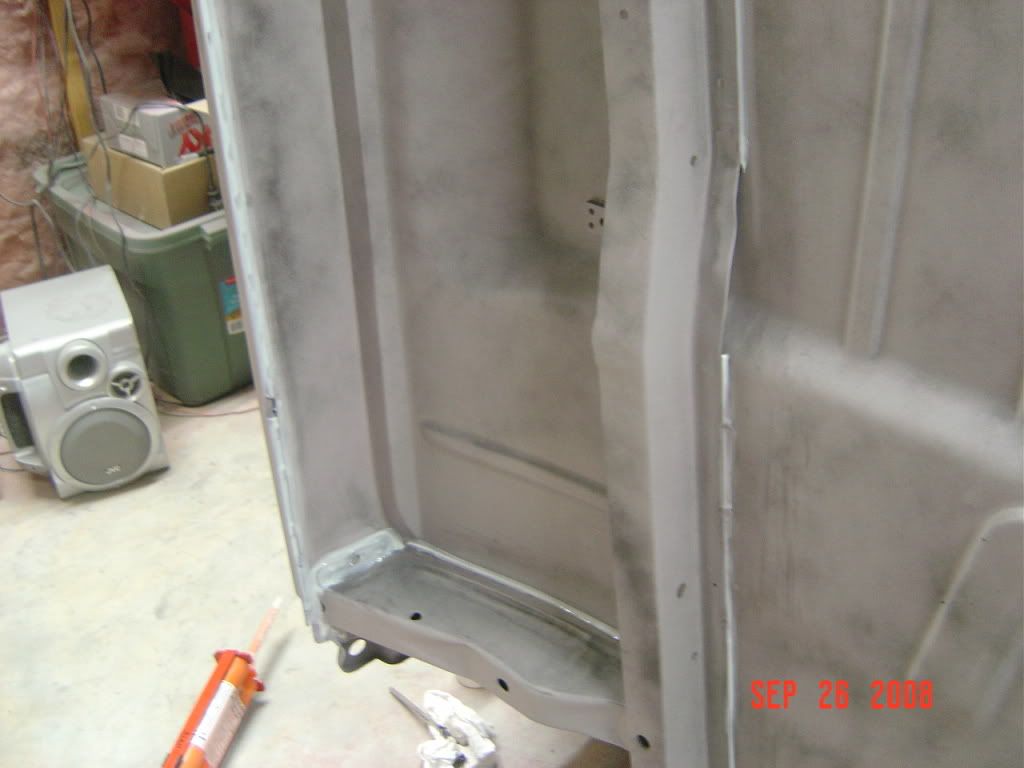 I'm gambaling on this. I'm leaving the hinges where they were when I aligned everything. This normally works for me. It might bite me later if things don't line up. 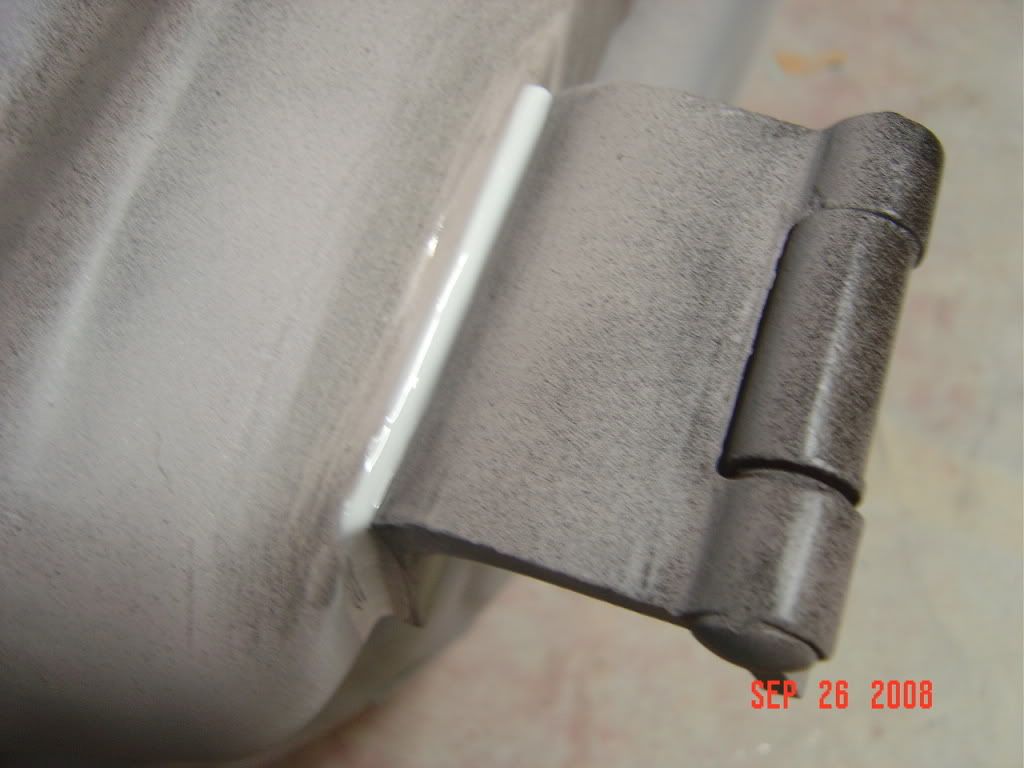 I'm going to try photobucket.com for my pix. It's alot easier to insert an image than Picassa. I just signed up tonight and I'm still learning it. I can't figure out how to put the pix in a certain order. Here is the link to it. http://s369.photobucket.com/albums/o...20C10%20Build/
__________________
Alan
Philippians 2:14-16 |
|
|
|
|
09-27-2008, 12:04 AM
|
#167 | |
|
1 thing at a time is progress.
Join Date: Jun 2007
Location: Ball Ground GA
Posts: 5,511
|
Re: My 1965 build thread
Quote:
Send me a link to your progress and good luck.
__________________
Alan
Philippians 2:14-16 |
|
|
|
|
|
09-27-2008, 01:04 AM
|
#168 |
|
Registered User
Join Date: Dec 2007
Location: Palmer, Alaska
Posts: 13,821
|
Re: My 1965 build thread
 Alan, glad to help! Alan, glad to help!looking good!!!
__________________
CHEVY ONLY
Last edited by joe231; 09-27-2008 at 01:05 AM. |
|
|
|
|
09-28-2008, 10:23 PM
|
#169 |
|
1 thing at a time is progress.
Join Date: Jun 2007
Location: Ball Ground GA
Posts: 5,511
|
Re: My 1965 build thread
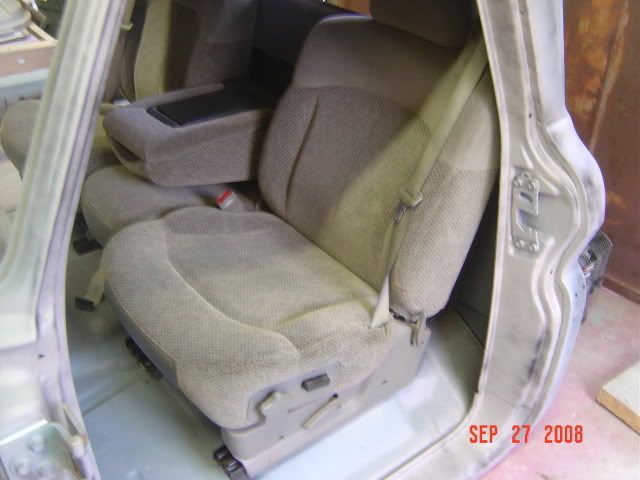
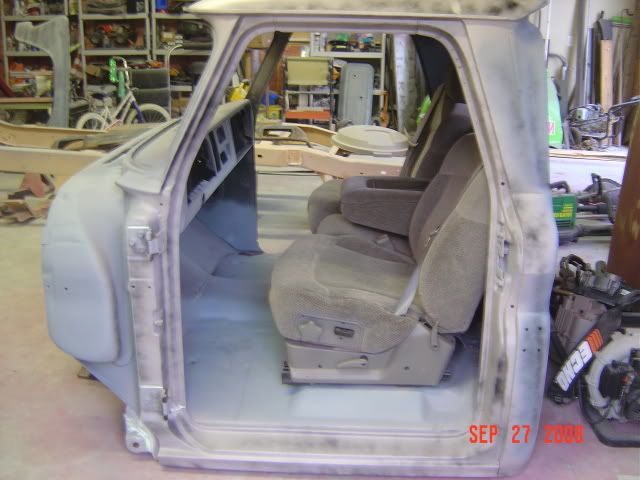
I got my Silverado seats set in temporarily. I have not tried to bolt them in place. The center console is not sitting down on the floor. The front legs will not stradle the hump enough.
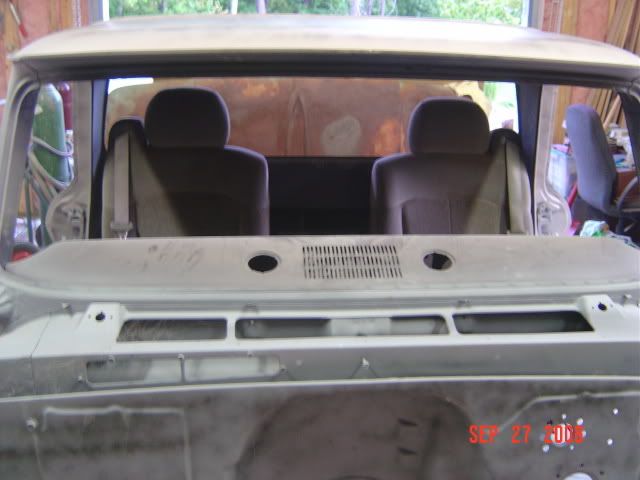   I'm in the process of setting the column. I got a tilt column with a key. I don't know what it came out of. Me and Sdailey took the column apart. It had alot of play. I found the pivot plate screws to be backing out. I'm going to see if I can get it adapted to hold the factory ebrake. I also have to work on the neutral safety switch by relocating it further up the column. If so I'll change the bearings since I've got it apart. 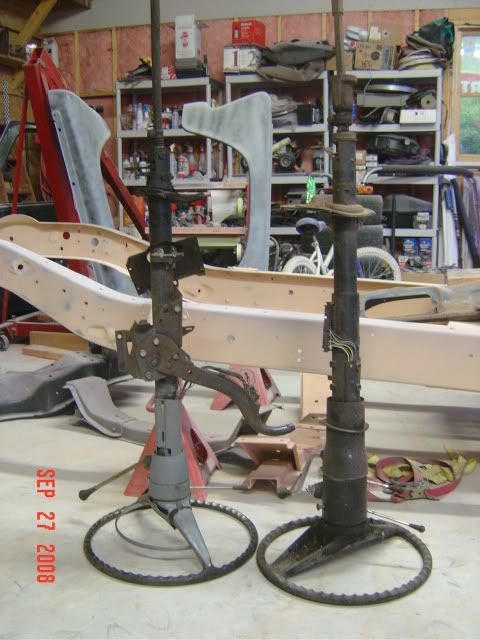 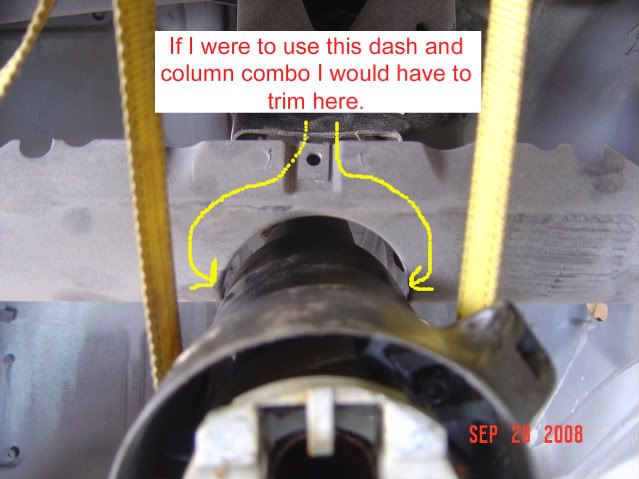 I removed the dash today. Here are the spot welds along the top pinch weld. 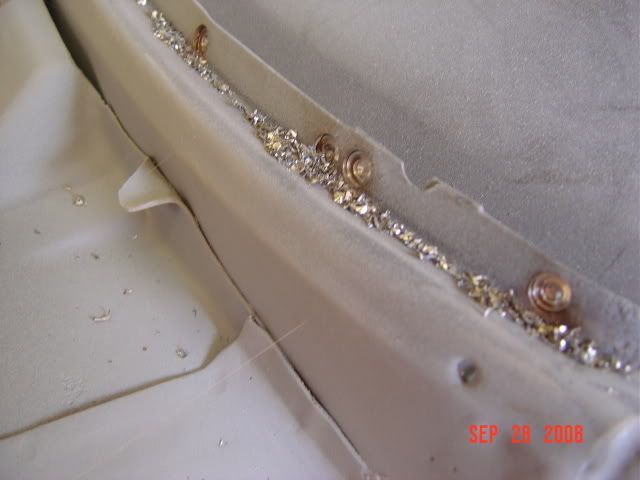 Something is missing.  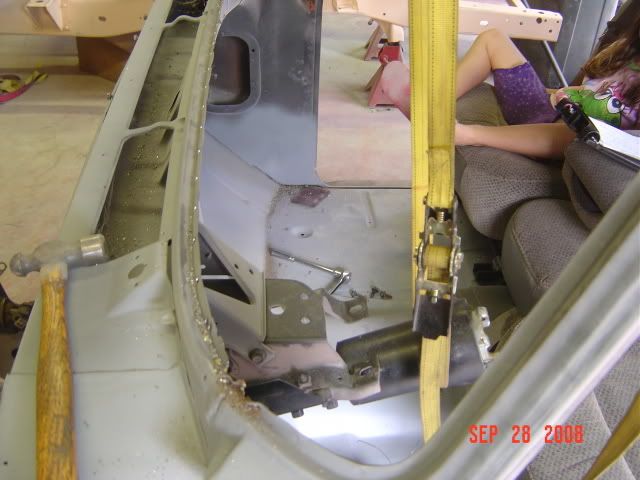
__________________
Alan
Philippians 2:14-16 Last edited by Alan's Classic; 09-28-2008 at 11:05 PM. Reason: spelling |
|
|
|
|
09-28-2008, 11:07 PM
|
#170 |
|
chevy only
 Join Date: Sep 2006
Location: Phoenix, AZ
Posts: 6,619
|
Re: My 1965 build thread
duuuude always love the nice work, thats going to be on nice truck , great job alan
__________________
CHEVY ONLY... Nothin Else ! |
|
|
|
|
09-29-2008, 11:23 PM
|
#171 |
|
1 thing at a time is progress.
Join Date: Jun 2007
Location: Ball Ground GA
Posts: 5,511
|
Re: My 1965 build thread
Thanks Dino, I appreciate the comments. It keeps me going.I've got the lower bracket mounted on the column. I had to remove 4 welded nuts to allow it to bolt up. I've still got to bolt the lower bracket to the column. I will wait till I get the dash in. 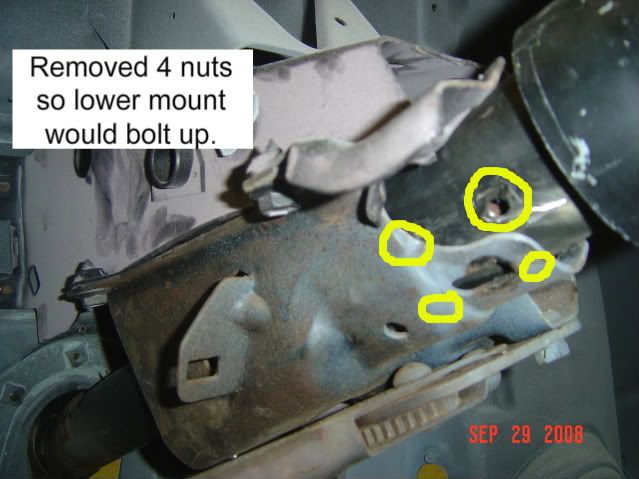 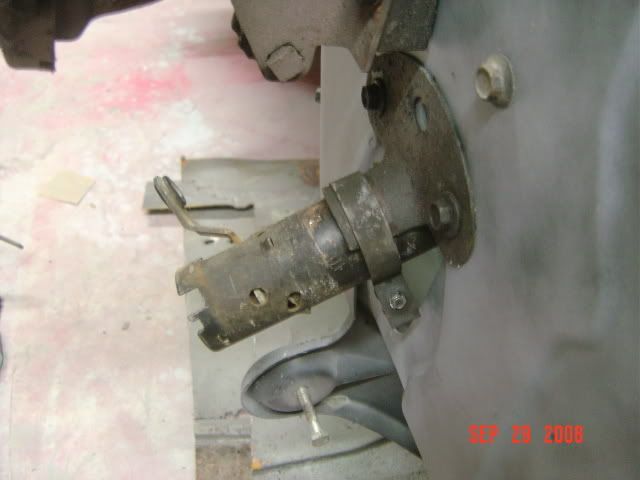 Made a cardboard dash to get a good visual. 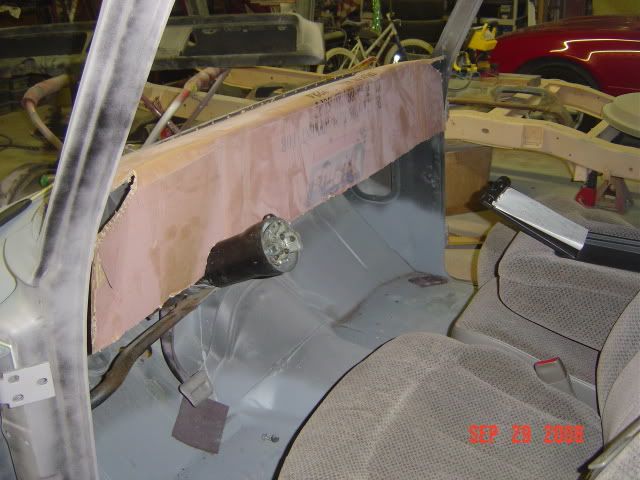 With the cardboard lined up on the steering column cutout the 65 dash is alot higher than the Impala. The cardboard is not angled down to reflect the 65 angle. From what I can tell is the Impala dash will be flat to the bottom of the windshield. The 65 dash dives down to the windshield pinchweld. The gauges appear to be located at the same height, since the Impalas gauges mount toward the top of the dash. 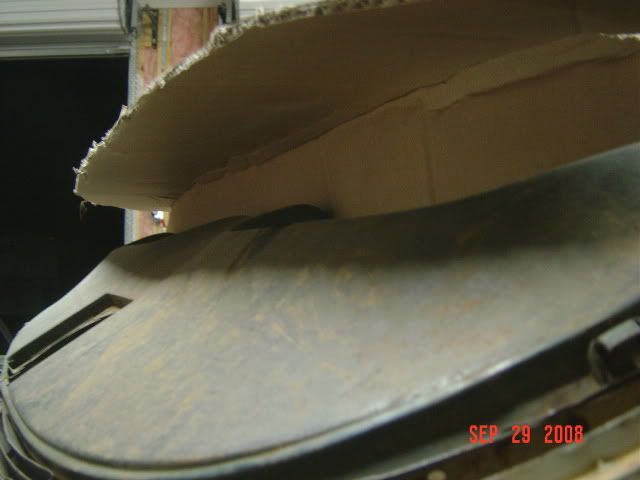 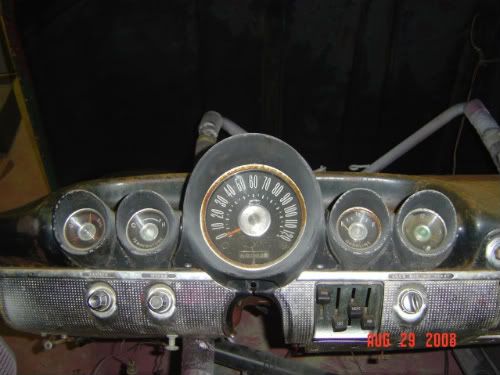 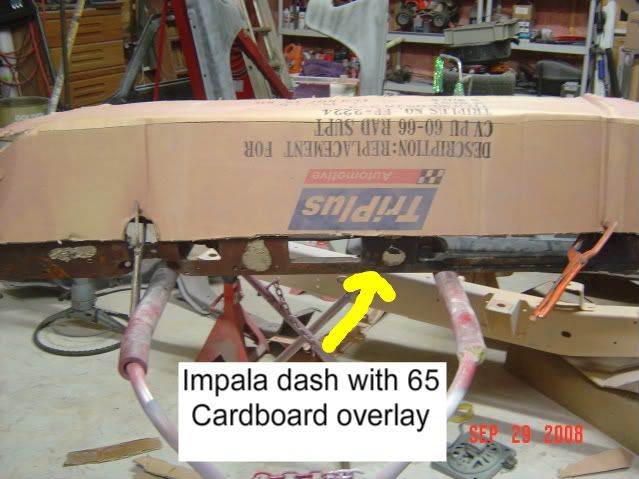 I sprayed white paint around the cardboard to give me an idea where I might need to cut. Don't worry I plan on cutting it long and whittle down from there. I've got several ideas of how I'm going to attach it to the pinch weld, but I'm open to suggestions. I'm going to try to use the Impala pinch weld and modify it to make it fit. I've also got to cut the dash down the middle because it is about 3" short on the passenger side. 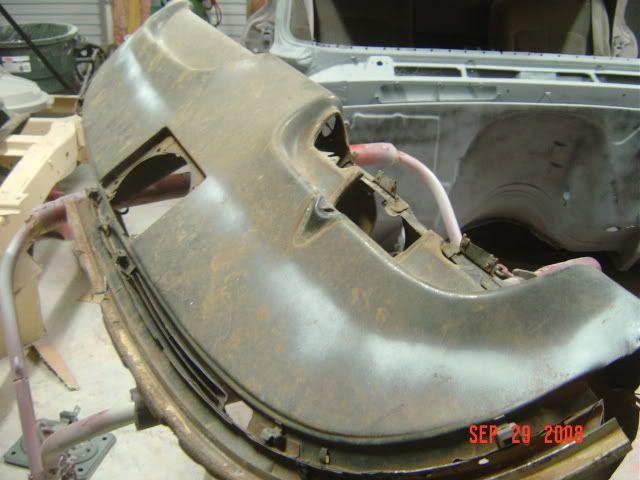 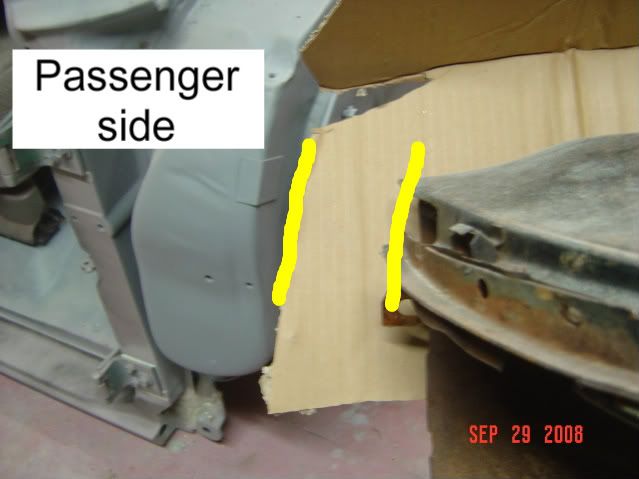
__________________
Alan
Philippians 2:14-16 |
|
|
|
|
09-30-2008, 08:09 AM
|
#172 |
|
Shloooooong bed member #2
Join Date: Aug 2008
Location: Millington Tn.
Posts: 1,864
|
Re: My 1965 build thread
Alan,
Thanks for the pictures and all the extra information. I know most of these guys know this stuff, but I'm sure learning alot from you. and I'm glad to see you give your helpers their union breaks..
__________________
David, Daughters 66 truck: http://67-72chevytrucks.com/vboard/s...d.php?t=484601 Learning to drive a 3 on the tree: http://www.youtube.com/watch?v=CcCMvRgBo1Q |
|
|
|
|
09-30-2008, 08:15 AM
|
#173 |
|
1961 crewcab
Join Date: Dec 2007
Location: missoula, mt
Posts: 6,164
|
Re: My 1965 build thread
maybe keep the pinch weld from the 65 dash, and cut the dash off from it about an inch in, then use that to weld the impala dash to.
you might even be able to overlap the impala dash over what is left of the 65, then spot them together , and seamseall it in the pinch by the winshield. |
|
|
|
|
09-30-2008, 02:33 PM
|
#174 | ||
|
1 thing at a time is progress.
Join Date: Jun 2007
Location: Ball Ground GA
Posts: 5,511
|
Re: My 1965 build thread
Quote:
Your welcome. Why doesn't the boss get any breaks? -------------------------------------------------------------------------------- Quote:
I have thought of that, but I hate to cut up my good unmolested C10 dash when someone could possibly use it. I might still do it once I study it some more. I might not be doing much for awhile. My wifes dad died this morning up in Montana. We are down here in GA. I got off work early to be here when she got home. I'll be back as soon as I can.
__________________
Alan
Philippians 2:14-16 |
||
|
|
|
|
09-30-2008, 02:44 PM
|
#175 |
|
Shloooooong bed member #2
Join Date: Aug 2008
Location: Millington Tn.
Posts: 1,864
|
Re: My 1965 build thread
Alan,
When you figure that one out, you truly have snatched the peeble from the masters hand. 
__________________
David, Daughters 66 truck: http://67-72chevytrucks.com/vboard/s...d.php?t=484601 Learning to drive a 3 on the tree: http://www.youtube.com/watch?v=CcCMvRgBo1Q |
|
|
|
 |
| Bookmarks |
| Tags |
| 1959, 1960, 1964, 1965, 1966, c10, hugger, impala, orange |
|
|


 Linear Mode

