
|
Register or Log In To remove these advertisements. |
|
|
|
|||||||
 |
|
|
Thread Tools | Display Modes |
|
|
 11-30-2012, 03:26 PM
|
#1 | |||
|
Boss Hogg
 Join Date: Apr 2002
Location: The Beaver State
Posts: 2,361
|
Re: HOW TO: Install HID Lighting & HID lighting explained
Quote:
This is the truth. Just popping in HID bulbs in non-HID housings is improper and irresponsible! You WILL cause glare and unsafe conditions for others! Not to rain on a sales parade, but it is like any mod, do it right.
__________________
RIP El Jay 2015 Subaru Outback 3.6R Limited 2002 Chevy Trailblazer LS 2WD Quote:
Quote:
|
|||

|

|
|
11-30-2012, 03:32 PM
|
#2 | ||
|
Registered User
Join Date: Feb 2000
Location: Wichita Falls, Texas
Posts: 3,153
|
Re: HOW TO: Install HID Lighting & HID lighting explained
Quote:
Quote:
|
||
|
|
|
|
11-30-2012, 04:28 PM
|
#3 |
|
Registered User
Join Date: Sep 2012
Location: Leesburg VA
Posts: 85
|
Re: HOW TO: Install HID Lighting & HID lighting explained
I'm going to see if I can get lightwerkz (http://shop.lightwerkz.net/HID-Projectors) to retrofit some projectors into some 7 inch jeep headlights.
I really dig the Mercedes G-glass headlamps. I'm hoping the retrofit would look something like this: 
__________________
-- 1968 fleetside - nolimit wide ride front and rear + ridetech |
|
|
|
|
11-30-2012, 04:47 PM
|
#4 | ||
|
Registered User
Join Date: May 2011
Location: Anderson SC
Posts: 3,870
|
Re: HOW TO: Install HID Lighting & HID lighting explained
Quote:
Here'a a better explanation of why drop in's cause glare. This is the mechanics of lighting and aiming and everyone agrees on this stuff. In a Halogen housing the shape of the reflector and the design of the fresnel lens work together to aim the light into a cut-off pattern on low beams. Everything about the beam pattern hinges around where the filament is located. The edge of the glowing filament creates the cut-off pattern when aimed out the reflector and lens. When you change the light source size and placement you also change how the light is aimed because the reflector/lens combo hasn't been redesigned to work with the new light source. The aim is determined by the placement and size of the filament, and the glowing filament's edge is the center point by which the aim is designed into the housing. 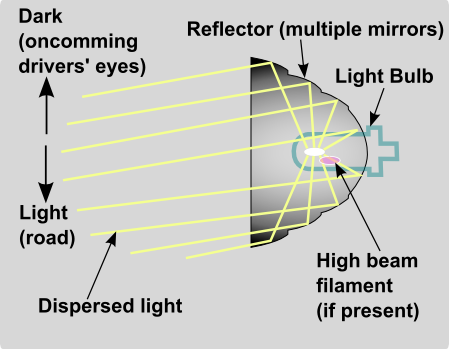 HID's use a completely different way to control the beam pattern. The "shielding" shown in the pic is a flap that drops out of the way to make a full high beam pattern. When it's up it creates the low beam cut-off. A solenoid controls the position of the flap. The aim/shape of the low beam cut-off is not determined by the size or placement of the light source- the edge of the flap blocks off a section of the reflector's light.  When you understand these two diagrams it becomes obvious that it's impossible to change the size and placement of light source in a housing without changing the aim and increasing glare. HID's have a huge light source compared to the small filament in a halogen bulb. Drop in's also lose the high/low beam feature because there is only one filament and no flap/solenoid to control the light beam. Quote:
Proper aim is that the beam pattern drops 3-4 inches every 25 feet. This allows for a low beam beam pattern that shines far enough out for city driving in traffic but doesn't cause excessive glare when topping a hill or driving in areas with differences in elevation where oncoming traffic is lower than the opposite lane. No matter how bright your lights are, they need to be aimed slightly down. The brighter the lights are, the more they need a sharp cut-off on low beams.
__________________
Project Goldilocks '66 C10 Short Fleet BBW Build '65 C10 Highly Detailed Stock Restoration Thread '78 Camaro Targa Roof Build '55 International Metal/Body/Paint Work '66 F100 Full Rotisserie Restoration '40 Packard 120 Convertible Coupe Restoration How To Restore and Detail an Original Gauge Cluster How To Detail Sand Body Panels, Edges, Corners, Etc |
||
|
|
|
|
| Bookmarks |
| Tags |
| headlights, hid conversion, relays |
|
|


 Hybrid Mode
