
|
Register or Log In To remove these advertisements. |
|
|
|
|||||||
 |
|
|
Thread Tools | Display Modes |
 09-12-2010, 03:50 PM
|
#1 |
|
Registered User
Join Date: Sep 2002
Location: Lake Charles Louisiana
Posts: 147
|
1972 Highlander 6.0/4L80E/LoMax
I would like to start off by saying thank you to the people of this site that put the information out there for everyone to use freely. Everything I needed I was able to find by using the search function on this website as well as LS1TECH.COM, and LT1SWAP.COM.
I would like to thank my friend Louis who owns Ashfords Automotive. He and I worked together for years in the automotive mechanic industry, and he helped me with finding all the plug pin-outs on his All-Data service that I needed so I could do my own wiring. The pin-out information is also available on LS1TECH.COM, and LT1SWAP.COM. I would also like to thank my machinist friend B.J. with Dubois Sheet Metal Works. I have been going to him for YEARS with my project ideas, and he has always been helpful and informative with my part designs and producing them with me. Your the man B.J.!! I ordered my pull-out from http://jjsautomotiveracing.com/index.aspx . I dealt with Brian and he was ALWAYS helpful and informative with whatever I needed and gave me a HELL of a price. In my package I requested every hose be intact and attatched to the motor/trans. I also requested all the wiring be un-cut. Here is a list of everything I received from Brian: 2005 6.0/4l80e 65,000 miles trans fluid lines trans to transfer case adapter oil cooler lines AC lines power steering lines fuel lines fuel pump assembly radiator hoses radiator overflow reservoir radiator end tanks intake tubing engine bay wiring engine bay relay/fuse box ECU under dash wiring BCM drive by wire (DBW) pedal TAC module gauge cluster Here it is the day I brought it home 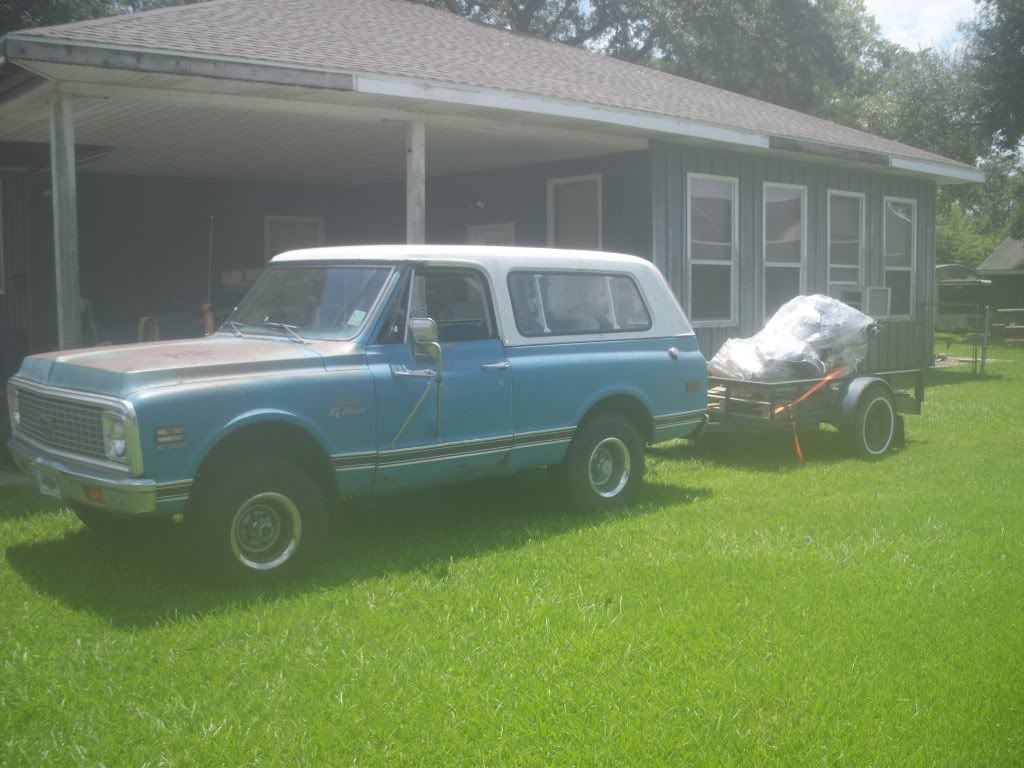 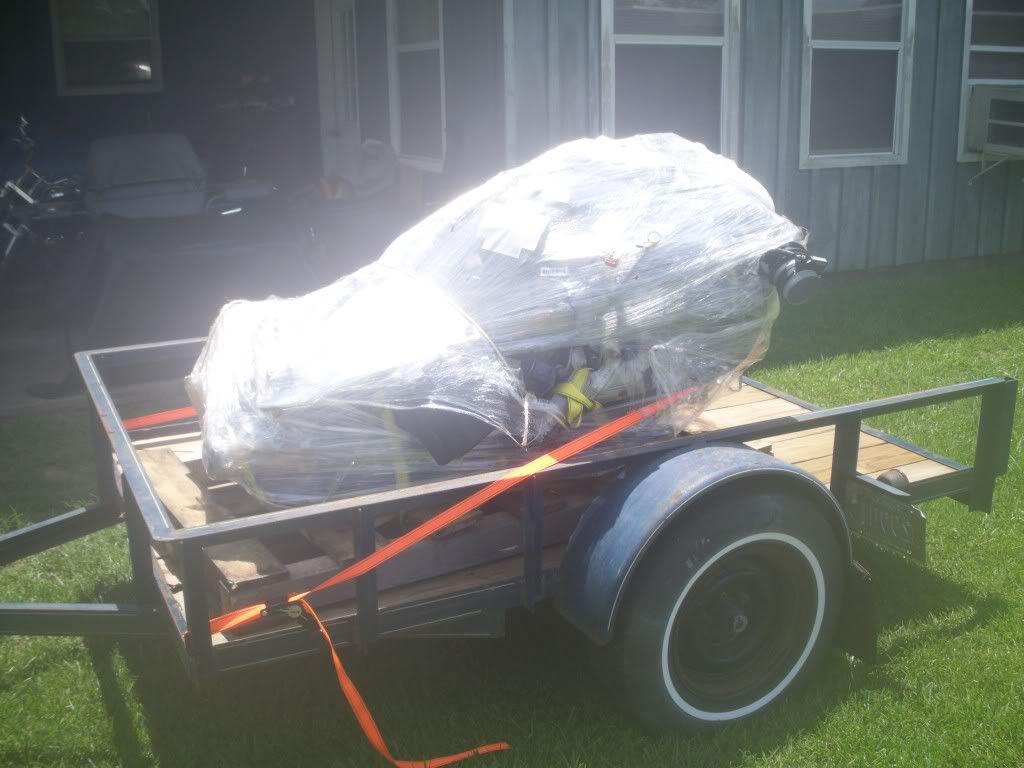 Out with the old 350 (never liked the gold Moroso bling anyway) 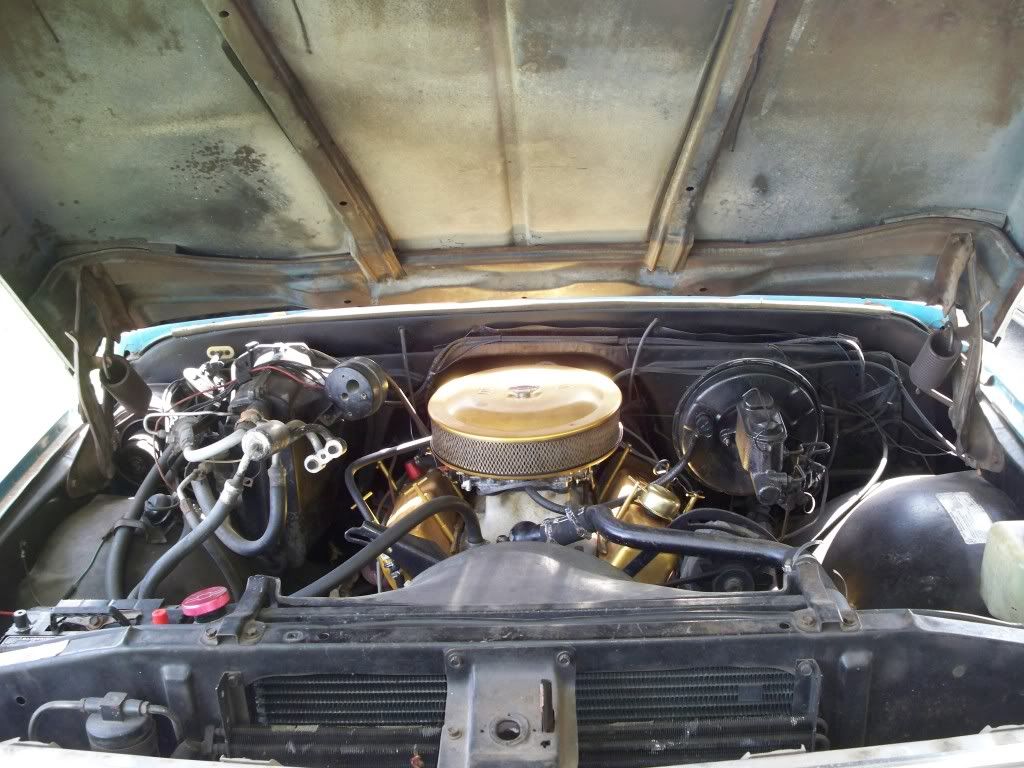 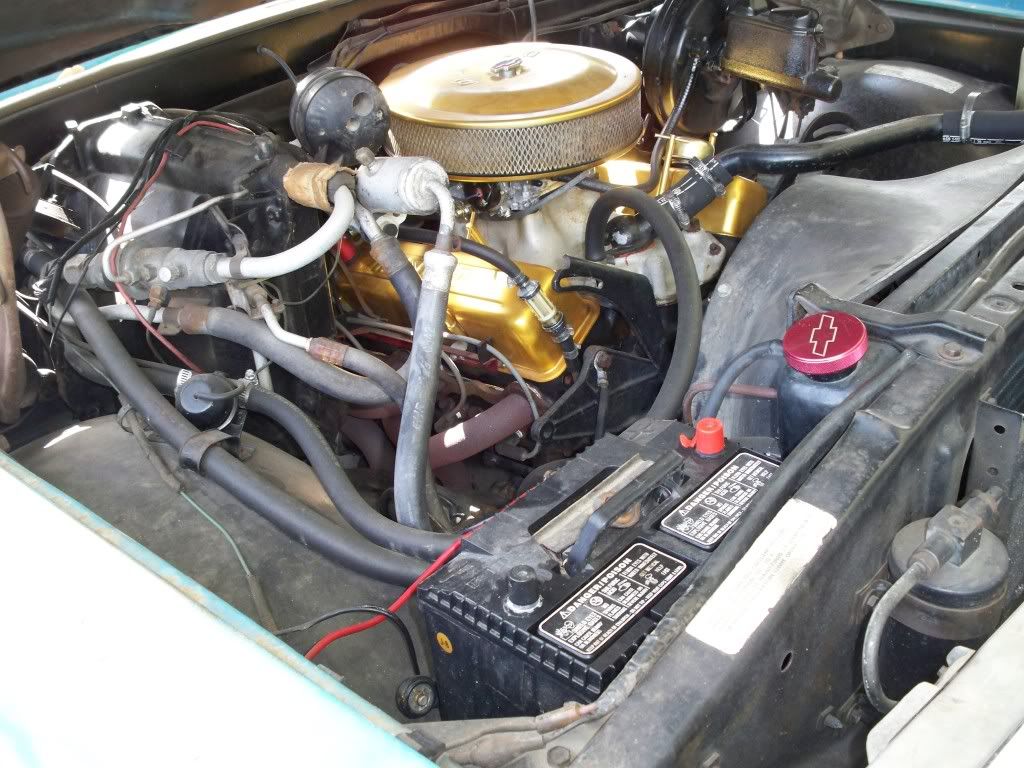 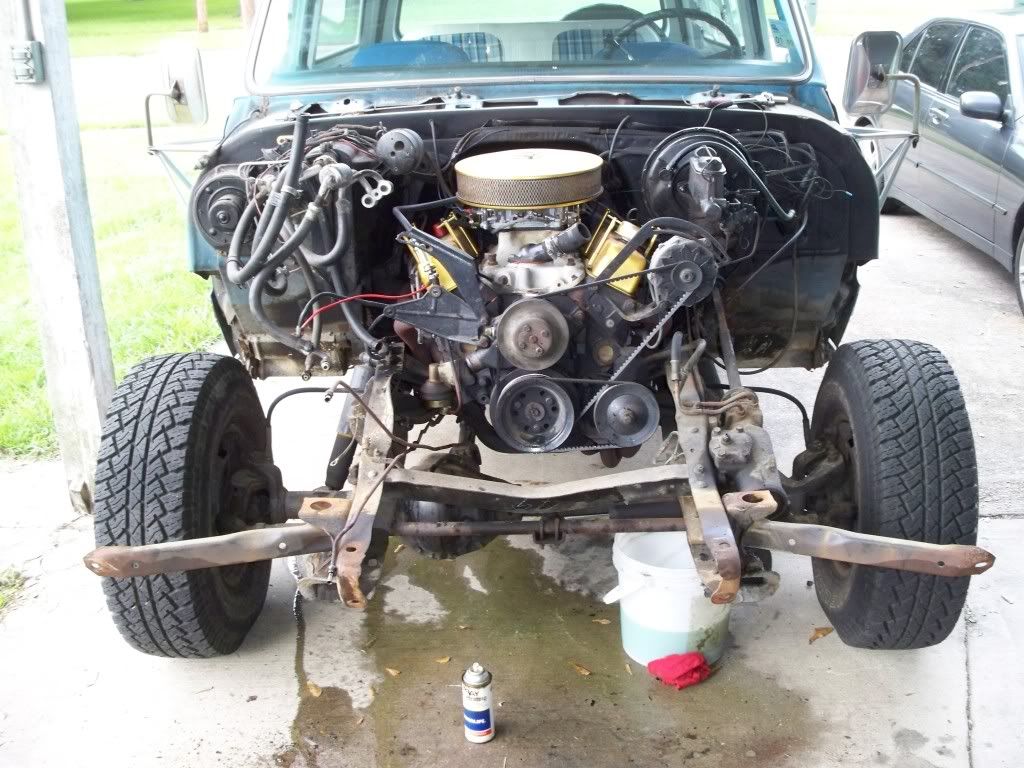 My friend Billy 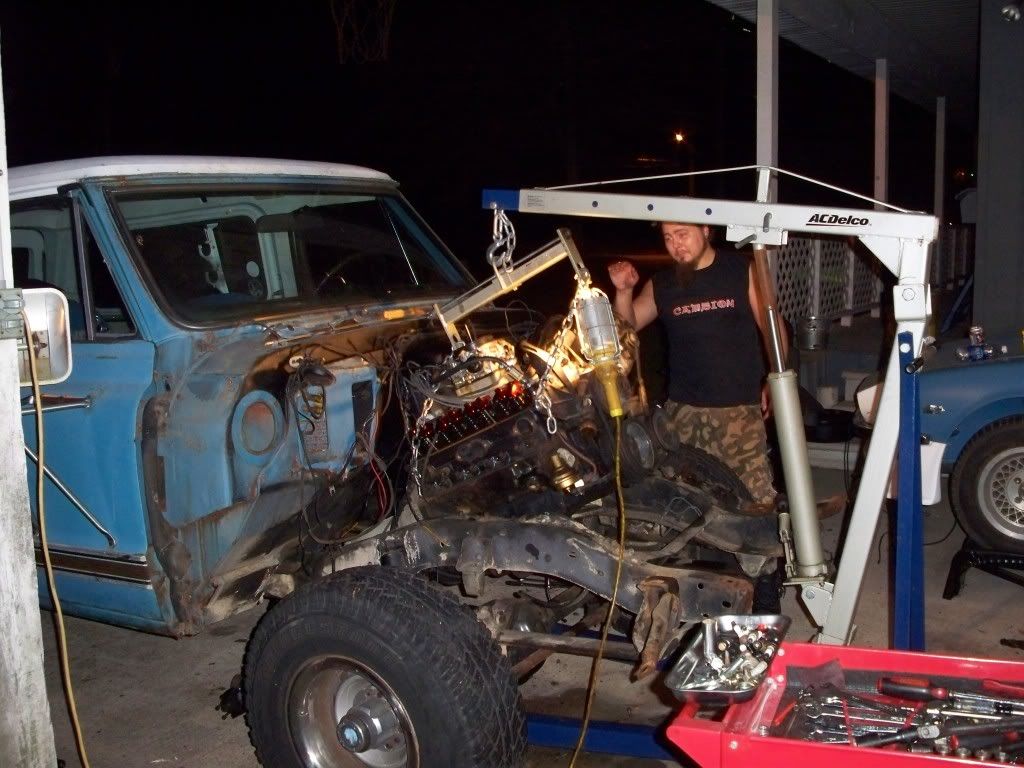 Next I wanted to keep the body stock and not cut any extra holes. And I wanted to use the stock transfer case but I didn't like any of the adaptors/options that were out there. The advanced adaptor is too long and expensive. My np205 leaked from every seam and needed a rebuild anyway, so I looked at the Lo Max np205 upgrade kit. It came with a new case that has all of the different bolt patterns in the front face (like the 4l80e adapter pattern) rebuild kit with new bearings and gaskets/seals new 3:1 gears etc. I have to say that this guy knows his stuff, and he sells nothing but top shelf parts GUARANTEED! I had the pleasure of meeting the owner of JB conversions John in person and here's his site http://www.jbconversions.com/ . VERY intelligent man and he's also a huge off road enthusiast. 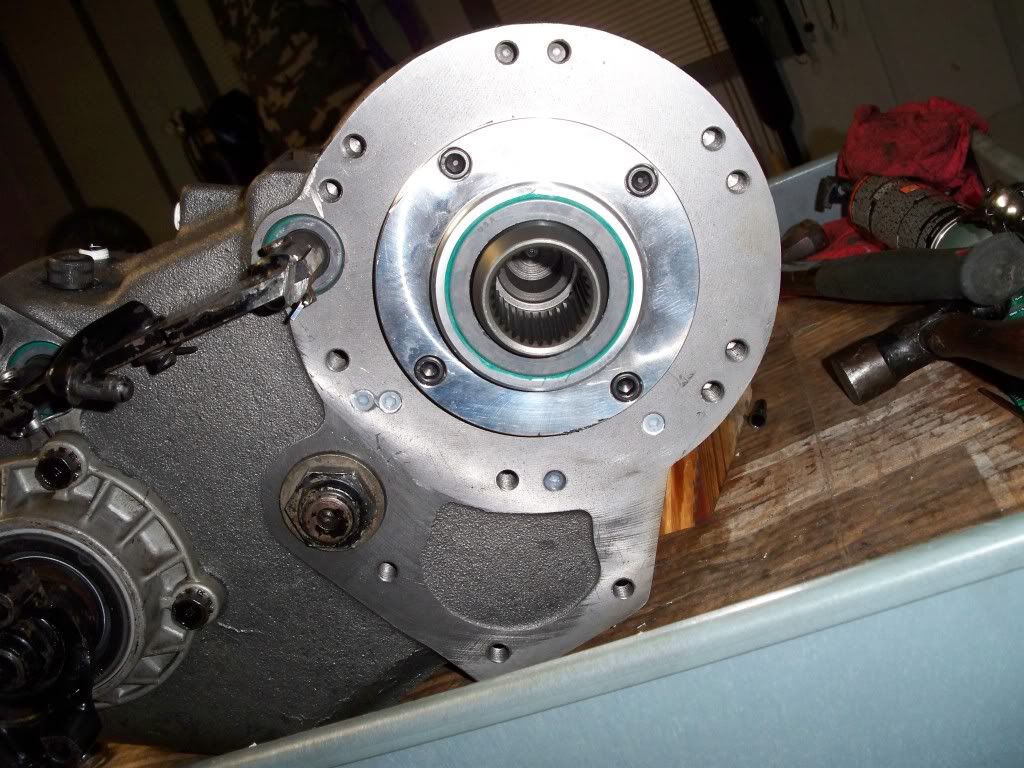 I wanted to keep the stock shifter and have it come through the floor in the stock location, so I designed a bracket that would bolt up next to the 2005 aluminum transfer case adapter piece. 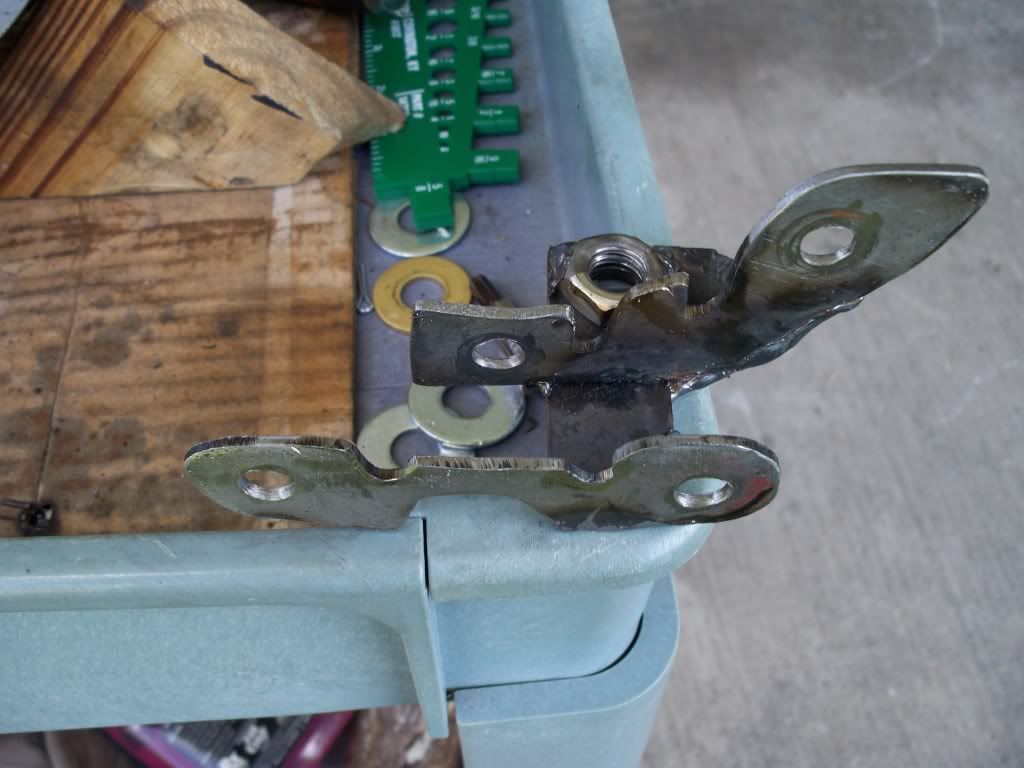 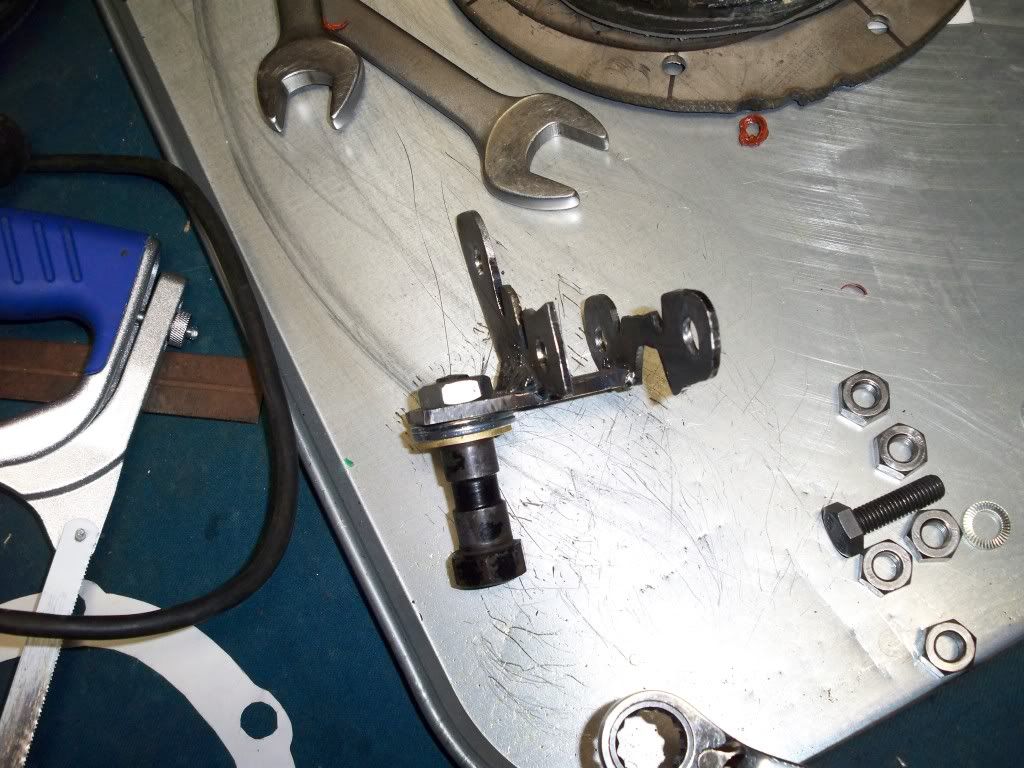 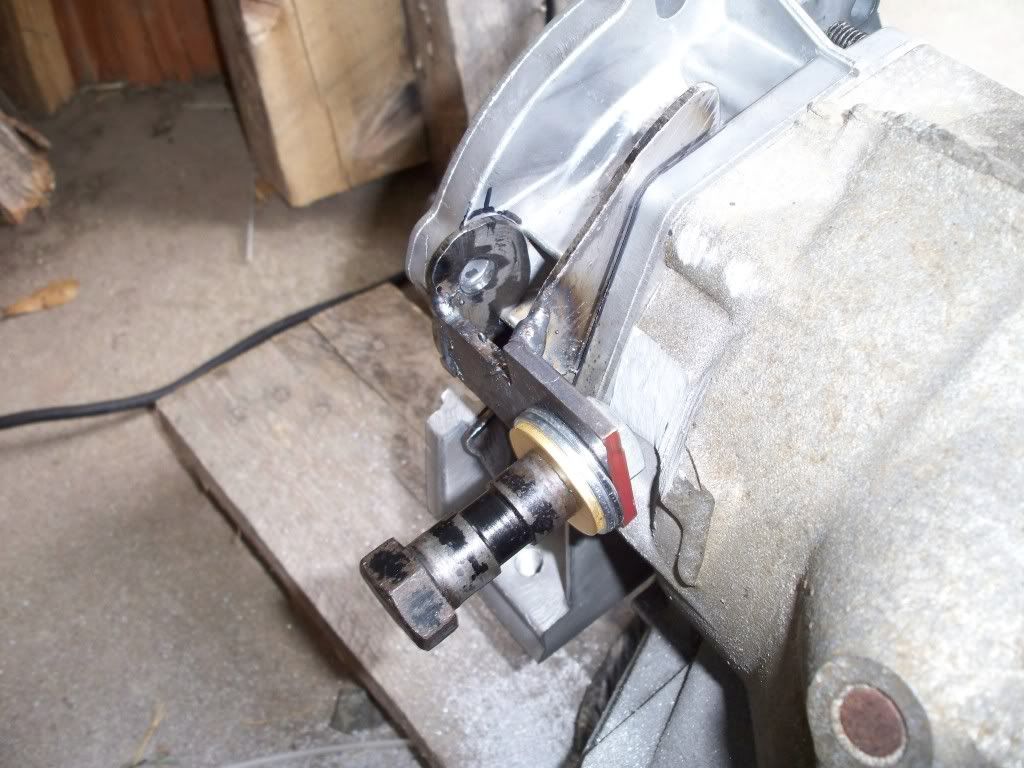 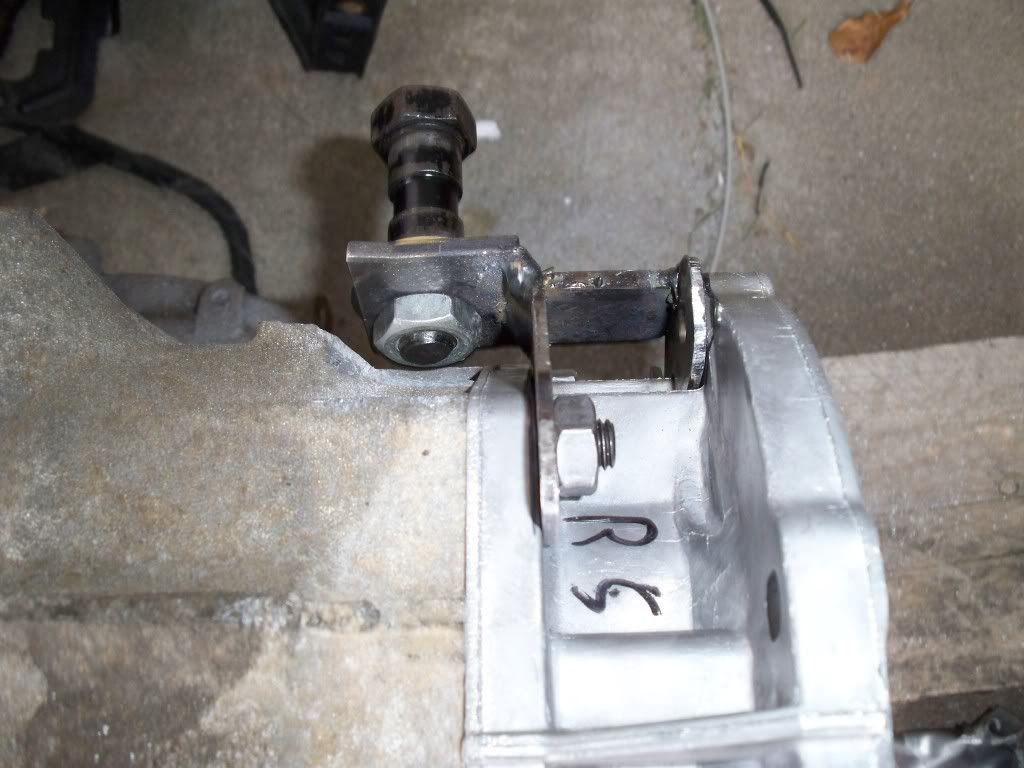 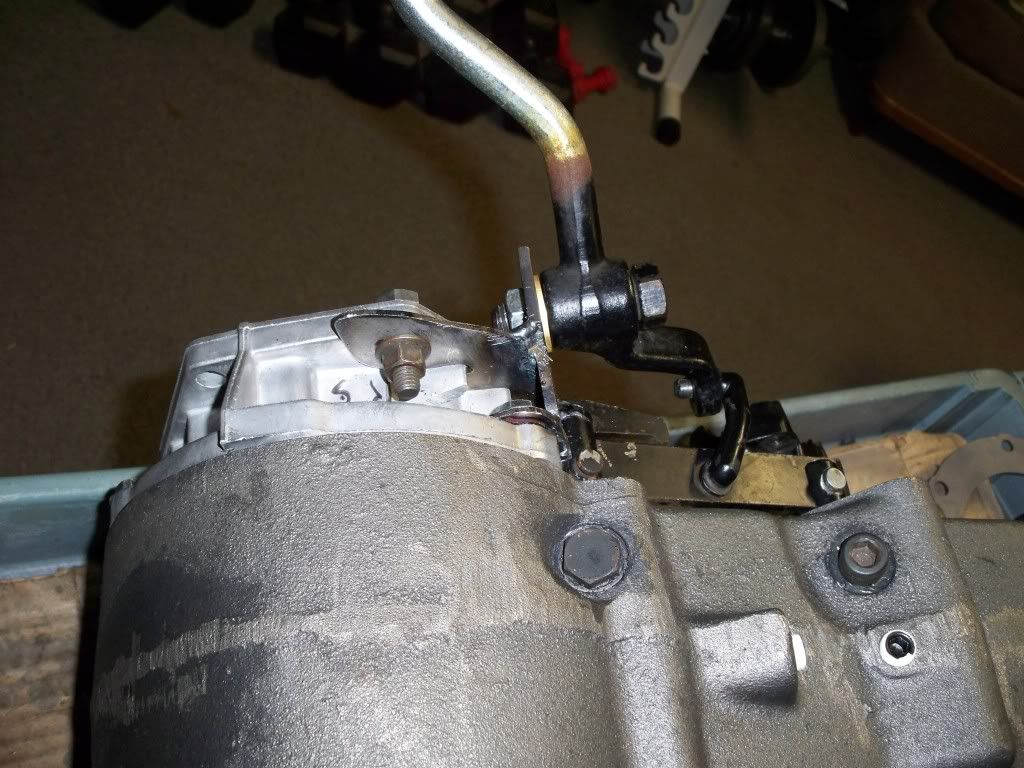 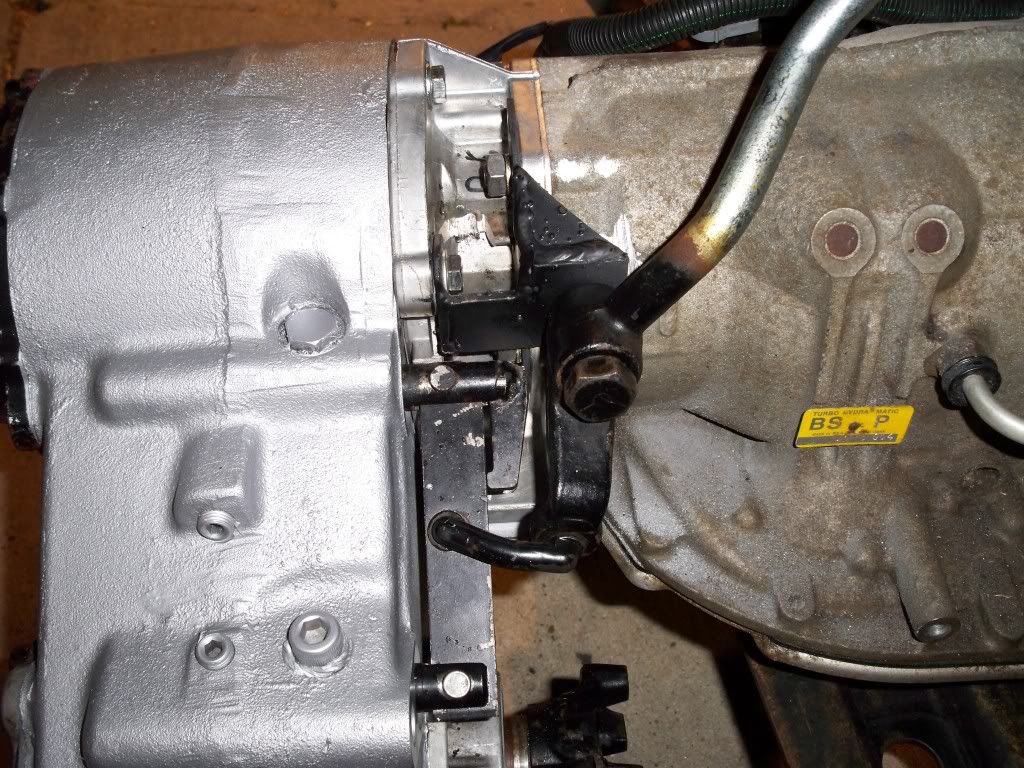 Then the motor was ready to slide in for the first time. 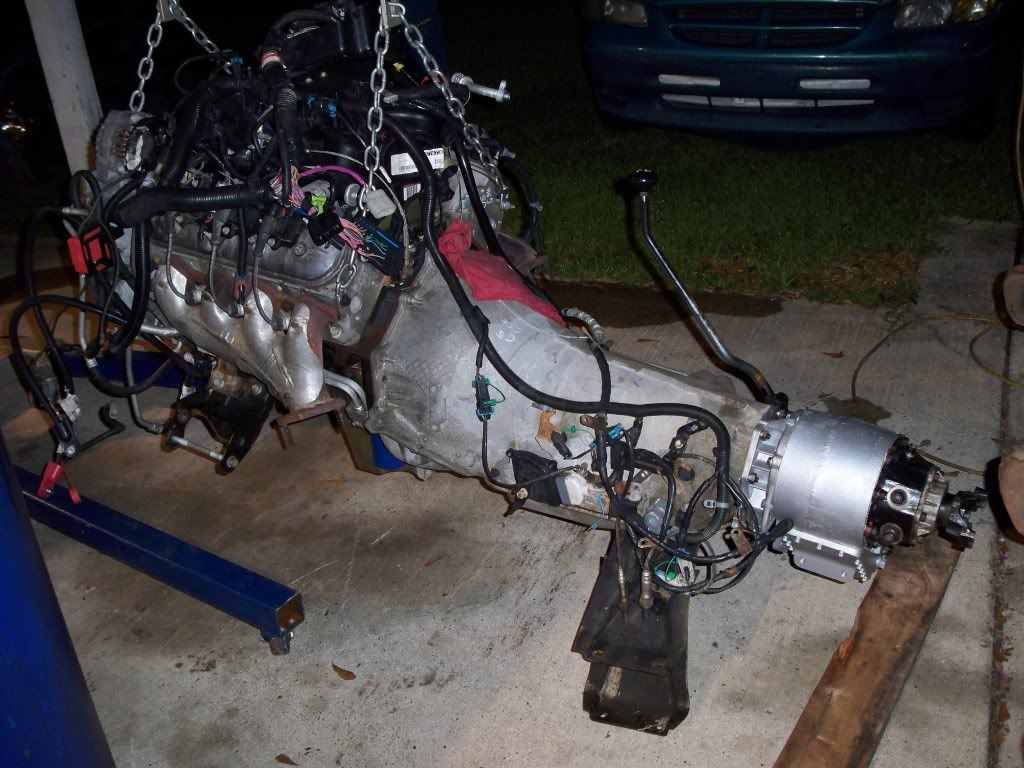 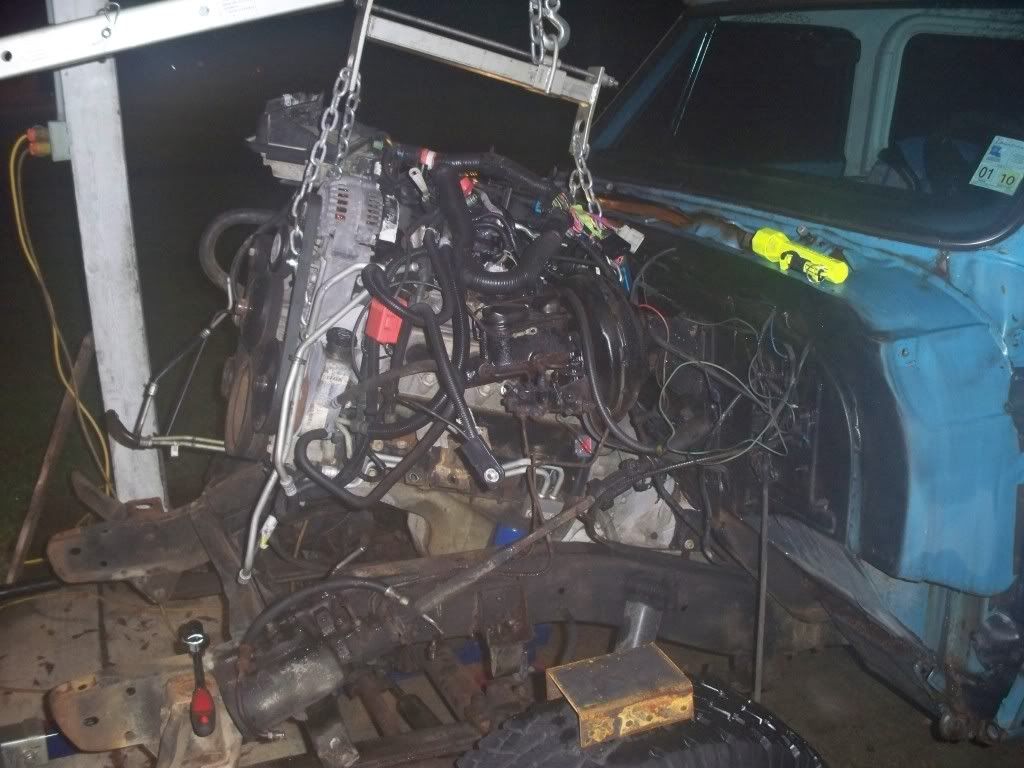 I bolted the np205 up in the stock location and assembled the crossmember. Then I got to work on making the motor mounts. I already knew the stock front 72 crossmember wouldn't work, and I knew the LS engine blocks were designed to be a structural part of the chasis they were installed in anyway, so I made my mounts to suit. I can fab up a tubular crossmember later if necessary. 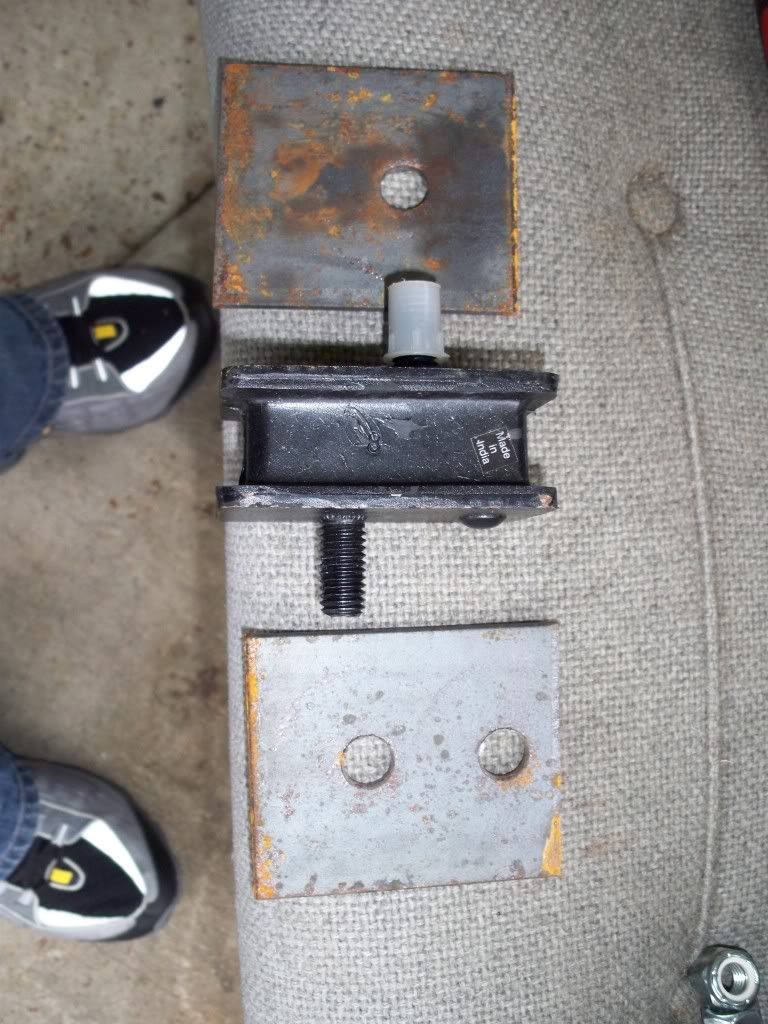 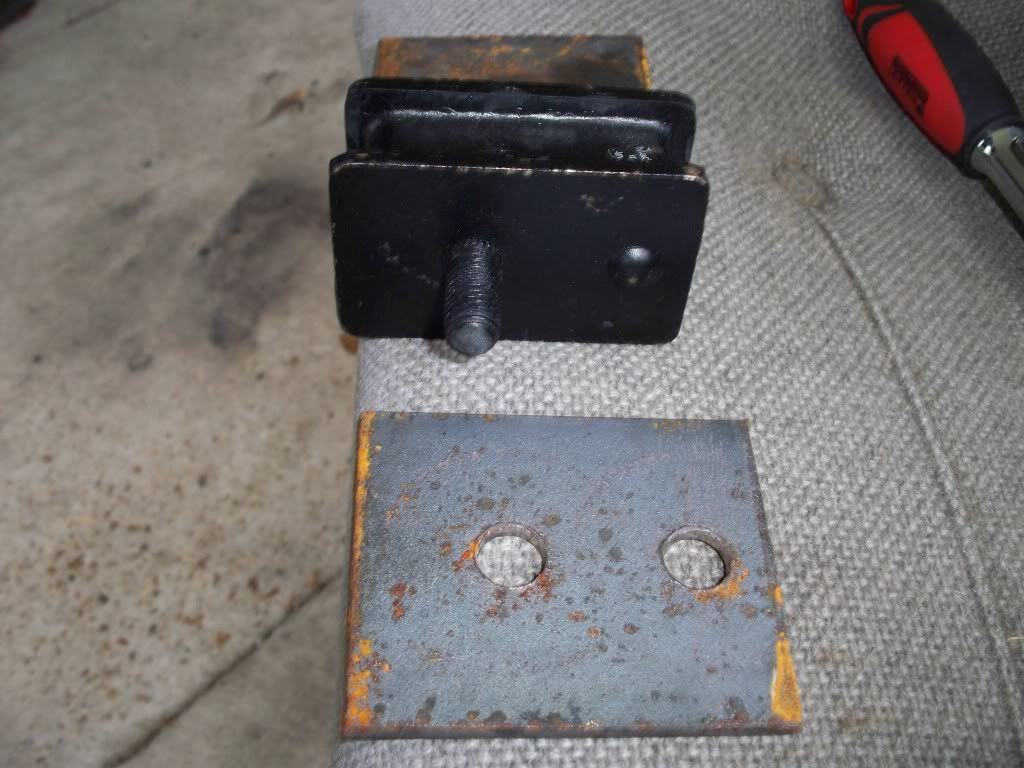  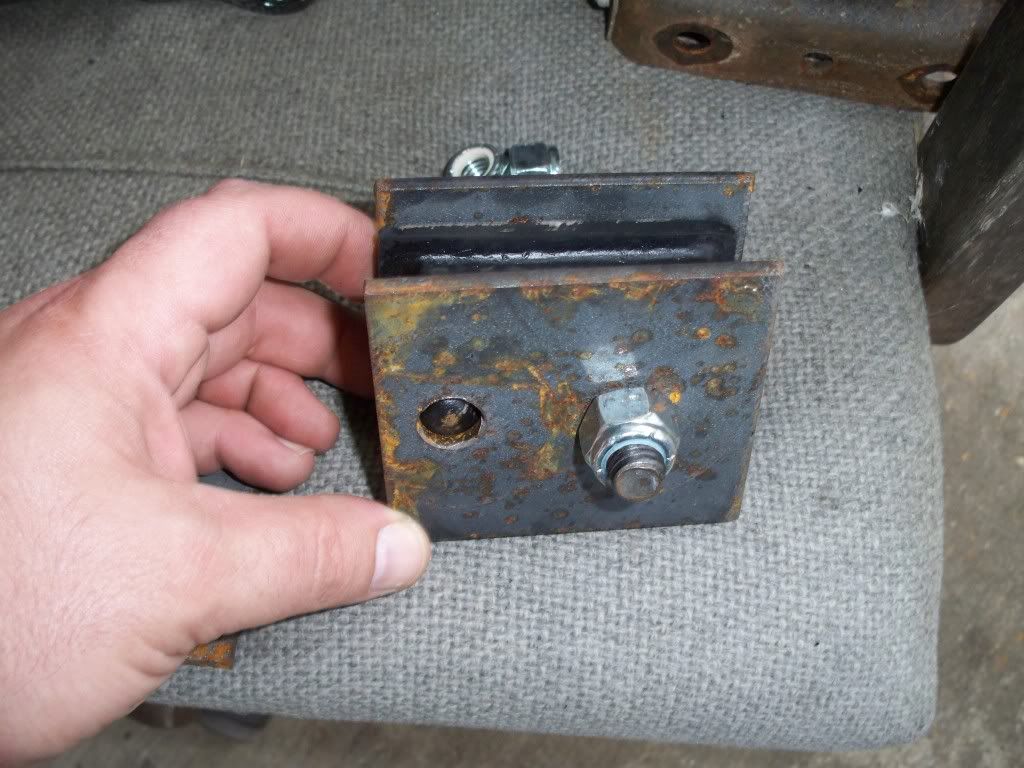 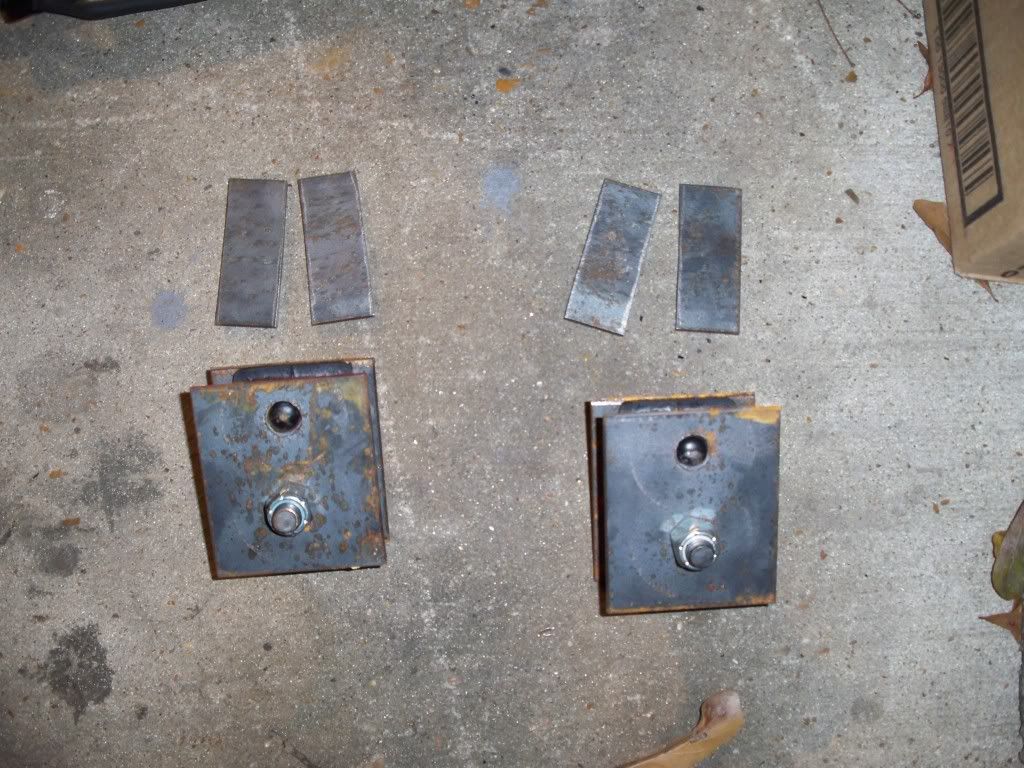 Frame brackets I made 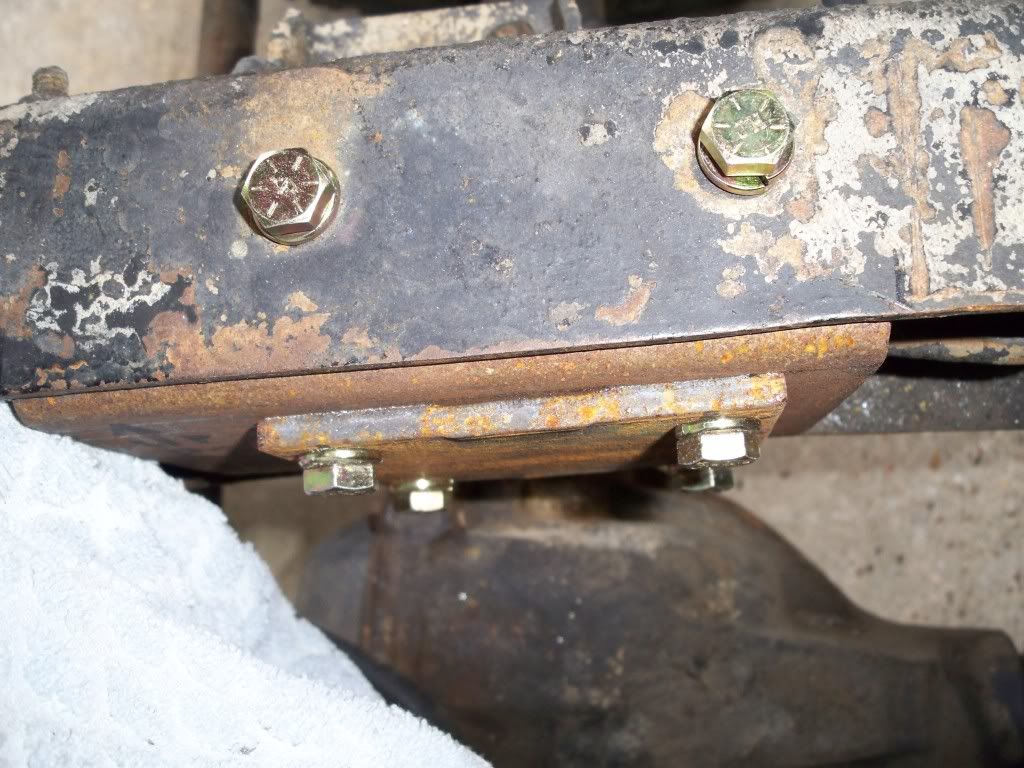 Motor plates I made 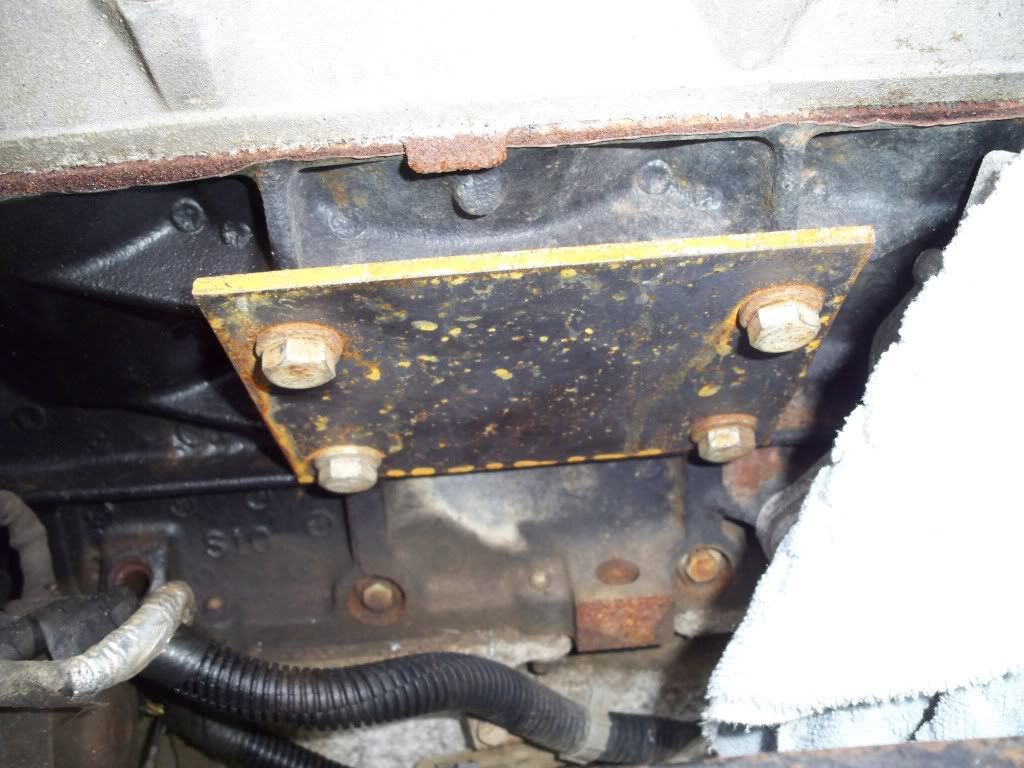 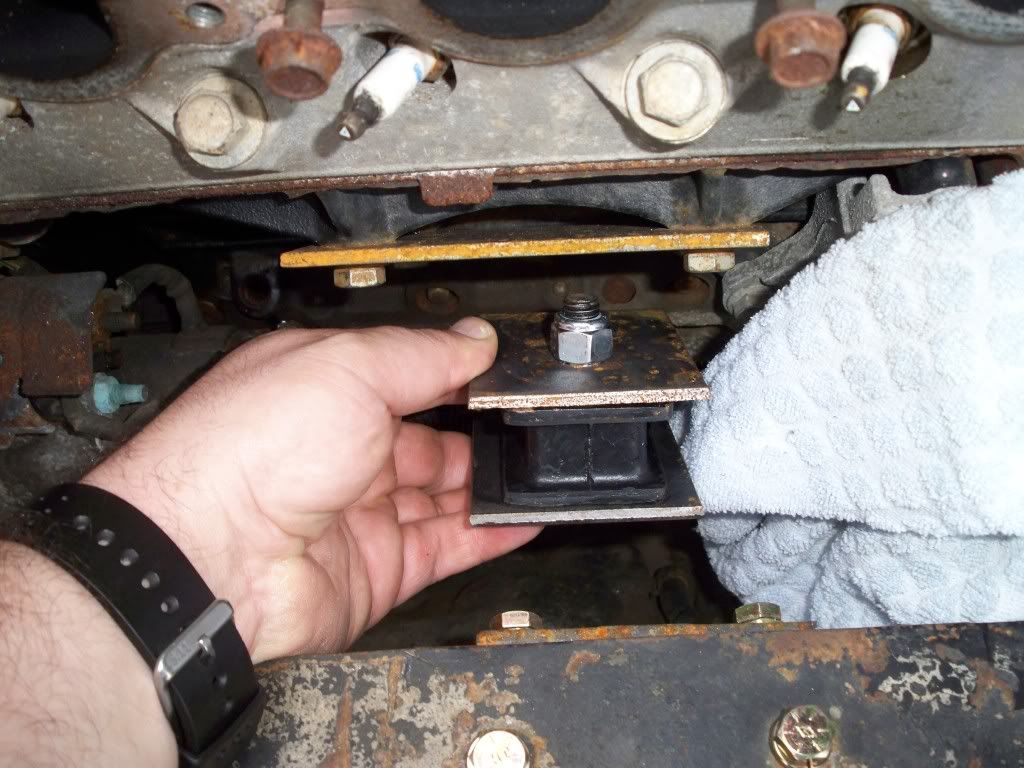 Painting everything  Once the motor was in place I discovered that the 4l80 shifter stud was in EXACTLY the same place as the th350 that was there previously, so I just had to bolt up the linkages and VOILA!! Sorry I didn't get any pics of this I was tired that night and didn't think of it again, untill now. I am going to ust the truck compressor with the vintage air kit, so I hade to make it work. I didn't want to spend a grand or two on a new serpentine setup when all I had to do was notch the frame and re-inforce it. I used a piece of scrap HEAVY wall 3 inch pipe. 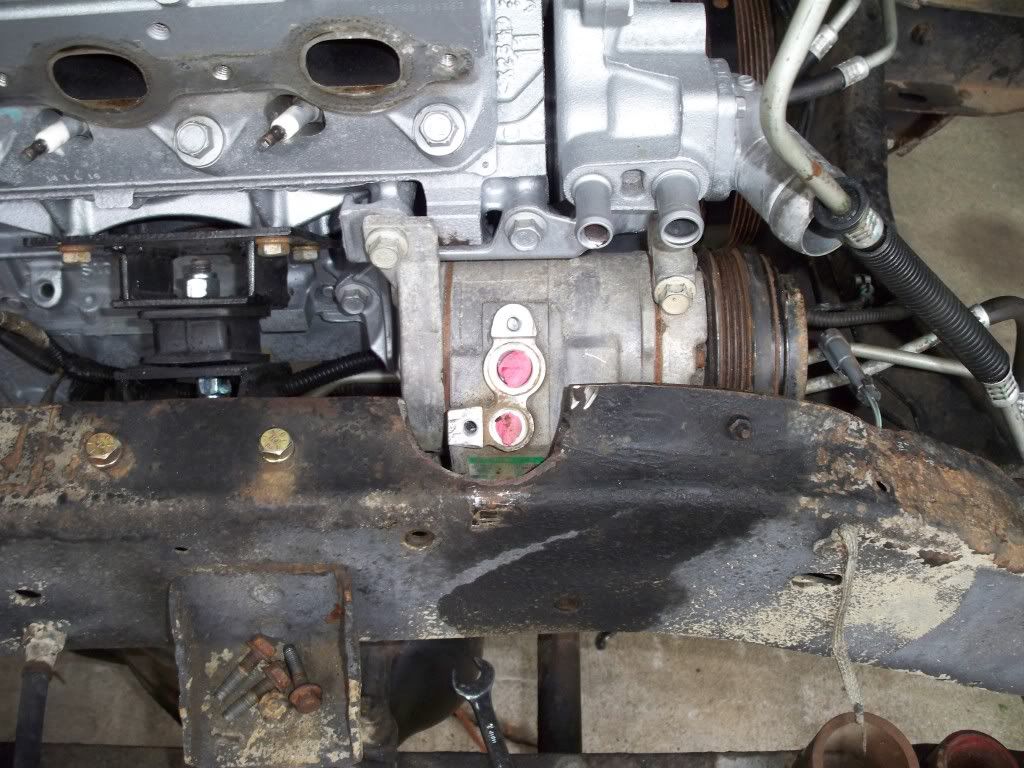 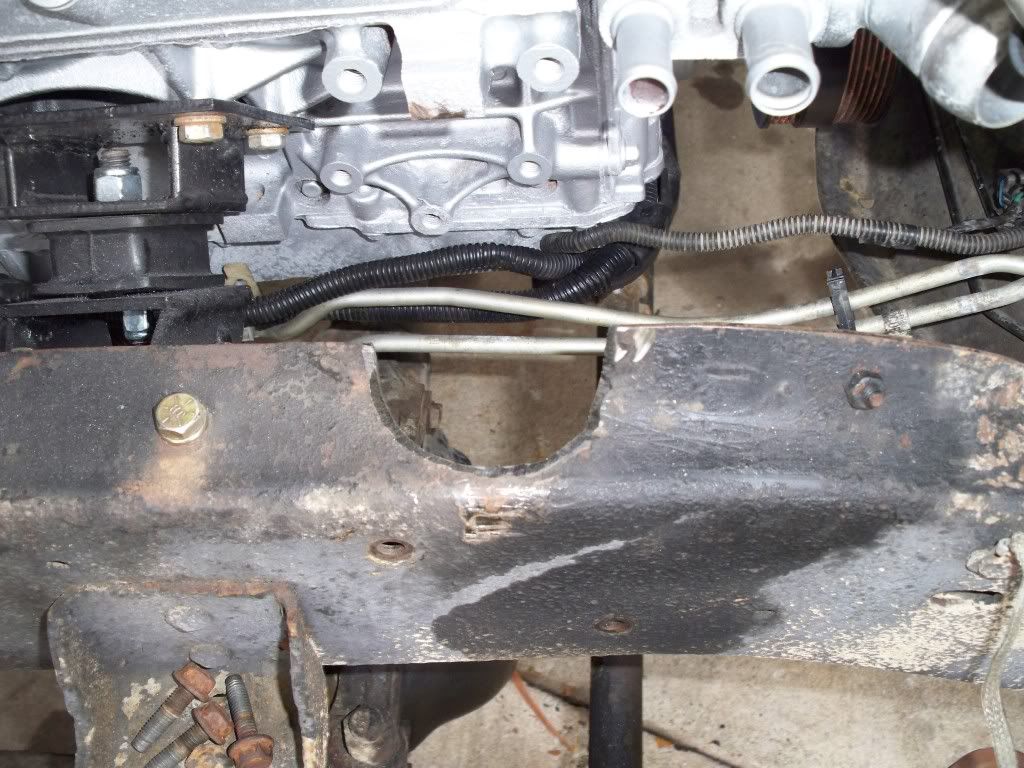 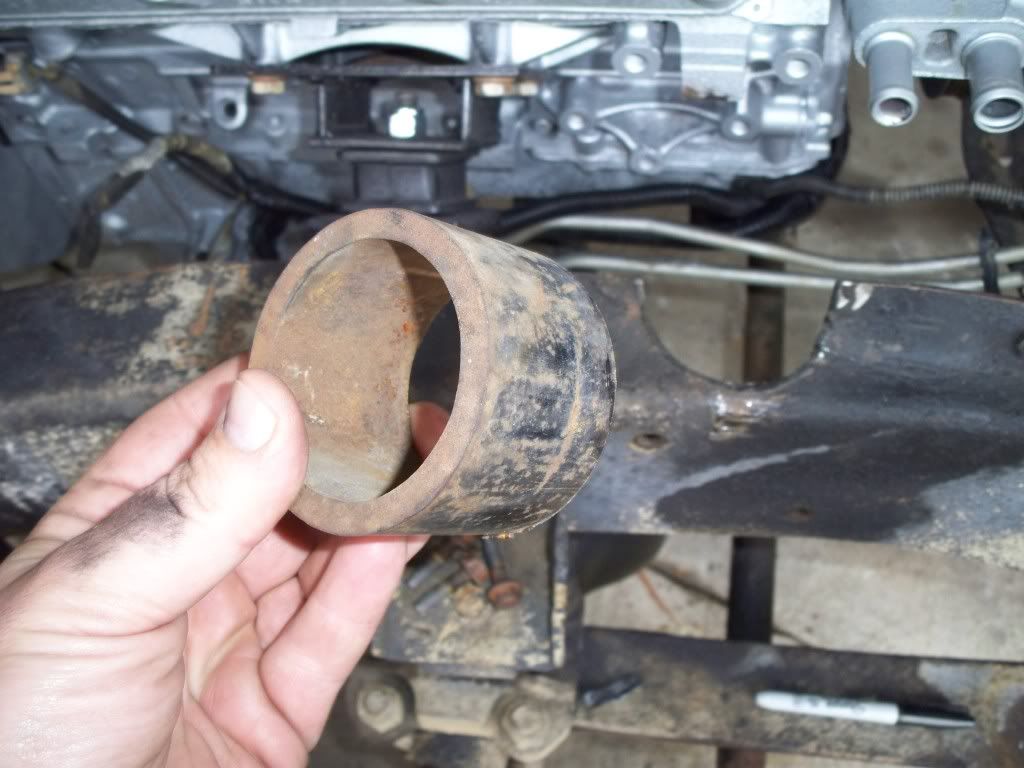 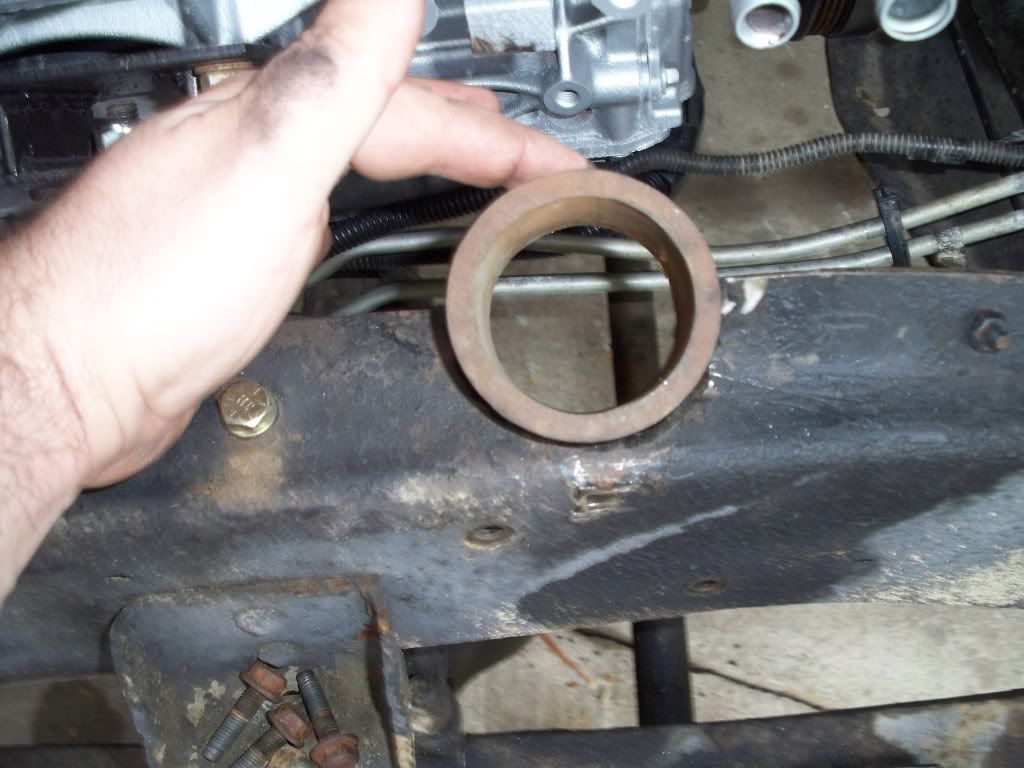  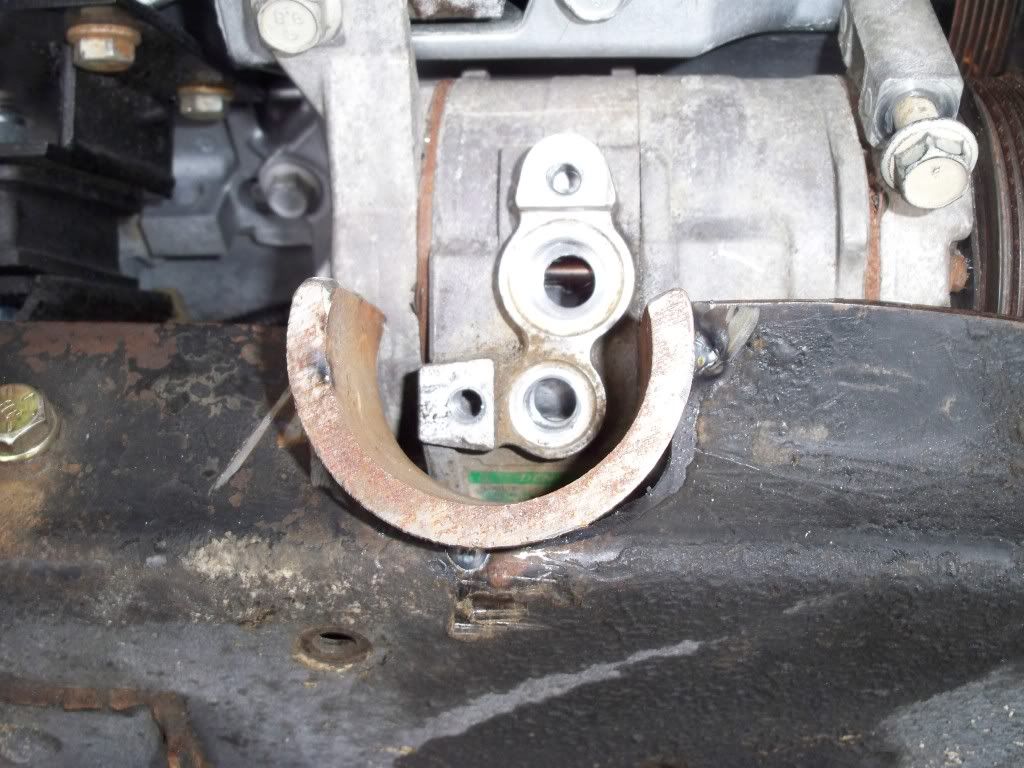 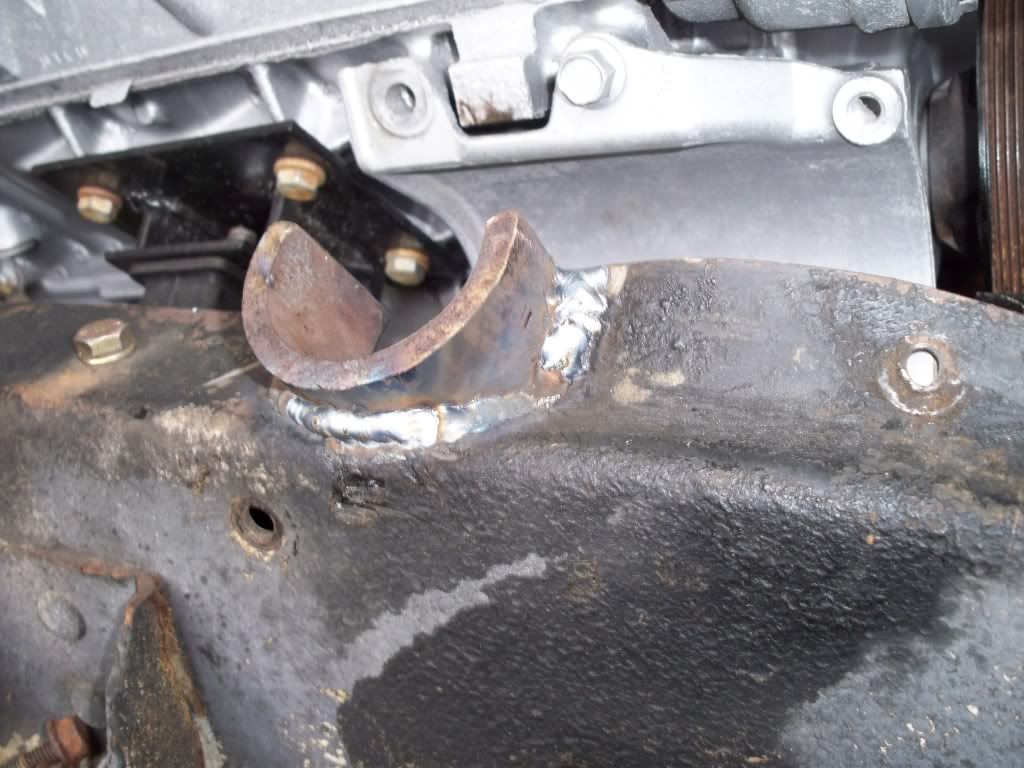 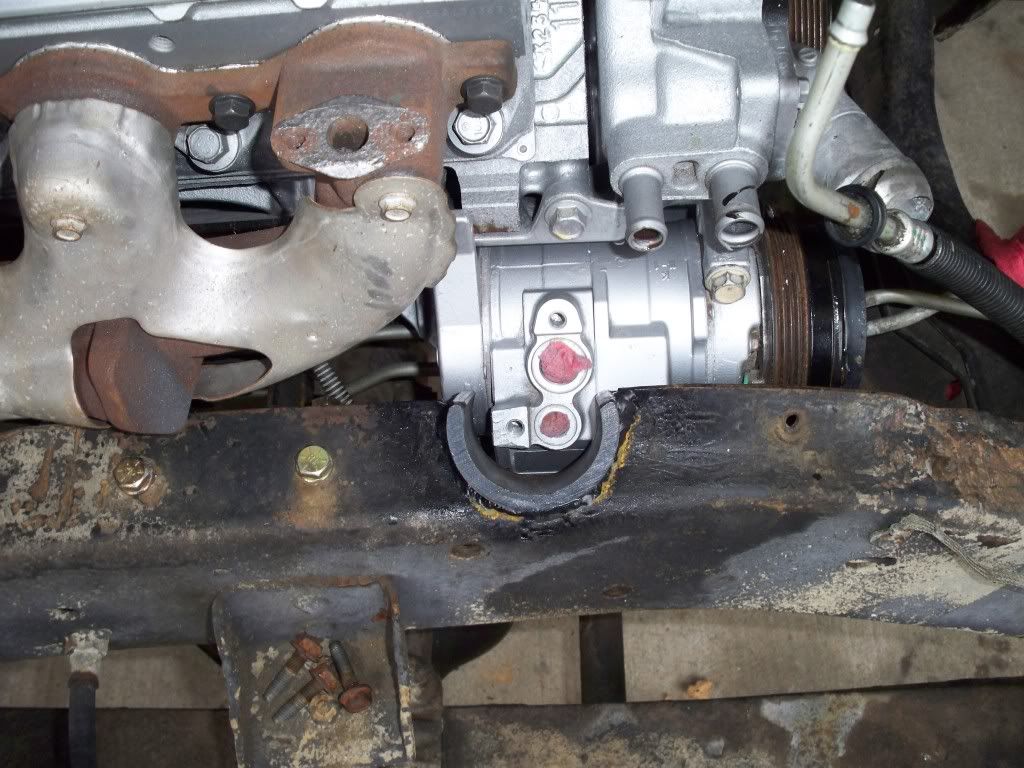 Next I got to work on the gauge cluster. I wanted to use the 2005 cluster for a number of reasons, correct mileage for my motor, all the gauges I need are in one package, etc. I never worked with fiberglass before and thought this would be a good time to learn. So I used the old scratched up original 72 cluster panel for my first attempt. Later on down the road when I restore the truck, I will make another one with a new "pretty" panel. It actually came out o.k. and I know what to do, and what not to do for the next one so it will be perfect. 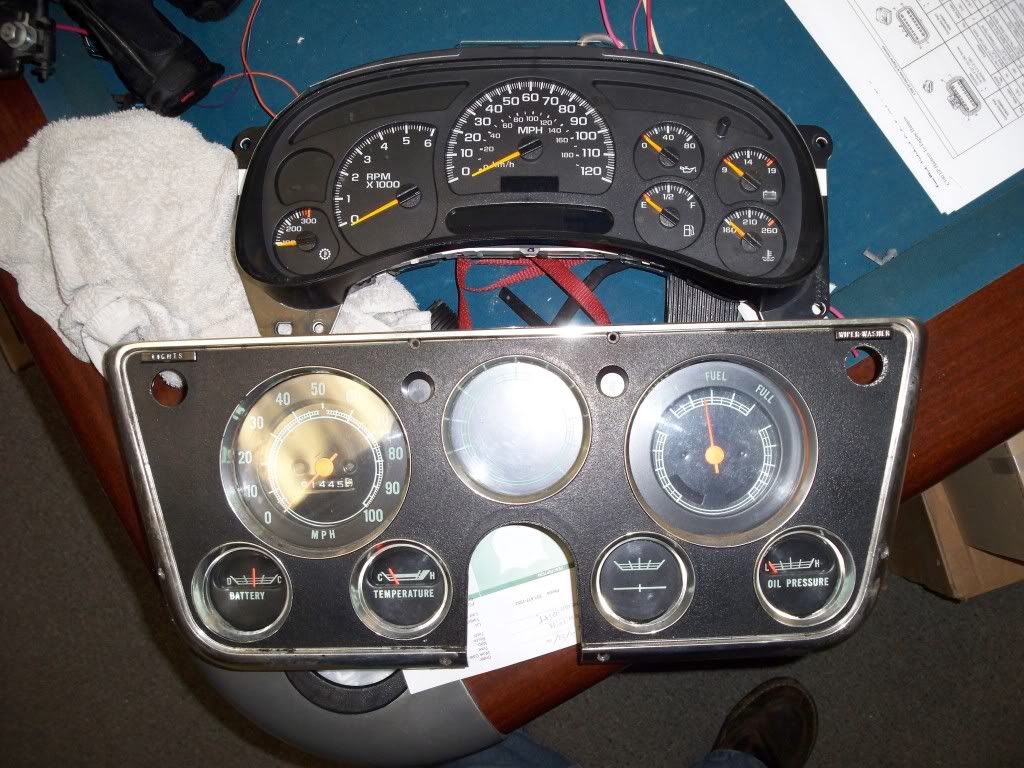 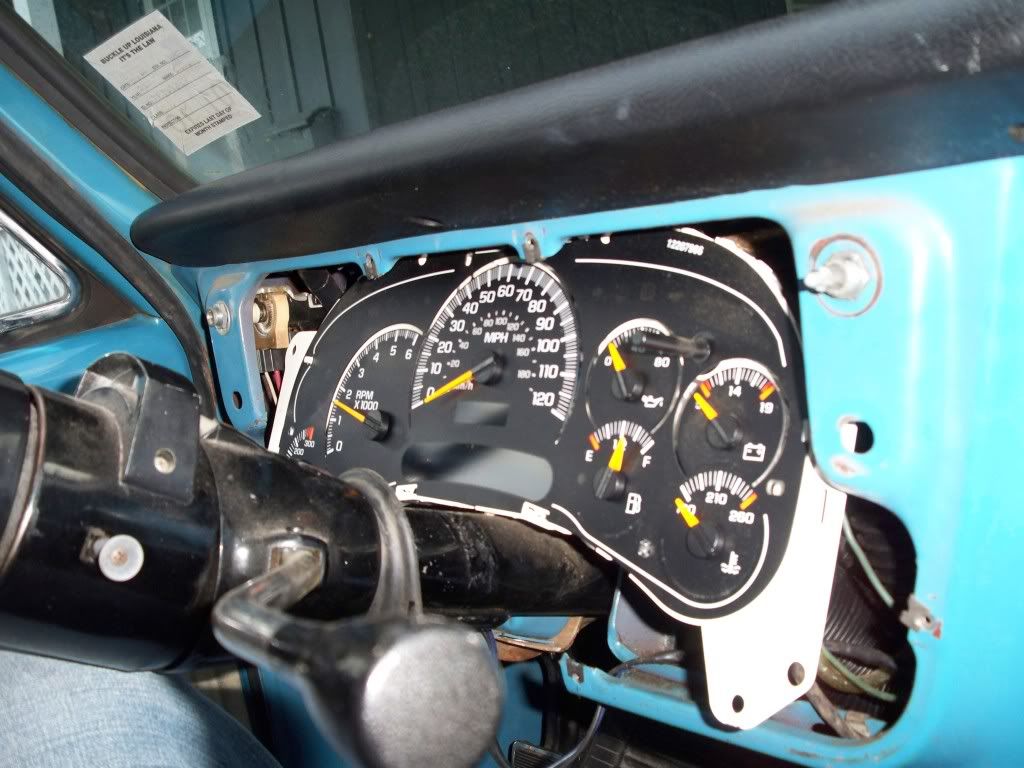 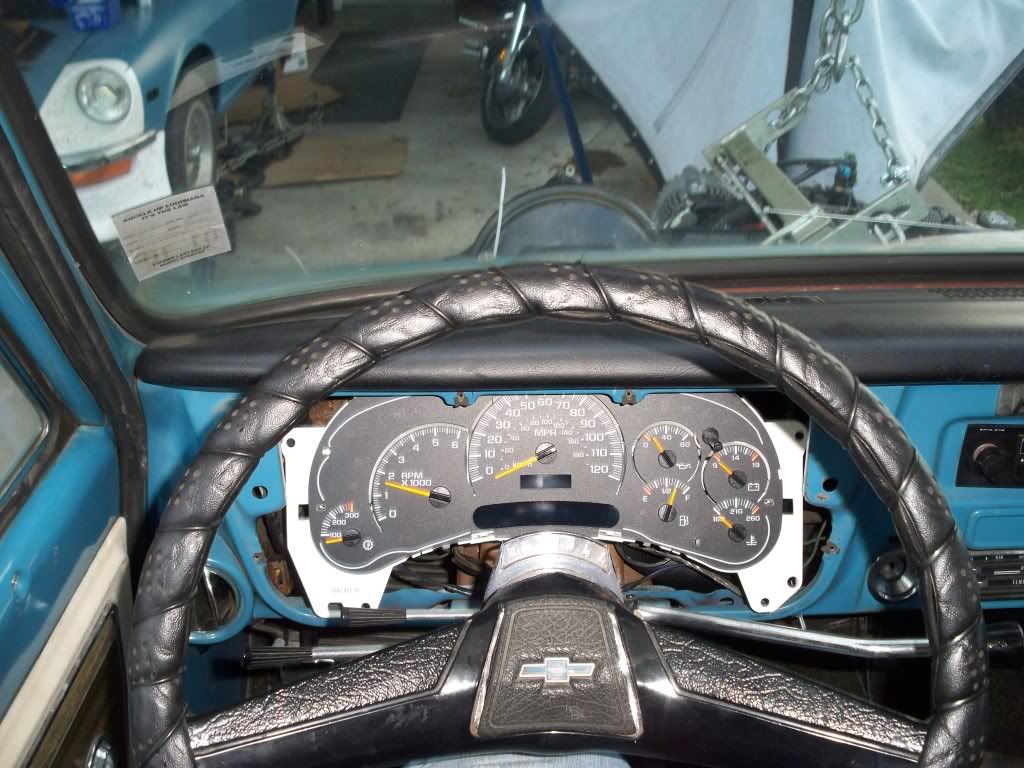 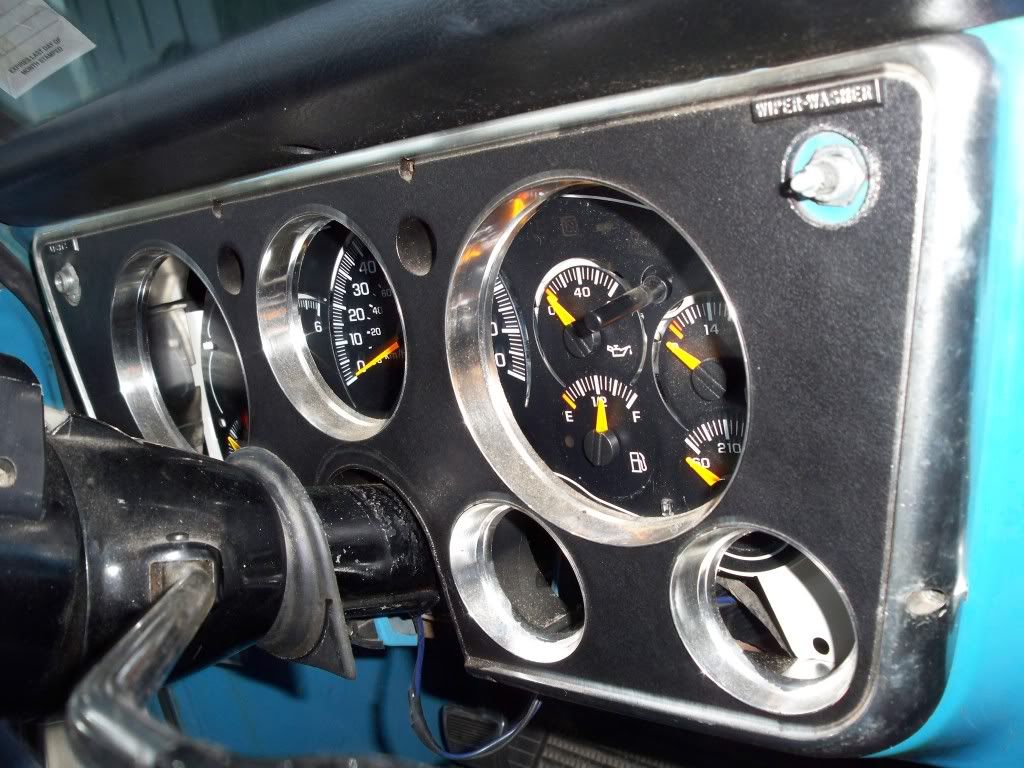 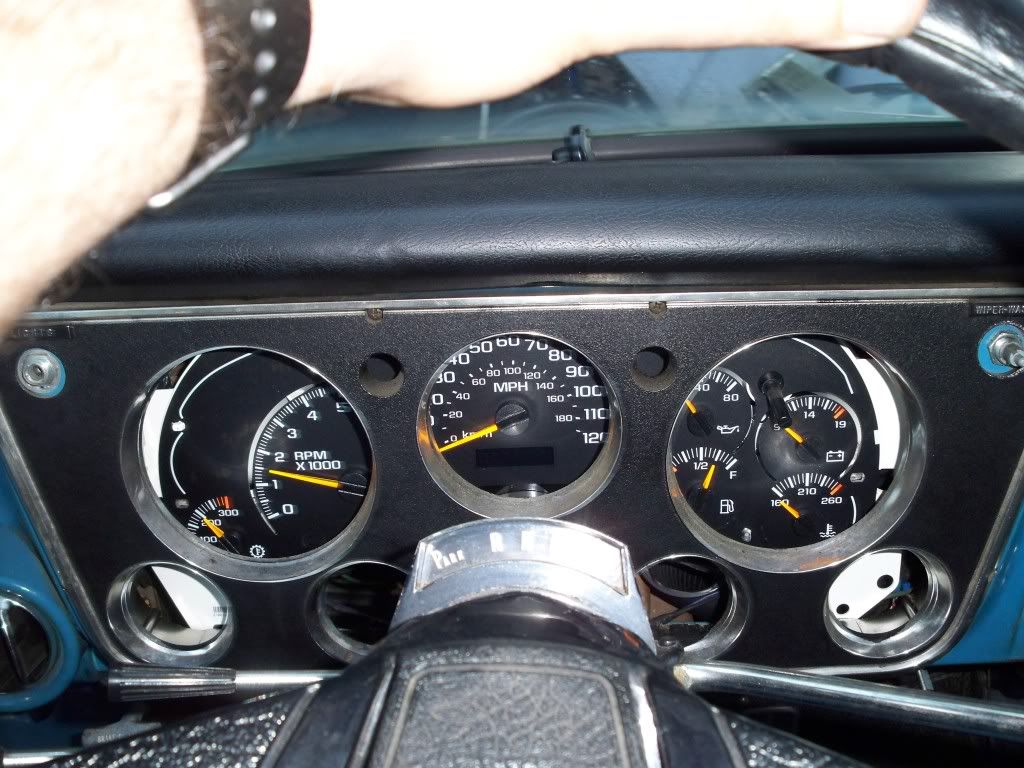 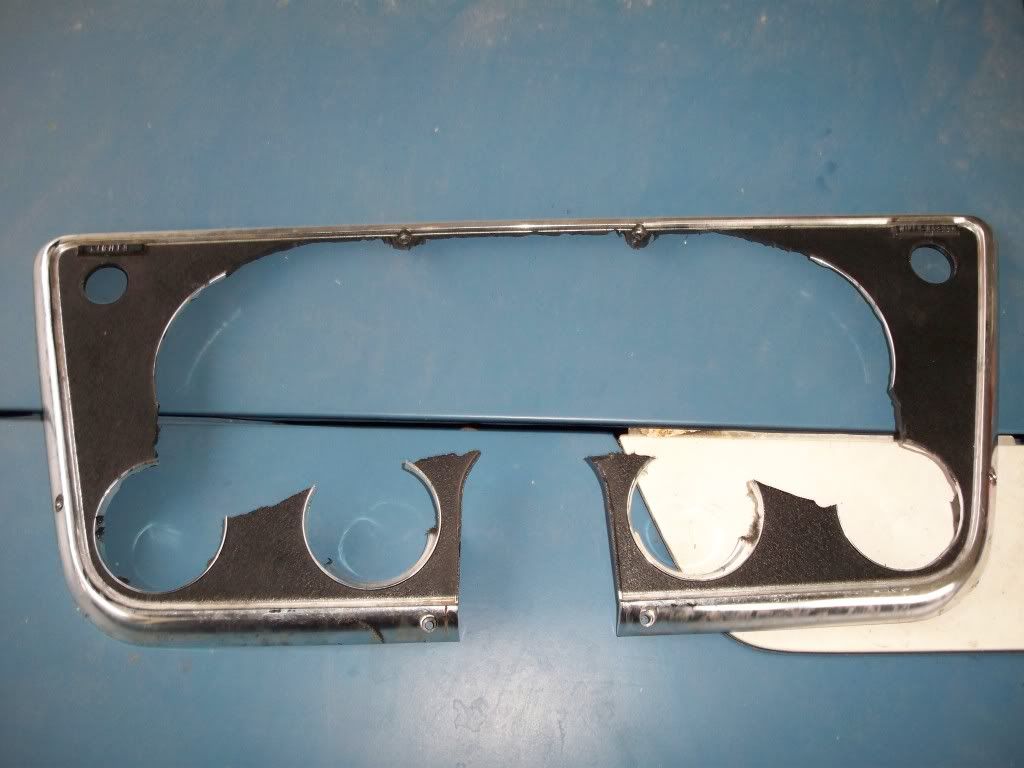 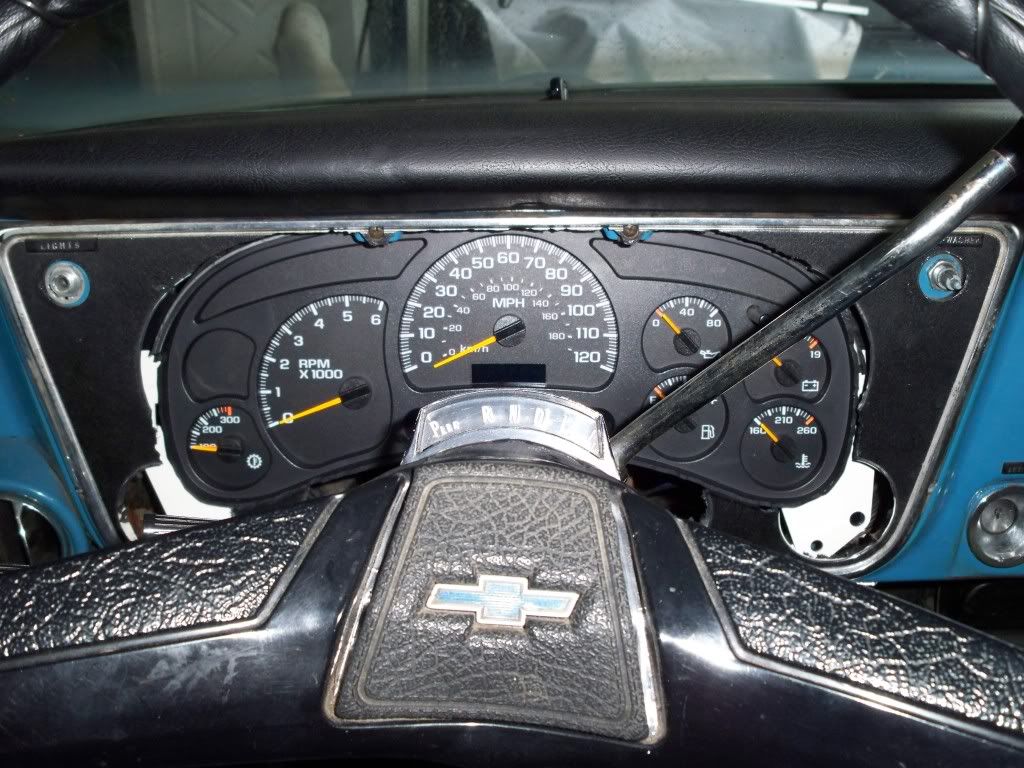 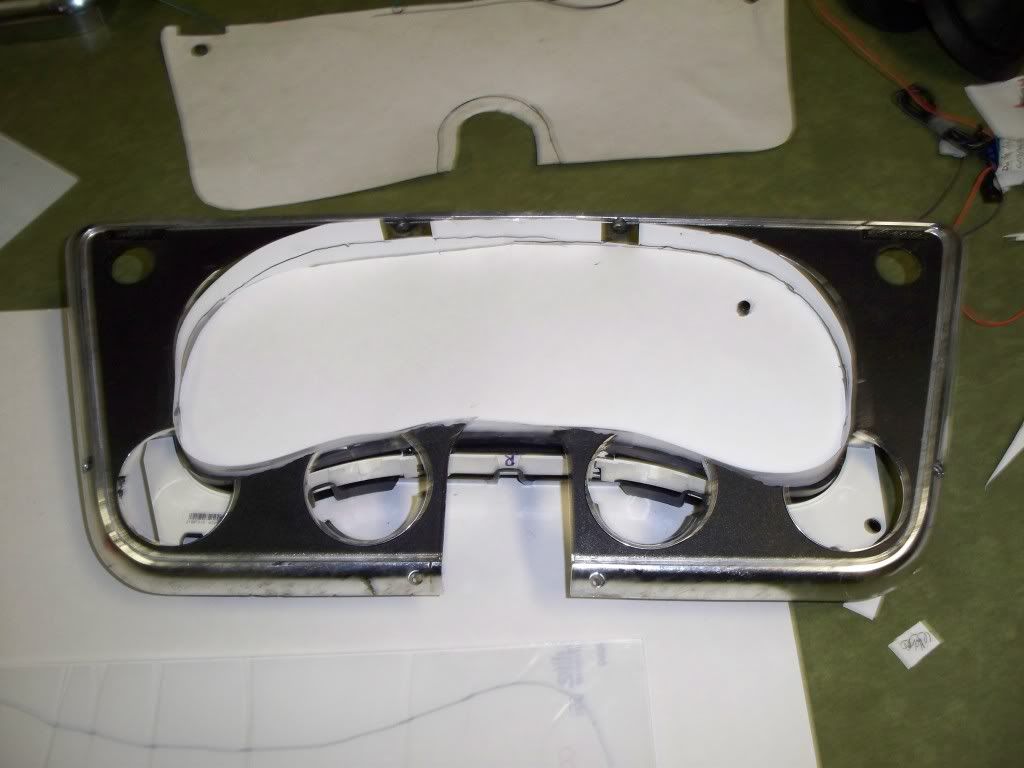 New acrylic face 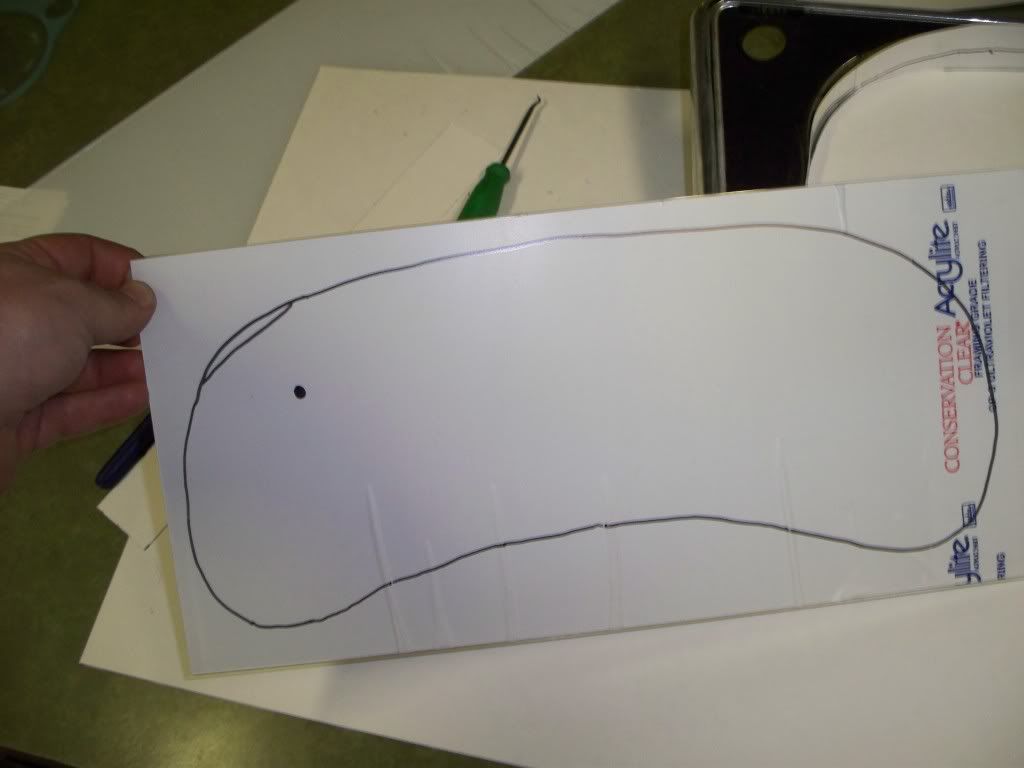  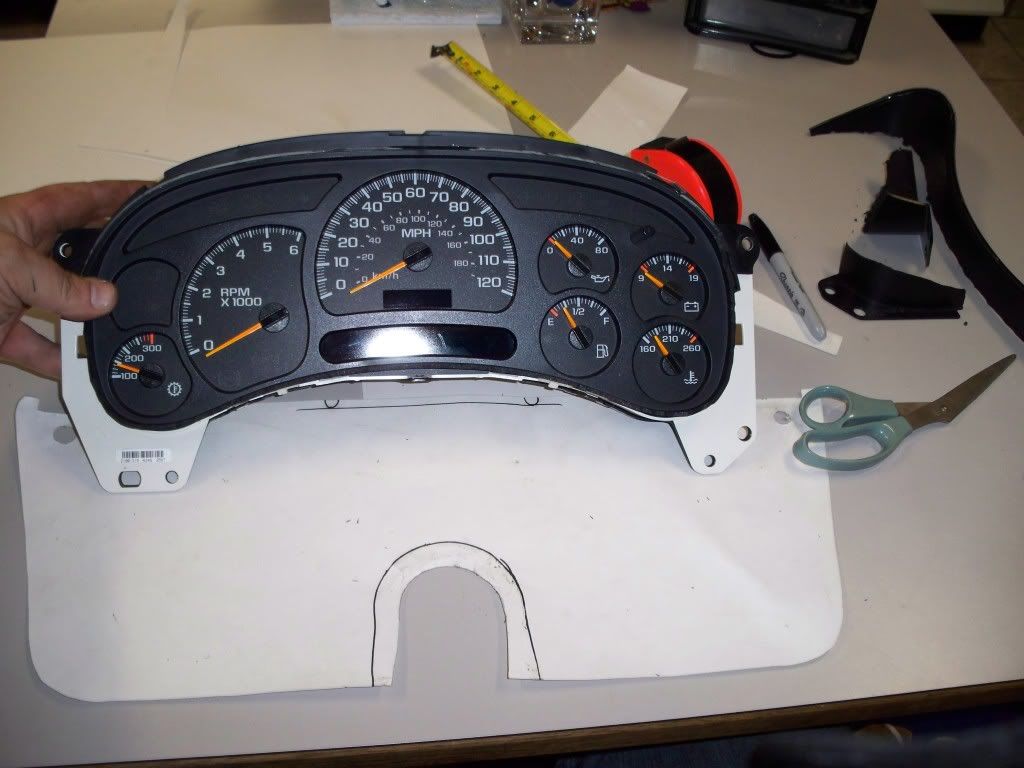 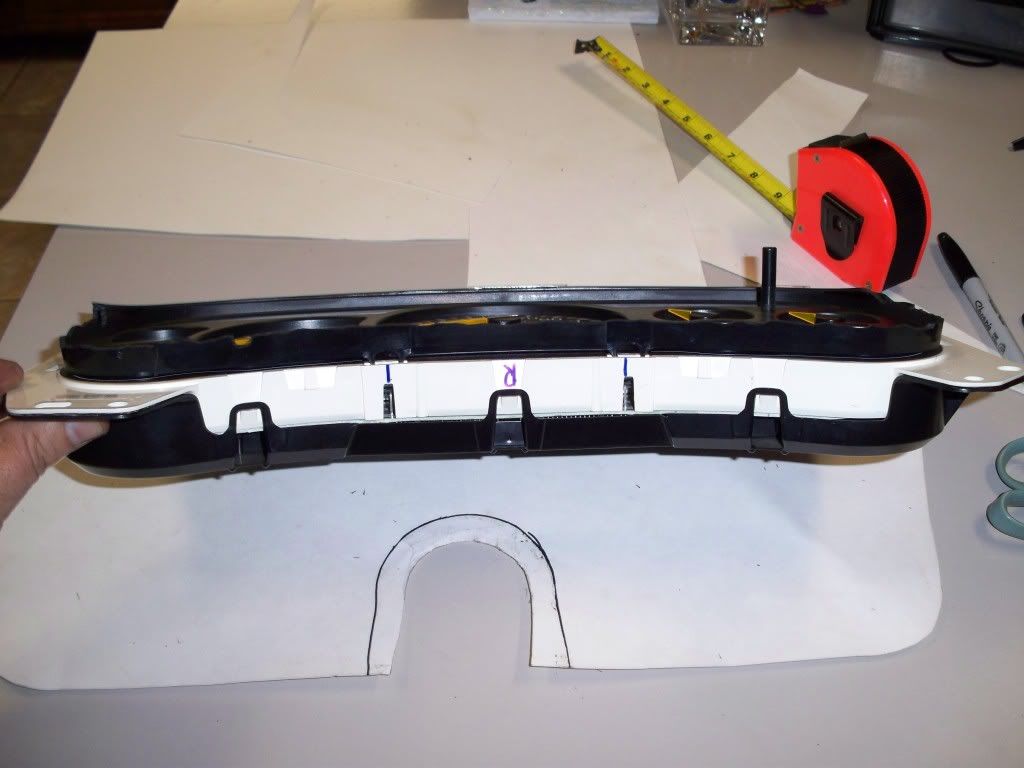 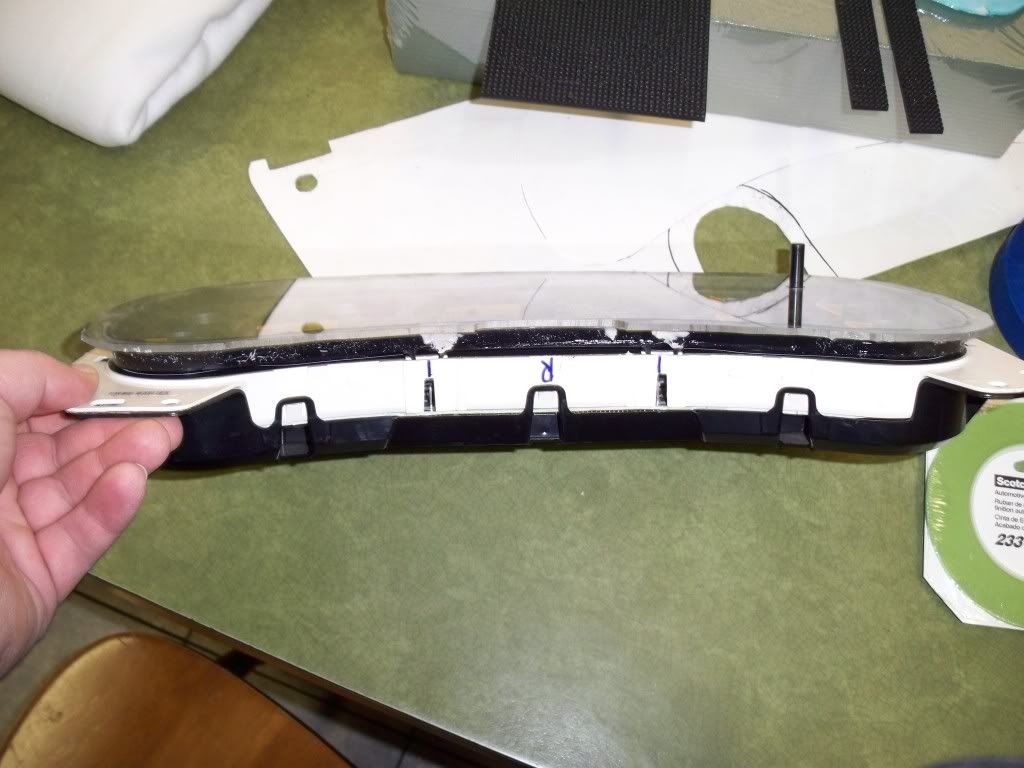 Ready for glassing 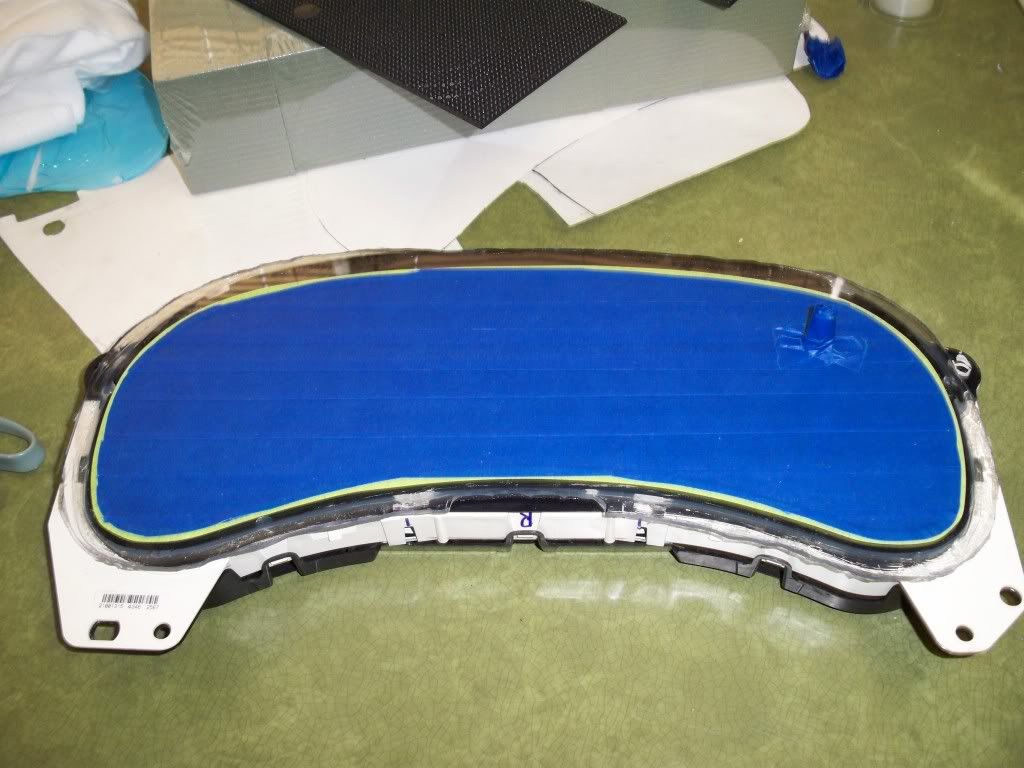 I used felt fabrick from the fabrick store for the "walls"  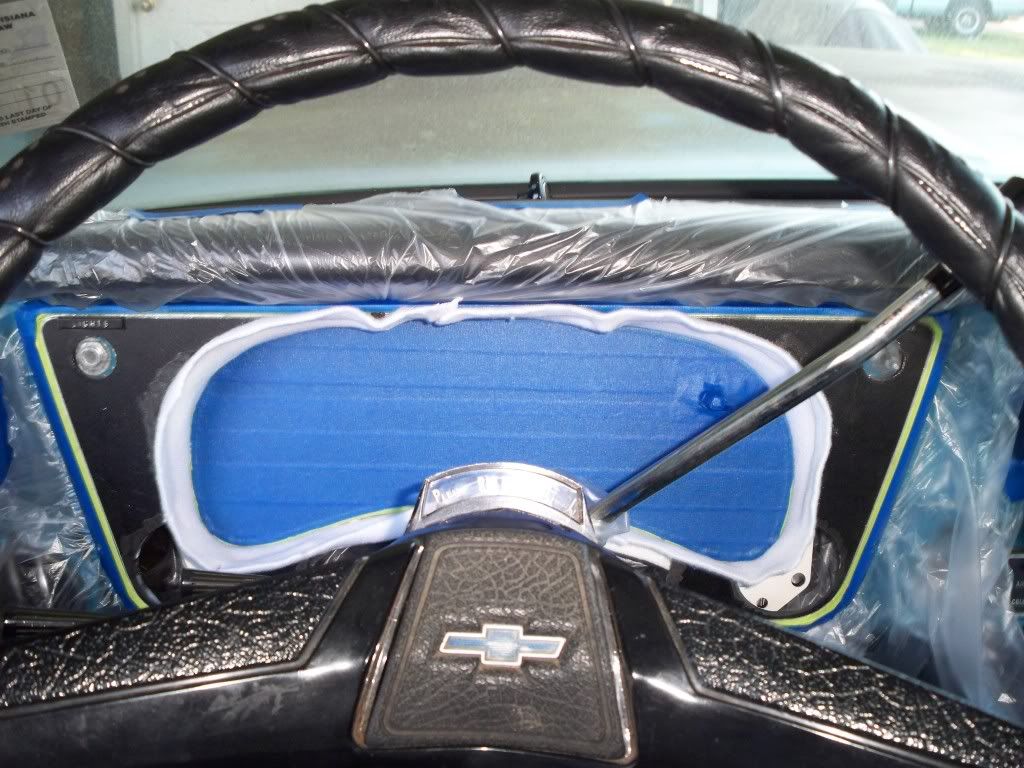 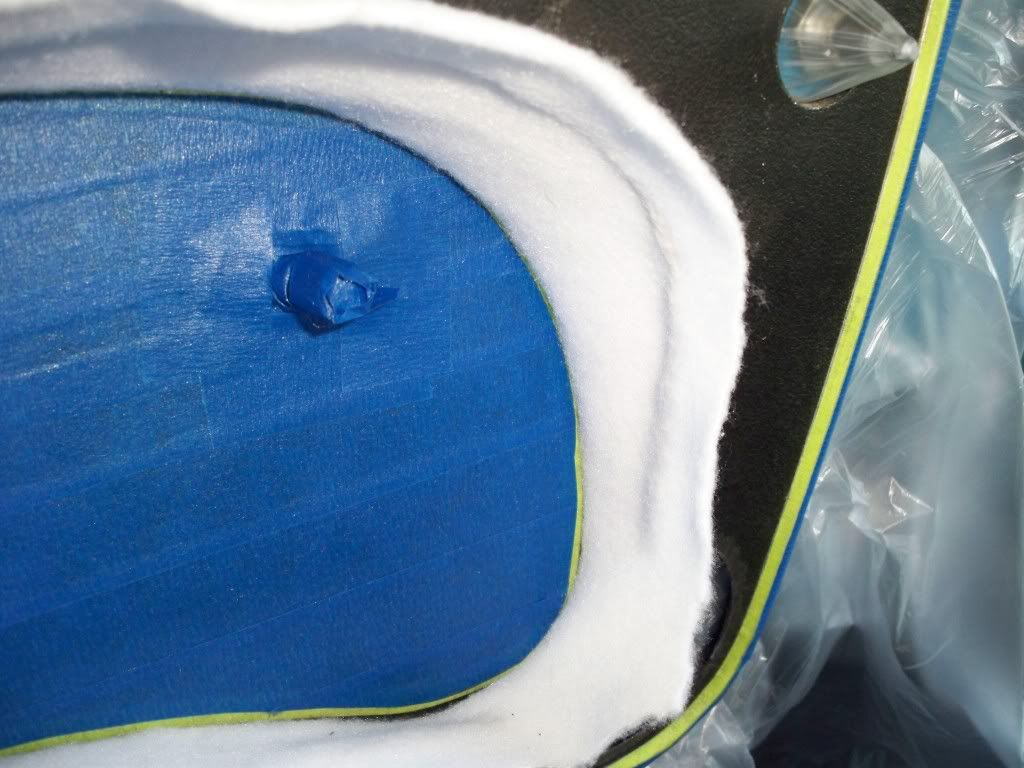 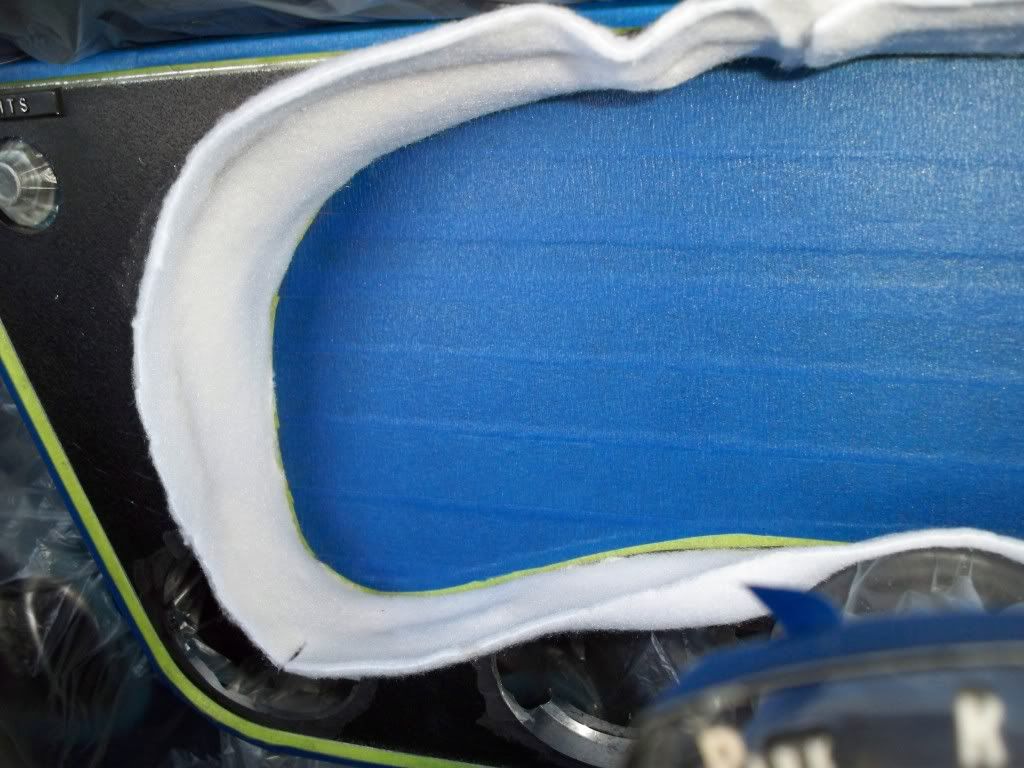 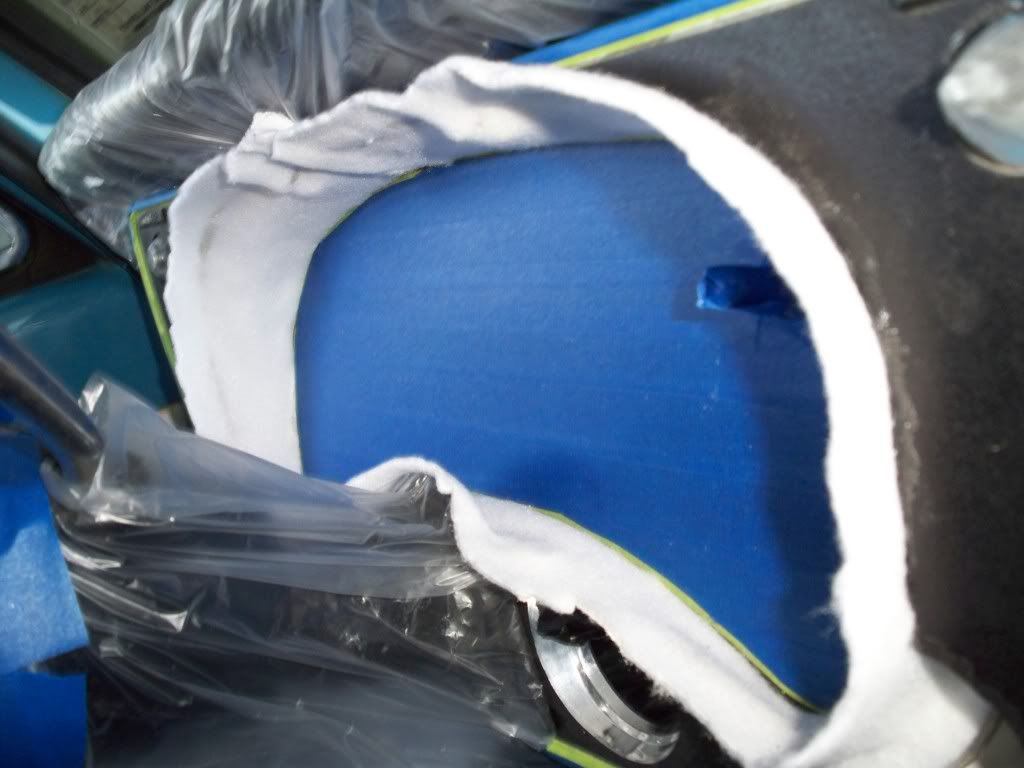 Then soak the felt with resin 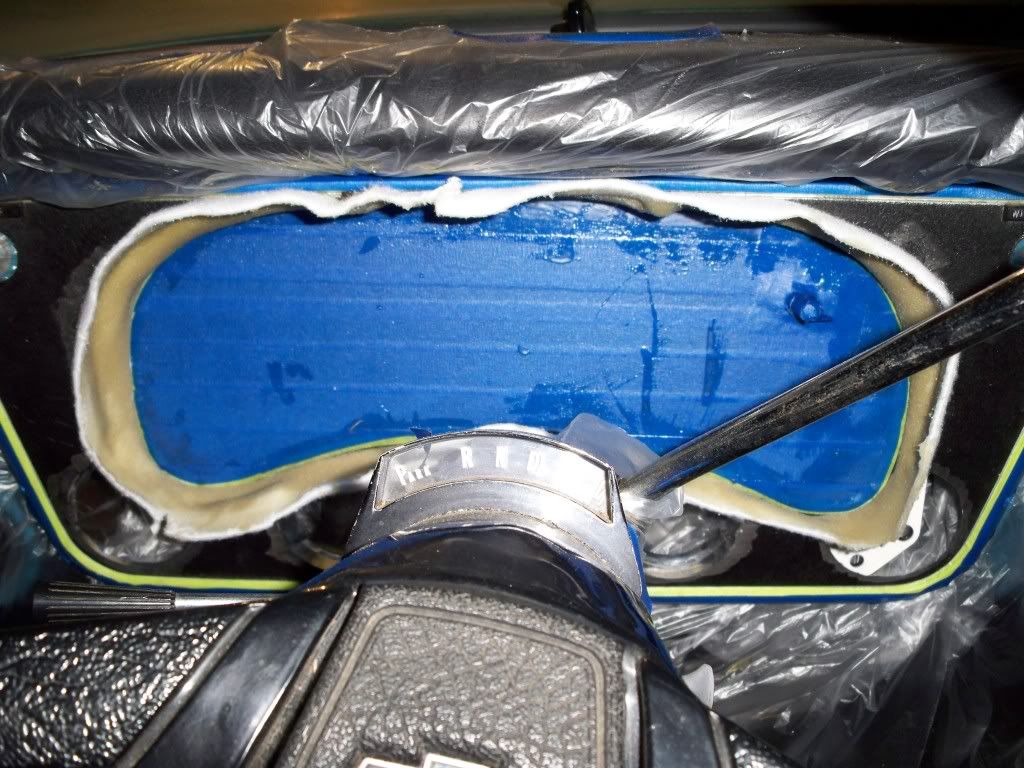 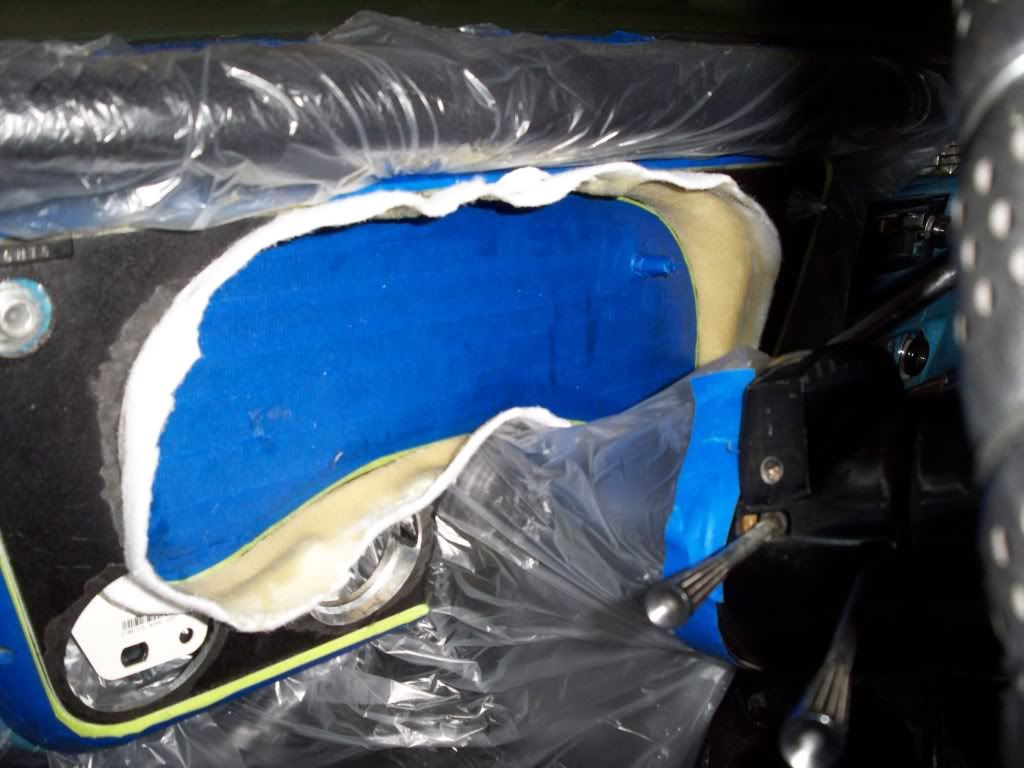 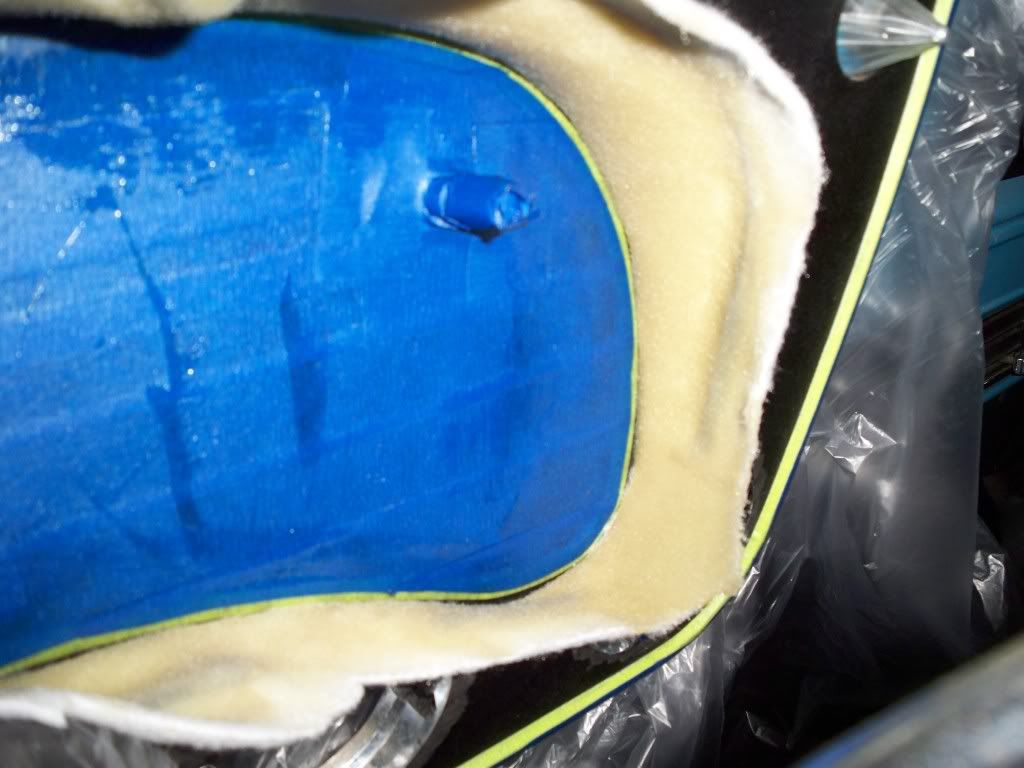  Now you can see the extra that needs to be trimmed/sanded flush with the 72 panel. 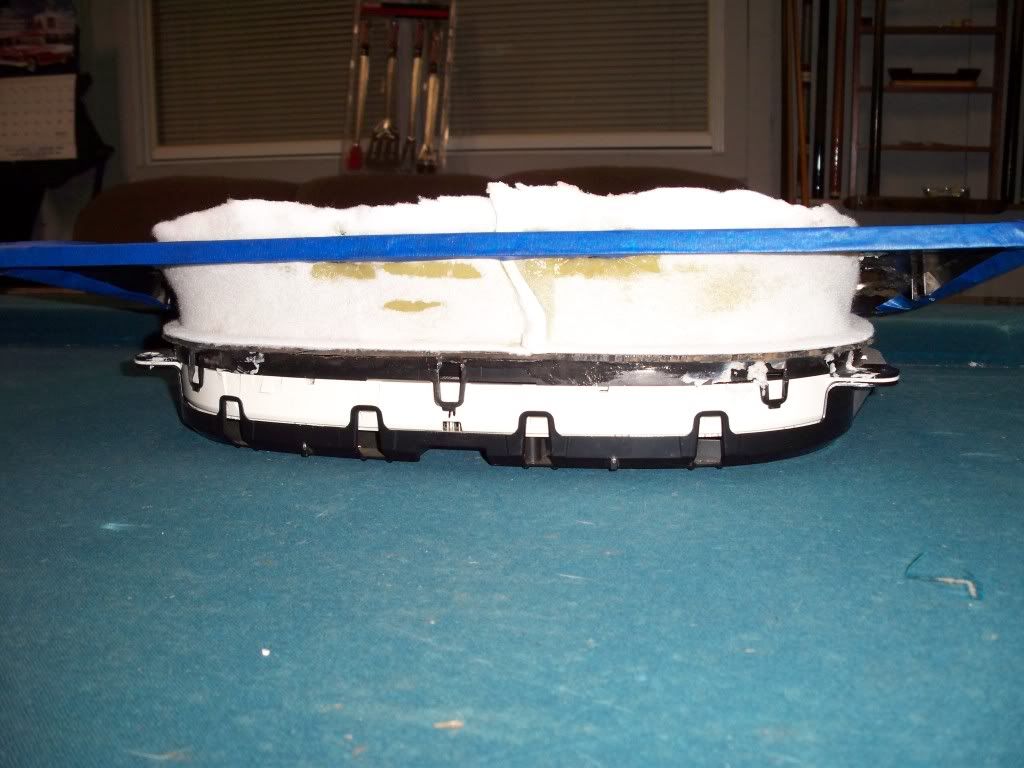 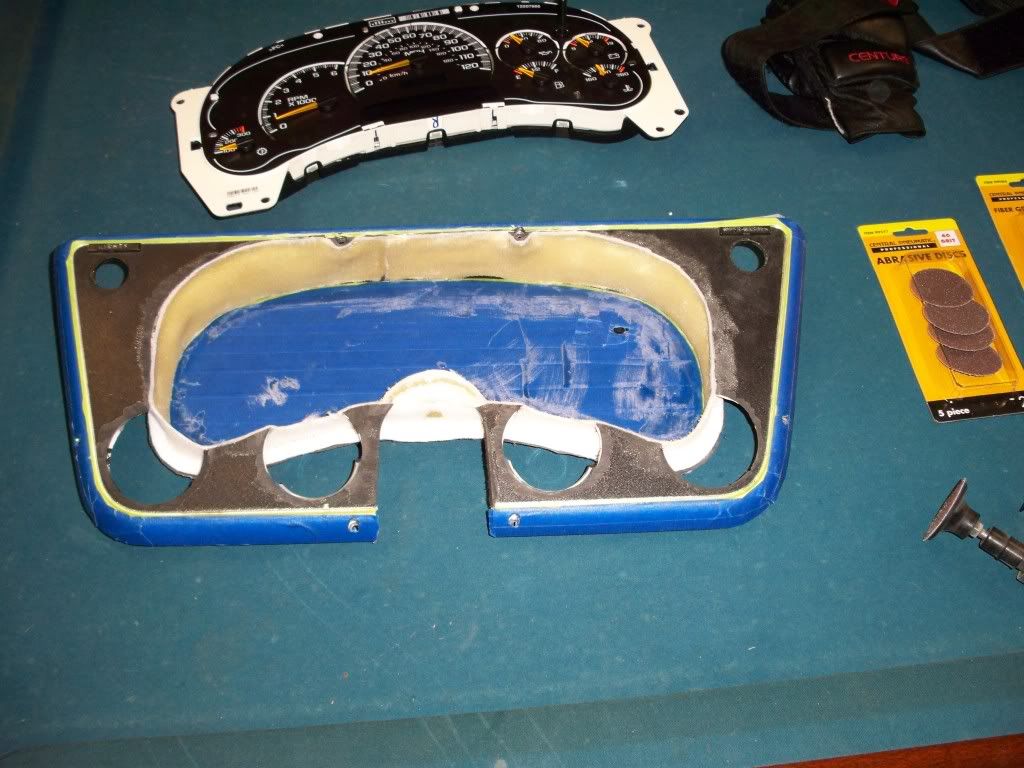 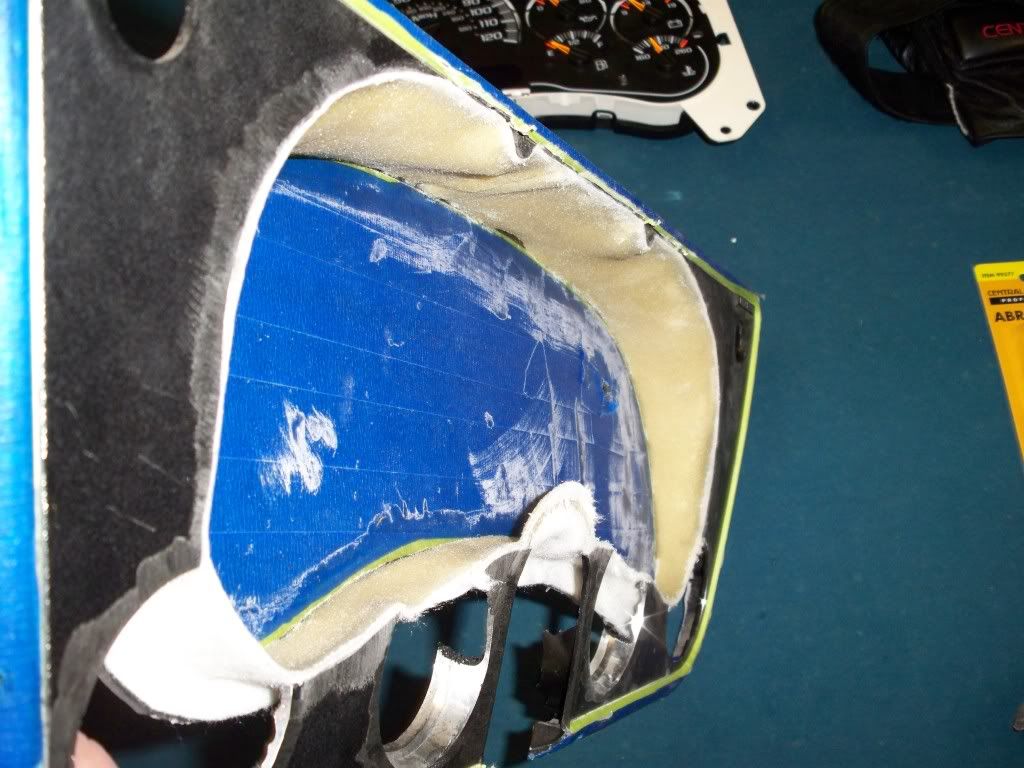 Then I used fiberglass cloth and resin to fill what was left of the old gauge holes. 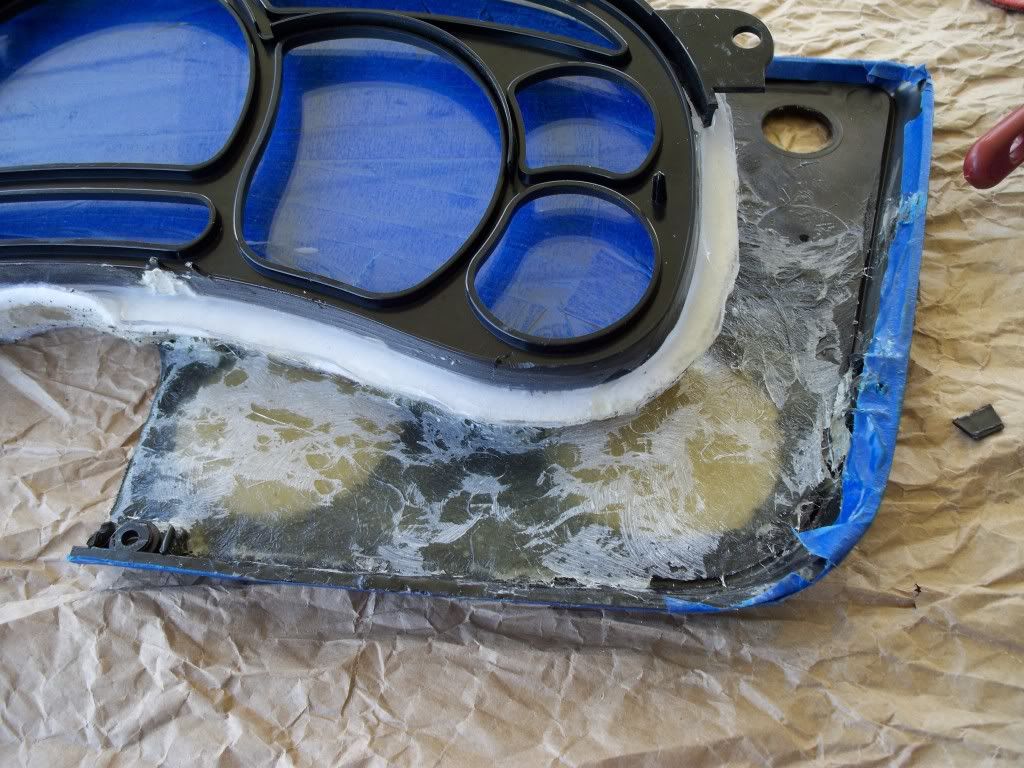 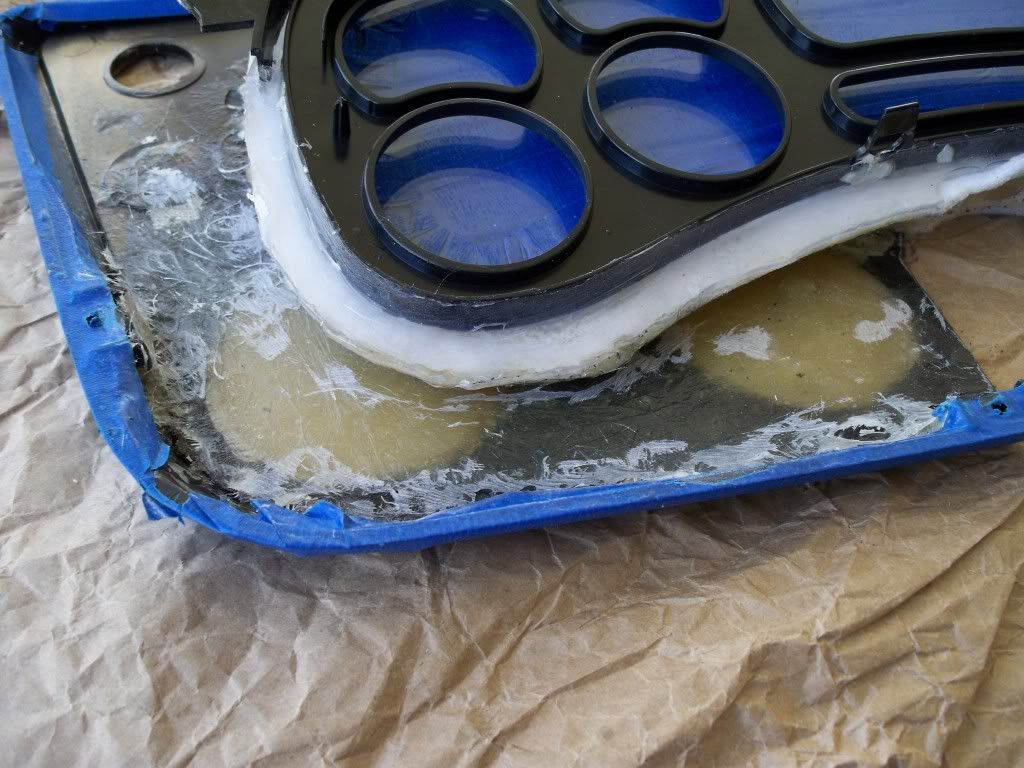 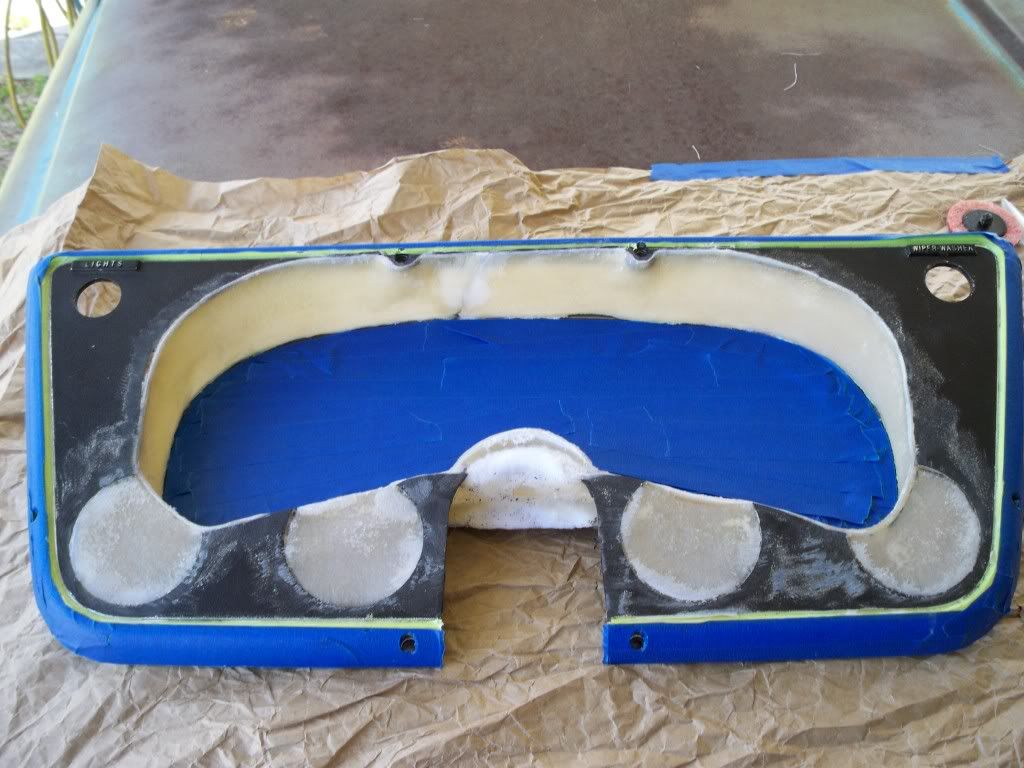 A little bit of bondo/sanding 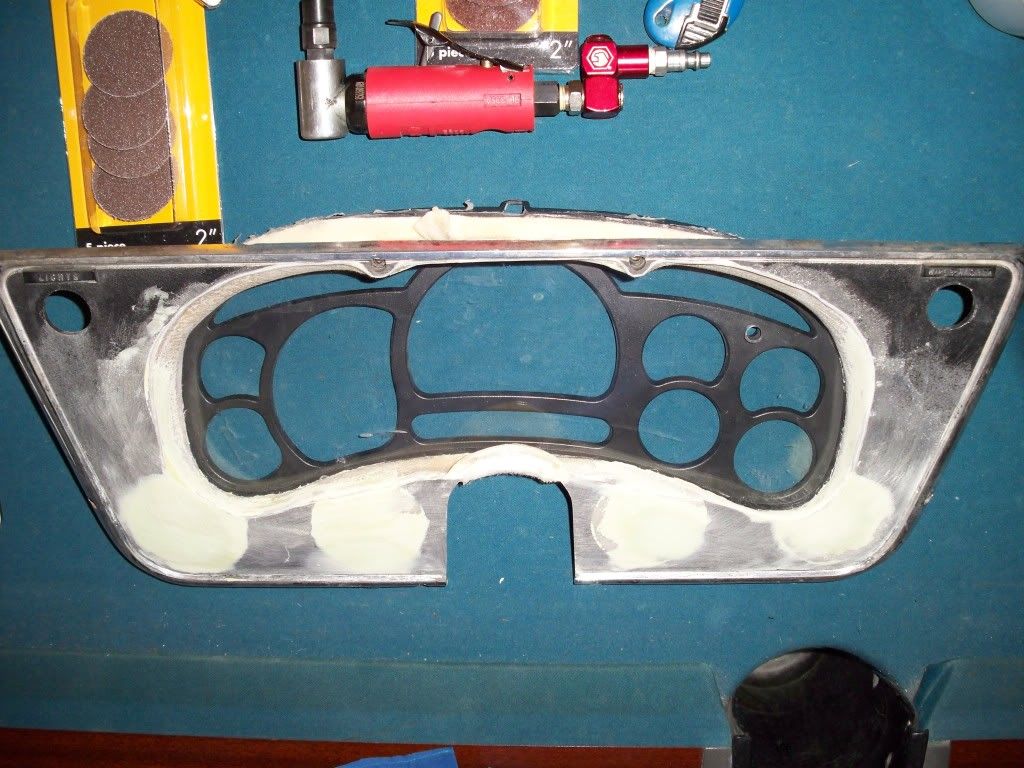 I used Rust-oleum "Multicolor Textured" (223525 Aged Iron) to get the texture back and top coated with Rust-oleum "Flat Protective Enamel" (7776 flat black). Both are available at any Lowes store. 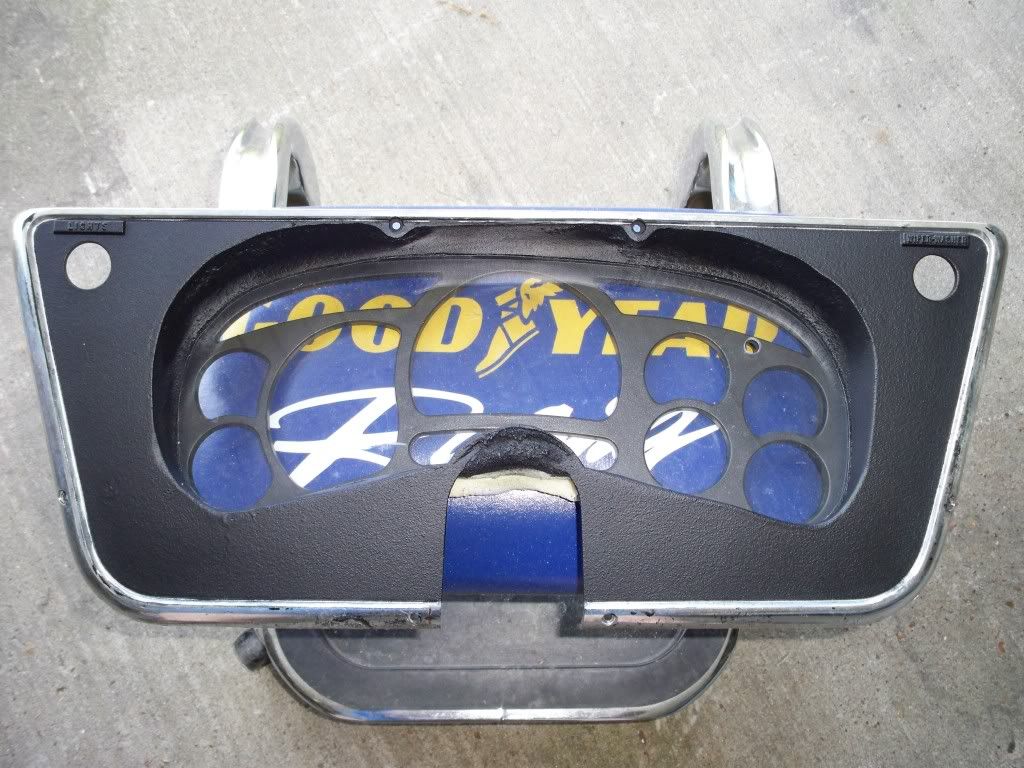 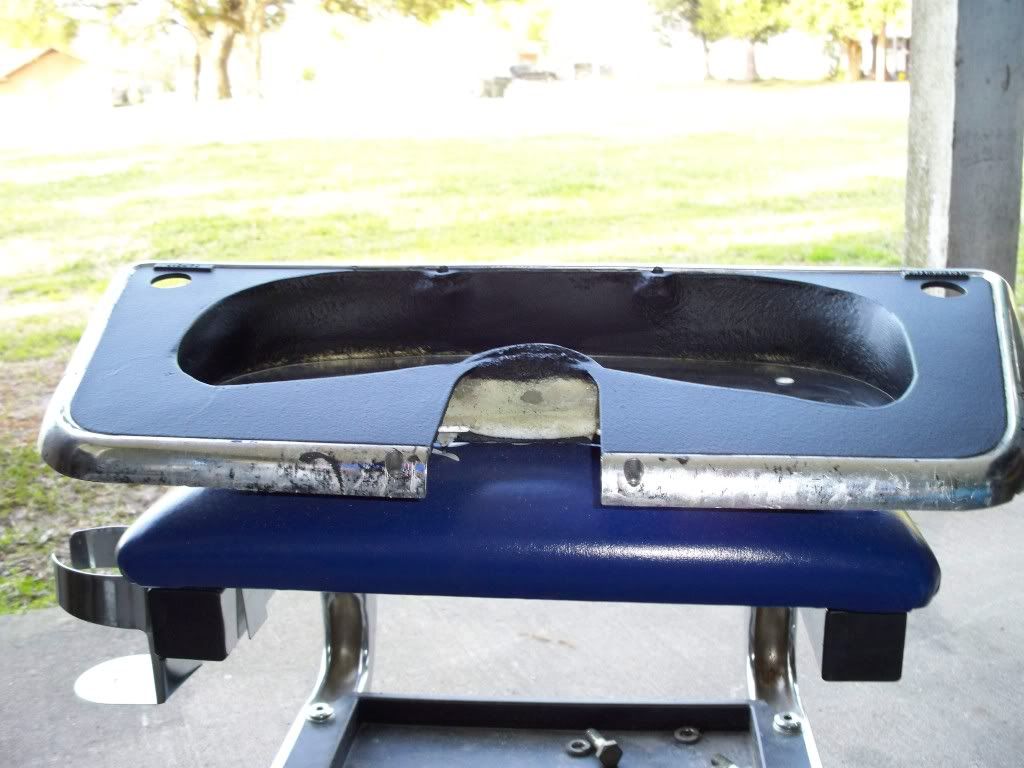 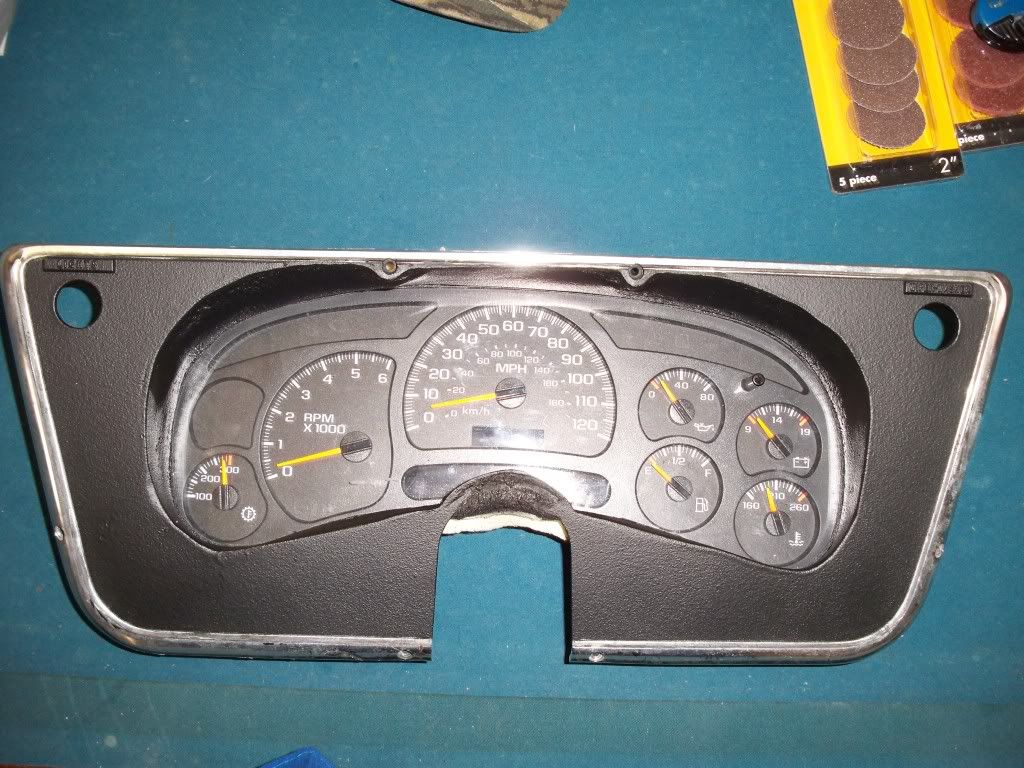 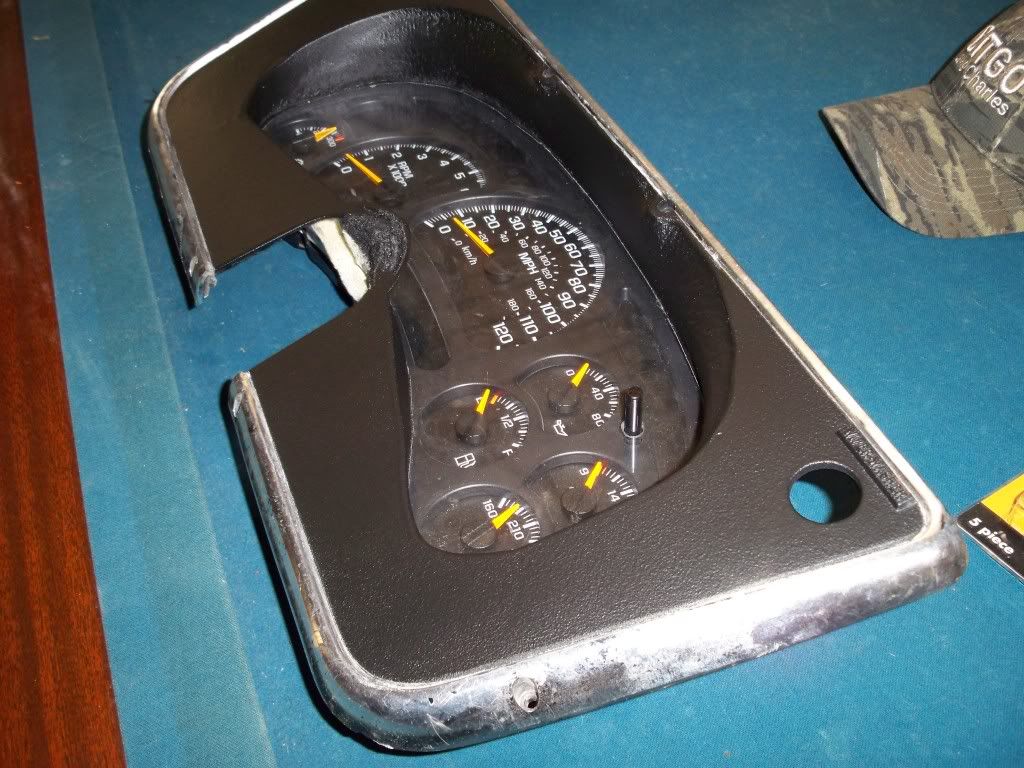 Next hurdle was the gas tank. I had JUST put in a new replacement metal tank in the blazer and had the old tank's filler neck soldered/brazed (however they do it) to the new tank. I also wanted to integrate the 2005 fuel pump assembly into it for several reasons, fuel gauge to work, correct fuel pressure, etc. My first attempt came out great. I made a mounting ring that had welded nuts on the back side for the fuel pump to slide down into. I then had a machinist buddy of mine machine a little ridge for the O-ring to sit in, and he cleaned up the center hole so the pump assembly would "just" clear it and slide down into it. 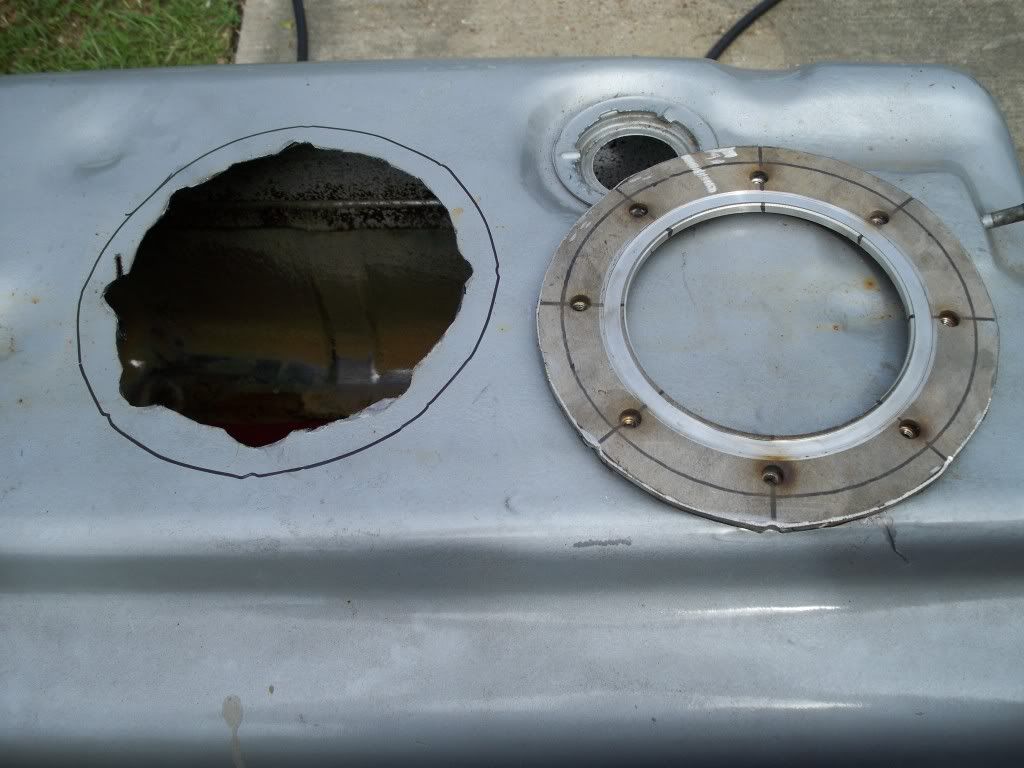 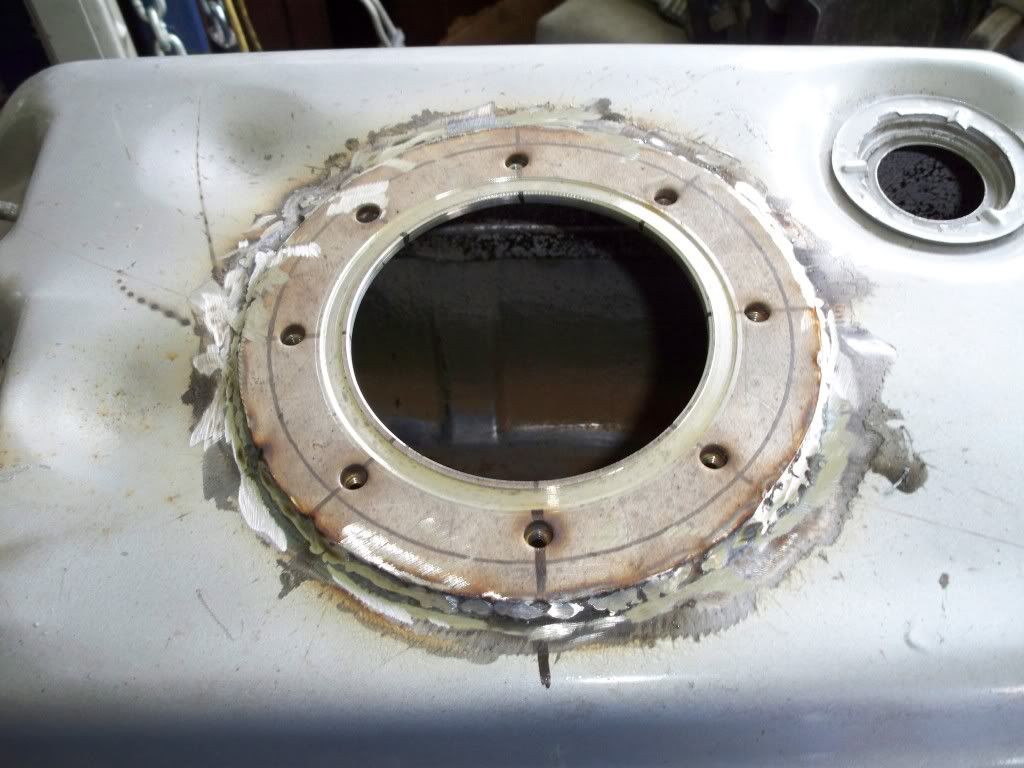 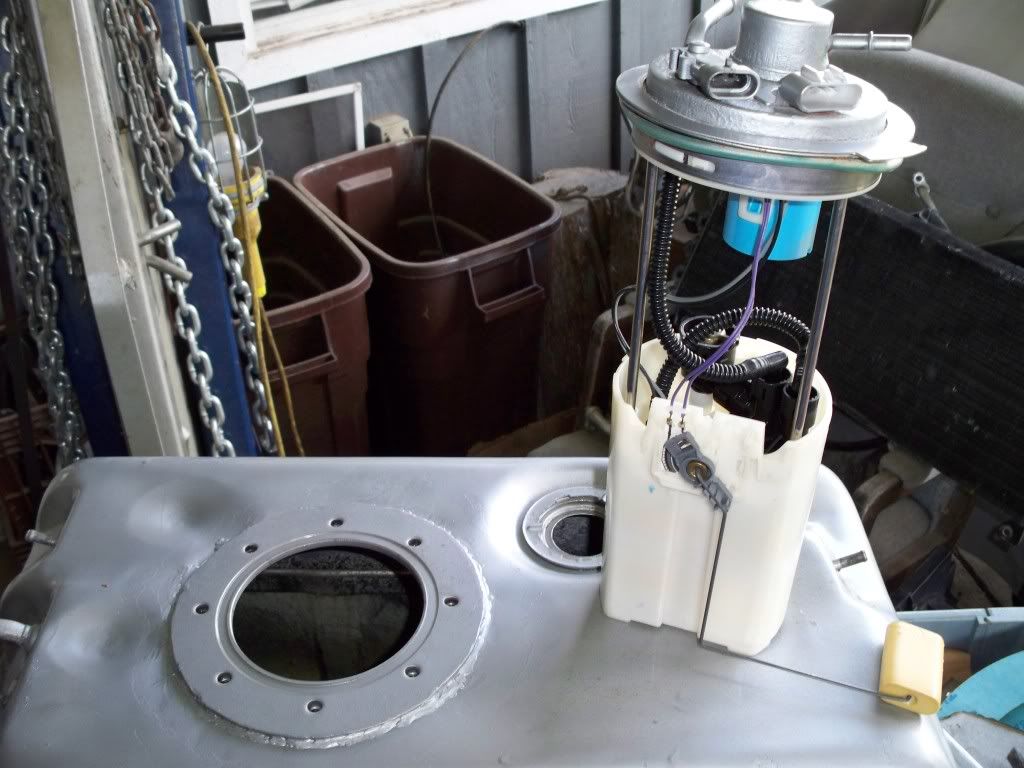 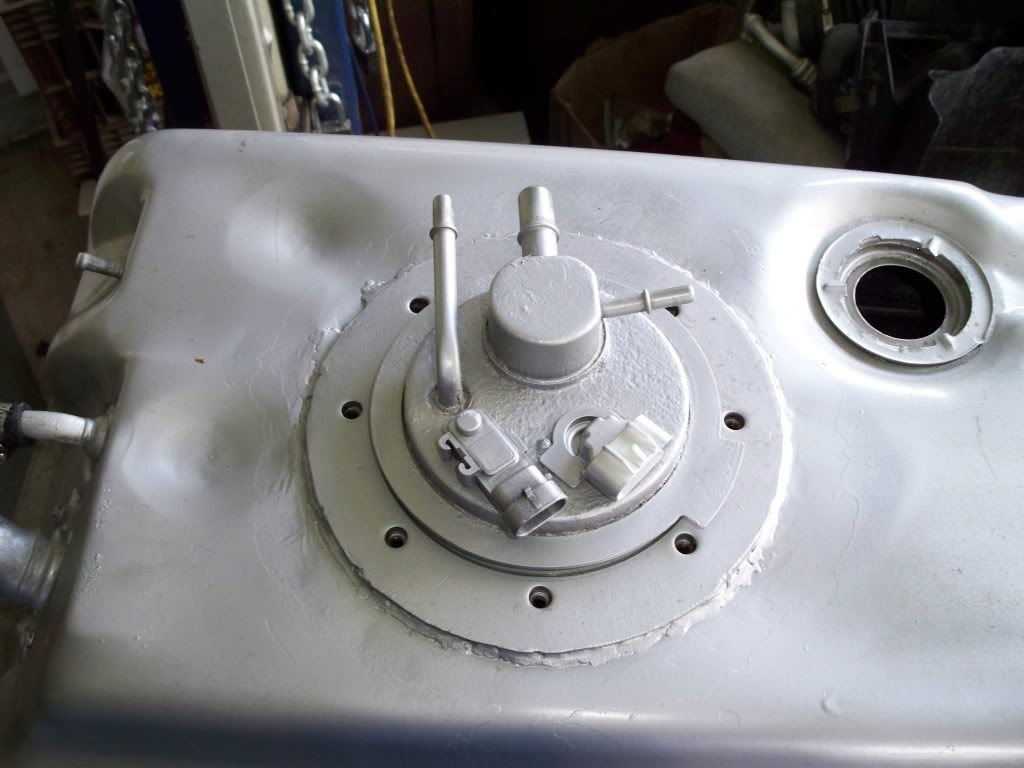 Then I made a top ring that would sit on the top of the pump assembly. The bolts (with sealing tape applied) would slide through this piece and squeeze down on the rubber o-ring sealing everything up. 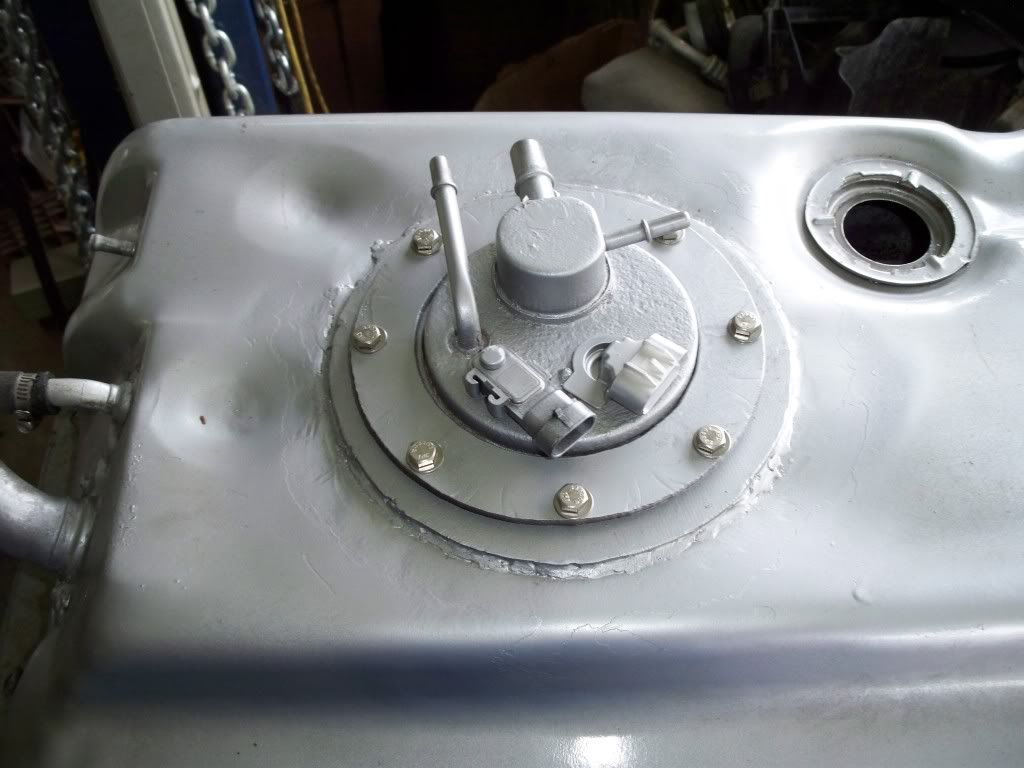  But I found out when I installed it that it hit the floor. Just about 3/4 inch too tall. So I had to go back to the drawing board. Lucky for me the fuel pump assembly's metal rods let it "collapse". So all I had to do was drop the mounting level down an inch or so to have PLENTY of room. 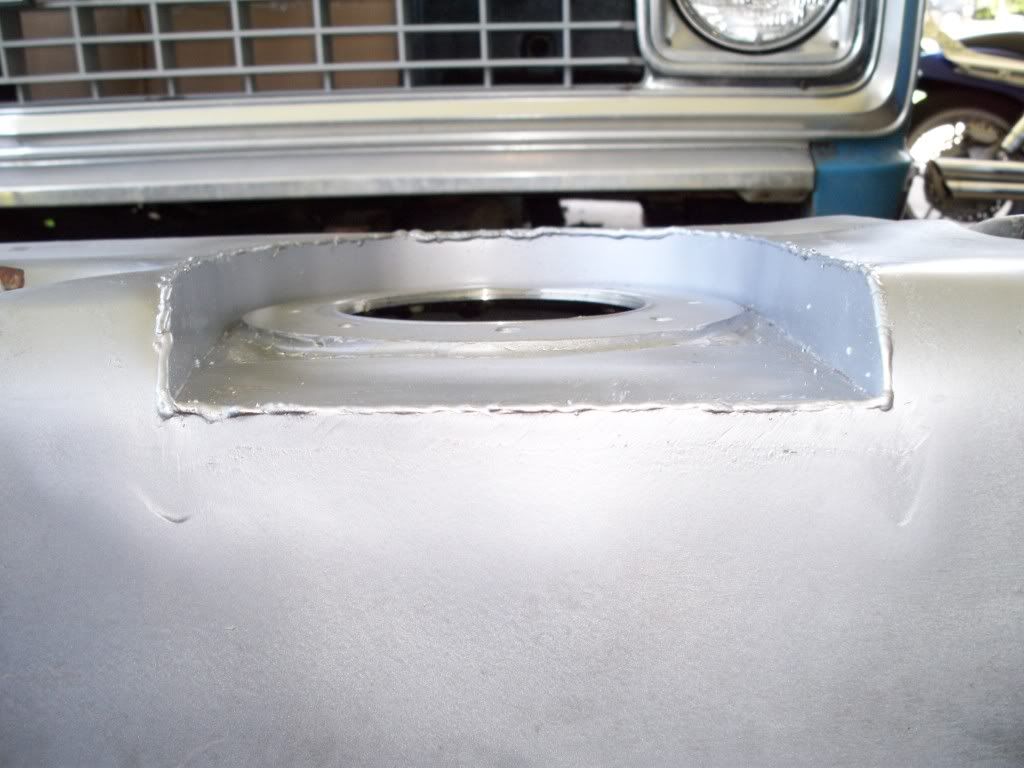  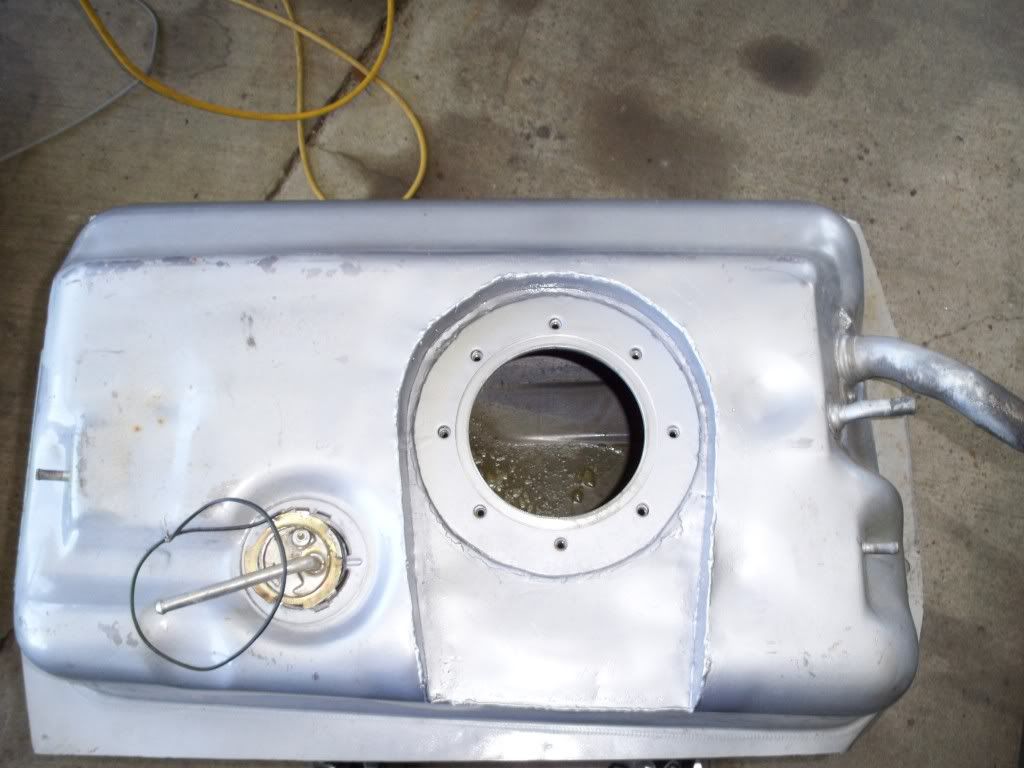 The springing action 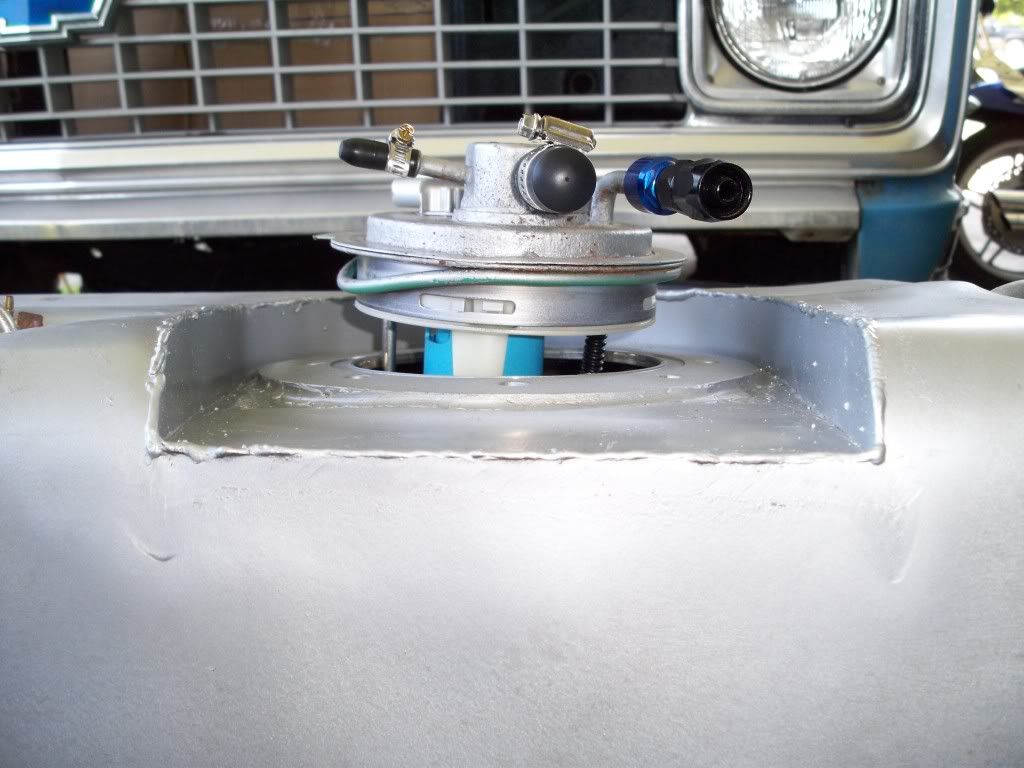 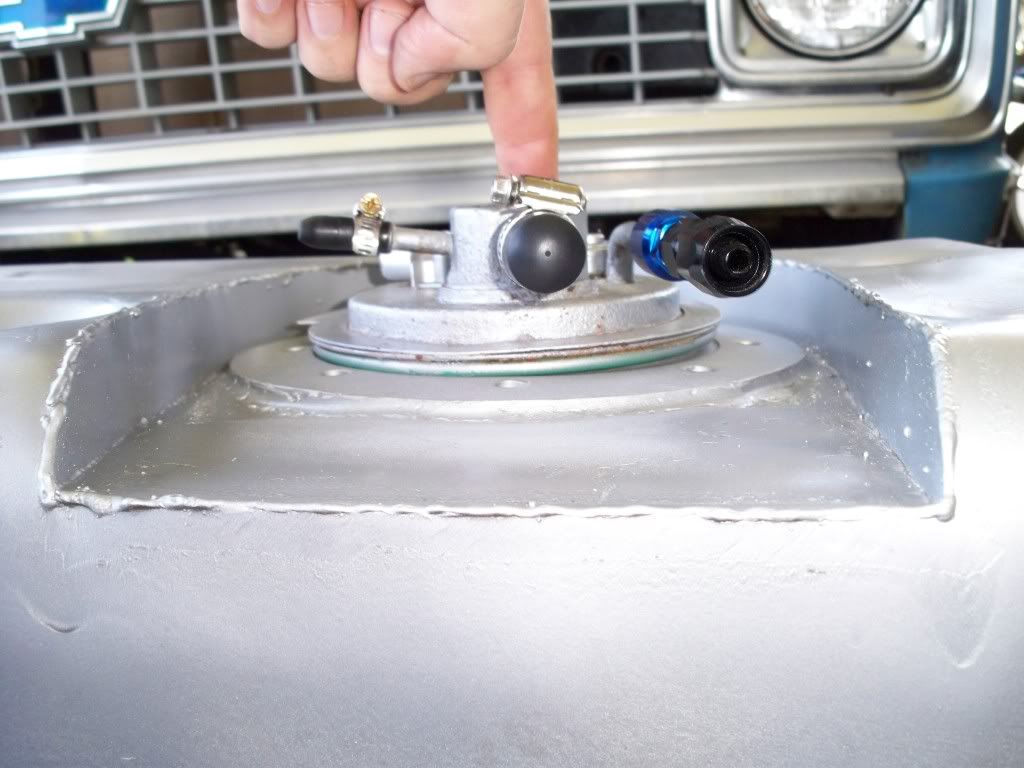 Everything bolted tegether 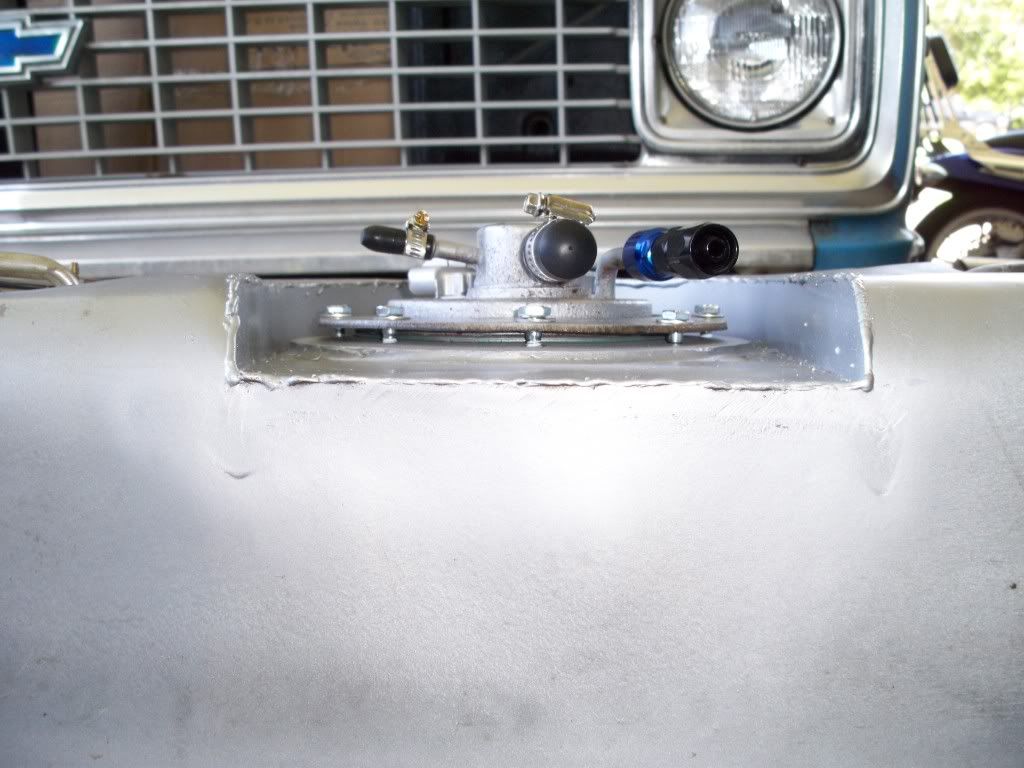 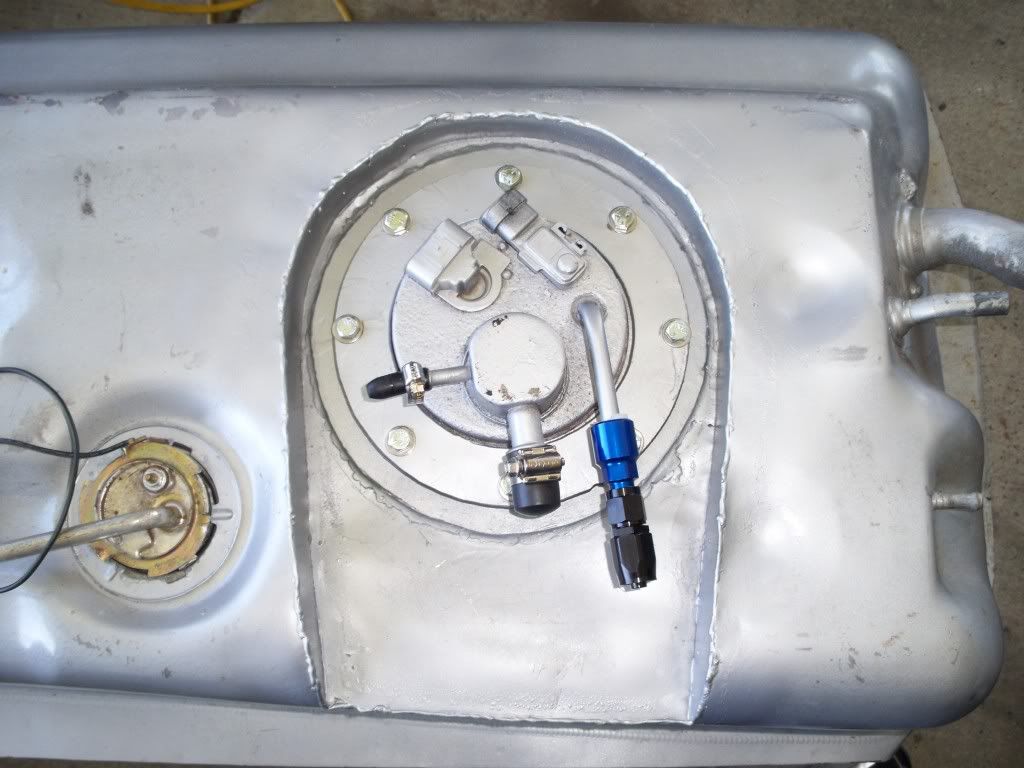 From there I ran my one fuel line to the engine. I capped everything else off except for the vent lines and mounted her up. Then came the radiator saga. My original plans were to find a radiator company that would make me an aluminum center section that was shorter than the 2005 so I could mount the end caps to it and install it in the 72 blazer core support. Since I had ALL the oil lines and trans lines, this would have been an affordable and EASY way to do this part of the drive line swap. BUT NOOOO, I got laughed out of radiator shops, hung up on, told me I was crazy "your putting a what in a what?" I left messages that never got returned, I got the run around, you name it. Everyone now operates on the "I can't find a part number in my catalog so that means it doesn't exist" philosophy. So I was on my own again..... Plan ""B" I ended up buying an ebay replacement aluminum radiator.  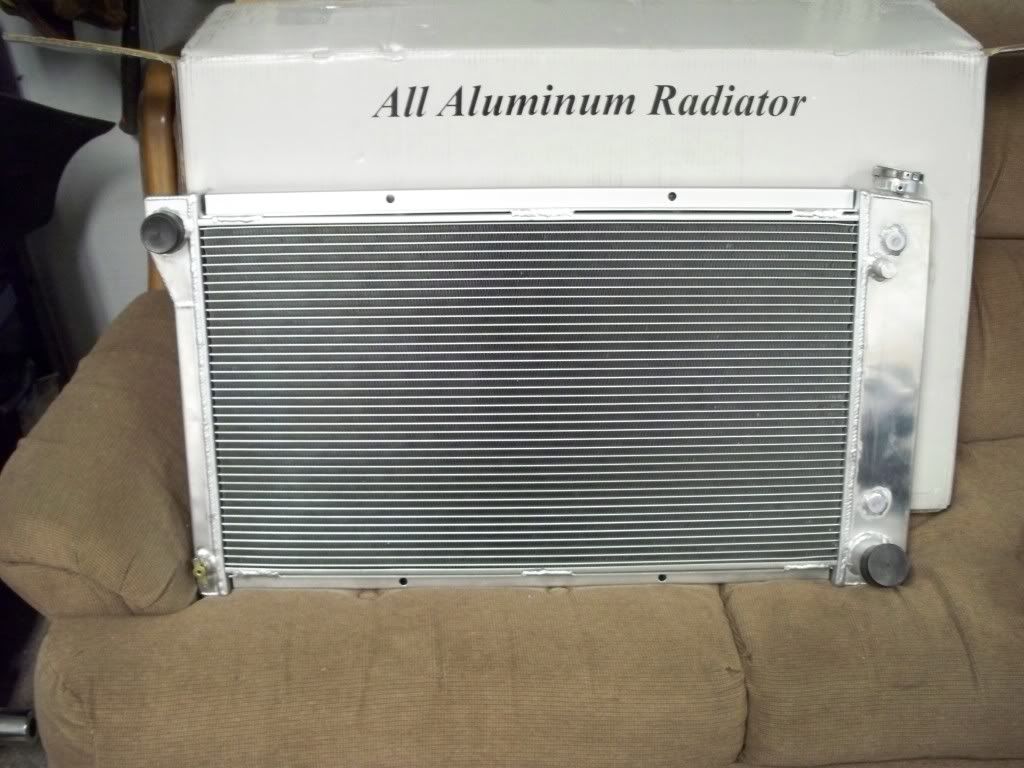 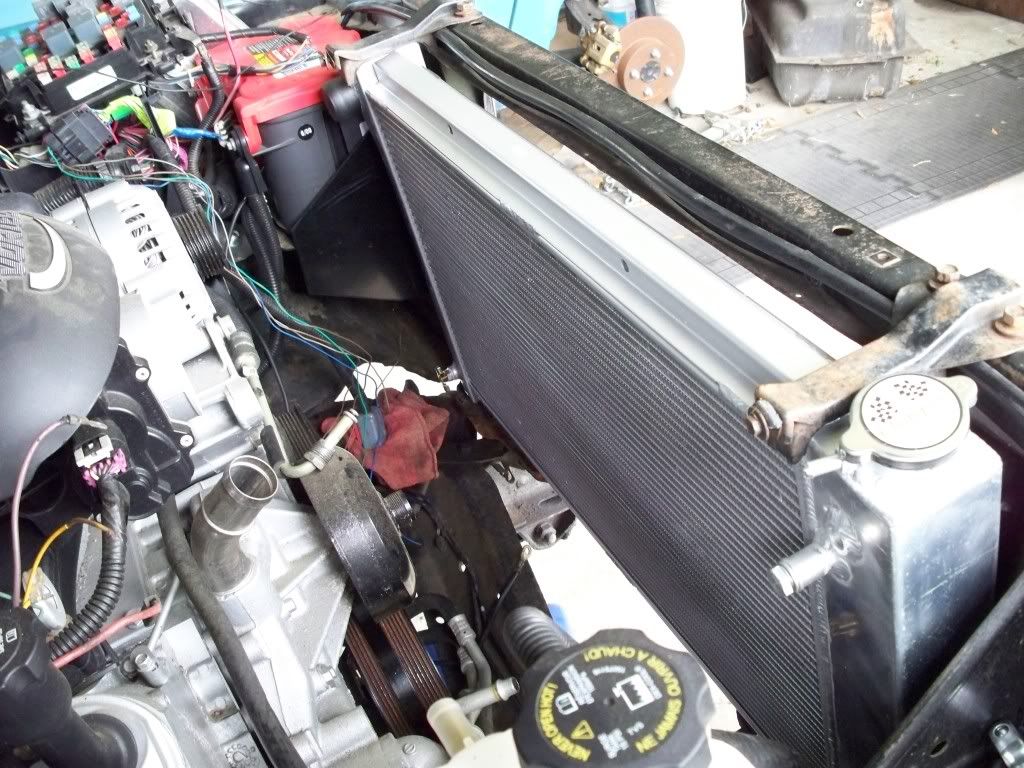 And I decided instead of buying an expensive quality aftermarket fan, I wanted to use the camaro LS1 dual fans. They can be had ANYWHERE for 100 bucks, and there are affordable replacement motors available to service the assembly, so it's a win-win really. 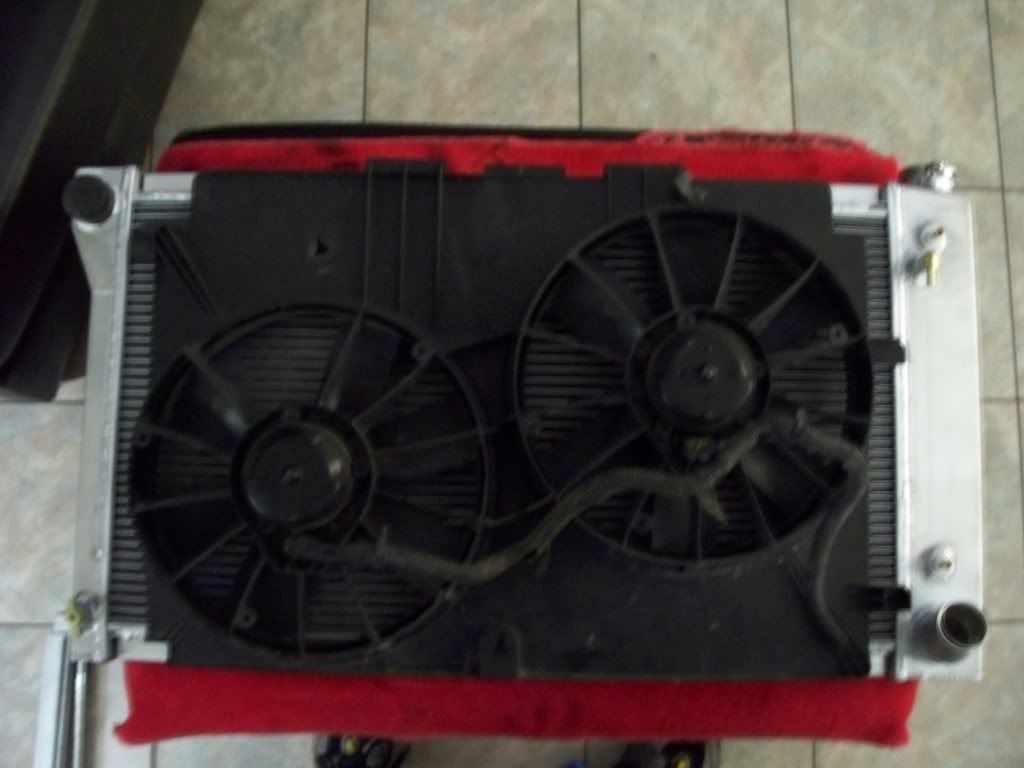 The bracket I made out of aluminum that allows the camaro fans to slide in and lock just like the stock on the camaro radiator. 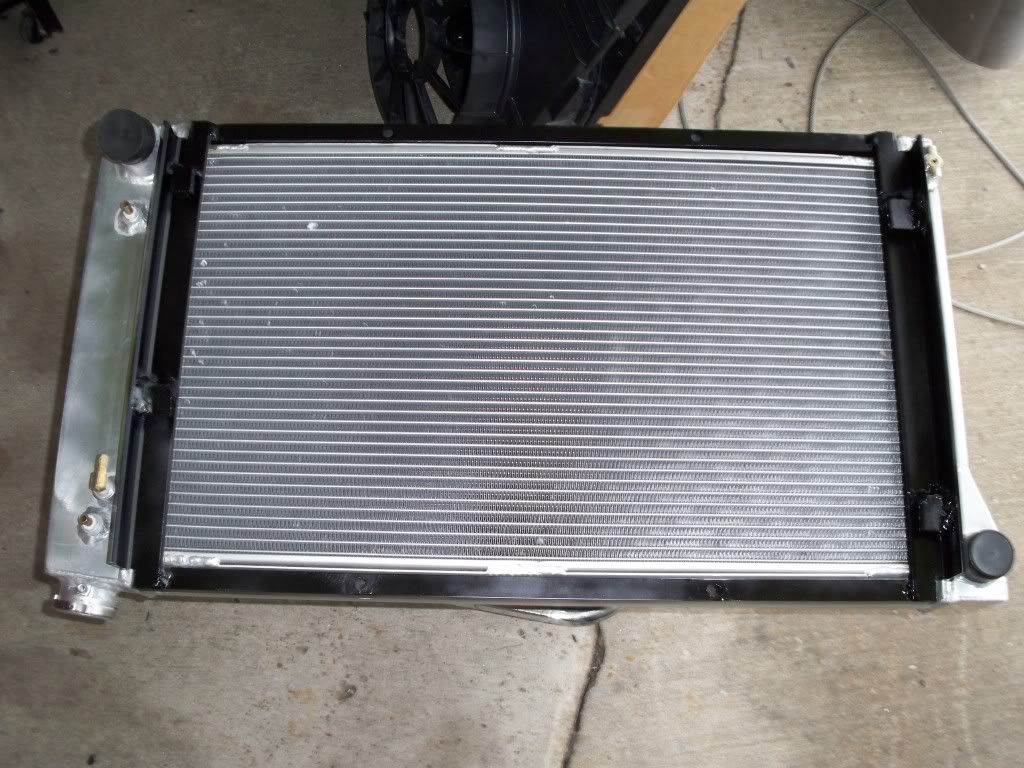 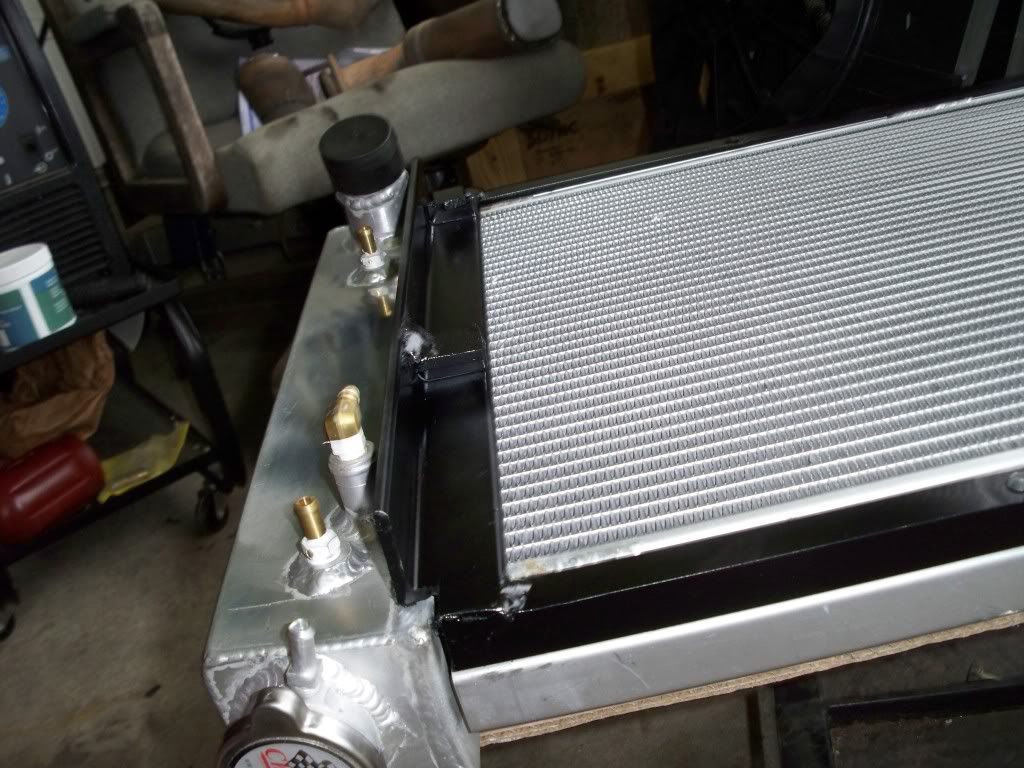 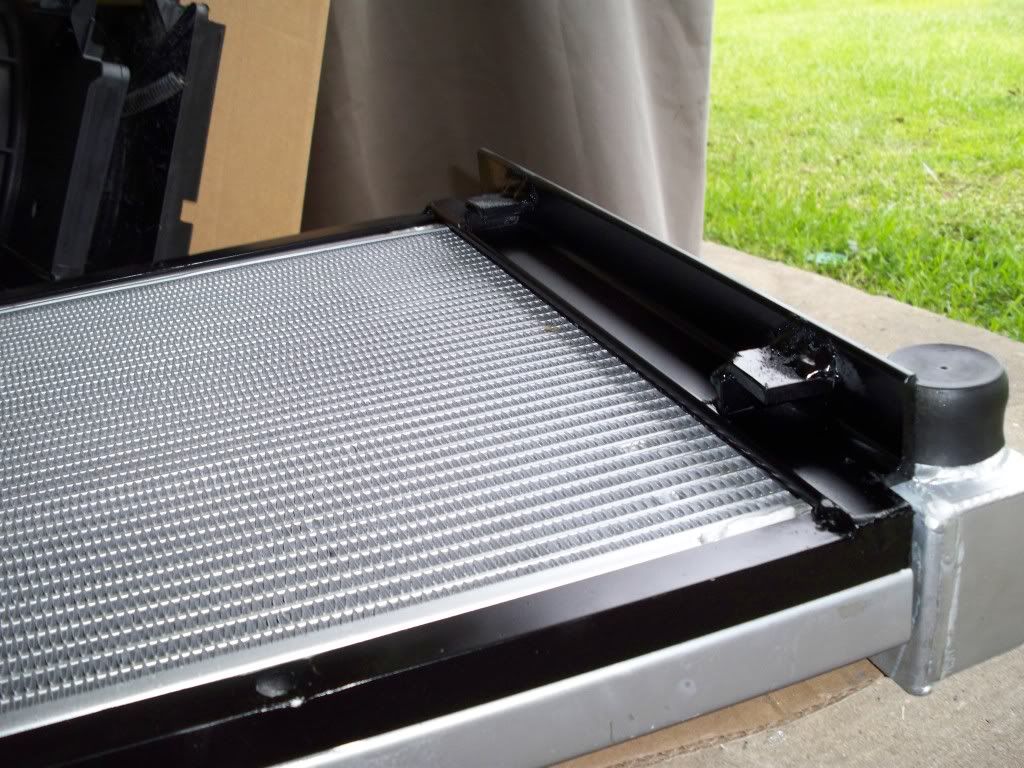 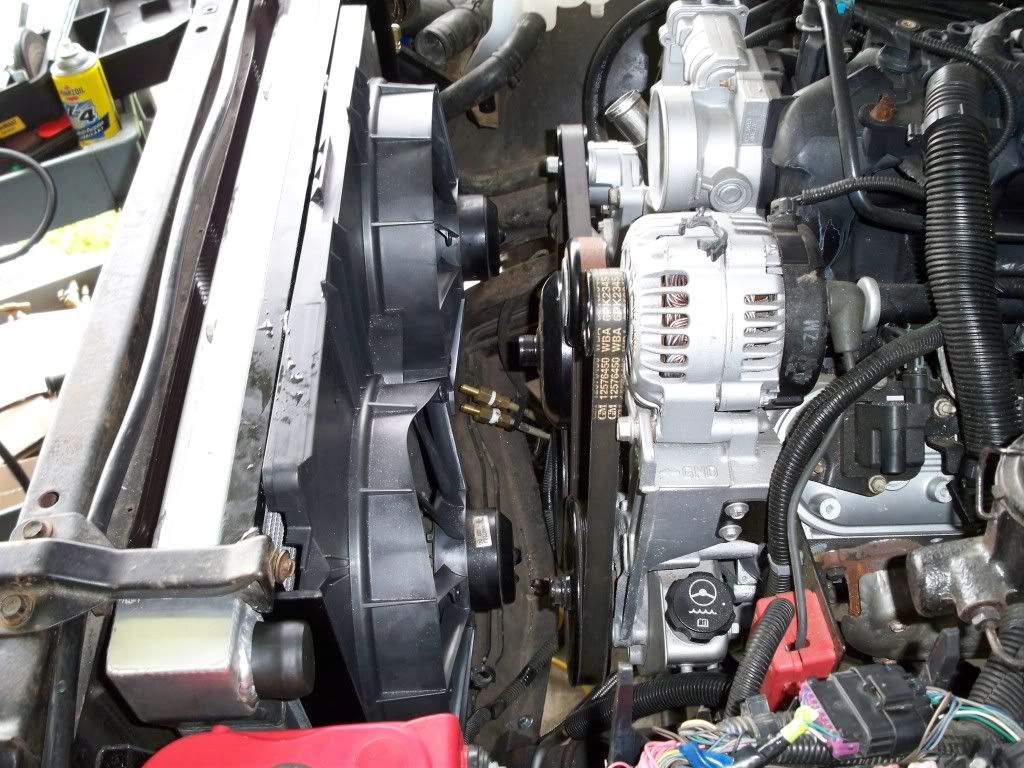 Then I made a wiring harness that mimicks the factory camaro wiring all the way to the truck ECU. 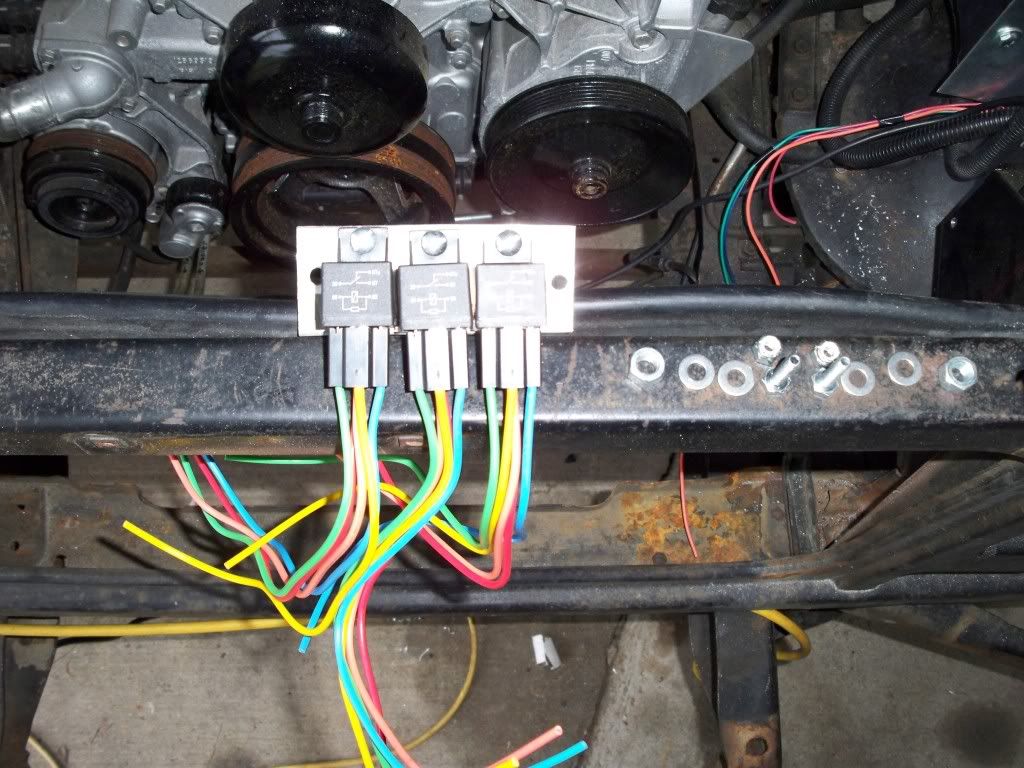 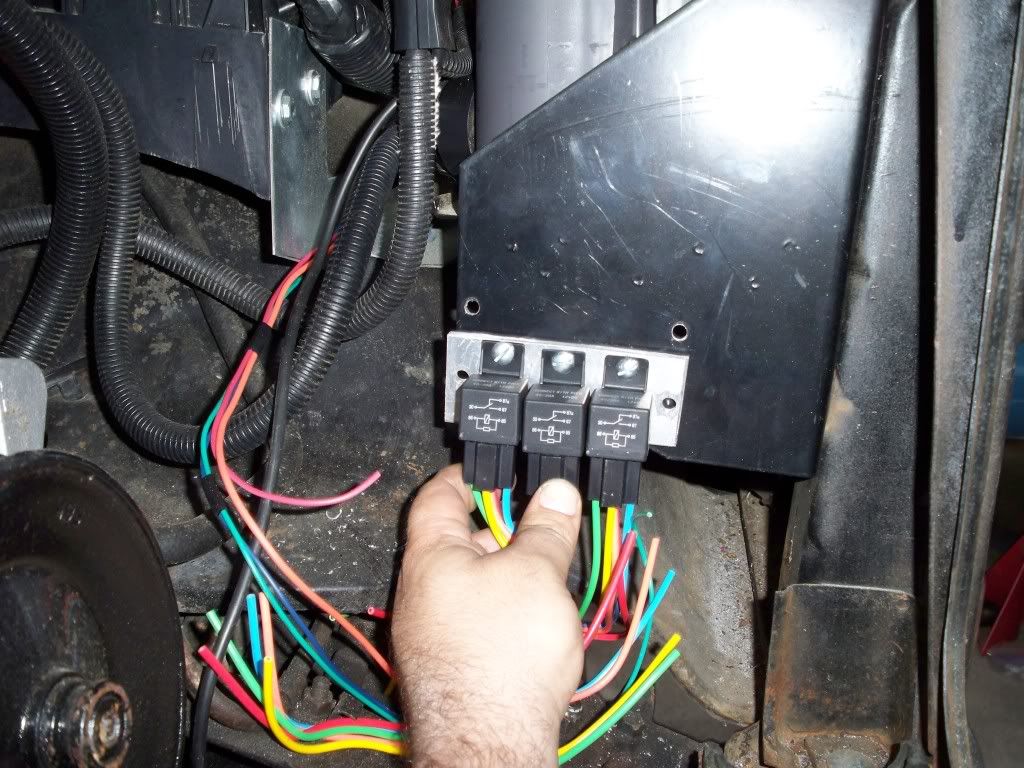  Remember that I got the 05 upper and lower radiator hoses with my pull-out and the original plan was to use the stock 05 radiator end caps so everything would be easy? Well since I had to ust the 72 replacement radiator, the 05 hoses wouldn't fit. So I went to my local O'reilly's and spent some time looking at all the hoses hanging on the wall in the back. I have been using that particular store for so many years, they all know me by name and didn't mind me hanging out back there for a while. So I found a few that might just work and they let me bring them home for test fitting. Well I found the perfect two hoses. The upper hose fits like it was made for me, and the lower hose just needed a little trimming. 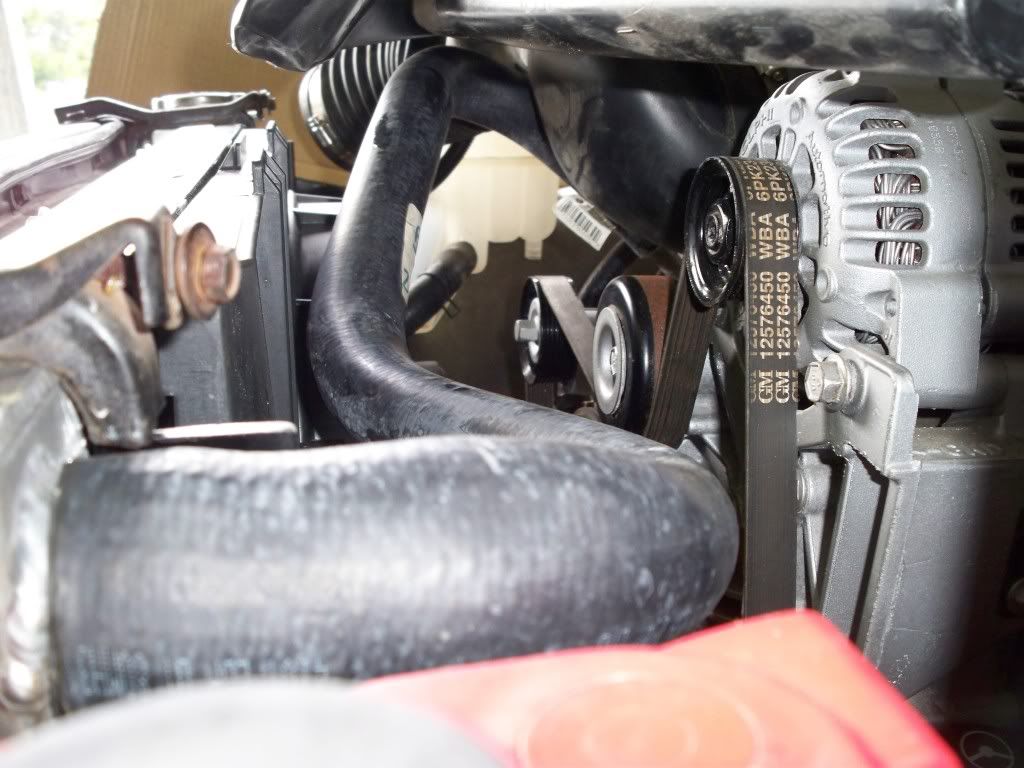  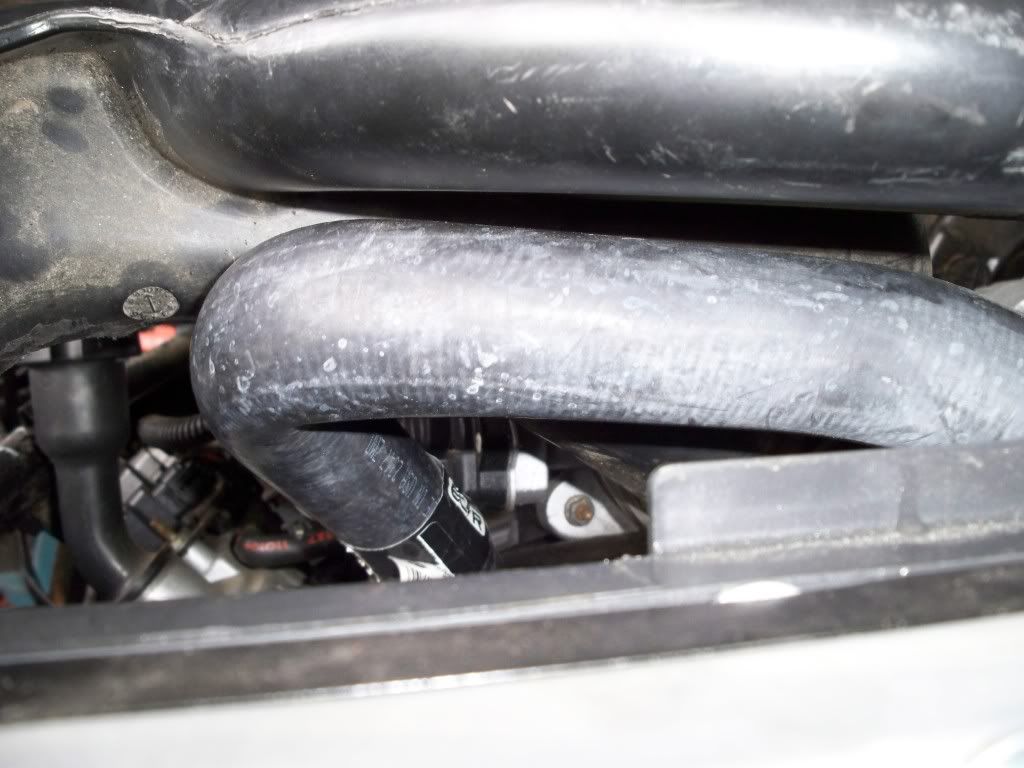 The two part numbers 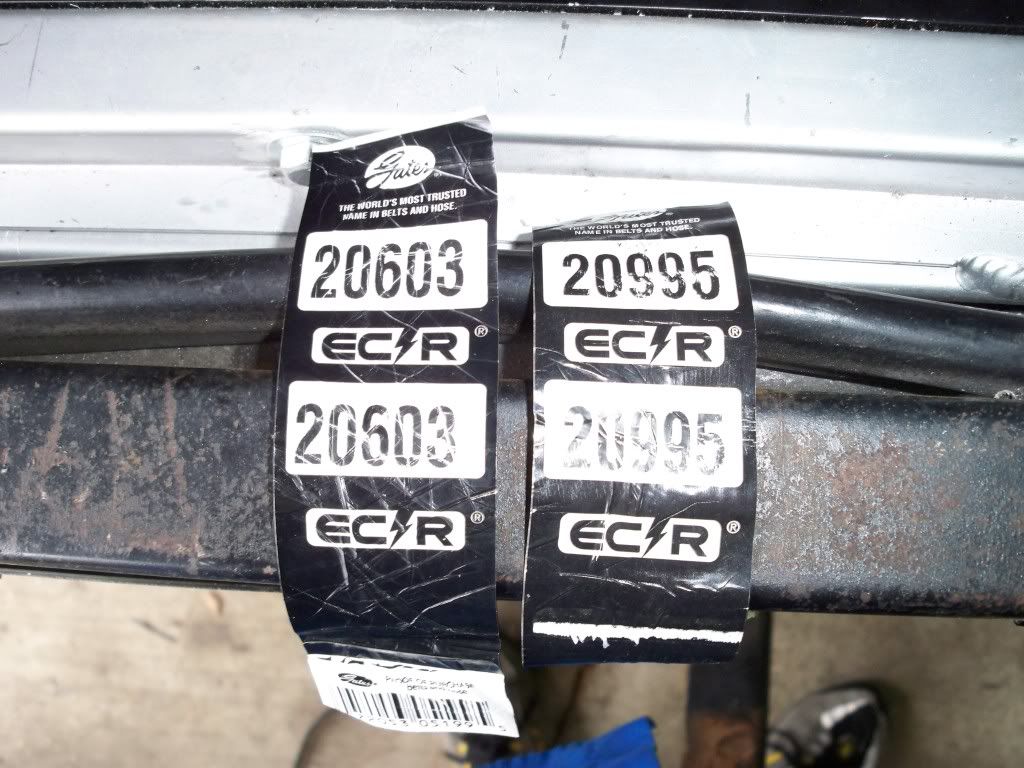 With the radiator section done I moved on the the coolers. I bought two B&M supercoolers to mount in front of the radiator, barbed fittings for the trans side and -10 AN for the oil side. I also purchased the Mocal LS series oil thermostat block with -10 AN male ends. Here is the link to the websites catalog http://97.74.103.94/files/newprod.pdf . I am also going to use the vintage air kit so the two coolers had to be recessed flush with the front of the core support for the vintage air parts to clear. In order to mount them flush I had to do two things. I had to move the lower radiator brackets foreward a little bit, space them up with a pieces of scrap 3/8ths plate and tack them down. Then I had to make two holes for the lines to go through and re-inforce them. 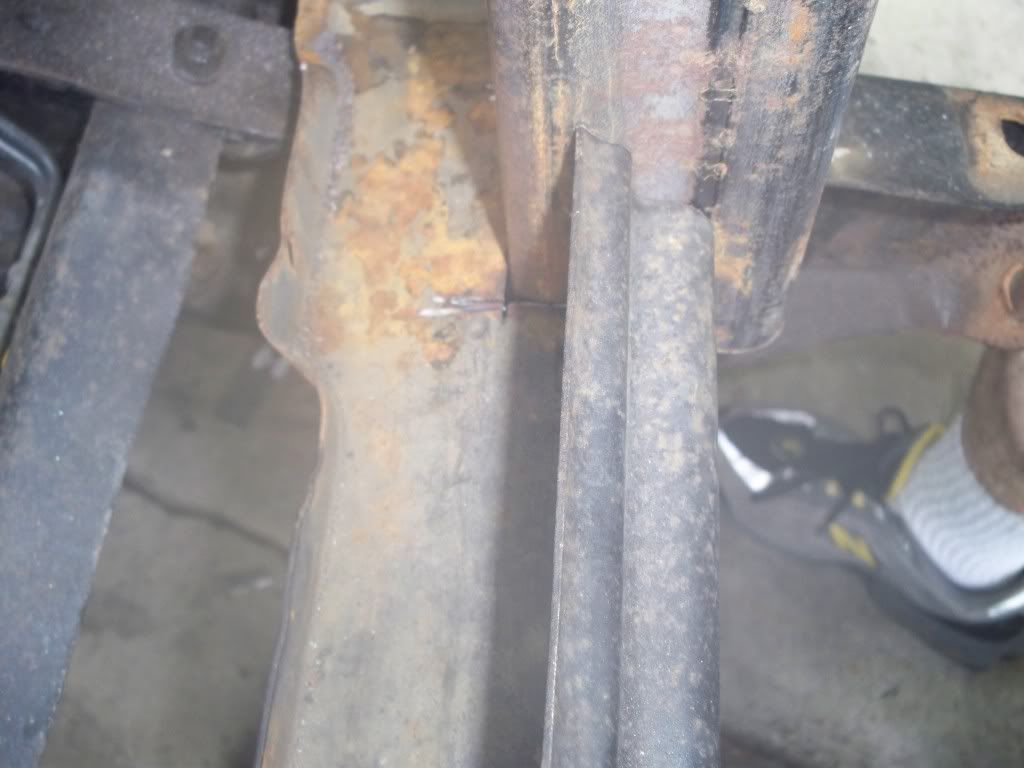 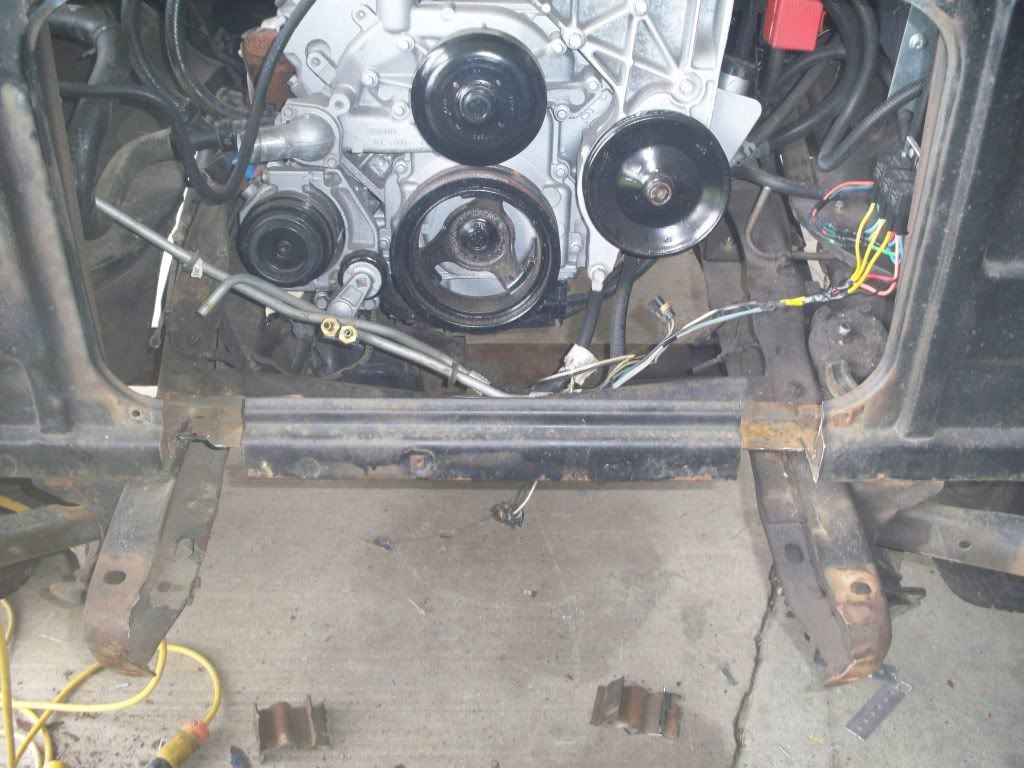 I used some HEAVY wall 3" box tubing scraps I picked up from my machinist friends shop. 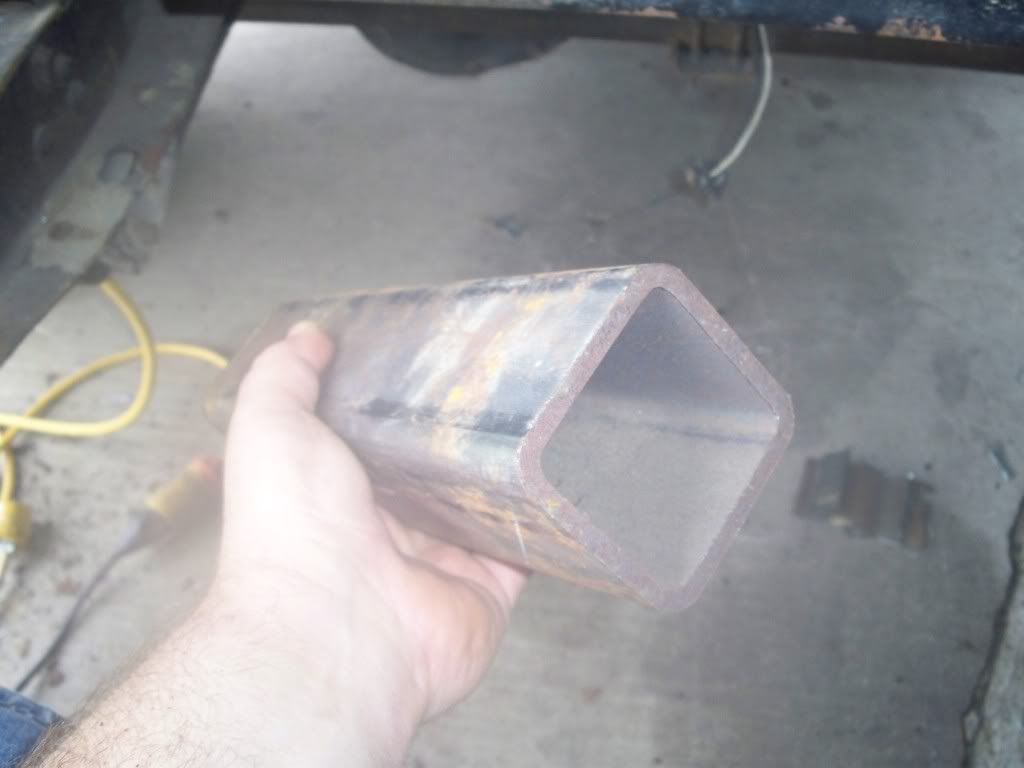 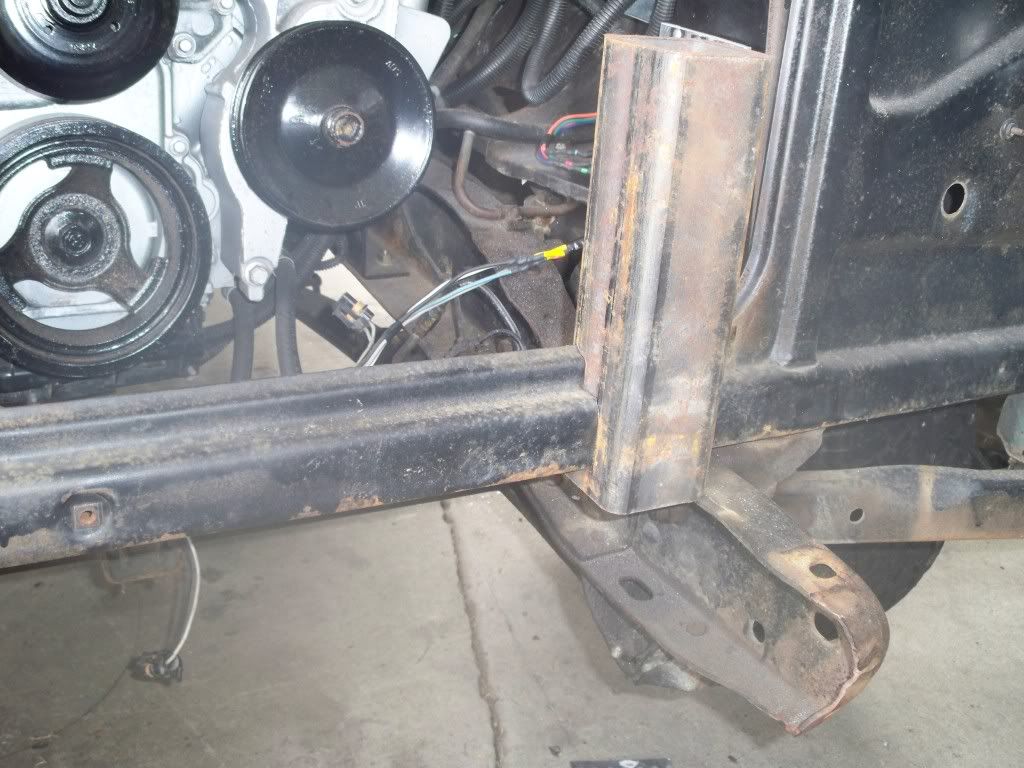 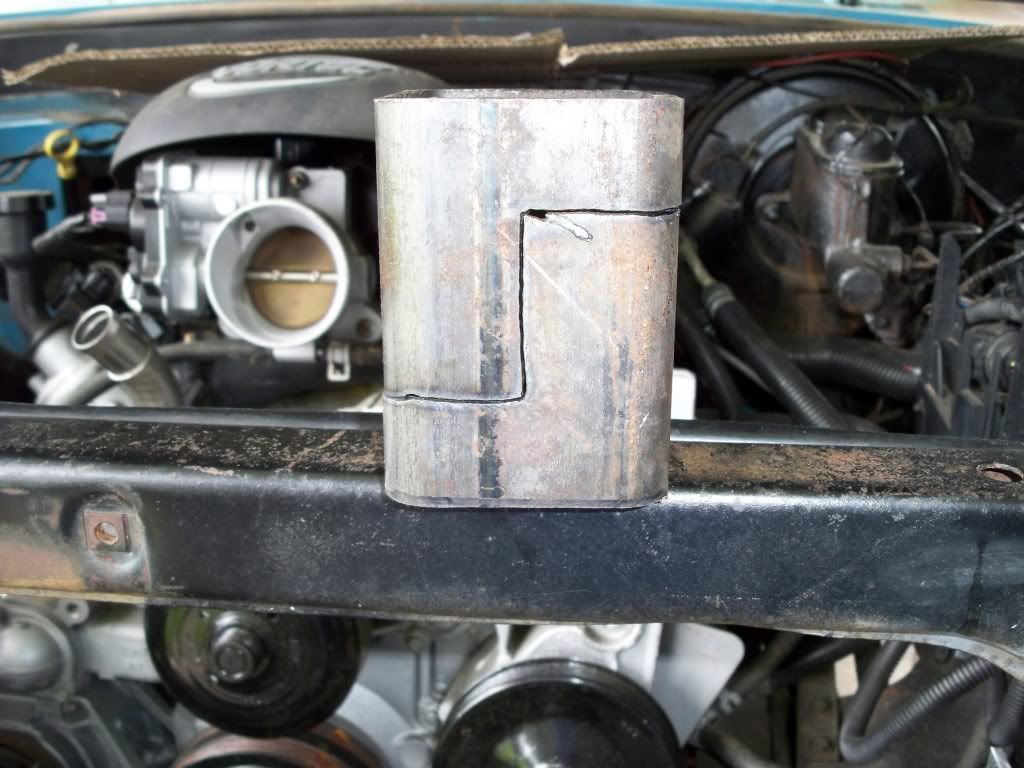 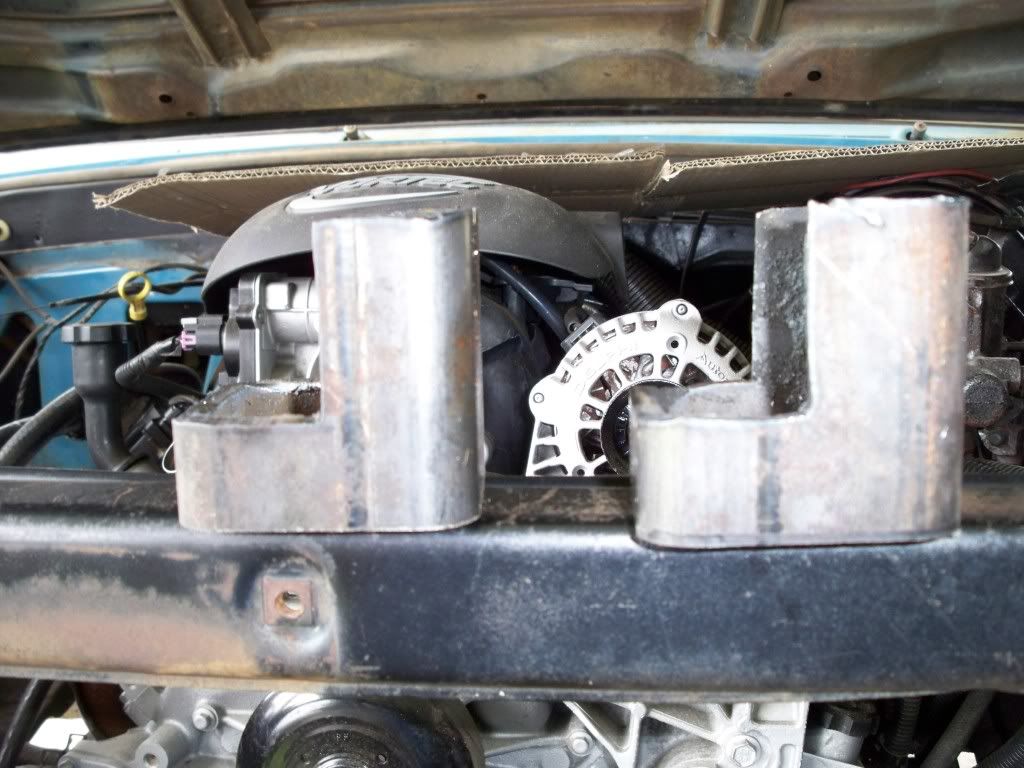 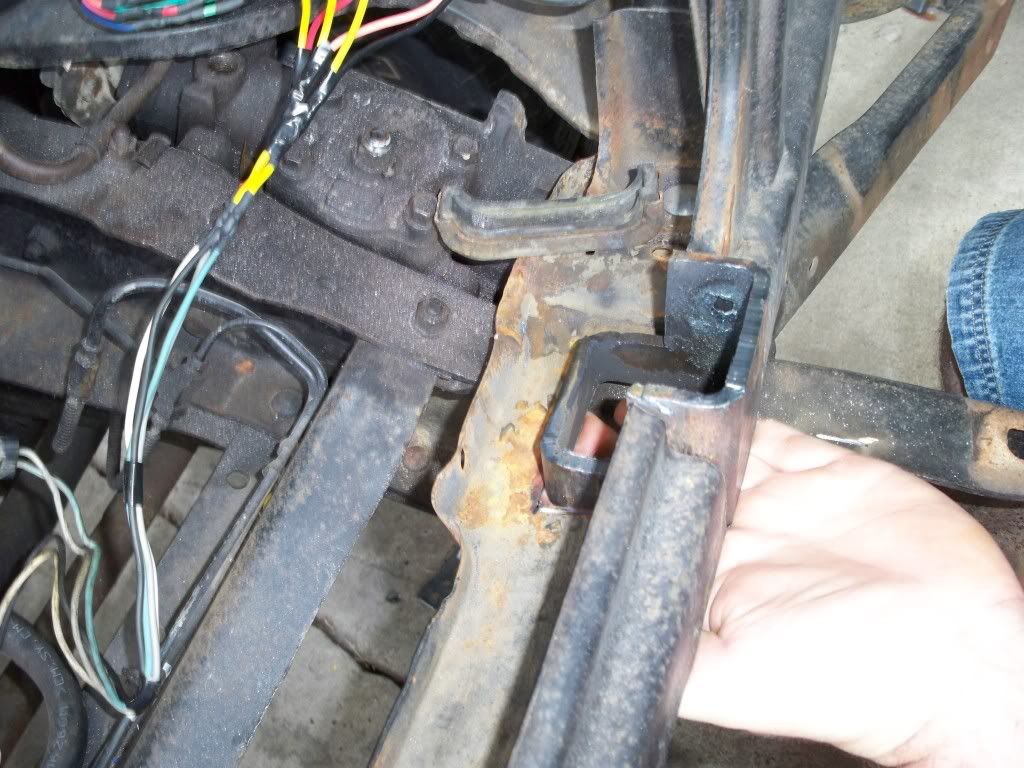 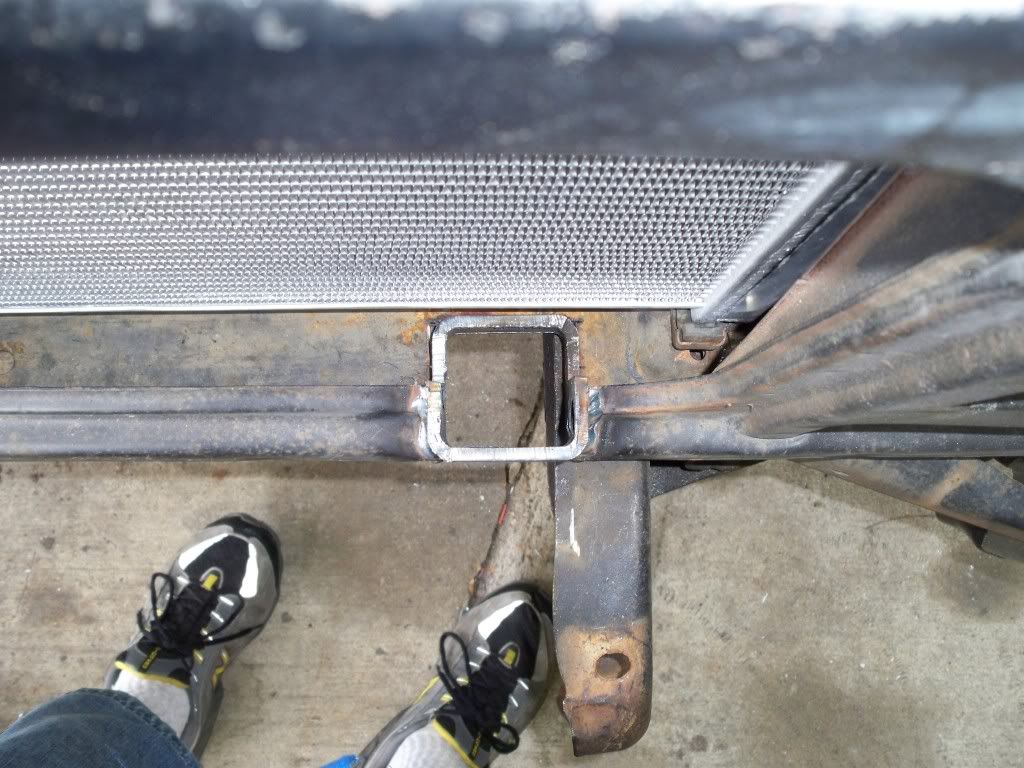 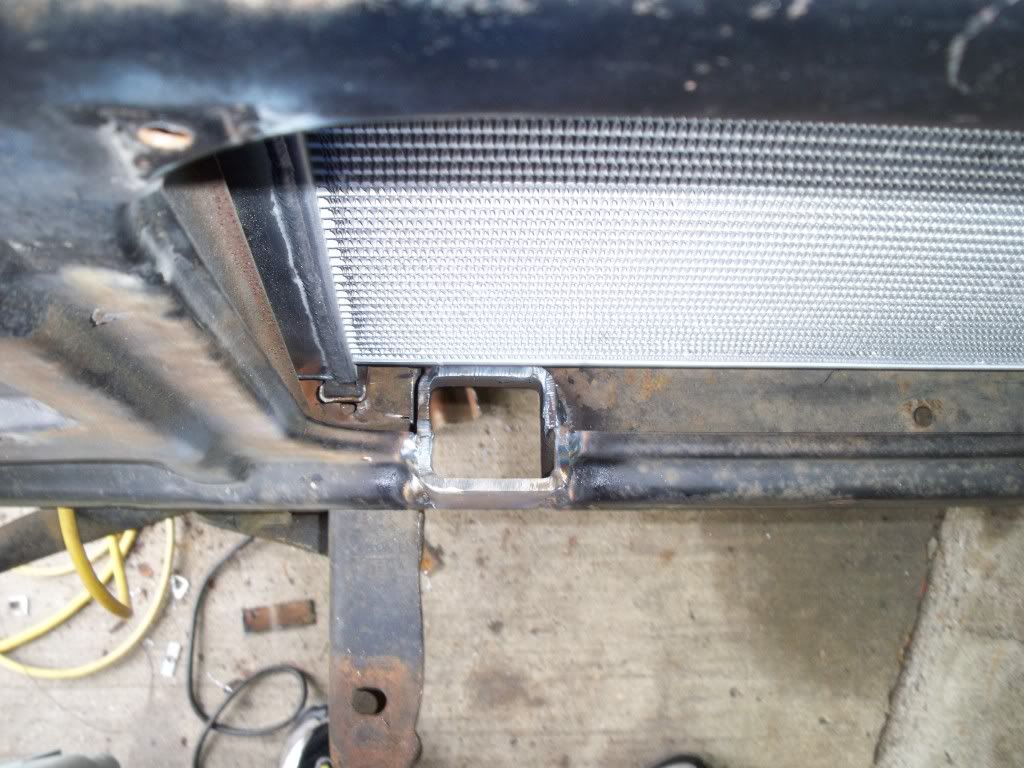 Routing/making the lines 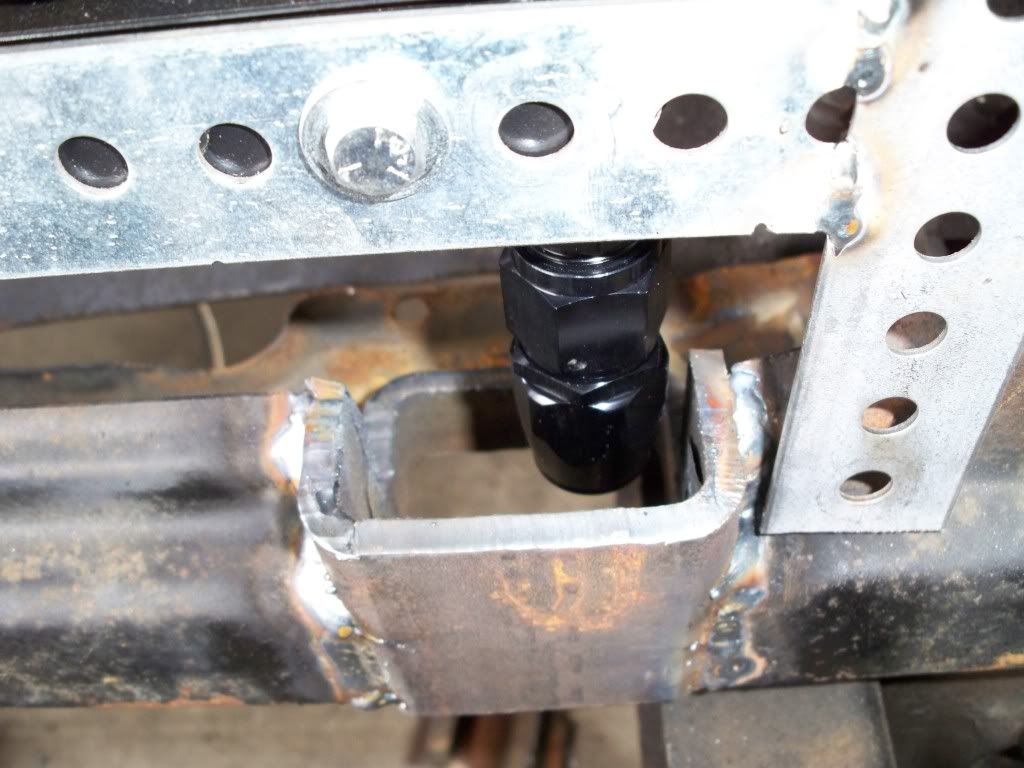  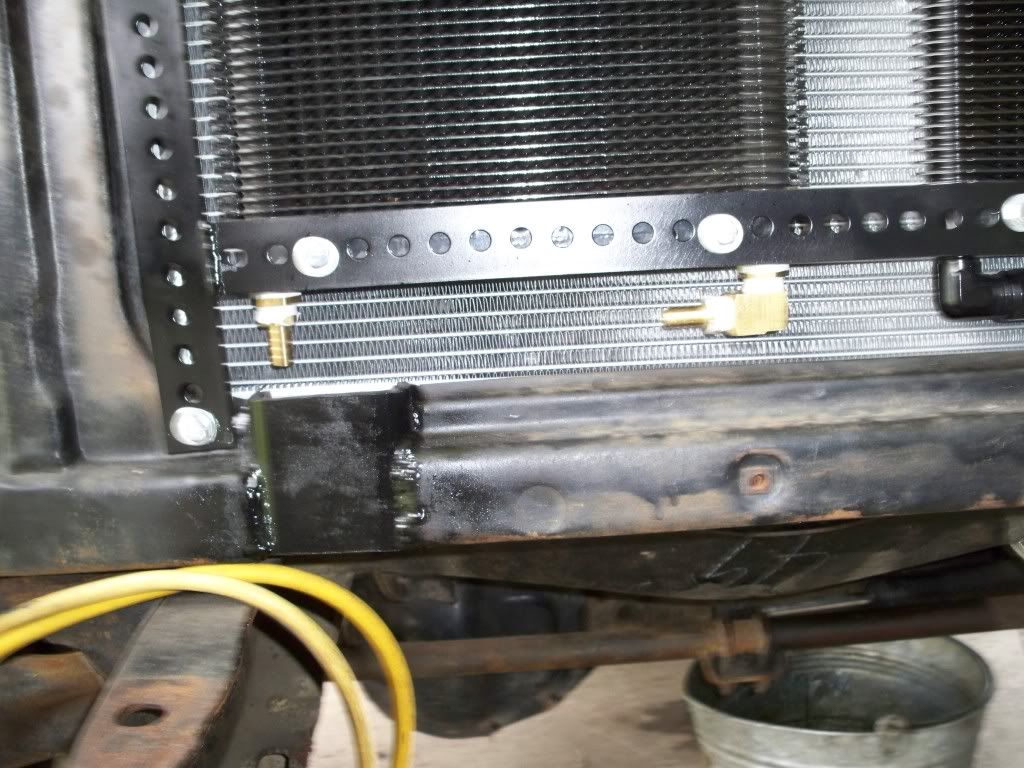 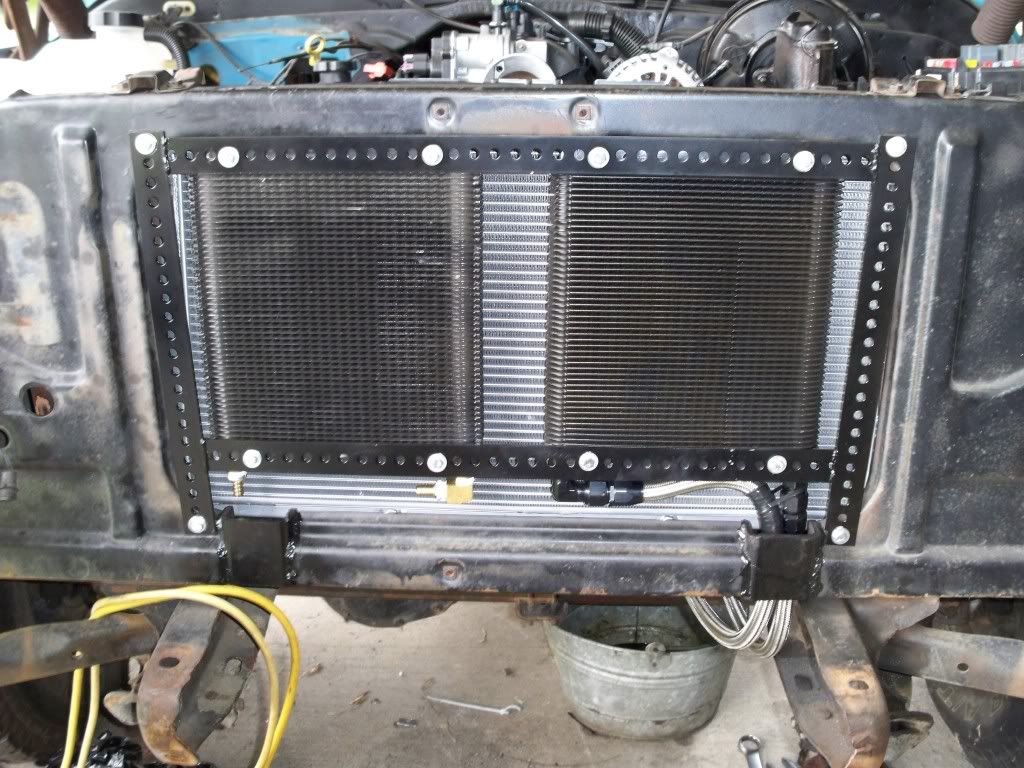 I hated cutting the core support but it was one of those things that just had to be done. Next up was the power steering line. I brought the stock 72 high side line, and the 05 high side line to a locak hydraulic shop. The guy put a female swivel end on the 05 hose and brazed a male fitting on the 72 hard line. 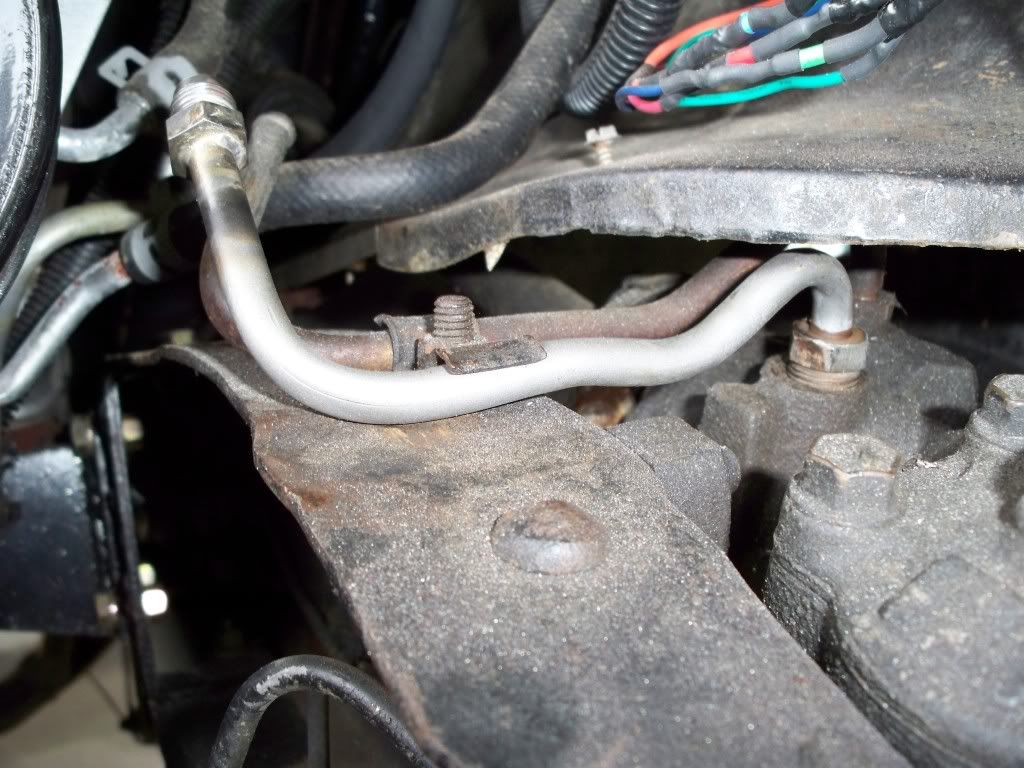 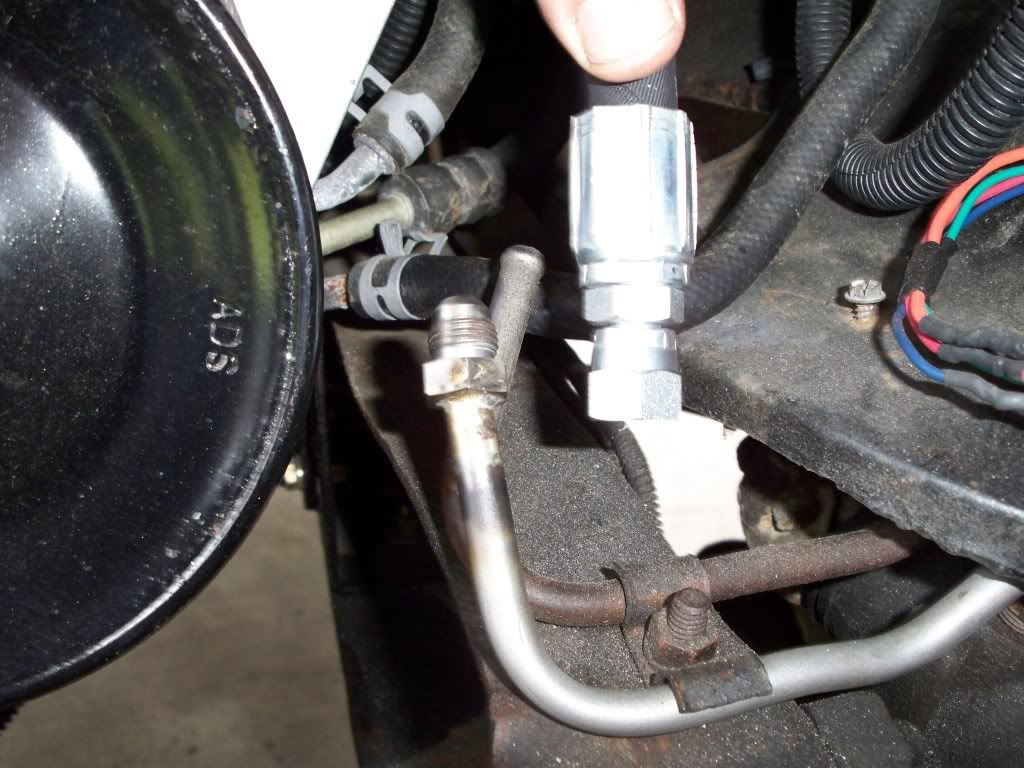 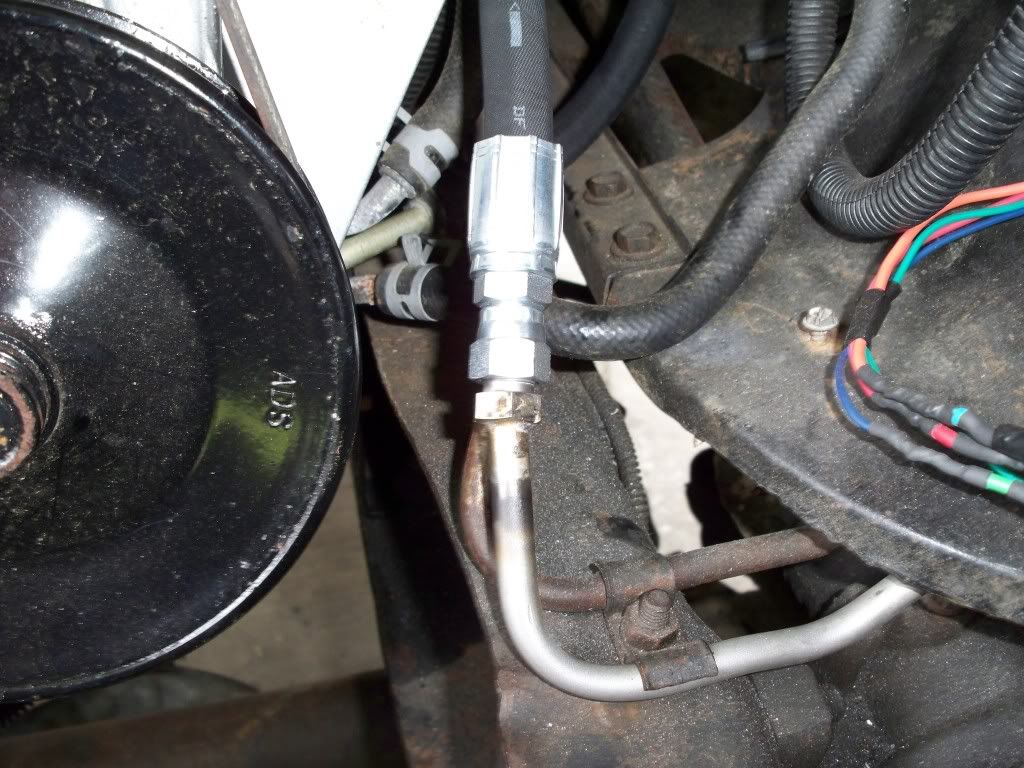 Next up was the intake ducting. I choped off the little box off the bottom and fiberglassed up the hole with some extra glass mat and resin I had left over from the cluster project.  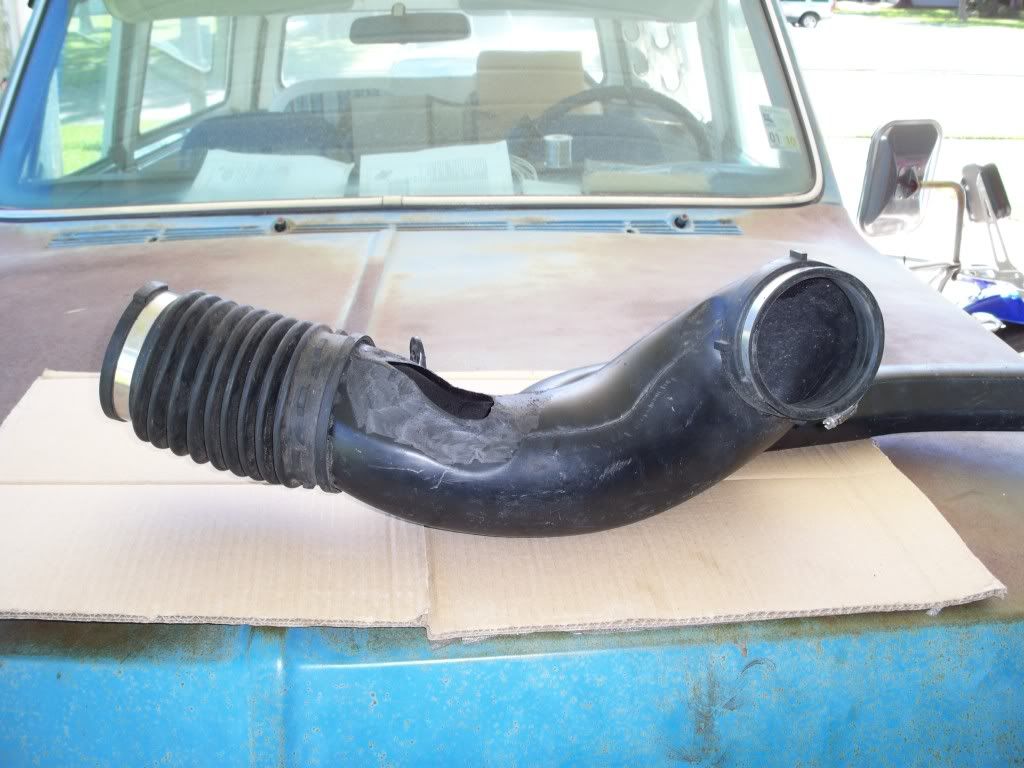 I then bought a K&N cone filter to attach to the MAF. Only one problem.... it was just a "fuzz" too big. 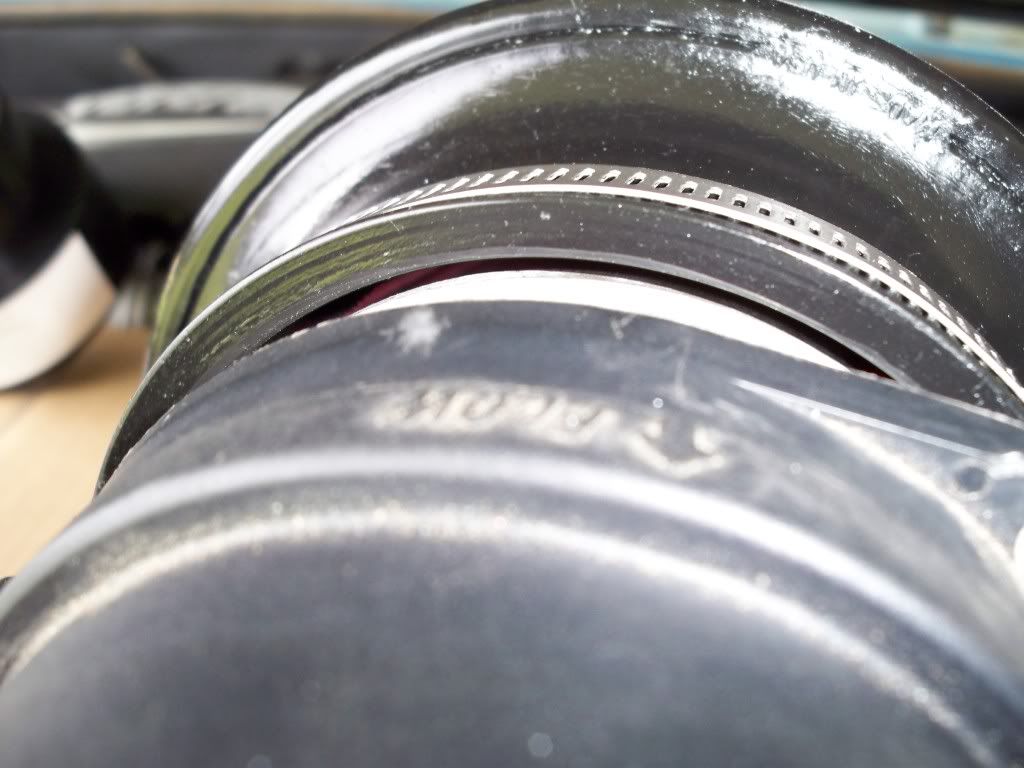 so I went to lowes and found something in the plumbing section that would work perfectly. 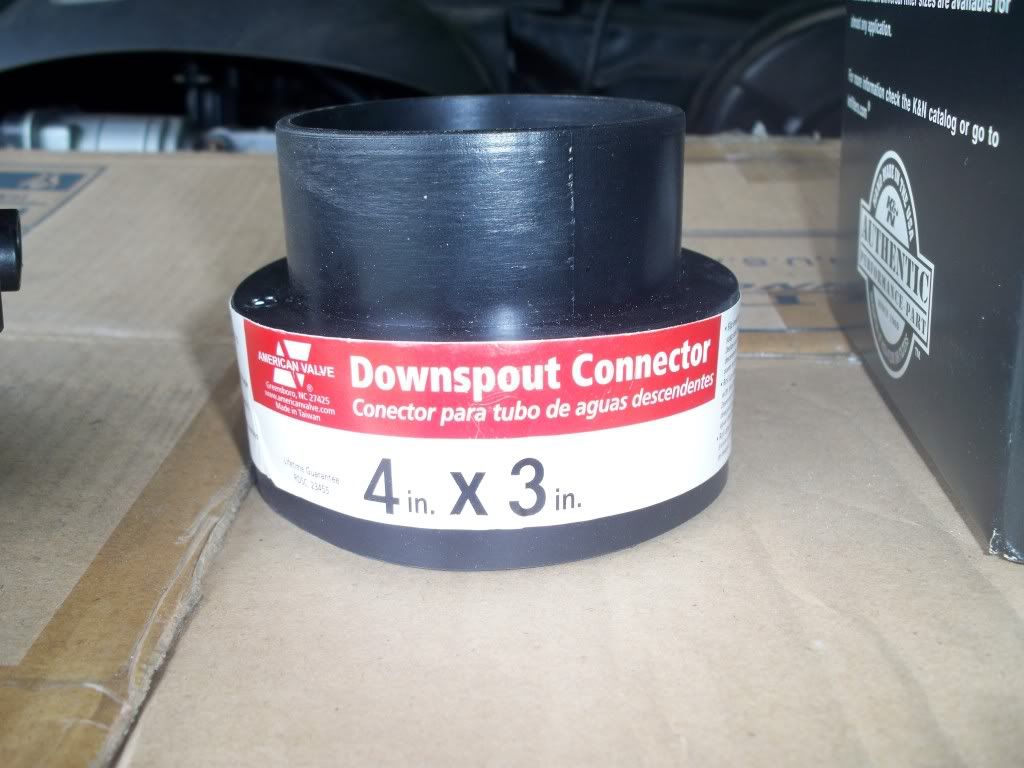 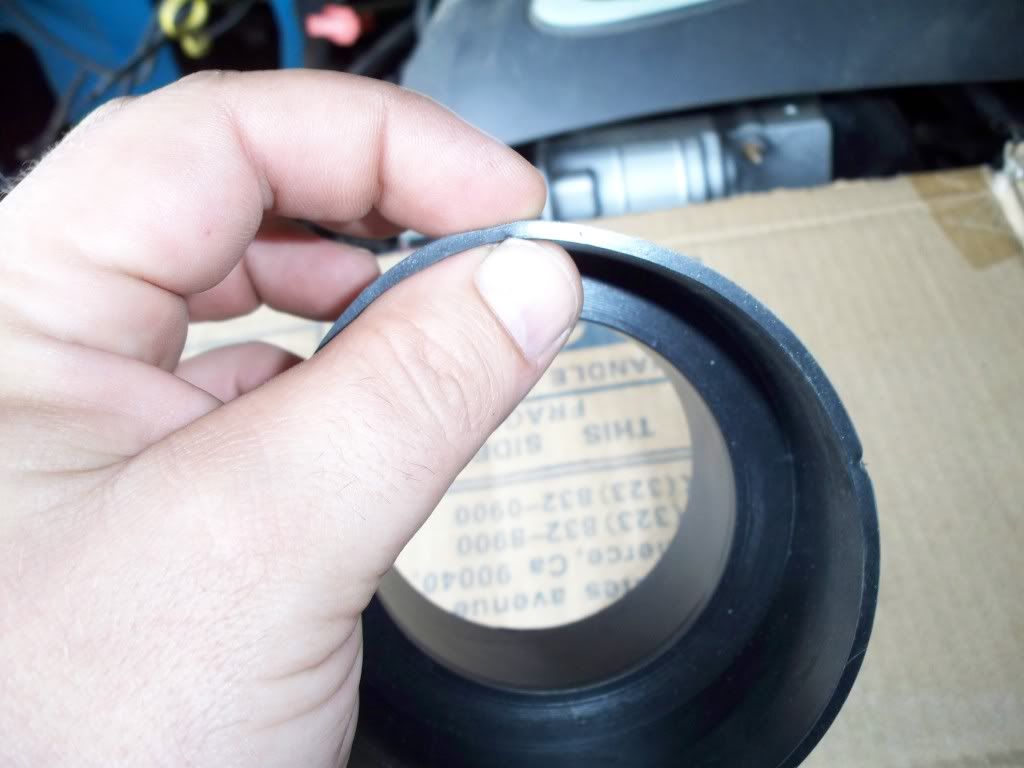 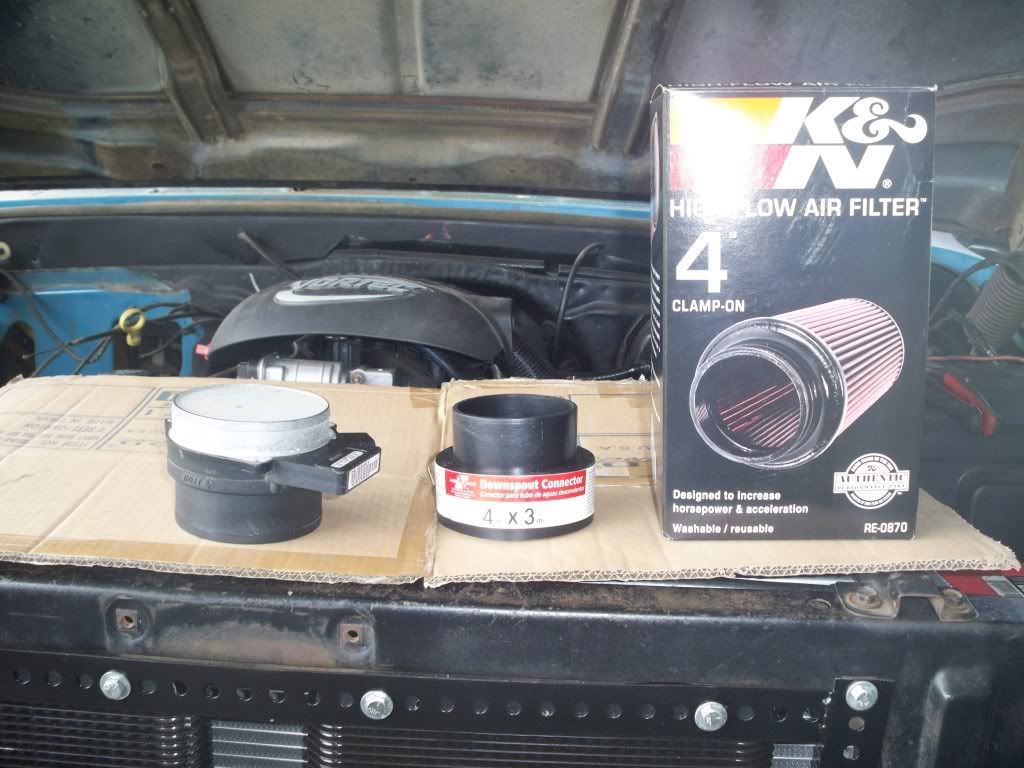 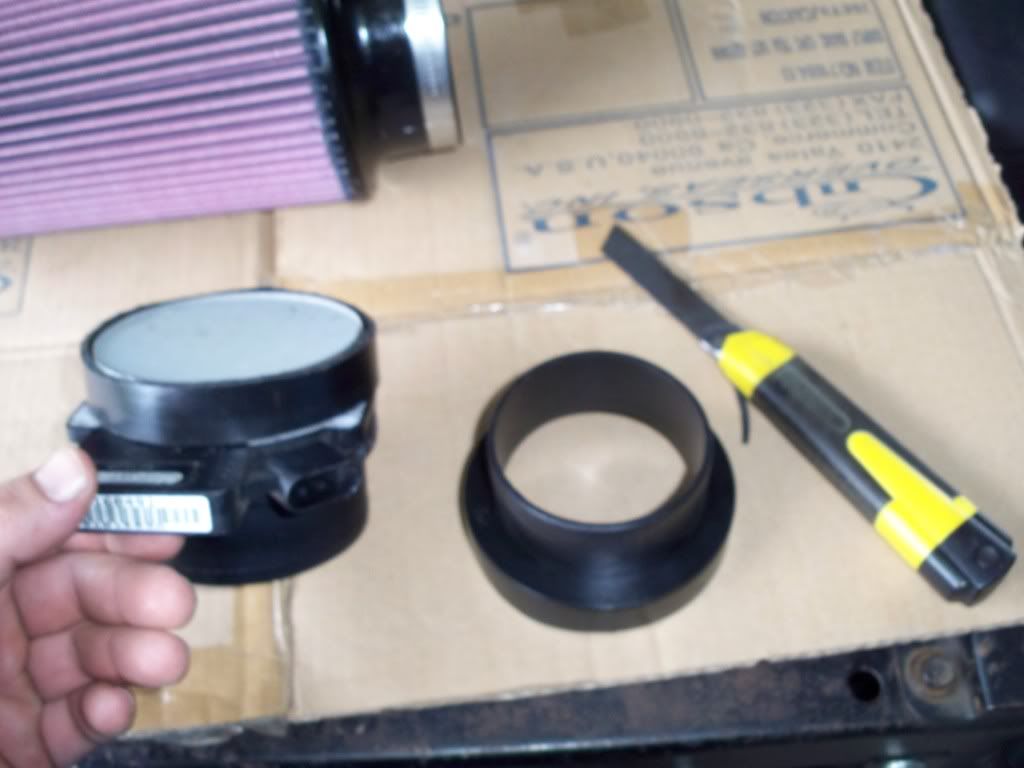 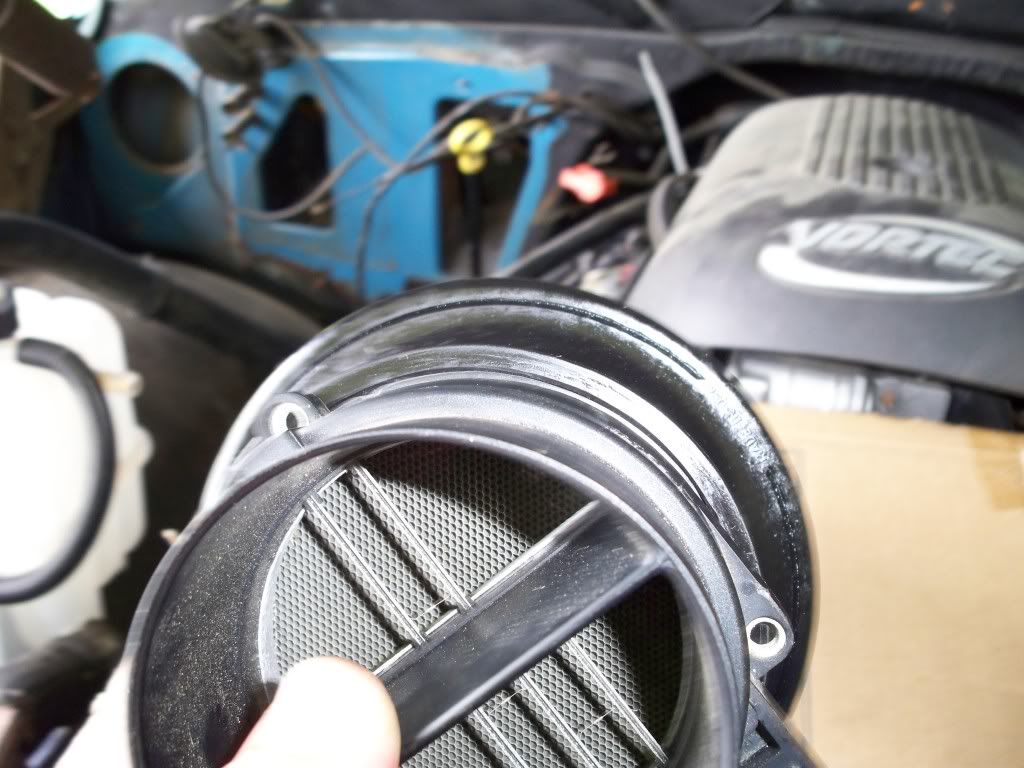  Allright guys, I need a break from my computer. I'll get to the rest later. I hope you enjoy.
__________________
1970 Datsun 240Z 1972 K5 Blazer Highlander 1972 Chevelle 1959 Apache 3100 SWB Fleetside 2006 VTX 1800f Build thread: http://67-72chevytrucks.com/vboard/s...ght=highlander |

|

|
|
09-12-2010, 04:07 PM
|
#2 |
|
VA72C10
 Join Date: Mar 2008
Location: Midlothian, VA
Posts: 25,269
|
Re: 1972 Highlander 6.0/4L80E/LoMax
Cool project. Looking forward to the rest of the build
__________________
Looking for a 67-72 swb or blazer project in or around VA. 
|
|
|
|
|
09-13-2010, 10:03 AM
|
#3 |
|
I'm a poor spectator
Join Date: Aug 2006
Location: San Antonio, Tx
Posts: 2,287
|
Re: 1972 Highlander 6.0/4L80E/LoMax
Very nice, I have a 2000 6.0 that i'm putting into my '71 so this is a great reference, thank you for posting this. Looks good, can't wait to see it run.
__________________
2006 Jeep Unlimited IMPACT ORANGE 1993 Chevy 2500 4x4 ExCab LWB 454/NV4500 Tow rig 1977 Ford F100 2x4 LWB 1st truck I owned, still have it!!!  1979 Ford F150 4x4 SWB Built Ford Tough!!!  1971 Chevy Blazer 350 / SM465 / NP205 UNDER CONSTRUCTION Soon to have a LQ4 6.0!!! |
|
|
|
|
09-13-2010, 10:40 AM
|
#4 |
|
Registered User
Join Date: Sep 2002
Location: Lake Charles Louisiana
Posts: 147
|
Re: 1972 Highlander 6.0/4L80E/LoMax
I'm driving it every day right now. I'm just getting some time to put all of this stuff into a post.
__________________
1970 Datsun 240Z 1972 K5 Blazer Highlander 1972 Chevelle 1959 Apache 3100 SWB Fleetside 2006 VTX 1800f Build thread: http://67-72chevytrucks.com/vboard/s...ght=highlander |
|
|
|
|
09-13-2010, 11:41 PM
|
#5 |
|
Future TOTM Winner
Join Date: Aug 2006
Location: Bulverde, TX
Posts: 2,692
|
Re: 1972 Highlander 6.0/4L80E/LoMax
Nice! I really like how you married the new with the old. I'm attempting the same thing but with a 5 speed. I think we would all like to see some more pics of your Blazer.
__________________
72 Chevy CST K5 HIGHLANDER BLAZER Getting a 6.0,NV4500,NP205,14BFF (Currently laying all over the place in little pieces) 72 Chevy swb step-side "LS" 6.0 Here's a build thread of sorts 2002 HD2500 Crew Cab, 8.1L Allison 4x4 Daily Driver Check it out www.lsdyno.com |
|
|
|
|
09-14-2010, 12:06 AM
|
#6 |
|
Registered User
Join Date: Sep 2002
Location: Lake Charles Louisiana
Posts: 147
|
Re: 1972 Highlander 6.0/4L80E/LoMax
Thank you for the compliments, I'll try and work on the rest of the info for the post tomorrow.
__________________
1970 Datsun 240Z 1972 K5 Blazer Highlander 1972 Chevelle 1959 Apache 3100 SWB Fleetside 2006 VTX 1800f Build thread: http://67-72chevytrucks.com/vboard/s...ght=highlander |
|
|
|
|
09-14-2010, 12:40 AM
|
#7 |
|
Registered User
Join Date: May 2007
Location: texas
Posts: 329
|
Re: 1972 Highlander 6.0/4L80E/LoMax
Looks super nice guy. One thing though. In the picture it looks like the pyrex part of your fuel filter is against the edge of your valve cover. Sure wouldn't want to see it go up in flames. Really like your dash cluster, good work.
|
|
|
|
|
09-14-2010, 05:50 PM
|
#8 |
|
Registered User
Join Date: Sep 2002
Location: Lake Charles Louisiana
Posts: 147
|
Re: 1972 Highlander 6.0/4L80E/LoMax
For the wiring, I used the 05 under hood fuse/relay center. It was easiest this way because I wanted to utilize so many things from the 05 truck. I think it is easier to use the fuse box than it is to un-assemble and re-construct the engine harness to make it stand alone, but it doesn't look as neat and tidy. I had the complete dash harness, complete engine harness, and the rest of the plugs that went to the fuse center with about 6" of wire left on them so I could tap into them if necessary. I made some brackets to mount the box on the 72 fenderwell in front of the brake booster and ran all the wires through an existing hole in the firewall.
   I ordered the re-pop drivers side battery tray from this thread http://67-72chevytrucks.com/vboard/s...illary+battery Since the 05 truck wiring was set up for the battery on this side already it just made everything easier, and I can wire up a second battery in the original passenger side tray later if necessary. I also mounted the ECU under this tray, just because that's how the 05 was set up originally and I didn't have to rebuild the whole wiring harness to move it inside the cab of the blazer (I will clean up the wiring harness, move the ECU, and try to hide the wires later on when I restore the body and frame). For the Drive By Wire (DBW) pedal, I just made a metal plate that bolted to the firewall just like the stock 72 pedal assembly, and spaced the DBW pedal over to the left (it has a big "s" curve in it). 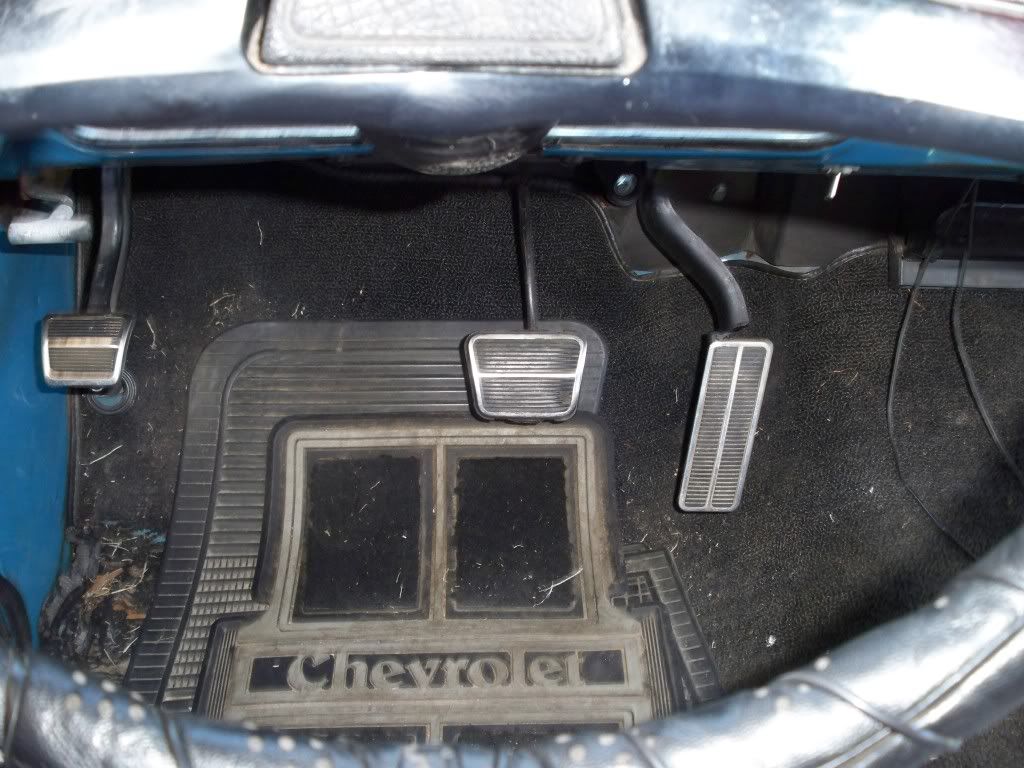 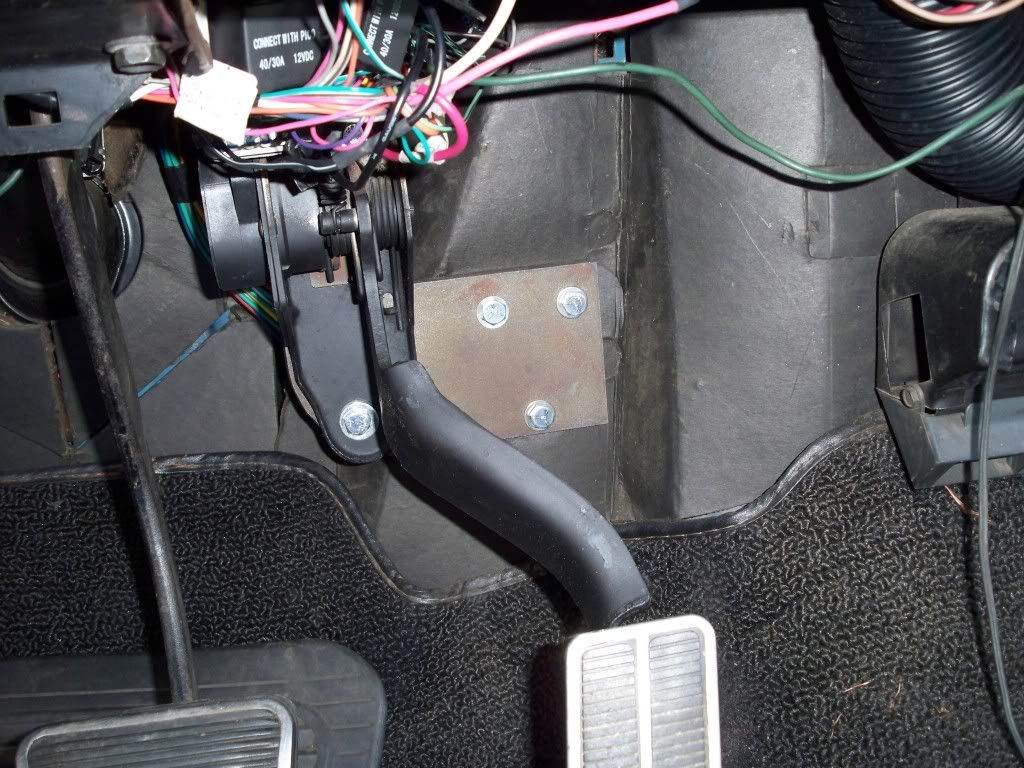 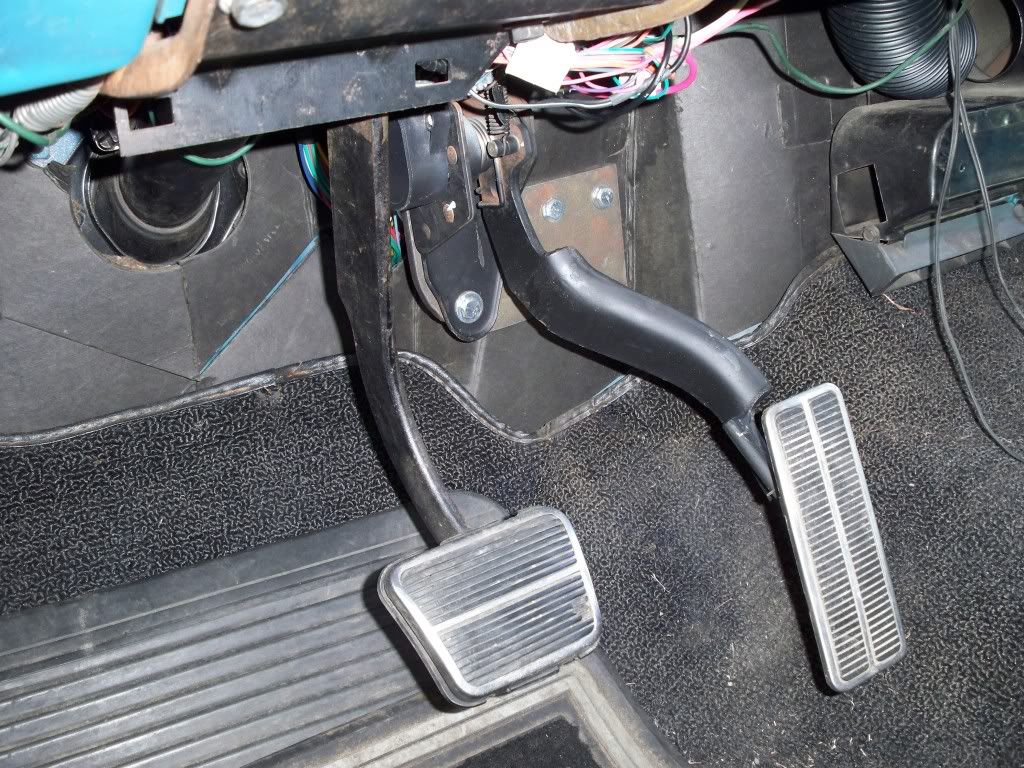 And I welded the 72 pedal to the 05 assembly  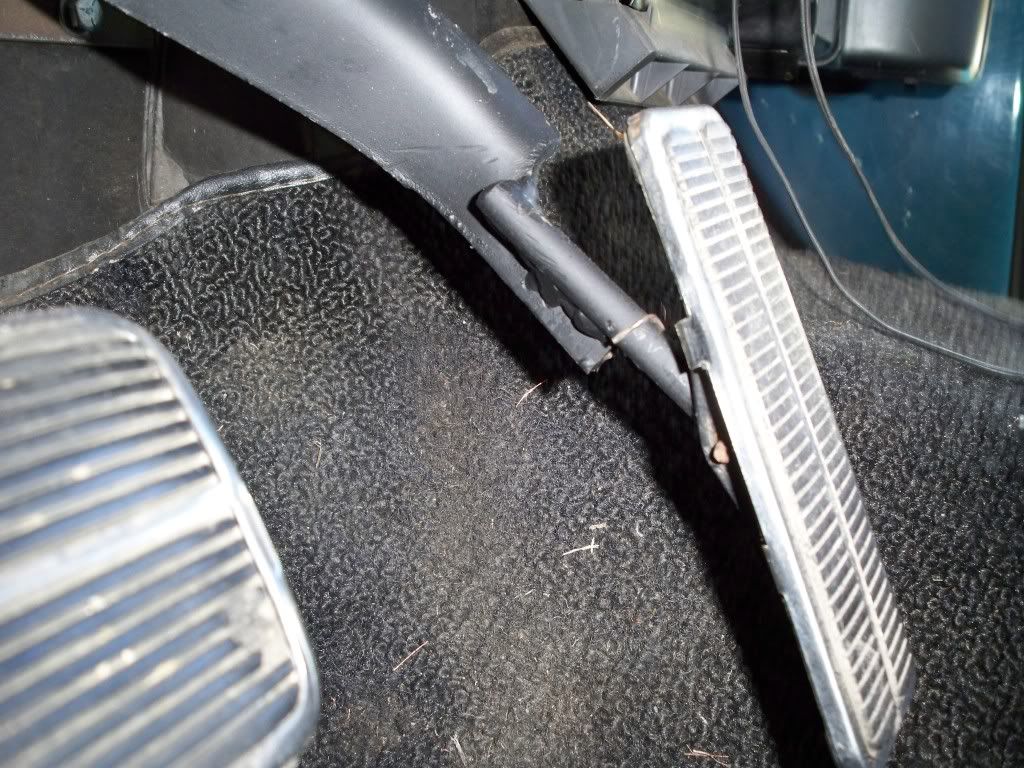 For the brake switch, you need a normally on(TCC switch signal for the ECU), and a normally off connection. So I used a 99-04 camaro brake pedal switch. 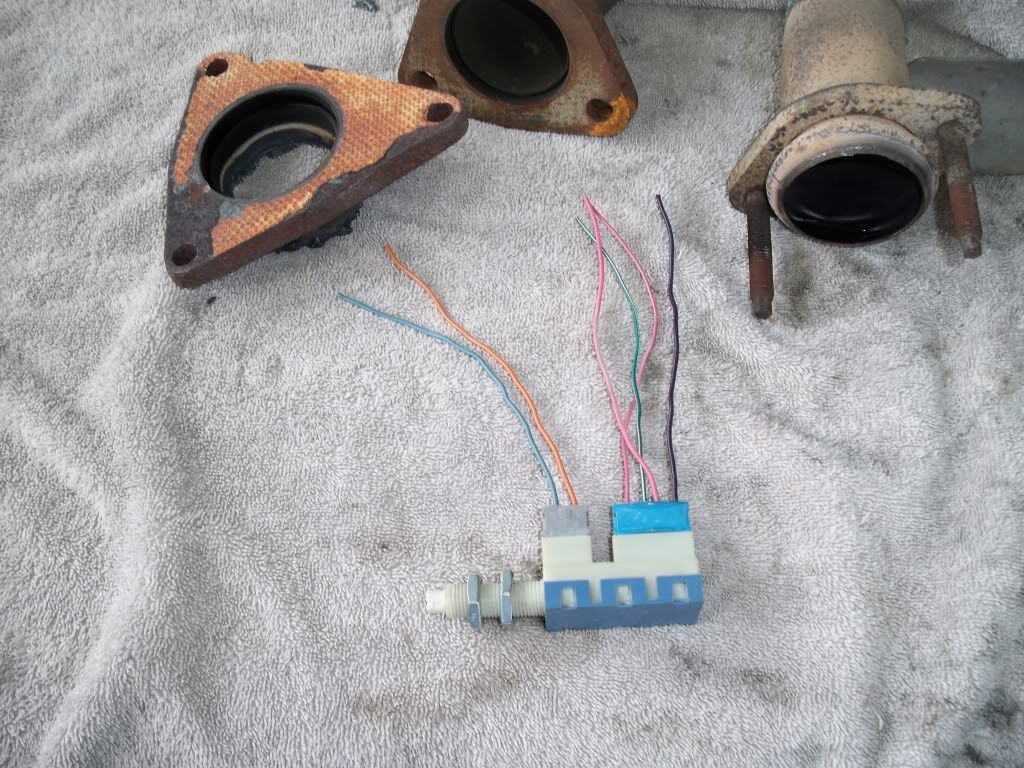 The camaro switch next to the 72 blazer switch. 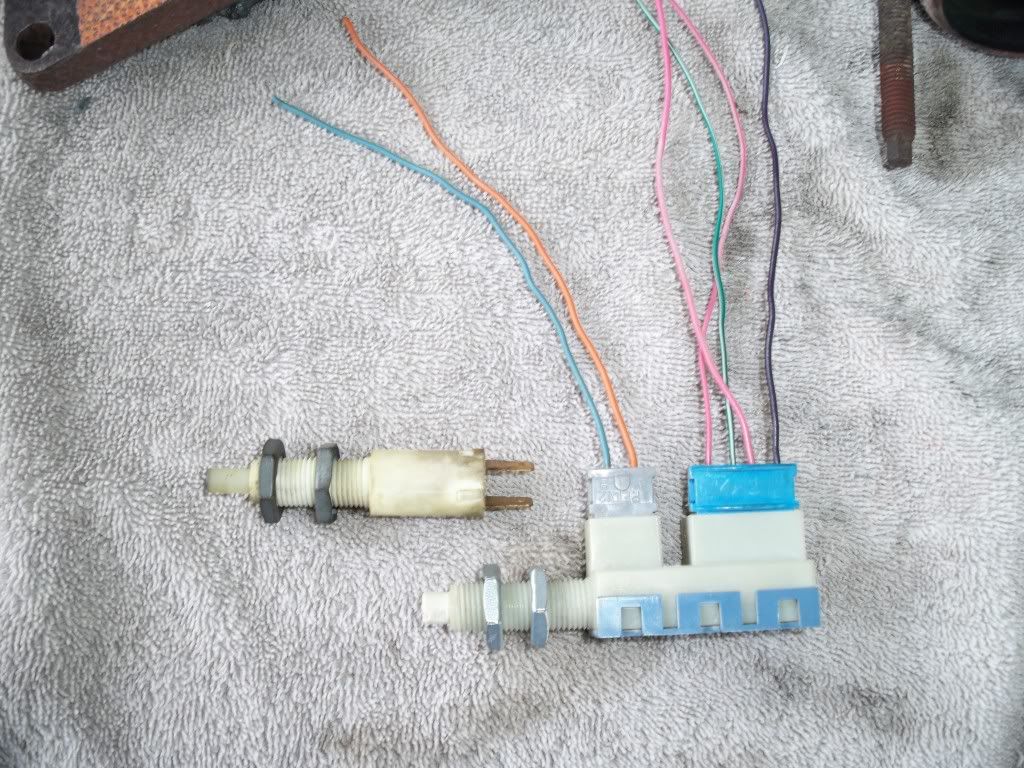 The little grey plug with the orange and blue wires is the "normally off" part of the switch (connect these to the truck brake light wires from the old switch). Also remember that if you are adding the HND-3 cruise, you have to connect the light blue "CHMSL"(center high mounted stop lamp) wire to this part of the switch also so your cruise will disengage when you press the brake pedal. The blue connector with the pink/white, green/white, pink, purple wires is the "normally on" part of the switch. I connected the TCC purple wire from the 05 brake pedal harness to the purple wire of the camaro switch. and spliced in the hot from an extra pink wire from the truck harness. The camaro switch fits EXACTLY like the stock blazer switch. It even uses the exact same thin metal nuts as the blazer switch. 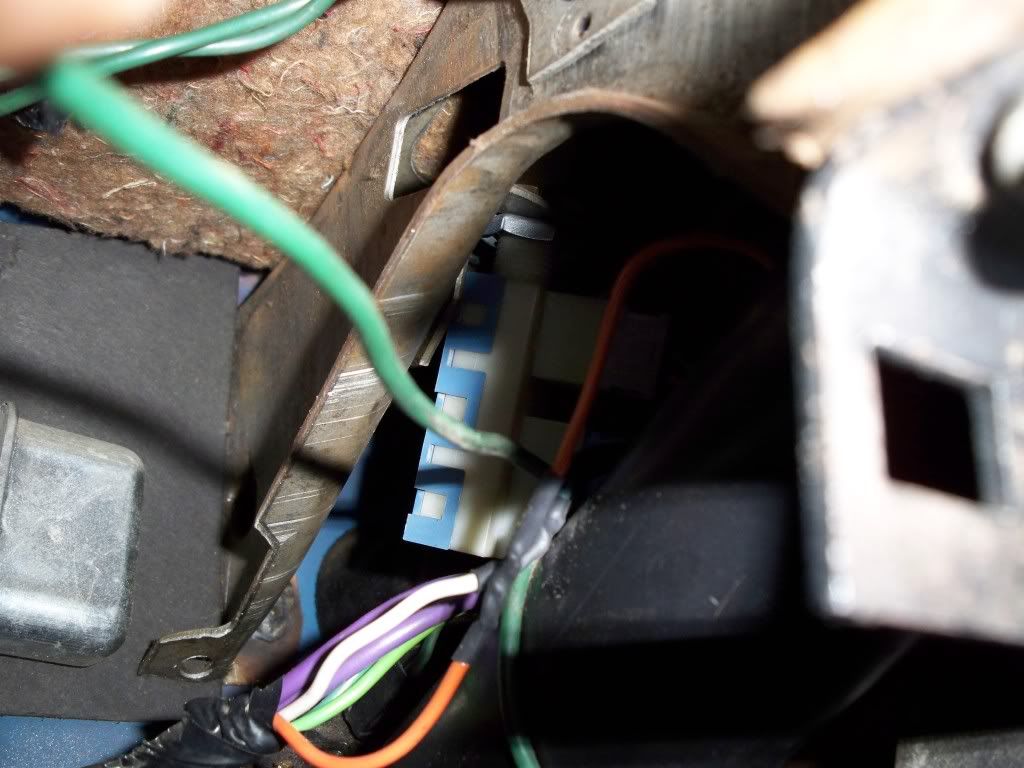 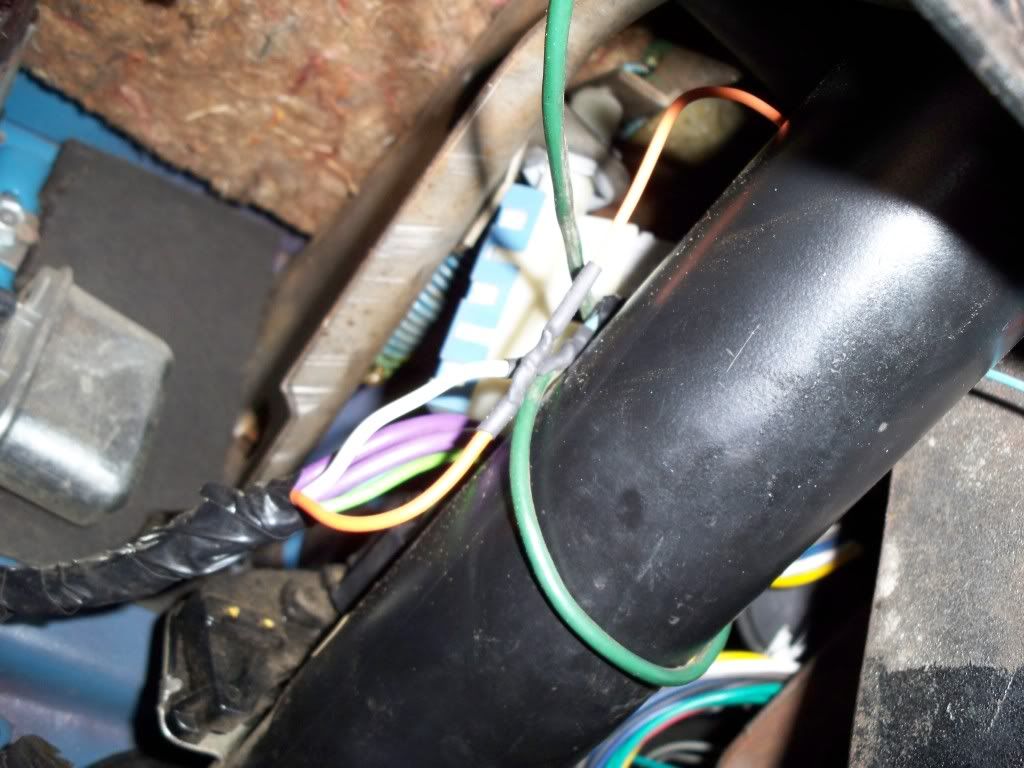 Since I have DBW, it was just too easy to buy the Dakota Digital HND-3 and wire it up per ACKATTACK's thread here http://67-72chevytrucks.com/vboard/s...d.php?t=398006 Here's mine (I even used the EXACT same relays with the pigtails, and I used 3 more of the same pigtailed relays for the electric camaro fan harness I made) 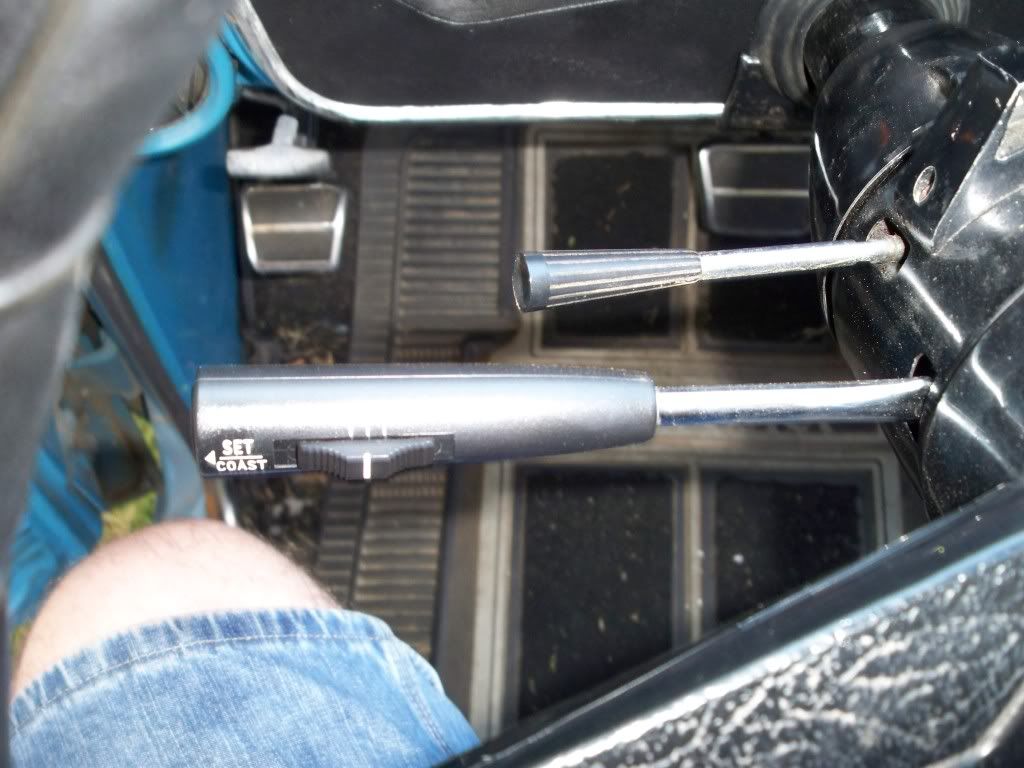 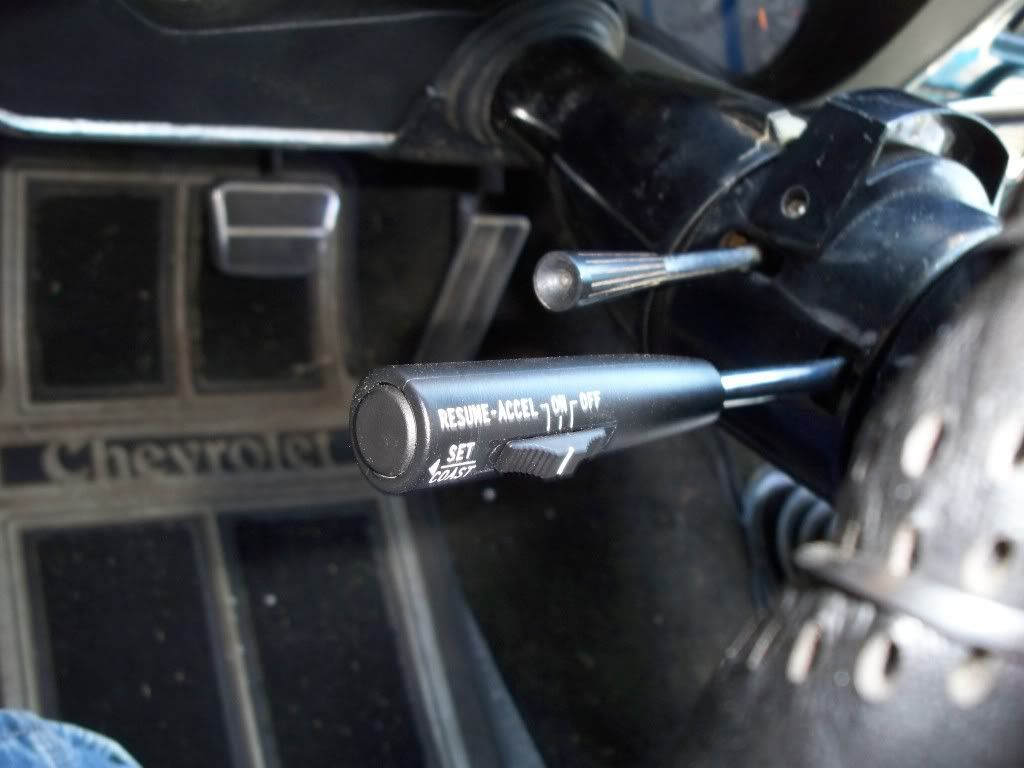 One difference though since I used the under hood fuse box. I just used the dash harness wires that ran to the steering collumn connector instead of the wires coming directly out of the TCM (they actually come from the C100 plug from the engine harness and follow inside the dash harness loom to the collumn connector). I also did this whith the ignition switch wires that ran to the column connector and the brake switch wires from the 05 brake switch harness. Here are a few of the general things I learned about the truck fuse/relay box. Make sure you put power to the fuse/relay box for the Ignition "0" circuit or your trans will not shift (stays in a "limp" mode). Ignition 0 circuit is normally powered back through the dash harness from the 05 under dash fuse box, so unless you are using the under dash fuse box in your swap, you need to replace this power signal. For this I just found an un-used pink wire from one of the under hood fuse box plugs and switched the pins (dissassemble the plug-slide the pins out-switch them-reassemble the plug-plug it back in). Find all the pin-outs for your year engine/harnesses and print them out, your life will be a lot easier. Don't get overwhelmed. Take it one circuit at a time, one component at a time, and before you know it, you'll be done. I finished all my wiring in a few afternoons once I got started on it. Label all your wires you are going to use. I went to office depot and bought a box of 1000 3.5x15/16 "stick on" white address labels (was only a few bucks). These when folded in half around a wire, are just the right size to write a description on. You will never have to look up that wire again, so you can move on to the next one. Masking tape would work also. Solder and heat shrink all your wire connections. Go to your local electrical supply store (not radio shack) and buy the good thick heat shrink. At my local shop it comes in 4 foot lengths and you just cut a little piece off as you need it. It takes a little longer to do things this way, but you won't have to worry about that connection ever again. And a loose connection will drive you crazy later when your swap is not running right and you don't know what to do (Learned this from my years in the automotive mechanic industry). SEARCH-SEARCH-SEARCH. Every answer you need is on LS1TECH.COM, and LT1SWAP.COM somewhere, as well as this one. It will save everyone a lot of time, if YOU find the answers to your questions (not to mention more satisfying to know you did it yourself). What I mean by this is every time I went to search for something I had to troll through a few dozen dead end threads of people asking the same question I had with the only replies being.... SEARCH. Here are a few pics of the truck I took today 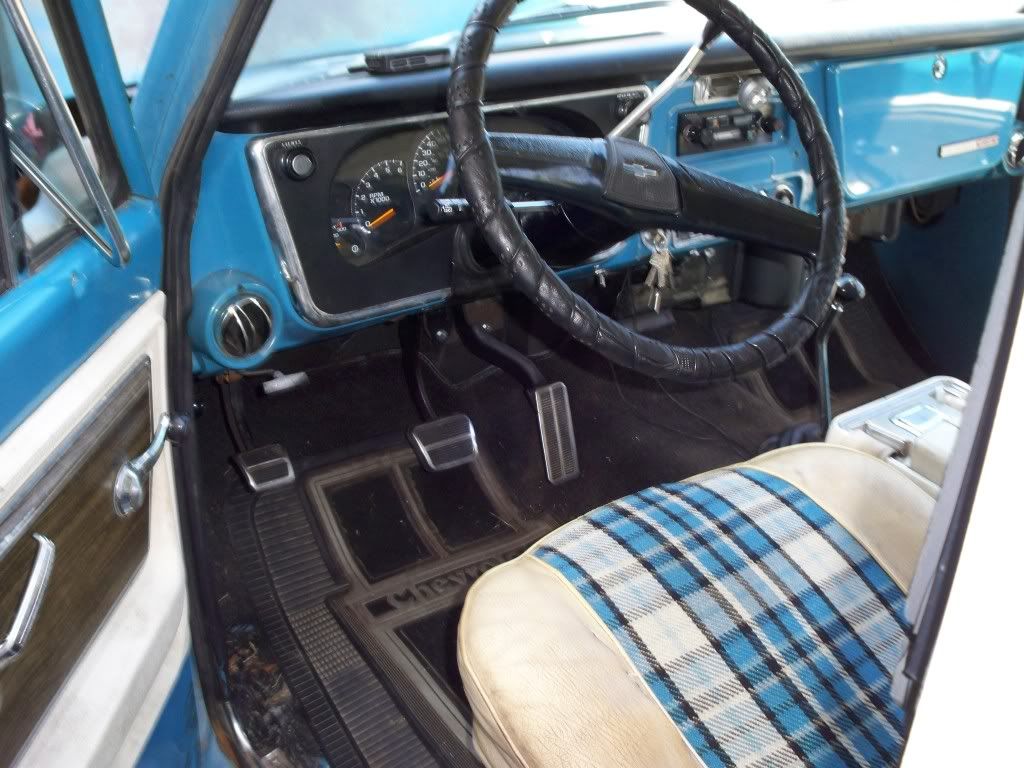   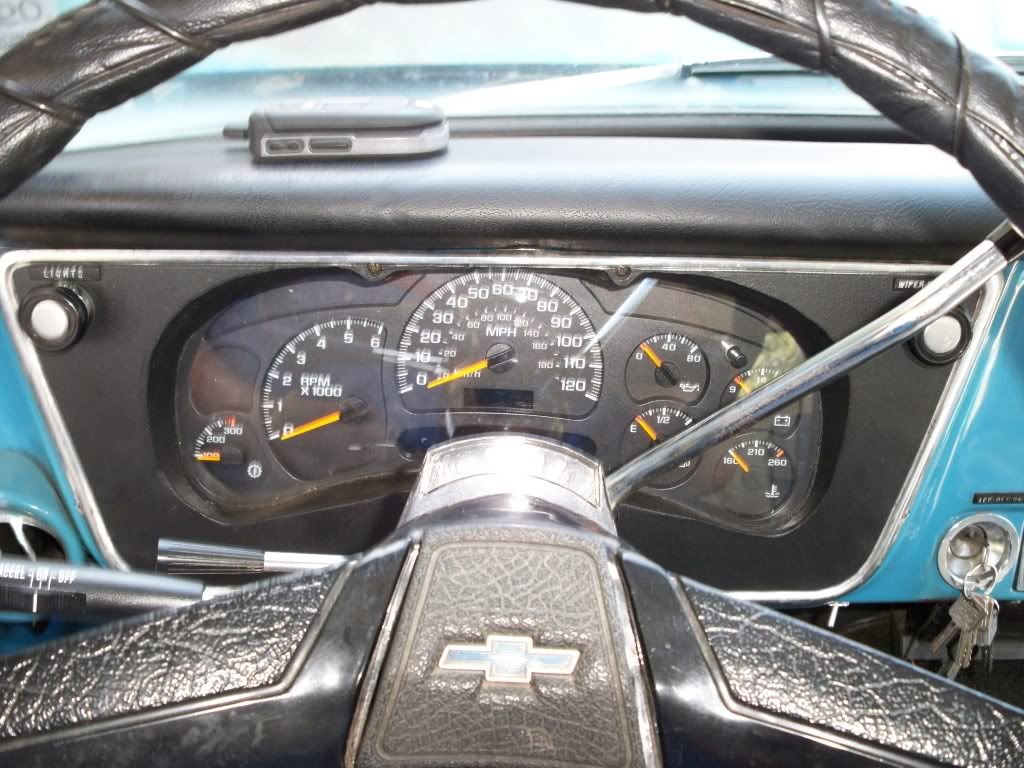 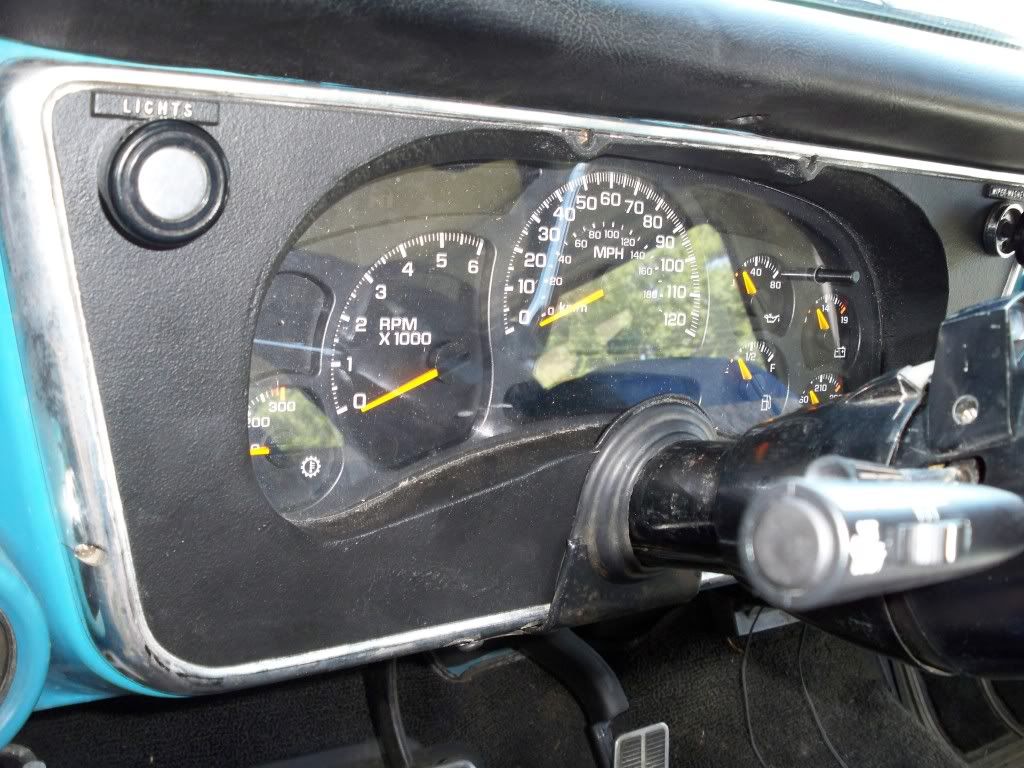 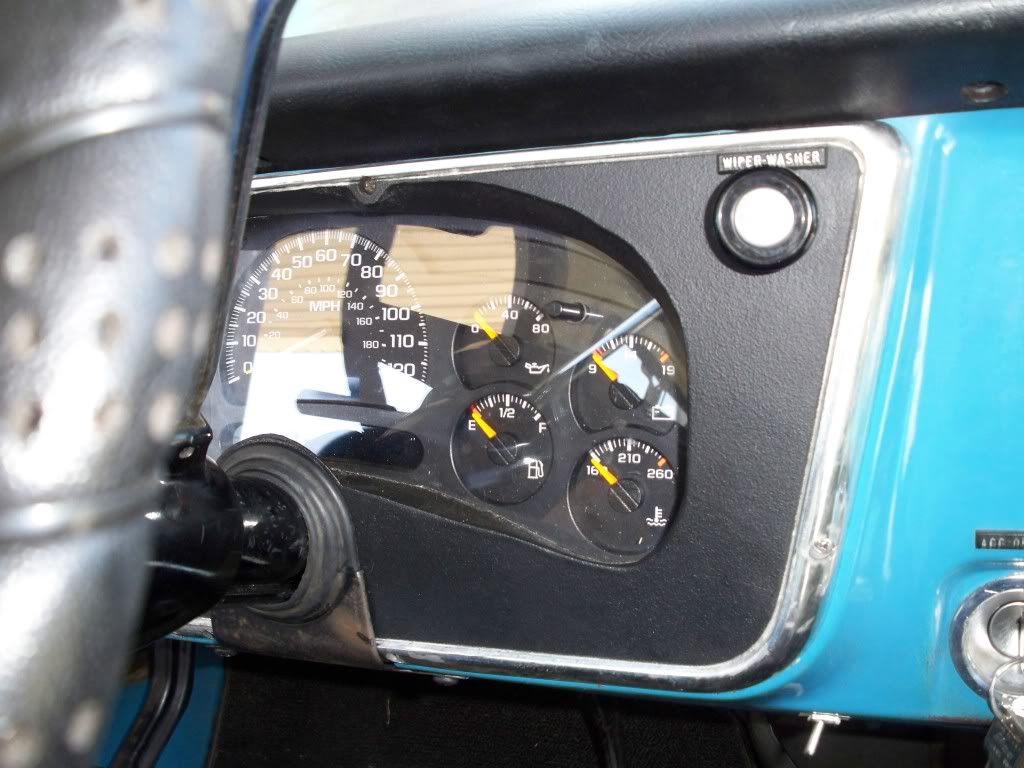
__________________
1970 Datsun 240Z 1972 K5 Blazer Highlander 1972 Chevelle 1959 Apache 3100 SWB Fleetside 2006 VTX 1800f Build thread: http://67-72chevytrucks.com/vboard/s...ght=highlander |
|
|
|
|
09-14-2010, 06:02 PM
|
#9 |
|
Registered User
Join Date: Nov 2002
Location: Charleston, South Carolina
Posts: 1,370
|
Re: 1972 Highlander 6.0/4L80E/LoMax
Very nice job. That dash cluster is awesome!
__________________
2006 Silverado CCSB, 1939 Ford Sedan, 1962 BelAir Wagon, 1976 Vega Panel Charleston, South Carolina Last edited by k5hart; 09-14-2010 at 06:02 PM. |
|
|
|
|
09-14-2010, 06:46 PM
|
#10 |
|
Senior Member
Join Date: Jun 2007
Location: Pine Ridge Florida
Posts: 4,126
|
Re: 1972 Highlander 6.0/4L80E/LoMax
Awesome build and write up. I am sure you have already helped a few people out!
__________________
Click on my Not really a build thread, yet NOT SO RUST FREE RUST FREE BLAZER LS ENGINE SWAP INFORMATION THREAD BOLT RESTORATIONS 4l60 to an NP205 |
|
|
|
|
09-14-2010, 07:17 PM
|
#11 |
|
VA72C10
Join Date: Mar 2008
Location: Midlothian, VA
Posts: 25,269
|
Re: 1972 Highlander 6.0/4L80E/LoMax

__________________
Looking for a 67-72 swb or blazer project in or around VA.
|
|
|
|
|
09-15-2010, 07:42 AM
|
#12 |
|
Registered User
Join Date: Sep 2002
Location: Lake Charles Louisiana
Posts: 147
|
Re: 1972 Highlander 6.0/4L80E/LoMax
Well, I know I left ALOT out, but everyone's wiring needs are going to be different. The plug pin-outs are going to change depending on what year/type vehicle you get the drivetrain from. And everyone will not want to use all the donor vehicles components like I did.
I just basically wanted a new truck. I could have gone out and bought a brand new 2011 2500HD, but it's not what I really wanted. Ever since I was a kid, I've always wanted this body style blazer. So the swap was just to make it a reliable daily driver. I don't think my blazer is anywhere close to some of the trucks, blazers, and suburbans on this site. I spent ZERO time doing anything cosmetic. Just a straight up engine swap for now.
__________________
1970 Datsun 240Z 1972 K5 Blazer Highlander 1972 Chevelle 1959 Apache 3100 SWB Fleetside 2006 VTX 1800f Build thread: http://67-72chevytrucks.com/vboard/s...ght=highlander |
|
|
|
|
09-18-2010, 12:30 AM
|
#13 |
|
Account Suspended
Join Date: Mar 2004
Posts: 55
|
Re: 1972 Highlander 6.0/4L80E/LoMax
I am about complete with mine too.....http://new.martymontez.com/?page=photos&s=&y=1&p=1
I had the same idea for the dash cluster. MAy as well...like you said, it goes with what's under the hood anyway. My gas tank is a mystery in that it was replaced by the original owner in '74 with this HUGE 37 gal tank made of 3/16 inch steel. (heavy). Eventually I'll rebuild another like it with the in-tank pump. ( I can't stand the noise. It's embarrassing at a stop light) one question...how long did it take you to write that first (awesome) post???? ( which is why I sent you a LINK instead...)MArty 
|
|
|
|
|
09-24-2010, 04:39 PM
|
#14 |
|
Registered User
Join Date: Sep 2002
Location: Lake Charles Louisiana
Posts: 147
|
Re: 1972 Highlander 6.0/4L80E/LoMax
Sorry it took me a while to get back to you Marty, my computer took a poop. Well I had to download all the pics to photobucket, that took about an hour (I didn't use all the pics I uploaded). Then typing and pasting pics took about 45 minutes including flipping through my notes.
I hope I didn't come across too harsh with the "search" comments. If there is anything you want to know you can ask me. Thank you for checking out my thread.
__________________
1970 Datsun 240Z 1972 K5 Blazer Highlander 1972 Chevelle 1959 Apache 3100 SWB Fleetside 2006 VTX 1800f Build thread: http://67-72chevytrucks.com/vboard/s...ght=highlander |
|
|
|
|
09-24-2010, 05:35 PM
|
#15 |
|
2WD Jimmy
 Join Date: Mar 2005
Location: Davis County, Utah
Posts: 2,563
|
Re: 1972 Highlander 6.0/4L80E/LoMax
You deserve a Medal for all the kind hard effort you put into this thread, so thank you!
Boy... you sure make me feel like a lazy good for nothing though. |
|
|
|
|
09-24-2010, 07:46 PM
|
#16 |
|
Registered User
Join Date: Jul 2010
Location: memphis
Posts: 2,537
|
Re: 1972 Highlander 6.0/4L80E/LoMax
nice fab work
|
|
|
|
|
09-25-2010, 02:53 PM
|
#18 |
|
Insert Title Here
Join Date: Feb 2006
Location: Dyer, Indiana
Posts: 5,679
|
Re: 1972 Highlander 6.0/4L80E/LoMax
awesome work, good job on everything..... I think for the gauge cluster, instead of building another one down the line.... just go to HomeDepot and get some of that sone/gravel style rattle cans and spray it.. that way it will cover the little wavyness and it will look kind of stockish
__________________
BOBBY _69 SWB_ 1000 pics of 67-72's>> http://s193.photobucket.com/albums/z...-72/?start=all << |
|
|
|
|
09-25-2010, 11:01 PM
|
#19 |
|
Registered User
Join Date: Sep 2002
Location: Lake Charles Louisiana
Posts: 147
|
Re: 1972 Highlander 6.0/4L80E/LoMax
I used the rustoleum (speckled textured stone look) stuff to get the texture back, then top coated over that with flat black. I included the part numbers for the cans in my first post.
__________________
1970 Datsun 240Z 1972 K5 Blazer Highlander 1972 Chevelle 1959 Apache 3100 SWB Fleetside 2006 VTX 1800f Build thread: http://67-72chevytrucks.com/vboard/s...ght=highlander |
|
|
|
|
09-26-2010, 10:56 PM
|
#20 |
|
PROJECT 7DEUCE
Join Date: Dec 2002
Location: GRANTS PASS OR
Posts: 21,590
|
Re: 1972 Highlander 6.0/4L80E/LoMax
Nice write up and thank you for the info..
__________________
GO BIG GREEN GO DUCKSMEMBER #6377 72 k-5 daily driver 6'' lift 35'' 350-350-205 slowly getting rust free. Project "7DEUCE" check out my build http://67-72chevytrucks.com/vboard/s...d.php?t=267665 Tim Powell..R.I.P EastSideLowlife..... R.I.P.. |
|
|
|
|
09-28-2010, 07:36 PM
|
#21 |
|
Registered User
Join Date: Jan 2008
Location: PENDLETON,INDIANA
Posts: 271
|
Re: 1972 Highlander 6.0/4L80E/LoMax
Dude awesome thread and a special write up this is a great project with wonderful details and with a really neat project nice job on the swap and the blazer i will be looking for updates on this one
|
|
|
|
|
09-29-2010, 10:50 PM
|
#22 |
|
Post Whore
Join Date: Feb 2000
Location: Rose Hill, KS, USA
Posts: 12,683
|
Re: 1972 Highlander 6.0/4L80E/LoMax
Very impressive!!!!!
__________________
1970 Blazer with a 400 sbc and 4" lift 1980 Pontiac Trans Am, 455 Oldsmobile 2012 Kawasaki Concours 14 |
|
|
|
|
10-02-2010, 07:20 AM
|
#23 |
|
Registered User
Join Date: Oct 2003
Location: Central Vermont
Posts: 8,538
|
Re: 1972 Highlander 6.0/4L80E/LoMax
Very cool thread to come across after being MIA for awhile, way to mix the two eras together.
|
|
|
|
|
11-11-2010, 05:01 PM
|
#24 |
|
*************
Join Date: Apr 2005
Location: Pensacola, FL
Posts: 17,827
|
Re: 1972 Highlander 6.0/4L80E/LoMax
Sweet looking conversion. You might want to throw this in the truck section for all the 4x4 guys.
__________________
Rob - https://www.instagram.com/hart_rod_c10 As Iron Sharpens Iron, So One Man Sharpens Another. Proverbs 27:17 FOR SALE: DBW pedal bracket - http://67-72chevytrucks.com/vboard/s...d.php?t=651123 FOR SALE: Hood Brackets http://67-72chevytrucks.com/vboard/s...d.php?t=679945 1987 Silverado SWB - 34.5K original miles http://67-72chevytrucks.com/vboard/s...d.php?t=801834 1969 SuperBurb - http://67-72chevytrucks.com/vboard/s...d.php?t=200387 1968 Farm truck - http://67-72chevytrucks.com/vboard/s...d.php?t=358692 1968 SWB - http://67-72chevytrucks.com/vboard/s...d.php?t=551258 1948 Chevy - http://67-72chevytrucks.com/vboard/s...=122164&page=3 |
|
|
|
|
11-11-2010, 06:24 PM
|
#25 |
|
Registered User
Join Date: Aug 2009
Location: Alden NY
Posts: 2,705
|
Re: 1972 Highlander 6.0/4L80E/LoMax
Superb job! You are gifted.
__________________
1961 C1 Corvette 1959 El Camino 350 TPI, 9" 4 w disc 69 Blazer K5 - sold July '20 2021 Durango RT 5.7 |
|
|
|
|
| Bookmarks |
|
|


 Linear Mode

